GANA I & C Co GN-716J User manual

USER’S MANUAL
GN-716J
16 Channel STAND ALONE DVR
GANA I & C Co., LTD

2
WARNING AND CAUTIONS
WARNING
CAUTION : TO REDUCE THE RISK OF FIRE OR ELECTRONISC
SHOCK, DO NOT EXPOSE THIS PRODUCT TO RAIN OR MOIS-
TURE. DO NOT INSERT ANY METALLIC OBJECT THROUGH
VENTILATION GRILLS
Explanation of Graphical Symbols
The lighting flash with arrowhead symbol, within an equilateral triangle, is
intended to alert the user to the presence of uninstalled "dangerous volt-
age" within the product's enclosure that may be of sufficient magnitude to
constitute a risk of electric shock to persons.
USER OF THE SYSTEM ARE RESPONSIBLE FOR CHECKING AND COMPLYING
WITH ALL FEDERAL, STATE, AND LOCAL LAWS AND STATUS, CONCERNING
THE MONITORING AND RECORDING OF VIDEO AND AUDIO SIGNALS . OUR
COMPANY SHALL NOT BE HELD RESPONSIBLE FOR THE USE OF THIS SYS-
TEM IN VIOLATION OF CURRENT LAWS AND STATUES.

3
TABLE OF CONTENTS
1. INTRODUCTION
1.1 Product introduction ................................................................................................... 1
1.2 Product contents......................................................................................................... 1
1.3 Explanation of DVR..................................................................................................... 1
1.4 Caution for using......................................................................................................... 1
2. FEATURE ........................................................................................................... 2
3. SPECIFICATION ................................................................................................. 3
4. UNIT DESCRIPTION........................................................................................... 5
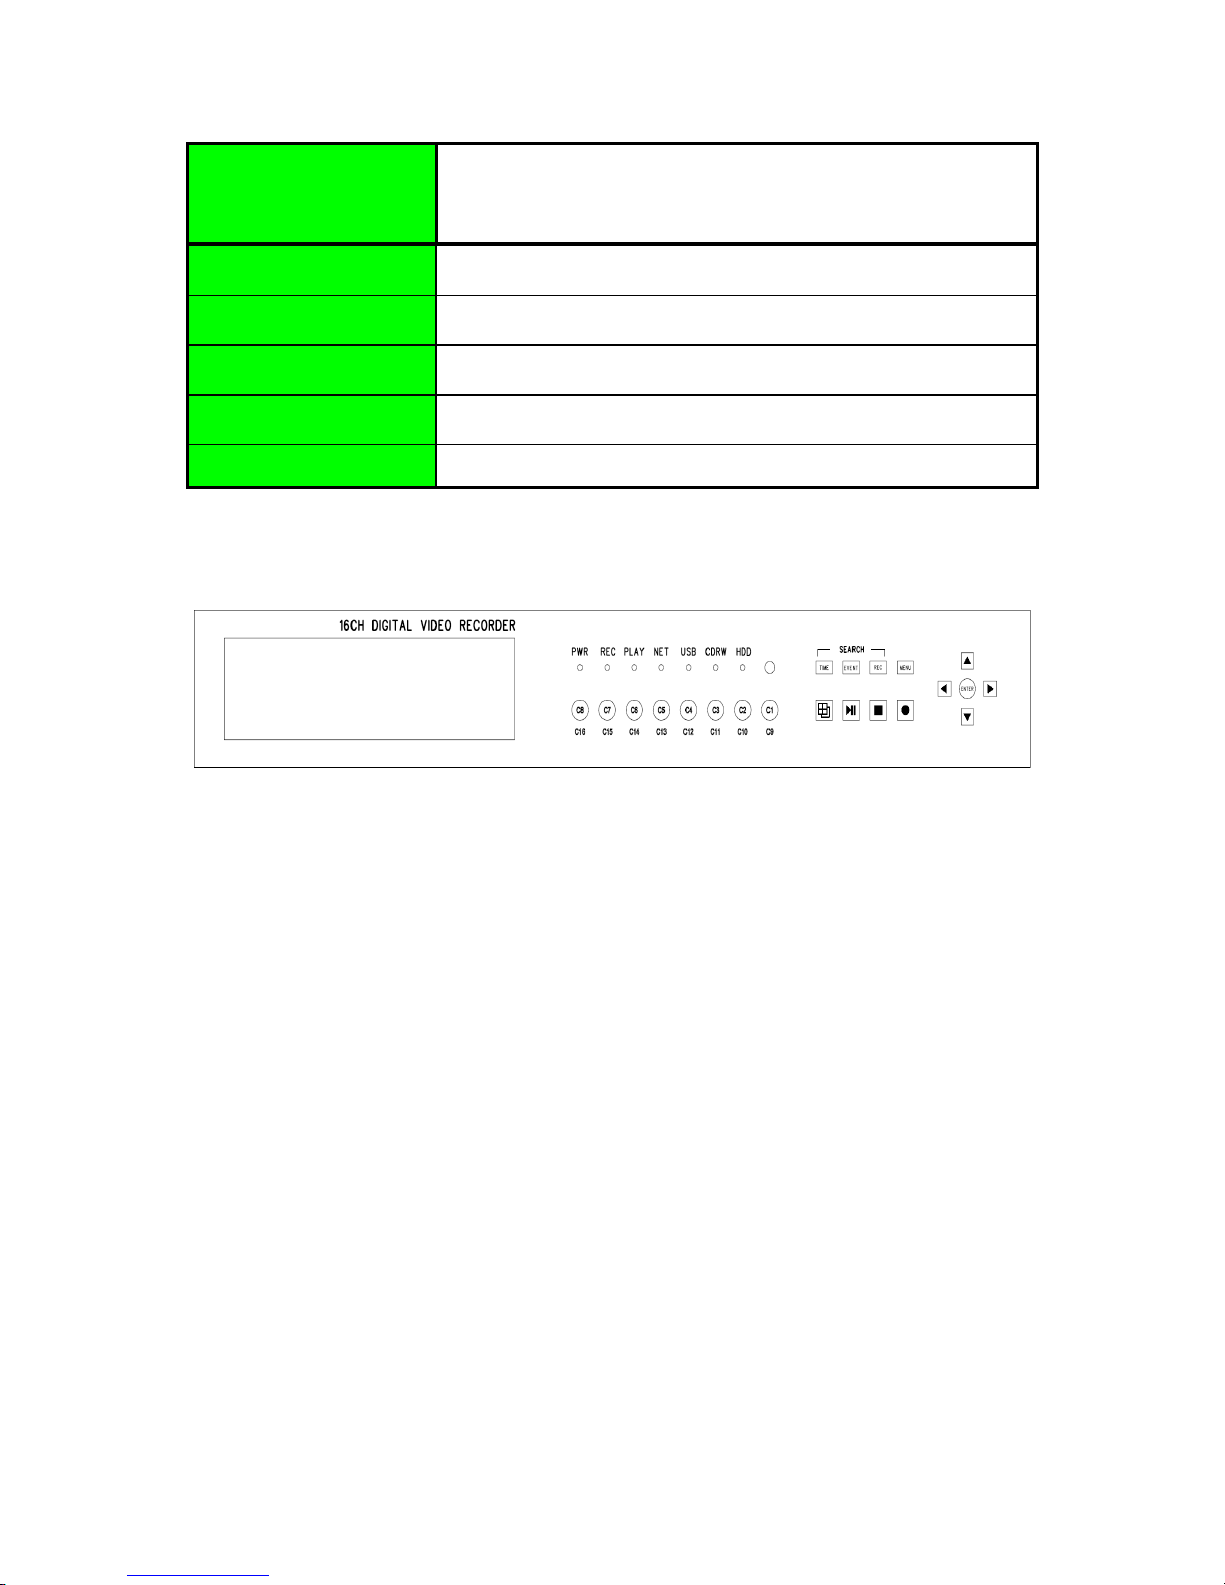
4.1 Front Panel Description .............................................................................................. 5
4.1.1. LED...................................................................................................................... 5
4.1.2. KEYPAD............................................................................................................... 5
4.2 Rear Panel Description ............................................................................................... 5
4.3 REMOCON................................................................................................................... 6
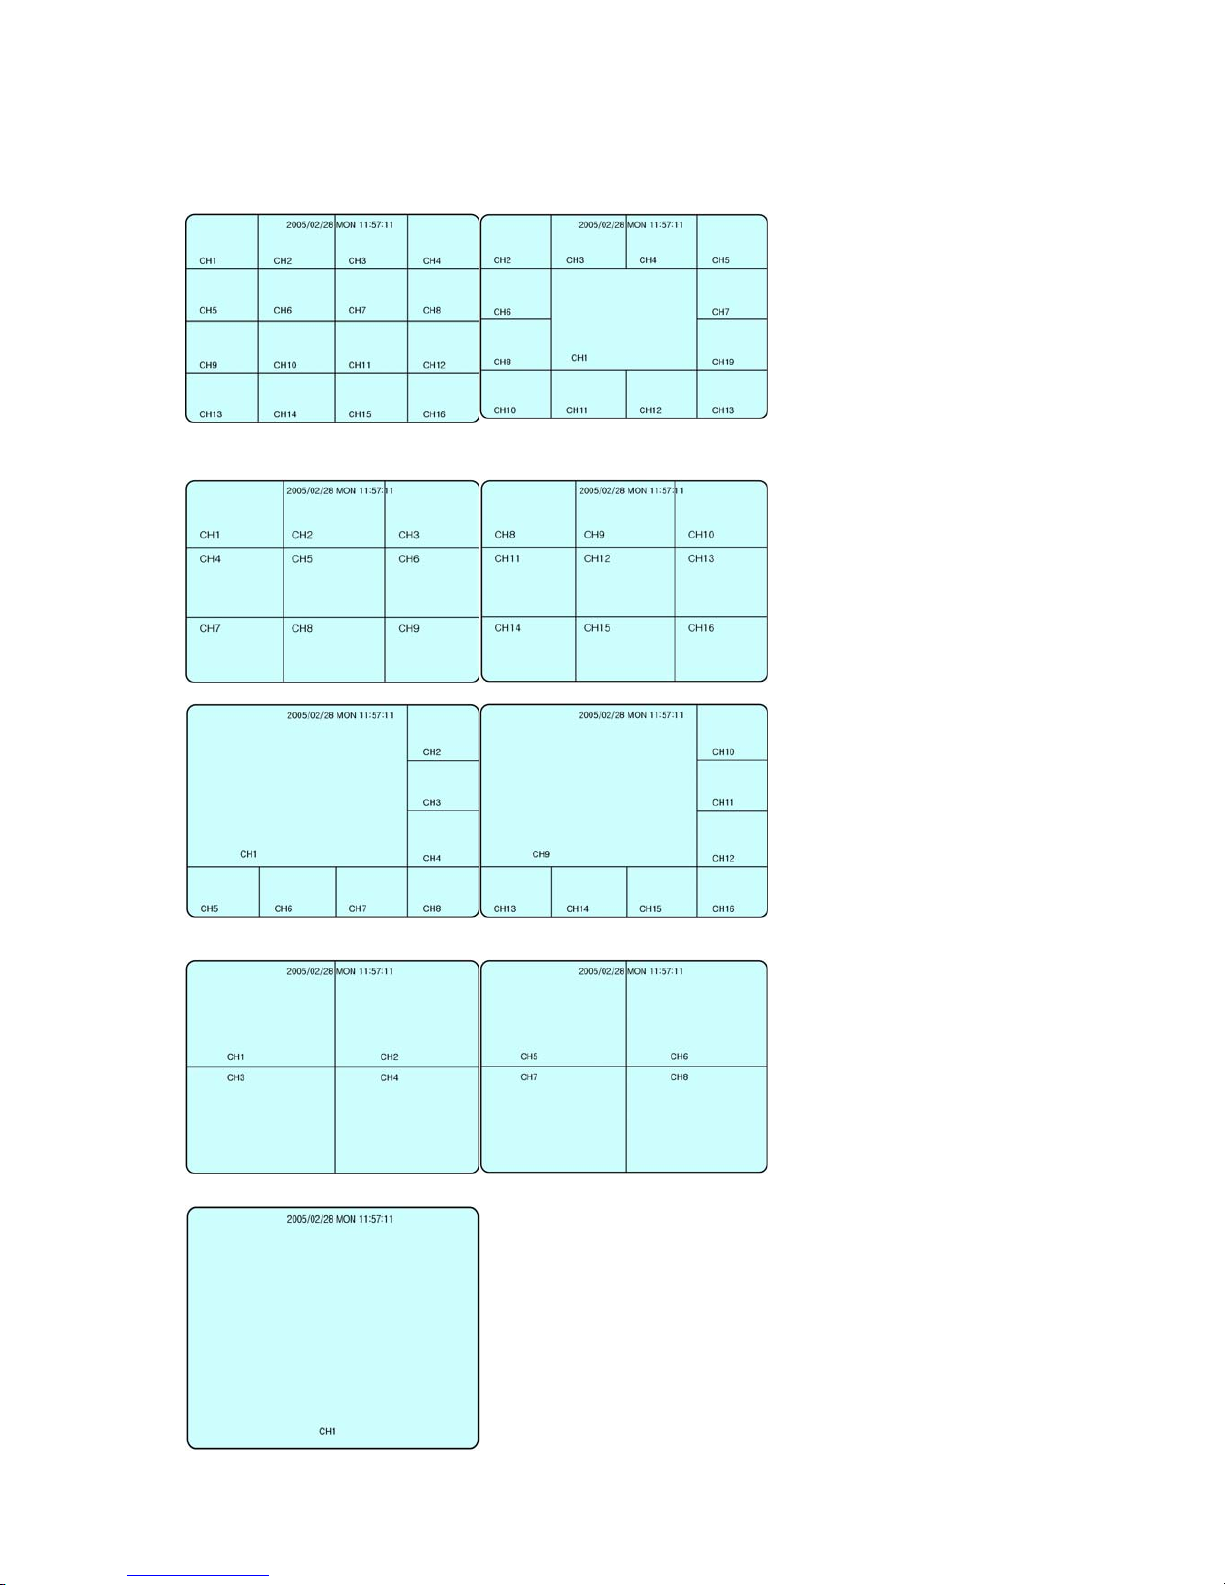
5. Display Modes .................................................................................................... 9
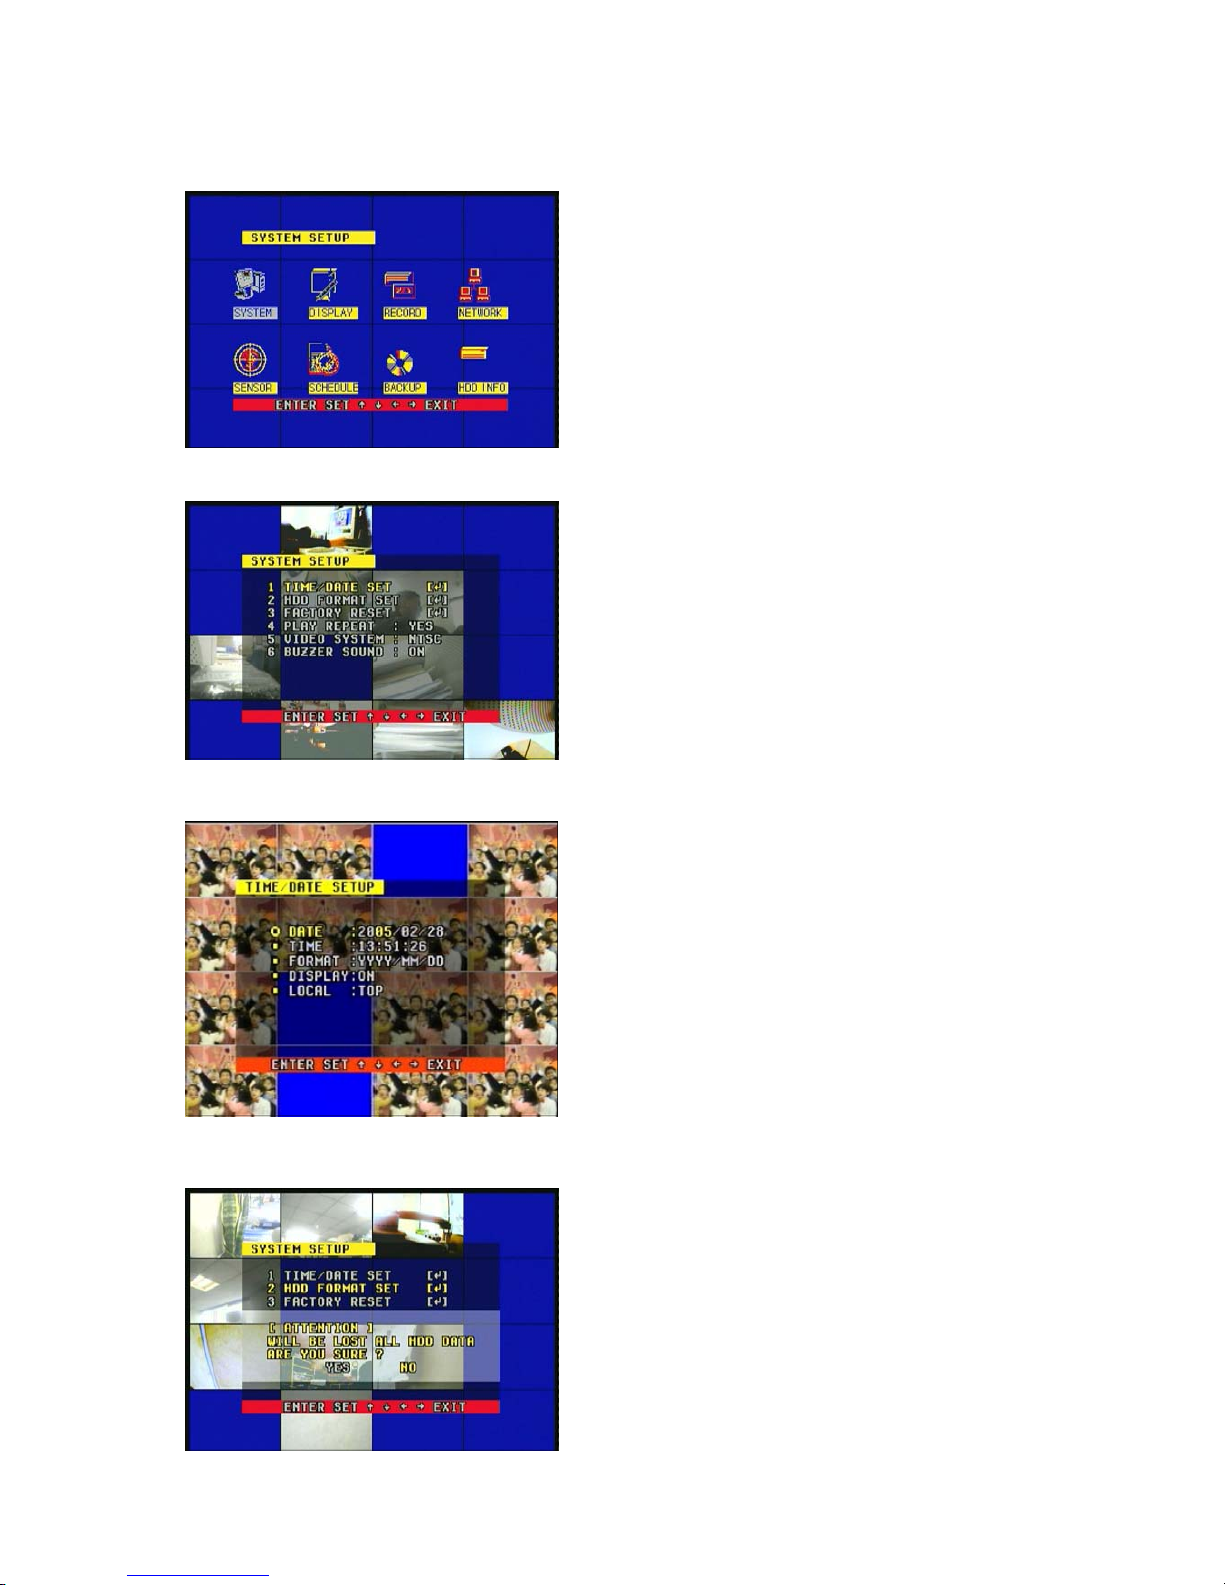
6. Setup Menu....................................................................................................... 11
6.1 SYSTEM SET............................................................................................................ 11
6.1.1 TIME/DATE SET ................................................................................................ 11
6.1.2 HDD FORMAT SET ............................................................................................ 12
6.1.3 AUTO SEQUENCE SET...................................................................................... 12
6.1.4 FACTORY SET ................................................................................................... 13
6.2 VIDEO SET ............................................................................................................... 13
6.2.1 CAMERA NAME SET.......................................................................................... 14
6.2.2 COLOR SET ........................................................................................................ 14
6.3 RECORD SET ............................................................................................................ 15
6.3.1 REC CHANNEL................................................................................................... 15
6.4 NETWORK SET ........................................................................................................ 16
6.4.1 N/W ENABLE ..................................................................................................... 16
6.5 SENSOR SET ............................................................................................................ 17
6.4.1 MOTION AREA SET ........................................................................................... 17
6.6 SCHEDULE SET ....................................................................................................... 18
6.7 USB BACKUP ........................................................................................................... 18
7.7.1 USB BACKUP ..................................................................................................... 18
7.7.2 CDRW BACKUP.................................................................................................. 18
6.8 STROAGE INFO ........................................................................................................ 18

4
7. Operating ......................................................................................................... 19
8. NetEYE (Network Viewer) ............................................................................... 24
9. LOCK ................................................................................................................ 24
9.1 SYSTEM LOCK...................................................................................................... 24
9.2 SYSTEM UNLOCK.....................................................................................................
10. Administation ................................................................................................. 19
10.1 IRMWARE UPDATE ................................................................................ 25
11. Installation
8.1 REC
8.2 Event
8.3 SCHEDULE
8.4 Search
8.5 Event Search
8.6 Time Search
8.7 Zoom
8.8 Freeze
8.9 MUTE
8.10 HDD Information
8.11 USB

5
2. FEATURES
-Multi screen (16Channels)
-Stand Alone Type (Non-PC, Linux)
-Real Time Quad Display
-Built-in Time/ Date / Title Generator
-Motion Detection Function
-Motion/ Alarm / Schedule recording
-Quick Search: Time/Event/Record
-Various Display mode and record/playback ( 4/8/9/13/16 screens)
-Hard Disk Drive Overwrite ON/OFF Function
-Able to watch Live screen and recorded screen at the same time by network(TCP/IP)
- Settable recording mode for event, schedule by network (TCP/IP)
-Pan/Tilt Controller (Option)
-MJPEG Format Compression
-Various function of Network Client Viewer (NetEYE)
-Full / Quad / AUTO-S / 8DIV/ 9DIV/ 13DIV / 16DIV
-Various Back mode ( USB memory, CD R/W)
-16Video input/ 1 Audio Input
-16Alarm Input/1 Relay Output(NC, NO)
-Front 21 keys/Remote controller 45keys
-Firmware upgrade by Network
-IR Remote controller
-1Channel Audio
1. INTRODUCTION
1.1 Product introduction
GN-716J is used with 16 cameras and save images and moving date at HDD (Hard Disk Drive).
And sub recording methods are CDRW, USB memory.
User can control and observe at remote place by Ethernet, and support Client Viewer and all
functions of normal DVR.
1.2 Product contents
Please check following contents in package.
a. GN-716J Body
b. Power Cable
c. User’s manual
d. NetEYE Installation program CD
1.3 Explanation of DVR
This model is digital recording type equipment and whenever user can record and playback image
or moving picture.
1.4 Precaution
Do not put overload on equipment and avoid strong impact on it.
Do not put this equipment at place where are lot of moistures and high temperature.

6
Capacity of saving All kind of HDD (Support 24 Bit, 48 Bit)
Max. 2 pieces of HDD can be installed (MASTER / SLAVE)
Compression M-JPEG (15KB/Field @ HIGH, NTSC)
No. of input 16 (NTSC/PAL) Channels
Resolution 720 x 480(576), 720 x 240(288), 320 x 240(288)
Recording Speed 60(50)Field/sec, 720 x 240(288)
120(100) Field/sec, 320 x 240(288)
Recording Mode
Manual record
Event record
- Alarm / Motion/ Schedule
Playback mode FF : 2X ~ 32X, REW : 2X~16X,
STILL, JOG function
Monitoring 60-fps @720x240, 50-fps @720x576
Display
16ch, 9ch, 4ch, Full etc.
Anti Rolling
Zoom, Freeze
Event, Rec, Time List Play
Full Duplex Live / Playback, Able to record while playback
Alarm Control TTL LEVEL INPUT 16EA
RELAY OUTPUT(NC/NO/COM) 1EA
Motion Detect Able to adjust 5steps of sensitivity, 16 x 12 Motion ( Settable motion detection
area)
PTZ control Pan / Tilt / Zoom function by connecting RS-485
BACKUP
Network Backup (Backup at NetEYE )
M-JPEG and save as avi file
Save by selecting Live/PB regardless screen output
USB Storage Backup
Save as Moving picture and STILL image
Save FAT16 file ( Recognized at Window)
Net EYE
TCP/IP Protocol
Remote controlling Record ON/OFF
Receive recorded list from DVR and playback each list
Remote Control 45 KEYS(39KEY/PTZ control 6KEY)
3. Specification

7
Input Power AC 115V/ AC230V
Power Source Built in power supply
Power consumption 35W
Size (mm) 432 x 67 x 400 (W x H x L)
Weight (KG) 3.1 KG (CDRW including)
4. Unit Description
4.1 Front Panel Description
4.1.1 LED
-PWR : POWER INDICATOR
-REC : RECORDING STATUS
-PLAY : PLAYBACK STATUS
-NET : LAN(TCP/IP) STATUS
-USB : USB STATUS
-CDRW : CDRW STATUS
-HDD : HDD STATUS
4.1.2 KEYPAD
- 1/9 ~ 8/16 : Channel selection (Full screen)
- MODE : 2x2-> 3x3-> 4x4 (->2x2) converting screen mode
*When the screen mode are 2x2, 3x3, use direction keys to go next.
- MENU(SETUP/EXIT) : Setup
- TIME : Time Search
- EVENT : Event Search
- REC : Record Search
- ENTER : Enter
-▲ ► ▼ ◄ : Direction key(Up/Down/Right/Left)
- : REW, FF, PREV, NEXT
(Direction keys can be used as REW,FF,PREV, NEXT at PLAYBACK mode)
- : PLAY/PAUSE, STOP, RECORD
*STOP key will be used as FREEZE key at LIVE MODE. And press STOP again to back LIVE
mode.
Audio Audio input 1-PORT

8
4.2 Rear Panel Description
-C1-C16 : Camera Input
-MON : Monitor port
-REC : VCR port
-S-VHS : S-VHS port
-AI : Audio Input
-AO : Audio Output
-ETHERNET : LAN Port
-USB : USB Port
-RS232 : Serial Port (option)
-RS485: PAN/TILT control port (option)
-ALARM : ALARM input/Relay Output
4.3 REMOTE CONTROLLER
-4X4, 3X3, 2X2, AUTO-S: DISPLAY MODE
-PIP : PICTURE IN PICTURE MODE(OPTION)
-REC(RED): HDD RECORD
-ZOOM : 2X ZOOM
-SEARCH(TIME/REC/EVENT): Time / Recorded Date
/ Search by each events
-ZOOM: 2X ZOOM
-PLAY() : PLAY/PAUSE. PLAY/PAUSE operating in PB.
-STOP() : This key used as EXIT key at PB mode
and FREEZE key at LIVE mode.
* Press STOP again to back to LIVE mode.
-MENU : MENU/SETUP Key
-ENTER: CONFIRM /SAVE Key
-▲ ► ▼ ◄ : Direction key (Right/UP/Down/Left)
- : REW, FF, PREV, NEXT key.
(Direction keys can be used as
REW,FF,PREV, NEXT at PLAYBACK mode)
-ADJ-,+ : When changing channel at FULL MODE.
-USB: USB BACKUP MENU
-CDRW: CDRW BACKUP MENU
-MUTE : AUDIO CH MUTE
-LOCK : SYSTEM LOCK/UNLOCK키
-INFO : SYSTEM INFOMATION키
-TELE, FAR, NEAR, WIDE: Used with PAN/TILT (OPTION)

9
5. Display Modes

10
6. Setup Menu
When user want to change setting value,
press MENU/EXIT keys in Remote controller
or Front key. Move the cursor to sub menu to
press Enter key and go out from current menu
by pressing MENU/EXIT.
--SETUP MODE consist of 8 icons.
TIME/DATE SET: To set Date and Time
HDD FORMAT SET: To format HDD ( Hard Disk
Drive)
FACTORY RESET: To return factory specification
PLAY REPEAT : To set Playback repeatedly
VIDEO SYSTEM : T set NTSC or PAL type
BUZZER SOUND : To set Buzzer ON / OFF
DATE : Set current Date
TIME : Set current Time
FORMAT : Set the Date display ( DD/MM/YYYY, MM/
DD/YYYY, YYYY/MM/DD)
DISPLAY : Set the display of Time and Date or not
(ON/OFF)
LOCAL : Select the location of display of Time and
Date (TOP / BOT)
6.1.2 HDD FORMAT SET
You can format Hard Disk Drive
When you select YES, HDD will be formatted. ( All
data will be cleared)
6.1 SYSTEM SETUP
6.1.1 TIME/DATE SETUP

11
6.1.3 FACTORY RESE
6.1.5 BUZZER SOUND
6.2. DISPLAY SETUP
6.1.5 VIDEO SET
You can return all setting as factory specification.
If you select YES, all setting will be returned as
factory specification.
You can return all setting as factory specification.
If you select YES, all setting will be returned as
factory specification.
You can return all setting as factory specification.
If you select YES, all setting will be returned as
factory specification.
You can return all setting as factory specification.
If you select YES, all setting will be returned as
factory specification.

12
6.2.1 CAMERA NAME SETUP
6.2.2 COLOR SET
CAMERA NAME : User can make name for each cameras by
pressing direction key and Enter key to choose.
User can set level of color for each channel.
( Using direction keys and select certain channel by Enter key
then set each section by UP/DOWN key.
UP/DOWN Key를 사용하여 변경 할 수 있습니다.)
* To go out from current mode, please press MENU/EXIT Key.

13
6.2.3 AUTO SEQUENCE SET
If pressing Enter key at AUTOSEQ SET in DISPLAY SETUP,
You can set dwell time for each camera in AUTO screen mode.
You can set Dwell time of display of each channel.
(0~99sec.)
* To go out from current mode, please press MENU/EXIT Key.
To select Border line color (BLACK / WHITE / GRAY)
6.2.4 BOUND COLOR SET
6.2.5 BLANK COLOR
BLANK COLOR : To select the color of Loss screen (BLACK / WHITE)
6.3 RECORD SET
OVER WRITE : To set OVER WRITE (YES / NO)
* OVER WRITE ( When HDD is full, it will write from
first section of HDD)
REC SPEED : To set speed of recording
( 1F, 2F,3F,5F,12F,20F,30F,60F)
Ex) 60F/sec : Record 60 field per 1 second.
1F/sec : Record 1 field per 1 second.
REC QUALITY : To set recording quality as 4 steps
(VERY HIGH / HIGH / LOW / VERY LOW)
RESOLUTION : Field
PLAY BACK SPEED : To set speed of Playback
Ex) 60/sec : Playback 60 field per 1 second.
1/sec : Playback 1field per 1 second.
AUDIO CH EN : To select certain channel for Audio
output. Ex) If selecting CH1 for Audio, the color of
CH1 Will be displayed as Yellow in main screen.

14
6.4 NETWORK SET
6.5 SENSOR SET
CHANNEL SELECT : To select cannel for setting with sensor (CH 01 - 16)
ALARM ENABLE : To set of Alarm operating or not (ON / OFF)
MOTION ENABLE : To set of Motion detection operating (ON / OFF)
MOTION LEVEL : To set of Motion operating level (VERY HIGH – VERY LOW)
BUZZER TIME : To set dwell time of buzzer sound when Motion detected (0 – 99 Sec)
SENSE REC TIME : When ALARM/Motion occurred, to set recording time (1~99 MIN)
OFF: CONTINUE
6.5.1 MOTION AREA SET
As you see above, Yellow area is Motion detecting
area. The other black area is no Motion detecting
area. You can move cursor from Yellow area to
Black area, then able to set as Motion detecting area
by pressing Enter key.
* If pressing Long key of body, all area will be
changed as the cursor locating.
SUB NET : To set Subnet Mask
GATEWAY : To set Gateway
IP ADDR : To set IP Address
NETWORK ENVIRONMENT : To set network envi-
ronment (LOCAL / EXTER)
Local :
External:

15
6.6 SCHEDULE SET
6.7 USB BACKUP
7.7.1 USB BACKUP
You can set USB BACKUP function .
BACKUP METHOD : To select how to BACKUP
(MOVIE / STILL)
USB INFORMATION : To show status of USB Stor-
age
User can save all recorded data using by CDRW, USB
MEMORY.
SUN – SAT : To set recording condition as user’s
desired day (00:00-23:59)
SCHEDULE RECORD : To set schedule recording
condition (ON / OFF)

16
6.7 CDRW BACKUP
6.8 HDD INFO
To show the status of HDD ( Hard Disk Drive).
MODEL : To show Model Number of HDD
CAPACITY : Total capacity of HDD
USED SIZE : Total used capacity
OVER WRITE : The number of OVER WRITE
7.7.2 CDRW BACKUP
You can set CDRW BACKUP function and carry on
BACKUP with CDRW.

17
7. OPERATION
7.1 REC
You can set recording ON/OFF of each channel individually as follows order.
SETUP -> RECORD SET -> REC CHANNEL
If pressing REC key, red mark will be turned on in front of channel name which
Has been set Recording ON, that channel will be recorded.
The channel which doesn’t have red mark, that channel will not be recorded
7.2 Event
When Alarm, Motion event are occurred, it will be automatically recorded .
SETUP -> SENSOR SET -> CHANNEL SELECT : Select each channel
SETUP -> SENSOR SET -> MOTION ENABLE : ON (Motion detecting)
SETUP -> SENSOR SET -> ALARAM ENABLE : ON (Alarm )
SETUP -> SENSOR SET -> MOTION LEVEL : Set Motion detecting level
Current Status (REC ON/FF) Operating (Recording)
No recording Record as 60 field in case of Event occurred
REC : ON, EVENT : ON Record current status and making Event list of recorded.
REC : OFF, EVENT : ON Making Event list and record

18
7.3 SCHDULE
User can set schedule (Desired time) for recording ( Set in SETUP -> SCHEDULE SET)
7.4 Search (TIME Key)
START TIME : Starting time to record, END TIME : When the recording is finished.
END TIME :
User can move select one of list then can play desired list by pressing Enter key.
7.5 Event Search
User can search Event list by pressing ES key in Remote controller,

19
7.6 Time Search
User can search recorded data of certain time then user can play desired time of recorded
images.
1) Year : User can select desired year with direction key, then press Enter.( Go to Month
setup)
2) Month: User can select desired month with direction keys ( There are red block under
Month setting bar which means it has been recorded at that month)
3) Date : User can select desired Date with direction keys ( There are red block under Date
setting bar which means there are recorded images at that date)
4) Time : User can select desired Time with direction keys (There are red block under Time
setting bar which means there are recorded images at that Time)
Playback : User can select red block and play recorded images by pressing Enter key.
* If there are more than two recorded data, it plays from first of them.
7.7 Zoom
User can watch the zoomed images by pressing zoom key in Remote controller.
The brighter zone will be zoomed at Zoom mode, then zoom by pressing Enter key.
User can watch anywhere at zoomed screen by pressing direction key..

20
7.9 MUTE
User can stop sound by pressing MUTE key and
displayed MUTE on screen.
7.10 HDD Information
User can see HDD information by pressing INF key
in Remote controller or front body.
7.8 Freeze
User can freeze screen at full screen mode by pressing STOP key at remote controller or
front key on DVR And if pressing STOP key again, it will be back to LIVE mode.
If user press STOP key in other display mode, “ F “ icon will be displayed on screen. And user
can select Desired channel to freeze by pressing the number of channel, those channels will be
freeze. And press the channel number again, it will be back to Live mode, or move to another
display mode.
Table of contents