GANGER GQ-3220C User manual

USER MANUAL
Bridge Saw Machine GQ-3220C

1/20
Content
Operating Instructions......................................................................................................................................................2
1. User manual................................................................................................................................................................4
1.1 Main interface......................................................................................................................................................5
2. Move manually...............................................................................................................................................................7
3. Use of handle..................................................................................................................................................................9
4. Interface check............................................................................................................................................................ 11
5. Lateral Portait cut....................................................................................................................................................... 12
6.PN chamfer set............................................................................................................................................................ 14
7. Circle/Prism/Ellipse Set........................................................................................................................................... 17
8. CAD.................................................................................................................................................................................. 19

2/20
Operating Instructions
[Pay attention]
1. Make sure that the motor and drive are properly installed, firmly fixed, and the power supply and
voltage wiring are correct before powering on.
2. During debugging, the motor should be unloaded first, and after confirming that the parameters
are correct, then carry out load debugging to prevent damage to the machine caused by incorrect
operation.
3. Do not switch on and off the system frequently to prevent damage to the drive.
4. The drive and motor may heat up after running for a period of time. It is strictly forbidden to
touch the drive radiator and motor during running and for a period of time after power off!
5. When an accident occurs or the motor does not operate normally, press the emergency stop
button immediately, and the machine will immediately stop running!
[Danger]
Even after the drive is powered off, the high voltage will remain for a period of time. Do not
disassemble the power cord within three minutes after the power is turned off, don’t touch the
terminal block.
It is strictly forbidden to disassemble the driver and motor with power on.
The personnel involved in disassembly and maintenance must have corresponding professional
knowledge and working ability.
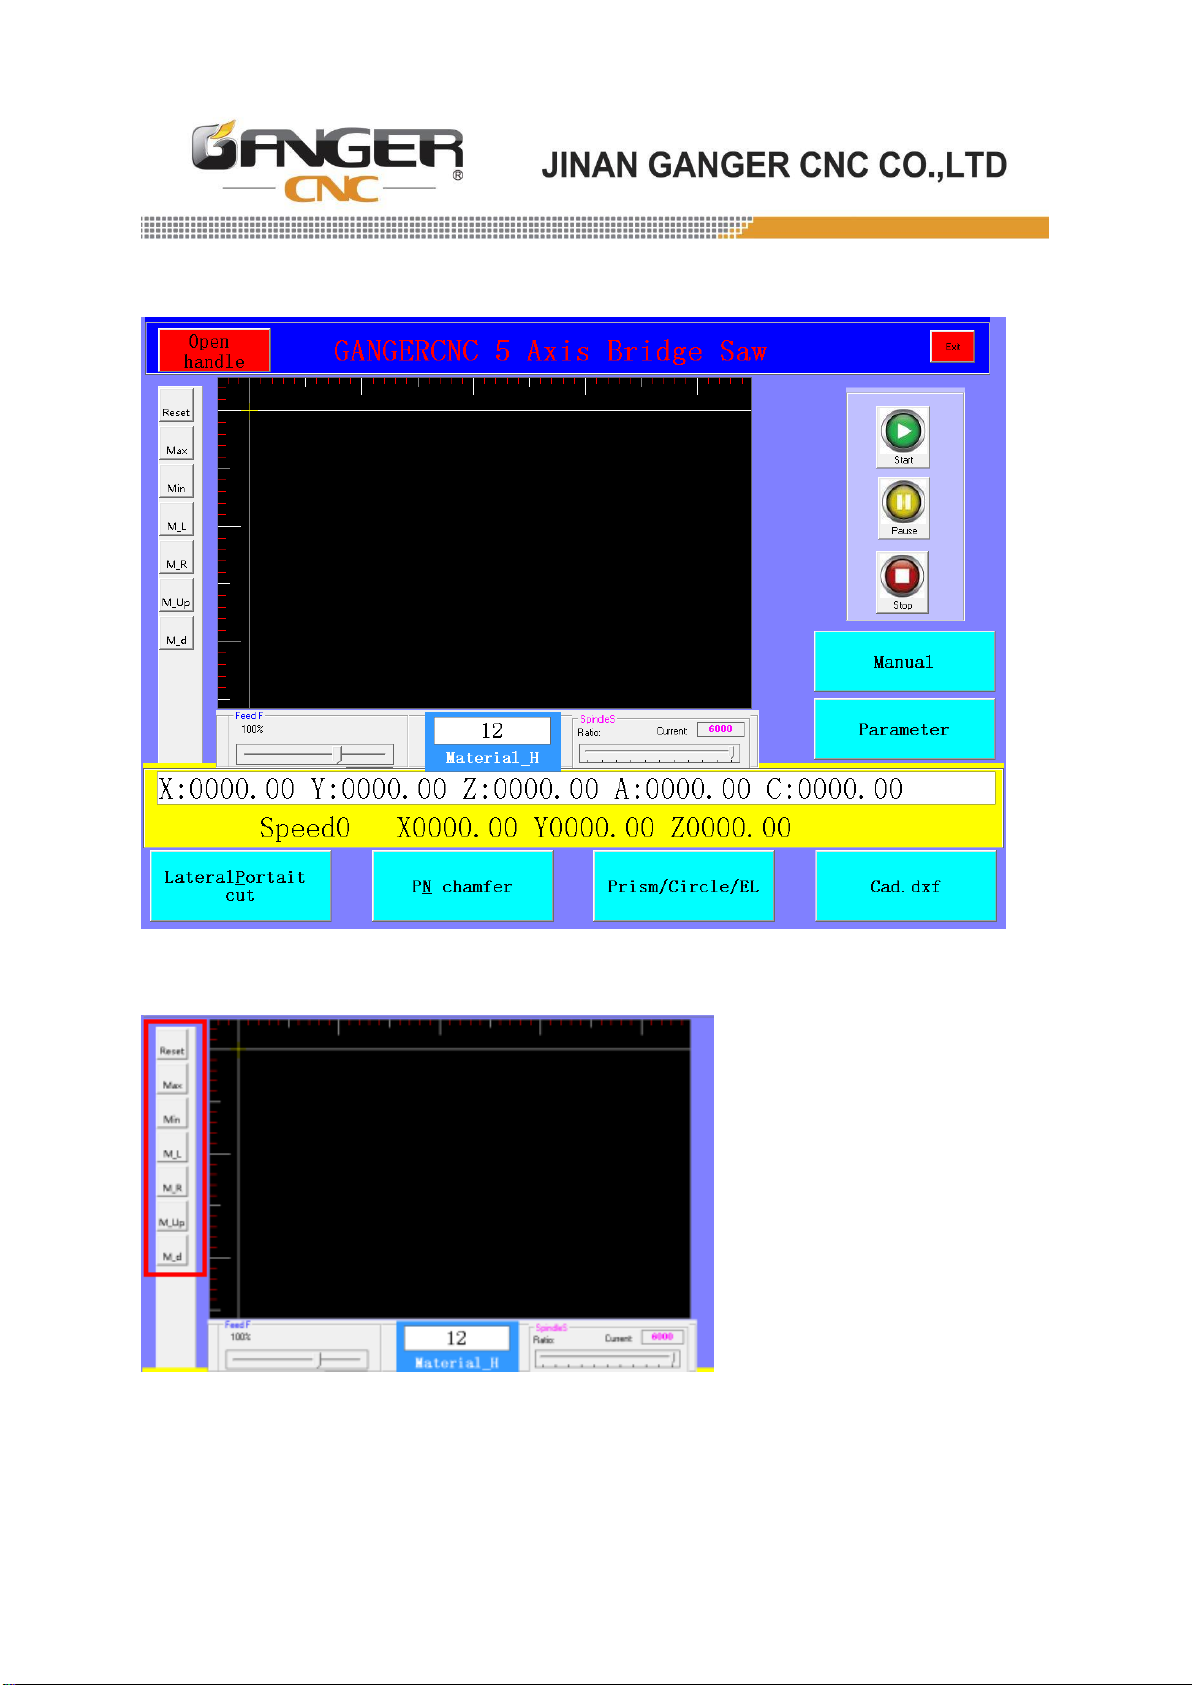
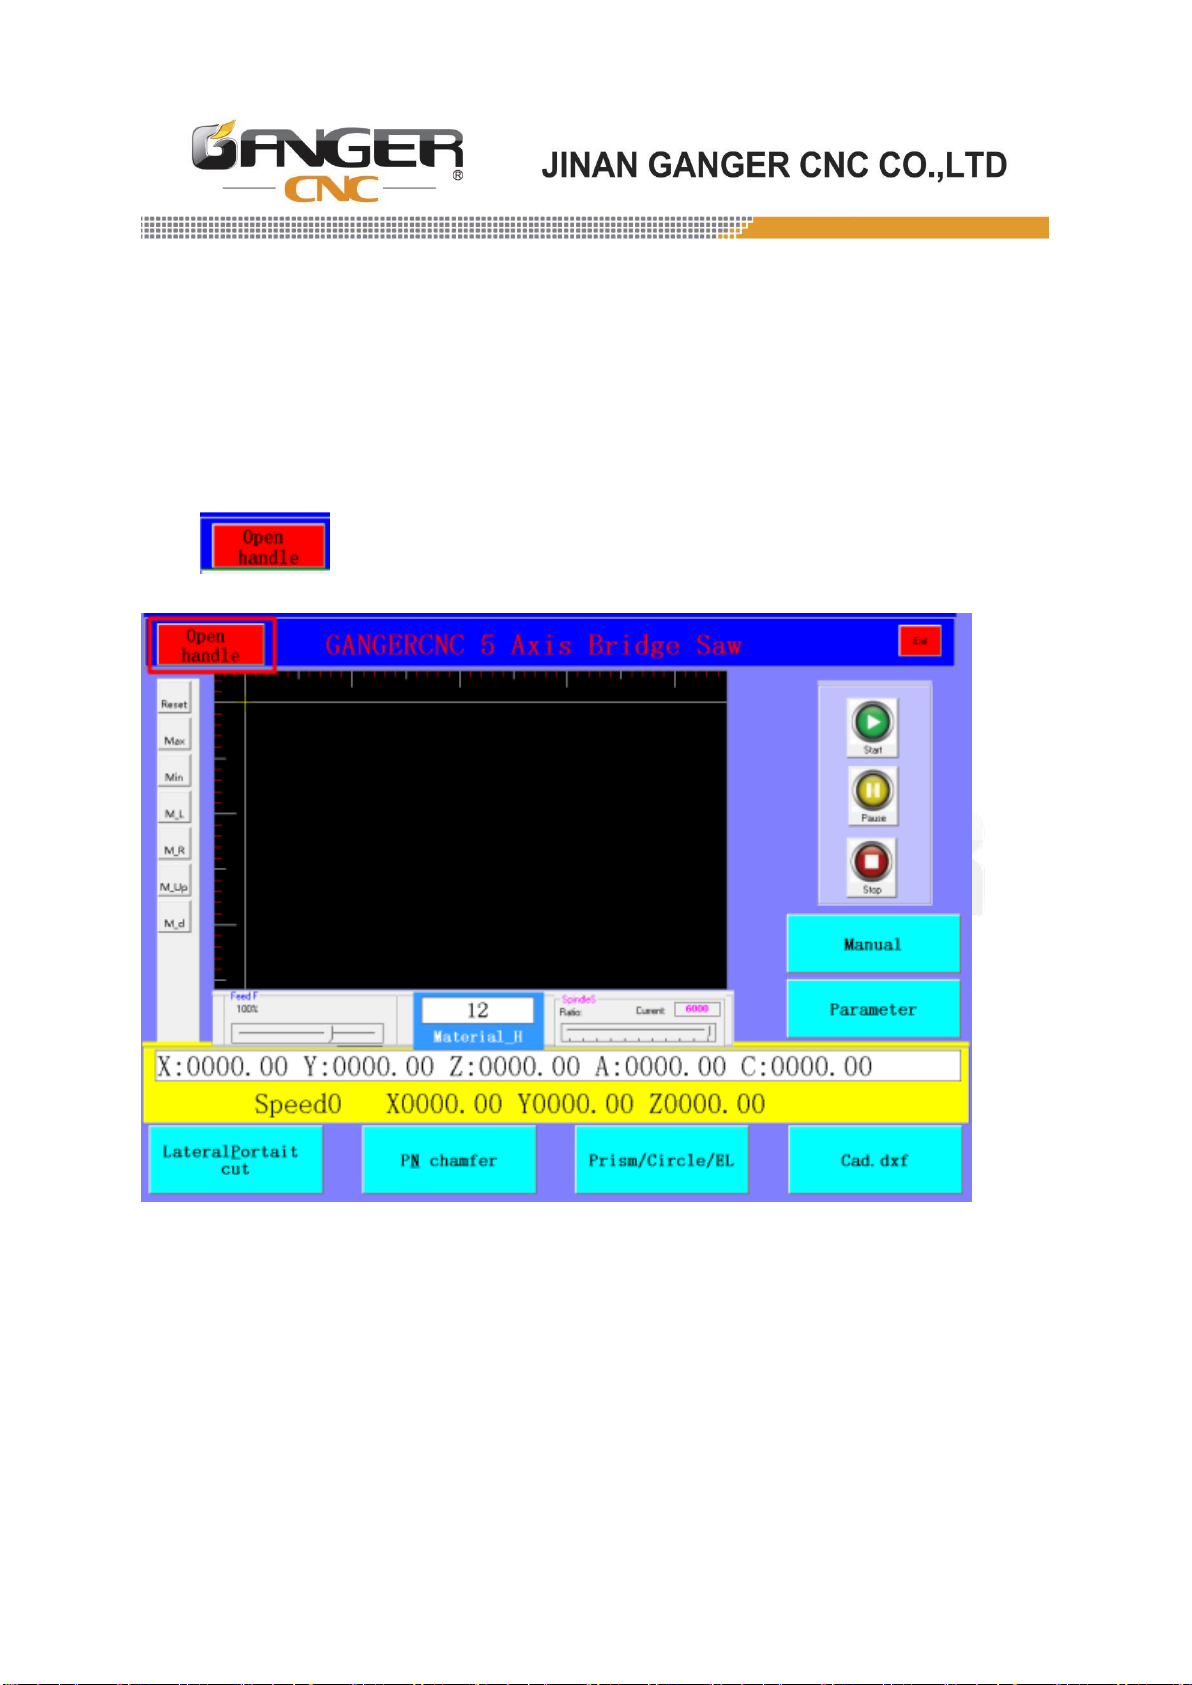
【Operation precautions】
1. The saw blade shaft must be lubricated weekly
2. Drawing specifications: Drawings must be made strictly in accordance with the drawing
specifications, otherwise the machine will wrong action!
3. Don't cut too fast when cutting the ellipse at a small angle, otherwise it will damage the saw

3/20
blade and the slab!
4. During machining process (especially the 45-degree chamfer), do not get too close to the saw
blade to prevent the danger of saw blade!
5. Every restarts, it needs to return all axis to zero and set the tool again!
6. The machine must be back all axis to 0.0 before operate table up & down!
7. Please don't forget to add hydraulic oil for the hydraulic pump!
8. The operator must not load and unload the blade until the saw blade completely stops rotating;
other people are strictly prohibited to operate the machine during the process of loading and
unloading the blade!
9. Operators must wear goggles, earplugs, masks and other basic safety protective gear!
10. It is strictly forbidden to open the control cabinet when it is working. If there is a fault, it must be
powered off for testing. The testing personnel need to have the corresponding professional
knowledge!
11. Before the machine is ready to cut, please check the status and various parameters to avoid
unnecessary errors (such as damaging the saw blade). Make sure that the parameters are correct
before cutting!

4/20
1. User manual
After the machine is powered on, the welcome interface displayed on the control screen, click
"Welcome to GANGERCNC Bridge Saw System" to enter the system interface.

5/20
1.1 Main interface
1.1.1 In the main interface
This is the CAD display area. The buttons in the red frame can zoom in, zoom out, move CAD
graphics, etc.

6/20
1.1.2In the red frame area of the interface
Can adjust the blade motor ratating speed and processing speed.
1.1.3 Ruler
CAD display area with ruler function, the distance shown in the figure is 1M.
1.1.4 Materials(slab)thickness
You can enter the material thickness (slab thickness) in the white box.
1.1.5 Coordinate
display
The yellow area in the main interface can display machine coordinates and workpiece
coordinates.

7/20
1.1.6 Start, Stop and Pause button.
Start button: click the start button, the machine starts to cut work.
Stop button: Click the stop button, the machine stops work.
Pause button: Click the pause button, the machine pauses work, click the start button to
continue the previous work.
2. Move manually

8/20
Click will shown as above screen.
In this interface, you can move the machine back and front, left and right, return to zero for each
axis, switch the moving speed, and change speed, etc.在此界面可以进行五轴桥切机的前后左右移
动,各轴回零,行程档位切换,速度切换等操
2.1 After switching to the custom mode, the machine will only move the set
custom value every time.
2.2 Click Switch to fast mode.
2.3 Press ZYX axis back to 0.
2.4 Press A0 or C0 A-axis and C-axis will back to 0.

9/20
3. Use of handle
The handle is mainly used for movement and tool setting in the “X+, X-, Y+, Y- “directions:
(The handle has been set to connect to the machine before delivery, and only need to install
the AAA battery).
Click to use the handle.
Introduction to the function keys of the handle:

10/20
After the machine is powered off, the handle will close automatically.

11/20
4. Interface check
Click interface check, will shown as above interface
4.1 In the port check interface, you can start and stop the blade; table up&down (the machine
must be back all axis to 0.0 before operate table up&down); start and stop the oil lubrication;
and observe the limit status and etc.operations.

12/20
5. Lateral Portait cut
5.1 : You can set the width and quantity of the slab in the Y axis
(the machine defaults to cut a slab with two shots, if you only need to cut one shot, please use the
function)
5.2 : You can set the width and quantity of the slab in the X axis
(the machine acquiescence to cut a slab with two shots, if you want cut one shot, please use the
function)

13/20
5.3 : You can set the cutting length when the blade on 0°position.
5.4 :You can set the cutting length when the heads on 270°.
5.5 Click The head can be quickly turned back to 0°from any angle.
5.6 Click The head can be quickly turned to 270°from any angle.
5.7 Click The machine only cut one shot at 0°.
5.8 Click The machine only cut one shot at 270°.
5.9 : Select a starting point in the X direction, double-click (the
coordinates of the start point will be displayed in ), and then move the blade
to the needed position (the coordinates of the end point of X will be displayed in
), and then click , the distance between the start point and the
end point will be displayed in “ ”.
5.10 : Select a starting point in the Y direction, double-click (the
coordinates of the start point will be displayed ), and then move the blade to
the needed position (the coordinates of the end point of Y will be displayed in ),

14/20
and then click , the distance between the start point and the end point will be
displayed in “ ”.
5.11 Click , the head is will cut at 45°chamfer state.
6. PN chamfer set

15/20
6.1 :You can set the width and quantity of the slab in the Yaxis
(the machine defaults to cut a slab with two shots, if you only need to cut one shot, please use the
function) .
6.2 :You can set the width and quantity of the slab in the X axis
(the machine acquiescence to cut a slab with two shots, if you want cut one shot, please use the
function) .
6.3 :You can set the cutting length when the blade on 0°position.
6.4 :You can set the cutting length when the heads on 270°.
6.5 Click :The head can be quickly turned back to 0°from any angle.
6.6 Click :The head can be quickly turned to 270°from any angle.
6.7 Click :The machine only cut one shot at 0°on the C axis and 45°on theA
axis.
6.8 Click :The machine only cut one shot at 270°on the C axis and 45°on theA
axis.

16/20
6.9 :The chamfer depth is the thickness of the slab.
6.10 :The depth of the reverse chamfer is the thickness of the slab.
6.11 :When the machine is cutting, the head is at 0 degrees.
:When cutting, the head is tilting at 45 degrees, the upper surface of the
cut slab is larger than the lower surface.
:When cutting, the head is tilting at 45 degrees, the lower surface of the
cut slab is larger than the upper surface.
Attention: The use of the buttons for “Rear”, “Left” and “Right” is the same as the “Front”
button.
6.12 : Only valid for CAD function processing; every time the depth of straight
cutting increases by 1mm, the cutting depth of the machine will increase downward by 1mm.

17/20
7. Circle/Prism/Ellipse Set
7.1 :Center coordinate in X direction
7.2 :Center coordinate in Y direction
7.3 :The radius of the outer circle ensures that the inner circle is cut out.
7.4 :The radius of the inner circle ensures that the outer circle is cut out.
7.5 :The outer ellipse radius in the X direction (the outer ellipse radius ensures

18/20
that the inner ellipse is cut out).
7.6 :The outer ellipse radius in the Y direction (the outer ellipse radius ensures
that the inner ellipse is cut out).
7.7 :The inner ellipse radius in the X direction (the inner ellipse radius ensures
that the outer ellipse is cut out).
7.8 :The inner ellipse radius in the Ydirection (the inner ellipse radius ensures
that the outer ellipse is cut out).
7.9 :the length of the slab to be cut prism
7.10 :the length of the slab to be cut prism
7.11 :the length of straight side of prism
7.12 :the length of hypotenuse side of prism
7.13 :the height between two straight sides of the prism in the Y direction
7.14 :The number of processing layers is determined by the thickness of the
slab, generally one layer is 3-4mm.

19/20
8. CAD
On the computer, save the CAD drawn graphics in DXF format, save the file to the U disk, plug it
into the USB interface on the system (black box) in the electrical box, and then copy the file to the
JHFIVE folder in the D disk.
8.1 :Every increase 1mm, the cutting depth of the machine will increase by
1mm.
8.2 : means the thickness of the slab.
8.3 :means the thickness of the slab.
Table of contents
Popular Saw manuals by other brands

DISCO
DISCO DAD 2H/6T troubleshooting guide

VONROC
VONROC MS501AC Original instructions

Wilton
Wilton 8201 Operating instructions & parts manual

Husqvarna
Husqvarna K 7000 Operator's manual

Hitachi
Hitachi C 10FSH Safety instructions and instruction manual

Laguna Tools
Laguna Tools Dake SE-5X6 RCT Instructional manual