Gantom Gantom 7 User manual

Gantom 7 User Guide Version 1.0 –12/15/2017
GANTOM 7: COMPACT SEVEN COLOR DMX SPOTLIGHT
USER GUIDE
The Gantom 7 packs seven-color output into a tiny package. With a native 15 degree beam angle, this
LED spotlight produces a punchy yet soft beam with homogeneous color mixing even at a close distance.
Included micro-lens diffusers and the magnetic accessory holder offer easy beam control solutions;
diffusing the spotlight to a floodlight is literally a snap. Native DMX control and a balanced, non-linear
dimming curve satisfies the most demanding theming tasks. This compact spotlight features lime,
amber, and ultraviolet beyond the common RGBW to achieve colors unavailable in standard LED
fixtures. With the Gantom 7, lighting designers obtain a virtually unlimited color palette in a compact
and efficient 7-Watt LED fixture. The Gantom 7 is configured using our DMX Programmer app, available
free for Apple and Android devices.
Features
oFull spectrum output with 7 LED colors. Multiple color profiles selectable (RGB, RGBA, RGBW,
RGBAWUv, RGBAWLUv).
oColor control via DMX512 or DMX Programmer app.
oPrecision-tuned non-linear dimming curve and color balance algorithm.
oStandalone mode allows set and forget operation without DMX signal (requires DMX
Programmer app).
oDMX address and configuration stored in memory.
oLow voltage and minimal heat for improved safety over incandescent sources.
oInternal constant current driver gives highly efficient and consistent output.
oMinimal maintenance required with over 50,000 hour lamp life.
oIndoor and outdoor use.
Available Models
The Gantom DMX is available in full color RGBW or Dynamic White. It is also available as either a Spot or
Flood light.
Product Name
Gantom 7
Gantom 7 PRO
SKU
GT77
GP277
Connector
2.1mm DC Power Jack for power
3.5mm TRS jack for signal
for use with Gantom GoCable System
Single locking connector for both
power and signal
for use with Gantom Pro Cable system

Gantom 7 User Guide Version 1.0 –12/15/2017
POWER AND WIRING REQUIREMENTS
The Gantom 7 has a maximum fixture wattage of 7.5W and an operating voltage of 12V DC. For
recommended power supplies check http://www.gantom.com/power-supplies/
Gantom’s standard DMX controllable light fixtures have a 2.1mm DC barrel jack for power and a 3.5mm
TRS jack for the control signal. Additionally, screw terminal adapters are included with every fixture to
simplify custom wiring. You can screw bare wires directly into these adapters
Rather than using a typical XLR cable for carrying the DMX signal, standard
Gantom fixtures use 3.5mm TRS cables. Gantom makes an XLR 5 Pin to 3.5mm
TRS adapter (product number CB51) that is perfect for connecting Gantom
products to an XLR based DMX environment.
The Gantom 7 is also available in our Gantom Pro configuration. This version has a single locking
connector which combines both power and data into one cable. This version is compatible with our G8
Power/Data Distribution Box and Pro Cable system. A single cable for power and data greatly simplifies
installation and the locking connector gives a secure connection for long term use. The Gantom Pro
series is recommended for permanent installations.
BARE WIRE PINOUT
Power
+
RED
-
BLUE
DMX signal
D+
GREEN
D-
YELLOW
COM
BLACK

Gantom 7 User Guide Version 1.0 –12/15/2017
CONFIGURING THE LIGHT FIXTURE
The Gantom 7 is programmed and configured using the free DMX Programmer App by Gantom. In
addition to setting the DMX starting address for the fixture, the app allows you to save a default color
and brightness for standalone operation of the light fixture if the application does not require any DMX
control.
What you need:
oAn Android or iOS device for running the Gantom Programmer app. Please note that a
headphone port is required to connect to the device to the fixture. The iPhone7 does work
with, but you will need to use the headphone port adapter that is included with the phone.
oA male-to-male 3.5mm audio 3.5mm cable. This is the same type of cable that you would use to
connect your Android or iOS device to headphones or to an AUX port.
oPower supply for the fixture. All Gantom fixtures accept 12v DC power. We recommend using
one of our PowerPak Mini units if you are just going to power a single fixture.
oThe free DMX Programmer app by Gantom. This can be found by searching “Gantom” in iTunes
for an Apple device or Google Play for an Android device
oIf you have a Gantom Pro series fixture, you will also need the CB107 programming adapter
cable
First, open the DMX Programmer app by Gantom. The app will open to
the screen you see here. From this screen, select Generic Console.
The app will then provide you instructions on how to connect the light
fixture to the tablet or smartphone. Please note the order in which the
cables should be connected. First connect the headphone cable to the
light fixture and to the tablet/smartphone. Next, connect the power to
the fixture. When prompted by the app, tap the “Next” button and you
will be taken to the control screen.

Gantom 7 User Guide Version 1.0 –12/15/2017
CONTROL SCREEN
oAddress –This box shows the address that will be
assigned to the fixture if you hit the “Assign Address”
button
oAssign Address –Hitting this button will assign the
selected address to the fixture. The light fixture should
blink in response to having a new address assigned.
oSave button –this will allow you to save a settings
profile into the app. Use this if you need to configure
many fixtures to have the exact same settings. Please
note that this button DOES NOT save the current
profile or address to the fixture.
oConsole Sliders –These sliders allow you to set
intensity levels for each channel. There are several
different channel mapping options which are covered
in the DMX Controlled Operation section of this
document.
oStore as Default –hitting this will save the current
color and brightness to be the default state for the
light when it turns on. If the light does not see DMX
signal when it is powered on, it will go to this state.

Gantom 7 User Guide Version 1.0 –12/15/2017
OTHER OPTIONS SCREEN
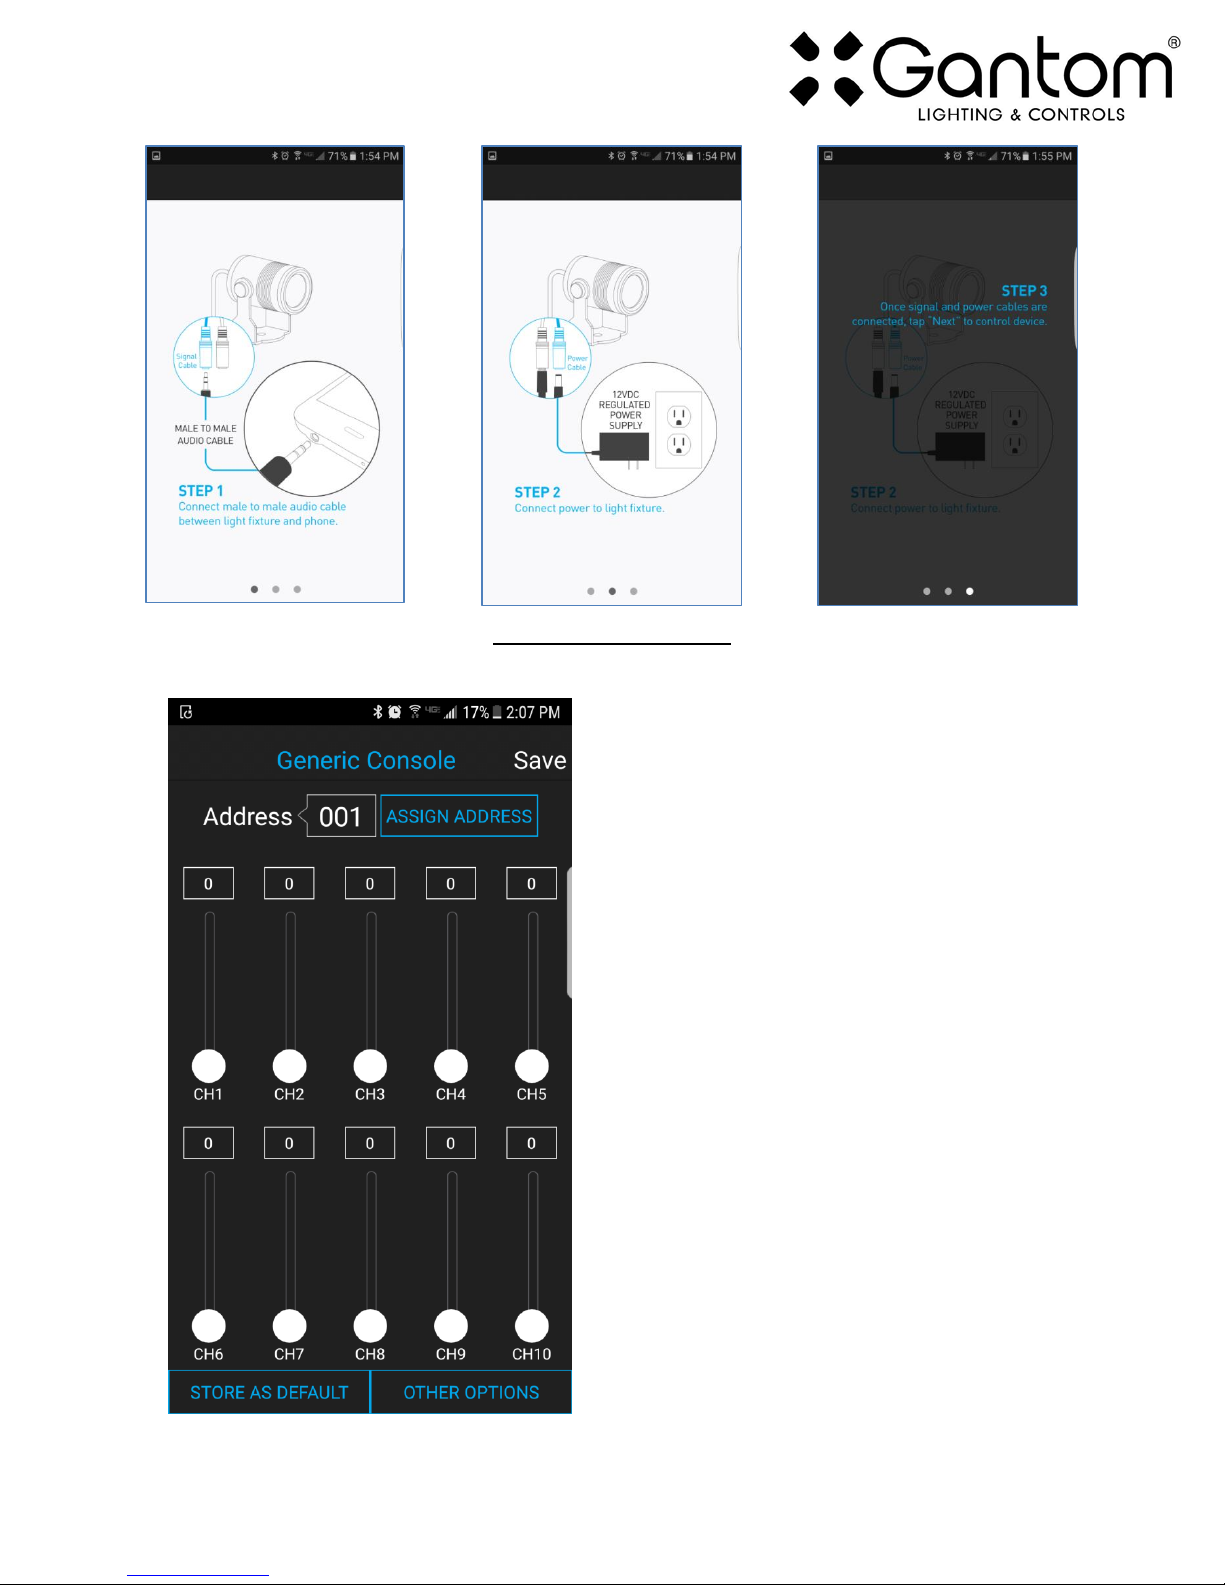
If you hit the “Other Options” button on the control screen, the following menu appears:
oReset - selecting this will reset the fixture to its default
factory settings. Do this if you are running into programming
issues.
oLock/Unlock 9600 –The Gantom DMX fixture can listen
to either a standard DMX signal OR to the special control
signal that comes from the app. Lock 9600 will turn OFF the
fixture’s ability to listen to DMX and ONLY allow it to be
controlled through the app interface. For most applications it
is recommended that you keep “UNLOCK 9600” selected.
BOOT SEQUENCE FLASHING
When the fixture first receives power, before it enters normal operation, it will first report its channel
mapping profile and second report its DMX address through a sequence of flashes.
Profile Report: Though the Gantom 7 has seven colors available, not all DMX consoles have the ability to
utilize all seven of them. Some users may prefer to operate the Gantom 7 as though it were an RGBW
or RGBA fixture because there are readily available preset profiles for those fixtures on many existing
DMX control environments. The Gantom 7 has five channel mapping profiles available: RGB, RGBA,
RGBW, (MASTER)RGBAWU, and (MASTER)RGBAWLU. More information on these can be found later in
the DMX Controlled Operation section. The Gantom 7 will report the profile it has selected by rapidly
flashing through the colors of that profile. There will be a slight pause, then the fixture will report its
DMX address.
Address Report: After reporting which channel mapping profile is selected, The Gantom 7 will report its
DMX address by flashing through another sequence of colors which represent its DMX address. Red
flashes indicate the first digit, green flashes indicate the second digit, and blue flashes indicate the third
digit of the DMX address. For example, if the Gantom 7 is assigned to address 245 it will indicate its
channel mapping profile, then report its address by flashing red 2 times, then flashing green 4 times,

Gantom 7 User Guide Version 1.0 –12/15/2017
then flashing blue 5 times. If it is assigned to DMX address 038, it will report its channel mapping profile
then report its address by flashing red 0 times, then flashing green 3 times, then flashing blue 8 times.
TURN OFF/ON boot sequence flashing: You may not want your fixture to report its channel mapping
profile and address every time it receives power. In order to toggle the boot sequence flashes on/off,
follow these steps. First, tap the number field next to the word “Address”. A new screen will appear
asking you to enter a DMX start address. Enter the number 512. Finally, hit the “Assign Address”button.
This will not actually change the DMX address of the light fixture, it will simply toggle the boot sequence
flashing either on or off.
STANDALONE OPERATION
Some applications may not require live DMX control. In order to configure your Gantom 7 for
standalone operation, all you must do is use the channel sliders on the Generic Console screen to set the
desired levels for each channel. Once the light has the desired output, tap the “STORE AS DEFAULT”
button at the lower left portion of the screen to save this setting directly into the light fixture.
Now, when the light fixture receives power it will automatically go to this newly saved DEFAULT setting
once it’s boot sequence is complete.
Please note that if DMX signal is passed to the fixture while it is operating in standalone mode, the DMX
signal will override the standalone setting.
DMX CONTROLLED OPERATION
The Gantom 7 was designed for use with standard DMX512 control systems. In order to maximize
compatibility with existing control hardware and software, the Gantom 7 has several different DMX
channel mapping profiles available. Some users may prefer to operate the Gantom 7 as though it were
an RGBW or RGBA fixture because there are readily available preset profiles for those fixtures on many
existing DMX control environments. The Gantom 7 has five channel mapping profiles available: RGB,
RGBA, RGBW, (MASTER)RGBAWU, and (MASTER)RGBAWLU.
DMX Channel Mapping Profiles
RGB
RGBA
RGBW
(M)RGBAWU
(M)RGBAWLU
CH1
Red (0-100%)
Red (0-100%)
Red (0-100%)
MASTER DIMMER (0-100%)
CH2
Green (0-100%)
Green (0-100%)
Green (0-100%)
Red (0-100%)
Red (0-100%)
CH3
Blue (0-100%)
Blue (0-100%)
Blue (0-100%)
Green (0-100%)
Green (0-100%)
CH4
Amber (0-100%)
White (0-100%)
Blue (0-100%)
Blue (0-100%)
CH5
Amber (0-100%)
Amber (0-100%)
CH6
White (0-100%)
White (0-100%)
CH7
Ultraviolet (0-100%)
Lime (0-100%)
CH8
Ultraviolet (0-100%)

Gantom 7 User Guide Version 1.0 –12/15/2017
ADDRESSING YOUR GANTOM DMX
The Gantom 7 can be given any DMX address from 1-506. To set your DMX address, first connect the
Gantom 7 to the DMX Programmer app by Gantom as was outlined earlier in this document. With the
Generic Console screen open, you should have full control of the fixture through the channel sliders. If
the light fixture is connected to the app but is not responding, try power cycling the light fixture.
Once you have verified that the light fixture is responding to control
signal from the app, tap the number field next to the word
“Address”. A new screen will pop up, prompting you to enter a DMX
address. After you enter your desired DMX address, the app will
return to the Generic Console screen. Finally, you must hit the
ASSIGN ADDRESS button in order to save the new address into the
fixture. Hitting the “Save”button will not save anything to the light
fixture’s memory.
SELECTING A DIFFERENT DMX CHANNEL MAPPING PROFILE
In order to select the preferred DMX channel mapping profile, you will need to follow the same
procedure for addressing the fixture, but instead of a fixture address you will enter one of the numbers
from the following table:
Channel Mapping Profiles
RGB
RGBA
RGBW
(M)RGBAWU
(M)RGBAWLU
Address to Enter:
507
508
509
510
511
Once you have entered the address corresponding to the desired profile, hit the “ASSIGN ADDRESS”
button. The light fixture should then cycle through a sequence of color flashes that matches the profile
you have selected. Please note that this will NOT actually change the DMX address of the fixture, since
the fixture can only be set to address 1-506.

Gantom 7 User Guide Version 1.0 –12/15/2017
BEAM SHAPING DIFFUSERS
The Gantom 7 has a beam angle of 15° and a field angle of 35°. For increasing the width of the beam,
included with the Gantom 7 is a set of Brightview diffusers which are pre-cut to fit the fixture. Also
included is a magnetic ring which can be used to attach the diffusers to the face of the light fixture. Each
diffuser is marked by having notches cut into the outside of it. The diffusers are described in the
following table:
Product Support:
We hope that this guide has been effective for learning how to use your Gantom DMX light fixture.
However, if you run into a wiring issue, a bug in the software, or just a light that doesn’t seem to want to
we will get back to you as soon as possible.
Distributor:
www.techni-lux.com
Phone: 407-857-8770
Fax: 407-857-8771
This manual suits for next models
2
Table of contents
Other Gantom Dj Equipment manuals
Popular Dj Equipment manuals by other brands

EuroLite
EuroLite Akku IP UP-4 Plus HCL Spot WDMX user manual

Strand Lighting
Strand Lighting NEO user manual

Chauvet DJ
Chauvet DJ COLORband Q3BT ILS user manual

thomann
thomann STARVILLE Mini Stage Par 7x6W RGB user manual

American Audio
American Audio encore2000 user guide

EuroLite
EuroLite LED PIX-12 QCL BAR user manual

Lites
Lites PROFILE LED WHITE Owner's and service manual

Chauvet Professional
Chauvet Professional STRIKE Saber Quick reference guide

Arrakis Systems
Arrakis Systems Innovation Series product manual

Coemar
Coemar Reflection LEDko FullSpectrum 6 instruction manual

Chauvet
Chauvet Wedge Tri Quick reference guide

Pioneer
Pioneer DDJ-WEGO quick start guide