manuals.online logo
Brands
  1. Home
  2. •
  3. Brands
  4. •
  5. Garageio
  6. •
  7. Garage Door Opener
  8. •
  9. Garageio Blackbox User manual

Garageio Blackbox User manual

1 Door Installation
Thank you for purchasing Garageio!
Installation can be completed in as little as 15 minutes per door
and requires no special tools. You’ll just need:
• A screwdriver
• A stepladder
• Masking tape
• Your Android phone, iPod Touch, or iPhone.
Step 1 of 9
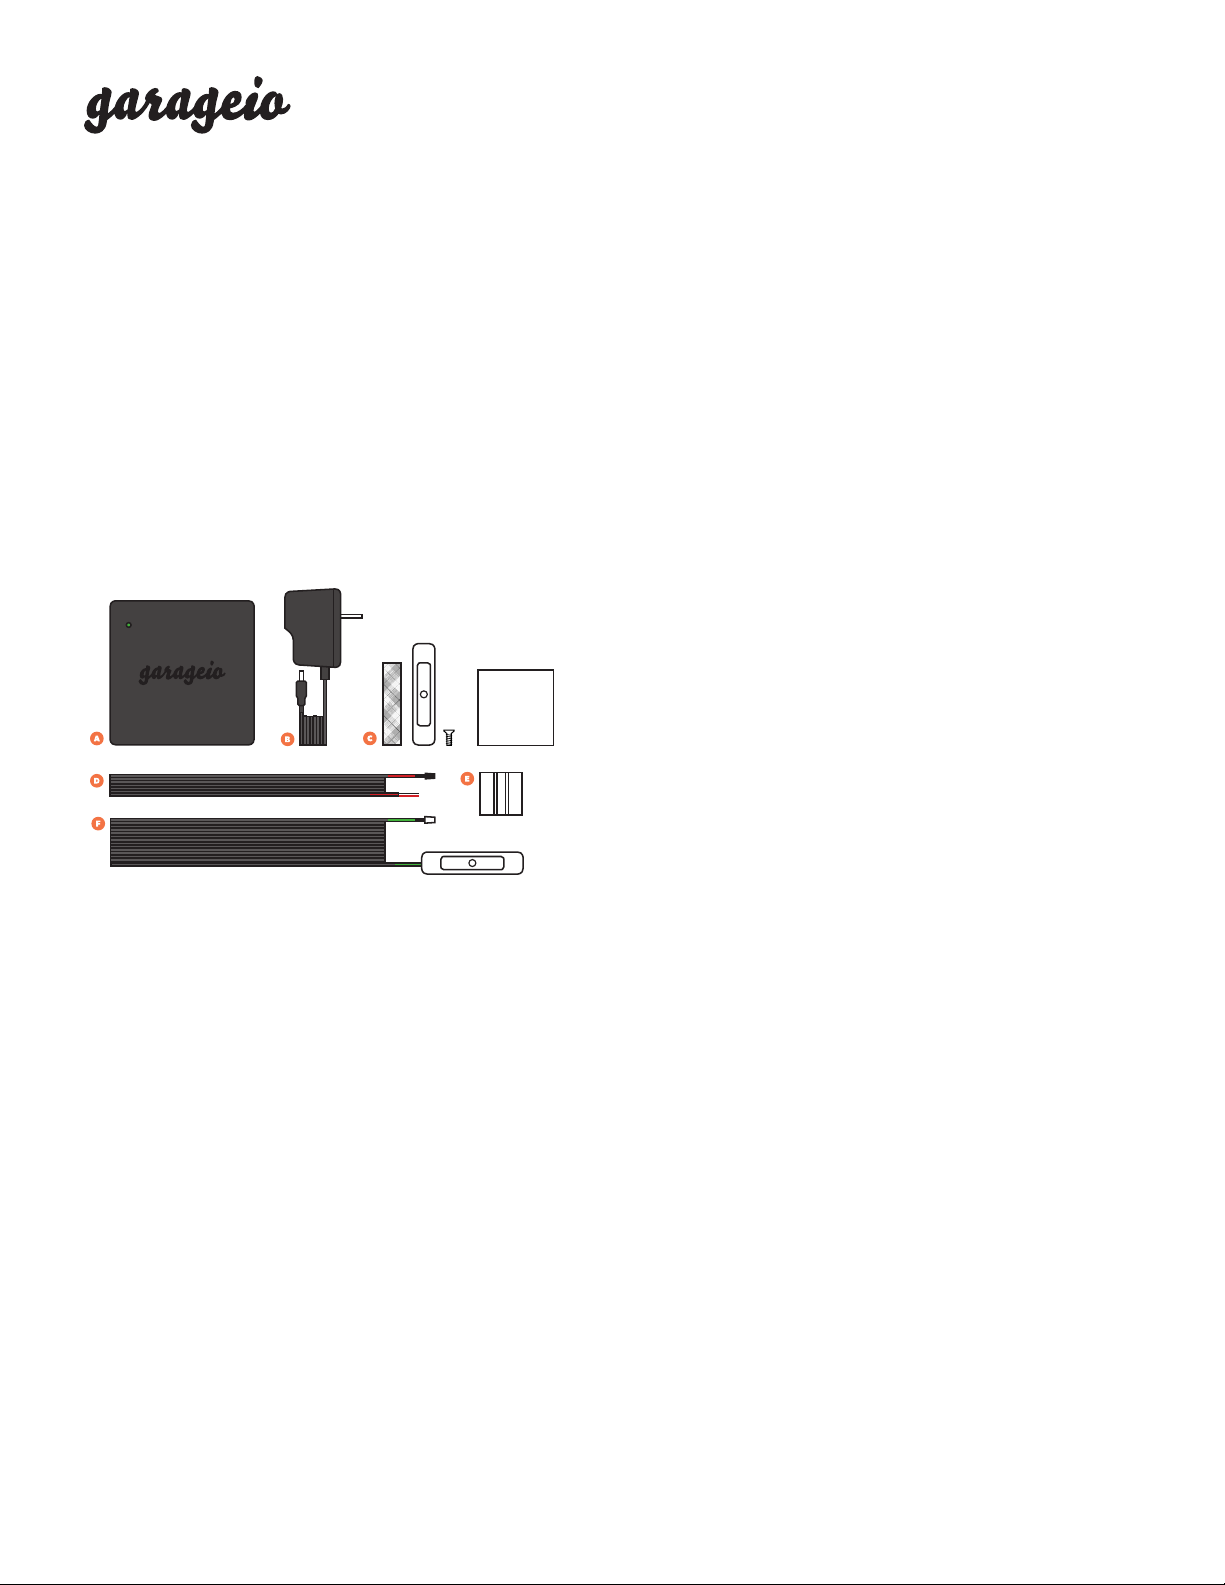
Unpack the contents of your box
Your kit should contain the following:
A. Garageio Blackbox
B. Power Adapter
C. Activator Package (containing 1 white activator and 4 screws)
D. Opener Cable (red-banded, 6- long with black connector)
E. Package of Adhesive-backed Cable Clips (containing 10 clips)
F. Sensor Cable (green-banded, 32- long)
Step 2 of 9
Power up the Garageio Blackbox
• While inside of your home, plug the power adapter (Part B)
into the DC IN port on the Garageio Blackbox (Part A).
• The front light on the Blackbox will blink orange, and will
continue to blink orange as you connect your Blackbox to your
wireless network during the next step.
Step 3 of 9
Connect the Blackbox to your wireless network
• Download the iPhone or Android Garageio app. Open the
app, select “Setup Your Garageio,” and connect your phone
to WiFi.
• Select “Send BlinkUp” and hold your screen to the Blackbox
SETUP port for 10 seconds. The Blackbox’s front light must be
blinking orange for BlinkUp to work.
TIP: If the Blackbox’s front light is not blinking orange, restart
the Blackbox by toggling the power switch, and select the
“Clear Wireless Settings” option in the app.
• Once BlinkUp is complete, the front light will flash green
several times while it connects to the Garageio service, then
turn off.
• Enter your 16-character Blackbox code online at
garageio.com/verify to check that BlinkUp has been
successfully connected.
Step 4 of 9
Install the Blackbox
• Mount the Blackbox to the side of your garage door opener
using the adhesive strips on the back of the Blackbox.
TIP: You can also mount the Blackbox to another surface
nearby (such as the ceiling or wall) using the tabs on the side
of the unit.
Step 5 of 9
Connect the Blackbox to your opener
• Locate the opener cable (Part D). Plug the black connector
into the Blackbox OPENERS port labeled 1.
• Connect the other end of the opener cable to your garage
door opener. Use the provided cable clips (Part E) to secure
the wires.
• View sample connection diagrams for your specific opener
model at garageio.com/opener.
ALCOHOL WIPE
(x10)
(x4)
PAGE 1
Questions? Visit garageio.com/support to view solutions to the most common installation issues.
Step 6 of 9
Mount the activator to your garage door
• Locate the activator package (Part C). Use a piece of masking
tape to temporarily affix the activator to the edge of your
closed garage door, near the top.
• Test for any interferences by manually opening and closing the
door, then permanently mount the activator by using either
the adhesive backing or supplied screws.
Step 7 of 9
Install the sensor
• Locate the green-banded sensor cable (Part F). Using the
adhesive backing or supplied screws, mount the sensor on
the wall at the same height as the activator so they vertically
align when the garage door is closed. They should be no
more than 1/2 inch apart.
• Route the sensor cable back to the Blackbox along the outside
of the garage door rails, securing it with the provided cable
clips to avoid any moving parts of the door.
Step 8 of 9
Power up the Blackbox
• Plug the power adapter (Part ) into the Blackbox DC IN port,
and then into a nearby power outlet. Switch the Blackbox on.
• The front light will blink red while the Blackbox connects to
your wireless network. Once successful, the front light will
blink green for several seconds while the Blackbox sets
itself up.
Step 9 of 9
Almost there!
Create a Garageio account online to finish setup.
garageio.com/connect
1 Door Installation PAGE 2
Questions? Visit garageio.com/support to view solutions to the most common installation issues.

Popular Garage Door Opener manuals by other brands

SOMFY Dexxo Smart 800 io installation guide

SOMFY

SOMFY Dexxo Smart 800 io installation guide

ASI DOORS 209 owner's manual

ASI DOORS

ASI DOORS 209 owner's manual

Craftsman 39535006 owner's manual

Craftsman

Craftsman 39535006 owner's manual

Raynor FliteStar-7 installation instructions

Raynor

Raynor FliteStar-7 installation instructions

Chamberlain LiftMaster Professional Security+ 3575C owner's manual

Chamberlain

Chamberlain LiftMaster Professional Security+ 3575C owner's manual

Chamberlain LiftMaster Security+ 3800E owner's manual

Chamberlain

Chamberlain LiftMaster Security+ 3800E owner's manual

Assa Abloy Norton Double D6011 Series installation instructions

Assa Abloy

Assa Abloy Norton Double D6011 Series installation instructions

SCS INTENSIVE 3A Installation and user manual

SCS

SCS INTENSIVE 3A Installation and user manual

SWS SeceuroGlide Excel OPERATING & MAINTENANCE GUIDE

SWS

SWS SeceuroGlide Excel OPERATING & MAINTENANCE GUIDE

Wayne-Dalton 9800 Installation instructions and owner's manual

Wayne-Dalton

Wayne-Dalton 9800 Installation instructions and owner's manual

Momentum Niro user manual

Momentum

Momentum Niro user manual

quiko QK-FTPB quick start guide

quiko

quiko QK-FTPB quick start guide

cedamatic GLISS 2000 OM manual

cedamatic

cedamatic GLISS 2000 OM manual

Chamberlain H owner's manual

Chamberlain

Chamberlain H owner's manual

Chamberlain Merlin MJ3800 Installation and operating instructions

Chamberlain

Chamberlain Merlin MJ3800 Installation and operating instructions

elock EL-EX5A manual

elock

elock EL-EX5A manual

Chamberlain Power Drive Security+ PD210S owner's manual

Chamberlain

Chamberlain Power Drive Security+ PD210S owner's manual

First Watch Security SecuRemote user manual

First Watch Security

First Watch Security SecuRemote user manual

manuals.online logo
manuals.online logoBrands
  • About & Mission
  • Contact us
  • Privacy Policy
  • Terms and Conditions

Copyright 2025 Manuals.Online. All Rights Reserved.