Garmin GFL 10 Quick guide

GFL™ 10 Installation and Conguration Instructions
Use the Garmin
®
GFL 10 adapter to adapt analog information provided by a uid-level sensor
on your boat to your NMEA 2000
®
network. The GFL 10 adapter allows you to observe
uid-level information on compatible Garmin display devices connected to your NMEA 2000
network. For a list of compatible Garmin chartplotters and devices, visit www.garmin.com.
Compare the contents of this package with the packing list on the box. If any pieces are
missing, contact your Garmin dealer immediately.
Product Registration
Help us better support you by completing our online registration today. Go to http://my.garmin
.com. Keep the original sales receipt, or a photocopy, in a safe place.
Contact Garmin
Contact Garmin Product Support if you have any questions while using your GFL 10 adapter. In
the USA, go to www.garmin.com/support, or contact Garmin USA by phone at (913) 397.8200
or (800) 800.1020.
In the UK, contact Garmin (Europe) Ltd. by phone at 0808 2380000.
In Europe, go to www.garmin.com/support and click Contact Support for in-country support
information, or contact Garmin (Europe) Ltd. by phone at +44 (0) 870.8501241.
See the Important Safety and Product Information guide in the compatible Garmin display device box for
product warnings and other important information.
CAUTION: Always wear safety goggles, ear protection, and a dust mask when drilling, cutting, or
sanding.
NOTICE: When drilling or cutting, always check the opposite side of the drilling or cutting
surface.
Needed Tools and Supplies
Heat-shrink tubing and a heat gun
Cable ties
Additional NMEA 2000 cabling and connectors (optional)
•
•
•
July 2009 190-01081-06 Rev. A Printed in Taiwan

GFL10InstallationandCongurationInstructions
Determining an Installation Location
When you are selecting a location to install the GFL 10 adapter, consider the following:
During installation, you connect the GFL 10 adapter to the analog gauge (or directly to the
uid-level sensor), and to the NMEA 2000 network. Therefore:
Choose a location that is within 173 in. (4.4 m) of the analog gauge (or the uid-level
sensor) to avoid splicing bare wires.
Choose a location between the NMEA 2000 backbone and the analog gauge (or the uid-
level sensor).
If you cannot connect the adapter directly to the NMEA 2000 network, add a drop cable.
See page 3 for more information.
The adapter is IEC 60529 IPX7 waterproof, and can be submerged up to 30 minutes at 1
meter. Do not install the adapter in a location where it will be submerged regularly, though
the location can be subject to wash-down.
You can use cable ties (not included) to secure the adapter to an existing structure on your
boat.
You can use mounted-head cable ties (not included) and screws (not included) to secure the
adapter to a bulkhead or other suitable surface on your boat.
Install the adapter at least 2 in. (5 cm) from a magnetic compass to prevent electromagnetic
interference, which can cause inaccurate compass readings.
Wiring the GFL 10 Adapter
Connect the GFL 10 adapter either to an analog gauge or to the sender directly using the bare
wires on the wiring harness.
Wiring the GFL 10 Adapter to an Analog Gauge
If your boat has an analog gauge representing the uid level, you can wire the GFL 10 adapter
directly to the gauge. Consult the owner’s manual provided by your boat or sensor manufacturer
to determine the ground, sensor, and power (ignition) connections on the gauge. Typically,
the power (ignition) connector is labeled with a “+”, a “+12V”, an “I”, or an “IGN” marking.
The ground connector is typically labeled with a “-”, a “ ”, or a “G” marking, and the sensor
connector is typically labeled with an “S” or a “G” marking. Do not remove any wires from the
back of the gauge, and wire the GFL 10 adapter to the gauge according to the following table.
Wiring the GFL 10 Adapter Directly to a Fluid-Level Sensor
If your boat does not have an analog gauge representing the uid level, you can wire the adapter
directly to the uid-level sensor. Consult the owner’s manual provided by your boat or sensor
manufacturer to determine the sending and ground terminals on the sensor. Typically, the
sending terminal is labeled with an “S” marking for sensor or a “G” marking for gauge, and the
ground terminal is typically labeled with a negative sign (-). Wire the GFL 10 adapter to the
sensor according to the following table.
•
◦
◦
◦
•
•
•
•
GFL10InstallationandCongurationInstructions
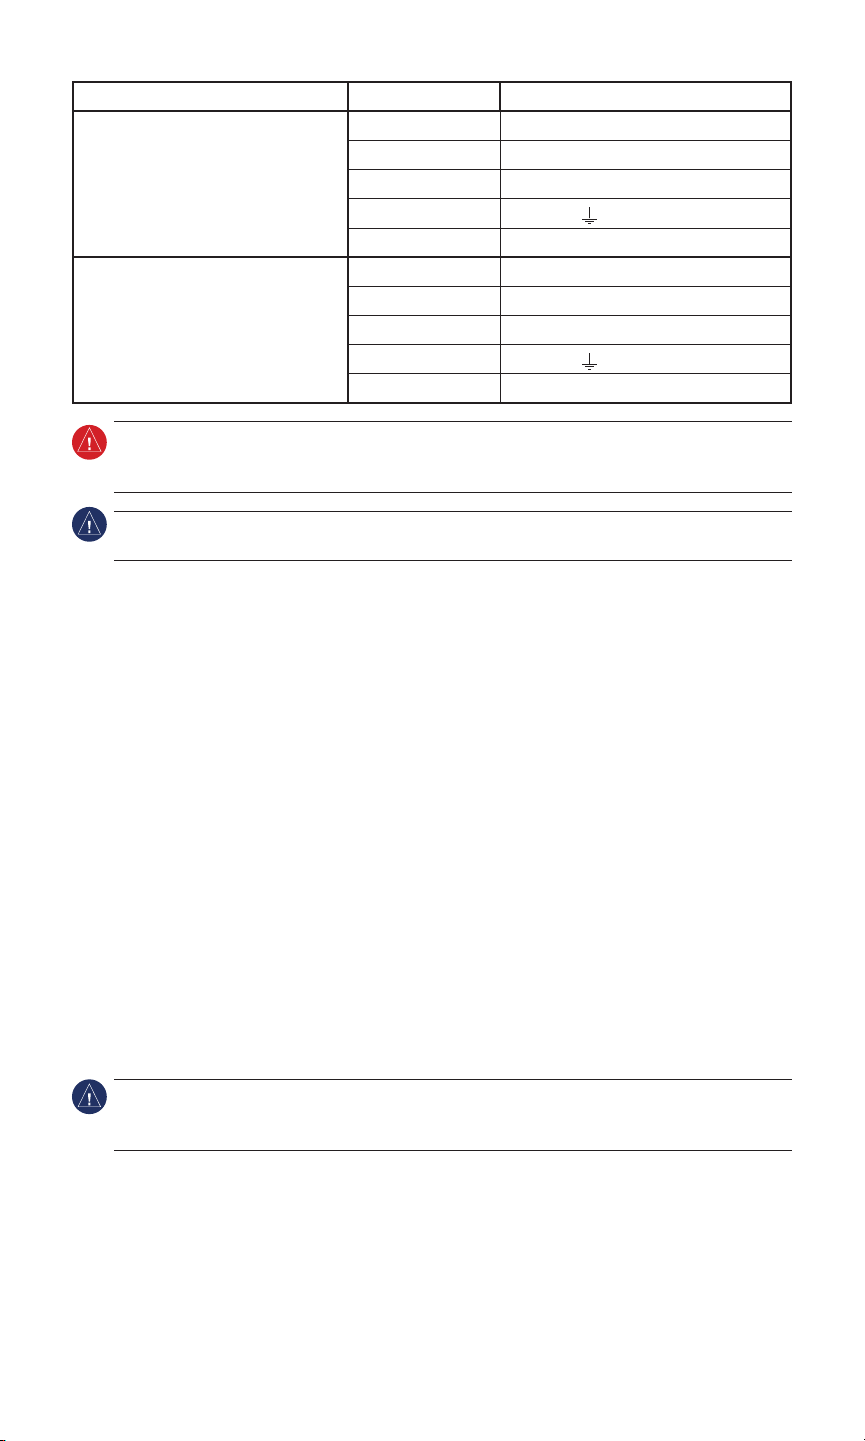
Connection Type Wire Color Gauge or Sensor Terminal
Analog Gauge Blue Sensor (S, G)
White Gauge power (+, +12V, I, IGN)
Yellow Unused
Black Ground (-, , G)
Red Unused
Resistive Sensor Blue Sensor (S, G)
White Unused
Yellow Unused
Black Ground (-, , G)
Red Unused
WARNING: When connecting the GFL 10 adapter directly to the sensor on a fuel tank, make the
connection to the sender on the tank before connecting the adapter to the NMEA 2000 network.
This will reduce the risk of sparks near the fuel tank.
NOTICE: After connecting the adapter to the gauge or sensor, cover any exposed wires with heat-
shrink tubing.
Connecting the GFL 10 Adapter to a NMEA 2000 Network
After you have connected the GFL 10 adapter to the analog gauge or to the sender, connect it
to the existing NMEA 2000 network on your boat. If you do not have a NMEA 2000 network
on your boat, you must build one. For more information on NMEA 2000 and to purchase
additional connectors and cables, go to www.garmin.com.
To connect the GFL 10 adapter to your existing NMEA 2000 network:
1. Determine where to connect the GFL 10 adapter to your existing NMEA 2000 backbone.
2. Disconnect one side of a NMEA 2000 T-connector from the backbone. To extend the
NMEA 2000 backbone, connect a NMEA 2000 backbone extension cable to the side of the
disconnected T-connector.
3. Add the included T-connector for the GFL 10 adapter to the NMEA 2000 backbone by
connecting it to the side of the disconnected T-connector.
4. Connect the NMEA 2000 connector on the GFL 10 adapter to the T-connector added in
step 3.
5. (Optional) If the GFL 10 adapter cannot connect directly to the NMEA 2000 backbone, route
a NMEA 2000 drop cable (not included) to the bottom of the T-connector added in step 3.
Use a drop cable with a length up to 20 ft. (6 m). Connect the drop cable to the T-connector
and to the NMEA 2000 connector on the GFL 10 adapter.
NOTICE: If you have an existing NMEA 2000 network on your boat, it should already be
connected to power. Do not connect an additional NMEA 2000 power cable to an existing NMEA
2000 network, because only one power source should be connected to a NMEA 2000 network.

GFL10InstallationandCongurationInstructions
➊
➋➋
➌
➍
➎
Connecting the GFL 10 Adapter to an
Existing NMEA 2000 Network
➊
GFL10adapter
➋
NMEA000device(notincluded)
➌
Dropcable(optional-notincluded)
➍
T-connector(oneincluded)
➎
ExistingNMEA000network
Conguring the GFL 10 Adapter
NOTICE: This section provides specic conguration information for the GFL 10 adapter
using your compatible Garmin display device. To access the NMEA 2000 conguration menu
on your display device, consult the documentation provided with your display device.
Conguring the NMEA 2000 Fluid Type
You can indicate the type of uid that is in the tank with which each GFL 10 adapter is
associated.
1. From the NMEA 2000 Devices list, select the GFL 10 device.
2. Select an option:
For most Garmin chartplotters, select Review > N2K Fluid Type.
For other Garmin marine devices, select Cong > N2K Fluid Type.
3. Selectauidtype.
4. Select OK.
Conguring the Tank Number
If your boat has multiple uid tanks, you can indicate which tank each GFL 10 adapter is
associated with.
1. From the NMEA 2000 Devices list, select the GFL 10 device.
2. Select an option:
For most Garmin chartplotters, select Review > Tank Number.
For other Garmin marine devices, select Cong > Tank Number.
3. Select a tank number.
4. Select OK.
•
•
•
•

GFL10InstallationandCongurationInstructions
Conguring the NMEA 2000 Tank Capacity
You can indicate the capacity of the uid tank that the GFL 10 adapter is associated with.
1. From the NMEA 2000 Devices list, select the GFL 10 device.
2. Select an option:
For most Garmin chartplotters, select Review > N2K Tank Capacity.
For other Garmin marine devices, select Cong > N2K Tank Capacity.
3. Select the tank capacity.
4. Select Done.
Calibrating the Fluid Level
To use the GFL 10 adapter, you must calibrate the uid level of the tank that the adapter is
associated with, using a minimum of two calibration points. The greater the number of uid
calibration points, the greater the accuracy of the reading on the uid-level gauge.
1. Turn the boat ignition key to the On position (not Start).
2. From the NMEA 2000 Devices list, select the GFL 10 device.
3. Select an option:
For most Garmin chartplotters, select Review > Level Calibration > Add Calibration
Point.
For other Garmin marine devices, select Cong > Level Calibration > Add Calibration
Point.
4. Selectthepercentageofuidcurrentlyinthetank,basedonthetotaltankcapacity.
5. Select Done.
6. Changetheleveloftheuidinthetank.
7. Select Add Calibration Point.
8. Selectthepercentageofuidcurrentlyinthetank,basedonthetotaltankcapacity.
9. Select Done.
10.Repeatsteps6through9toaddadditional,optionaluid-levelcalibrationpoints.
Troubleshooting the Tank Number
If multiple GFL 10 adapters are assigned to the same NMEA 2000 uid type, each adapter is
assigned a unique tank number automatically. If the “Invalid NMEA 2000 tank conguration”
error message appears, you must assign a unique tank number to each adapter.
For example, if two adapters are assigned the NMEA 2000 uid type value of Live Well and the
error message appears, you must assign each adapter a unique tank number.
1. From the NMEA 2000 Devices list, select the GFL 10 device.
2. Select an option:
For most Garmin chartplotters, select Review > Tank Number.
For other Garmin marine devices, select Cong > Tank Number.
3. Select a tank number.
4. Select OK.
•
•
•
•
•
•

GFL10InstallationandCongurationInstructions
Troubleshooting the Gauge Type
When connected to a gauge, the GFL 10 adapter gauge type is set to Auto Detect by default,
and the adapter automatically detects the type of gauge it is connected to. If the uid-level
reading on a connected Garmin chartplotter or marine instrument changes with the engine
RPM, the adapter may be detecting the wrong type of gauge.
NOTE: The fuel level changes when the boat is moving. Test the gauge-type setting when the
boat is not moving.
To test the gauge-type setting:
1. When the boat is not moving, put the engine in neutral.
2. UsethethrottletoincreasetheengineRPM.Iftheuid-levelreadingchangeswiththe
engine RPM, change the gauge type.
To change the gauge type:
1. From the NMEA 2000 Devices list, select the GFL 10 device.
2. Select an option:
For most Garmin chartplotters, select Review > Gauge Type.
For other Garmin marine devices, select Cong > Gauge Type.
3. Select an option:
To automatically detect the gauge type, select Auto Detect.
To indicate a one-coil gauge, select 1 Coil.
To indicate a two-coil gauge, select 2 Coil.
4. Perform the gauge-type setting test.
Resetting the Fluid Level Calibration
Youcanresettheuid-levelcalibrationofthetankthattheGFL10adapterisassociatedwith.
1. From the NMEA 2000 Devices list, select the GFL 10 device.
2. Select an option:
For most Garmin chartplotters, select Review > Level Calibration.
For other Garmin marine devices, select Cong > Level Calibration.
3. Select Reset Calibration.
4. Select Yes.
5. Calibratetheuidlevel.
•
•
•
•
•
•
•

GFL10InstallationandCongurationInstructions
Conguring the GFL 10 Adapter if the Tank Number and
Fluid Type Selections Are Not Displayed
Depending on the version of software loaded on your Garmin marine instrument, the specic
conguration options may not be displayed on the conguration screens.
To congure the tank number if the menu option is not displayed:
If your boat has multiple uid tanks, you can indicate which tank each GFL 10 adapter is
associated with.
1. From the NMEA 2000 Devices list, select the GFL 10 device.
2. Select an option:
For most Garmin chartplotters, select Review > Generic Cong.
For other Garmin marine devices, select Cong >Generic Conguration.
2. Enter the following command: “INSTANCE=”
3. After the command, enter a whole number between 1and 16, which indicates the tank
number, followed by Done.
For example, INSTANCE=2Done indicates that the adapter is associated with tank number
2.
To congure the uid type if the menu option is not displayed:
You can indicate the type of uid that is in the tank that each GFL 10 adapter is associated with.
1. From the NMEA 2000 Devices list, select the GFL 10 device.
2. Select an option:
For most Garmin chartplotters, select Review > Generic Cong.
For other Garmin marine devices, select Cong >Generic Conguration.
3. Enter the following command: “FLUIDTYPE=”
4. Afterthecommand,enteranumberbetween0and5toindicatetheuidtypeasdenedin
the following table, followed by Done.
For example, FLUIDTYPE=1Done indicates that the tank contains fresh water.
Fluid Type FLUIDTYPE Value Fluid Type FLUIDTYPE Value
Fuel 0 Live well 3
Fresh water 1 Oil 4
Waste water 2 Black water
(sewage)
5
•
•
•
•

GFL10InstallationandCongurationInstructions
Restoring Factory Default Settings
When you restore factory default settings, you will lose all custom conguration settings except
uid-level calibration.
1. From the NMEA 2000 Devices list, select the GFL 10 device.
2. Select an option:
For most Garmin chartplotters, select Review > Factory Defaults.
For other Garmin marine devices, select Cong > Factory Defaults.
3. Select Yes.
•
•

GFL10InstallationandCongurationInstructions
Specications
Physical
Weight: 12.85 oz. (365 g)
Size: (W × H × L)
31
/
32
×
43
/
64
× 3
3
/
32
in. (24.7 × 17.0 × 78.6 mm)
Total Cable Length: 16 ft. (4.9 m)
Case Material: Thermoplastic rubber (PCB overmold); PVC jacket (cable); PVC overmold
(connectors/strain reliefs). Waterproof to IEC 529 IPX7 standards.
Temperature Range: From 5°F to 158°F (from -15°C to 70°C)
Compass Safe Distance: 2 in. (5 cm)
Electrical
Power Input Source: 9–16 Vdc from the NMEA 2000 bus
NMEA 2000 Power Usage: 1 W max
NMEA 2000 Load Equivalency Number (LEN): 2 (100 mA)
Communications
Use the following table to determine the approved NMEA 2000 PGN information that is
received and transmitted by a GFL 10 adapter when communicating with a NMEA 2000-
compliant device.
Transmit Receive
059392 ISO Acknowledgment 059392 ISO Acknowledgment
060928 ISO Address Claim 059904 ISO Request
126208 NMEA - Command/Request/
Acknowledge Group Function
060928 ISO Address Claim
126464 Transmit/Receive PGN List Group
Function
126208 NMEA - Command/Request/
Acknowledge Group Function
126996 Product Information
The GFL 10 is NMEA 2000
certied
127505 Fluid Level

For the latest free software updates (excluding map data) throughout the life of your
Garmin products, visit the Garmin Web site at www.garmin.com.
© 2009 Garmin Ltd. or its subsidiaries
Garmin International, Inc.
1200 East 151st Street, Olathe, Kansas 66062, USA
Garmin (Europe) Ltd.
Liberty House, Hounsdown Business Park, Southampton, Hampshire, SO40 9LR UK
Garmin Corporation
No. 68, Jangshu 2nd Road, Shijr, Taipei County, Taiwan
www.garmin.com
July 2009 Part Number 190-01081-06 Rev.A Printed in Taiwan
All rights reserved. Except as expressly provided herein, no part of this manual may be reproduced, copied,
transmitted, disseminated, downloaded or stored in any storage medium, for any purpose without the express prior
written consent of Garmin. Garmin hereby grants permission to download a single copy of this manual onto a hard
drive or other electronic storage medium to be viewed and to print one copy of this manual or of any revision hereto,
provided that such electronic or printed copy of this manual must contain the complete text of this copyright notice
and provided further that any unauthorized commercial distribution of this manual or any revision hereto is strictly
prohibited.
Information in this document is subject to change without notice. Garmin reserves the right to change or improve its
products and to make changes in the content without obligation to notify any person or organization of such changes
or improvements. Visit the Garmin Web site (www.garmin.com) for current updates and supplemental information
concerning the use and operation of this and other Garmin products.
Garmin
®
, and the Garmin logo are trademarks of Garmin Ltd. or its subsidiaries, registered in the USA and other
countries. GFL™ 10 is a trademark of Garmin Ltd. or its subsidiaries. These trademarks may not be used without the
express permission of Garmin.
NMEA 2000
®
and the NMEA 2000 logo are registered trademarks of the National Marine Electronics Association.
Table of contents
Other Garmin Adapter manuals

Garmin
Garmin GRA 10 Quick guide

Garmin
Garmin GST 10, Water Speed and Temperature Adapter Installation and... Operating and maintenance instructions

Garmin
Garmin GEA 71 User manual

Garmin
Garmin GBT 10 Bennett Trim Tab Adapter Installation and... Operating and maintenance instructions

Garmin
Garmin ANT+ adapter for iPhone User manual

Garmin
Garmin GET 10, Engine Tilt Adapter Installation and... Operating and maintenance instructions

Garmin
Garmin NMEA 2000 Transducer Adapter Kit User manual

Garmin
Garmin ELOG User manual

Garmin
Garmin NMEA 2000 Network Updater User manual


