Garmin NMEA 2000 Transducer Adapter Kit User manual

February 2010 190-01164-90 Rev. A Printed in Taiwan
installation instructions (EN)
instructions d’installation (FR)
istruzioni di installazione (IT)
installationsanweisungen (DE)
instrucciones de instalación (ES)
instruções de Instalação (PT)
installationsvejledning (DA)
installeringsinstruksjoner (NO)
installationsinstruktioner (SV)
NMEA 2000
Transducer Adapter Kit


NMEA 2000 Transducer Adapter Kit
Installation Instructions
Use the Garmin
®
NMEA 2000 Transducer Adapter Kit to adapt depth information, which is
currently provided by an installed Airmar
®
P19 (or compatible) 200 kHz transducer on your
boat, to your NMEA 2000
®
network. The Garmin NMEA 2000 Transducer Adapter Kit allows
you to observe depth information on compatible Garmin display devices connected to your
NMEA 2000
®
network. For a list of compatible Garmin devices, visit www.garmin.com.
Contact Garmin
Contact Garmin Product Support if you have any questions while installing your NMEA 2000
Transducer Adapter Kit. In the USA, go to www.garmin.com/support, or contact Garmin USA
by phone at (913) 397.8200 or (800) 800.1020. In the UK, contact Garmin (Europe) Ltd. by
phone at 0808 2380000. In Europe, go to www.garmin.com/support and click Contact Support
for in-country support information, or contact Garmin (Europe) Ltd. by phone at +44 (0)
870.8501241.
WARNING
See the Important Safety and Product Information guide in the compatible Garmin display
device box for product warnings and other important information.
CAUTION
Always wear safety goggles, ear protection, and a dust mask when drilling, cutting, or sanding.
notice
When drilling or cutting, always check the opposite side of the drilling or cutting surface.
Needed Tools and Supplies
A drill and a
3
/
32
in. (2.5 mm) drill bit
A number 2 Phillips screwdriver
Wire cutters
•
•
•
Pliers
Cable ties
Additional NMEA 2000 cabling and
connectors (optional)
•
•
•
Determining an Installation Location
When you are selecting a location at which to install the NMEA 2000 Transducer Adapter, refer
to the layout diagram on page 4 and consider the following:
Install the adapter at least 37
1
/
2
in. (95 cm) from a compass to avoid interference.
If possible, install the adapter close to the location you disconnect the installed transducer
from the installed head unit, most likely behind the dashboard.
The adapter is IEC 60529 IPX7 waterproof, and can be submerged up to 30 minutes at
1 meter. Do not install the adapter in a location where it will be submerged consistently,
although the location can be subject to wash-down.
Verify that all cables will reach the location before beginning the installation procedures.
•
•
•
•

4 NMEA 2000 Transducer Adapter Kit Installation Instructions
NMEA 2000 Transducer Adapter Kit Installation Layout
NMEA 2000
transducer adapter
Mounting
bracket
Installed
transducer
Wiring
connections
NMEA 2000
drop cable To the
existing
NMEA 2000
network
Cable tie-down
point
Adapter cable
Mounting the NMEA 2000 Transducer Adapter Kit
After you have determined a suitable location to install the NMEA 2000 Transducer Adapter,
use the included mounting bracket to mount it to the bulkhead or other suitable structure.
1. Using the mounting bracket as a template, mark the four pilot-hole locations.
2. Using a 3/32 in (2.5 mm) drill bit, drill the four pilot holes.
3. Place the adapter in the bracket and secure the mounting bracket to the mounting surface
using the included 10 mm M3 screws.
Wiring the NMEA 2000 Transducer Adapter Kit to the
Installed Transducer
Use the included adapter cable to wire the NMEA 2000 Transducer Adapter Kit to the installed
transducer.
To wire the adapter cable to the installed transducer:
1. Disconnect the installed transducer from the installed display device.
2. Cut the three wires from the installed transducer to the same length. Do not strip the wire
insulation. If the installed transducer has more than the three wires indicated in the wiring
assignment table, cut and tape the additional wires.
3. Use the included water-resistant connectors to connect the wires from the installed
transducer to the wires on the included adapter cable, according to the wiring assignment
table. (See page 5)
Adapter Cable Installed Transducer
Black Black
Blue Blue or purple
Green Bare wire
Wiring Assignment Table
NOTE: Some installed transducers may have a purple wire instead of a blue wire. If your
transducer has a purple wire, connect it to the blue wire on the adapter cable.

NMEA 2000 Transducer Adapter Kit Installation Instructions 5
To install the included water-resistant connectors:
1. Insert two matching wires into an included
connector.
2. Use a standard pair of pliers to fully depress the
red button into the connector.
3. Wipe the excess water-repellent gel from the
connector.
4. Repeat steps 1–3 for the remaining two sets of
wires.
Connecting the NMEA 2000 Transducer Adapter Kit to a
NMEA 2000 Network
Connect the NMEA 2000 Transducer Adapter Kit to your existing NMEA 2000 network using
the supplied drop cable and T-connector. If you do not have a NMEA 2000 network installed
on your boat, you will need the appropriate NMEA 2000 cables and connectors to build one.
Contact your local Garmin dealer.
If you are unfamiliar with NMEA 2000, read the “NMEA 2000 Network Fundamentals” chapter
of the Technical Reference for Garmin NMEA 2000 Products. The document is located on the
Garmin Web site at http://www.garmin.com/garmin/cms/us/onthewater/nmea2000.
Connecting and Securing the Cables
If you have not done so already, connect the NMEA 2000 transducer adapter cable to the
connector in the center of the NMEA 2000 transducer adapter. Connect the NMEA 2000 drop
cable to the connector on the edge of the adapter. See the layout diagram on page 4.
To help make the cable-routing process easier, the locking ring is packaged separately from the
adapter cable.
To install the locking ring on the adapter cable:
1. Route the adapter cable away from sources of
electronic interference so that the cable connector is at
the mounting location of the adapter
2. Separate the two halves of the locking ring.
3. Align the two halves of the locking ring over the
connector on the adapter cable and snap them together.
4. Insert the O-ring into the end of the assembled
connector.
Securing the Adapter Cable
To ensure a lasting connection to the installed transducer,
use cable ties (not included) to secure the adapter cable
either to the tie-down point on the mounting bracket or
to the structure of the boat. You can also use mounted-
head cable ties (not included) and screws (not included)
to secure the adapter cable to a bulkhead or other suitable
surface on your boat.
Water-resistant
connector
Wire from the
adapter cable
Wire from
the installed
transducer
Water-resistant
connector
Wire from the
adapter cable
Wire from
the installed
transducer
Installing the Locking RingInstalling the Locking Ring

6 NMEA 2000 Transducer Adapter Kit Installation Instructions
Specications
Physical Specications
Specication Measurement
Size W × H × D: 4 in. × 4
19
/
32
in. × 3 in. (101.4 × 116.3 × 76.2 mm)
Weight Adapter only: 4.26 oz. (120.9 g) With bracket: 7.08 oz. (200.7 g)
Case Material PC/PBT plastic
Waterproof Rating IEC 60529 IPX7
Temp. Range From 5°F to 158°F (from -15°C to 70°C)
Compass Safe Distance 37
1
/
2
in. (95 cm)
Power
Specication Measurement
Source NMEA 2000 (9–16) Vdc
Usage 2.4 W max
Fuse 3 A (NMEA 2000)
NMEA 2000 Load Equivalency Number (LEN) 4
NMEA 2000 draw 200 mA maximum
NMEA 2000 PGN Information
Transmitted PGN Number PGN Number Description
059392 ISO Acknowledgement
060928 ISO Address Claim
126208 NMEA–Command/Request/Acknowledge Group Function
126464 Transmit/Receive PGN List Group Function
126996 Product Information
128267 Water Depth
130312 Temperature
Garmin Intelliducers are NMEA 2000 certied.
© 2010 Garmin Ltd. or its subsidiaries
Garmin
®
and the Garmin logo are trademarks of Garmin Ltd. or its subsidiaries, registered in the USA and other
countries. These trademarks may not be used without the express permission of Garmin.
NMEA 2000
®
and the NMEA 2000 logo are registered trademarks of the National Marine Electronics Association.
AIRMAR
®
is a trademark of Airmar Technology Corp.

Kit d’adaptateur de sonde NMEA 2000
Instructions d’installation
Utilisez le kit d’adaptateur de sonde NMEA 2000 Garmin®pour adapter les informations de profondeur,
actuellement fournies par une sonde 200 kHz Airmar®P19 (ou compatible) installée sur votre bateau, à
votre réseau NMEA 2000®. Le kit d’adaptateur de sonde NMEA 2000 Garmin vous permet d’observer
les informations de profondeur sur des périphériques d’afchage Garmin compatibles connectés à votre
réseau NMEA 2000®. Pour obtenir la liste des appareils Garmin compatibles, rendez-vous sur le site
www.garmin.com.
Pour contacter Garmin
Pour toute question concernant l’installation du kit d’adaptateur de sonde NMEA 2000, contactez le
service d’assistance produit de Garmin. Aux Etats-Unis, rendez-vous sur le site www.garmin.com/support
ou contactez Garmin USA par téléphone, au (913) 397-8200 ou au (800) 800-1020. Au Royaume-Uni,
contactez Garmin (Europe) Ltd. par téléphone au 0808 2380000. En Europe, rendez-vous sur le site
www.garmin.com/support et cliquez sur Contact Support pour obtenir l’assistance requise dans votre
pays, ou contactez Garmin (Europe) Ltd. par téléphone, au +44 (0) 870 850 1241.
AVERTISSEMENT
Consultez le guide Informations importantes sur le produit et la sécurité inclus dans l’emballage du
périphérique d’afchage Garmin compatible pour prendre connaissance des avertissements et autres
informations sur le produit.
ATTENTION
Portez toujours des lunettes de protection, un équipement anti-bruit et un masque anti-poussière, lorsque
vous percez, coupez ou poncez.
remarque
Lorsque vous percez ou coupez, commencez toujours par vérier la nature de la face opposée de
l’élément de perçage ou de coupage.
Outils et matériel requis
Une perceuse et un foret de 2,5 mm (3/32 po)
Un tournevis cruciforme numéro 2
Un coupe-l
•
•
•
Pinces
Attaches de câble
Câbles et connecteurs NMEA 2000
supplémentaires (facultatifs)
•
•
•
Choix d’un emplacement d’installation
Pour choisir l’emplacement d’installation de l’adaptateur de sonde NMEA 2000, reportez-vous au
schéma de la page 8 et tenez compte des points suivants :
Installez l’adaptateur à au moins 95 cm (37 1/2 po) de tout compas an d’éviter les interférences.
Si possible, installez l’adaptateur près de l’endroit où vous déconnectez la sonde installée de l’unité
de tête installée, vraisemblablement derrière le tableau de bord.
L’adaptateur est étanche, conformément à la norme CEI 60529 IPX7, et peut être immergé à 1 mètre
de profondeur pendant 30 minutes au maximum. N’installez pas l’adaptateur dans un endroit où il
risque d’être immergé systématiquement, bien que l’emplacement d’installation puisse être soumis à
grande eau.
Avant de commencer la procédure d’installation, vériez que tous les câbles atteignent l’endroit
voulu.
•
•
•
•

8 Instructions d’installation du kit d’adaptateur de sonde NMEA 2000
Schéma d’installation du kit d’adaptateur de sonde NMEA 2000
Adaptateur de sonde
NMEA 2000
Support de
montage
Sonde
installée
Câbles
Câble de dérivation
NMEA 2000 Vers le réseau
NMEA 2000
existant
Point d’arrimage
de câble
Câble
d’adaptateur
Montage du kit d’adaptateur de sonde NMEA 2000
Dès lors que vous avez déni un emplacement d’installation approprié pour l’adaptateur de sonde
NMEA 2000, utilisez le support de montage inclus pour le monter sur la cloison ou toute autre surface
adaptée.
1. En utilisant le support de montage comme modèle, marquez l’emplacement des quatre trous
d’implantation.
2. A l’aide d’un foret de 2,5 mm (
3
/
32
po), percez les quatre trous d’implantation.
3. Placez l’adaptateur dans le support et xez le support de montage à la surface de montage à l’aide
des vis 10 mm M3 incluses.
Branchement du kit d’adaptateur de sonde NMEA 2000 à la
sonde installée
Utilisez le câble d’adaptateur inclus pour brancher le kit d’adaptateur de sonde NMEA 2000 à la sonde
installée.
Pour brancher le câble d’adaptateur à la sonde installée :
1. Débranchez la sonde installée du périphérique d’afchage installé.
2. Coupez les trois ls de la sonde installée à la même longueur. N’ôtez pas l’isolation des ls. Si la
sonde installée possède davantage de ls que les trois indiqués dans le tableau des ls, coupez les
ls supplémentaires et recouvrez-les de ruban adhésif.
3. Utilisez les connecteurs étanches inclus pour relier les ls de la sonde installée aux ls du câble
d’adaptateur inclus, selon les indications du tableau des ls. (Reportez-vous à la page 9.)
Câble d’adaptateur Sonde installée
Noir Noir
Bleu Bleu ou violet
Vert Fil dénudé
Tableau des ls
REMARQUE : il est possible que certaines sondes installées présentent un l violet au lieu d’un l
bleu. Si votre sonde comporte un l violet, connectez-le au l bleu du câble d’adaptateur.

Instructions d’installation du kit d’adaptateur de sonde NMEA 2000 9
Pour installer les connecteurs étanches inclus :
1. Insérez deux ls correspondants dans un connecteur
inclus.
2. Utilisez une paire de pinces standard pour abaisser
entièrement le bouton rouge sur le connecteur.
3. Essuyez l’excédent de gel imperméable sur le
connecteur.
4. Répétez les étapes 1 à 3 pour les deux autres
ensembles de ls.
Connexion du kit d’adaptateur de sonde NMEA 2000 à un réseau
NMEA 2000
Branchez le kit d’adaptateur de sonde NMEA 2000 au réseau NMEA 2000 existant à l’aide du câble de
dérivation et du connecteur en T fournis. Si votre bateau ne possède pas de réseau NMEA 2000, vous
aurez besoin des câbles et des connecteurs NMEA 2000 appropriés pour en créer un. Contactez votre
revendeur Garmin.
Si le NMEA 2000 ne vous est pas familier, consultez le chapitre « Concepts fondamentaux sur
NMEA 2000 » du Référentiel technique pour les produits Garmin NMEA 2000. Ce document gure sur le
site Web de Garmin, à l’adresse suivante : http://www.garmin.com/garmin/cms/us/onthewater/nmea2000.
Connexion et xation des câbles
Si vous ne l’avez pas encore fait, branchez le câble d’adaptateur de sonde NMEA 2000 au connecteur
situé au centre de l’adaptateur de sonde NMEA 2000. Branchez le câble de dérivation NMEA 2000 au
connecteur situé sur le bord de l’adaptateur. Reportez-vous au schéma de la page 8.
Pour faciliter le processus d’acheminement des câbles, l’anneau de verrouillage est emballé séparément
du câble d’adaptateur.
Pour installer l’anneau de verrouillage sur le câble
d’adaptateur :
1. Eloignez le câble d’adaptateur des sources d’interférences
électroniques pour que le connecteur de câble se trouve à
l’emplacement de montage de l’adaptateur.
2. Séparez les deux moitiés de l’anneau de verrouillage.
3. Alignez les deux moitiés de l’anneau de verrouillage sur le
connecteur du câble d’adaptateur et encastrez-les.
4. Insérez le joint torique dans l’extrémité du connecteur
assemblé.
Fixation du câble d’adaptateur
Pour garantir un raccordement durable à la sonde installée,
utilisez des attaches de câble (non fournies) pour xer le câble
d’adaptateur au point d’arrimage du support de montage ou à la
structure du bateau. Vous pouvez également utiliser des attaches
de câble pré-montées (non fournies) et des vis (non fournies)
pour xer le câble d’adaptateur à une cloison ou à toute autre
surface adaptée de votre bateau.
Connecteur
étanche
Fil du câble
d’adaptateur
Fil de la sonde
installée
Connecteur
étanche
Fil du câble
d’adaptateur
Fil de la sonde
installée
Installation de l’anneau de
verrouillage
Installation de l’anneau de
verrouillage

10 Instructions d’installation du kit d’adaptateur de sonde NMEA 2000
Caractéristiques techniques
Spécications physiques
Caractéristique Mesure
Dimensions L × H × P : 101,4 × 116,3 × 76,2 mm (4 × 4 19/32 × 3 po)
Poids Adaptateur seulement : 120,9 g (4,26 oz) Avec support : 200,7 g (7,08 oz)
Matériau du boîtier Plastique PC/PBT
Degré d’étanchéité CEI 60529 IPX7
Plage de températures De -15 °C à 70 °C (5 °F à 158 °F)
Distance de sécurité du compas 95 cm (37 1/2po)
Alimentation
Caractéristique Mesure
Source NMEA 2000 (9–16) V cc
Utilisation 2,4 W max.
Fusible 3 A (NMEA 2000)
Numéro d’équivalence de charge NMEA 2000 4
Intensité NMEA 2000 200 mA maximum
Données PGN NMEA 2000
Numéro PGN transmis Description du numéro PGN
059392 Reconnaissance ISO
060928 Réclamation d’adresse ISO
126208 NMEA : fonction de groupe de commande/requête/conrmation
126464 Fonction de groupe de liste PGN de transmission/d’émission
126996 Informations produit
128267 Profondeur de l’eau
130312 Température
Les sondes intelligentes Garmin sont certiées NMEA 2000.
© 2010 Garmin Ltd. ou ses liales
Garmin® et le logo Garmin sont des marques commerciales de Garmin Ltd. ou de ses liales, déposées aux Etats-Unis et dans
d’autres pays. Ces marques commerciales ne peuvent pas être utilisées sans l’autorisation expresse de Garmin.
NMEA 2000®et le logo NMEA 2000 sont des marques déposées de la National Marine Electronics Association.
AIRMAR®est une marque commerciale de Airmar Technology Corp.

Kit adattatore per trasduttori NMEA 2000
Istruzioni di installazione
Utilizzare il kit adattatore per trasduttori Garmin®NMEA 2000 per adattare le informazioni sulla
profondità fornite da un trasduttore a 200 kHz Airmar®P19 (o da un dispositivo compatibile) installato
sull’imbarcazione alla rete NMEA 2000®. Il kit adattatore per trasduttori Garmin NMEA 2000 consente
di osservare i dati relativi alla profondità mediante i dispositivi di visualizzazione compatibili Garmin
collegati alla rete NMEA 2000®. Per un elenco dei dispositivi Garmin compatibili, visitare il sito Web
www.garmin.com.
Come contattare Garmin
In caso di dubbi relativi all’installazione del kit adattatore per trasduttori NMEA 2000, contattare il
servizio di assistenza Garmin. Negli Stati Uniti, visitare il sito Web www.garmin.com/support oppure
contattare Garmin USA al numero (913) 397.8200 oppure (800) 800.1020. Nel Regno Unito, contattare
Garmin (Europe) Ltd. al numero 0808 2380000. In Europa, visitare il sito www.garmin.com/support
e fare clic su Contact Support per informazioni sull’assistenza nazionale oppure contattare Garmin
(Europe) Ltd. al numero +44 (0) 870.8501241.
ATTENZIONE
Per avvisi sul prodotto e altre informazioni importanti, consultare la guida Informazioni importanti sulla
sicurezza e sul prodotto inclusa nella confezione del dispositivo di visualizzazione Garmin compatibile.
AVVERTENZA
Durante le operazioni di trapanatura, taglio o carteggiatura, indossare sempre occhiali protettivi, una
maschera antipolvere e un’adeguata protezione per l’udito.
avviso
Prima di effettuare operazioni di trapanatura o taglio, vericare sempre il lato opposto della supercie da
trapanare o tagliare.
Strumenti e forniture necessarie
Un trapano e una punta da trapano da
2,5 mm (3/32 di poll.)
Un cacciavite Phillips numero 2
Pinze tagliali
•
•
•
Pinza
Fascette
Cavi e connettori NMEA 2000 aggiuntivi
(opzionali)
•
•
•
Identicazione di una posizione per l’installazione
Per la scelta della posizione nella quale installare l’adattatore per trasduttori NMEA 2000, fare
riferimento allo schema a pagina 12 e tenere presenti le seguenti indicazioni:
Installare l’adattatore ad almeno 95 cm (37 1/2poll.) dalla bussola per evitare possibili interferenze.
Se possibile, installare l’adattatore vicino alla posizione in cui viene scollegato il trasduttore installato
dall’unità di direzione, in genere dietro al cruscotto.
L’adattatore è impermeabile in conformità allo standard IEC 60529 IPX7 e può essere immerso in
1 metro d’acqua per 30 minuti. Ciò nonostante, non installare l’adattatore in una posizione in cui
potrebbe essere regolarmente sommerso o bagnato dall’acqua.
Prima di procedere all’installazione, vericare che la posizione sia raggiungibile da tutti i cavi
necessari.
•
•
•
•

12 Istruzioni di installazione del kit adattatore per trasduttori NMEA 2000
Installazione del kit adattatore per trasduttori NMEA 2000
Adattatore per
trasduttori NMEA 2000
Staffa di
montaggio
Trasduttore
installato
Collegamenti
dei cavi
Cavo di derivazione
NMEA 2000 Alla rete
NMEA 2000
esistente
Punto di ssaggio
in basso del cavo
Cavo
dell’adattatore
Montaggio del kit adattatore per trasduttori NMEA 2000
Dopo aver individuato una posizione idonea per l’installazione dell’adattatore per trasduttori
NMEA 2000, ssare la staffa di montaggio in dotazione sulla paratia o su un’altra struttura idonea.
1. Utilizzando la staffa di montaggio come modello, contrassegnare la posizione dei quattro fori guida.
2. Utilizzando una punta da trapano da 2,5 mm (
3
/
32
di poll.), praticare i quattro fori guida.
3. Posizionare l’adattatore nella staffa e ssare quest’ultima alla supercie di montaggio utilizzando le viti
M3 da 10 mm incluse.
Collegamento del kit adattatore per trasduttori NMEA 2000 al
trasduttore installato
Utilizzare il cavo dell’adattatore incluso per collegare il kit adattatore per trasduttori NMEA 2000 al
trasduttore installato.
Per collegare il cavo dell’adattatore al trasduttore installato:
1. Scollegare il trasduttore installato dal dispositivo di visualizzazione installato.
2. Tagliare i tre li del trasduttore installato in modo che siano della stessa lunghezza. Non rimuovere
il rivestimento isolante dei li. Se il trasduttore installato è dotato di più li rispetto ai tre indicati nella
tabella di assegnazione dei li, tagliare e ssare i li aggiuntivi con del nastro adesivo.
3. Utilizzare i connettori impermeabili in dotazione per collegare i li dal trasduttore installato ai li del
cavo dell’adattatore incluso, come indicato nella tabella di assegnazione dei li (vedere pagina 13).
Cavo dell’adattatore Trasduttore installato
Nero Nero
Blu Blu o viola
Verde Cavo senza rivestimento
Tabella di assegnazione dei li
NOTA: alcuni dei trasduttori installati posso disporre di un lo viola piuttosto che di un lo blu. Se il
trasduttore in uso dispone di un lo viola, collegarlo al lo blu del cavo dell’adattatore.

Istruzioni di installazione del kit adattatore per trasduttori NMEA 2000 13
Per installare i connettori impermeabili inclusi:
1. Inserire due li corrispondenti in un connettore
incluso.
2. Utilizzare un comune paio di pinze per premere
completamente il pulsante rosso nel connettore.
3. Rimuovere il gel idrorepellente in eccesso dal
connettore.
4. Ripetere i passaggi 1–3 per le due coppie di li
restanti.
Collegamento del kit adattatore per trasduttori NMEA 2000 a una
rete NMEA 2000
Collegare il kit adattatore per trasduttori NMEA 2000 alla rete NMEA 2000 esistente utilizzando il cavo
di derivazione e il connettore a T in dotazione. Se l’imbarcazione non dispone di una rete NMEA 2000
installata, è necessario utilizzare i cavi e i connettori NMEA 2000 appropriati per crearne una. Contattare
i rivenditori Garmin locali.
Se non si ha dimestichezza con NMEA 2000, consultare il capitolo “Concetti di base della rete
NMEA 2000” del Riferimento tecnico per i prodotti Garmin NMEA 2000 per ulteriori informazioni.
Tale documento è reperibile nel sito Web di Garmin all’indirizzo http://www.garmin.com/garmin/cms
/us/onthewater/nmea2000.
Collegamento e ssaggio dei cavi
Se l’operazione non è già stata eseguita, collegare il cavo dell’adattatore per trasduttori NMEA 2000
al connettore centrale dell’adattatore per trasduttori NMEA 2000. Collegare il cavo di derivazione
NMEA 2000 al connettore sul bordo dell’adattatore. Vedere lo schema a pagina 12.
Per agevolare la procedura di instradamento dei cavi, l’anello di bloccaggio viene fornito separatamente
dal cavo dell’adattatore.
Per installare l’anello di bloccaggio sul cavo
dell’adattatore:
1. È necessario stendere il cavo lontano da sorgenti di
interferenze elettroniche, in modo che il connettore del
cavo si trovi nella posizione di montaggio dell’adattatore.
2. Separare le due metà dell’anello di bloccaggio.
3. Allineare le due metà dell’anello di bloccaggio sul connettore
dell’adattatore facendole scattare in posizione.
4. Inserire la guarnizione circolare all’estremità del connettore
assemblato.
Fissaggio del cavo dell’adattatore
Per assicurare un collegamento duraturo al trasduttore installato,
utilizzare alcune fascette (non incluse) per ssare il cavo
dell’adattatore al punto di ssaggio in basso della staffa di
montaggio o alla struttura dell’imbarcazione. È inoltre possibile
utilizzare fascette a testa montata (non incluse) e viti (non
incluse) per ssare il cavo dell’adattatore a una paratia o ad
altre superci idonee dell’imbarcazione.
Connettore
impermeabile
Filo dal cavo
dell’adattatore
Filo dal
trasduttore
installato
Connettore
impermeabile
Filo dal cavo
dell’adattatore
Filo dal
trasduttore
installato
Installazione dell’anello di
bloccaggio
Installazione dell’anello di
bloccaggio

14 Istruzioni di installazione del kit adattatore per trasduttori NMEA 2000
Speciche
Speciche siche
Speciche Valore
Dimensioni L × A × P: 101,4 × 116,3 × 76,2 mm (4 poll. × 4 19/32 poll. × 3 poll.)
Peso Solo adattatore: 120,9 g (4,26 oz.); con staffa: 200,7 g (7,08 oz.)
Materiale del rivestimento Plastica PC/PBT
Classicazione impermeabilità IEC 60529 IPX7
Intervallo di temperatura Da -15 °C a 70 °C (da 5 °F a 158 °F)
Distanza di sicurezza dalla bussola 95 cm (37 1/2di poll.)
Alimentazione
Speciche Valore
Sorgente NMEA 2000 (9–16) V cc
Consumo Max 2,4 W
Fusibile 3 A (NMEA 2000)
Numero LEN (Load Equivalency Number) NMEA 2000 4
Corrente NMEA 2000 200 mA max
Informazioni su PGN NMEA 2000
Numero PGN trasmesso Descrizione numero PGN
059392 Riconoscimento ISO
060928 Richiesta indirizzo ISO
126208 Funzione di gruppo comando/richiesta/riconoscimento NMEA
126464 Funzione di gruppo elenco PGN in trasmissione/ricezione
126996 Informazioni sul prodotto
128267 Profondità dell’acqua
130312 Temperatura
Gli Intelliducer Garmin sono certicati NMEA 2000.
© 2010 Garmin Ltd. o società afliate
Garmin® e il logo Garmin sono marchi di Garmin Ltd. o società afliate, registrati negli Stati Uniti e in altri Paesi. L’uso di tali
marchi non è consentito senza il consenso esplicito da parte di Garmin.
NMEA 2000®e il logo NMEA 2000 sono marchi registrati della National Marine Electronics Association.
AIRMAR®è un marchio di Airmar Technology Corp.

NMEA 2000-Schwinger-Adapterkit
Installationsanweisungen
Verwenden Sie das Garmin
®
NMEA 2000-Schwinger-Adapterkit, um Tiefenangaben anzupassen, die
momentan durch einen auf Ihrem Boot installierten Airmar
®
P19-200-kHz-Schwinger (oder ein kompatibles
Gerät) an Ihr NMEA 2000
®
-Netzwerk übertragen werden. Das NMEA 2000-Schwinger-Adapterkit von
Garmin ermöglicht die Anzeige der Tiefenangaben auf kompatiblen Anzeigegeräten von Garmin, die mit
dem NMEA 2000
®
-Netzwerk verbunden sind. Eine Liste kompatibler Garmin-Geräte nden Sie unter
www.garmin.com.
Kontaktaufnahme mit Garmin
Falls Sie Fragen zur Installation des NMEA 2000-Schwinger-Adapterkits haben, setzen Sie sich mit dem
Produktsupport von Garmin in Verbindung. Besuchen Sie in den USA www.garmin.com/support, oder wenden
Sie sich telefonisch unter +1-913-397-8200 oder +1-800-800-1020 an Garmin USA. In Großbritannien wenden
Sie sich telefonisch unter 808-238-0000 an Garmin (Europe) Ltd. Als Kunde in Europa besuchen Sie die
Internetseite www.garmin.com/support, und klicken Sie auf Contact Support (Kontaktaufnahme mit Support),
um Supportinformationen für das jeweilige Land zu erhalten. Alternativ können Sie sich telefonisch unter
+44 (0)-870-850-1241 an Garmin (Europe) Ltd. wenden.
WARNUNG
Lesen Sie alle Produktwarnungen und sonstigen wichtigen Informationen in der Anleitung Wichtige
Sicherheits- und Produktinformationen, die dem kompatiblen Anzeigegerät von Garmin beiliegt.
ACHTUNG
Tragen Sie beim Bohren, Schneiden und Schleifen immer Schutzbrille, Gehörschutz und eine
Staubschutzmaske.
Hinweis
Prüfen Sie beim Bohren oder Schneiden stets die gegenüberliegende Seite der zu bearbeitenden Oberäche.
Erforderliche Werkzeuge und Hilfsmittel
Eine Bohrmaschine und ein 2,5-mm-Bohrer
(
3
/
32
Zoll)
Kreuzschlitzschraubendreher, Typ Nr. 2
Drahtabschneider
•
•
•
Zange
Kabelbinder
Zusätzliche NMEA 2000-Kabel und
-Steckverbinder (optional)
•
•
•
Auswählen des Montageorts
Wenn Sie einen Montageort zur Installation des NMEA 2000-Schwinger-Adapters auswählen, gehen Sie
gemäß dem Installationsplan auf Seite 16 vor, und beachten Sie die folgenden Punkte:
Montieren Sie den Adapter mit einem Abstand von mindestens 95 cm (37
1
/
2
Zoll) von einem
Magnetkompass, um Interferenzen zu vermeiden.
Der Adapter sollte möglichst nah an dem Ort montiert werden, an dem der installierte Schwinger von
der vorhandenen Steuereinheit abgetrennt wurde. Dieser Ort bendet sich wahrscheinlich hinter dem
Instrumentenbrett.
Der Adapter ist wasserdicht gemäß IEC 60529 IPX7 und kann bei einer Eintauchtiefe von 1 Meter
30 Minuten lang dem Eindringen von Wasser standhalten. Montieren Sie den Adapter nicht an einer Stelle,
an der er sich regelmäßig unter Wasser bendet. Die Stelle kann jedoch abießendem Wasser ausgesetzt
sein.
Überprüfen Sie vor der Installation, ob alle Kabel genügend Spiel aufweisen, damit sie an den Montageort
gezogen werden können.
•
•
•
•

16 NMEA 2000-Schwinger-Adapterkit – Installationsanweisungen
NMEA 2000-Schwinger-Adapterkit – Installationslayout
NMEA 2000-Schwinger-
Adapter
Halterung
Installierter
Schwinger
Drahtan-
schlüsse
NMEA 2000-
Stichleitung An das
vorhandene
NMEA 2000-
Netzwerk
Verzurrpunkt
Adapterkabel
Montieren des NMEA 2000-Schwinger-Adapterkits
Nachdem ein geeigneter Montageort zur Installation des NMEA 2000-Schwinger-Adapters ausgewählt wurde,
verwenden Sie die im Lieferumfang enthaltene Halterung, um den Adapter an der Schottwand oder einem
anderen, geeigneten Teil der Schiffsaufbauten zu befestigen.
1. Markieren Sie die vier Vorbohrungen. Verwenden Sie dabei die Halterung als Schablone.
2. Bohren Sie die vier Vorbohrungen mithilfe eines 2,5-mm-Bohrers (
3
/
32
Zoll).
3. Setzen Sie den Adapter in die Halterung ein, und sichern Sie die Halterung an der Montageäche mithilfe
der beigefügten 10 mm-M3-Schrauben.
Verkabeln des NMEA 2000-Schwinger-Adapterkits und des
installierten Schwingers
Verwenden Sie das im Lieferumfang enthaltene Adapterkabel, um das NMEA 2000-Schwinger-Adapterkit mit
dem installierten Schwinger zu verkabeln.
So verkabeln Sie das Adapterkabel mit dem installierten Schwinger:
1. Trennen Sie den installierten Schwinger von dem vorhandenen Anzeigegerät.
2. Schneiden Sie die drei Drähte aus dem installierten Schwinger auf gleicher Länge ab. Lösen Sie nicht
die Kabelisolierung. Falls der installierte Schwinger über mehr als die drei Drähte verfügt, die in der
Leitungsbelegung der Verkabelung angegeben werden, schneiden Sie die zusätzlichen Drähte ab, und
kleben Sie sie mit Klebeband zusammen.
3. Verwenden Sie die im Lieferumfang enthaltenen wasserdichten Anschlüsse, um die Drähte des installierten
Schwingers mit den Drähten des im Lieferumfang enthaltenen Adapterkabels gemäß Leitungsbelegung der
Verkabelung zu verbinden. (Siehe Seite 17)
Adapterkabel Installierter Schwinger
Schwarz Schwarz
Blau Blau oder Violett
Grün Kabel mit offenen Enden
Leitungsbelegung der Verkabelung
HINWEIS: Einige installierte Schwinger können über violette statt blaue Drähte verfügen. Falls Ihr Schwinger
mit einem violetten Draht ausgerüstet ist, verbinden Sie ihn mit dem blauen Draht des Adapterkabels.
NMEA 2000-Schwinger-Adapterkit – Installationsanweisungen 17
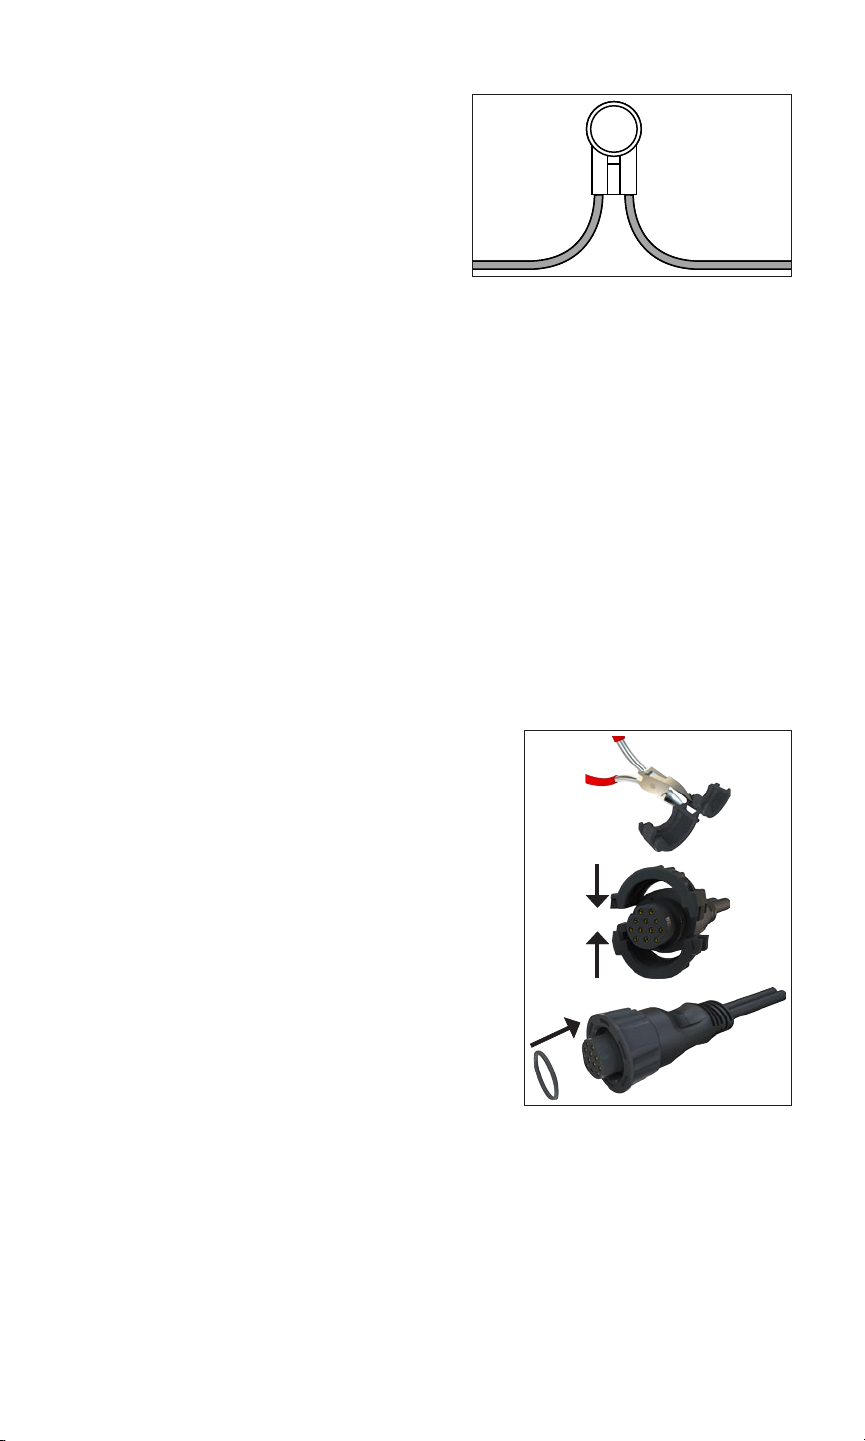
So installieren Sie die im Lieferumfang enthaltenen wasserdichten Anschlüsse:
1. Führen Sie zwei passende Drähte in einen der im
Lieferumfang enthaltenen Anschlüsse ein.
2. Verwenden Sie eine Standardzange, um die rote
Taste komplett in den Anschluss zu drücken.
3. Wischen Sie das überschüssige wasserabweisende
Gel vom Anschluss ab.
4. Wiederholen Sie die Schritte 1–3, um die zwei
verbleibenden Drähte zu verbinden.
Anschließen des NMEA 2000-Schwinger-Adapterkits an ein
NMEA 2000-Netzwerk
Verbinden Sie das NMEA 2000-Schwinger-Adapterkit mithilfe der im Lieferumfang enthaltenen Stichleitung
und dem T-Stück mit dem vorhandenen NMEA 2000-Netzwerk. Wenn auf Ihrem Schiff noch kein
NMEA 2000-Netzwerk installiert ist, müssen Sie mit entsprechenden NMEA 2000-Kabeln und Anschlüssen
ein Netzwerk einrichten. Weitere Informationen erhalten Sie bei Ihrem Garmin Händler.
Wenn Sie mit NMEA 2000 nicht vertraut sind, nden Sie weitere Informationen im Kapitel „NMEA 2000 –
Grundlagen zum Netzwerk“ des Handbuchs Technische Informationen für Garmin NMEA 2000-Produkte.
Dieses Dokument ist auf der Garmin-Website verfügbar: http://www.garmin.com/garmin/cms/us/onthewater
/nmea2000.
Verbinden und Sichern der Kabel
Falls Sie dies noch nicht getan haben, verbinden Sie das NMEA 2000-Schwinger-Adapterkabel mit dem
Anschluss in der Mitte des NMEA 2000-Schwinger-Adapters. Verbinden Sie die NMEA 2000-Stichleitung
mit dem Anschluss am Adapterrand. Siehe Installationsplan auf Seite 16.
Um die Verlegung der Kabel zu erleichtern, sind die Sicherungsringe von den Adapterkabeln getrennt verpackt.
So installieren Sie den Sicherungsring auf dem
Adapterkabel:
1. Verlegen Sie das Adapterkabel mit ausreichendem Abstand
zu anderen elektronischen Störquellen, sodass sich der
Kabelanschluss am Montageort des Plotters bendet.
2. Trennen Sie die beiden Hälften des Sicherungsrings.
3. Richten Sie die beiden Hälften des Sicherungsrings über den
Anschluss auf dem Adapterkabel aus, und drücken Sie sie
zusammen, bis sie hörbar einrasten.
4. Bringen Sie den O-Ring am Ende der Steckerbaugruppe an.
Sichern des Adapterkabels
Um eine dauerhafte Verbindung mit dem installierten Schwinger
sicherzustellen, verwenden Sie Kabelbinder (nicht im Lieferumfang
enthalten), damit das Adapterkabel entweder am Verzurrpunkt
an der Halterung oder an einem Teil des Schiffsaufbaus gesichert
wird. Sie können das Adapterkabel auch mit Kabelbindern, mit
Befestigungsösen und mit Schrauben (beide Zubehörteile nicht im
Lieferumfang enthalten) an einer Schottwand oder einer anderen
geeigneten Montageäche auf dem Schiff befestigen.
Wasserdichter
Anschluss
Draht aus dem
Adapterkabel
Draht aus dem
installierten
Schwinger
Wasserdichter
Anschluss
Draht aus dem
Adapterkabel
Draht aus dem
installierten
Schwinger
Anbringen des SicherungsringsAnbringen des Sicherungsrings

18 NMEA 2000-Schwinger-Adapterkit – Installationsanweisungen
Technische Daten
Abmessungen und Gewicht
Angabe Abmessungen
Größe B × H × T: 101,4 × 116,3 × 76,2 cm (4 × 4
19
/
32
× 3 Zoll)
Gewicht Nur Adapter: 120,9 g (4,26 oz.), mit Halterung: 200,7 g (7,08 oz.)
Gehäusewerkstoffe PC/PBT-Kunststoff
Wasserdichtigkeit IEC 60529 IPX7
Temperaturbereich -15 °C bis 70 °C (5 °F bis 158 °F)
Sicherheitsabstand zum Kompass 95 cm (37
1
/
2
Zoll)
Stromversorgung
Angabe Leistung
Quelle NMEA 2000 – 9 bis 16 V Gleichspannung
Leistungsaufnahme max. 2,4 W
Sicherung 3 A (NMEA 2000)
NMEA 2000 Load Equivalency Number (LEN, Stromaufnahme
des Gerätes)
4
NMEA 2000-Stromaufnahme max. 200 mA
PGN-Informationen unter NMEA 2000
Übertragene PGN-Nummer PGN-Nummerbeschreibung
059392 ISO-Zulassung
060928 ISO-Adressenanforderung
126208 Gruppenfunktion NMEA – Befehl/Anforderung/Bestätigung
126464 PGN-Liste-Gruppenfunktion – Senden/Empfangen
126996 Produktinformationen
128267 Wassertiefe
130312 Temperatur
Garmin-Intelliducer sind für NMEA 2000 zertiziert.
© 2010 Garmin Ltd. oder deren Tochtergesellschaften
Garmin
®
und das Garmin-Logo sind Marken von Garmin Ltd. oder deren Tochtergesellschaften und in den USA und anderen Ländern
eingetragen. Diese Marken dürfen nur mit ausdrücklicher Genehmigung von Garmin verwendet werden.
NMEA 2000
®
und das NMEA 2000-Logo sind eingetragene Marken der National Maritime Electronics Association.
AIRMAR
®
ist eine Marke von Airmar Technology Corp.

Kit adaptador del transductor NMEA 2000
Instrucciones de instalación
Utiliza el kit adaptador del transductor NMEA 2000 de Garmin®para adaptar la información de
profundidad, proporcionada actualmente por un transductor Airmar®P19 (o compatible) de 200 kHz
instalado en la embarcación, a la red NMEA 2000®. El kit adaptador del transductor NMEA 2000 de
Garmin permite observar la información de profundidad en pantallas de Garmin compatibles conectadas
a la red NMEA 2000®. Para obtener una lista de los dispositivos de Garmin compatibles, visita
www.garmin.com.
Comunicación con Garmin
Ponte en contacto con el departamento de asistencia de Garmin si tienes alguna duda relativa a la
instalación del kit adaptador del transductor NMEA 2000. En Estados Unidos, visita www.garmin
.com/support o ponte en contacto con Garmin USA por teléfono llamando al (913) 397.8200 ó
(800) 800.1020. En el Reino Unido, ponte en contacto con Garmin (Europe) Ltd. por teléfono llamando
al 0808 2380000. En Europa, visita www.garmin.com/support y haz clic en Contact Support para
obtener información de asistencia local o ponte en contacto con Garmin (Europe) Ltd. por teléfono
llamando al +44 (0) 870-8501241.
ADVERTENCIA
Consulta la guía Información importante sobre el producto y su seguridad que se incluye en la caja de la
pantalla de Garmin compatible y en la que encontrarás advertencias e información importante sobre el
producto.
PRECAUCIÓN
Utiliza siempre gafas de seguridad, un protector de oídos y una máscara antipolvo cuando vayas a
realizar oricios, cortes o lijados.
aviso
Al realizar oricios o cortes, comprueba siempre el otro lado de la supercie de perforación o corte.
Herramientas y materiales necesarios
Un taladro y una broca de 3/32 in (2,5 mm)
Un destornillador Phillips del número 2
Cortadores de hilos
•
•
•
Alicates
Bridas
Cables y conectores NMEA 2000 adicionales
(opcionales)
•
•
•
Determinación de la ubicación de instalación
Al seleccionar una ubicación para la instalación del adaptador del transductor NMEA 2000, consulta el
diagrama de diseño de la página 20 y ten en cuenta lo siguiente:
Instala el adaptador al menos a 37 1/2in (95 cm) de cualquier compás para evitar interferencias.
Si es posible, instala el adaptador cerca de la ubicación donde desconectes el transductor instalado de
la unidad principal instalada, preferiblemente detrás de los controles.
El adaptador tiene resistencia al agua conforme a la norma IEC 60529 IPX7, por lo cual se puede
sumergir a 1 metro durante 30 minutos como máximo. No instales el adaptador en ninguna ubicación
en la que quede sumergido constantemente, aunque sí puede quedar expuesto a la erosión del agua.
Verica que todos los cables llegan a la ubicación seleccionada antes de iniciar los procedimientos de
instalación.
•
•
•
•

20 Instrucciones de instalación del kit adaptador del transductor NMEA 2000
Diseño de instalación del kit adaptador del transductor NMEA 2000
Adaptador del
transductor NMEA 2000
Soporte de
montaje
Transductor
instalado
Conexiones
de cables
Cable de caída de
voltaje NMEA 2000 A la red NMEA
2000 existente
Punto de amarre
del cable
Cable
adaptador
Montaje del kit adaptador del transductor NMEA 2000
Una vez que hayas seleccionado una ubicación adecuada para la instalación del adaptador del transductor
NMEA 2000, utiliza el soporte de montaje incluido para montar el adaptador en el mamparo o en otra
estructura adecuada.
1. Marca las cuatro ubicaciones de los oricios guía utilizando el soporte de montaje como plantilla.
2. Con una broca de
3
/
32
in (2,5 mm), perfora los cuatro oricios guía.
3. Coloca el adaptador en el soporte y ja el soporte de montaje en la supercie de montaje mediante los
tornillos M3 de 10 mm incluidos.
Cableado del kit adaptador del transductor NMEA 2000 al
transductor instalado
Utiliza el cable adaptador incluido para conectar el kit adaptador del transductor NMEA 2000 al
transductor instalado.
Para conectar el cable adaptador al transductor instalado:
1. Desconecta el transductor instalado de la pantalla instalada.
2. Corta los tres hilos del transductor instalado a la misma longitud. No quites el aislamiento de los hilos.
Si el transductor instalado tiene más hilos de los tres indicados en la tabla de asignación del cableado,
corta los hilos que sobren y fíjalos con cinta adhesiva.
3. Utiliza los conectores resistentes al agua incluidos para conectar los hilos del transductor instalado a
los hilos del cable adaptador incluido, de acuerdo con la tabla de asignación del cableado. (Consulta
la página 21)
Cable adaptador Transductor instalado
Negro Negro
Azul Azul o morado
Verde Cable de hilos desnudos
Tabla de asignación del cableado
NOTA: algunos transductores instalados tienen un hilo morado en lugar de uno azul. Si tu transductor
tiene un hilo morado, conéctalo al hilo azul del cable adaptador.
This manual suits for next models
1
Table of contents
Languages:
Other Garmin Adapter manuals

Garmin
Garmin ANT+ adapter for iPhone User manual

Garmin
Garmin NMEA 2000 Network Updater User manual

Garmin
Garmin GET 10, Engine Tilt Adapter Installation and... Operating and maintenance instructions

Garmin
Garmin GFL 10 Quick guide

Garmin
Garmin GST 10, Water Speed and Temperature Adapter Installation and... Operating and maintenance instructions

Garmin
Garmin ELOG User manual

Garmin
Garmin GRA 10 Quick guide

Garmin
Garmin GBT 10 Bennett Trim Tab Adapter Installation and... Operating and maintenance instructions

Garmin
Garmin GEA 71 User manual


