Thales Gemalto AGS2-E User manual

GENERAL NOTE
THE USE OF THE PRODUCT INCLUDING THE SOFTWARE AND DOCUMENTATION (THE "PROD-
UCT") IS SUBJECT TO THE RELEASE NOTE PROVIDED TOGETHER WITH PRODUCT. IN ANY
EVENT THE PROVISIONS OF THE RELEASE NOTE SHALL PREVAIL. THIS DOCUMENT CONTAINS
INFORMATION ON GEMALTO M2M PRODUCTS. THE SPECIFICATIONS IN THIS DOCUMENT ARE
SUBJECT TOCHANGEATGEMALTOM2M'SDISCRETION. GEMALTO M2M GMBH GRANTS A NON-
EXCLUSIVE RIGHT TO USE THE PRODUCT. THE RECIPIENT SHALL NOT TRANSFER, COPY,
MODIFY, TRANSLATE, REVERSE ENGINEER, CREATE DERIVATIVE WORKS; DISASSEMBLE OR
DECOMPILE THE PRODUCT OR OTHERWISE USE THE PRODUCT EXCEPT AS SPECIFICALLY
AUTHORIZED. THE PRODUCT AND THIS DOCUMENT ARE PROVIDED ON AN "AS IS" BASIS ONLY
AND MAY CONTAIN DEFICIENCIES OR INADEQUACIES. TO THE MAXIMUM EXTENT PERMITTED
BY APPLICABLE LAW, GEMALTO M2M GMBH DISCLAIMS ALL WARRANTIES AND LIABILITIES.
THE RECIPIENT UNDERTAKES FOR AN UNLIMITED PERIOD OF TIME TO OBSERVE SECRECY
REGARDING ANY INFORMATION AND DATA PROVIDED TO HIM IN THE CONTEXT OF THE DELIV-
ERY OF THE PRODUCT. THIS GENERAL NOTE SHALL BE GOVERNED AND CONSTRUED
ACCORDING TO GERMAN LAW.
Copyright
Transmittal, reproduction, dissemination and/or editing of this document as well as utilization of its con-
tents and communication thereof to others without express authorization are prohibited. Offenders will be
held liable for payment of damages. All rights created by patent grant or registration of a utility model or
design patent are reserved.
Copyright © 2019, Gemalto M2M GmbH, a Thales Company
Trademark Notice
Gemalto, the Gemalto logo, are trademarks and service marks of Gemalto and are registered in certain
countries. Microsoft and Windows are either registered trademarks or trademarks of Microsoft Corpora-
tion in the United States and/or other countries. All other registered trademarks or trademarks mentioned
in this document are property of their respective owners.
audio_codec_adapter_setup_v04 2019-10-16
Confidential / Released
Audio Codec Adapter Setup for Cinterion® Modules
2Page 2 of 34
User Guide: Audio Codec Adapter Setup for Cinterion® Modules
Version: 04
Date: 2019-10-16
DocId: audio_codec_adapter_setup_v04
Status Confidential / Released

Audio Codec Adapter Setup for Cinterion® Modules
Contents
34
audio_codec_adapter_setup_v04 2019-10-16
Confidential / Released
Page 3 of 34
Contents
0 Document History...................................................................................................... 4
1 Introduction.................................................................................................................5
1.1 Related Documents ...........................................................................................5
1.2 Supported Products...........................................................................................5
2 Audio Codec Adapter Overview ................................................................................6
2.1 MAX9860 Audio Codec Adapter........................................................................6
2.1.1 Interfaces..............................................................................................6
2.1.1.1 DIP Switch Default Settings ..................................................7
2.1.2 Access ..................................................................................................8
2.1.2.1 Update...................................................................................8
2.1.2.2 Configuration.........................................................................9
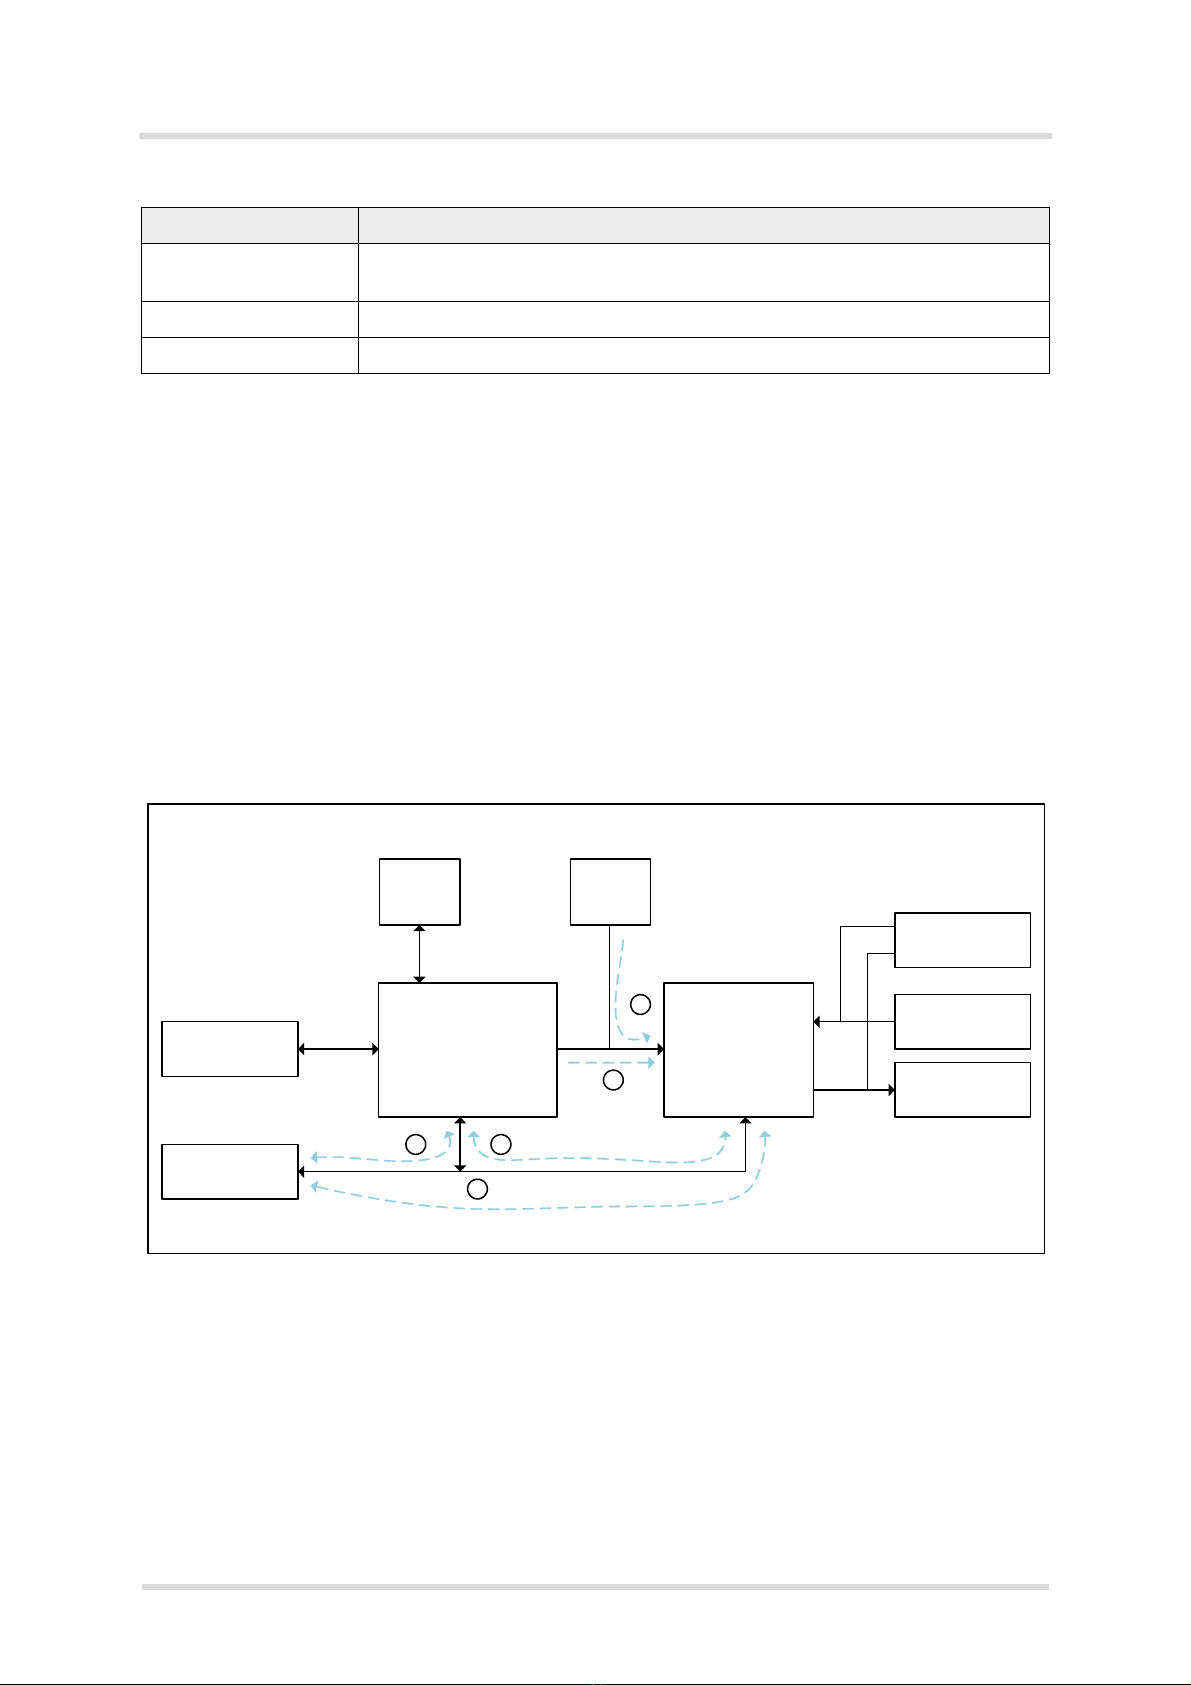
2.1.3 Block Diagram.....................................................................................10
2.2 NAU8822 Audio Codec Adapter......................................................................11
2.2.1 Interfaces............................................................................................11
2.2.1.1 DIP Switch Default Settings ................................................12
2.2.2 Access ................................................................................................13
2.2.2.1 Update.................................................................................13
2.2.2.2 Configuration.......................................................................14
2.2.3 Block Diagram.....................................................................................15
3 Audio Codec Adapter Setup ....................................................................................16
3.1 Assembly with DSB75 and AH6-DSB75 Adapter ............................................16
3.1.1 Configuration.......................................................................................17
3.1.1.1 Master/Slave.......................................................................17
3.1.1.2 Bit Clock..............................................................................17
3.1.1.3 Framesync ..........................................................................17
3.1.1.4 DIP Switch and AT Command Settings...............................19
3.1.2 Operation............................................................................................21
3.1.2.1 Voice Calls ..........................................................................21
3.1.2.2 Module Generated Tones....................................................21
3.1.2.3 Audio Codec Adapter Generated Tones..............................22
3.1.2.4 Tone Recognition ................................................................23
4 Appendix A - DAI Signal Timings at Oscilloscope.................................................24
5 Appendix B - MAX9860 Codec Adapter Schematics .............................................26
6 Appendix C - NAU8822 Codec Adapter Schematics..............................................30

Audio Codec Adapter Setup for Cinterion® Modules
0 Document History
4
audio_codec_adapter_setup_v04 2019-10-16
Confidential / Released
Page 4 of 34
0 Document History
Preceding document: "Audio Codec Adapter Setup for Cinterion® Modules" v03
New document: "Audio Codec Adapter Setup for Cinterion® Modules" v04
Preceding document: "Audio Codec Adapter Setup for Cinterion® Modules" v02
New document: "Audio Codec Adapter Setup for Cinterion® Modules" v03
Preceding document: "Audio Codec Adapter Setup for Cinterion® Modules" v01
New document: "Audio Codec Adapter Setup for Cinterion® Modules" v02
New document: "Audio Codec Adapter Setup for Cinterion® Modules" v01
Chapter What is new
Throughout
document Added NAU8822 audio codec adapter.
1.2 Added ELS61x, ELS81x, and ALS5 as supported products.
Chapter What is new
Throughout
document Removed ELS51 and ELS31-USA products.
3.1.1.4 Added settings for AT^SAIC command for ELS31 in Table 4.
Chapter What is new
3.1.1.1 Added note that ELS31/ELS51 modules cannot be configured as masters.
4New Appendix A - DAI Signal Timings at Oscilloscope.
Chapter What is new
--- Initial document setup.

Audio Codec Adapter Setup for Cinterion® Modules
1 Introduction
33
audio_codec_adapter_setup_v04 2019-10-16
Confidential / Released
Page 5 of 34
1 Introduction
The Audio Codec Adapter is a simple and easy-to-use universal adapter board designed to
quickly evaluate the digital audio functionality of the supported Gemalto M2M (evaluation)
products. Using this reference adapter, it is possible to develop and test external audio appli-
cations for the supported Cinterion®modules (see Section 1.2).
This document1guides you through the process of connecting the Audio Codec Adapter cor-
rectly and getting started with the evaluation of the module’s audio functionality.
The Audio Codec Adapter is intended for use in test environments only. All persons handling
the Audio Codec Adapter must be properly trained in electronics and observe good engineering
practice standards.
The Audio Codec Adapter is a test/development board, and has not been designed to be em-
bedded into other products.
1.1 Related Documents
[1] AT Command Set for your product
[2] Hardware Interface Description for your product
[3] DSB75 Hardware Description, v14
[4] Getting Started with your product
1.2 Supported Products
This User Guide applies to the following products:
• AGS2-E, AGS2-W
• BGS2-E, BGS2-W
• BGS5, BGS8
• EHS5-E, EHS5-US, EHS6, EHS8
• ELS31-VA
• ELS61-E, ELS61-E2, ELS61-ER2, ELS61-US, ELS61-AUS, ELS81-E, ELS81-US
• PDS5, PDS6, PDS8
• AHS3-E, AHS3-W
• PHS8-P, PHS8-E, PHS8-US, PHS8-USA
• ALS3-E, ALS3-US, ALS3-C
• PLS8-E, PLS8-US, PLS8-V, PLS8-X, PLS8-J
•ALAS5
1. The document is effective only if listed in the appropriate Release Notes as part of the technical docu-
mentation delivered with your Gemalto M2M module.

Audio Codec Adapter Setup for Cinterion® Modules
2 Audio Codec Adapter Overview
33
audio_codec_adapter_setup_v04 2019-10-16
Confidential / Released
Page 6 of 34
2 Audio Codec Adapter Overview
This chapter gives an overview of the available Audio Codec Adapters, i.e., MAX9860 in Sec-
tion 2.1 and NAU8822 in Section 2.2 employed by Gemalto M2M to evaluate the digital audio
interface functionality of the supported modules.
2.1 MAX9860 Audio Codec Adapter
The MAX9860 Audio Codec Adapter is based on the MAX9860 16-bit mono audio voice codec
from Maxim Integrated. The adapter board can be plugged to the DSB75 (or DSBmini) in order
to be used with a variety of Cinterion®modules (see Section 1.2), and supports the following
features:
The Audio Codec Adapter supports the following features:
• Directly connects to DSB75 (or Mini-DSB)
• Most important configuration settings are accessible via DIP switch
• Almost all configuration settings are accessible via RS232 serial interface
• PCM/I2S support
• BCLK = 256(only in slave mode), 512, 1024, 2048kHz
• Master/Slave mode
• 16kHz WB/8kHz NB mode
• Handset/Headphone support
• Short/long FSYNC2
• Sending DTMF sound sequences on analogue or on digital (long FSYNC Intel mode)
• Recognizing beep sounds by means of FFT on analogue or on digital (long FSYNC Intel
mode)
2.1.1 Interfaces
Figure 1 and Figure 2 show various interfaces on the top and bottom sides of the Audio Codec
Adapter.
Figure 1: Audio Codec Adapter top view
2. Note: The short frame master mode is not usable because the MAX9860 voice codec generates wrong
AD converter output at bit 14.
Top
RS232
Reset
Interface
button
DIP switch Headset
(Microphone,
Headphone)
3.5mm jacks

Audio Codec Adapter Setup for Cinterion® Modules
2.1 MAX9860 Audio Codec Adapter
33
audio_codec_adapter_setup_v04 2019-10-16
Confidential / Released
Page 7 of 34
Figure 2: Audio Codec Adapter bottom view
Note: Only one out of Handset and Headset interface can be connected and operatedat a time.
2.1.1.1 DIP Switch Default Settings
The following figure shows the default settings for the DIP switch. These settings configure a
basic slave mode that should straightforwardly work with most Cinterion®modules. For more
information on how to set the DIP switch see Section 3.1.1.4.
Figure 3: DIP switch defaults (e.g., ELS61-ER2)
Bottom
Digital
Handset
plug (RJ9)
Audio
Interface
(DAI)
Slave(SLV)
Master2(MST2)
PCM
ShortFramesync(FS)
NarrowBand(NB)
1.8V
MCKL(int.)
I2C(int.)
Master(MST)
Master1(MST1)
I2S
LongFramesync(FS)
WideBand(WB)
3.0V
MCLK(ext.)
I2C(ext.)

Audio Codec Adapter Setup for Cinterion® Modules
2.1 MAX9860 Audio Codec Adapter
33
audio_codec_adapter_setup_v04 2019-10-16
Confidential / Released
Page 8 of 34
2.1.2 Access
For update, configuration and programming purposes the Audio Codec Adapter can be ac-
cessed via the RS232 serial interface on its top side.
The RS232 interface on the Audio Codec Adapter can be connected to a PC’s serial port by
using a crimped cable that links the 10-pin connector at the Audio Codec Adapter to a 9-pin
connector at the PC. Such a crimped cable is shown in Figure 4:
Figure 4: Crimped serial cable
Once connected to the PC, the Audio Codec Adapter should be available at a defined COM
port for update, configuration, and programming as described in the below sections.
2.1.2.1 Update
Please complete the following steps to update the Audio Codec Adapter:
• Unzip the archive with the latest software for the Audio Codec Adapter to a directory on the
PC. The following files should be available: CodecAdapterMAX.bin, Sloadhost.exe, and
firmware_update_com_x.bat
• Call the batch file firmware_update_com_x.bat.
• Enter the COM port number the Audio Codec Adapter is connected at.
• Wait for a few seconds until the update is complete, and the adapter was reset, i.e., until
the LEDs were restarted.
Having updated the Audio Codec Adapter’s software, the adapter is ready to be employed for
configuration and programming.
Note: Coming from the factory, the above described update procedure is also required to ini-
tialize the Audio Codec Adapter before it can be used for the first time, i.e., before any of the
LEDs on the Audio Codec Adapter’s top side will light to indicate the adapter’s current status.

Audio Codec Adapter Setup for Cinterion® Modules
2.1 MAX9860 Audio Codec Adapter
33
audio_codec_adapter_setup_v04 2019-10-16
Confidential / Released
Page 9 of 34
2.1.2.2 Configuration
There are two ways to configure the Audio Codec Adapter:
• Firstly, the hardware DIP switch can be used to configure the most important configuration
settings. See Section 2.1.1.1 and Section 3.1.1 for default and other settings. This way to
configure the adapter should normally be sufficient.
• Secondly, the RS232 interface can used via its COM port to configure almost all configura-
tion settings. This type of configuration can be only done while in the so-called Terminal
mode.
To reach the Terminal mode, the following steps should be completed:
- Below settings must be specified for a terminal program:
Baudrate: 115.2 kbits/s
Format: 8N1
Flow Control: Hardware flow control must be disabled. This means DTR must be set
inactive (off or low level), and RTS must be set inactive (off or low level).
- Now, the RTS line must be reset to enable the Terminal mode, i.e. the RTS line has to
be activated and deactivated again.
Having enabled the Terminal mode the following commands are available to configure the Au-
dio Codec Adapter.
Table 1: Terminal mode commands
Command Description/Remark
? or Help Displays short help
Status or Mode Displays the current status, and measures BCLK and FSC frequencies
Master or Slave Selects master or slave mode from the adapter’s point of view. In slave mode
FSC is set automatically in case 8KHz or 16KHz were measured.
Interface=1.8V/3.0V Sets interface voltage level. 1.8V required for DSBmini (with Starter Kit B60).
MCLK=int/ext/bclk Selects MCLK (mainly for ext. MCLK mode; effective in master mode)
BCLK=256/512/1024/
2048 Sets the BCLK to the selected value (kHz; effective in master mode)
FSC=short/long/I2S
FSC=8kHz/16kHz 1. Sets the FSC to the selected value: Short, long, or I2S
2. Sets the FSC to the selected value: 8kHz=NB or 16kHz=WB
Vol=-3dB Speaker, headphone attenuation in +-1dB steps
Micvol=28dB Microphone volume in 1dB steps
Boost=20dB Displays and sets microphone preamplifier in dB (20dB or 30dB)
Reg Lists all audio codec registers
Reg 0x06 Lists audio codec register 6, <8 bits>
Reg7=0x55 Sets audio codec register to 0x55
DTMF=seq<n> local/
netw Sends a DTMF sequence to the headset (<local>) or module (<netw>). <n>
can be 1, 2, 3 or 4, each with a predefined DTMF sequence variant. See also
Section 3.1.2.3.
Deactivated

Audio Codec Adapter Setup for Cinterion® Modules
2.1 MAX9860 Audio Codec Adapter
33
audio_codec_adapter_setup_v04 2019-10-16
Confidential / Released
Page 10 of 34
Commands are case insensitive, blanks are ignored.
Commands without "=" are typically status requests (i.e., READ commands), and commands
with "=" are assignments or settings (i.e., WRITE commands).
Commands must be terminatedwith at least "\r" = 0x0D (under Windows). End ofline is entered
as "\r\n" = 0x0D, 0X0A (under Windows).
2.1.3 Block Diagram
Figure 5 shows a block diagram of the Audio Codec Adapter. For further details please refer to
the schematics given in chapter 5.
Figure 5: Block diagram
SINUS=<Hz>, <dur>
local/netw Generates a sine wave to the headset (<local>) or module (<netw>). Seealso
Section 3.1.2.3.
DSP=detect Detects audio frequencies in local input signals. See also Section 3.1.2.4.
Reset Resets audio codec adapter
Table 1: Terminal mode commands
Command Description/Remark
RS232
Interface
DSB75
connector
MCU
DIP
switch
Ext.
I2C
Codec
Headphone
Microphone
Handset
UART I2C
PCM/I2S
I2C
PCM/I2S
1 2
3
1
2
I2C:Eitherpath1orpath2isactivated.
CodecisworkingonlyinslavemodeforI2C
PCM/I2S:Eitherpath1orpath2orpath3isactivated.

Audio Codec Adapter Setup for Cinterion® Modules
2.2 NAU8822 Audio Codec Adapter
33
audio_codec_adapter_setup_v04 2019-10-16
Confidential / Released
Page 11 of 34
2.2 NAU8822 Audio Codec Adapter
The NAU8822 Audio Codec Adapter is based on the NAU8822 stereo audio voice codec from
Nuvoton. The adapter board can be plugged to the DSB75 (or DSBmini) in order to be used
with a variety of Cinterion®modules (see Section 1.2), and supports the following features:
The Audio Codec Adapter supports the following features:
• Directly connects to DSB75 (or Mini-DSB)
• Most important configuration settings are accessible via DIP switch
• Almost all configuration settings are accessible via RS232 serial interface
• PCM/I2S support
• BCLK = 128, 256, 512, 2048kHz
• Master/Slave mode
• 16kHz WB/8kHz NB mode
• Handset/Headphone support
• Short/long FSYNC
• Sending DTMF sound sequences on analogue or on digital (long FSYNC Intel mode)
• Recognizing beep sounds by means of FFT on analogue or on digital (long FSYNC Intel
mode)
2.2.1 Interfaces
Figure 6 and Figure 7 show various interfaces on the top and bottom sides of the Audio Codec
Adapter.
Figure 6: Audio Codec Adapter top view
Top
RS232
Reset
Interface
button
DIP
Headset
(Microphone,
Headphone)
3.5mm jacks
Switches

Audio Codec Adapter Setup for Cinterion® Modules
2.2 NAU8822 Audio Codec Adapter
33
audio_codec_adapter_setup_v04 2019-10-16
Confidential / Released
Page 12 of 34
Figure 7: Audio Codec Adapter bottom view
Note: Only one out of Handset and Headset interface can be connected and operatedat a time.
2.2.1.1 DIP Switch Default Settings
The following figure shows the default settings for the DIP switch. These settings configure a
basic slave mode that should straightforwardly work with most Cinterion®modules. For more
information on how to set the DIP switch see Section 3.1.1.4.
Figure 8: DIP switch defaults (e.g., ELS61-ER2)
Bottom
Digital
Handset
plug (RJ9)
Audio
Interface
(DAI)
Slave(SLV)
PCM
SHORTFS
NB/8kHz
TC65i(1.8V)
MCKL(int.)
I2C(int.)
Master(MST)
I2S
LONGFS
WB/16kHz
Norm.(3.0V)
EXT.(MCLK)
EXT.(I2C)

Audio Codec Adapter Setup for Cinterion® Modules
2.2 NAU8822 Audio Codec Adapter
33
audio_codec_adapter_setup_v04 2019-10-16
Confidential / Released
Page 13 of 34
2.2.2 Access
For update, configuration and programming purposes the Audio Codec Adapter can be ac-
cessed via the RS232 serial interface on its top side.
The RS232 interface on the Audio Codec Adapter can be connected to a PC’s serial port by
using a crimped cable that links the 10-pin connector at the Audio Codec Adapter to a 9-pin
connector at the PC. Such a crimped cable is shown in Figure 4:
Figure 9: Crimped serial cable
Once connected to the PC, the Audio Codec Adapter should be available at a defined COM
port for update, configuration, and programming as described in the below sections.
2.2.2.1 Update
Please complete the following steps to update the Audio Codec Adapter:
• Unzip the archive with the latest software for the Audio Codec Adapter to a directory on the
PC. The following files should be available: CodecAdapterMAX.bin, Sloadhost.exe, and
firmware_update_com_x.bat
• Call the batch file firmware_update_com_x.bat.
• Enter the COM port number the Audio Codec Adapter is connected at.
• Wait for a few seconds until the update is complete, and the adapter was reset, i.e., until
the LEDs were restarted.
Having updated the Audio Codec Adapter’s software, the adapter is ready to be employed for
configuration and programming.
Note: Coming from the factory, the above described update procedure is also required to ini-
tialize the Audio Codec Adapter before it can be used for the first time, i.e., before any of the
LEDs on the Audio Codec Adapter’s top side will light to indicate the adapter’s current status.

Audio Codec Adapter Setup for Cinterion® Modules
2.2 NAU8822 Audio Codec Adapter
33
audio_codec_adapter_setup_v04 2019-10-16
Confidential / Released
Page 14 of 34
2.2.2.2 Configuration
There are two ways to configure the Audio Codec Adapter:
• Firstly, the hardware DIP switch can be used to configure the most important configuration
settings. See Section 2.1.1.1 and Section 3.1.1 for default and other settings. This way to
configure the adapter should normally be sufficient.
• Secondly, the RS232 interface can used via its COM port to configure almost all configura-
tion settings. This type of configuration can be only done while in the so-called Terminal
mode.
To reach the Terminal mode, the following steps should be completed:
- Below settings must be specified for a terminal program:
Baudrate: 115.2 kbits/s
Format: 8N1
Flow Control: Hardware flow control must be disabled. This means DTR must be set
inactive (off or low level), and RTS must be set inactive (off or low level).
- Now, the RTS line must be reset to enable the Terminal mode, i.e. the RTS line has to
be activated and deactivated again.
Having enabled the Terminal mode the following commands are available to configure the Au-
dio Codec Adapter.
Table 2: Terminal mode commands
Command Description/Remark
? or Help Displays short help
Status or Mode Displays the current status, and measures BCLK and FSC frequencies
Master or Slave Selects master or slave mode from the adapter’s point of view. In slave mode
FSC is set automatically in case 8KHz or 16KHz were measured.
Interface=1.8V/3.0V Sets interface voltage level. 1.8V required for DSBmini (with Starter Kit B60).
MCLK=int/ext/bclk Selects MCLK (mainly for ext. MCLK mode; effective in master mode)
BCLK=128/256/512/
2048 Sets the BCLK to the selected value (kHz; effective in master mode)
FSC=short/long/I2S
FSC=8kHz/16kHz 1. Sets the FSC to the selected value: Short, long, or I2S
2. Sets the FSC to the selected value: 8kHz=NB or 16kHz=WB
Vol=-3dB Speaker, headphone attenuation in +-1dB steps
Micvol=28dB Microphone volume in 1dB steps
Boost=20dB Displays and sets microphone preamplifier in dB (20dB or 30dB)
Reg Lists all audio codec registers
Reg 0x06 Lists audio codec register 6, <8 bits>
Reg7=0x55 Sets audio codec register to 0x55
DTMF=seq<n> local/
netw Sends a DTMF sequence to the headset (<local>) or module (<netw>). <n>
can be 1, 2, 3 or 4, each with a predefined DTMF sequence variant. See also
Section 3.1.2.3.
Deactivated

Audio Codec Adapter Setup for Cinterion® Modules
2.2 NAU8822 Audio Codec Adapter
33
audio_codec_adapter_setup_v04 2019-10-16
Confidential / Released
Page 15 of 34
Commands are case insensitive, blanks are ignored.
Commands without "=" are typically status requests (i.e., READ commands), and commands
with "=" are assignments or settings (i.e., WRITE commands).
Commands must be terminatedwith at least "\r" = 0x0D (under Windows). End ofline is entered
as "\r\n" = 0x0D, 0X0A (under Windows).
2.2.3 Block Diagram
Figure 5 shows a block diagram of the Audio Codec Adapter. For further details please refer to
the schematics given in chapter 5.
Figure 10: Block diagram
SINUS=<Hz>, <dur>
local/netw Generates a sine wave to the headset (<local>) or module (<netw>). Seealso
Section 3.1.2.3.
DSP=detect Detects audio frequencies in local input signals. See also Section 3.1.2.4.
Reset Resets audio codec adapter
Table 2: Terminal mode commands
Command Description/Remark
RS232
Interface
DSB75
connector
MCU
DIP
switch
Ext.
I2C
Codec
Headphone
Microphone
Handset
UART I2C
PCM/I2S
I2C
PCM/I2S
2 3
1
1
2
I2C:Eitherpath1orpath2isactivated.
CodecisworkingonlyinslavemodeforI2C
PCM/I2S:Eitherpath1orpath2orpath3isactivated.

Audio Codec Adapter Setup for Cinterion® Modules
3 Audio Codec Adapter Setup
33
audio_codec_adapter_setup_v04 2019-10-16
Confidential / Released
Page 16 of 34
3 Audio Codec Adapter Setup
3.1 Assembly with DSB75 and AH6-DSB75 Adapter
The Audio Codec Adapter setup with DSB75 and AH6-DSB75 Adapter is based on the refer-
ence environment for development, test and approval purposes that is described in the Startup
User Guide of a specific module. For detailed information on the startup environment please
refer to [4]. The Audio Codec Adapter setup comprises the following hardware components:
DSB75 Development Support Board, AH6-DSB75 Adapter, Evaluation module as well as Au-
dio Codec Adapter. The below Figure 11 shows how these hardware components are assem-
bled - with all jumper settings and switches in their default positions.
Figure 11: Audio codec adapter setup
DSB75Audio Codec Adapter
AH6-DSB75 AdapterEvaluation Module
Crimped cable to access
Audio Codec Adapter Headsetvia RS232 interface
(PLS8-E sample) MS-AGND jumper

Audio Codec Adapter Setup for Cinterion® Modules
3.1 Assembly with DSB75 and AH6-DSB75 Adapter
33
audio_codec_adapter_setup_v04 2019-10-16
Confidential / Released
Page 17 of 34
3.1.1 Configuration
Depending on the module andthe required audio scenario, the Audio Codec Adapter mayhave
to be configured in different ways - and with different settings. As described in Section 2.1.2.2,
the Audio Codec Adapter can be configured in two ways - by means of a DIP switch or via
RS232 COM port and a special Terminal mode. Both possibilities are referred to in the below
sections that describe the possible configuration settings for various modules, including DIP
switch settings and settings for the module via AT command.
3.1.1.1 Master/Slave
Master and slave configuration settings are seen from the point of view of the Audio Codec
Adapter. For example, if a module is configured as master (see [1]: AT^SAIC), the Audio Codec
Adapter must be configured as slave. In order to avoid outputs driving outputs, this setting is
important. Note that ELS31 modules cannot be configured as masters. As slaves they are
therefore always the receiver of the master clock.
In master mode the bit clock (BCLK; see Section 3.1.1.2) and sampling rate (Framesync =
FSC; see Section 3.1.1.3) are driven by the Audio Codec Adapter. The appropriate level con-
verters are set to output. Also note that with MAX9860, BCLK and FSC can be set separately
as Master or Slave, while NAU8822 can only be switched to either Master or Slave.
3.1.1.2 Bit Clock
In slave mode the bit clock is derived from the PCM/DAI interface lines. There is no need to
adjust anything at the Audio Codec Adapter.
In master mode however, the bit clock is derived directly from the master clock (MCLK) provid-
ed by the Audio Codec Adapter’s MCU.
While in master mode, the following command can be specified in order to configure the bit
clock: BCLK=128 (NAU8822 only) / 256 / 512 / 1024 (MAX9860 only) / 2048 (Default
BCLK rating is 2048MHz)
See Section 2.1.2.2 for details on how to access the Audio Codec Adapter via Terminal mode
for configuration purposes.
3.1.1.3 Framesync
The sampling rate (=Framesync or word select) must be selected for master and slave modes.
The settings can be either 8KHz (NB) or 16KHz (WB) frequency, and either long or short PCM
frame or I2S framesync. The default FSC setting is 8KHz (NB=Narrow Band).
In SLAVE mode the FSC is set automatically once after a reset or by querying the FSC setting
using the command FSC. In this case the FSC frequencies are measured at 8KHz and set to
this value.
See Section 2.1.2.2 for details on how to access the Audio Codec Adapter via Terminal mode
for configuration purposes.

Audio Codec Adapter Setup for Cinterion® Modules
3.1 Assembly with DSB75 and AH6-DSB75 Adapter
33
audio_codec_adapter_setup_v04 2019-10-16
Confidential / Released
Page 18 of 34
Please note that all PCM data and frame synchronization signals are written to the PCM bus
on the rising clock edge and read on the falling edge, whereas all I2S data and frame synchro-
nization signals are written to the I2S bus on the falling clock edge and read on the rising edge.
The following figures show the various timings for the Framesync modes. For a further mea-
sured sample please also refer to Appendix A - DAI Signal Timings at Oscilloscope.
I2S mode3
PCM short FSYNC mode (NB)
PCM long FSYNC mode (NB)
3. Most modules use I2S left channel only. PHS8 can use the right channel for microphone array function-
ality.

Audio Codec Adapter Setup for Cinterion® Modules
3.1 Assembly with DSB75 and AH6-DSB75 Adapter
33
audio_codec_adapter_setup_v04 2019-10-16
Confidential / Released
Page 19 of 34
3.1.1.4 DIP Switch and AT Command Settings
MAX9860
Table 4 list the default DIP switch and AT^SAIC command settings required to setup the MAX9860 for a specific (sample) module.
Legend:
0: Switch set to the left position; 1: Switch set to right position; X: Switch setting irrelevant
"LEDs": The colors , , and indicate the color of the LEDs that light up at the Audio Codec Adapter.
Table 3: MAX9860 DIP switch and AT command settings for selected products
Product AT^SAIC setting Audio Codec Adapter DIP switch settings Comment
Slave/
Master MST2/
MST1 PCM/
I2S Short/
Long NB/
WB 1.8V/
3.0V Int./Ext.
MCLK Int./Ext.
I2C
EHS5/6 - 0 X01 0 1 0 0
BGS2/AGS2 SAIC=1,1 0 X01 0 1 0 0
SAIC=3,1 0 X10 0 1 0 0
PHS8 R3 SAIC=1,1,1,2,0,0,1 0 X00 0 1 0 0
SAIC=1,1,1,1,0,0,1 0 X00 0 1 0 0
SAIC=1,1,1,2,1,0,1 1 1 0 0 0 1 0 0 Check master setting on the AH6-DSB75 Adapter.1
1. The module (configuration) is a slave for clock as well as frame synchronization signals generated on the Audio Codec Adapter. Note: In this case the MS – AGND jumper on
AH6-DSB75 Adapter (X305) must be removed for correct signal directions through the AH6-DSB75 Adapter’s voltage converters. The MS - AGND jumper is show in Figure 11.
PLS8 R3 SAIC=1,1,1,3,0,0,1,0 0 X00 0 1 0 0
SAIC=1,1,1,2,1,0,1,1 1 1 0 0 1 1 0 0 Check master setting on the AH6-DSB75 Adapter.1
SAIC=3,1,1,1,0,0,1,0 0 X1X01 0 0
SAIC=3,1,1,1,0,0,1,1 0 X1X11 0 0
PLS8 R2 SAIC=3,1,1,0,0,0,1,0 0 X1X010 0
ALAS3 SAIC=1,1,1,0,0,0,1,0 0 X00 0 0 0 0 DSB75 adapter for ALAS3 requires 1.8V levels.2
2. Note: With ALAS3 evaluation modules the ALAS6-DSB75 Adapter is required instead of the AH6-DSB75 Adapter. As this adapter supports 1.8V voltage levels, the correspond-
ing level switch must be set to “1V8”.
ELS31 SAIC=1,1,1,4,1,1,1,1 1 1 0 11 1 0 0 Check master setting on the AH6-DSB75 Adapter.1

Audio Codec Adapter Setup for Cinterion® Modules
3.1 Assembly with DSB75 and AH6-DSB75 Adapter
33
audio_codec_adapter_setup_v04 2019-10-16
Confidential / Released
Page 20 of 34
NAU8822
Table 4 list the default DIP switch and AT^SAIC command settings required to setup the NAU8822 for a specific (sample) module.
Legend:
1: Switch set to up position
0: Switch set to the down position
"LEDs": The colors , , and indicate the color of the LEDs that light up at the Audio Codec Adapter.
Table 4: NAU8822 DIP switch and AT command settings for selected products
Product AT^SAIC setting Audio Codec Adapter DIP switch settings Comment
Master/
Slave I2S/
PCM Long/
Short WB/
NB 3.0V/
1.8V Ext./Int.
MCLK Ext./Int.
I2C
EHS5/6 - 0 0 1 0 0 0 0
BGS2 SAIC=1,1 0 0 1 0 0 0 0
AGS2 SAIC=3,1 0 1 0 0 0 0 0
ELS61 SAIC=1,"","","",0,0,1,0,0 0 0 10 0 0 0
ELS31 SAIC=1,1,1,2,1,1,1,0 1 0 10 0 0 0 Check master setting on the AH6-DSB75 Adapter.1
1. The module (configuration) is a slave for clock as well as frame synchronization signals generated on the Audio Codec Adapter. Note: In this case the MS – AGND
jumper on AH6-DSB75 Adapter (X305) must be removed for correct signal directions through the AH6-DSB75 Adapter’s voltage converters. The MS - AGND jumper
is show in Figure 11.
PHS8 R3 SAIC=1,1,1,1,1,0,0 0 0 0 0 0 0 0
SAIC=1,1,1,1,1,1,0 1 0 0 0 0 0 0 Check master setting on the AH6-DSB75 Adapter.1
SAIC=1,1,1,1,3,1,0 1 0 0 0 0 0 0 Check master setting on the AH6-DSB75 Adapter.1
PLS8 R2 SAIC=1,1,1,3,0,0,1,1 0 0 0 1 0 0 0
SAIC=3,1,1,0,0,0,1,0 0 1 0 0 0 0 0
ALAS5 SAIC=3,1,1,0,0,0,1,0 0 1 0 0 1 0 0
This manual suits for next models
35
Table of contents
Other Thales Adapter manuals
Popular Adapter manuals by other brands

Aspect
Aspect TDMHA.00 installation guide

ZyXEL Communications
ZyXEL Communications NWD-211AN - brochure

Aiphone
Aiphone GHW-LC Installation and operation manual

Magewell
Magewell XI102XE-HD user guide

Lava Computer
Lava Computer nSynC-Staging Reference manual

Extron electronics
Extron electronics ASA 100 Series Brochure & specs