Garmin Force Instruction manual

FORCE™TROLLING MOTOR
Quick Start Manual
DRAFT
Getting Started
WARNING
Do not run the motor when the propeller is out of the water.
Contact with the rotating propeller may result in severe injury.
Do not use the motor in areas where you or other people in the
water may come into contact with the rotating propeller.
Always disconnect the motor from the battery before cleaning or
servicing the propeller to avoid injury.
You are responsible for the safe and prudent operation of your
vessel. The autopilot features on the trolling motor are tools that
enhance your capability to operate your boat. They do not
relieve you of the responsibility of safely operating your boat.
Avoid navigational hazards and never leave the motor controls
unattended.
Learn to operate the autopilot features on calm and hazard-free
open water.
Use caution when using operating the trolling motor near
hazards in the water, such as trees, shallow rocks, docks,
pilings, and other boats.
CAUTION
When using the autopilot features, be prepared for sudden
stops, acceleration, and turns.
When stowing or deploying the motor, be aware of the risk of
entrapment or pinching from moving parts, which can result in
injury.
When stowing or deploying the motor, be aware of slick surfaces
around the motor. Slipping when stowing or deploying the motor
may result in injury.
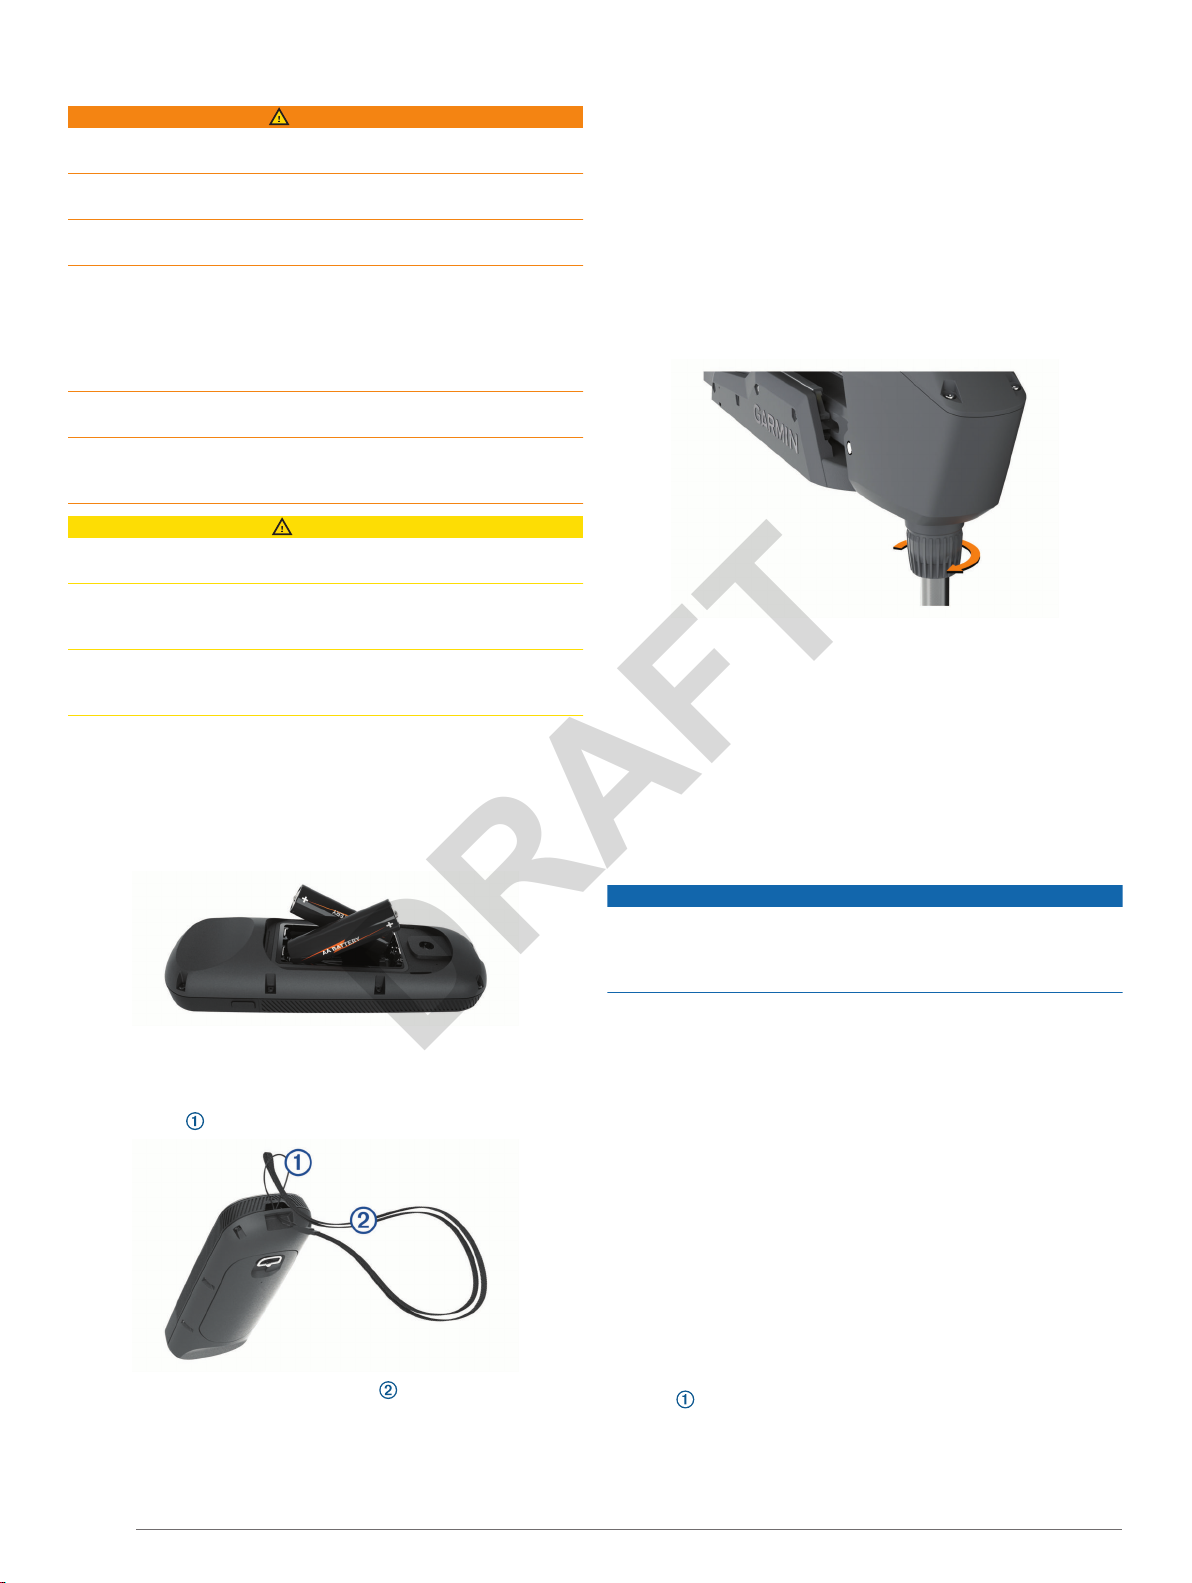
Installing Batteries
The remote control operates using two AA batteries (not
included). Use lithium batteries for best results.
1Turn the D-ring counter-clockwise, and pull up to remove the
cover.
2Insert two AA batteries, observing polarity.
3Replace the battery cover, and turn the D-ring clockwise.
Attaching a Lanyard
1Starting from the back of the remote control, insert the loop of
the lanyard through the slot.
2Thread the other end of the lanyard through the loop, and
pull it tight.
3If necessary, place the lanyard around your neck or wrist to
tether it during use.
Deploying the Motor from the Stowed Position
1Disengage the safety strap.
2Pull the pull-cable back until it stops to release the latch, and
continue to hold it tight.
3Lift the motor up and forward using the pull-cable, then lower
it slowly into the deployed position.
4If necessary, push down on the mount arm to lock the motor
in the deployed position.
Adjusting the Depth of the Trolling Motor
1Move the motor so that it stops halfway between the stowed
and deployed positions.
2Loosen the collar at the base of the steering system housing.
3Raise or lower the depth of the trolling motor.
4Tighten the collar at the base of the steering system housing.
5Select an action:
• If you are deploying the trolling motor, move the motor to
the fully deployed position to check the depth.
• If you are stowing the trolling motor, move the motor to the
stowed position to check the depth.
6Repeat this procedure if necessary to set the correct depth
for the deployed or stowed position.
Stowing the Motor from the Deployed Position
NOTICE
You must allow the motor to stop rotating completely before
moving it to the stowed position. If the motor is rotating when
you move it to the stowed position, it may damage the steering
system.
1Pull the pull-cable up until it stops to release the latch, and
continue to hold it tight.
2Lift the pull-cable up and backward to lift and lower the motor
slowly into the stowed position.
NOTE: You may need to adjust the depth of the trolling motor
so it rests correctly on the mount base in the stowed position
(Adjusting the Depth of the Trolling Motor, page 2). If it is
adjusted too shallow, it may press on the gas spring. If it is
adjusted too deep, it may hang off the end of the mount base.
3If necessary, push down on the steering system housing to
lock it in the stowed position.
4Secure the safety strap (Securing the Safety Strap,
page 2).
Securing the Safety Strap
The safety strap holds the motor securely to the base in the
stowed position and prevents unintended deployment.
1With the motor in the stowed position, lift the long end of the
strap over the top of the motor.
2 Quick Start Manual
DRAFT

2Feed the end of the strap through the buckle on the other
end of the strap.
3Pull the strap through the buckle until it holds the motor
securely to the mount.
4Pull the strap away from the buckle, and push down to fasten
it to the other side of the strap.
Updating the Software
You should update the trolling motor software for the best
performance.
Use the ActiveCaptain® app on your compatible smartphone
to download and install software updates on the trolling
motor.
See the online owner's manual for more information
(Downloading the Manuals from the Web, page 6).
Operation
You can use the remote control, the foot pedal, a compatible
Garmin® chartplotter, or any combination of these devices to
operate the trolling motor.
NOTE: Some features available when using the remote control
and chartplotter are not available when using the foot pedal
only.
Trolling Motor Display Panel
The display panel on the trolling motor mount shows important
information at a glance.
Speed Shows the motor speed level.
Trolling motor
battery status
Green: the motor battery power is good.
Yellow: the motor battery power is low.
Red: the motor battery power is critically low.
GPS signal
status
Green: the motor has acquired a GPS position.
Yellow: the motor has a poor GPS signal.
Red: the motor does not have a GPS signal.
Motor status Shows the status of the trolling motor (Status
Indicator, page 3).
Power Hold to turn the motor off.
NOTE: By default, the trolling motor turns on
automatically when it receives power. It is not
necessary to push this button to turn it on.
When the propeller is turning, press to stop the
propeller.
Press three times to enter pairing mode.
Propeller
status
Illuminates when the propeller is enabled.
Heading hold
status
Illuminates when heading hold is enabled.
Anchor lock
status
Illuminates when anchor lock is enabled. Anchor
lock uses the trolling motor to hold your position.
Status Indicator
The LED indicates the motor status.
Green Normal operation
Red Solid: system booting
Blinking: system error
Blue Pairing mode
Yellow Recovery mode (for software updates and recovery
procedures)
Remote Control Keys
Key Description
Hold to turn the remote control on and off.
Press to enable and hold the cruise control at the current
speed over ground (SOG).
Press to disable the cruise control and return to manual
speed control.
If the propeller is enabled, press to set the it to full speed.
If the propeller is disabled, press to enable the propeller
and set it to full speed.
Press again to return to the previous speed and propeller
state.
Press for manual control.
Hold to steer using gestures (Using Gesture Controls to
Steer, page 5).
Press to enable and disable the propeller.
Press to navigate the menu.
When in the menu, press to select a menu item, and
press to go back.
When in anchor lock, press to jog the anchor lock position
forward, backward, left, or right.
When in heading hold or manual control, press and for
single-degree step turns, or hold for steering in five-degree
increments.
Press and for incremental speed changes, or hold for
continuous speed changes.
Quick Start Manual 3
DRAFT

Key Description
Press to enable heading hold (set and maintain the current
heading).
Press to disable heading hold, stop the propeller, and
resume manual control.
Hold to set the heading hold by pointing the remote (Using
Gesture Controls to Set and Adjust Heading Hold,
page 5).
Press to enable anchor lock. Anchor lock uses the trolling
motor to hold your position.
When in anchor lock, press to disable heading hold and
return to the previous steering mode.
Hold to jog the anchor lock position by pointing the remote
(Using Gesture Controls to Adjust Your Anchor Lock
Position, page 5).
Press to open the menu.
Press to exit the menu.
Press to mark a waypoint.
1 through 4 Press to open the shortcut for the Garmin chartplotter
assigned to the key. 1
Remote Control Screen
Shows the operational status of the trolling motor.
For example, when in manual control, Manual is shown, and
when the heading hold is enabled, Heading Hold is shown,
along with the heading-hold set point in degrees.
Shows the trolling motor battery status.
Green: the motor battery power is good.
Yellow: the motor battery is low.
Red: the motor battery power is critically low.
TIP: You can view the remote control battery level by pressing
.
Shows the status of the propeller.
When the propeller icon is shown, the propeller is enabled.
When the propeller icon is not shown, the propeller is disabled.
Shows the GPS signal strength of the trolling motor.
PROP Shows the speed level of the propeller.
SOG Shows the measured speed over ground (SOG) in the specified
units.
Foot Pedal
You can use the foot pedal to operate the trolling motor.
Momentary
propeller
control
Hold to enable the propeller at the set speed.
Release to disable the propeller.
Speed wheel Rotate the wheel away from you to increase the
propeller speed or cruise control speed.
Rotate the wheel toward you to decrease the
propeller speed or cruise control speed.
NOTE: The speed wheel is inactive when anchor
lock is enabled.
Steering pedal Push the pedal with your toes to turn the motor
clockwise.
Push the pedal with your heel to turn the motor
counter-clockwise.
NOTE: When anchor lock or heading hold is
enabled, or you are following a route, press the
pedal to resume manual control at the previous
propeller speed.
Status indicator Shows the status of the foot pedal (Status
Indicator, page 4).
Continuous
propeller
control
Press to enable and disable the propeller.
Heading hold Press to set and maintain the current heading.
Press to disable heading hold, stop the propeller,
and resume manual control.
Anchor lock Press to enable anchor lock . Anchor lock uses the
trolling motor to hold your position.
Press to disable anchor lock and return to the
previous steering mode.
Status Indicator
The LED on the foot pedal indicates the foot pedal status.
Flashes green, then
stops
The foot pedal is powering on.
Flashes blue, then
stops
The foot pedal is connected to the trolling motor.
Flashes green when
pushing a button
The foot pedal is sending a command for the
button being pushed.
Flashes red when
pushing a button
The foot pedal is not connected to the trolling
motor.
Blinking red The foot pedal batteries are low and should be
replaced.
Off The LED turns off when the pedal is connected
to the trolling motor and not sending commands.
This prolongs battery life.
Gesture Controls
You can point or move the remote control to interact with the
trolling motor. You must calibrate the compass in the trolling
motor (Calibrating the Trolling Motor, page 5), and the
compass in the remote control (Calibrating the Remote Control,
page 5) before you can use gesture controls.
1Requires a connection to a compatible Garmin chartplotter.
4 Quick Start Manual
DRAFT
Using Gesture Controls to Steer
You can steer the motor by moving the remote control.
1If necessary, engage the propeller.
2Hold .
3While holding , move the remote control to the left or right
to steer port or starboard.
4Release to stop steering.
Using Gesture Controls to Set and Adjust Heading Hold
You can use the remote control to set and adjust the heading
hold in a specified heading.
1If necessary, engage the propeller.
2Point the remote control toward where you want to engage or
change the heading hold.
3Hold .
The motor engages or changes the heading hold, and steers
the boat in the direction you are pointing while you hold the
key.
4Release to set the heading hold direction.
Using Gesture Controls to Adjust Your Anchor Lock
Position
You can use the remote control to adjust your position when in
anchor lock.
1If necessary, engage anchor lock.
2Hold .
3Point the remote control in the direction you want to move
your anchor lock position.
Your position jogs 1.5 m (5 ft.) in the direction you point.
4Repeat the previous step until the anchor lock is in the
location you want.
5Release .
Basic Configuration
You should perform these basic configuration procedures before
using your trolling motor. For a complete list of settings and
configuration options, see the online owner's manual
(Downloading the Manuals from the Web, page 6).
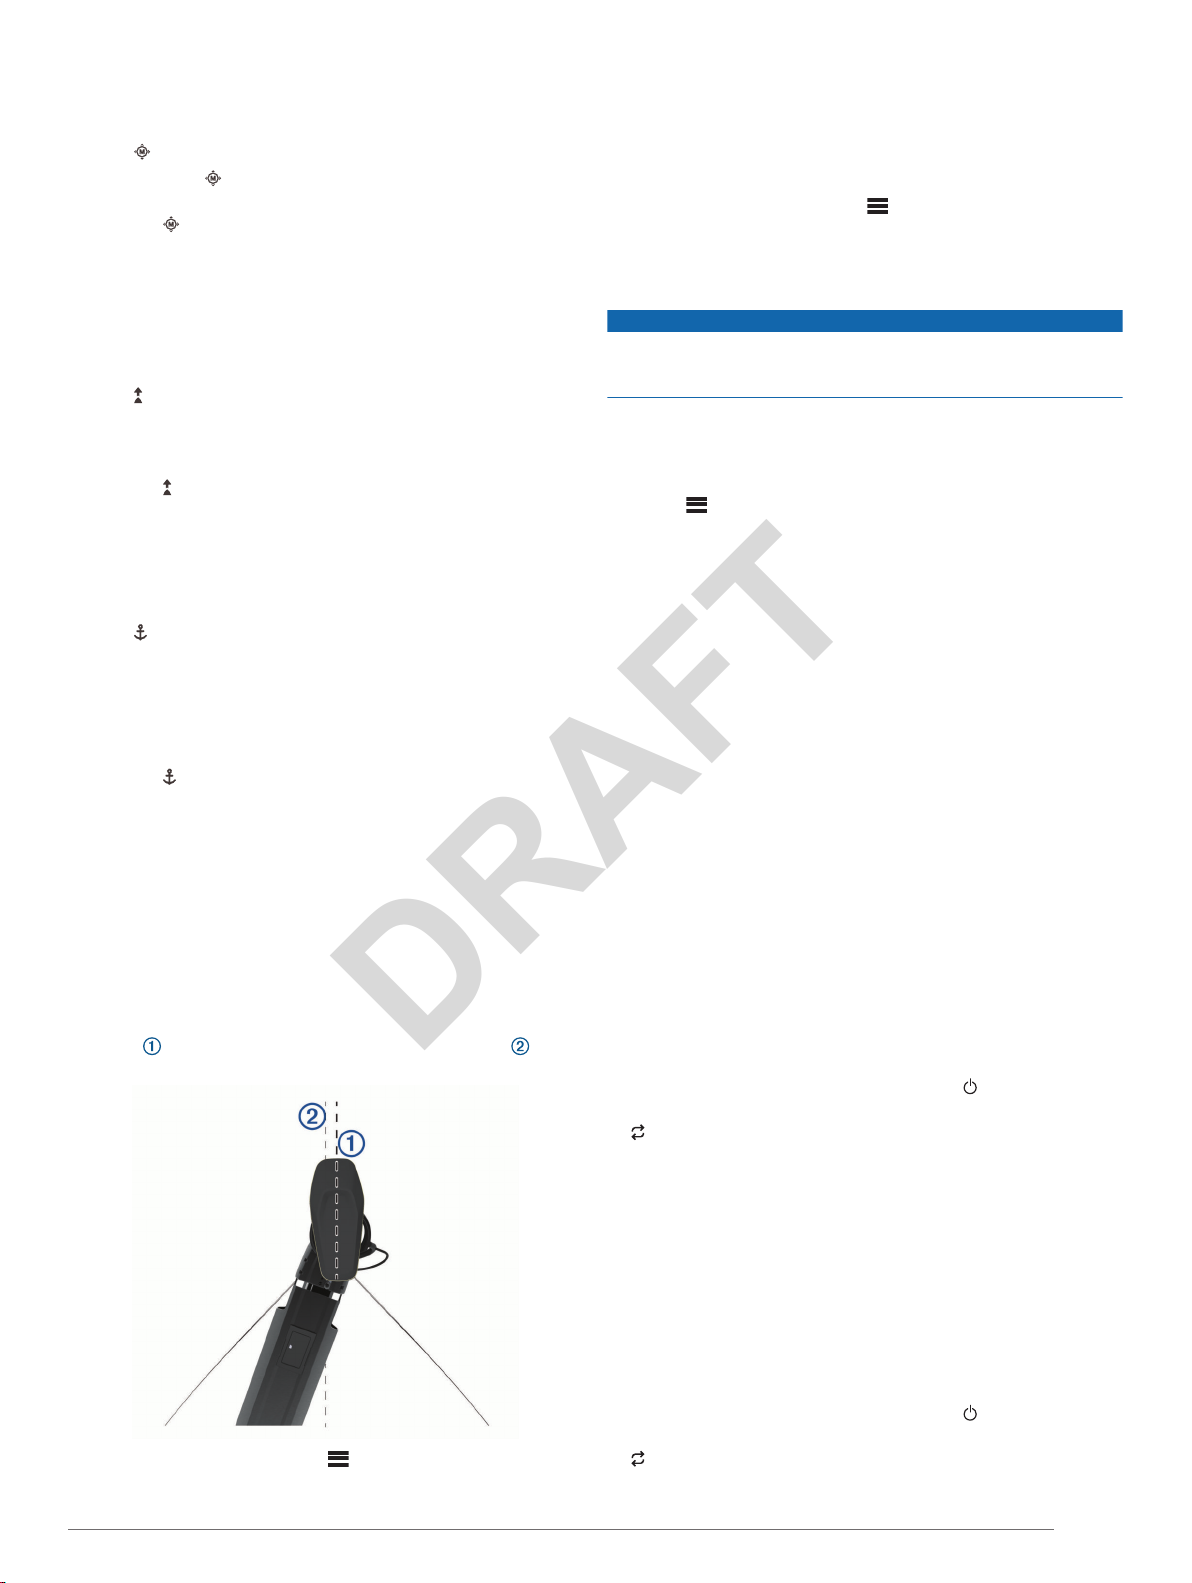
Setting the Bow Offset
Based on the installation angle, the trolling motor may not align
with the center line of your boat. For the best results, you should
set the bow offset.
1Using the remote control, adjust the angle of the trolling
motor so it aligns with the center line of your boat ,
pointing straight forward.
2On the remote control, select > Settings > Trolling Motor
> Calibrate > Bow Offset.
3Repeat this procedure if necessary.
Calibrating the Trolling Motor
You must calibrate the compass in the trolling motor before you
can use the autopilot features.
1Drive the boat to an open area of calm water.
2On the remote control, select > Settings > Trolling Motor
> Calibrate > Compass.
3Follow the on-screen instructions.
Calibrating the Remote Control
NOTICE
Calibrate the electronic compass outdoors. To improve heading
accuracy, do not stand near objects that influence magnetic
fields, such as vehicles, buildings, and overhead power lines.
You must calibrate the compass in the remote control before
you can control the motor using gestures. If the gesture controls
are not working properly after calibration, you can repeat this
process as often as needed.
1Select > Settings > Remote > Calibrate.
2Select Start, and follow the on-screen instructions.
Gain Settings
If the autopilot features, such as heading hold and anchor lock,
do not perform as expected, you may need to adjust the gain
settings.
See the online owner's manual for more information
(Downloading the Manuals from the Web, page 6).
Connecting to a Chartplotter
Your compatible Garmin chartplotter must have the latest
software version installed before you can connect the trolling
motor.
You can connect the trolling motor wirelessly to a compatible
Garmin chartplotter on your boat. After you connect to a
compatible chartplotter, you can control the trolling motor from
the chartplotter in addition to the remote control and foot pedal.
Download the latest version of your chartplotter's owner's
manual for complete operation instructions.
1Turn on the chartplotter and the trolling motor.
2Make sure that the chartplotter is hosting a wireless network.
NOTE: If you have multiple chartplotters installed, only one is
the wireless network host. Consult your chartplotter's owner's
manual for more information.
3On the chartplotter, select Settings > Communications >
Wireless Devices > Garmin Trolling Motor > Start.
4On the trolling motor display panel, press three times to
enter pairing mode.
on the trolling motor display panel illuminates blue as it
searches for a connection to the chartplotter, and changes to
green when the connection is successful.
5After the chartplotter and trolling motor connect successfully,
enable the trolling motor bar on the chartplotter to control the
motor.
Download the latest version of your chartplotter's owner's
manual for complete operation instructions.
Pairing the Remote Control
The remote control is paired with the trolling motor at the factory,
but you may need to pair them again if the connection is broken.
1Turn on the trolling motor.
2On the trolling motor display panel, press three times to
enter pairing mode.
on the trolling motor display panel illuminates blue as it
searches for a connection.
Quick Start Manual 5
DRAFT
Other manuals for Force
7
Table of contents
Other Garmin Outboard Motor manuals


