Garneau e-URBANIA User manual

E-BIKE USER MANUAL

CONTAINS USEFUL INFORMATION. PLEASE KEEP THIS MANUAL.
LOUIS GARNEAU SPORTS INC.
30, DES GRANDS LACS STREET, ST-AUGUSTIN-DE-DESMAURES, QUÉBEC, CANADA, G3A 2E6
TEL.: (418) 878-4135 / 1-800-463-8356 FAX: (418) 878-4335 / 1-800-463-5131
LOUIS GARNEAU U.S.A. INC.
3916 US ROUTE 5, P.O. BOX 1460 DERBY, VT 05829 USA
TEL.: (802) 334-5885 / 1-800-448-1984 FAX: (802) 334-6425 / 1-800-448-1985
WARNING
DEALER CAUTION! PLEASE GIVE THIS
DOCUMENT TO THE CUSTOMER UPON
PURCHASE.
MAN-00003/20-02-19

1
Dear customer,
We thank you for your purchase. In order to fully enjoy your new bike in a secure manner, it is strongly advised to read this user manual
attentively. It contains technical information required for the good performance and maintenance of your bike, as well as important
information for your safety. Negligence could result in expensive damage as well as serious accidents.
If you have other questions, or if you haven’t understood certain details, do not hesitate to contact your dealer who will gladly inform you.
REGISTRATION
In order to offer quality products and provide good customer support, Louis Garneau Sports is offers an online registration system for
your product. To stay informed by Louis Garneau Sports of any development regarding your product, follow the link below to register your
bike online. Your comments are appreciated as they help us develop and manufacture better cycling equipment.
Register your bike online at: garneau.com → Product info → Bike Registration.
FOREWORD

2
WARRANTY
Louis Garneau Sports warrants, for the original owner only, the frame, rigid fork or original component parts of each new Louis Garneau
bicycle to be free from defects in material and workmanship for the following specified periods for the Bafang electric systems.
LIFETIME LIMITED WARRANTY:
- Frame
5 YEARS FROM THE DATE OF PURCHASE:
- Fork
2 YEARS FROM THE DATE OF PURCHASE:
- Motor
- Battery (a loss of no more than 30% of its original nominal capacity at a maximum of 500 charge cycles)
1 YEAR FROM THE DATE OF PURCHASE:
- Controller
- Sensor
- Charger
- Wiring
The maximum permissible total weight (bike, rider and luggage) for our e-bikes is 135 kg (300 lb).
For all other parts, components, and exclusions, visit Garneau.com → Product info → Warranties → Warranty details.

3
FOR SAFETY, BE SURE TO READ THIS USER MANUAL THOROUGHLY BEFORE USE AND FOLLOW IT FOR CORRECT USE.
1. IMPORTANT NOTICE 5
2. SAFETY 5
2.1 Handling the battery 5
2.2 Safe riding 6
2.3 Using the product safely 7
2.4 Battery maintenance 8
3. COMPONENTS 9
4. CHARGING INSTRUCTIONS 10
4.1 Handling 10
4.2 Disposal 10
4.3 Charging ports 10
5. BICYCLE MAINTENANCE 11
5.1 Battery 11
5.1.1 Installation 11
5.1.2 Sleep mode 13
E-BIKE USER MANUAL
TABLE OF CONTENTS

4
5. BICYCLE MAINTENANCE (SUITE)
5.2 Lights 14
5.2.1 Front light 14
5.2.2 Rear light 15
5.3 Rear wheel 16
5.4 Bottom bracket 18
6. e-URBANIA 21
6.1 Functions 21
6.2 Display 25
6.3 Troubleshooting 26
7. e-ESPACE 27
7.1 Functions 27
7.1.1 ON/OFF 28
7.1.2 Assistance level 29
7.1.3 Turning the headlight on/off 29
7.1.4 Walk assistance mode (6 km/h) 29
7.2 Display settings 30
7.2.1 Reset single-trip distance 32
7.2.2 Selecting Metric or Imperial units 32
7.2.3 Backlight brightness setting 33
7.2.4 “Auto Off” time setting 33
7.2.5 Wheel size 34
7.2.6 Check speed limit 34
7.2.7 Check battery information 34
7.3 Troubleshooting 35

5
1. IMPORTANT NOTICE
• Contact the place of purchase or a bicycle dealer for information concerning the installation and adjustment of products which are not found
in the user manual.
• Do not disassemble or alter this product.
• Use the product according to local laws and regulations.
• For guidelines concerning replacement, contact the place of purchase or a bicycle dealer.
• Be sure to observe the following to avoid burns or other injury from fluid leakages, overheating, fire or explosions.
2. SAFETY
2.1 HANDLING THE BATTERY
• Do not deform, modify, disassemble or apply solder directly to the battery. Doing so may cause leakage, overheating, bursting, or ignition of
the battery.
• Do not leave the battery near sources of heat such as heaters, stoves or fireplaces. Do not heat the battery or throw it into a fire. Doing so may
cause the battery to ignite or explode.
• Do no throw the battery or subject it to strong shocks. Doing so may cause overheating, an explosion or fire.
• Do not place the battery in fresh water or sea water and do not allow the battery terminals to get wet. Doing so may cause the battery to
overheat, explode or ignite.
• When charging, use the charger and follow the instructions specified by the battery manufacturer. Disregarding these instructions may cause
the battery to overheat, explode or ignite.
• If any liquid leaking from the battery gets into your eyes, immediately wash the affected area thoroughly with clean water such as tap water
without rubbing your eyes and seek medical advice immediately. If this is not done, the battery liquid could damage your eyes permanently.
• Do not recharge the battery in places with high humidity or outdoors. Doing so may result in electric shock.
• Do not insert or remove the plug when it is wet. Doing so may result in electric shock. If there is water leaking from the plug, dry it thoroughly
before inserting it.
• If the battery does not reach full charge after 5 hours (e-Urbania) or 4 hours (e-Espace), immediately unplug the battery from the outlet to stop
charging and contact the place of purchase. Failure to do so may cause the battery to overheat, explode or ignite.

6
• Do not use the battery if it has any noticeable scratches or other external damage. Doing so may cause the battery to overheat or explode, as
well as problems with operation.
• The operating temperature ranges for the battery are specified below. Do not use the battery in temperatures outside these ranges. If the battery
is used or stored in temperatures outside these ranges, fire, injury or problems with operation may occur.
1. During use: –20°C to 60°C
2. When charging: 0°C to 45°C
• Do not leave the battery in a place exposed to direct sunlight, inside a vehicle on a hot day or in other hot places. Doing so may result in battery
leakage.
• If any leaked fluid gets on your skin or clothes, wash it off immediately with clean water. The leaked fluid could damage your skin.
• Store the battery in a safe place out of reach of children and pets.
• When you carry a power-assisted bicycle in a car, remove the battery from the bicycle and place the battery on a stable surface in the car.
• Do not short-circuit the (+) and (-) terminals with other metals.
• Do not store batteries with objects such as hairpins, coins or screws.
2.2 SAFE RIDING
• Do not pay too much attention to the cycle computer when riding, otherwise accidents may result.
• Make sure the wheels are securely installed on the bicycle before riding. If the wheels are not securely installed, the bicycle may fall over and
serious injury may result.
• If riding a power-assisted bicycle, make sure that you are fully familiar with the start-off characteristics of the bicycle before riding it on roads
with several vehicle lanes and pedestrian footpaths. If the bicycle starts off suddenly, accidents may result.
• Make sure the bicycle lights illuminate before riding at night.

7
2.3 USING THE PRODUCT SAFELY
• Be sure to remove the battery and charging cable before wiring or attaching parts to the bicycle. Otherwise, an electric shock may result.
• Do not move the bicycle when charging the battery while it is installed on the bicycle. The power plug for the battery charger could come loose
and not be fully inserted into the electrical outlet, resulting in a risk of fire.
• When installing this product, be sure to follow the instructions given in the user manual. Furthermore, it is recommended that you use only
genuine parts. If bolts and nuts are left loosened or the product is damaged, the bicycle could fall over suddenly and serious injury may result.
• Do not disassemble the product. Disassembling it may cause injury.
• After reading the user manual carefully, keep it in a safe place for later reference.
• Be sure to install caps to any connectors not being used.
• For installation and adjustment of the product, consult a dealer.
• The product is designed according to an IP54 rating (e-Urbania/e-Espace) to withstand wet weather riding conditions. However, the product
must never be submersed in water.
• Do not clean the bicycle under a high-pressure wash. If water gets into any of the components, operating problems or rusting may occur.
• Do not turn the bicycle upside down. The cycle computer or the shifting switch may get damaged.
• Handle the product carefully and avoid subjecting it to any strong shocks.
• When charging the battery while it is mounted on the bicycle, be careful of the following:
-When charging, make sure there is no water on the battery mount charger outlet or the charger plug.
-Make sure the battery is locked into the battery mount before charging.
-Do not remove the battery from the battery mount while charging.
-Do not ride with the charger mounted.
-Always place the cover over the battery mount charger socket when not charging.
• Periodically check the battery charger and adapter for any damage, particularly the cord, plug and case. If the charger or adapter is broken, do
not use it until it has been repaired.
• Cycling is a demanding activity and must be practiced only by people with sufficient physical and mental abilities as well as knowledge of the
risks involved in the practice of this activity.
• Do not allow children to play near the product.

8
2.4 BATTERY MAINTENANCE
• Only charge the battery with the included charger.
• When not using the battery for an extended period, charge it to approximately 50%. Check the charge condition after six months. When only one
LED of the charge-control indicator lights up, recharge the battery again to approximately 50%.
• Once the battery is charged, unplug the battery from the charger and unplug the charger from the wall socket.
• A Li-Ion battery will self-discharge over time. If the battery is left uncharged then stored without charging, it may discharge to such a low state
that the battery can no longer be charged and must be replaced.
• Store the battery in a dry, well-ventilated location. Protect the battery from moisture and water.
• Under unfavorable weather conditions, it is recommended to remove the battery from the bicycle and store it in a protected location.
• The battery can be stored at temperatures between -4°F (-20°C) and 113°F (+45°C). For a long battery life, however, it is best to store the battery at
room temperature of approximately 68°F (20°C).
• If the bicycle is not ridden for an extended time, do not store the battery on the bicycle.

9
3. COMPOMENTS
Battery
Front light
Rear light
Motor
Controller

10
• Connect the charger directly to a power source. Never use extension
cords.
• Avoid reverse charging.
• Do not use the charger for non-rechargeable batteries, as they can
overheat and fail.
• This charger is not intended to charge automobile batteries.
4.1 HANDLING
• The charger is designed for indoor use only. Do not expose it to rain
or snow.
• Using this charger with other types of batteries may cause these to
burst, resulting in personal injury or damage.
• Do not incinerate, disassemble or short-circuit the battery.
• If the battery performance decreases substantially, the battery
should be replaced.
• Store the charger in a cool and dry place when not in use.
• Disconnect the supply before connecting or disconnecting it to the
battery.
• During charging, the battery must be placed in a well-ventilated
area.
• This appliance is not intended for use by children or persons
with reduced physical, sensory or mental capacities, or lack of
experience and knowledge, unless they are supervised or have
been given instructions concerning the use of the appliance by a
person responsible for their safety.
4.2 DISPOSAL
• This product must not be disposed with domestic waste. This
product must be disposed at an authorized place for recycling of
electrical and electronic appliances.
• By collecting and recycling waste, you ensure the product is
disposed in an environmentally friendly and healthy way and help
save natural resources.
4.3 CHARGING PORTS
The battery can be charged via two charging ports. One is located on
the bicycle and the other is located on the battery itself, allowing you
to charge the battery separately.
4. CHARGING INSTRUCTIONS
Warning: Explosive gases may be released and/or an explosion may
occur if these requirements are not followed.

11
5.1.1 installation
To install the battery on the bike, first make sure that the lock located
on the non-drive side of the bicycle is in the unlocked position.
On the battery, locate the electrical connector side (see image below)
and align it at the bottom of the frame’s battery opening.
5.1 BATTERY
5. BICYCLE MAINTENANCE

12
Then, push the other side of the battery upward to clip it onto the frame.
Once in place, push the other locking system into the lock position to
secure the battery in place for riding.
Make sure to use the key to lock the second mechanism on the drive
side of the bicycle. Once both lock systems are in lock position, the
bicycle can be safely ridden.
In the event that the keys are lost, locate the key lock mechanism on
the bike and note the three-digit code on the lock. Contact your dealer
for a replacement key.

13
5.1.2 Sleep mode
The battery is designed to go in sleep mode by itself after 2h of inactivity
to save power. To start the system again after an automatic shut down,
press the button on of the battery (see image below) to exit the sleep
mode. Once the battery button LED is lit, the controller power button
can be pressed to start the system.
Once the battery is out of its sleep mode, follow the steps below to turn
the system on/off:
Press for 2 seconds, the display will turn ON;
Press for 2 seconds, the display will turn OFF. It will automatically
turn OFF when on standby for 5 minutes.

14
5.2 LIGHTS
5.2.1 Front light
To install the front light, use the long bolt with the help of a 5 mm Allen
key and a 10 mm hex wrench to tighten the light’s bracket to the front
of the fork.
Once the light is installed on the fork, connect the white connector to
the light. To facilitate the connection, the light can be rotated forward
to expose the plug.

15
5.2.2 Rear light
The rear light is already installed on the seatpost. To connect it to
the electrical system, make sure the seatpost is not installed on the
bike and that the wire coming from the bike is out of the seat tube.
Connect the seatpost wire to the seat tube exposed wire. Once
connected, push the excess wire down the seat tube and insert the
seatpost.

16
5.3 REAR WHEEL
To remove the rear wheel, you must first disconnect the wire that
powers the motor. The wire must be unsecured from the frame by
unscrewing the wire holder from the frame using a 5 mm Allen key.
Once the wire is free, pull the connector apart. The connector is located
on the bicycle drive side, under the frame next to the rear wheel.
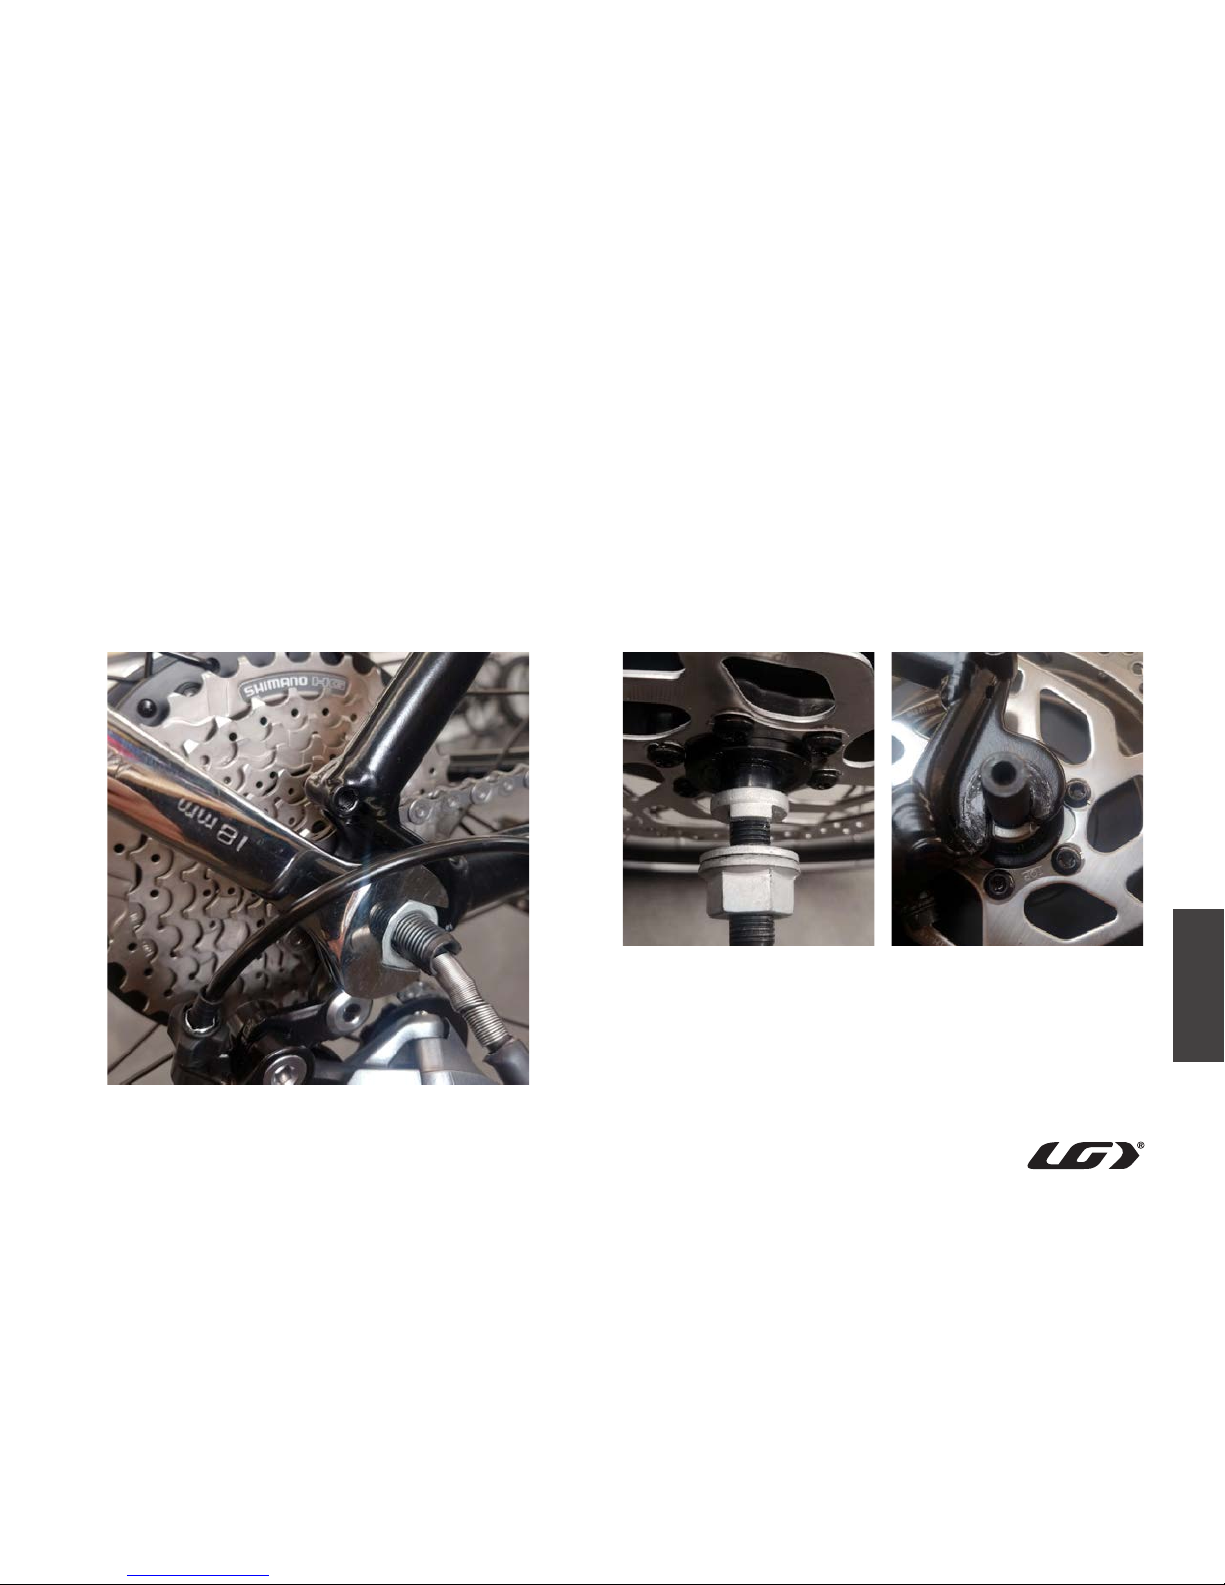
17
Remove the plastic caps from the wheel axle’s hex nuts. Use two 18 mm
hex wrenches to loosen both nuts at the same time. The wheel can
then be removed from the frame.
To re-install the rear wheel on the bicycle, make sure the anti-rotation
washer is aligned with the drop-out opening of the frame.
Once the wheel is re-installed, make sure to tighten the nut to the
specified torque (30-40 Nm or 22-30 ft/lb). Then, connect the wire by
aligning both arrows on the two connectors and secure the wire to the
frame with the previously removed screw.

18
5.4 BOTTOM BRACKET
a. Left cap
b. Right cap
c. Center shaft assembly
d. Left locking ring assembly
e. Bottom bracket
To remove the bottom bracket, use a spanner (Shimano TL-FC38) to
unscrew ( counter clockwise) the right cap (b) from the bottom bracket.
This manual suits for next models
1
Table of contents
Popular Bicycle manuals by other brands


PROPAIN
PROPAIN tyee 2020 Assembly instructions

Cruz
Cruz Bike-Rack G Assembly instructions

DELTA-SPORT
DELTA-SPORT X Bike 66951 Instructions for use

Qualisports
Qualisports Ebike operation instruction

Derby cycle
Derby cycle Pedelec ORIGINAL OPERATING INSTRUCTIONS – GENERAL

Kid's CONCEPT
Kid's CONCEPT Neo Assembly instruction