GASLAND chef Pro Series User manual

3330-A Marathon Ct Charleston, SC 29418
1 (844) 538-7890
www.gaslandchef.com
Built-in Gas Cooktop
Installation Instructions
Available Models
Pro GH2122SF/Pro GH2305SF/Pro GH2365SF

NEVER use this appliance as a space heater to heat or warm the room. Doing
so may result in carbon monoxide poisoning and overheating of the oven.
WARNING: If the information in these instructions is not followed exactly, a fire
or explosion may result causing property damage, personal injury or death.
— Do not store or use gasoline or other flammablevapors and liquids in the
vicinity of this or any other appliance.
— WHAT TO DO IF YOU SMELL GAS
• Do not try to light any appliance.
• Do not touch any electrical switch.
• Do not use any phone in your building.
• Immediately call your gas supplier from a neighbor’s phone.
Follow the gas supplier’s instructions.
• If you cannot reach your gas supplier, call the fire department.
— Installation and service must be performed by a qualified installer, service
agency or the gas supplier.
NEVER Operate the Top surface Cooking Section of this Appliance Unattended.
• Failure to follow this warning statement could result in fire, explosion, or burn
hazard that could cause property damage, personal injury, or death.
• If a fire should occur, keep away from the appliance and immediately call your
fire department.
DO NOT ATTEMPT TO EXTINGUISH AN OIL/GREASE FIRE WITH WATER
WARNING
WARNING
01
www.gaslandchef.com
3330-A Marathon Ct Charleston, SC 29418
1 (844) 538-7890

Contents
Cooktop Description .....................................................................................
Technical Data ..............................................................................................
Packing List ..................................................................................................
Installation ....................................................................................................
Positioning For Gas Cooktop .......................................................................
Installation Guide ..........................................................................................
Gas Connection ............................................................................................
Gas Connection And Check .........................................................................
Electrical Connection ....................................................................................
Converting To Type Of Propane ...................................................................
Using The Cooktop .......................................................................................
Regulating The Flame ..................................................................................
Turning Off ....................................................................................................
Pan Size .......................................................................................................
Cleaning And Maintenance ..........................................................................
Maintenance And Troubleshooting ...............................................................
Warranty .......................................................................................................
04
05
05
06
06
07
11
13
15
16
18
19
20
20
21
23
25
02
www.gaslandchef.com
3330-A Marathon Ct Charleston, SC 29418
1 (844) 538-7890

This appliance can be used by children aged from 8 years and above and
persons with reduced physical, sensory or mental capabilities or lack of
experience and knowledge if they have been given supervision or instruction
concerning use of the appliance in a safe way and understand the hazards
involved. Children shall not play with the appliance. Cleaning and user
maintenance shall not be made by children without supervision.
If the supply cord is damaged, it must be replaced by the manufacturer. Its
service agent or similarly qualified persons in order to avoid a hazard.
The disconnection may be achieved by having the plug accessible or by
incorporating a switch in the fixed wiring in accordance with the wiring rules.
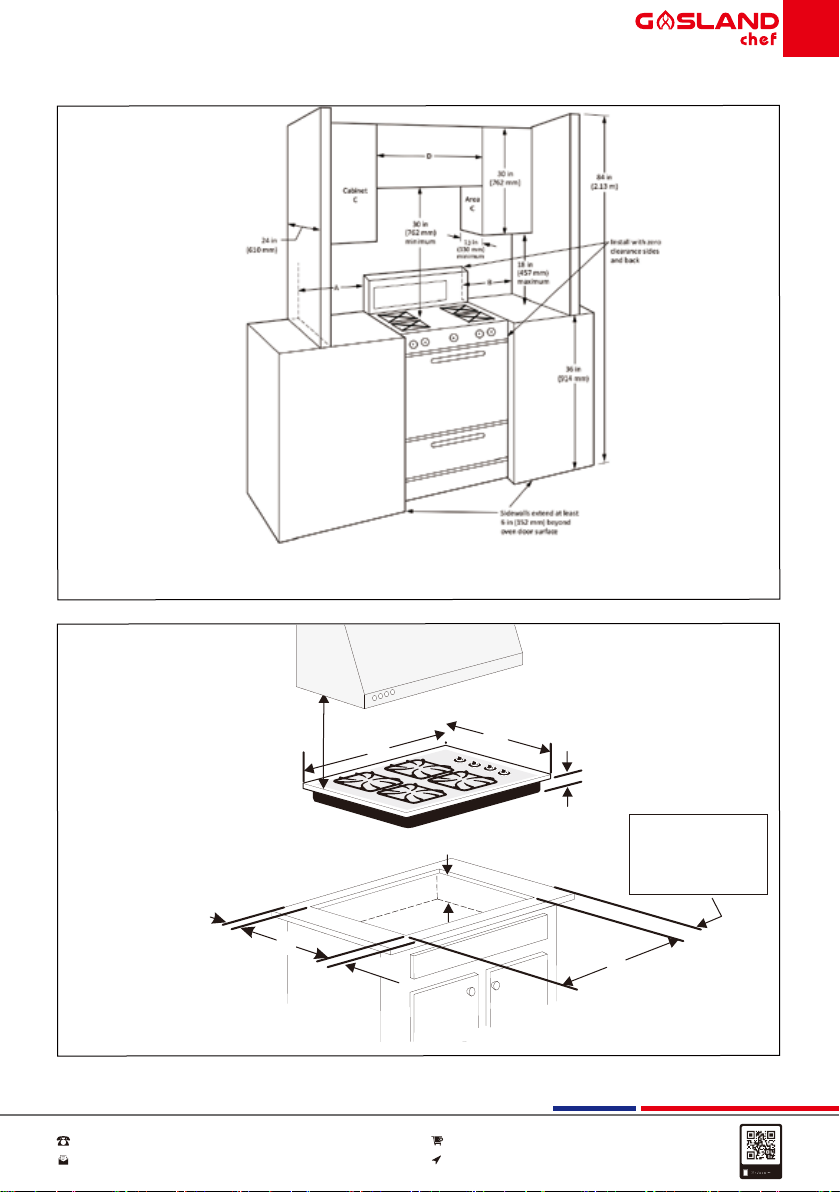
It is dangerous to store stuff in cabinet areas above appliance rules.
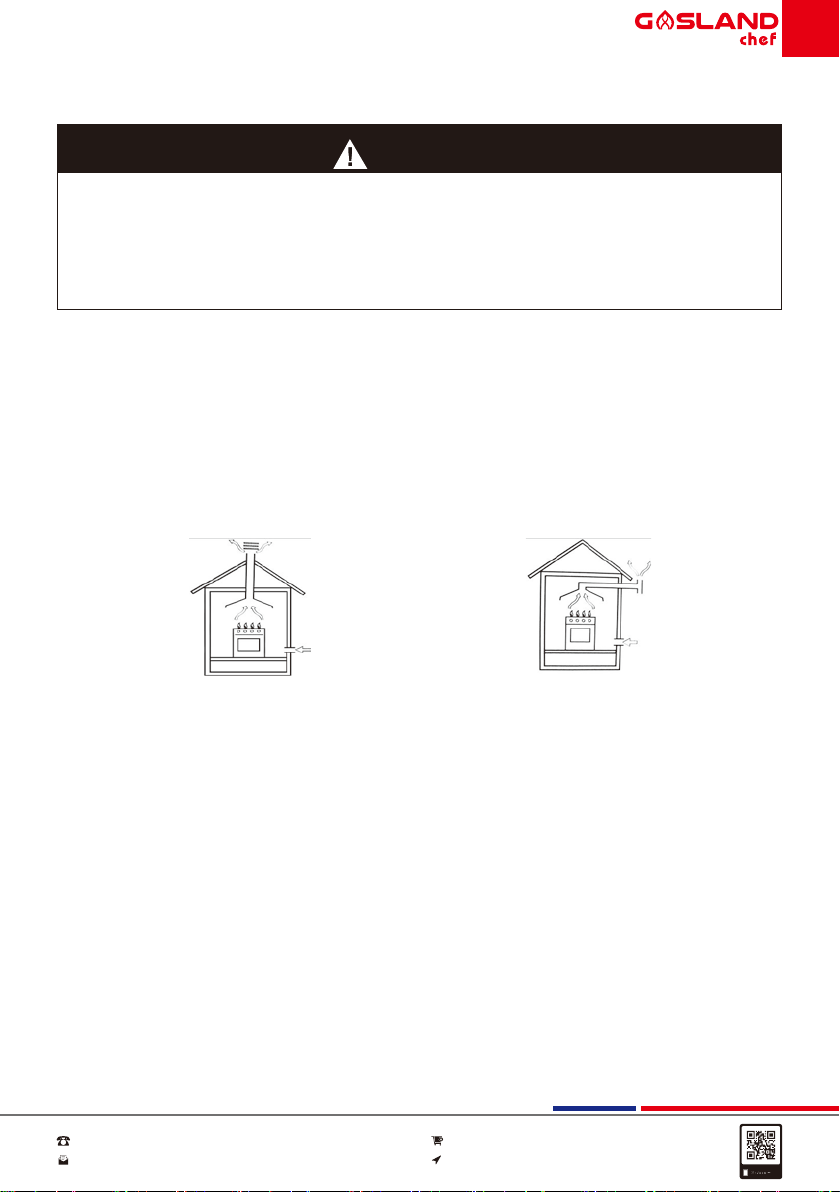
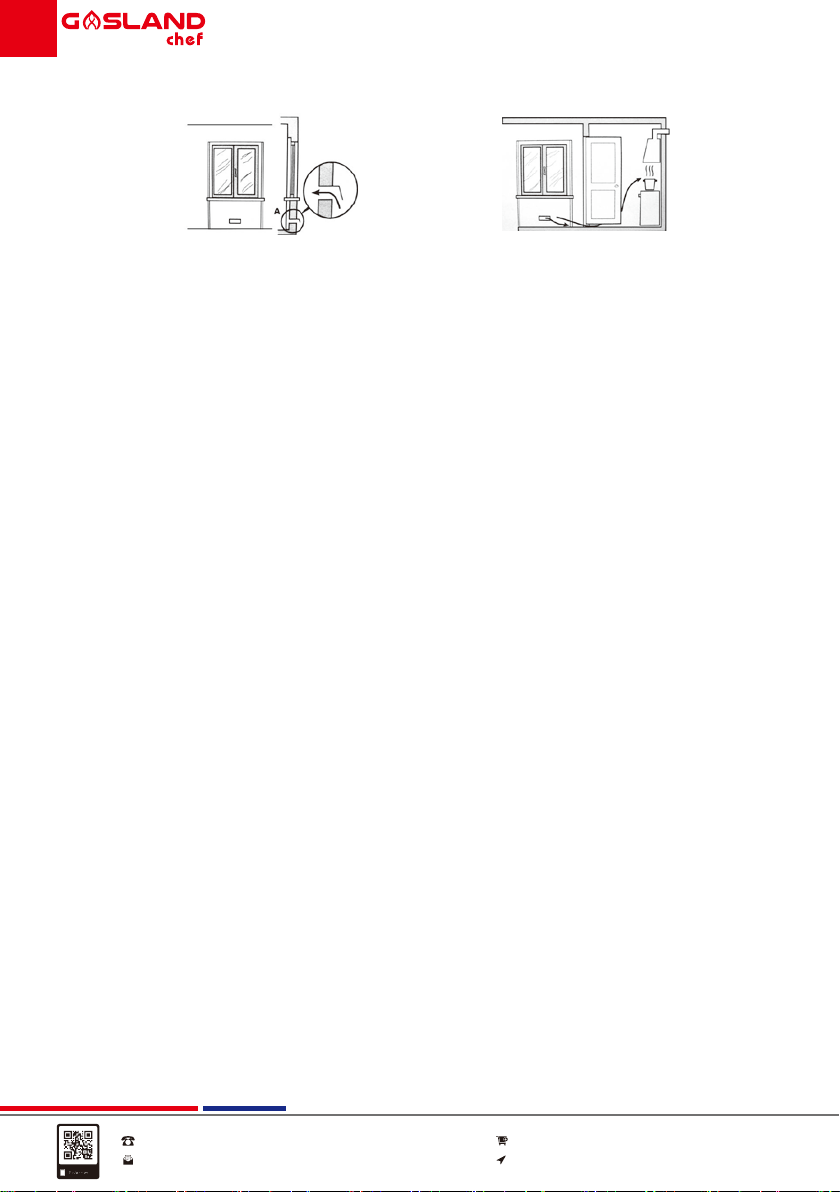
This appliance shall be installed in accordance with the regulations in force and
only used in a well ventilated space.
Read the instructions before installing or using this appliance.
The installation must conform with local codes or, in the absence of local codes,
with the National Fuel Gas Code, ANSI Z223.1/NFPA 54 or, in Canada, the
Natural Gas and Propane Installation Code, CSA B149.1.
The appliance, when installed, must be electrically grounded in accordance with
local codes or, in the absence of local codes, with the National Electrical Code,
NFPA 70 or the Canadian Electric Code, CSA C22.1-02.
1. The appliance and its individual shut-off valve must be disconnected from the
gas supply piping system during any pressure testing of that system at test
pressures in excess of 1/2 psi(3.5 kPa).
2. The appliance must be isolated from the gas supply piping system by closing
its individual manual shut-off valve during any pressure testing of the gas
supply piping system at test pressures equal to or less than 1/2 ps(3.5 kPa).
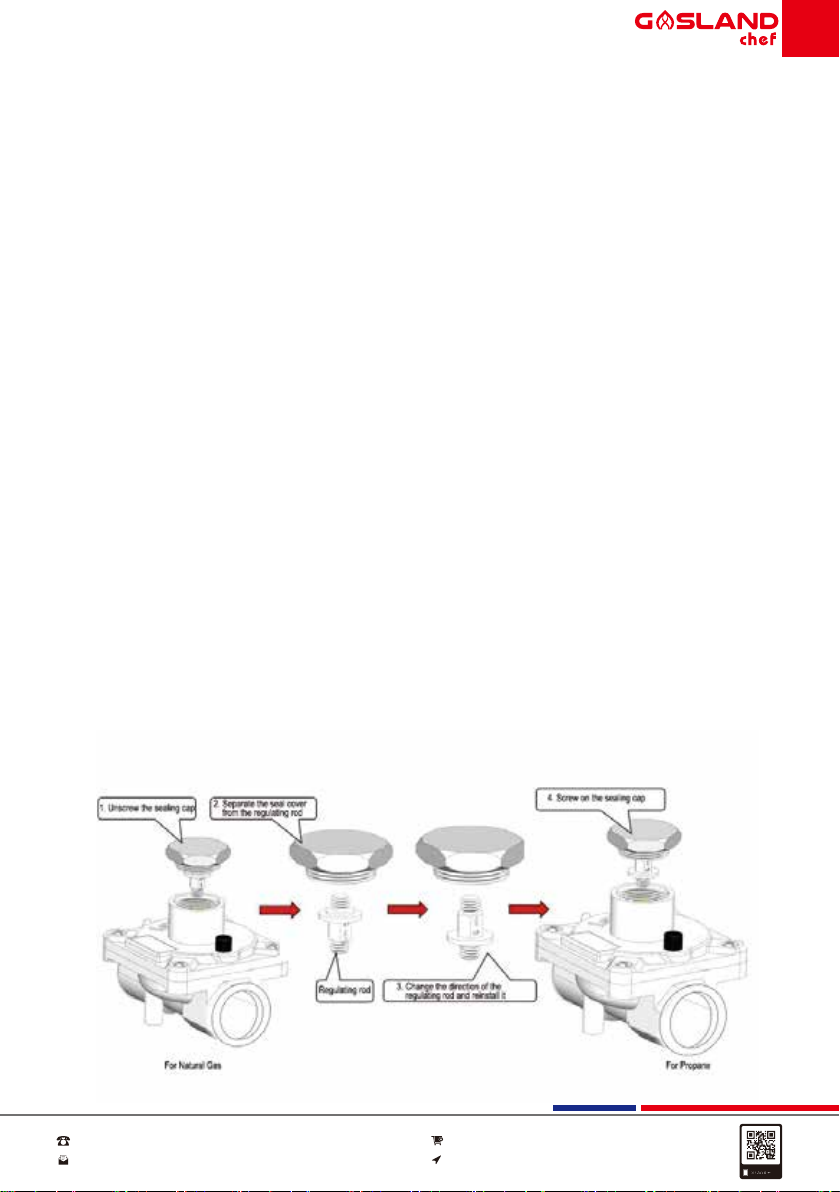
3. Maximum gas supply pressure: Propane: 13 in w.c.; NG: 8 in w.c.
4. Recommend Supply pressure for checking regulator setting:
Propane: 11 in wc; NG: 5 in wc.
WARNING
03
www.gaslandchef.com
3330-A Marathon Ct Charleston, SC 29418
1 (844) 538-7890

A. Safety device - activates if the flame
accidentally goes out (spills, drafts, etc.)
interrupting the delivery gas to the burner
B. Ignitor for gas burners
Cooktop Description
Close-up view
Pro GH2122SF Pro GH2305SF Pro GH2365SF
B
A
2 4 2
3 5 1
4
3
5
2 4 2
3 5 1
1. Auxiliary burner
2. Rapid burner
3. Semi rapid burner
4. Wok burner(Triple ring burner)
5. Control knobs for gas burners
04
www.gaslandchef.com
3330-A Marathon Ct Charleston, SC 29418
1 (844) 538-7890

Technical Data
Packing List
Model
Cut out size
Dimension
Gas type
727x480mm/
28.6″x18.9″
480x285mm/
19.1″x11.2″
840x480mm/
33″x18.9″
510x310x103mm/
20″x12.2″x4″
NG/LPG
Burner configuration
Gas type
Work burner
(Triple ring burner)
Rapid burner
Semi rapid burner
Auxiliary burner
NG LPG
Injector diamete Injector diameter
0.064″/1.62mm
0.059″/1.50mm
Btu/hr
0.045″/1.14mm
0.033″/0.83mm
12000
10200
6000
3400
0.042″/1.06mm
0.038″/0.97mm
0.029″/0.75mm
0.022″/0.56mm
12000
10200
6000
3400
Btu/hr
762x510x100mm/
30″x20″x4″
915x525x100mm/
36″x20.7″x4″
Product weight 19.8lb/9.0kg 41.0lb/18.0kg 44.0lb/20.0kg
Pro GH2122SF Pro GH2305SF Pro GH2365SF
Description
Gas cooktop
Burner
Burner cap
Gas regulator
Gas inlet fitting
Propane injector
Sponge sealing strip
Teflon tape
Cardboard
Instruction manual
Installation package: clip x 4 , ST4 screws x 4
Quantity
1 pcs
1 set
1 set
1 pcs
1 pcs
1 set
1 pcs
1 pcs
1 pcs
1 pcs
1 set
Item NO.
1
2
3
4
5
6
7
8
9
10
11
05
www.gaslandchef.com
3330-A Marathon Ct Charleston, SC 29418
1 (844) 538-7890

Installation
Positioning For Gas Cooktop
The following requirements must be observed:
a. The room must be fitted with a ventilation system which ventilate smoke and
gases from combustion to the outside of rooms. This must be done by hood or
electric ventilator.
b. The room must be allowed for the influx of the air which for proper
combustion. The air flow for combustion purposes must not less than 70.6 cu
ft/h per kW of installed capacity. The air supply will be effected by influx from
the outside through a duct, its inner cross section is at least 6.1 cu in and
must not be blocked accidentally.
The gas cooktop without safety devices, to prevent flame go out accidentally,
must have a ventilation working on twice volume. For example, a minimum of
12.2 cu in(Fig.5). Otherwise, the room can be vented indirectly through
adjacent rooms which is fitted with ventilation ducts to the outside.
Al though the adjacent rooms are not shared areas, bedrooms, but fire risk is
hidden(Fig.6).
The following instructions are directed at the qualified installer, so the installa-
tion and maintenance procedures may be followed in the most professional
and expert manner.
Important: Unplug the electrical connection before performing any maintenance
or regular upkeep work.
WARNING
In a chimney stack or branched flue. Directly to the outside
06
www.gaslandchef.com
3330-A Marathon Ct Charleston, SC 29418
1 (844) 538-7890

c. Intensive and prolonged working of the gas cooktop that need to intensify
ventilation, e.g. opening windows or increasing the power of the air intake
system(if present).
d. Liquefied petroleum gases are heavier than air, so settle it downward. Rooms
in which LPG tanks are installed must be fitted with ventilation to the outside
to avoid of gas leakage. Therefore, LPG tanks which are empty or partially
full, must not be installed or stored in rooms or spaces below ground level
(cellars etc.). It is a good idea to keep only the tank which is working currently
in the room, and make sure that it is not closed to heating source(ovens,
fireplaces, stoves, etc.).
Installation Guide
The gas cooktops are designed with protection degree against excessive heating,
the appliance can be installed next to cabinets, and the height should not exceed
the cooktop. For a correct installation, the following precautions must be followed:
a. The cooktop may be located in a kitchen, a diner or bed/ sitting room, but not
in a bathroom or shower room.
b. The furniture standing near to the unit, it is higher than the working boards,
must be placed at least 4.3" distance to the edge of the board.
c. The cupboard should be positioned near to the worktop at a height of 18" at
least(Fig.7).
d. Cooktop should be installed directly under the hood, the hood should be at
least 34" from the cooktop(Fig.8).
Adjacent Room
Examples of ventilation holes
for comburent air.
Fig.5
Enlarging the ventilation slot
between window and floor.
Fig.6
Room to be Vented
07
www.gaslandchef.com
3330-A Marathon Ct Charleston, SC 29418
1 (844) 538-7890

G
H
AB
C
F
Gas Cooktop
Dimensions
Gas Cooktop
Cut-out Dimensions
34
" Min.
4.7
" Min.
6.7" Min.
clearance to side
wall(left and right)
from cut-out
Fig.8
Fig.7
Install to cabinet
(For reference)
≥36 in
1.7
" Min.
* For a top unit,the minimum spacing between Individual top sections: >10 in
08
www.gaslandchef.com
3330-A Marathon Ct Charleston, SC 29418
1 (844) 538-7890

5.9" Max.
Sponge sealing strip
Product Dimensions(inch/mm)
Cutout Dimensions(inch/mm)
Pro GH2122SF
Pro GH2305SF
Pro GH2365SF
12.0(310)
30.0(760)
36.0(915)
20.0(510)
20.0(510)
20.6(522)
11.2(285)
18.9(480)
18.9(480)
19.0(485)
28.6(727)
33.0(840)
Model
Pro GH2122SF
Pro GH2305SF
Pro GH2365SF
Minimum Minimum Minimum
4(101.6)
4(101.6)
4(101.6)
A. WidthModel B. Depth C. Height
F. Width G. Depth H. Height BelowSize
1.8(45.3)
1.7(42.7)
1.7(42.7)
10.9(276)
28.3(718)
32.7(830)
18.7(476)
18.4(468)
18.5(470)
D. Bottom Case
Width
E. Bottom Case
Depth
e. Please make sure the sponge sealing tape is properly attached to the edge of
the cut-out(Fig.10).
Fig.9
Fig.10
09
www.gaslandchef.com
3330-A Marathon Ct Charleston, SC 29418
1 (844) 538-7890

f. Fixing fittings(hooks, screws) are provided to place the cooktop on worktop,
the worktop measure 0.8" to 1.9" in thickness(Fig.11).
Note: Use the hooks contained in the "installation package".
g. In the event the gas cooktop is not installed on a built-in oven, a wooden
panel must be inserted for insulation. This panel must be placed at least 0.8"
distance from the bottom of cooktop.
Important: When installing the gas cooktop above a built-in oven, the oven
should be placed on two wooden strips; in the case of a joining cabinet
surface, remember to leave a space of at least 1.8" x 22" at the back. When
installing on a built-in oven without forced ventilation, ensure that there are air
inlets and outlets for ventilating the interior of the cabinet adequately.
When install cooktop on a built-in oven without forced ventilation, ensure that
have air inlets and outlets to ventilate the interior of the cabinet adequately.
Hook position for
H=0.8" top
Hook position for
H=1.6" top
Fig.11
Fig.12 Fig.13
Fig.14 Fig.15
Hook position for
H=1.9" top
22.0″(560mm)
1.8″(45mm)
10
www.gaslandchef.com
3330-A Marathon Ct Charleston, SC 29418
1 (844) 538-7890

The gas cooktop is installed successfully
Note: Once the gas cooktop has been installed, it is important to remove any
protective materials, which were put on in the factory. Any gas installation must be
carried out by a competent person.
Gas Connection
Pressure regulator installation
The gas cooktop must be installed by a competent person to the relevant Gas
Standards. Please ensure that once the gas cooktop is installed, it is easily
accessible for the engineer in the event of a breakdown.
CAUTION
Do not make the connection too tight.
The regulator is die cast. Overtightening may crack the regulator resulting in a
gas leak and possible fire or explosion.
WARNING
First, make sure that the pressure regulator arrow points toward the cooktop air
pipe joint, and then fasten the pressure regulator to the cooktop air pipe.
WARNING
11
www.gaslandchef.com
3330-A Marathon Ct Charleston, SC 29418
1 (844) 538-7890

Assemble the flexible connector from the gas supply pipe to the gas cooktop in
the following order(Fig.16):
1. Manual shutoff valve
2. Gas fitting
3. Flexible connector
4. Gas fitting
5. Pressure regulator
6. Gas cooktop
Use pipe-joint compound made for use with Natural and LP/Propane gas to seal
all gas connections. If flexible connectors are used, be certain connectors are
not kinked.
Pressure
Regulator
(Front view)
Pressure
Regulator
(Bottom view)
Gas Fitting
Gas
Fitting
On
Off
Manual
Shutoff
Valve
Regulator gas
flow direction
Flexible
Connector
Gas Cooktop
All connections must be wrench-tightened
Around teflon tape
Fig.16
Around teflon tape
Around teflon tape
GAS FLOW
12
www.gaslandchef.com
3330-A Marathon Ct Charleston, SC 29418
1 (844) 538-7890

Note: The supply line must be equipped with an approved manual shutoff valve.
This valve should be located in the same room as the cooktop and should be in a
location that allows ease of opening and closing. Do not block access to the
shutoff valve. The valve is for turning on or shutting off gas to the appliance.
Once regulator is in place, open the shutoff valve in the gas supply line.
Wait a few minutes for gas to move through the gas line.
Gas Connection And Check
The cooktop valve is in the closed state, open the gas supply valve, coated
the connector with moderate amounts of soapy water, if there is air bubbles that it
means there is leakage, tighten the connector and test again. If repeat 3 to 4
times and there is still air bubbles, notify professionals to deal with it.
* Note: Leak testing of the appliance shall be conducted according to the
manufacturer’s instructions. The inspection places as below picture:
Manual shutoff valve
open position
To gas cooktop To gas supply line
Fig.17
Leakage test places
1713
www.gaslandchef.com
3330-A Marathon Ct Charleston, SC 29418
1 (844) 538-7890

The gas cooktop must be earthed
If the cooktops to be connected to a 120V, 60 Hz AC electrical supply. Before
switching on, make sure the electricity supply voltage is the same as that indicat-
ed on the cooktops rating label. Ensure that the cooktops supply cable does not
come into contact with surfaces with temperatures higher than 122°F/50°C.
Any electrical work required to install this gas cooktop should be carried out by a
qualified electrician or competent person. Check the last letter of your model to
know the electrical supply type:A is for AC, D is for DC.
CAUTION
Critical Grounding Instructions:
This appliance is equipped with a three-prong grounding plug foryour protection
against shock hazard and should be plugged directly into a properly grounded
receptacke. Do not cut or remove the grounding prong from this plug.
WARNING
Grounding type
wall receptacle
Do not, under any
circumstances, cut,
remove, or bypass
the grounding prong.
Power supply cord with
3-prong grounding plug.
14
www.gaslandchef.com
3330-A Marathon Ct Charleston, SC 29418
1 (844) 538-7890

Electrical Connection
Circuit diagram:
Pro GH2122SF
Fig.19
Pro GH2305SF/Pro GH2365SF
Fig.20
Valve
N-Blue
E-Green and yellow
L-Brown
Igniter
120v/ac
N E L
N
N
L
Ignition
Needle
Valve
N-Blue
E-Green and yellow
L-Brown
Igniter
120v/ac
N E L
N
N
L
Ignition
Needle
1715
www.gaslandchef.com
3330-A Marathon Ct Charleston, SC 29418
1 (844) 538-7890

Converting To Type Of Propane
WARNING:This appliance can be used with Propane and Natural gas. It is shipped
from thfactory adjusted for use with Natural gas: Conversion orifices are located in
accessories package. Follow the instructions packaged with the orifices for gas
conversion.
1. Air supply valve and cooktop valve need to be closed, unplug the power plug
for AC model.
2. When the gas pressure regulator is in NG state and need to be converted to
Propane regulator, and then counterclock wise unscrew the marked NG
threaded rod, reverse the threaded rod, turn the LP arrow upwards and
tighten it to the screw cap, then install the cap back to the gas pressure
regulator. The gas pressure regulator gas conversion needs to be used with
the accessory kit(See Burner Configuration for detailed Injector specifications).
3. Remove the burners, burner caps, and screw out the Injector from the burner
bases. Then install those Injector in the Conversion Kit bag to each burner
base correspondingly. Save the orifices removed from the appliance for future
use.
4. Input inlet pressure of 11 in w.c.(2740 Pa ), coat the Injector joints and the gas
pressure regulator joints with moderate amounts of soapy water, there shall be
no bubbling.
5. Place the burner, burner cap, check if the position between the ignition pin
and the burner is correct, and then open the valve, AC model plugged in the
power plug. Leakage test please refer to page 13 “Gas Connection And
Check" section.
6. Test the outlet pressure, the pressure is required to be 10±1 in w.c. If it cannot
meet the scope of the requirements, need to unscrew the pressure regulator
nut as Fig.21, rotate slightly to adjust the white plastic parts inside the
pressure regulator.
Fig.21
16
www.gaslandchef.com
3330-A Marathon Ct Charleston, SC 29418
1 (844) 538-7890

7. Ignition test requires that the burner can be lit in 5 seconds normally, after 1
minute the flame is stable, there should be no liftedflame and yellow fire.
8. Similarly, when use in NG status, turn the marked NG arrow upwards and
tighten it to the screw cap(Fig.21). Repeat the above operation. The outlet
pressure requires to be 4 ± 1 in w.c.
9. After the conversion is completed, the conversion label in the accessory bag
needs to be attached next to the original la bel.
Incorrect flame:
lifting off the burner
Fig.22 (Incorrect and good flame patterns)
Good flame:
well-defined blue flame
with slight yellow tipping
Original
label Conversion
label
(Product bottom)
Injector dimameter:
1.62mm
Fig.23
162
1#: Wok burner(Injector: NG-ø1.62mm/Propane-1.06mm)
2#: Rapid burner(Injector: NG-ø1.5mm/Propane-0.97mm)
3#: Semi-rapid burner(Injector: NG-ø1.14mm/Propane-0.75mm)
4#: Auxiliary burner(Injector: NG-ø0.83mm/Propane-0.56mm)
17
www.gaslandchef.com
3330-A Marathon Ct Charleston, SC 29418
1 (844) 538-7890

Using The Cooktop
Lighting
• Simply press the knob in, turn counterclockwise to “LITE” position.
• Press the ignition device and hold the knob till the burner is ignited.
• Before releasing knob, ensure a flame is established.
• If the burner fails to ignite, put into off position and waite for at least 30 seconds
then try again.
Re-ignition
If the flame is out for certain reasons, the safety device will cut off the gas power
automatically. Turn the knob to “HI” position, then ignite again, you should wait for
30 seconds when you do that.Due to the air in the tong, there may be unsmooth
ignition, revolve the knob to “HI” position and ignite again.
Push the control knob in and turn
it to the LITE position.
Fig.24 Fig.25
This conversion kit shall be installed by a qualified service technician in accor-
dance with the manufacturer's instructions and all applicable codes and
requirements of the authority having jurisdiction. If the information in these
instructions is not followed exactly, a fire, explosion or production of carbon
monoxide may result causing property damage, personal injury or loss of life.
The installation is not proper and complete until the operation of the converted
appliance is checked as specified in the manufacturer's instructions supplied
with the kit.
Complete parts list identifying all components provided in the kit.
WARNING
18
www.gaslandchef.com
3330-A Marathon Ct Charleston, SC 29418
1 (844) 538-7890

Manual Ignition
If in case of a power failure or failure of the ignition, a match or lighting devise can
be used. Care must be taken when using this method. The device shall not be
operated for more than 15s. If after 15s the burner has not lit, stop operating the
device and open the compartment door and/or wait at least 1 min before attempt-
ing a further ignition of the burner. In the event of the burner flames being
accidentally extinguished, turn off the burner control and do not attempt to re-ig-
nite the burner for at least 1 min.
Regulating The Flame
As the burners are adjusted correctly, the flame should be light blue, and the inner
flame should be clear. The size of flame depends on the position of the related
control knob.
To reduce the flames, turn the control knob counterclockwise from “HI” position
to “LO” position until you feel resistance.
To increase the flames, turn the control knob clockwise from “LO” position to
“HI” position until you reach the stop.
Since the outer portion of the flame is much hotter than the center, the flame
should be set so that it does not spread beyond the sides of the pan. Flame tips
which extend beyond the sides of the pan are hazardous.
-Burner ON large flame -Burner ON small
flame saving mode -Burner OFF
Fig.26
Fig.27
1719
www.gaslandchef.com
3330-A Marathon Ct Charleston, SC 29418
1 (844) 538-7890
Other manuals for Pro Series
4
This manual suits for next models
3
Table of contents
Languages:
Other GASLAND chef Cooktop manuals
Popular Cooktop manuals by other brands

ARENDO
ARENDO 305591 user manual

Gaggenau
Gaggenau Vario 400 Series use and care manual

Star Manufacturing International
Star Manufacturing International 8I-802H-LP Installation and operating instructions

Frigidaire
Frigidaire GLEC30S9E - 30 in Smoothtop Electric Cooktop installation instructions

Gaggenau
Gaggenau CX48261 Series installation instructions

Smeg
Smeg SA312XA Installation and operating instructions