Gastrodomus FRI30E User manual

1
ELEKTRISCHE FRITTEUSE
FREIDORA ELÉCTRICA
FRIGGITRICE ELETTRICA
ELECTRIC FRYER
Manuale d’uso
User manual
Betriebsanleitung
Manual del usuario

2
ITALIANO / ENGLISH / DEUTSCH / ESPAÑOL
INDICE / INDEX / ÍNDICE
I. Caratteristiche della friggitrice....................................................................................................................... 4
II.Istruzioni......................................................................................................................................................... 5
III.Specifica......................................................................................................................................................... 6
IV.Pulizia ............................................................................................................................................................ 6
V. Risoluzione dei problemi............................................................................................................................... 7
VI.Diagramma.................................................................................................................................................... 7
VII.Visioni delle parti separate........................................................................................................................... 9
I. Features of the Fryer .................................................................................................................................... 12
II.Instructions................................................................................................................................................... 13
III.Specification ................................................................................................................................................ 14
IV.Cleaning....................................................................................................................................................... 14
V.Trouble shooting .......................................................................................................................................... 15
VI.Diagram....................................................................................................................................................... 15
VII.Explosive view ............................................................................................................................................ 16
I. Merkmale der Fritteuse................................................................................................................................ 20
II. Anleitung ..................................................................................................................................................... 21
III. Technische Daten ....................................................................................................................................... 22
IV. Reinigung.................................................................................................................................................... 22
V. Problemlösung ............................................................................................................................................ 23
VI. Schaltplan................................................................................................................................................... 24
VII. Einzelteile .................................................................................................................................................. 25
I.Características de la freidora......................................................................................................................... 28
II.Instrucciones ................................................................................................................................................ 29
III.Características técnicas ............................................................................................................................... 30
IV.Limpieza ...................................................................................................................................................... 30
V. Resolución de problemas ............................................................................................................................ 31
VI.Diagrama ..................................................................................................................................................... 32
VII. Visiones de las piezas separadas............................................................................................................... 33

3
Friggitrice elettrica
Manuale d'uso
Si prega di leggere attentamente questo manuale prima di utilizzare per capire l'uso corretto e il
funzionamento.

4
AVVERTENZE
1. Scollegare il cavo dalla presa di corrente quando non è in uso e prima della pulizia.
2. NON spostare o trasportare questa friggitrice finché l'olio della friggitrice non si è raffreddato
completamente. Farlo può provocare gravi ustioni.
3. Non utilizzare questa unità per un uso diverso da quello previsto.
4. Non utilizzare all'aperto.
5. Cucinare sempre su una superficie solida, asciutta e piana.
6. L'alta temperatura può causare scottature. Non stare in piedi sopra la friggitrice durante il funzionamento e
non toccare nessuna parte della macchina durante il funzionamento, eccetto il manico del cestello e i
comandi di alimentazione.
7. Non utilizzare l'unità con un cavo o una spina danneggiati, nel caso in cui l'apparecchio non funzioni
correttamente o sia stato danneggiato in qualsiasi modo.
8. Tenere i bambini e gli animali lontani dalla friggitrice.
9. Non modificare l'unità. Si prega di leggere attentamente questo manuale prima dell'uso per comprendere
l'uso e il funzionamento corretto. Le avvertenze di sicurezza, i suggerimenti per la pulizia e le
raccomandazioni elettriche sono fornite per ridurre il rischio di danni o lesioni
ATTENZIONE!
Qualsiasi installazione errata, alterazione, regolazione e/o manutenzione impropria può portare a perdite di
proprietà e lesioni.
Tutte le riparazioni devono essere effettuate solo da professionisti autorizzati.
TENERE TUTTI I LIQUIDI INFIAMMABILI E COMBUSTIBILI LONTANI DAL PRODOTTO.
QUESTA MACCHINA DEVE ESSERE COLLOCATA SU UNA SUPERFICIE PIANA
I. Caratteristiche della friggitrice
1. Pulsante reset: Interruttore di sicurezza della temperatura
①
②
③
④
⑤
③
⑥
⑦
⑧

5
Nota: Rimuovere il coperchio nero per premere il pulsante di reset se la temperatura dell'olio oltre 230 ℃.
L'interruttore toglie l'alimentazione all'unità
2. Luce verde: Indicatore di potenza
3: Luce gialla: Indicatore di calore
4: Interruttore di accensione e spegnimento
5. Regolatore del termostato: Gamma di temperatura: 50-200C.
Usato per impostare e regolare la temperatura come desiderato
6.Livello dell'olio MAX: L'olio non deve superare il simbolo del livello massimo in quanto potrebbe
fuoriuscire.
7. Livello dell'olio MIN: L'apparecchio non funziona se l'olio sta al di sotto il livello minimo , poichè potrebbe
surriscaldarsi e prendere fuoco
8. Microinterruttore: E' sul fondo della scatola elettrica, blocca automaticamente l'alimentazione nel caso
in cui la spina elettrica non venga rimossa dalla corrente.
II.Istruzioni
1. Assicuratevi che l'alimentazione elettrica che state usando sia adeguata per l'uso continuo della
friggitrice e che la tensione sia adeguata. Si consiglia l'uso di un dispositivo di protezione dalle sovratensioni
o di un interruttore automatico.
2. Riempire il recipiente dell'olio con olio vegetale fino al livello minimo e massimo, tenendo conto del
volume del cibo.
3. Assicurarsi che la manopola del regolatore di temperatura sia in posizione "OFF" prima di collegare la
macchina ad una presa di corrente. Una volta collegata la macchina, si accenderà una "Power Light" verde.
Quindi, ruotare la manopola del regolatore di temperatura in senso orario fino alla temperatura desiderata
indicata dalla lancetta. Quando la temperatura desiderata è stata raggiunta, la "Heat Light" gialla si
spegnerà e si spegnerà, e il regolatore di temperatura manterrà la temperatura automaticamente.
4. Sollevare il cestello degli alimenti verso l'alto e lontano dalla macchina per caricare il cibo, e posizionare
con attenzione il cestello carico nella macchina per evitare spruzzi. Scuotere delicatamente l'olio in eccesso
dal cibo quando lo si rimuove dalla vasca dopo la frittura.
5. Il cestello per friggere incluso è destinato a contenere cibi piccoli come patatine fritte e anelli di cipolla.
Gli alimenti di grandi dimensioni possono essere messi direttamente nel cestello o nel serbatoio dell'olio.
6. Dopo l'uso della friggitrice, girare il regolatore di potenza in senso antiorario fino alla posizione "OFF".
Togliere la spina dall'alimentazione. Attendere che l'olio si raffreddi prima di scaricarlo.
7. Scaricare l'olio, dopo averlo raffreddato.
8. Rimuovere la griglia inferiore di protezione con le pinze. Non infilare la mano nell'olio.
6
9. Sollevare delicatamente l'unità della scatola elettrica dal retro della macchina. Questo rimuoverà
l'elemento dall'olio di frittura. Il microinterruttore sul fondo della scatola elettrica interromperà
automaticamente l'alimentazione nel caso in cui la spina elettrica non venga rimossa dall'alimentazione.
Posizionare il tutto in un luogo pulito e asciutto.
10. Lavare delicatamente l'elemento con acqua e sapone. Usare una spugna morbida. Non usare mai
prodotti chimici aggressivi o spazzole metalliche per pulire l'elemento.
11. Lavare delicatamente il serbatoio dell'olio con acqua e sapone, asciugarlo accuratamente.
12. Riposizionare la scatola elettrica e l'elemento allineandolo e assicurarsi che tutto sia stato asciugato.
13. Coprire la vasca della friggitrice col suo coperchio quando l'unità non è in uso.
14. Usare sempre olio vegetale fresco e pulire la friggitrice quotidianamente.
AVVERTENZE
-Questo apparecchio deve essere utilizzato esclusivamente da un operatore
addetto (utilizzatore).
- Non toccare le superfici calde.
- Non immergere mai l'unità, il cavo o la spina in un liquido.
III.Specifica
IV.Pulizia
Per mantenere l'aspetto dell’apparecchio e aumentare la durata del servizio, pulire l'unità quotidianamente.
Non toccare il liquido caldo o le superfici di riscaldamento mentre l'unità è in riscaldamento o in
funzione.
•I liquidi caldi e il cibo possono provocare scottature. Lasciare raffreddare il liquido caldo.
•Prima di maneggiare, non far cadere o versare l'acqua nell'olio caldo in quanto spruzzerà o farà
schizzare l'olio caldo fuori dal serbatoio.
•L'olio troppo riscaldato o i vapori dell'olio possono incendiarsi causando un incendio.
•Monitorare la temperatura dell'olio, la qualità e il livello, usare e mantenere il sistema di rimozione
dei vapori d'olio.
Modello
Voltaggio
Potenza
Capacità
Dimensioni
Cestello
FRI30E
220-
240V/50HZ
4.8KW
30L
590*540*360mm
1pz

7
•Riscaldare l'olio con attenzione, se l'olio fuma ridurre il calore. Non lasciare l'unità incustodita, se si
verifica un incendio spegnere l'unità e coprire fino al raffreddamento, non mettere acqua sull'olio
caldo o in fiamme.
•Non operare con olio al di sotto del segno dell'olio, L'olio sporco ha un punto di combustione più
basso. Sostituire l'olio regolarmente.
•Mantenere il corretto livello dell'olio.
•Scollegare l'unità.
•Non immergere il cavo, la spina o i comandi in acqua o in qualsiasi altro liquido
•Ruotare la testa della friggitrice in posizione alta.
•Usare un panno umido o una spugna immersa in acqua saponata per pulire l'unità. Oppure si può
riempire il serbatoio con acqua con liquido per lavare i piatti.
•Abbassa il cestello della friggitrice e falla bollire per qualche minuto risciacqua bene è importante
che l'unità non sia in funzione da asciutta perché causerebbe la bruciatura dell'elemento.
•Asciugare bene dopo la pulizia.
V. Risoluzione dei problemi
Problema
Causa
Soluzione
La spia non si accende e l'unità
non si riscalda
⚫Spina non correttamente inserita
⚫Microinterruttore non chiuso
Inserire l'unità
Regolare la distanza limite del
microinterruttore.
La spia di calore non è acceso.
La temperatura non aumenta
⚫I tubi del riscaldatore elettrico
non sono collegati
correttamente.
⚫Il riscaldatore è difettoso
Stringere I cavi ad entrambi i lati del
riscaldatore elettrico
Sostituire il tubo di riscaldamento
elettrico.
La spia di accensione è acceso
ma la temperatura desiderata
non viene raggiunta
⚫Il regolatore di temperatura è
bruciato
Sostituire il regolatore del termostato
Il controllo della temperatura è
normale ma la spia non è accesa
⚫La spia è bruciata
Sostituire spia
La spia di temperatura è acceso,
ma il tubo del riscaldatore non è
caldo
⚫Attivazione funzione di
sicurezza di temperatura è
saltato/guasto
Resettare il pulsante di protezione
contro il surriscaldamento a mano sul
fondo della scatola elettrica
La temperatura non può essere
controllata
⚫La funzione di sicurezza di
temperatura è fuori servizio
Sostituire il limitatore di
temperatura/Tasto Reset button
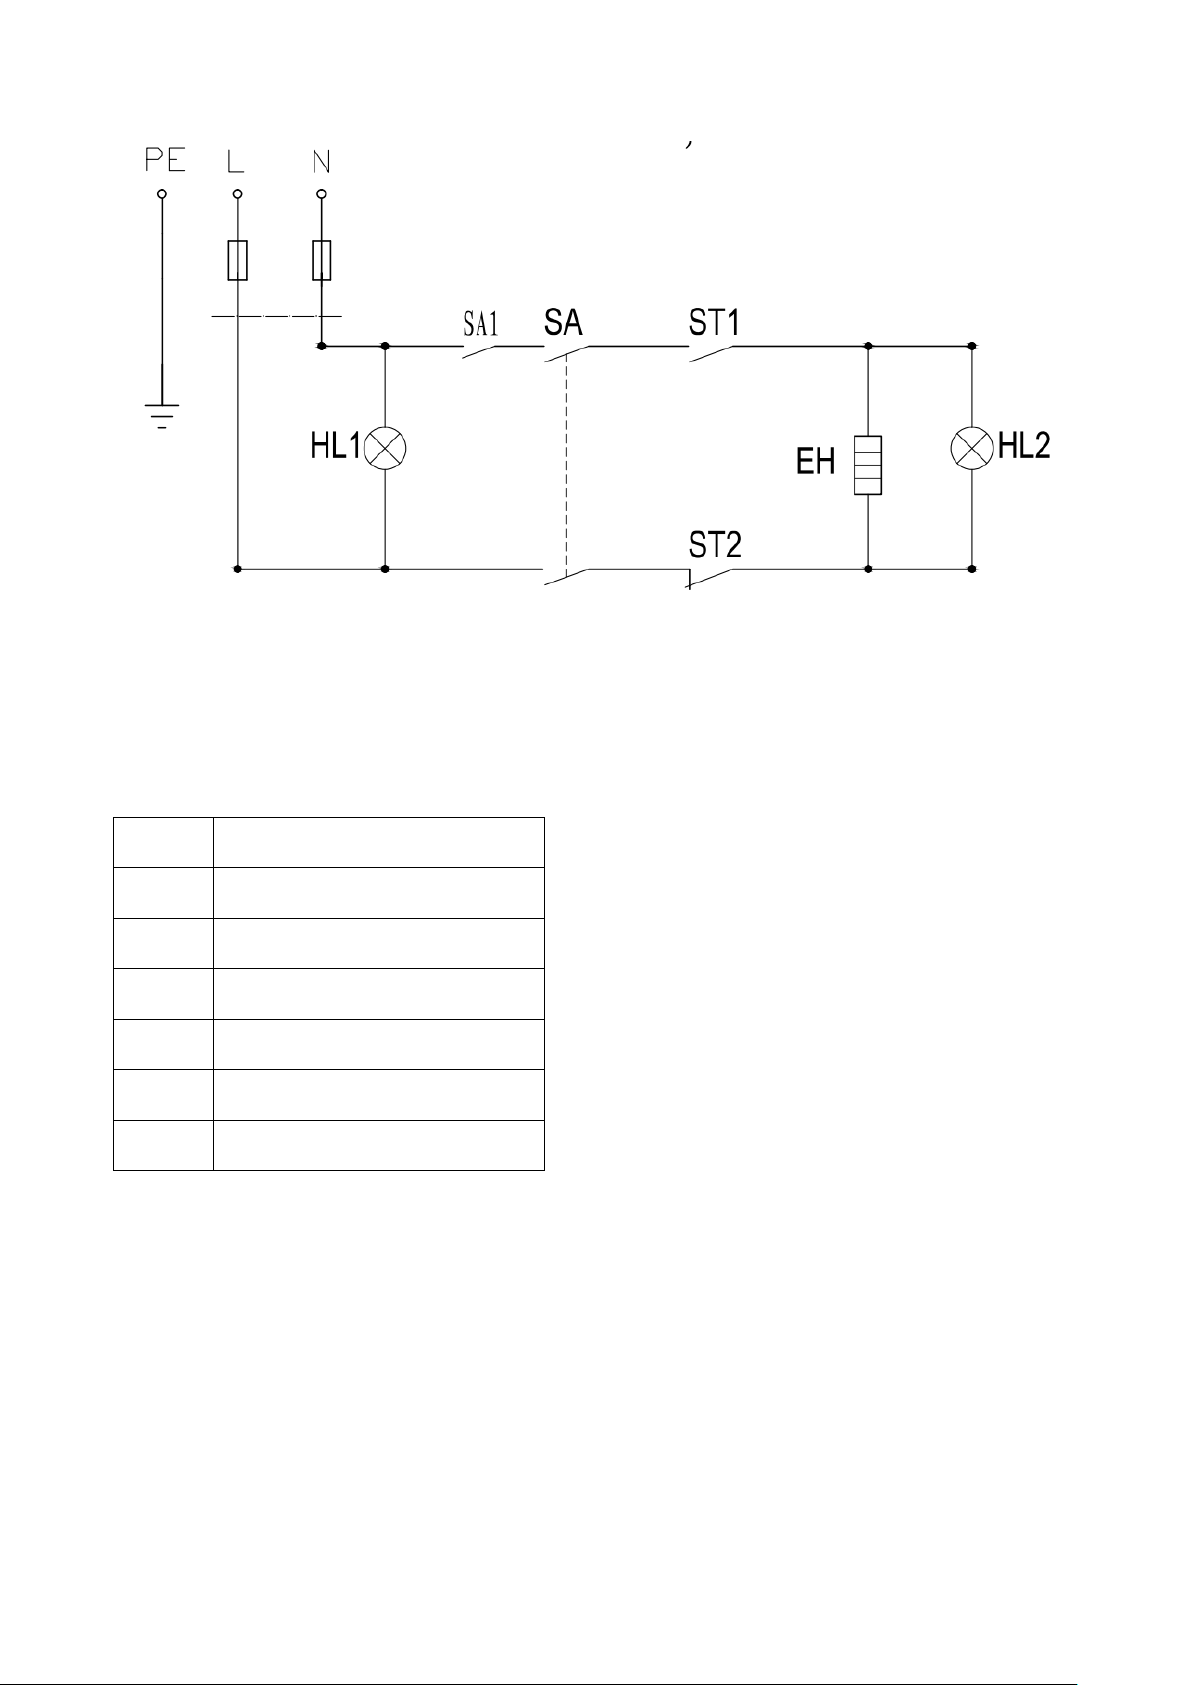
VI.Diagramma
8
ST1
Termostato
ST2
Funzione di controllo di temperatura
HL1
Indicatore di potenza
HL2
Spia di calore
SA1
Micro interruttore
EH
Serpentina
SA
Tasto di accensione

9
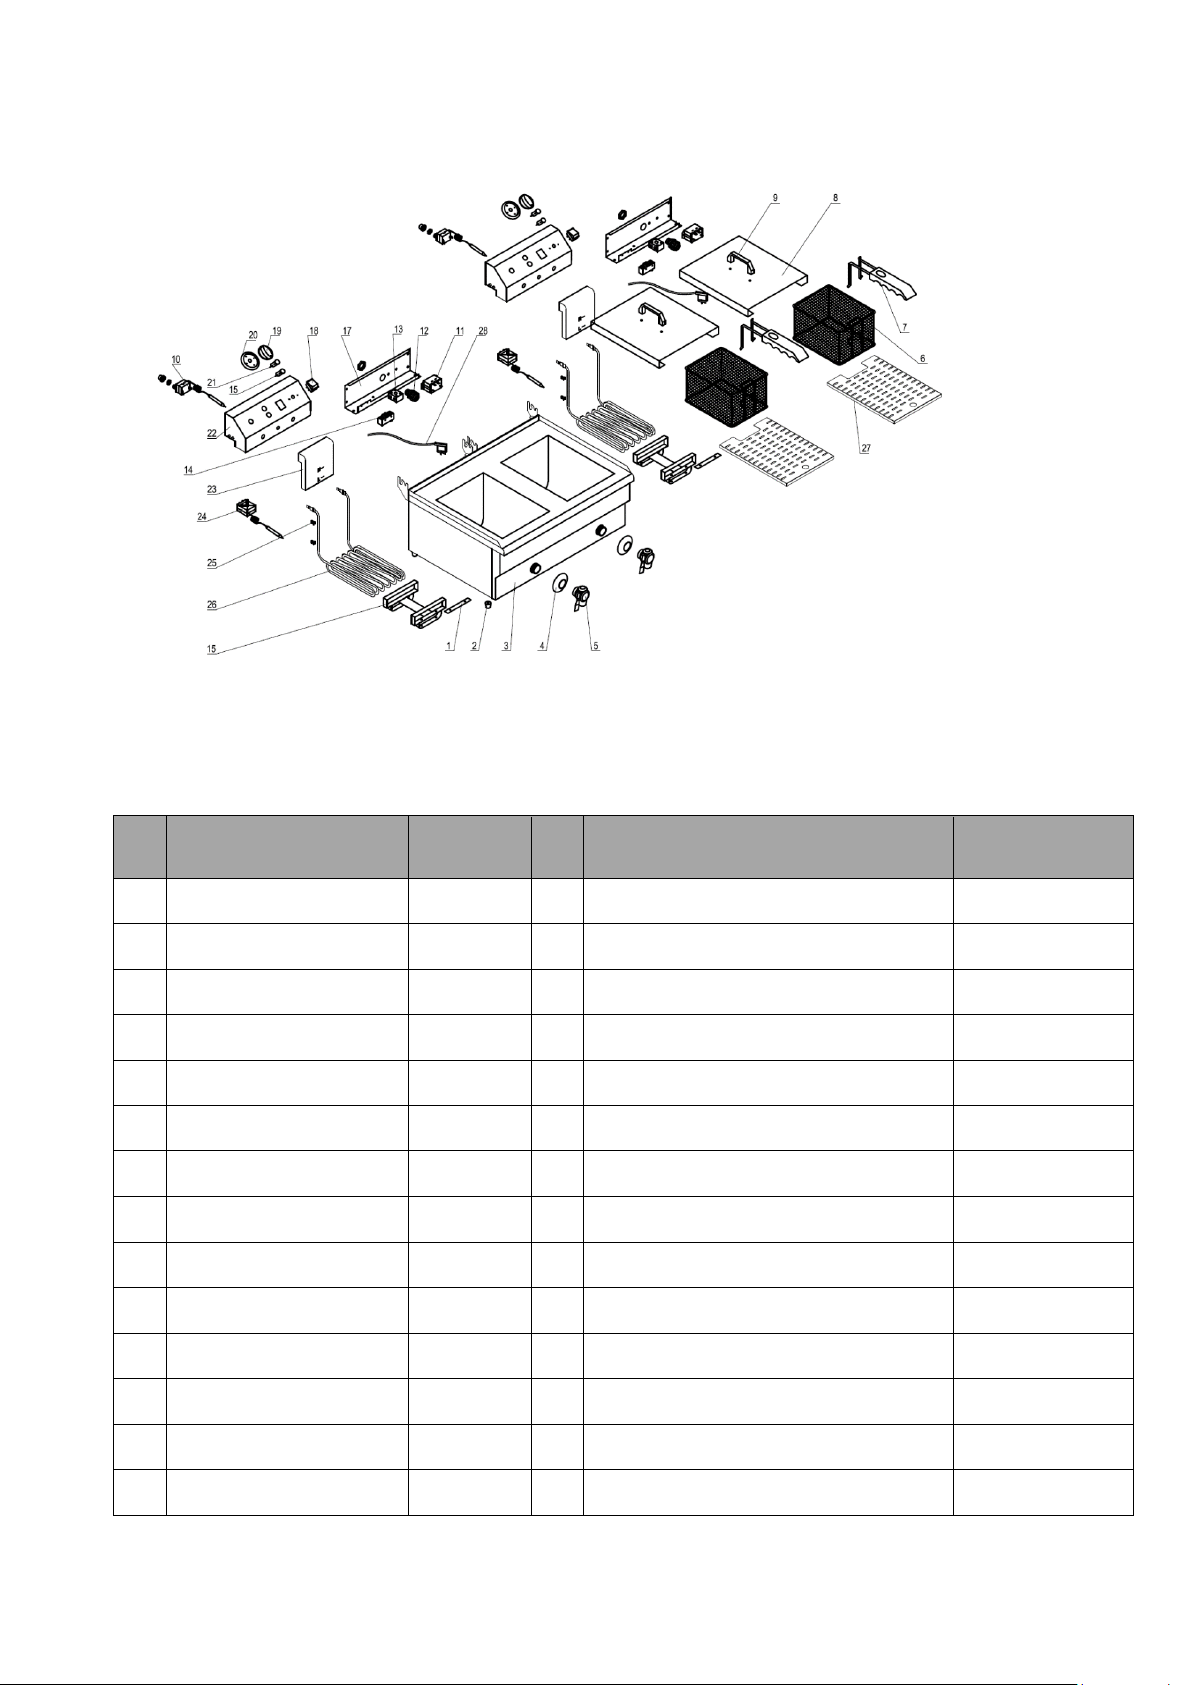
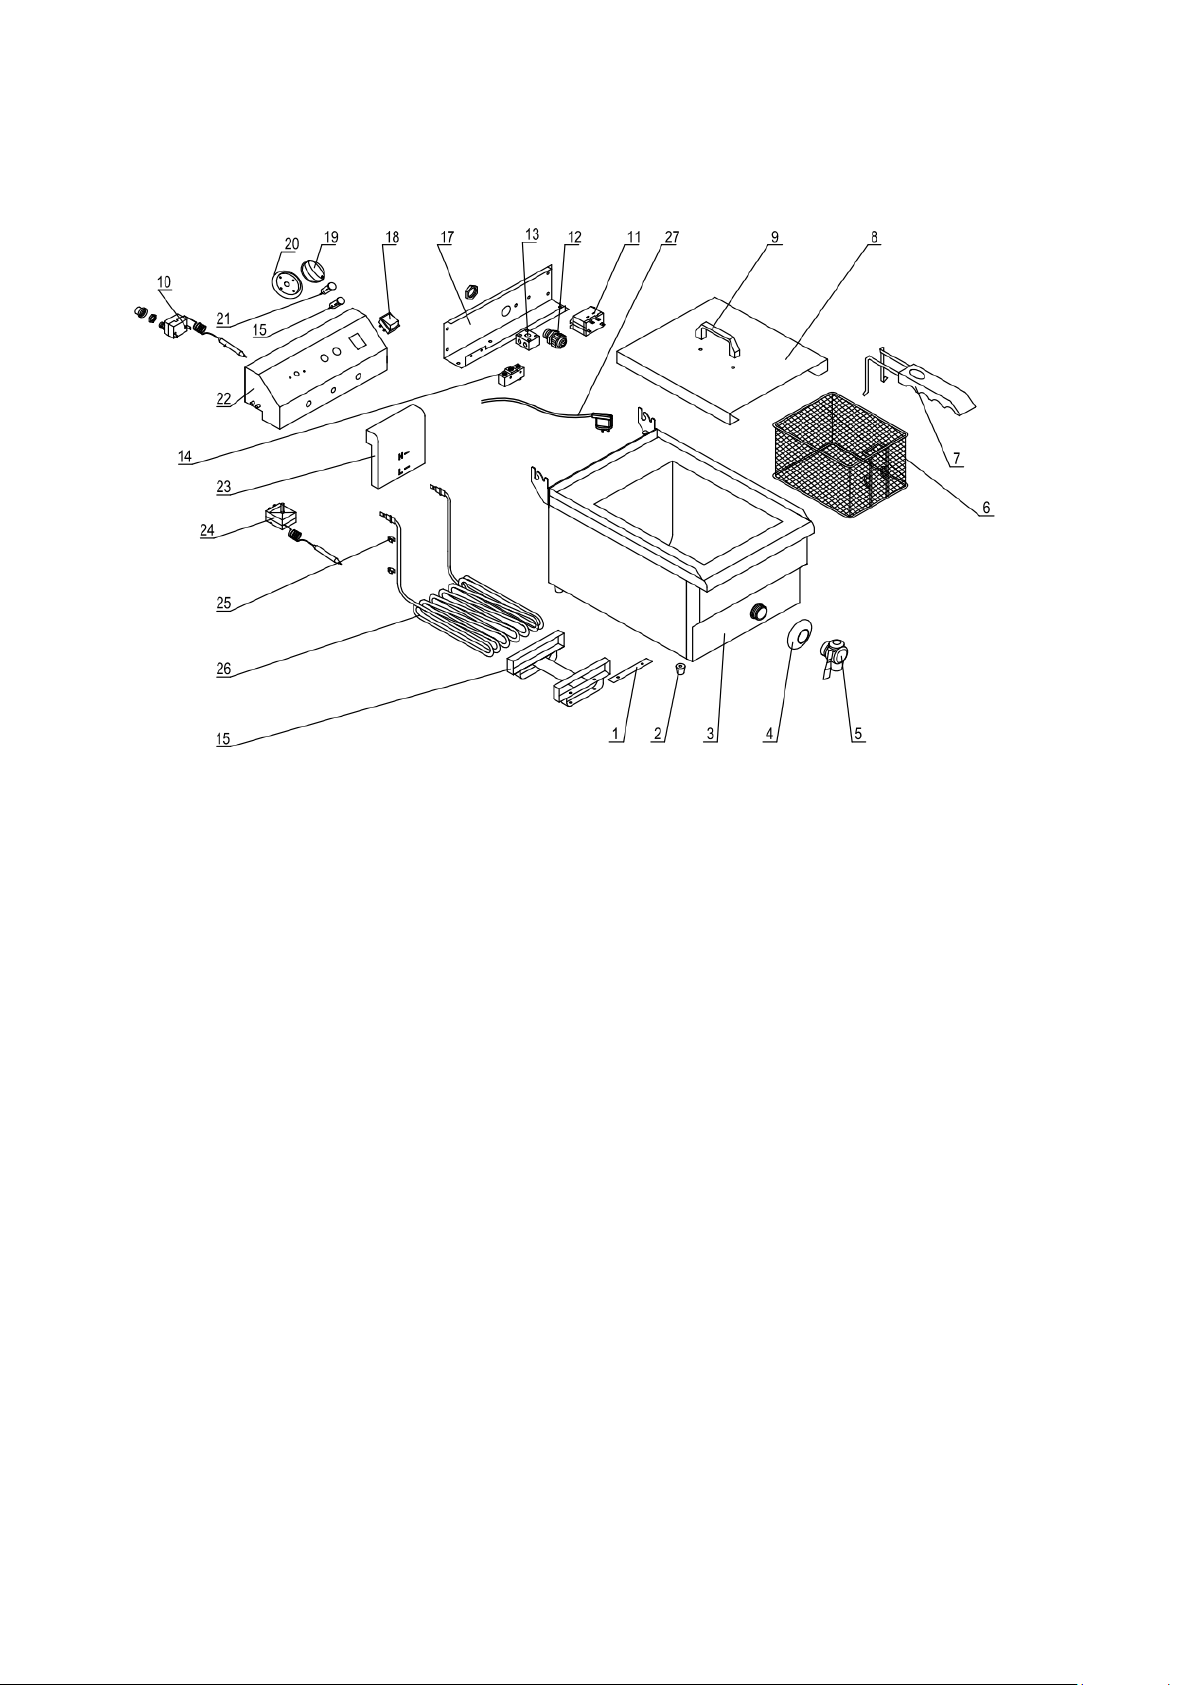
VII.Visioni delle parti separate –Modello:EF-102V EF-132V EF-162V
NO.
ARTICOLO
QTY/PZ
N.
ARTICOLO
QT/PZ
1
PIATTO RISCALDANTE
2
15
PIASTRA DI SUPPORTO DEL
RISCALDATORE
2
2
PIEDINI DI GOMMA
4
16
SPIA DI CALORE
2
3
STRUTTURA DELLA MACCHINA
1
17
SCHEDA
2
4
COPERCHIO DELLA VALVOLA
DELL'OLIO
2
18
TASTO DI ACCENSIONE
2
5
COPERCHIO DELLA VALVOLA
DELL'OLIO
2
19
MANOPOLA DEL TERMOSTATO
2
6
CESTELLO
2
20
QUADRANTE DEL TERMOSTATO
2
7
MANICO CESTELLO
2
21
SPIA DI ACCENSIONE
2
8
COPERCHIO
2
22
COMANDO ELETTRICO
2
9
MANICO COPERCHIO
2
23
LIVELLO OLIO MIN & MAX
2
10
LIMITATORE DI TEMPERATURA
2
24
TERMOSTATO
2
11
RELE’
2
25
CHIUSURA GANCIO
2
12
CAVO DI BLOCCO
2
26
SERPENTINA
2
13
MORSETTO
2
27
COLLEGAMENTO SCHEDA
2
14
MICRO INTERRUTORE
2
28
CAVO
1

10
Modello No:EF-101V EF-131V EF-161V
N.
ARTICOLO
QT/PZ
N.
ARTICOLO
QT/PZ
1
PIATTO RISCALDANTE
1
15
PIASTRA DI SUPPORTO DEL RISCALDATORE
1
4
16
SPIA DI CALORE
1
3
STRUTTURA DELLA MACCHINA
1
17
SCHEDA
1
4
COPERCHIO DELLA VALVOLA
1
18
PIEDINI IN GOMMA
2
5
COPERCHIO DELLA VALVOLA
1
19
MANOPOLA TEERMOSTATO
1
6
CESTELLO
1
20
QUADRANTE TERMOSTATO
1
7
MANICO CESTELLO
1
21
SPIA DI ACCENSIONE
1
8
COPERCHIO
1
22
COMANDO ELETTRICO
1
9
MANICO COPERCHIO
1
23
LIVELLO OLIO MIN & MAX
1
10
LIMITATORE DI TEMPERATURA
1
24
TERMOSTATO
1
11
RELE’
1
25
CHIUSURA GANCIO
1
12
CAVO DI BLOCCO
1
26
SERPENTINA
1
13
MORSETTO
1
27
COLLEGAMENTO SCHEDA
1
14
MICRO INTERRUTORE
1
28
CAVO
1

11
Electric Fryer
User’s Manual
Please read this manual thoroughly before using to understand proper use and function

12
WARNINGS
1.Unplug cord from outlet when not in use and before cleaning.
2. DO NOT move or transport this fryer until fryer oil has cooled completely. Doing so can result in severe
burns.
3. Do not use this unit for other than intended use.
4.Do not use outdoors.
5. Always cook on a firm, dry and level surface.
6. High temperature will cause scalding. Do not stand over fryer when operating and do not touch any part of
machine while in operation, other than handle of basket and power controls.
7. Do not use unit with a damaged cord or plug, in the event the appliance malfunctions, or has been
damaged in any manner.
8.Keep children and animals away from fryer.
9.Do not modify unit. . Please read this manual thoroughly before using to understand proper use and
function. Safety warnings, cleaning suggestions and electrical recommendations are given to reduce the risk
of damage or injury
WARNING!
Any Incorrect Installation, Alterations, Adjustments And/or Improper Maintenance Can Lead To Property
Loss And Injury.
All Repairs Should Be Done By Authorized Professionals Only.
KEEP ALL FLAMMABLE AND COMBUSTABLE LIQUIDS AWAY FROM PRODUCT. THIS
MACHINE MUST BE PLACED ON A LEVEL SURFACE
I. Features of the Fryer
①
②
③
④
⑤
③
⑥
⑦
⑧

13
1.Reset Button: Temperature Safety Switch
Remark: Remove black cover to press the reset button down.if the oil temperature over 230℃.
The switch cuts power to the unit
2. Green Light: Power Indicator
3: Yellow Light: Heat indicator
4: Power On and Off Switch
5. Thermostat controller: Temperature Range:50-200C.
Used to set and adjust the temperature as desired
6. Max Oil Lever: Do not fill with oil above this mark. Because it may cause oil to overflow
7. Min Oil Lever: Do not operate with oil below this mark as the oil may overheat and start a fire
8. Micro-switch:
It’s on the bottom of the electrical box unit will automatically cut off power in case electric plug is not
removed from power supply.
II.Instructions
1. Please make sure the power supply you are using is adequate for continual fryer use and voltage is
adequate. The use of a surge protector or circuit breaker is advisable.
2. Fill oil receptacle with vegetable oil to between the minimum and maximum levels, allowing for
food volume.
3. Make sure the temperature regulator knob is in the “OFF” position before you plug the machine
into an outlet. Once you plug the machine in, a green “Power Light” will come on. Then, rotate the
temperature regulator knob clockwise to the desired temperature indicated by the pointer. When the
desired temperature has been reached, the yellow "Heat Light" will turn off and cycle, and the
temperature controller will maintain the temperature automatically.
4. Lift food basket up and away from machine to load food, and carefully place loaded basket into
machine to avoid splash. Gently shake off excess oil from food when removing from tank after frying.
5. The enclosed frying basket is intended to hold small foods such as French fries and onion rings.
Large food can be placed directly into the basket or oil tank
6. After fryer usage, turn power controller counterclockwise to the “OFF” position. Remove plug
from power supply. Wait for oil to cool down before draining.
7. Drain oil, after cooled,
8. Remove protective bottom grate with tongs. Do not stick hand into oil.
9. Gently lift up electrical box unit from back of machine. This will remove the element from the
frying oil. The micro switch on the bottom of the electrical box unit will automatically cut off power
in case electric plug is not removed from power supply. Place this in a clean dry place.
10. Gently wash the element with soap and water. Use a soft sponge. Never use harsh chemicals or
metal scrubbers to clean the element.
11. Gently wash oil tank with soap and water, dry it thoroughly.
12. Replace the Electrical box and element lining it up and ensure that everything has been wiped
dry.
13. Cover the fryer tank with the night cover when the unit is not in use.
14. Always use fresh vegetable oil and clean the fryer nightly

14
WARNINGS
This equipment must be used exclusively by an authorized operator (user).
• Do not touch any hot surfaces.
• Do not immerse unit, cord or plug in liquid at any time.
III.Specification
IV.Cleaning
To maintain the appearance and increase the service life clean your unit daily
Do not touch hot liquid or heating surfaces while unit is heating or operating
⚫Hot liquids and food can burn skin. Allow the hot liquid to cool
⚫Before handling,do not Drop or spill water into hot oil as it will spray or splatter the hot oil out of the tank
⚫Over heated oil or oil vapors can ignite causing s fire.
⚫Monitor oil temperature. Quality and level use and maintain oil vapor removal system
⚫Heat oil carefully. If oil smokes reduce heat do not leave unit unattended if fire occurs turn unit off cover
until cool.do not put water on hot or flaming oil.
⚫Do not operate with oil below oil mark. Dirty oil has a lower flash point. Replace oil on a regular basis
⚫Maintain correct oil level.
⚫Unplug the unit
⚫Do not immerse the cord plug or controls in water or any other liquid
⚫Rotate the fryer head to the up position
⚫Using a damp cloth or sponge dipped in soapy water to clean the unit. Or you may fill the tank with water
with dish washing liquid
⚫Lower fryer head to the down position and boil it for a few minutes rinse thoroughly it’s important that
the unit doesn’t run dry as it will cause the element to burn out
⚫Dry thoroughly after cleaning.
Model
Voltage
Power
Capacity
Dimension
Basket
FRI30E
220-
240V/50HZ
4.8KW
30L
590*540*360mm
1pcs

15
V.Trouble shooting
Problem
Caused
Solution
Indicator light will not turn on
and unit will not heat
⚫Plug not properly in-serted
⚫Micro switch not closed
Plug unit in
Adjust the limit distance of micro-
switch.
Heating indicator is not on.The
temperature is not increasing
⚫Electric heater tubes is not
properly connected.
⚫Heater is defective
Tighten both sides of electric heater
Replace electric heating tube.
Power indicator is on but the
desired temperature is not
reached
⚫Temperature controller is
burned out
Replace Thermostat Control
Temperature control is normal
but indicator is not on
⚫Indicator light is burned out
Replace indicator.
Temperature indicator is
on.But heater tube is not hot
⚫Temperature limiter has
tripped
Reset over heating protecting button
by hand on bottom of electrical box
Temperature can not be
controlled
⚫Temperature Limiter is out of
order
Replace temperature limiter/Rest
Button
VI.Diagram
ST1
Thermostat
ST2
Temperature Limiter
HL1
Power indicator
16
HL2
Heat indicator
SA1
Micro switch
EH
Heater
SA
Power switch
VII.Explosive view –Model: EF-102V EF-132V EF-162V
NO.
ITEM NAME
QTY/PCS
NO.
ITEM NAME
QTY/PCS
1
HEATER PLATE
2
15
HEATER SUPPORTING PLATE
2
2
RUBBER FEET
4
16
HEAT INDICATOR
2
3
MACHINE'S BODY
1
17
BOARD
2
4
OIL VALVE COVER
2
18
POWER SWTICH
2
5
OIL VALVE COVER
2
19
THERMOSTAT KNOB
2
6
BASKET
2
20
THERMOSTAT DIAL
2
7
BAKSET HANDLE
2
21
POWER INDICATOR
2
8
LID
2
22
ELECTRICAL BOX
2
9
LID HANDLE
2
23
MIN & MAX OIL LEVEL
2
10
TEMPER LIMITER
2
24
THERMOSTAT
2
11
RELAY
2
25
CLASPS
2
12
CABLE LOCKER
2
26
HEATER
2
13
TERMINAL
2
27
FILLER BOARD
2
14
MICRO SWITCH
2
28
CABLE
1
17
Model No:EF-101V EF-131V EF-161V
NO.
ITEM NAME
QTY/PCS
NO.
ITEM NAME
QTY/PCS
1
HEATER PLATE
1
15
HEATER SUPPORTING PLATE
1
4
16
HEAT INDICATOR
1
3
MACHINE'S BODY
1
17
BOARD
1
4
OIL VALVE COVER
1
18
2
RUBBER FEET
5
OIL VALVE COVER
1
19
THERMOSTAT KNOB
1
6
BASKET
1
20
THERMOSTAT DIAL
1
7
BAKSET HANDLE
1
21
POWER INDICATOR
1
8
LID
1
22
ELECTRICAL BOX
1
9
LID HANDLE
1
23
MIN & MAX OIL LEVEL
1
10
TEMPER LIMITER
1
24
THERMOSTAT
1
11
RELAY
1
25
CLASPS
1
12
CABLE LOCKER
1
26
HEATER
1
13
TERMINAL
1
27
FILLER BOARD
1
14
MICRO SWITCH
1
28
CABLE
1
18

19
Elektrische Fritteuse
Bedienungsanleitung

20
Diese Bedienungsanleitung muss v vor dem Gebrauch sorgfältig durchgelesen werden. Denn nur dann ist
eine korrekte Handhabung und Benützung des Gerätes möglich.
WARNUNGEN
- Ziehen Sie den Netzstecker aus der Steckdose, wenn Sie die Fritteuse nicht benutzen und bevor Sie
sie reinigen.
- Bewegen oder transportieren Sie diese Fritteuse NICHT, bevor das Frittieröl nicht vollständig
abgekühlt ist. Andernfalls kann es zu schweren Verbrennungen kommen.
- Verwenden Sie dieses Gerät ausschließlich für den vorgegebenen Zweck. Es darf nicht für andere
Zwecke benützt werden.
- Verwende Sie das Gerät nicht im Freien.
- Stellen Sie das Gerät nur auf eine stabile, trockene und ebenen Fläche.
- Hohe Temperaturen können zu Verbrennungen führen. Stehen Sie während des Betriebs nicht über
der Fritteuse und berühren Sie während des Betriebs keine Teile des Geräts. Nur der Griff des Korbs
und die Bedienelemente dürfen berührt werden.
- Das Gerät darf nicht in Betrieb genommen werden wenn das Kabel oder der Stecker beschädigt
sind, das Gerät eine Fehlfunktion aufweist oder es auf irgendwelche andere Weise beschädigt wurde.
- Halten Sie Kinder und Tiere unbedingt von der Fritteuse fern.
- Nehmen Sie keine Änderungen am Gerät vor. Bitte lesen Sie diese Betriebsanleitung vor dem
Gebrauch gründlich durch, um sich mit der korrekten Verwendung und Funktion vertraut zu machen.
Die Sicherheitshinweise, Reinigungsvorschläge und elektrischen Empfehlungen sollen das Risiko
von Schäden oder Verletzungen verringern.
ACHTUNG!
Jede unsachgemäße Installation, Änderung, Einstellung und/oder Wartung kann zu Sachschäden und
Verletzungen führen.
Alle Reparaturen dürfe nur von autorisierten Fachleuten durchgeführt werden.
HALTEN SIE ALLE ENTFLAMMBAREN UND BRENNBAREN FLÜSSIGKEITEN VON DEM
PRODUKT FERN. DIESES GERÄT MUSS AUF EINER EBENEN FLÄCHE AUFGESTELLT
WERDEN.
I. Merkmale der Fritteuse
①
②
③
④
⑤
③
⑥
⑧
Table of contents
Languages:
Other Gastrodomus Fryer manuals


