Gastrodomus FAIR User manual

FAIR OVENS
Manuale di istruzioni
Instruction manual
Manual de instrucciones

1

2
WARNING!
BEFORE SWITCHING ON THE OVEN: REMOVE THE REFRACTORY STONES CAREFULLY, REMOVE
THE POLYSTYRENE UNDER ALL THE STONES, AND THEN PUT AGAIN THE STONES INSIDE THE
ROOM OF THE OVEN.
ВНИМАНИЕ!
ПЕРЕД ПЕРВЫМ ВКЛЮЧЕНИЕМ ПЕЧИ ОСТОРОЖНО ПРИПОДНЯТЬ ШАМОТНЫЙ КАМЕНЬ И
ДОСТАТЬ ПОЛИСТИРОЛОВЫЙ УПЛОТНИТЕЛЬ ПОД КАМНЯМИ. АККУРАТНО ПОЛОЖИТЬ
КАМЕНЬ ВПЕРВОНАЧАЛЬНОЕ ПОЛОЖЕНИЕ.
ATTENTION!
AVANT D’ALLUMER LE FOUR, ENLEVER LES PIERRE SOIGNEUSEMENT, ENLEVER LE
POLYSTYRENE QUI SE TROUVE DESSOUS TOUTES LES PIERRES ET, SEULEMENT APRES AVOIR
FAIT CA, REMETTRE LES PIERRE DANS LE FOUR.
ATTENZIONE!
PRIMA DI METTERE IN FUNZIONE IL FORNO SOLLEVARE CON CAUTELA LE PIETRE, TOGLIERE
IL POLISTIROLO DA SOTTO TUTTE LE PIETRE PRESENTI, MANEGGIARE LE PIETRE CON CURA E
DOPO AVER RIMOSSO IL POLISTIROLO RIMETTERE LE PIETRE ALL’INTERNO DELLA CAMERA.
ATENDIMENTO!
ANTES DE PÔR EM FUNCIONAMEINTO O FORNO , LEVANTAR COM CUIDADO AS PEDRAS , TIRAR
O POLIESTIRENO PRESENTE EMBAIXO DAS PEDRAS, MANIPULAR COM CUIDADO AS PEDRAS E
DEPOIS DE TER TIRADO O POLIETIRENO VOLTAR A COLOCAR AS PEDRAS DENTRO DA CÂMARA.
¡ATENCIÓN!
ANTES DE PONER EN MARCHA EL HORNO, LEVANTAR CON CUIDADO LAS PIEDRAS, QUITAR EL
POLIESTERENO QUE SE ENCUENTRA DEBAJO DE ESTAS, MANIPULAR LAS PIEDRAS CON
CUIDADO Y TRAS HABER QUITADO EL POLIESTERENO VOLVER A RECOLOCARLAS EN EL
INTERIOR DE LA CÁMARA.
ACHTUNG!
UNTER DEN STEINEN BEFINDET SICH EINE SCHICHT AUS POLYSTYROL, BITTE DIESES
POLYSTYROL VOR DEM EINSCHALTEN DES OFENS ENTFERNEN.
BEHANDLE DIE STEINE SORGFÄLTIG UND, NACH DEM ENTFERNEN DES POLYSTYROLS, LEGEN
SIE DIE STEINE WIEDER IN DEN KAMMERN
UWAGA!
PRZED URUCHOMIENIEM PIECA NALEŻY W PIERWSZEJ KOLEJNOŚCI WYJĄĆ Z PIECA PŁYTY
SZAMOTOWE, USUNĄĆ ZABEZPIECZENIE STYROPIANOWE, A NASTĘPNIE PONOWNIE UMIEŚCIĆ
PŁYTY SZAMOTOWE W PIECU. :هيبنت
سا لبق ،رذحب راجح�ا عفرا نرفلا مادختةدوجوملا راجح�ا عيمج تحت نم نيريتسيلوبلا لزأو دعبو ،رذحب راجح�ا عم لماعت ،
.ةفرغلا لخاد راجح�ا عضو دعأ نيريتسيلوبلا ةلازإ

3
ITALIANO
MATRICOLA................................................................................................................ 4
ETICHETTA MATRICOLA ................................................................................................. 4
INFORMAZIONI GENERALI......................................................................................... 4
IMPORTANZA DEL MANUALE........................................................................................... 4
STATO “FORNO SPENTO” ............................................................................................... 4
GARANZIA.................................................................................................................... 4
DESTINAZIONE D’USO ................................................................................................... 4
LIMITI D’USO................................................................................................................ 5
INSTALLAZIONE ......................................................................................................... 5
PRESCRIZIONI A CARICO DELL’UTENTE ........................................................................... 5
COLLEGAMENTO ELETTRICO........................................................................................... 5
MORSETTIERA .............................................................................................................. 6
EQUIPOTENZIALE.......................................................................................................... 6
USO E FUNZIONAMENTO ............................................................................................ 7
PANNELLO COMANDI ..................................................................................................... 7
PRIMA MESSA IN FUNZIONE........................................................................................... 8
ACCENSIONE DEL FORNO............................................................................................... 8
SPEGNIMENTO DEL FORNO ............................................................................................ 8
MANUTENZIONE ......................................................................................................... 9
PULIZIA ....................................................................................................................... 9
DEMOLIZIONE ............................................................................................................ 9
AVVERTENZE GENERALI................................................................................................. 9
4
MATRICOLA
ETICHETTA MATRICOLA
La matricola è costituita da una etichetta adesiva serigrafata di colore grigio, applicata sul retro del forno.
Nella targhetta sono indicati in modo leggibile e indelebile i seguenti dati:
- Nome del fabbricante; - N° di matricola ;
- Potenza elettrica (kW/A); - Tensione e frequenza elettrica (Volt/Hz);
- Modello; - Anno di costruzione
- Dicitura “Made in Italy”; - Peso del forno
INFORMAZIONI GENERALI
IMPORTANZA DEL MANUALE
Prima di utilizzare il forno in oggetto è obbligatorio leggere e comprendere in tutte le sue parti il presente
manuale.
Il presente manuale deve sempre essere a disposizione degli “operatori autorizzati” e trovarsi vicino al forno
bene custodito e conservato.
La ditta costruttrice declina ogni responsabilità per eventuali danni a persone, animali e cose, causati
dall’inosservanza delle norme descritte nel presente manuale.
Il presente manuale è parte integrante del forno e deve essere conservato fino allo smaltimento finale dello
stesso.
Gli “operatori autorizzati” devono eseguire sul forno esclusivamente gli interventi di loro specifica
competenza.
STATO “FORNO SPENTO”
Prima di eseguire qualsiasi tipo di intervento manutentivo e/o regolazione sul forno è obbligatorio sezionare
la fonte di alimentazione elettrica, togliendo la spina di alimentazione dalla presa di rete, assicurandosi che
il forno sia effettivamente spento e raffreddato.
GARANZIA
La ditta costruttrice garantisce che i forni in oggetto sono stati collaudati in sede della stessa. La garanzia
del forno è di dodici mesi.
LE MANOMISSIONI E/O LA SOSTITUZIONE DI PEZZI CON RICAMBI NON ORIGINALI,
FANNO DECADERE LA GARANZIA, ED ESONERANO IL FABBRICANTE DA OGNI
RESPONSABILITÀ.
DESTINAZIONE D’USO
L’uso previsto per cui è stata progettato e realizzato il forno è il seguente:
USO PREVISTO: COTTURA DELLA PIZZA, PANE, FOCACCE, GRATINATURA DI PRODOTTI GASTRONOMICI E
RISCALDAMENTO DI VIVANDE SU TEGLIA.
IL FORNO PUÒ ESSERE UTILIZZATO ESCLUSIVAMENTE DA UN OPERATORE ADDETTO (UTILIZZATORE).
5
QUESTO APPARECCHIO NON E’ DESTINATO AD ESSERE UTILIZZATO DA PERSONE (BAMBINI COMPRESI)
CON CAPACITA’ FISICHE, SENSORIALI O MENTALI RIDOTTE, O CON MANCANZA DI ESPERIENZA E
CONOSCENZA, A MENO CHE NON ABBIANO RICEVUTO ASSISTENZA O ISTRUZIONI ALL’USO
DELL’APPARECCHIO DA UNA PERSONA RESPONSABILE DELLA LORO SICUREZZA.
I BAMBINI DEVONO ESSERE SORVEGLIATI PER EVITARE CHE GIOCHINO CON L’APPARECCHIO.
LIMITI D’USO
Il forno in oggetto è stato progettato e realizzato esclusivamente per la destinazione d’uso descritta al
paragrafo precedente e pertanto è assolutamente vietato qualsiasi altro tipo d’impiego e utilizzo al fine di
garantire, in ogni momento, la sicurezza degli operatori autorizzati e l’efficienza del forno stesso.
INSTALLAZIONE
PRESCRIZIONI A CARICO DELL’UTENTE
Il luogo dove viene installato il forno deve avere le seguenti caratteristiche ambientali:
essere asciutto, la temperatura e l’umidità relativa del locale nel quale deve essere installato non
devono superare i valori indicati nella tabella dei dati tecnici;
fonti idriche adeguatamente distanti;
ventilazione ed illuminazione idonee e rispondenti alle norme igieniche e di sicurezza previste dalle
leggi vigenti.
IL FORNO NON DEVE ESSERE INSTALLATO IN PROSSIMITÀ DI MATERIALI
INFIAMMABILI (LEGNO, PLASTICA, COMBUSTIBILI, GAS, ETC.). EVITARE NEL MODO
PIU’ ASSOLUTO IL CONTATTO D’OGGETTI INFIAMMABILI CON LE SUPERFICI CALDE
DEL FORNO. ASSICURARE SEMPRE LE CONDIZIONI DI SICUREZZA ANTINCENDIO.
MANTENERE UNO SPAZIO LIBERO ATTORNO AL FORNO DI ALMENO 30 CM.
Verificare che la tensione d’alimentazione, la frequenza e la potenza dell’impianto siano compatibili con i
valori riportati sia nelle caratteristiche tecniche che nella targhetta apposta sul retro del forno.
Le caratteristiche della presa d’alimentazione elettrica devono essere compatibili con la spina installata sul
cavo.
COLLEGAMENTO ELETTRICO
IL COLLEGAMENTO ELETTRICO DEL FORNO ALLA RETE DI ALIMENTAZIONE
ELETTRICA DEVE ESSERE ESEGUITO OBBLIGATORIAMENTE ED ESCLUSIVAMENTE
DA UN TECNICO AUTORIZZATO (ELETTRICISTA) IN POSSESSO DEI REQUISITI
TECNICO-PROFESSIONALI RICHIESTI DALLE NORME VIGENTI NEL PAESE DI
UTILIZZO DEL FORNO, CHEDERE DI RILASCIARE UNA DICHIARAZIONE DI
CONFORMITÀ DELL’INTERVENTO ESEGUITO.
PER IL COLLEGAMENTO DIRETTO ALLA RETE E’ NECESSARIO PREVEDERE UN
DISPOSITIVO AVENTE APERTURA TRA I CONTATTI TALE DA ASSICURARE LA
DISCONNESSIONE COMPLETA NELLE CONDIZIONI DELLA CATEGORIA DI
SOVRATENSIONE III, CONFORMEMENTE ALLE REGOLE DI INSTALLAZIONE.
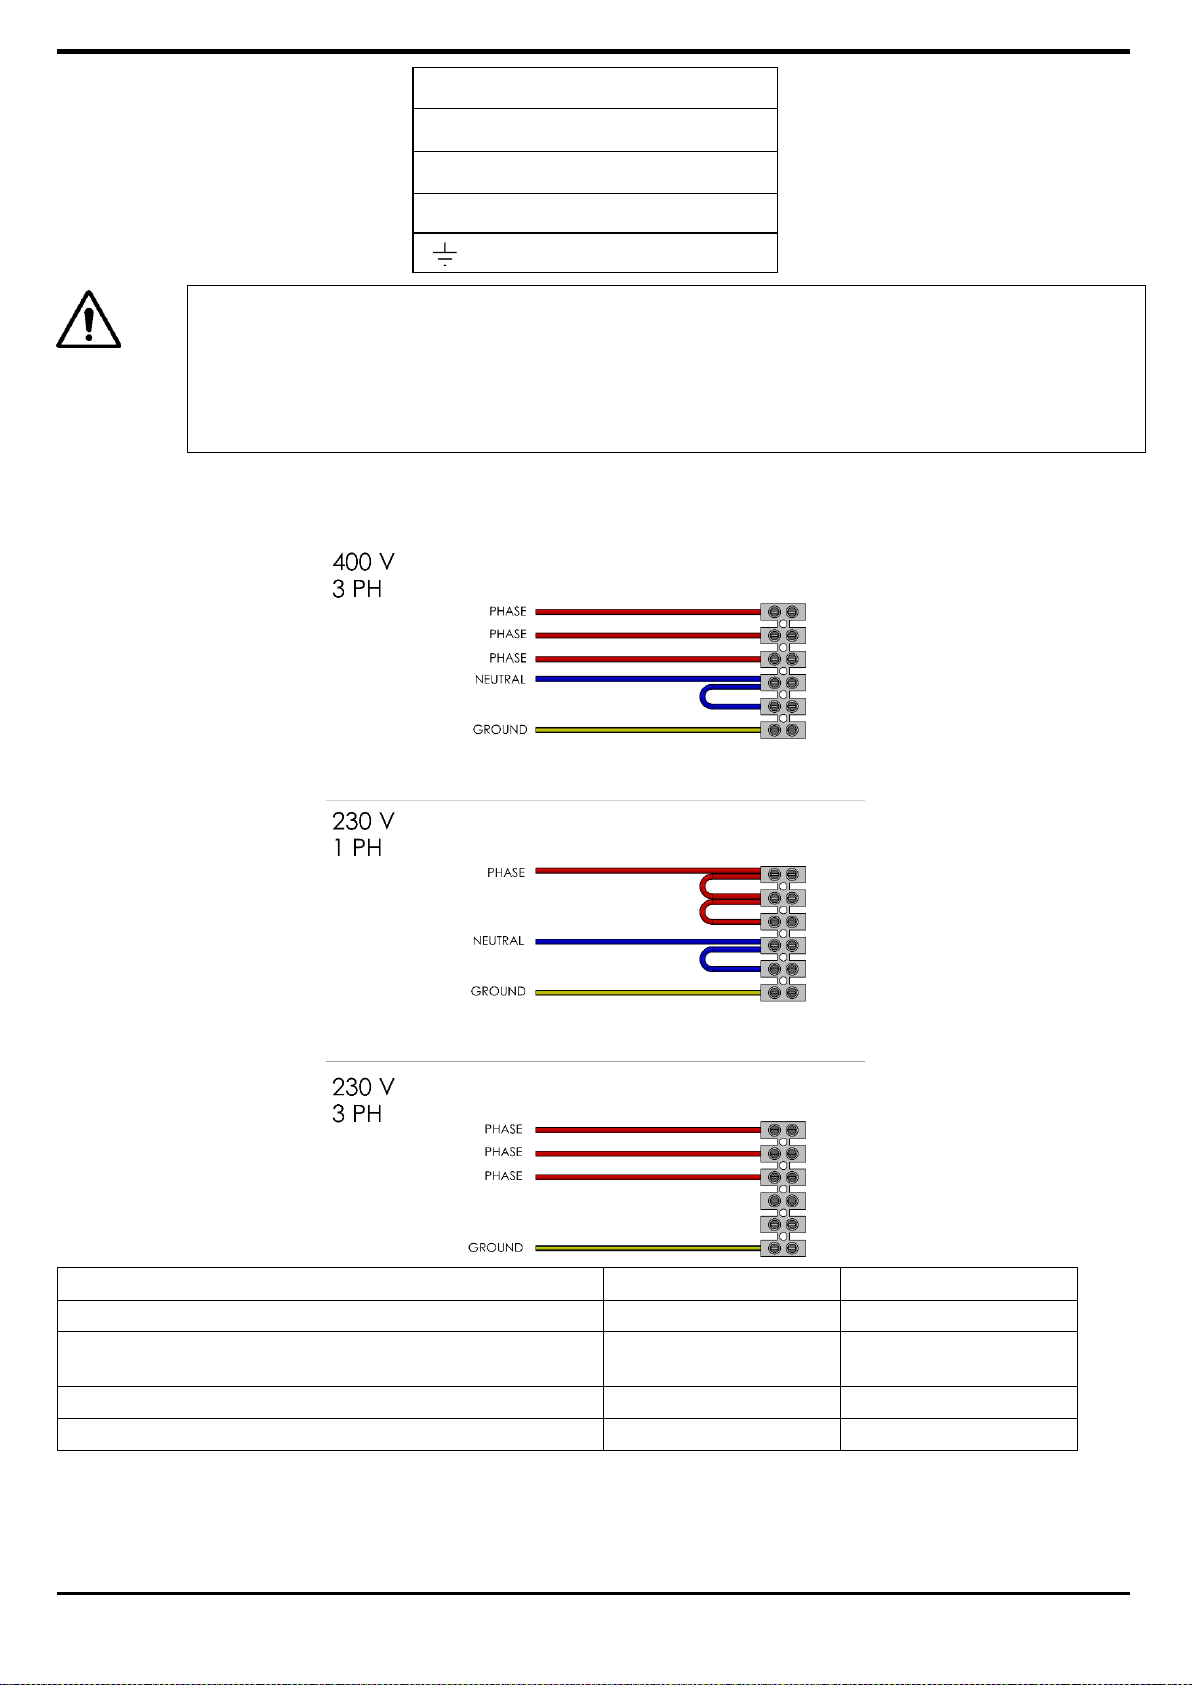
Per collegare la macchina alla rete elettrica è indispensabile procedere nel modo seguente:
1. Smontare il pannello destro del forno.
2. Collegare alla morsettiera (FIG. A/B) i conduttori L1—L2—L3—N —di un cavo di alimentazione tipo
H07RNF 3G X “x” mm² sguainato con puntalini.
3. Assemblare all’altra estremità del cavo una spina normalizzata e polarizzata (la distinzione tra fase e
neutro deve essere inequivocabile).
Per collegare il forno a 230V MONOFASE è sufficiente fare un ponte tra L1-L2-L3 con le apposite piastrine
presenti inserite nella morsettiera.
6
L1 Morsetto N. 1
L2 Morsetto N. 2
L3 Morsetto N. 3
N Morsetto N. 5
Morsetto N. 6
A COLLEGAMENTO ELETTRICO ULTIMATO, IL TECNICO AUTORIZZATO
(ELETTRICISTA) DEVE RILASCIARE UNA DICHIARAZIONE CHE ATTESTI LA
MISURAZIONE DI CONTINUITÀ DEL CIRCUITO DI PROTEZIONE EQUIPOTENZIALE.
L’APPARECCHIATURA DEVE ESSERE COLLEGATA TRAMITE UN INTERRUTTORE
DIFFERENZIALE (RCD) AVENTE CORRENTE MINIMA NOMINALE D’INTERVENTO NON
SUPERIORE AI 30 MA.
MORSETTIERA
La morsettiera è posta internamente al forno.
Tipologia forno
N. di cavi
Sezione (mm²)
Monofase monocamera
3
4
Monofase bicamera e versioni 9 monofase
3
6
Trifase monocamera e bicamera
5
4
Trifase dalle versioni 9 in su
5
6
EQUIPOTENZIALE
L’ apparecchiatura deve essere inserita in un sistema equipotenziale. Il morsetto di collegamento si trova
in prossimità della morsettiera di alimentazione del forno. Il filo equipotenziale deve avere una sezione
minima di 10 mm ².

7
USO E FUNZIONAMENTO
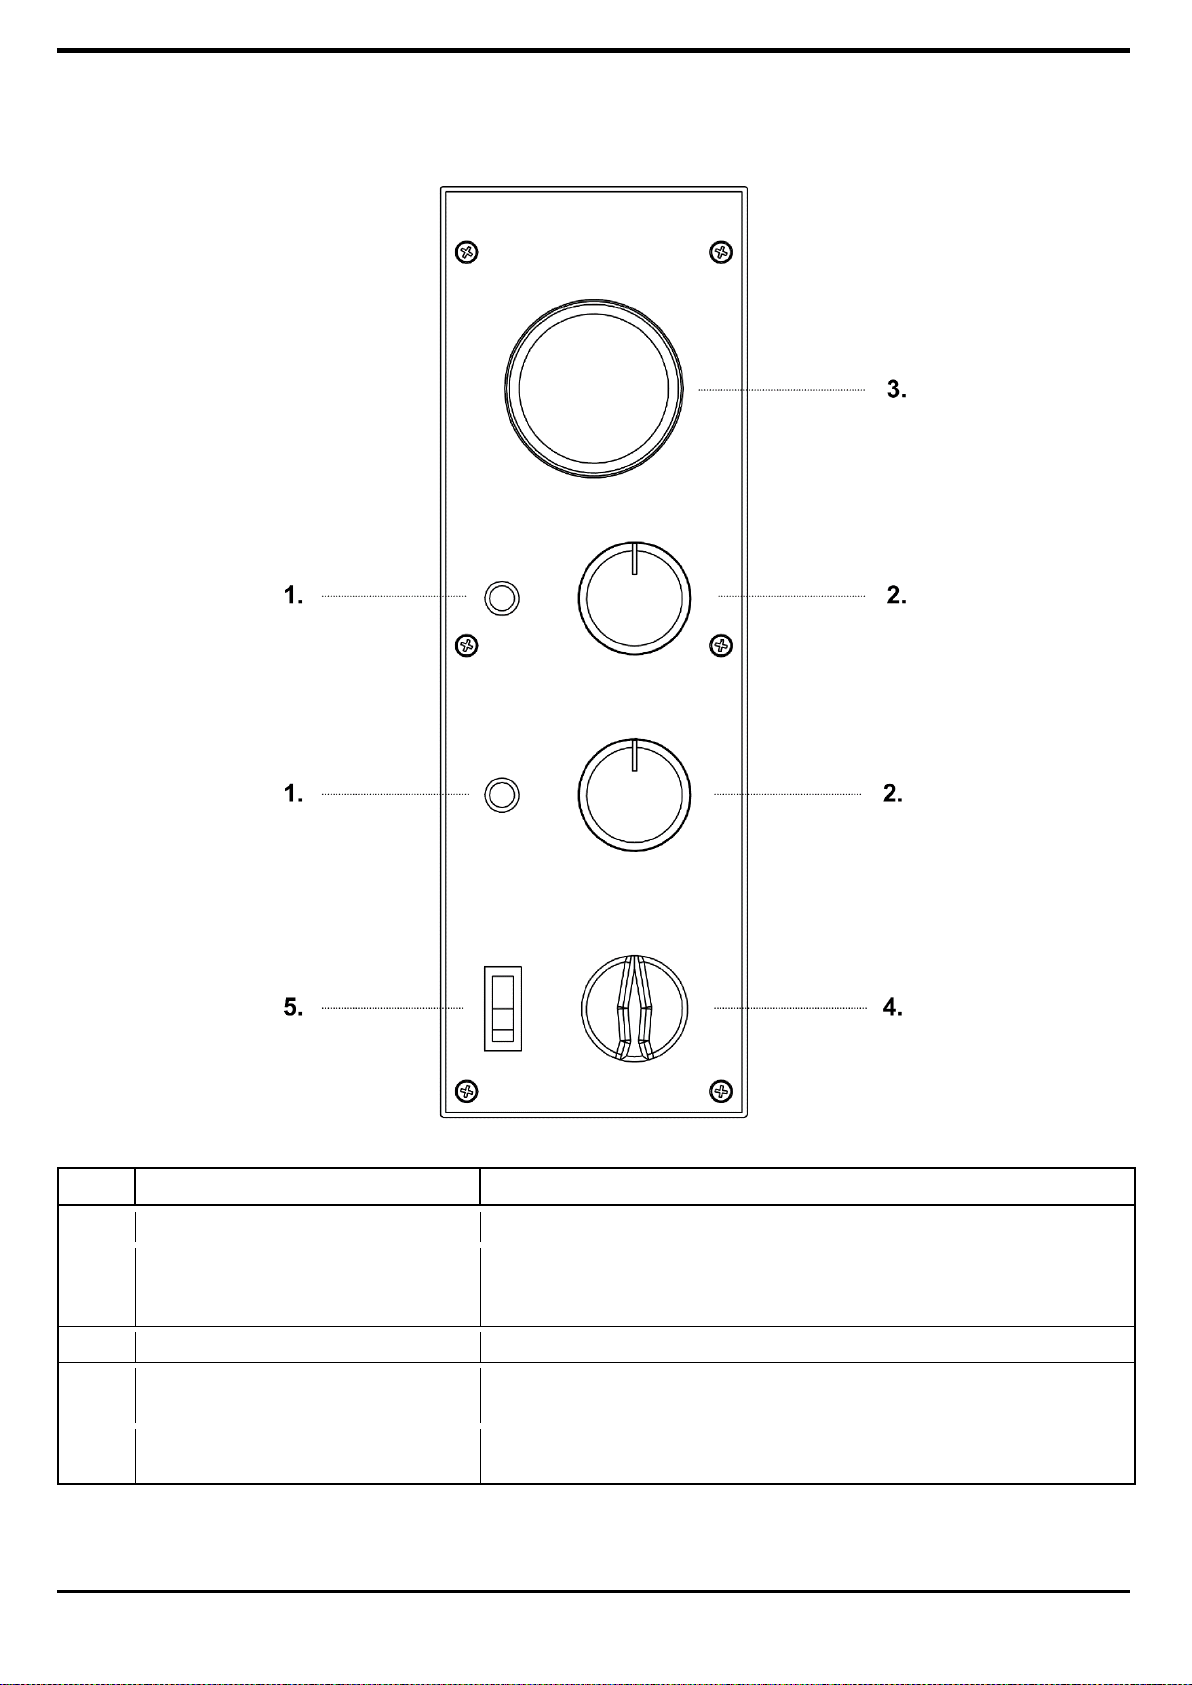
PANNELLO COMANDI
RIF.
DENOMINAZIONE
FUNZIONE
1
Spia luminosa
Accesa segnala il funzionamento della resistenza in uso.
2
Termostato
• Pos. 0:
Disattiva il funzionamento della resistenza
• Pos. 45-455°C :
Attiva il funzionamento della resistenza ed imposta la
temperatura desiderata.
3
Termometro
Indica la temperatura della camera nel forno.
4
Interruttore resistenza
• Pos. I: Attiva il funzionamento della resistenza;
• Pos. 0: Disattiva il funzionamento della resistenza
5
Interruttore luce camera
• Pos. I: Accende la luce nella camera del forno;
• Pos. 0: Spegne la luce nella camera del forno.

8
PRIMA MESSA IN FUNZIONE
Prima di accendere il forno togliere il polistirolo da sotto le pietre e asportare il film protettivo evitando di
usare utensili che possano danneggiare le superfici.
NONOSTANTE LE POTENZIALITÀ TERMICHE OFFERTE DAL FORNO, PER MOTIVI DI
SICUREZZA, LA TEMPERATURA MASSIMA CONSENTITA SELEZIONABILE CON
L’AUSILIO DEI TERMOSTATI E’ 455°C
LA MESSA IN SERVIZIO DEL FORNO PUÒ ESSERE EFFETTUATA SOLO AD
INSTALLAZIONE COMPLETA CON RILASCIO DA PARTE DEI TECNICI AUTORIZZATI
DELLA DICHIARAZIONE DI CONFORMITÀ PER IL COLLEGAMENTO ELETTRICO.
La prima messa in funzione deve essere effettuata procedendo come segue:
1. Pulire il frontale del forno con un panno asciutto e morbido in modo da rimuovere eventuali residui;
2. Collegare la spina del cavo di alimentazione alla presa di alimentazione elettrica;
3. Portare l’interruttore del forno “ON/OFF” in pos.”ON”;
4. Impostare la temperatura del forno a 150°C
5. Lasciare in funzione il forno per circa 1 h;
6. Spegnere il forno portando il pulsante “ON/OFF” in pos.”OFF”;
7. Aprire la porta del forno per 15 min circa in modo da lasciare evacuare eventuali vapori e odori;
8. Richiudere la porta e ripetere l’operazione portando il valore della temperatura interna della camera a
300°C;
9. Lasciare in funzione il forno per circa 1 h;
10. Disattivare il funzionamento delle resistenze tramite il tasto “ON/OFF” in pos. “OFF”;
ACCENSIONE DEL FORNO
1. Collegare la spina del cavo di alimentazione alla presa di alimentazione elettrica;
2. Portare il pulsante del forno “ON/OFF” in pos.”ON”;
3. Impostare i gradi (°C) di lavoro desiderati
4. Una volta che il forno ha raggiunto la temperatura desiderata, visibile nel display, è possibile inserire
nel forno la pizza per la cottura;
5. Aprire manualmente la porta del forno tramite le apposite maniglie;
6. Per illuminare l’interno della camera cottura premere l’interruttore lampada forno;
7. Inserire all’interno del forno la pizza e/o le pizze da cuocere servendosi di strumenti idonei a questo
tipo d’impiego. È importante evitare di lasciare troppo a lungo aperta la porta in quanto il calore
fuoriuscito abbassa la temperatura del forno;
8. Richiudere la porta e controllare la cottura attraverso il vetro d’ispezione;
9. La temperatura di cottura della pizza varia a seconda che la stessa sia posta direttamente sulla pietra
refrattaria o su una teglia. Nel primo caso si consiglia di impostare la temperatura di cottura a 280°C
per la platea e 320°C per il cielo; nel secondo caso, invece, 320°C per la platea e 280°C per il cielo;
10. A cottura ultimata aprire la porta, estrarre la pizza e/o le pizze e richiudere la porta.
SPEGNIMENTO DEL FORNO
Una volta terminato l’utilizzo del forno procedere come segue:
Spegnere il forno portando in posizione “OFF” l’interruttore “ON/OFF”.

9
MANUTENZIONE
PRIMA DI ESEGUIRE QUALSIASI TIPO DI INTERVENTO MANUTENTIVO È
OBBLIGATORIO DISINSERIRE LA SPINA DEL FORNO DALLA PRESA DI
ALIMENTAZIONE ELETTRICA.
PULIZIA
La pulizia deve essere eseguita alla fine di ogni utilizzo in osservanza delle norme igieniche e a tutela della
funzionalità del forno.
Pulizia del piano refrattario: questa operazione va effettuata con il forno caldo.
Una volta raggiunta la temperatura di circa 350°C, spegnere il forno, aprire la porta e pulire il piano
mediante una spazzola in fibra vegetale o metallo morbido dotata di manico lungo tale da evitare il contatto
con parti calde del forno.
Pulizia esterna del forno: (superfici in acciaio inox, vetro d’ispezione e pannello comandi): questa operazione
va effettuata a forno freddo.
vigenti.
SI RACCOMANDA ALL’OPERATORE ADDETTO DI UTILIZZARE APPOSITI GUANTI E
INDUMENTI IDONEI PER EVITARE SCOTTATURE.
PER LA PULIZIA E’ VIETATO L’USO DI: GETTI D’ACQUA, POLVERI ABRASIVE,
SOSTANZE CORROSIVE O QUANTO ALTRO CHE POSSA DANNEGGIARE I
COMPONENTI E COMPROMETTERE LA SICUREZZA IN GENERALE, ED IN
PARTICOLARE SOTTO IL PROFILO IGIENICO.
Per ogni intervento di manutenzione straordinaria, riparazione e/o sostituzione rivolgersi esclusivamente al
rivenditore autorizzato da cui si è acquistato il forno e/o ad un tecnico autorizzato in possesso dei requisiti
tecnico-professionali richiesti dalle normative vigenti.
DEMOLIZIONE
AVVERTENZE GENERALI
All’atto della demolizione del forno, attenersi obbligatoriamente alle prescrizioni delle normative vigenti.
Procedere alla differenziazione delle parti che costituiscono il forno secondo i diversi tipi di materiali di
costruzione (Plastica, rame, ferro, ecc…).

10
ENGLISH
MARKING PLATE....................................................................................................... 11
SERIAL LABEL..............................................................................................................11
GENERAL INFORMATION .......................................................................................... 11
THE IMPORTANCE OF THE MANUAL ................................................................................11
STATUS OF “TURNED OFF OVEN” ...................................................................................11
WARRANTY..................................................................................................................11
DESTINATION OF USE ..................................................................................................11
LIMITS OF USE ............................................................................................................12
INSTALLATION......................................................................................................... 12
INSTRUCTIONS FOR THE USER......................................................................................12
ELECTRIC CONNECTION................................................................................................12
TERMINAL BOX......................................................................................................... 13
EQUIPOTENTIAL...........................................................................................................13
USE AND FUNCTIONING ........................................................................................... 14
CONTROL PANEL ..........................................................................................................14
FIRST COMMISIONING..................................................................................................15
TURNING ON OVEN ......................................................................................................15
TURNING OFF THE OVEN...............................................................................................15
MAINTENANCE ......................................................................................................... 16
CLEANING...................................................................................................................16
DEMOLITION ............................................................................................................ 16
GENERAL WARNINGS....................................................................................................16

11
MARKING PLATE
SERIAL LABEL
The plate bears in readable and indelible way the following data:
- Name of the manufacturer; - Serial number;
- CE marking; - Electric voltage and frequency (Volt/Hz);
- Model (MOD); - Year of construction;
-Electric power (kW/A); - Weight of the oven;
- “Made in Italy”
GENERAL INFORMATION
THE IMPORTANCE OF THE MANUAL
Before using the concerned oven, it is compulsory to read and understand this manual in all its parts.
This manual must always be available for the “authorized operators” and has to be placed and preserved
close to the oven.
The manufacturer declines all liability for eventual damages to persons, animals, and things caused by the
inobservance of the regulations described in this manual.
This manual is an integral part of the oven and must be preserved until its final dismantling.
The “authorized operators” must perform on the oven exclusively interventions for which they are
specifically competent.
STATUS OF “TURNED OFF OVEN”
Before performing any type of maintenance and/or adjustment intervention, it is compulsory to disconnect
the power supply source, disconnecting the power supply plug from the mains outlet verifying that the
oven is effectively turned off and cooled.
WARRANTY
The manufacturer warrants that the concerned ovens are tested at manufacturer’s premises.
The warranty of the oven is of 12 (twelve) months.
THE TAMPERING AND/OR REPLACEMENT OF PARTS WITH NON ORIGINAL SPARE
PARTS CAUSE THE DECAY OF THE WARRANTY AND RELEASE THE MANUFACTURER
FROM ANY LIABILITY.
DESTINATION OF USE
The foreseen use for which this oven has been designed and produced is the following:
FORESEEN USE: PIZZA BAKING, GRATINATING OF GASTRONOMY PRODUCTS AND HEATING OF
FOODSTUFF IN BAKING PANS.
THE OVEN CAN BE USED EXCLUSIVELY BY AN AUTHORIZED OPERATOR (USER).
12
THIS APPLIANCE IS NOT INTENDED FOR USE BY PERSONS (INCLUDING CHILDREN) WITH REDUCED
PHYSICAL, SENSORY OR MENTAL CAPABILITIES, OR LACK OF EXPERIENCE AND KNOWLEDGE, UNLESS
THEY HAVE BEEN GIVEN SUPERVISION OR INSTRUCTION CONCERNING USE OF THE APPLIANCE BY A
PERSON RESPONSIBLE FOR THEIR SAFETY.
CHILDREN SHOULD BE SUPERVISED TO ENSURE THAT THEY DO NOT PLAY WITH THE APPLIANCE
LIMITS OF USE
This oven has been designed and manufactured exclusively for the destination of use described above,
therefore, any other type of use is strictly forbidden in order to assure, at any time, the safety of the
authorized operators, as well as the efficiency of the oven itself.
INSTALLATION
INSTRUCTIONS FOR THE USER
The place where the oven is installed must have the following enviromental characteristics:
To be dry;
Water sources at safe distance;
Adequate ventilation and lighting corresponding to hygene and security rules following the existing
laws.
THE OVEN MUST NOT BE INSTELLED IN PROXIMITY OF THE INFLAMMABLE
MATERIALS (WOODS, PLASTIC, COMBUSTIBLE, GAS, ETC.). AVOID THE CONTACT
OF INFLAMMABLE OBJECTS WITH THE HOT SURFACES OF THE OVEN. ALWAYS
ASSURE THE SAFETY FIREPROOF CONDITIONS. MAINTAIN A FREE SPACE AROUND
THE OVEN OF AT LEAST 30 CM.
Verify that the electrical set-up corresponds with the numbers of the techincal characteristics on the small
plate at the back of the oven. The characteristics of the electric socket must be compatible with the plug
installed on the cable.
ELECTRIC CONNECTION
THE ELECTRIC CONNECTION OF THE OVEN TO THE MAINS MUST BE
COMPULSORILY AND EXCLUSIVELY PERFORMED BY AN AUTHORIZED TECHNICIAN
(ELECTRICIAN) SATISFYING THE TECHNICAL AND PROFESSIONAL REQUIREMENTS
STATED BY THE REGULATIONS IN FORCE IN THE COUNTRY OF USE OF THE OVEN,
WHO MUST ISSUE A DECLARATION OF CONFORMITY FOR THE INTERVENTION
PERFORMED.
To connect the machine to the electric network it is necessary to proceed as follows:
1. Connect to the wires to the terminals L1—L2—L3—N —of power cord type H07RNF 3G X “x”
mm² unsheathed with ferule;
2. Put together the other end of the cable and a plug, which is normalised and polarised (the
distinction between phase and neutral must be unequivocal.
3. To connect the oven to 230 V single phase is sufficient to make a bridge between L1-L2-L3 with
the special plates present in the terminal box.
13
L1 Clamp N. 1
L2 Clamp N. 2
L3 Clamp N. 3
N Clamp N. 5
Clamp N. 6
ONCE THE ELECTRIC CONNECTION HAS BEEN PERFORMED, THE AUTHORIZED
TECHNICIAN (ELECTRICIAN) MUST ISSUE A DECLARATION CERTIFYING THE
MEASUREMENT OF THE CONTINUITY OF THE EQUIPOTENTIAL PROTECTION
CIRCUIT.
THE APPLIANCE IS TO BE SUPPLIED THROUGH A RESIBASIC CURRENT DEVICE
(RCD) HAVING A RATED RESIBASIC OPERATING CURRENT NOT EXCEEDING 30 MA
TERMINAL BOX
The terminal box is placed externally on the back of the oven.
Oven type
N. of cables
Section (mm²)
Single phase, one chamber
3
4
Single phase, two chambers and versions 9 single
phase
3
6
Three phase one chamber and two chambers
5
4
Three phase from versions 9 and up
5
6
EQUIPOTENTIAL
The equipment must be connected with an equi-potential system . the connection terminal is located near
the terminal box. The bonding wire must have a minimal section of 10 mm ².
14
USE AND FUNCTIONING
CONTROL PANEL
REF.
DENOMINATION
FUNCTION
1
Warning light
If lighted, it signals the operation of the resistor in use.
2
Thermostat
• Pos.0:it disables the operation of the resistor;
• Pos. 45-455°C: it enables the operation of the resistor and
sets the wished temperature.
3
Thermometer
Indicates the temperature in the baking chamber.
4
Switch heating element
• Pos. I: It enables the operation of the resistor;
• Pos. 0: It disables the operation of the resistor.
5
Chamber lamp switch
• Pos. I: It switches on the light in the oven chamber;
• Pos. 0: It switches off the light in the oven chamber.

15
FIRST COMMISIONING
Remove the polystyrene underneath the refractory stones and the protective film avoiding using tools that
can damage the surfaces.
FOR THE SAFETY REASONS, THE MAXIMUM TEMPERATURE ALLOWED TO BE SET IS
455°C.
THE FIRST COMMISSIONING CAN BE CARRIED OUT ONLY AFTER AN
INSTALLATION CARRIED OUT BY AUTHORIZED PERSONEL WHO WILL ISSUE A
DECLARATION OF CONFORMITY.
The first commissioning must be carried out as follows:
1. Clean the front of the oven with a dry, soft cloth to remove any residue;
2. Connect the plug to the socket;
3. Push “ON/OFF” button;
4. Set the oven temperature to 150°C
5. Let the oven work for about 1 h.
6. Turn the oven off by pressing ON/OFF button;
7. Open the door for about 15 min in order to let eventual vapors and smell go out;
8. Close the door and repeat the process described in Section 4) at the temperature of 300°C;
9. Let the oven work for about 1 h;
10. Switch the heating elements off by putting “ON/OFF” button in off position.
TURNING ON OVEN
1. Connect the plug to the socket;
2. Push the “ON/OFF” button;
3. Set the oven temperature to desired
4. Once the oven has reached the desired temperature, it is possible to insert the pizza in the oven
for the backing;
5. Open the oven manually using the suitable handles;
6. To switch the light on, press the oven lamp button;
7. Insert the pizza and/or the pizzas to be backed using suitable devices. It is important to avoid
leaving the door open for too long, since the temperature drops down.
8. Close the door again and check the backing through the glass door;
9. The baking temperature varies if it is positioned directly on the refractory stone or on a baking
pan. In the first case, it is suggested to set the backing temperature at 280 °C for the bottom and
320 °C for the ceiling; in the second case, set 320 °C for the bottom and 280 °C for the ceiling;
10. When the baking process is over, open the door extract the pizza (or pizzas) and close the
door again.
TURNING OFF THE OVEN
Once the use of the oven has ended, proceed as follows:
For turning off the oven press the ON/OFF button.
16
MAINTENANCE
BEFORE PERFORMING ANY TYPE OF MAINTENANCE INTERVENTION, IT IS
COMPULSORY TO DISCONNECT THE PLUG OF THE OVEN FROM THE POWER SUPPLY
OUTLET.
CLEANING
The clearing must be done every time the oven has been used following all the rules to prevent
malfunctioning of the oven and for hygienic purpose.
Cleaning of the refractory surface: this operation has to be performed with hot oven.
Once the temperature of about 350°C has been reached, turn off the oven, open the door and clean the
surface using a brush in vegetable fiber equipped with a long handle in order to avoid the contact with the
oven hot parts.
External clearing of the oven: (surfaces in stainless steel, inspection WIDE and control panel):
this operation has to be performed with cold oven.
IT IS RECOMMENDED TO THE OPERATOR IN CHARGE TO USE PROPER GLOVES AND
SUITABLE CLOTHING TO AVOID BURNINGS.
IT IS FORBIDDEN TO USE THROWS OR DRIPS OF WATER, ABRASIVE OR
CORROSIVE SUBSTANCES, AND ANYTHING ELSE THAT CAN DAMAGE THE
COMPONENTS, COMPROMISE THE SAFETY, AND BE DANGEROUS FROM AN
HYGIENIC POINT OF VIEW.
For any intervention of supplementary maintenance, repairing and/or replacement refer exclusively to the
authorized dealer where the oven has been purchased and/or to an authorized technician satisfying the
technical and professional requirements stated by the regulations in force.
DEMOLITION
GENERAL WARNINGS
When dismantling the oven, compulsorily observe the provisions of the regulations in force. Differentiate
the parts making up the oven according to different types of construction materials (plastic, copper, iron,
etc.).

17
ESPAÑOL
PLACA....................................................................................................................... 18
ETIQUETA DE SERIE .....................................................................................................18
INFORMACIÓN GENERAL.......................................................................................... 18
IMPORTANCIA DEL MANUAL ..........................................................................................18
ESTADO “HORNO PAGADO” ...........................................................................................18
GARANTÍA...................................................................................................................18
DESTINO DE USO.........................................................................................................18
LÍMITES DE USO ..........................................................................................................19
INSTALACIÓN........................................................................................................... 19
DISPOSICIONES A CARGO DEL USUARIO........................................................................19
CONEXIÓN ELÉCTRICA..................................................................................................19
BORNERO....................................................................................................................20
SISTEMA EQUIPOTENCIAL.............................................................................................20
USO Y FUNCIONAMIENTO......................................................................................... 21
PANEL DE MANDOS ......................................................................................................21
PRIMERA PUESTA EN SERVICIO .....................................................................................22
ENCENDIDO DEL HORNO...............................................................................................22
APAGADO DEL HORNO..................................................................................................22
MANTENIMIENTO ..................................................................................................... 23
PULIZIA ......................................................................................................................23
DESGUACE................................................................................................................ 23
ADVERTENCIAS GENERALES..........................................................................................23
18
PLACA
ETIQUETA DE SERIE
La etiqueta de matriculación consiste en una etiqueta adhesiva serigrafiada de color gris, aplicada en la
parte trasera del horno.
En la etiqueta se indican de manera legible e indeleble los siguientes datos:
- Nombre del fabricante; - Nº de serie (MATR);
- Marcado CE; - Tensión y frecuencia eléctrica (Volt/Hz);
- Modelo (MOD); - Año de fabricación (ANNO);
- Potencia eléctrica (kW/A); - Peso del horno (PESO);
- Rótulo “Made in Italy”
INFORMACIÓN GENERAL
IMPORTANCIA DEL MANUAL
Antes de utilizar el horno en cuestión, es obligatorio leer y comprender este manual en su totalidad.
Este manual debe estar siempre a disposición de los “operadores autorizados” y encontrarse cerca del
horno, bien guardado y conservado.
La empresa fabricante declina toda responsabilidad por posibles daños a personas, animales o cosas
debidos al incumplimiento de las normas descritas en este manual.
Este manual es parte integrante del horno y debe conservarse hasta la eliminación final de este.
Los “operadores autorizados” deben realizar en el horno únicamente las operaciones de su competencia
específica.
ESTADO “HORNO PAGADO”
Antes de realizar cualquier operación de mantenimiento y/o regulación en el horno, es obligatorio
desconectar la fuente de alimentación eléctrica, extrayendo el enchufe de la toma de red, asegurándose
de que el horno esté efectivamente apagado y frío.
GARANTÍA
La empresa fabricante garantiza que los hornos en cuestión han sido sometidos a ensayo en su sede. La
garantía del horno tiene una validez de doce meses.
LAS MANIPULACIONES Y/O LA SUSTITUCIÓN DE PIEZAS CON RECAMBIOS NO
ORIGINALES ANULAN LA GARANTÍA Y EXIMEN AL FABRICANTE DE TODA
RESPONSABILIDAD.
DESTINO DE USO
para el que se ha diseñado y fabricado el horno es el siguiente:
USO PREVISTO: COCCIÓN DE PIZZAS, GRATINADO DE PRODUCTOS GASTRONÓMICOS Y
CALENTAMIENTO DE PLATOS EN BANDEJA.
EL HORNO SOLAMENTE PUEDE SER UTILIZADO POR UN OPERADOR ENCARGADO (USUARIO).
19
ESTE APARATO NO ESTÁ DESTINADO A SER UTILIZADO POR PERSONAS (NIÑOS INCLUIDOS) CON
CAPACIDADES FÍSICAS, SENSORIALES O MENTALES DISMINUIDAS O QUE CAREZCAN DE LA
EXPERIENCIA O LOS CONOCIMIENTOS NECESARIOS, A NO SER QUE UNA PERSONA RESPONSABLE DE SU
SEGURIDAD LES FACILITE ASISTENCIA O INSTRUCCIONES PARA EL USO DEL APARATO.
ES NECESARIO SUPERVISAR A LOS NIÑOS PARA IMPEDIR QUE JUEGUEN CON EL APARATO.
LÍMITES DE USO
El horno en cuestión ha sido diseñado y fabricado únicamente para el destino de uso descrito, por lo que
se prohíbe terminantemente cualquier otro tipo de uso, para garantizar en todo momento la seguridad de
los operadores autorizados y la eficiencia del horno.
INSTALACIÓN
DISPOSICIONES A CARGO DEL USUARIO
El lugar en el que se instala el horno debe presentar las siguientes características ambientales:
estar seco
fuentes de agua a una distancia adecuada
ventilación e iluminación adecuadas conforme a las normas higiénicas y de seguridad establecidas
por la legislación vigente.
NO DEBE INSTALARSE EL HORNO CERCA DE MATERIALES INFLAMABLES (MADERA,
PLÁSTICO, COMBUSTIBLES, GAS, ETC.). EVITE A TODA COSTA EL CONTACTO DE
OBJETOS INFLAMABLES CON LAS SUPERFICIES CALIENTES DEL HORNO.
GARANTICE SIEMPRE LAS CONDICIONES DE SEGURIDAD ANTIINCENDIO. DEJE UN
ESPACIO LIBRE DE AL MENOS 30 CM ALREDEDOR DEL HORNO.
Compruebe que la tensión de alimentación, la frecuencia y la potencia de la instalación sean compatibles
con los valores indicados en las características técnicas y en la placa situada en la parte trasera del horno.
Las características de la toma de alimentación eléctrica deben ser compatibles con el enchufe instalado en
el cable.
CONEXIÓN ELÉCTRICA
LA CONEXIÓN ELÉCTRICA DEL HORNO A LA RED DE ALIMENTACIÓN DEBE SER
REALIZADA ÚNICA Y EXCLUSIVAMENTE POR UN TÉCNICO AUTORIZADO
(ELECTRICISTA) QUE POSEA LOS REQUISITOS TÉCNICO-PROFESIONALES
EXIGIDOS POR LAS NORMAS VIGENTES EN EL PAÍS DE USO DEL HORNO, Y QUE
DEBERÁ EXPEDIR UNA DECLARACIÓN DE CONFORMIDAD DE LA INTERVENCIÓN
REALIZADA.
PARA LA CONEXIÓN DIRECTA A LA RED DEBE INSTALARSE UN DISPOSITIVO CON
UNA SEPARACIÓN DE CONTACTOS QUE GARANTICE LA DESCONEXIÓN COMPLETA
EN LAS CONDICIONES DE LA CATEGORÍA III DE SOBRETENSIÓN, CONFORME A
LAS REGLAS DE INSTALACIÓN.
Para conectar la máquina a la red eléctrica es indispensable seguir estos pasos:
1. Conecte al bornero (FIG. A) los conductores L1—L2—L3—N —de un cable de alimentación de
tipo H07RNF 3G X “x” mm² desenvainado con terminales.
2. Monte en el otro extremo del cable un enchufe normalizado y polarizado (la distinción entre fase y
neutro inequívoca).
3. Para conectar el horno a 230V MONOFÁSICOS basta hacer un puente entre L1-L2-L3 con las
placas previstas, incluidas en la caja del bornero
Other manuals for FAIR
1
This manual suits for next models
18
Table of contents
Languages:
Other Gastrodomus Oven manuals


Popular Oven manuals by other brands

AEG
AEG BPE748380M user manual

GE
GE Monogram ZET837BYBB installation instructions

Wood Stone
Wood Stone MT. CHUCKANUT WS-MS-4-RFG-IR-W Installation and operation manual

Miele
Miele H 7164 B Operating and installation instructions

Middleby Marshall
Middleby Marshall PS500 Series Owner's operating and installation manual

Hamilton Beach
Hamilton Beach 31407 use & care


