Gate House 73013959 User manual
DRIVE GATE DROP ROD
VARILLA VERTICAL PARA
PUERTA DE DOBLE ABERTURA
ITEM/ARTÍCULO #0254190
MODEL/MODELO #73013959
Purchase Date/Fecha de compra ______________
Questions/¿Preguntas?
Call customer service at 1-888-418-4400,
8 a.m. - 5 p.m., EST, Monday - Friday.
Llame al Servicio al Cliente al 1-888-418-4400,
de lunes a viernes de 8 a.m. a 5 p.m., hora
estándar del este. ATTACH YOUR RECEIPT HERE
ADJUNTE SU RECIBO AQUÍ
CARE AND MAINTENANCE/CUIDADO Y MANTENIMIENTO
TROUBLESHOOTING/SOLUCIÓN DE PROBLEMAS
ONE YEAR WARRANTY/UN AÑO DE GARANTÍA
• Make sure grommets are clean and free of debris to allow the drop rod to swing.
• Keep screws tight and occasionally lubricate latch when necessary.
• Use a diluted, mild dish washing soap to clean.
• Asegúrese de que las arandelas estén limpias y libres de residuos, para que la varilla vertical se pueda balancear.
• Mantenga los tornillos bien ajustados y lubrique ocasionalmente el pestillo cuando sea necesario.
• Utilice detergente de lavavajillas suave o diluido para la limpieza.
The Drive Gate Drop Rod is warranted for one year for manufacturing defects including: fading, peeling, aking, splintering, corroding, rusting
or abnormal discoloration under normal use and service.
The warranty does not cover damage resulting from accident, unreasonable use, neglect, alteration, improper service, improper installation,
acts of God or any other causes not arising out of defects in materials or workmanship.
Should your product prove defective under warranty, call 1-888-418-4400. Your problem will be assigned a tracking number and an autho-
rized representative will contact you to arrange a convenient time to schedule an on site inspection, if need be.
You must have proof of your purchase in order for the problem to be corrected.
This warranty is in lieu of all conditions or warranties, express, or implied including but not limited to any implied conditions or warranties or
merchantability or tness for a particular purpose on the part of the manufacturer or its licensors. Some states do not allow the exclusions of
implied warranties or limitations of how long an implied warranty lasts, so the above limitations may not apply to you. If the product is defec-
tive per the above coverages, your sole and exclusive remedy shall be repair or replacement as provided above. The manufacturer and its
licensors shall not be liable for any damages, loss of use, loss of prots, or interruption of business whether such alleged damages are based
in warranty, tort, contract or indemnity.
La varilla vertical de puerta de doble abertura posee garantía por un año por efectos de fabricación, tales como: descoloramiento, descas-
carado, escamado, astillado, corrosión, oxidación o decoloración anormal en condiciones de uso y servicio normales.
Esta garantía no cubre daños ocasionados por accidentes, mal uso, negligencia, alteraciones, reparaciones o instalación incorrectas, desas-
tres naturales u otras causas no originadas por defectos en los materiales o en la mano de obra.
Si el producto presenta defectos cubiertos por la garantía, llame al 1-888-418-4400. Su problema recibirá un número de seguimiento y un
representante autorizado se pondrá en contacto con usted para programar una inspección en el sitio si fuera necesario. Debe contar con un
comprobante de compra para poder corregir el problema.
Esta garantía reemplaza todas las demás condiciones y garantías, expresas o implícitas, lo que incluye, pero no se limita a, condiciones o
garantías implícitas de comerciabilidad o idoneidad para cualquier propósito particular por parte del fabricante o sus licenciantes. Algunos
estados no permiten exclusiones o garantías implícitas o limitaciones con respecto a la extensión de una garantía implícita, de modo que
es posible que las limitaciones anteriores no se apliquen en su caso. Si el producto presenta los daños mencionados, la única y exclusiva
obligación del fabricante será reparar o reemplazar los productos como se ha indicado anteriormente. El fabricante y sus licenciantes no
serán responsables de cualquier daño, pérdida de utilidad o benecios, o interrupción de los servicios, aunque estos supuestos daños estén
basados en la garantía, agravios, contrato o indemnización.
Printed in CHINA
Impreso en CHINA
PROBLEM
PROBLEMA
POSSIBLE CAUSE
CAUSA DEL PROBLEMA
CORRECTIVE ACTION
ACCIÓN CORRECTIVA
Latch will not catch or drop
rod is not tting properly.
El pestillo no cierra o la
varilla vertical no encaja
correctamente.
Latch catch and/or drop rod is not
aligned correctly.
La traba del pestillo o la varilla vertical
no están alineadas correctamente.
Move, reinstall and ll holes.
Mueva, vuelva a instalar y rellene los oricios.
Lowes.com
Gatehouse® is a registered
trademark of LF, LCC.
All Rights Reserved.
Gatehouse® es una marca
registrada de LF, LCC. Todos
los derechos reservados.
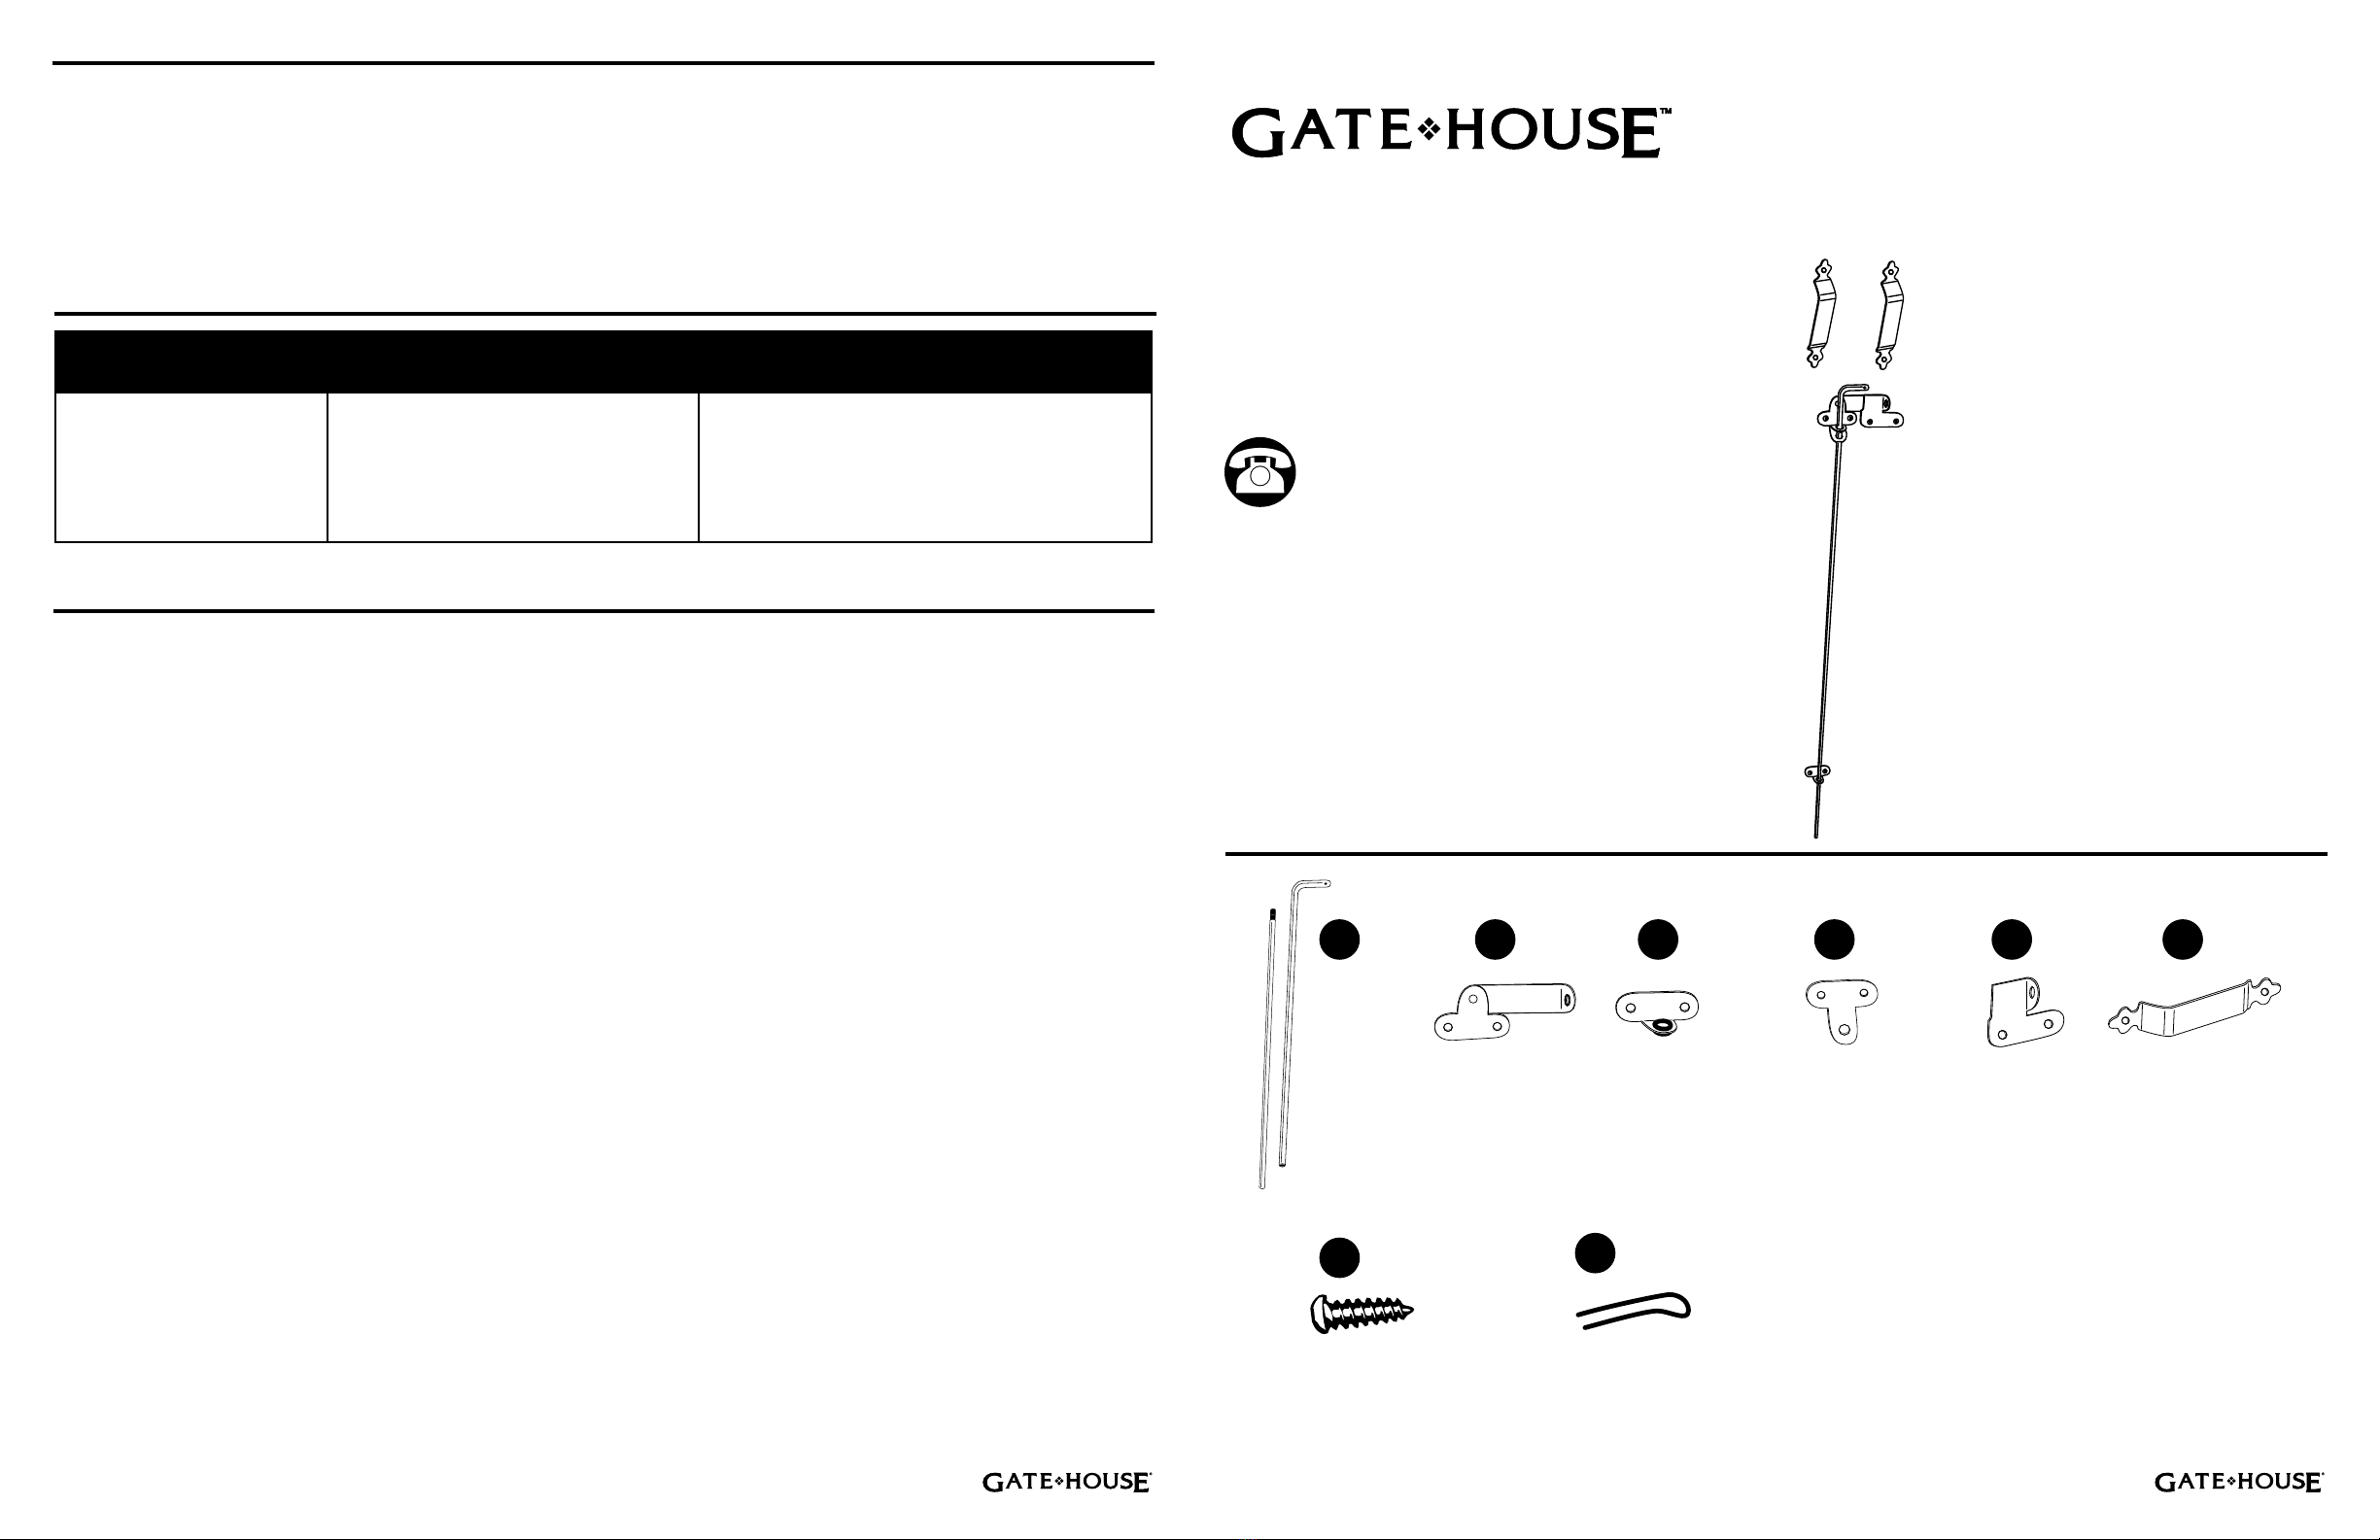
PACKAGE CONTENTS/CONTENIDO DEL PAQUETE
Lowes.com
Drop Rod
Varilla vertical
Latch
Pestillo
x 1
A B C
x 1
Rod Guide
Guía de la varilla
x 2
D
Plastic Binder
Sujetador plástico
x 1
Latch Catch
Pasador del
pestillo
x 1
E
Handles
Manijas
x 2
F
3/4 in. Screws
Tornillos de 3/4 pulg
Cotter Pin
Pasador de chaveta
x 10 x 1
GH
73013959 BOM V1 7/12
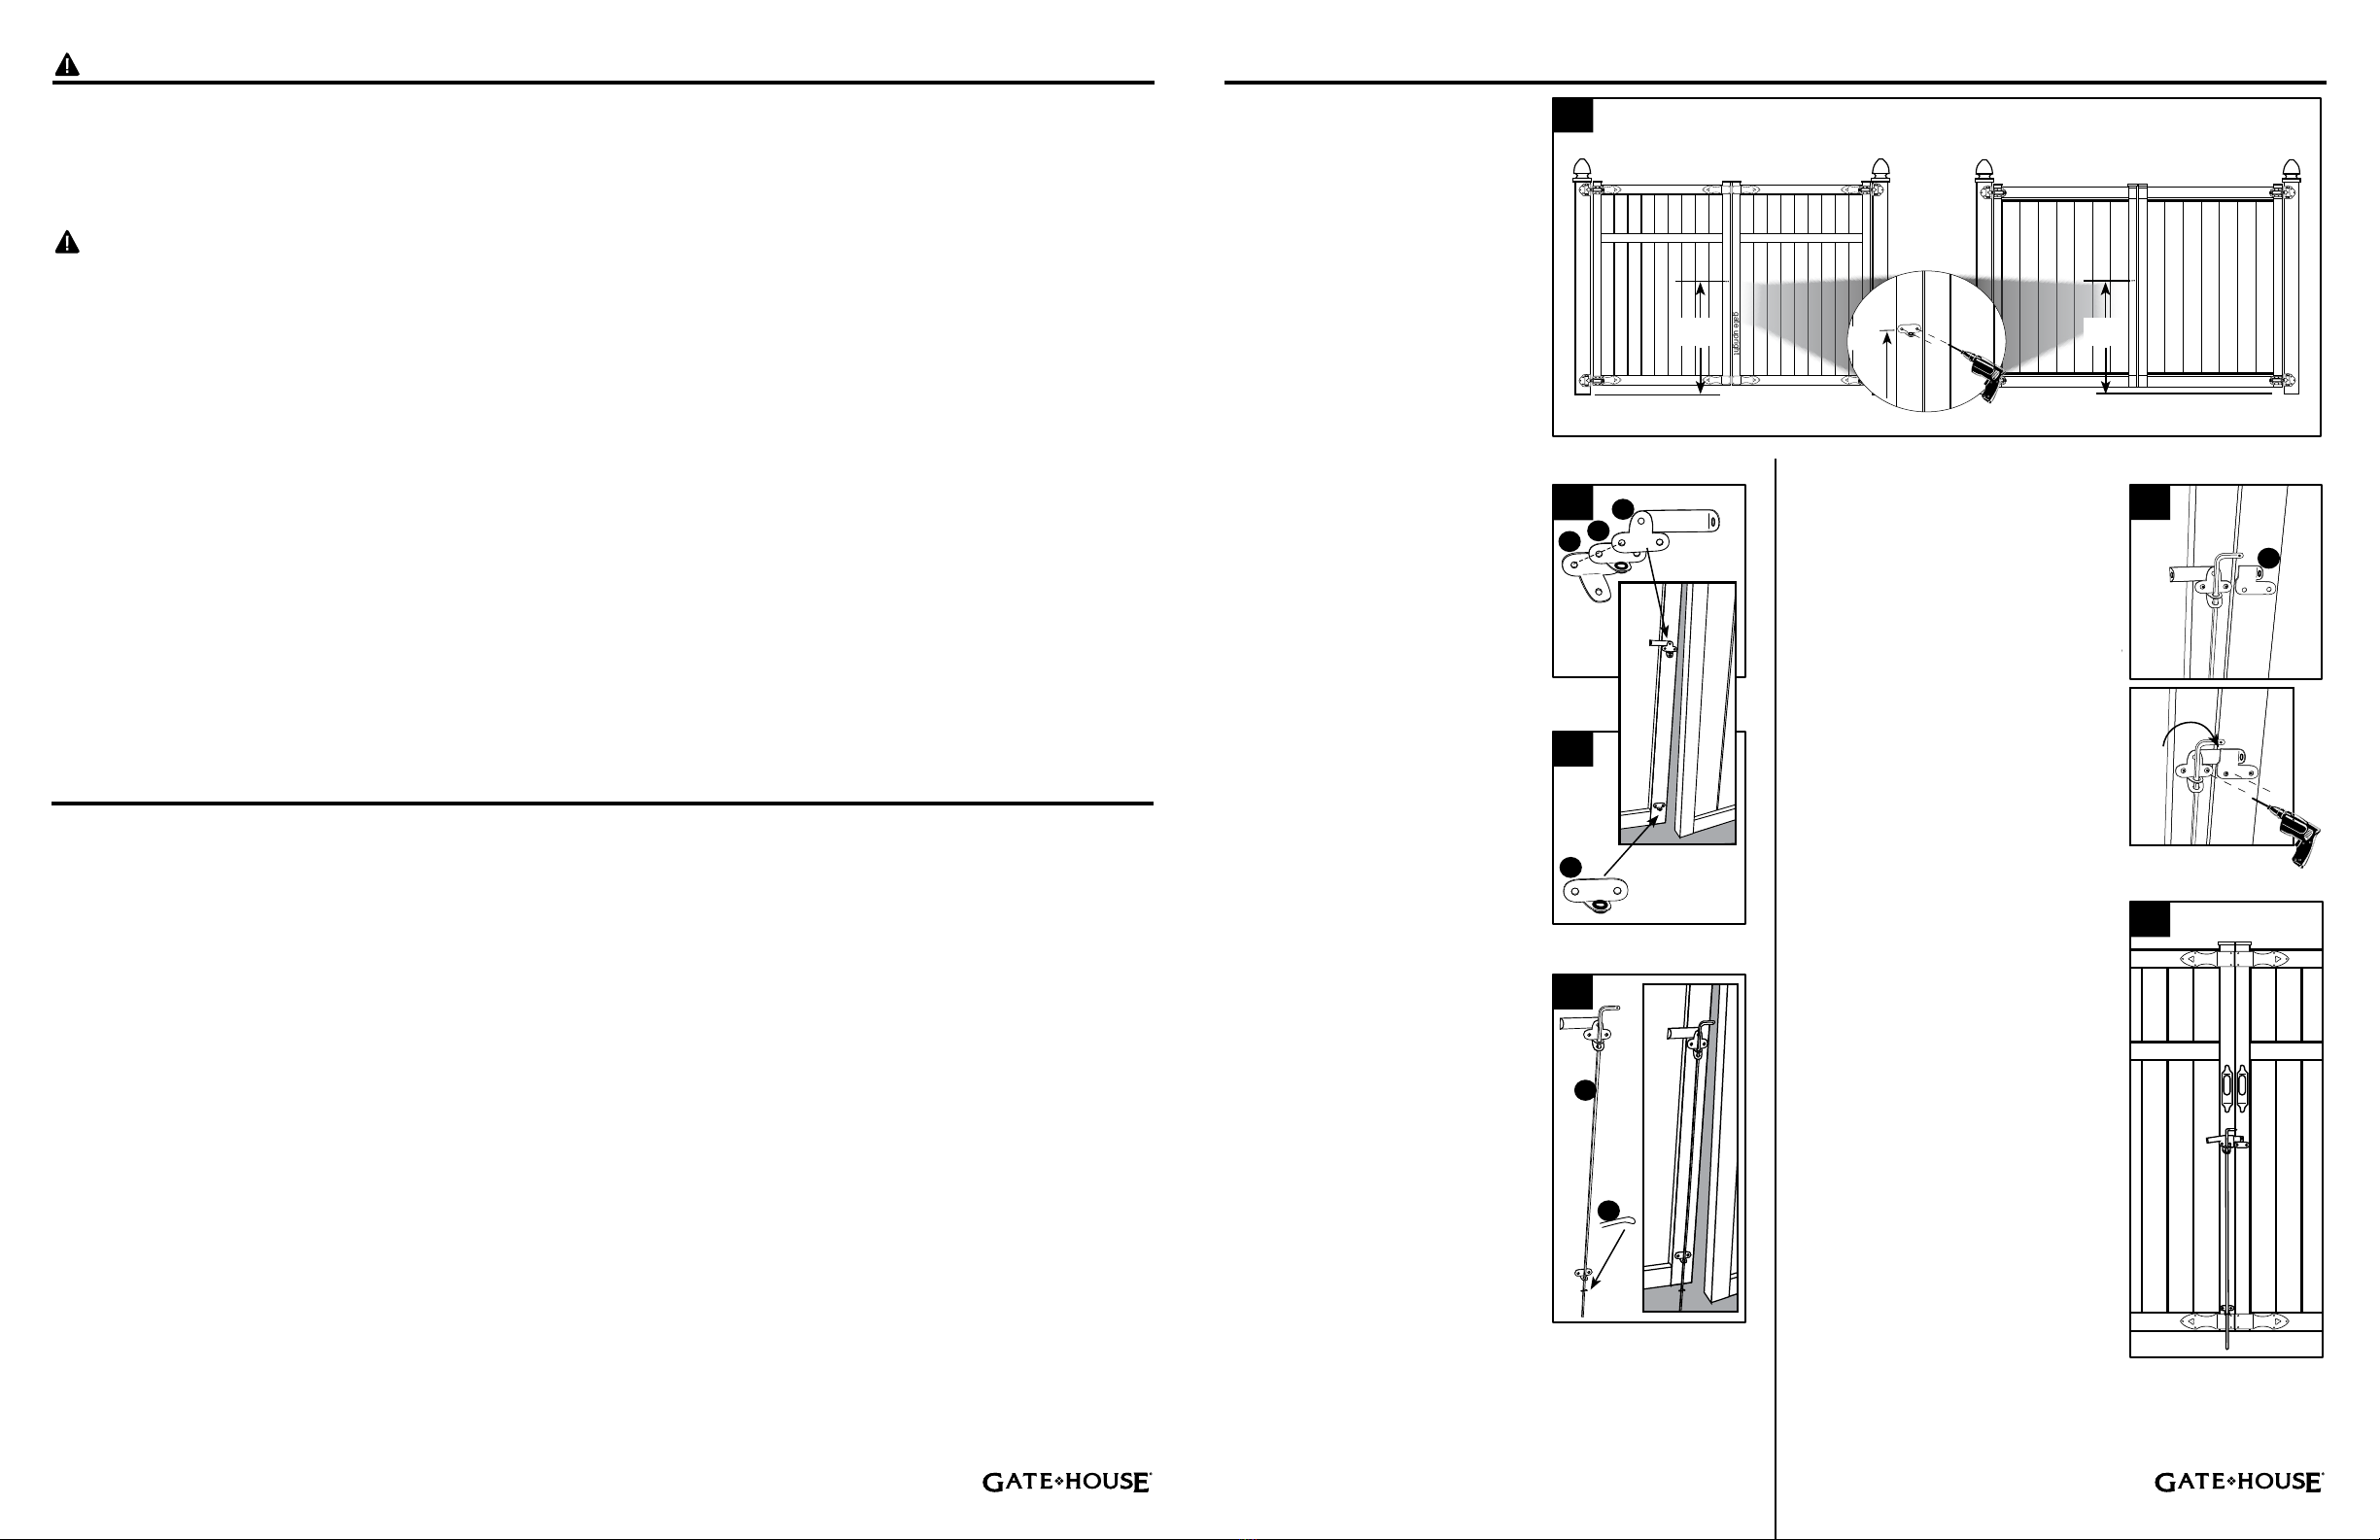
ASSEMBLY INSTRUCTIONS/INSTRUCCIONES DE ENSAMBLAJE
5.
On the right hand side of the gate,
hold up the latch catch (E) and close
the gate to align the latch with the
catch mechanism. Mark the holes.
Pre-drill with 1/8 in. bit, then mount the
latch catch (E) using the screws (G).
Del lado derecho de la puerta, sos-
tenga la traba del pestillo (E) y cierre
la puerta para alinear el mecanismo
del pestillo con la traba. Marque los
oricios. Taladre con la broca de 1/8
pulg (0,50 cm) y luego je la traba del
pestillo (E) con los tornillos (G).
1
2
3
4
1.
On the left hand side of the gate,
using rod guide (C) as template, mark
and pre-drill 1/8 in. holes 35 in. from
the driveway surface on the gate up-
right previously installed from the DIY
or Pro Framed Gate Kit.
Del lado izquierdo de la puerta, y
utilizando la guía de la varilla (C) como
patrón, marque y pretaladre oricios
de 1/8 pulg (0,50 cm) a 35 pulg
(88,90 cm) de la supercie de la
entrada del garaje en el parante de la
puerta previamente instalado de los kit
de marcos de puerta DIY o Pro.
2.
Assemble and install the latch (B),
rod guide (C), and plastic binder (D)
with screws (G).
Ensamble e instale el pestillo (B), la
guía de la varilla (C) y el sujetador
plástico (D) con los tornillos (G).
3.
Install the second rod guide (C)
on the gate above the bottom rail
with screws (G).
Instale la segunda guía de la varilla (C)
en la puerta sobre el riel inferior con
los tornillos (G).
4.
Attach the two pieces of the drop
rod (A) together. Flip up the plastic
binder (D) and insert the drop rod (A)
through the latch (B), rod guide (C),
plastic binder (D) and bottom rod guide
(C). The plastic binder (D) will lock the
rod in the up right position. Replace the
cotter pin (H).
Una las dos piezas de la varilla vertical
(A). Levante el sujetador plástico (D) e
inserte la varilla vertical (A) a través del
pestillo (B), la guía de la varilla (C), el
sujetador plástico (D) y la guía inferior
de la varilla (C). El sujetador plástico
(D) trabará la varilla en la posición
superior. Reemplace el pasador de
chaveta (H).
Parante de la puerta
gate upright
Panel izquierdo Panel derechoPanel derechoPanel izquierdo
Marco para puerta DIY Marco para puerta PRO
35 in.
88,90 cm
Parante de la puerta
gate upright
5
6
6.
Measure, pre-drill 1/8 in. holes and at-
tach handles (F) at the desired location
on the gate using screws (G).
Mida, pretaladre oricios de 1/8 pulg
(0,50 cm) y je las manijas (F) en el
lugar deseado de la puerta con los
tornillos (G).
Left Panel Right PanelRight PanelLeft Panel
DIY Framed Gate PRO Framed Gate
SAFETY INFORMATION/INFORMACIÓN DE SEGURIDAD
WARNING/ADVERTENCIA
Please read and understand this entire manual before attempting to assemble, operate or install the product.
Lea y comprenda completamente este manual antes de intentar ensamblar, usar o instalar el producto.
• Incorrect installation may cause harm to the gate or individual.
• Not pool code approved.
• Do not allow children to play with gate.
• La instalación incorrecta puede causar daños a la puerta o a las personas.
• No posee código para piscinas aprobado.
• No permita que los niños jueguen con la puerta.
PREPARATION/PREPARACIÓN
Before beginning installation of product, make sure all parts are present. Compare parts with package contents list and
hardware contents list. If any part is missing or damaged, do not attempt to assemble, install or operate the product.
Estimated Assembly Time: 15-20 minutes
Tools Required for Assembly (not included): level, drill, Phillips head screwdriver, tape measure, pencil, safety glasses
Antes de comenzar a instalar el producto, asegúrese de tener todas las piezas. Compare las piezas con la lista del
contenido del paquete y la lista de aditamentos. No intente ensamblar, instalar ni usar el producto si falta alguna pieza o
si estas están dañadas.
Tiempo estimado de ensamblaje: 15 a 20 minutos.
Herramientas necesarias para el ensamblaje (no se incluyen): nivel, taladro, destornillador Phillips, cinta métrica, lápiz,
gafas de seguridad.
DC
C
A
H
E
B
Lowes.com Lowes.com
35 in.
88,90 cm
35 in.
88,90 cm
This manual suits for next models
1
Popular Gate Opener manuals by other brands

Viking
Viking T-21 Installation instructions and safety information

HySecurity
HySecurity SlideDriver II installation manual

Erreka
Erreka PUMA-I Quick installation and programming guide

Beninca
Beninca CORE user manual

Dea
Dea LIVI 803E - 9NET Operating instructions and warnings

SOMFY
SOMFY axovia 400C installation guide


