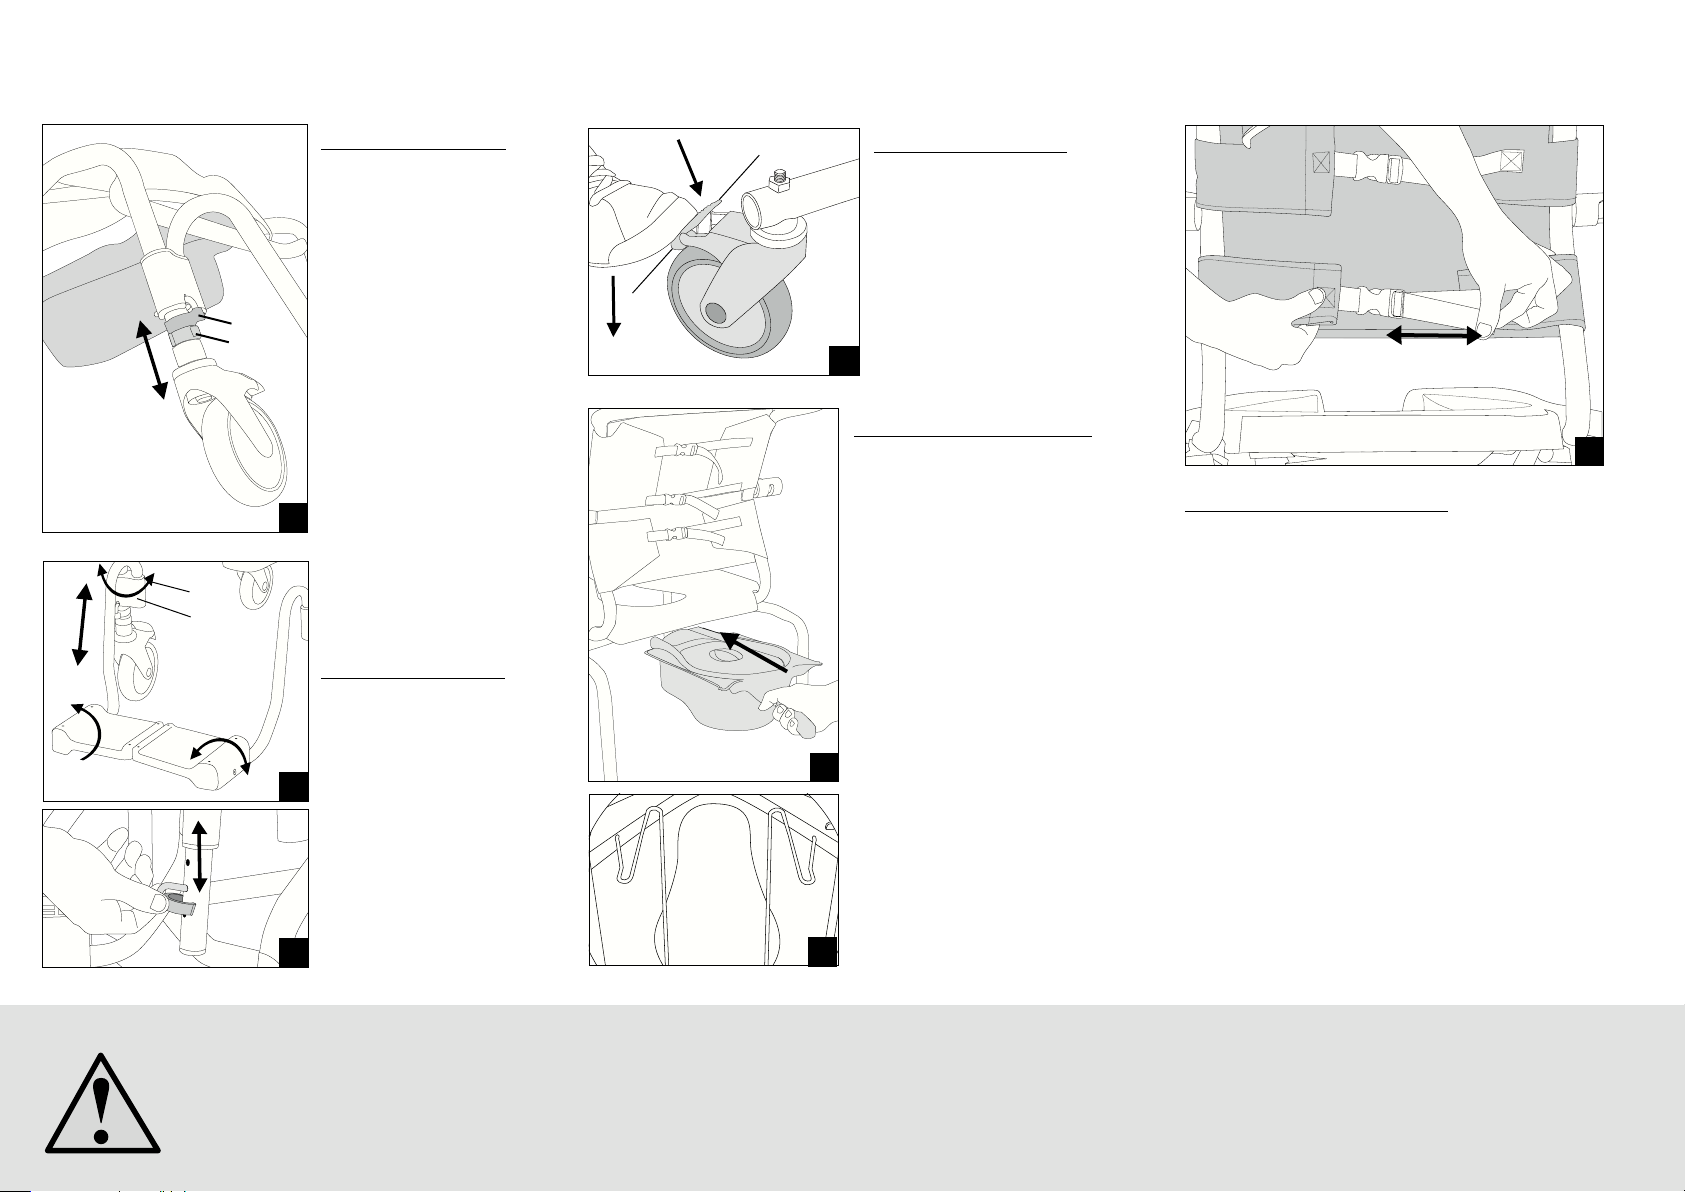
a) The footrest can be height-
adjusted when removing the
clip (see figure 3) and the
footrest can be positioned to
required height (don’t forget to
refit the clips)
b) The footrest can be angled
at a side by gripping at B- lift
upwards/swing
c) The footrest plate could be
turned upwards (c1) and/or
angled (c2) accordingly.
Manual instruction Basic
Height adjustment (1)
You can adjust the chair in two
ways- either when the commode
is standing on all wheels- or on it’s
side.
Adjusting the front wheels- loosen
the footrest clips (a-green clips) and
the telescope wheel (b-grey clips)
Adjust the telescope wheel to
required height (1), insert the GREY
clips (the lowest hole)
Position the footrest to required
height- tighten with GREEN clips.
Adjusting the rear wheels- loosen
the telescope clips GREY clips.
Adjust the telescope wheel to
required height- insert the GREY clips
in the lowest hole in the frame.
When all the adjustment has been
made- ensure that the CLIPS (a+b)
have been mounted correctly= the
clips are fitted correctly to the frame.
1
3
5
Sanitary pan (5 & 6)
The sanitary pan is pushed from the
rear side between the seat and the
panholder according to figure 5-6.
Make sure that the sanitary pan
is pushed on top of the panholder.
Also make sure that the sanitary
pan will be in the correct position in
relation to the seat.
Footrest (2 & 3)
Caution
Read the instruction carefully before
using the commode.
• Theprescriberisresponsiblethattheproductissuitablefortheuser.
• Max.userweightis150kg.
• NeverstandontheBasic.
• Cautionistobetakenwhenthegroundisunevenandalsowhen
passing thresholds or similar obstacles.
Locking wheel (4)
All the wheels are braked/locked.
Push lower part to brake (A).
Push upper part to release brake
(B)
4
B
A
7
There is a 2 year warranty on possible manufacturing faults
(does not include wear and tear).
Warranty
656-280 Shower commode
Basic
2
a
1
b
B
c2
c1
Mounting the backrest (7)
Attach the backrest around the
backframe – lock with the snap.
Adjust to required position.
Make sure that the opening for the
armrest is fitted towards the opening
in the backrest.
a
b
a) Fotstödet kan regleras i höjd
genom att clips tas ur (se figur
4) och fotstöd flyttas till önskad
höjd (var noga med att åter-
placera clips)
b) Fotstödet kan svängas
åt sidan genom att fatta fotstöd
vid pil B – lyft uppåt/sväng.
c) Fotstödsplattan kan vridas
upp (c1) och/eller vinklas (c2)
enligt önskemål.
Bruksanvisning Basic
Höjdreglering (bild 1 )
Höjdreglering kan göras med stol
ståendes på alla hjul alternativt
med stol liggande på sidan.
Justering av framhjul, lossa klämmor
för fotstöd (a=grön klämma) samt
teleskopshjul (b=grå klämma).
För teleskopshjulet till önskad
inställning (1) – lås med GRÅ
klämma (nedersta hålet).
Positionera fotstödet i önskad
höjd – lås med GRÖN klämma.
Justering av bakhjul, lossa
klämman för teleskopshjul GRÅ klämma.
För teleskopshjulet till önskad
inställning – lås position med GRÅ
klämma i stativets nedersta hål.
Då alla justeringar har gjorts
försäkra er om KLÄMMOR (a+b) har
monterats på ett riktigt sätt = Bygel/
klämma sitter stumt mot stativrör.”
1
3
5
Uppsamlingskärl (bild 5 & 6)
Uppsamlingskärl skjuts in bakifrån
mellan sits och trådgejder enligt
figur 6-7.
Var noga med att uppsamlings-
kärlet skjuts ovanpå trådgejder.
Var även noga med att kärlet
hamnar på rätt ställe i förhållande
till uttag/sits.
Fotstöden (bild 2 & 3)
Säkerhet
Läs bruksanvisningen noga före
användning.
• Patientansvarig / Ordinatör bär ansvaret för att produkten är
lämplig för dess användare.
• Användarens personvikt bör vara max 150 kg.
• Stå aldrig på Basic
• Iaktta försiktighet vid lutande mark och passage över trösklar eller liknande.
Låsning av hjul (bild 4)
Samtliga hjul är låsbara.
Låsning görs genom att med
foten trycka bromsen mot
hjulet (se pil A).
Frigör bromsen genom att med foten
återställa bromsen (se pil B).
4
B
A
7
Vi lämnar 2 års garanti på ev. fabrikationsfel
(gäller ej förslitningsdetaljer).
Garanti
6
56-280 Hygienstol
Basic
2
a
1
b
B
c2
c1
Montering av Ryggband (bild 7)
”Fäst ryggbandet runt ryggstativet
– lås fast med klickspännen.
Justera till önskat läge.
Var noga med att uttag för armstöd
passas mot uttaget i ryggbandet.”
a
b


