GE GE006 User manual


Preface
32
Preface
Thank you for selecting the GE006 Blood Glucose Monitoring System. This manual provides all the
information you need to operate this product for accurate test results. Please read this entire manual
before you start any testing.
For people living with diabetes, it is important to regularly monitor blood glucose levels to effectively
reduce complications from the disease. The easy-to-use GE006 Blood Glucose Monitoring System
provides accurate, reliable test results to help you better manage your diabetes.
The GE006 Blood Glucose Monitoring System is designed for in vitro diagnostic use only (for self-testing
by a single user outside the body). Testing requires only a small amount of fresh capillary whole blood
from either the fingertip, palm or forearm.
The GE006 Blood Glucose Monitoring System is manufactured and supported by Bionime Corporation. If
you have any questions or concerns, please contact your local Bionime Customer Service or call us at
886 0800 241 688 GMT+08:00, 08:30~17:30.
The GE006 Blood Glucose Monitoring System is a personal blood glucose monitoring system to be used
for self-testing only. It is not recommended for multiple users.
A healthcare professional should be contacted when Customer Service is not available.

Caution
54
Precaution
- Before using the GE006 Blood Glucose Monitoring System to test your blood glucose, please read all of
the instructions and conduct all of the tests including the quality control test (Refer to page 37).
- Please perform the quality control test regularly to make sure the test results are accurate.
- The GE006 Blood Glucose Meter can only be used with GE006 Blood Glucose Test Strips. Other brands’
test strips should not be used under any circumstances. The use of other brands’ strips may give
inaccurate results.
- The GE006 Blood Glucose Monitoring System is intended for in vitro diagnostic use only. The GE006
Blood Glucose test results using fresh capillary whole blood samples from the fingertip, palm and
forearm are calibrated to be the equivalent to that of plasma testing.
- The GE006 Blood Glucose Monitoring System is intended for self-testing. It should not be used to
screen for or diagnose diabetes mellitus.
- If the GE006 Blood Glucose Meter and Test Strips are exposed to a substantial change in temperature,
please wait 30 minutes before measurement.
- Follow all environmental protection regulations when disposing of batteries.
- Avoid contact with dripping or splashing liquids.
- The minimum blood sample size to test using the GE006 Blood Glucose Monitoring System is 0.75µL:
( )
Blood sample size above 3.0µL might contaminate the test strip port and the meter.
Blood sample size below 0.75µL may cause an inaccurate result or may prevent a meter reading. An Er4
reading will be displayed if the sample size is too small. In this case, repeat the test with a new test strip.
Sample Size Example 0.75µL 1.0 1.5µL 2.0µLµL 3.0µL
Important Safety Notes:
- The GE006 Blood Glucose Meter and Lancing Device are for single patient use. Do not
share them with anyone including other family members.
- All parts of the kit are considered biohazardous and can potentially transmit infectious
diseases, even after following the cleaning and disinfecting procedures.
- Users should wash their hands thoroughly with soap and water before and after handling
the meter, lancing device, or test strips.
Please refer to the
section "Cleaning and Disinfecting Procedures" on page 47.

Table of Contents
76
Table of Contents
About the Blood Glucose Monitoring System
The Blood Glucose Monitoring System ........ ................................... ................
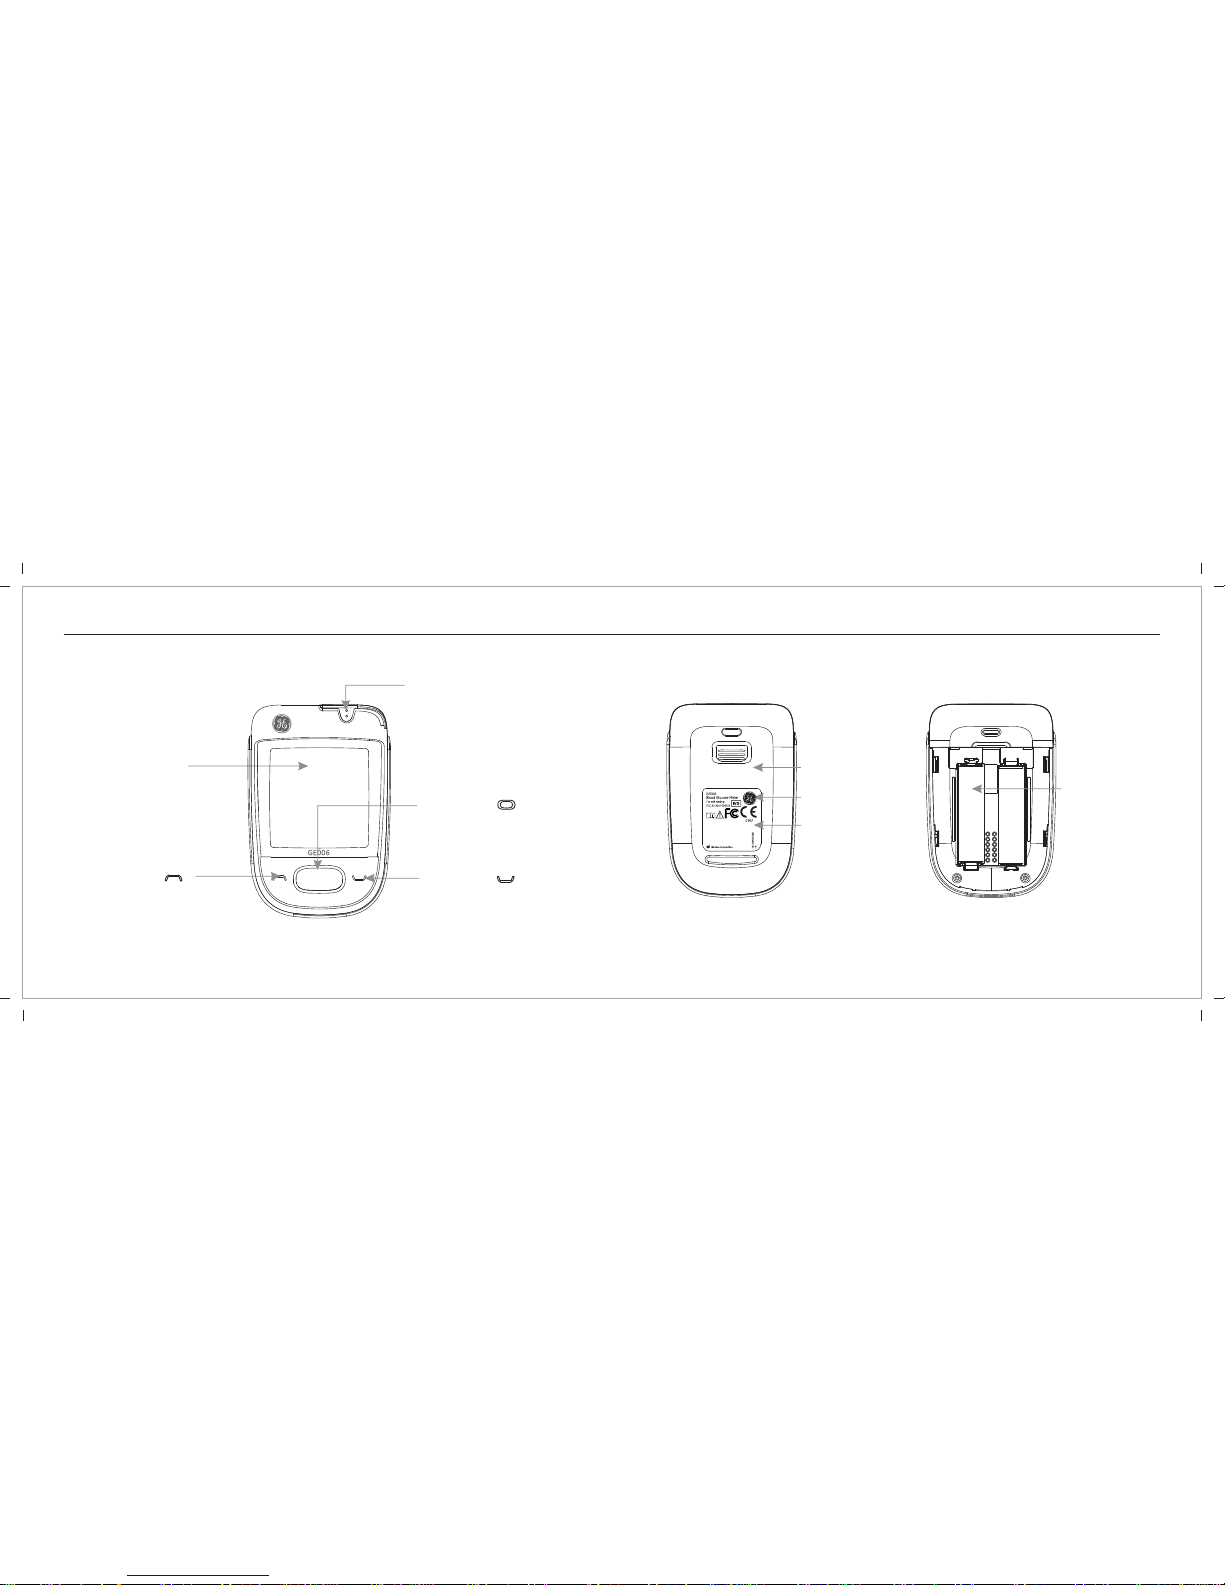
The GE006 Blood Glucose Meter ................................................. ..................................
The GE006 Blood Glucose Test Strip ......................................................... .................
Before Testing
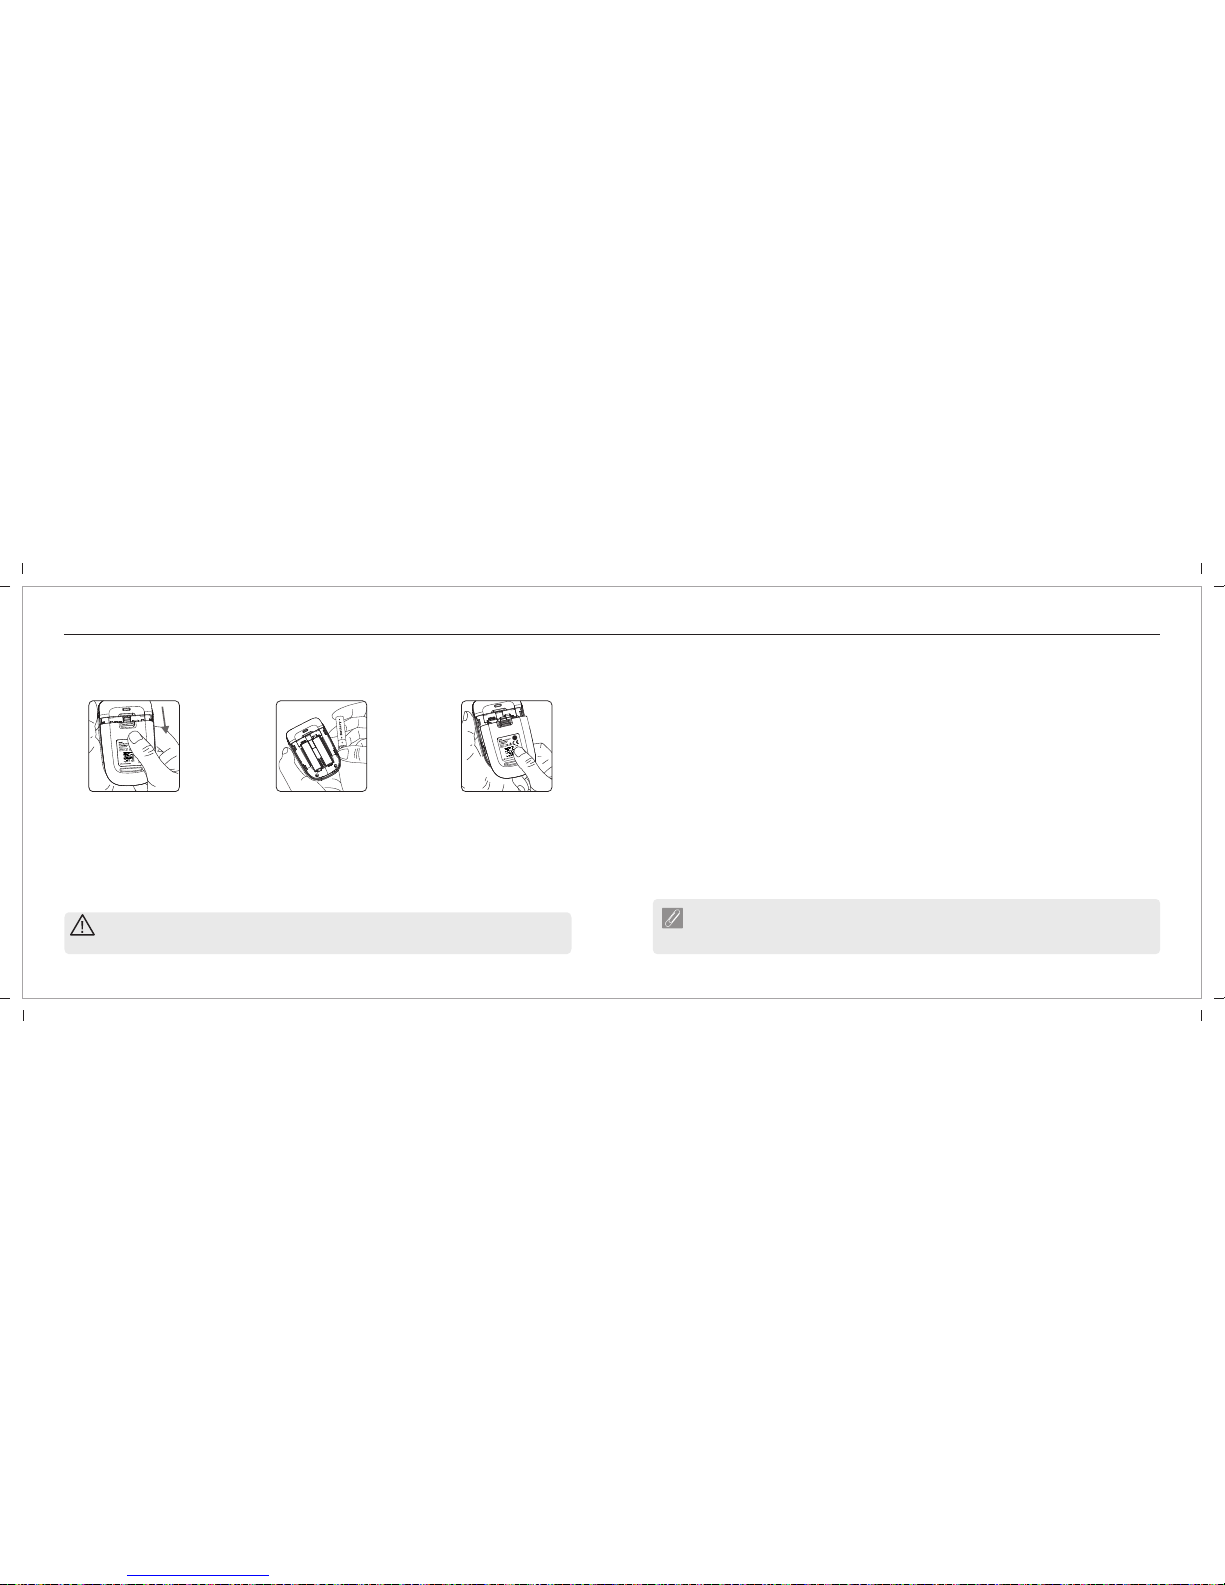
Meter Activation and Battery Change ............................................................................... .......
Setting Up Your Meter - Setting the Date, Time and Volume ............................................... ................
Turning On/Off the Meter ........................................................................................... ....................
Turning On/Off the Bluetooth .............................................................................. .......................
Handling the GE006 Blood Glucose Test Strip ................................................ ..................................
Testing Procedure
Getting Ready for Testing ......................................................................................... .....................
Performing a Blood Glucose Test .............................................. .............................................
Setting Markers .......
Alternative Site Testing ......................................................... ..........................................................
View Window Appearance .................................................... ......................................................
Understanding Test Results and Messages ......................................................... ....................................................
GE006
GE006 ................................................. .........
.............................................................
...............................................................
................................................
.........................
................................................
................................................
...................................
................................................
...................................................
...........................................................................................................................................................................
................................................
.................................................
.............
Quality Control
About Quality Control Testing ......................................................................................................................................................
Performing a Quality Control Test .............................................................................................................................................
Understanding Control Test Results ..........................................................................................................................................
.....................................................
.....................................................
.....................................................
......................................................
.....................................................
..................................................
....................................................................................................................................................................
.........................................................................................
NCC 警語 ...............................................................................................................................................................................................
..................................................
..................................................
.................................................
.................................................
.................................................
.................................................
.................................................
..................................................
Test Memory
Recalling Test Results ......................................................... .........................................................
Recalling Average Test Results ....................................................... ........................................
Caring for Your Meter .............................................................................. ....................................
Cleaning and Disinfecting Procedures .............................................. .................................
Error Messages and Troubleshooting ................................................. ................................
Limitations ................................................................................................. ..........................................
Real Time Synchronize
Specifications ................................................................................................ ....................................
Warranty ......................................................................................................... .....................................
Customer Service .................................................................................................................. ............
Expected Blood Glucose Values Without Diabetes ........................................... ................
Component Manufacturer Information ........................................................... .......................
Log Book .......................................................................................................................... .....................
Warranty Card ...................................................................................................................... .............
Emergency Card ..................................................................................................... ..........................
FEDERAL COMMUNICATIONS COMMISION (FCC) STATEMENT
40
42
43
45
46
47
51
55
56
58
60
61
63
64
65
66
67
82
85
8
10
14
16
18
21
22
23
25
26
32
34
35
31
37

9
10 *
53 *2
6 *
1
8
4 *
7 *
8 *
9 *
The GE006 Blood Glucose Monitoring System
Contents
Your GE006 Blood Glucose Monitoring System consists of several items. Please identify each item, learn
its name and how it is used.
Below are the items included in your GE006 Blood Glucose Monitoring System:
1. Getting Started Guide
2. User's Manual (includes Log Book, Warranty Card, Emergency Card )
3. GE006 Blood Glucose Test Strip Package Insert *
4. Rightest® Control Solution GC550 Package Insert *
5. GE006 Blood Glucose Meter ( with 2 AAA batteries installed )
6. GE006 Blood Glucose Test strips ( 10/25 pcs )*
7. *
8. Lancing Device *
9. Clear Cap *
10. Disposable Sterile Lancets ( 10 pcs ) *
11. Carrying Case ( not shown )*
12. Instruction for the lancing device ( not shown )*
(* Different packages have different bundled items. Some of packages might not include * items.)
*
*
Rightest® Control Solution GC550
Rightest® GD500
The GE006 Blood Glucose Monitoring System
If you want to purchase optional items, please contact the Customer Support Center at
866-0800-241-688.

1110
The Blood Glucose MeterGE006 The Blood Glucose MeterGE006
Left Button ( )
Main Button ( )
Display Window
Right Button ( )
Test Strip Port
Meter Battery
Product name
Battery Cover
Meter Serial Number

1312
Indicates a test result stored in memory
Indicates a test result not included into the Average
function of this meter
Indicates the average result
Indicates a control solution test result
Unit of test result
Test result
Warns when the battery is low or must be replaced
Indicates when to apply the blood sample
Indicates the time in 12H format
The GE006 Blood Glucose Meter The GE006 Blood Glucose Meter
Appears when an error occurs
Appears after you insert test strip into meter
Current date under time mode or testing date under
memory mode
Warns when the operational temperature limit is
exceeded during testing
Displays current time under time mode or testing time
under memory mode
Manufacturing use only
Indicates a meal marker with test result
Indicates that the Bluetooth is turned on
Indicates that the Bluetooth is turned off
Indicates the time period of test results

1514
The GE006 Blood Glucose Test Strip The GE006 Blood Glucose Test Strip
The GE006 Blood Glucose Meter can only be used with GE006 Blood Glucose Test Strips and Rightest™
Control Solution GC550. The use of other test strips or control solutions can lead to incorrect results.
Sample Port
Apply blood/control solution here.
Noble Metal Electrodes
Electrochemical sensor
View WIndow
PRECAUTION
- Close the GE006 Blood Glucose Test Strip vial immediately after removing a test strip.
- Do not reuse GE006 Blood Glucose Test Strips.
- Do not use expired GE006 Blood Glucose Test Strips.
- When you open a new vial of GE006 Blood Glucose Test Strips, record the date on the vial.
Discard the vial of test strips after 3 months from opening.
- Store the GE006 Blood Glucose Test Strip between 4-30°C (or 39-86°F) and in a location (<
90% relative humidity). Do not expose to direct sunlight or heat.
- If the GE006 Blood Glucose Meter and Test Strips are exposed to a substantial change in
temperature, please wait 45 minutes before measurement.
- For detailed information, please refer to the GE006 Blood Glucose Test Strip Package
Insert.
Electrode Contacts
Hold here to insert
test strip into
meter.

17
16
Meter Activation and Battery Change
Your Blood Glucose Meter comes with two AAA, batteries installed. Two new batteries will
provide power to perform approximately 800 tests under normal use with one data transfer. Press the
main button or insert a strip to activate your meter.
GE006
4. The GE006 Blood Glucose Meter
5. Press any button to exit the self-test and enter Setting Mode.
will enter Self-Testing Mode automatically when replacing the battery
(all symbols will appear on the screen).
6. You must set the time and date when replacing the battery. See Chapter “Setting Up Your Meter -
Setting the Date, Time, and Volume" on page 18. Test results are still stored in the memory.
1. Turn the
over. Press and slide the
battery cover to open.
GE006 Blood Glucose
Meter
2. Install the batteries. Be sure to
put the batteries in the correct
direction.
3. Slide the battery cover
back until it snaps into
place.
Meter Activation and Battery Change
CAUTION
- Please follow the local regulation to properly discard a used battery.
- Risk of explosion if battery is replaced by an incorrect type.
You can enter the Setting Mode two ways.
1. Replace the Battery
2. With Battery Inserted
After removing the battery, press the main button several times until there is no signal on screen,
then follow the battery installation steps to replace battery. The GE006 Blood Glucose Meter will
perform a self-test. Press the main button to exit the self-test and enter the Setting Mode.
Press the main button to turn on the GE006 Blood Glucose Meter. Hold down the main button for 7
seconds. During this time the screen will go blank until you hear a beep. After the beep, the meter will
turn on into the Setting Mode. The display screen will show setting data.
NOTE
- Use the Left and Right buttons to select your setting data and press the main button to
confirm each selection. After confirming all of the settings, you will return to the Time Mode.

1918
1)
2)
3)
4a) 4b)
5) 6)
1. Year setting
, press the Left or Right button until you see the
current year. Press the Main button to confirm.
2. Month setting
With the month blinking, press the Left or Right button until you see the
current month. Press the Main button to confirm.
With the year format blinking
Once the year is confirmed, the
Month Setting will appear.
Once the month is
confirmed, the Day Setting will appear.
Once the day is confirmed, the Time
Setting will appear.
3. Day setting
With the day blinking, press the Left or Right button until you see the current
day. Press the Main button to confirm.
Setting Up Your Meter - Setting the Date, Time and Volume Setting Up Your Meter - Setting the Date, Time and Volume
4. Time format 12/24H selection
With the time format blinking, press the Left or Right
button to switch between 12H and 24H. Press the Main
button to confirm.
5. Hour setting
With the hour blinking, press the Left or Right button until
you see the current hour. Press the Main button to
confirm.
6. Minute setting
With the minutes blinking, press the Left or Right button
until you see the current minute. Press the Main button to
confirm.
Once confirmed, the Hour Setting will
appear.
Once the hour is confirmed, the Minute Setting
will appear.
Once the minute is confirmed, the Volume
Setting will appear.

2120
7a) 7b)
NOTE
- If you do not change any settings during Meter Set-up for over 2 minutes, the GE006 Blood
Glucose Meter will leave setting mode and power off automatically.
7. Volume Setting
With the volume blinking, press the Left or Right button to
turn the volume on or off. Press the Main button to confirm
and finish the settings.
8. Setting the Unit of Measurement
With milligrams per deciliter (mg/dL) or millimoles per liter
(mmol/L) blinking, press the Left or Right button to switch.
Then press the Main button to confirm it and finish the
settings.
9. Ending setting
After measurement of unit setting, for confirmation you will
hear a beep (if volume is turned on). All the settings are saved
and completed and will return to time screen.
Setting Up Your Meter - Setting the Date, Time and Volume
1. How to turn on the GE006 Blood Glucose Meter
Press the Main button or Insert a test strip.
2. Manual Power off
To power off the GE006 Blood Glucose Meter, press and hold the Main button for 4 seconds.
3. Auto Power off
The GE006 Blood Glucose Meter will power off automatically after 2 minutes if no buttons are pressed
or no strip is inserted.
Turning On / Off the Meter
8a) 8b)
9)

23
22
Turning On/ Off the Bluetooth
1. Auto turn on the Bluetooth
After leaving the Setting mode, the Bluetooth will turn on automatically and the
" " symbol blinks on the screen.
2. Turn off the Bluetooth
In Time mode, press and hold the Right or Left button for two seconds. The
blinking " " symbol will switch to the “ “ symbol with a beep (If Volume is
turned on).
3. Manual turn on the Bluetooth
In Time mode, press and hold the Right or Left button for two seconds. The
“ “ symbol will switch to the blinking “ “ symbol with a beep (If Volume is
turned on).
1)
2)
NOTE
1.The blinking symbol should turn to steady immediately when
the Bluetooth connection is established.
2. Blinking back and forth “ “ symbol on the screen means the
meter is transferring data.
“ “ 12
Handling the GE006 Blood Glucose Test Strip
How to handle the GE006 Blood Glucose Test Strip.
Inserting the GE006 Blood Glucose Test Strip:
1. Hold the GE006 Blood Glucose Test Strip between your thumb and middle
finger with the view window " " facing up.
2. Put your forefinger on the side of the strip as shown.
3. Insert the GE006 Blood Glucose Test Strip into test strip port until it clicks
and firmly stops.
1
2
3

25
24
Handling the GE006 Blood Glucose Test Strip
Removing the GE006 Blood Glucose Test Strip:
1. Hold the GE006 Blood Glucose Test Strip as shown.
2. Rotate the GE006 Blood Glucose Test Strip counterclockwise and pull up
simultaneously.
3. Take the GE006 Blood Glucose Test Strip out of the test strip port.
Please follow your health care professional's direction and discard used
strips properly.
2
3
Getting Ready for Testing
Before performing a blood glucose test, prepare the
items below :
- GE006 Blood Glucose Meter
- GE006 Blood Glucose Test Strips
(Please check the expiration date on the test strip vial. Do
not use expired test strips)
- Rightest™ GD500 Lancing device
- Sterile lancet
- Alcohol swab (optional)
PlungerBase
Lancet carrier
Release button
Depth adjustable cap
1

10
9
7
27
26
6
Performing a Blood Glucose Test
1. Hold the depth adjustable cap in one hand and hold the base
with the other hand. Bend the cap down. When a gap
appears between the cap and base, pull the cap and base in
opposite directions.
2. Pull off the depth adjustable cap.
3. Insert a new disposable lancet firmly into lancet carrier.
4. Twist off and set aside the protective cover of the disposable
lancet.
5. Replace the depth adjustable cap.
6. Choose a depth of penetration by rotating the top portion of
the depth adjustable cap until your desired setting is visible
in the window. Settings are based on skin type " " for
soft or thin skin; " " for average skin; " " for thick or
calloused skin.
12
34
5
Performing a Blood Glucose Test
7. Hold the base in one hand and pull on the plunger with the
other hand. The device will be cocked. Release the plunger
and it will automatically move back to its original position
near the base.
8. Wash your hands with warm soapy water and dry
thoroughly.
9. Take one GE006 Blood Glucose Test Strip from the vial.
Close the vial cap immediately.
10. Insert the strip into the test strip port of the GE006 Blood
Glucose Meter with the view window facing up.
11. Once the strip is inserted, all symbols will appear on your
meter display and will be accompanied by a beep (if
volume is turned on).
8
NOTE
- The will automatically detect the Code
number on the strip. You do not have to check the Code number on
the meter display and strip vial.
GE006 Blood Glucose Meter
11

29
28
Performing a Blood Glucose Test
12. A blood drop icon will appear on the display window and
will be accompanied by a beep (if volume is turned on).
Apply the blood sample within 2 minutes.
13. Place the lancing device against your fingertip and press
the release button.
14. Touch and hold the blood drop to the edge of sample
port until the view window is filled with blood. If the view
window is not completely filled with blood the test will
not start. If the blood sample was insufficient, discard
the test strip and repeat with a new GE006 Blood
Glucose Test Strip.
15. Countdown Mode will begin on the display window. After
5 seconds, your test result will appear.
15
12
14c
14a 14b
13
Performing a Blood Glucose Test
16. Pull off the depth adjustable cap. Without touching the used
disposable lancet, insert the lancet tip into the protective
lancet cover.
17. Hold the release button in one hand (see picture 17, step 1)
and pull on the plunger with the other hand (see picture 17,
step 2) to safely eject the used disposable lancet.
18. Discard the used disposable lancet into an appropriate
puncture-proof or biohazard container.
19. Replace the depth adjustable cap after finishing the test.
16
1
2
17
18 19

31
30
CAUTION
- Do not apply your blood drop to the sample port on the strip until you see the " " appear.
The GE006 Blood Glucose Meter is performing an internal test and will display " " and
“ " if you apply blood too soon. If this occurs, please repeat the test with a new test
strip.
- Record the opening date of a new test strip vial. Discard the vial of test strips
3 months after opening.
- Always keep the metal contacts of the test strip port clean. If any dust or
impurities are present, please clean with a small, soft brush.
- The GE006 Blood Glucose Monitoring System and Rightest™ GD500 Lancing
Device are intended for a single user only. Do not share these devices with anyone,
including other family members.
- All parts of this kit are considered biohazards and can potentially transmit infectious
diseases, even after you have performed the cleaning and disinfecting procedure.
- Users should wash hands thoroughly with soap and water after handling the meter,
lancing device, and test strips.
- Please refer to the section "Cleaning and Disinfecting Procedures "on page 47 for cleaning
and disinfecting instructions.
Performing a Blood Glucose Test Setting Markers
According to actual life status, you can set meal markers with test result.
You have to perform meal marker setting immediately after the meter displays the reading of your test
result.
1. After test, the test result is displayed on the screen with time, date and flashing “ “.
2. Press the Right or Left button to choose among “ “ (before meal), “ “ (after meal), ” ” (no
marker) and “ “. Then press the Main button to confirm and save this record.
Before meal: You execute this blood glucose test before a meal.
After meal: You execute this blood glucose test after a meal.
(Blank) no marker: regular test or definition by user.
No average: You will exclude this test result from average calculation.
Please refer to "Excluding test results from the average calculation "on page 45 for
more information.
NOTE
If no button pressed, the marker will be set blank automatically after 15 seconds.

33
32
Pressing for
a few seconds
Releasing
button
Alternative site testing: palm or forearm blood sampling
- To perform alternative site testing, install the clear cap for your
.
( For detailed information, refer to the instruction manual for the
. )
- To increase the blood flow, massage the intended puncture area of your palm or
forearm for a few seconds.
- Immediately after massaging the intended puncture area, press and hold the
lancing device with the clear cap against palm or forearm.
- Press the release button.
- Continue holding the lancing device against your palm or forearm and gradually
increase pressure for a few seconds until the blood sample size is sufficient. DO
NOT test on the palm or forearm if you are testing for hypoglycemia (Low blood
glucose).
Rightest™ GD500
Lancing Device
Rightest™ GD500
Lancing Device
(
Palm
Forearm
Alternative Site Testing Alternative Site Testing
CAUTION
- Test results may vary if blood samples are taken from different sites or under certain
conditions where glucose levels are changing rapidly such as: following a drink, a meal, an
insulin dose or exercise. In these cases, only the fingertip should be used.
- DO NOT test on the palm or forearm if you are testing for hypoglycemia (Low blood glucose).
- Fingertip samples can show the rapid change in glucose faster than palm or forearm
samples.
- Consult your healthcare professional before sampling from your palm or forearm.
- Since the blood flow in the forearm and palm is slower than in the fingertip,
sites other than
fingertip.
- If you use the normal lancing device for your palm or forearm, the blood sample may not be
sufficient for meter operation.
- Periodically compare the test system to a laboratory test system that is known to be well
maintained and monitored by a healthcare provider.
use the clear
cap provided with the GD500 Lancing Device when testing Rightest™

34 35
View Window Appearance
Make sure your blood sample covers the
whole area of the view window to get an
accurate test result. An insufficient blood
sample will result in an error message ("Er4").
If this occurs, repeat the test with a new test
strip.
Insufficient blood sample Sufficient blood sample
CAUTION
- Check the expiration date printed on the strip vial every time you use a test strip. Do not use
expired GE006 Blood Glucose Test Strips.
- Use each GE006 Blood Glucose Test Strip immediately after removing it from the vial.
- Do not reuse GE006 Blood Glucose Test Strips.
-
- Apply the blood sample only on the sample port of the test strip.
Do not perform testing immediately after moving from one ambient temperature to another
(e.g. after coming indoors from the outside). Allow 45 minutes for the temperature of the
meter and the test strips to equilibrate.
Understanding Test Results and Messages
If your blood glucose result is unusually high or low, or if you question your test results, repeat the test
with a new GE006 Blood Glucose Test Strip.
You can also run a Quality Control Test with the Control Solution GC550 to check your GE006
Blood Glucose Meter and GE006 Test Strip (Refer to “Performing a Quality Control Test” on page 40) .
If the test result still remains unusually high or low, contact your healthcare professional immediately.
If you are experiencing symptoms that are not consistent with your blood glucose test results and you
have made sure to follow all instructions in this manual, contact your healthcare professional
immediately.
Consult your health care provider for appropriate disposal of used test strips and lancets.
Rightest™

37
36
Understanding Test Results and Messages
The Meter displays results between 10 and 600 mg/dL.
If the test result is below 10 mg/dL , “ ” will appear on the screen. Please
repeat your test with by a new test strip.
If you still get a “ ” result, contact your healthcare professional.
If the test result is above 600 mg/dL, “ ” will appear on the screen. Please
repeat your test again with a new test strip.
If you still get a “ ” result, contact your healthcare professional.
GE006 Blood Glucose
About Quality Control Testing
What is a Quality Control Test ?
To ensure proper monitoring function, it is necessary to regularly perform a quality control test.
Use one of the Control Solution GC550 when testing your GE006 Blood Glucose Monitoring
System in the Control Solution Mode. If the test result is within the Control Solution Range printed on the
strip vial label, the GE006 Blood Glucose Monitoring System passes the Quality Control Test and your
GE006 Blood Glucose Monitoring System is working properly.
Rightest™
Control Solution Range:
Example of Control Solution Range printed on
your test strip vial label.
Control Solution Range mg/dL
Level 2: 107-145
Level 4: 315-426
NOTE
- Level 2 of is provided in your starter kit. If you want to
purchase or another control solutions,
Rightest™ Control Solution GC550
Level 4 Level 2 please contact Bionime Customer
Service at 886 0800 241 688.

3938
About Quality Control Testing
When should a Quality Control Test Be Performed ?
- To ensure that your GE006 Blood Glucose Meter and GE006 Blood Glucose Test Strip are
working properly.
- To confirm that you are following the correct testing procedures.
- To prepare for your initial blood glucose test.
- To check the GE006 Blood Glucose Test Strip when you open a new vial of strips.
-
- To practice testing.
Required Items for Quality Control Tests
To perform a quality control test, prepare the items below :
- GE006 Blood Glucose Meter
- GE006 Blood Glucose Test Strips
-
To check your GE006Blood Glucose Meter after it has been dropped, damaged or exposed to liquids.
- If you suspect that your test results are inaccurate, or if your test results are not consistent with the
way you feel.
Control Solution GC550Rightest™
CAUTION
- Each time you open a new bottle of control solution, write the expiration date on the label.
The is good for 3 months after opening the bottle, or
until the expiration date printed on the label, whichever comes first.
Rightest™ Control Solution GC550
- Wipe the bottle cap with a clean tissue before tightly closing the bottle of control solution.
- Close the bottle of control solution tightly immediately after using.
- Check the expiration date before use. (Refer to the
Package Insert).
- Keep control solution bottles out of reach of children.
Rightest™ Control Solution GC550
Example
Exp. Date 2014-11
About Quality Control Testing
Table of contents
Other GE Blood Glucose Meter manuals