GE 29096 User manual

We bring good things to life.
29096
Caller ID with Call Waiting
User's Guide

2
EQUIPMENT APPROVAL INFORMATION
Your telephone equipment is approved for connection to the Public Switched Telephone Network and is in compliance
with parts 15 and 68 FCC Rules and Regulations and the Technical Requirements for Telephone Terminal Equipment
published by ACTA.
1Notification to the Local Telephone Company
On the bottom of this equipment is a label indicating among other information the US number and Ringer
Equivalence Number (REN) for the equipment. You must upon request provide this information to your telephone
company.
The REN is useful in determining the number of devices you may connect to your telephone line and still have all of
these devices ring when your telephone number is called. In most (but not all) areas the sum of the RENs of all devices
connected to one line should not exceed 5. To be certain of the number of devices you may connect to your line as
determined by the REN you should contact your local telephone company.
Notes
• This equipment may not be used on coin service provided by the telephone company.
• Party lines are subject to state tariffs and therefore you may not be able to use your own telephone equipment if you
are on a party line. Check with your local telephone company.
• Notice must be given to the telephone company upon permanent disconnection of your telephone from your line.
2Rights of the Telephone Company
Should your equipment cause trouble on your line which may harm the telephone network the telephone company
shall where practicable notify you that temporary discontinuance of service may be required. Where prior notice is not
practicable and the circumstances warrant such action the telephone company may temporarily discontinue service
immediately. In case of such temporary discontinuance the telephone company must: (1) promptly notify you of such
temporary discontinuance; (2) afford you the opportunity to correct the situation; and (3) inform you of your right to
bring a complaint to the Commission pursuant to procedures set forth in Subpart E of Part 68 FCC Rules and
Regulations.
The telephone company may make changes in its communications facilities equipment operations or procedures
where such action is required in the operation of its business and not inconsistent with FCC Rules and Regulations. If
these changes are expected to affect the use or performance of your telephone equipment the telephone company must
give you adequate notice in writing to allow you to maintain uninterrupted service.
US NUMBER IS LOCATED ON THE CABINET BOTTOM
REN NUMBER IS LOCATED ON THE CABINET BOTTOM

3
INTERFERENCE INFORMATION
This device complies with Part 15 of the FCC Rules. Operation is subject to the following two conditions: (1) This device
may not cause harmful interference; and (2) This device must accept any interference received including interference that
may cause undesired operation.
This equipment has been tested and found to comply with the limits for a Class B digital device pursuant to Part 15 of the
FCC Rules. These limits are designed to provide reasonable protection against harmful interference in a residential
installation.
This equipment generates uses and can radiate radio frequency energy and if not installed and used in accordance with
the instructions may cause harmful interference to radio communications. However there is no guarantee that
interference will not occur in a particular installation.
If this equipment does cause harmful interference to radio or television reception which can be determined by turning the
equipment off and on the user is encouraged to try to correct the interference by one or more of the following measures:
• Reorient or relocate the receiving antenna (that is the antenna for radio or television that is “receiving” the
interference).
• Reorient or relocate and increase the separation between the telecommunications equipment and receiving antenna.
• Connect the telecommunications equipment into an outlet on a circuit different from that to which the receiving
antenna is connected.
• Consult the dealer or an experienced radio/TV technician for help.
If these measures do not eliminate the interference please consult your dealer or an experienced radio/television
technician for additional suggestions. Also the Federal Communications Commission has prepared a helpful booklet
“How To Identify and Resolve Radio/TV Interference Problems.” This booklet is available from the U.S. Government
Printing Office Washington D.C. 20402. Please specify stock number 004-000-00345-4 when ordering copies.
SEE MARKING ON BOTTOM / BACK OF PRODUCT
RISK OF ELECTRIC SHOCK
DO NOT OPEN
WAR I G: TO PREVENT FIRE OR
ELECTRICAL SHOCK HAZARD DO
NOT EXPOSE THIS PRODUCT TO
RAIN OR MOISTURE.
THE LIGHTNING FLASH
AND ARROW HEAD
WITHIN THE TRIANGLE
IS A WARNING SIGN
ALERTING YOU OF
“DANGEROUS
VOLTAGE” INSIDE THE
PRODUCT.
CAUTION: TO REDUCE THE RISK OF
ELECTRIC SHOCK, DO NOT REMOVE
COVER (OR BACK). NO USER
SERVICEABLE PARTS INSIDE. REFER
SERVICING TO QUALIFIED SERVICE
PERSONNEL.
THE EXCLAMATION
POINT WITHIN THE
TRIANGLE IS A
WARNING SIGN
ALERTING YOU OF
IMPORTANT
INSTRUCTIONS
ACCOMPANYING THE
PRODUCT.
CAUTIO :

4
• Displays caller’s name and number as well as time and
date of the call.*
• Displays caller’s name and number of the call waiting.
• Three line display.
• Three language display - English, French and Spanish.
• 15 dot matrix characters used for caller Name and
Number service.
• Displays total calls received in standby mode. Stores the
CID information for up to 70 name and number CID
records.
• Dials displayed telephone number with area code
arrangement.
• Dual review buttons allow forward or backward review of
call records.
FEATURES
• Electronic contrast control.
• Delete button allows individual or collective deletion of
call records.
• Programmable area code.
• New call indicator.
• Unknown Call, Private Call, Error, and No Data Sent
indication.
• Real time clock.
* Requires telephone company provided Caller ID Name
and Number service.

5
TABLE OF CONTENTS
EQUIPME T APPROVAL I FORMATIO ........ 2
ITERFERE CE I FORMATIO ................... 3
FEATURES ............................................ 4
BEFORE Y OU BEGI ............................... 6
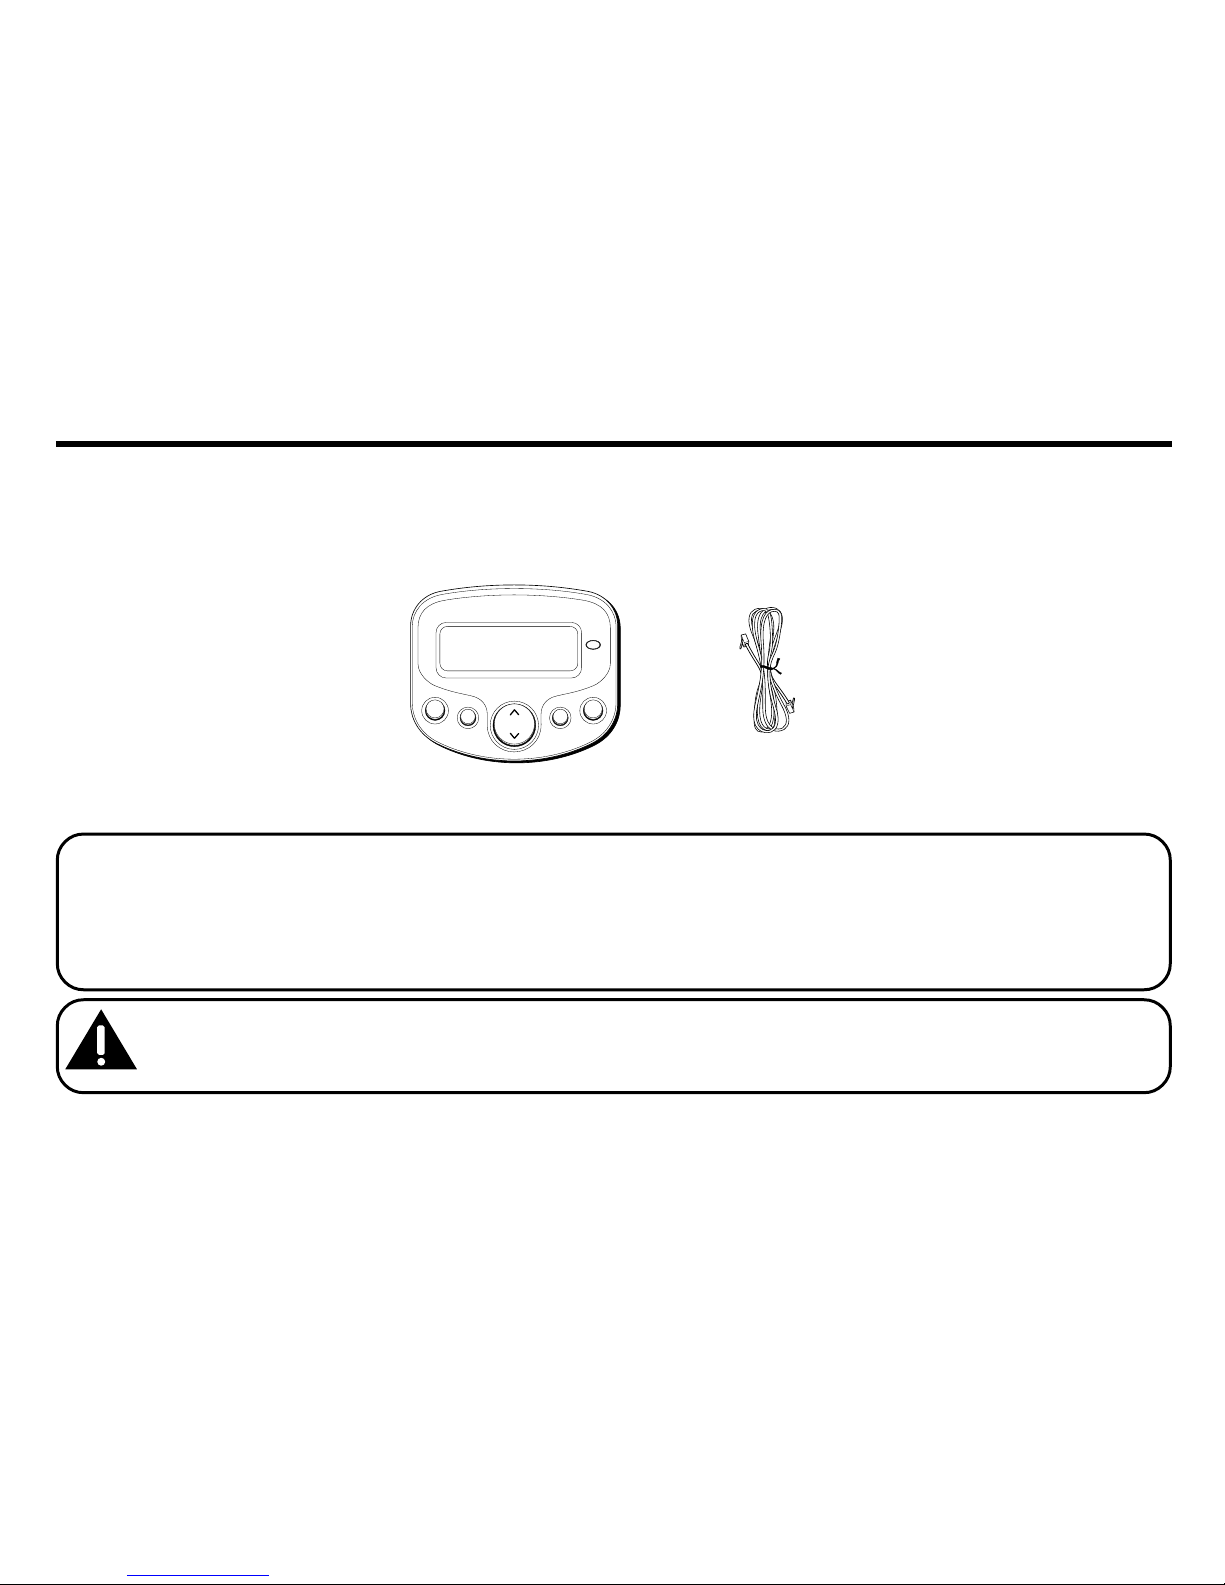
PARTS CHECKLIST ............................................. 6
ITRODUCTIO TO CID SERVICE .............. 7
YOUR CALLER ID CALL WAITING UNIT ALLOWS
YOU TO...........................................................7
ISTALLATIO ....................................... 7
IMPORTANT INSTALLATION
INFORMATION .................................................... 7
MODULAR JACK REQUIREMENTS .......................... 7
INSTALLING THE BATTERIES .................................. 8
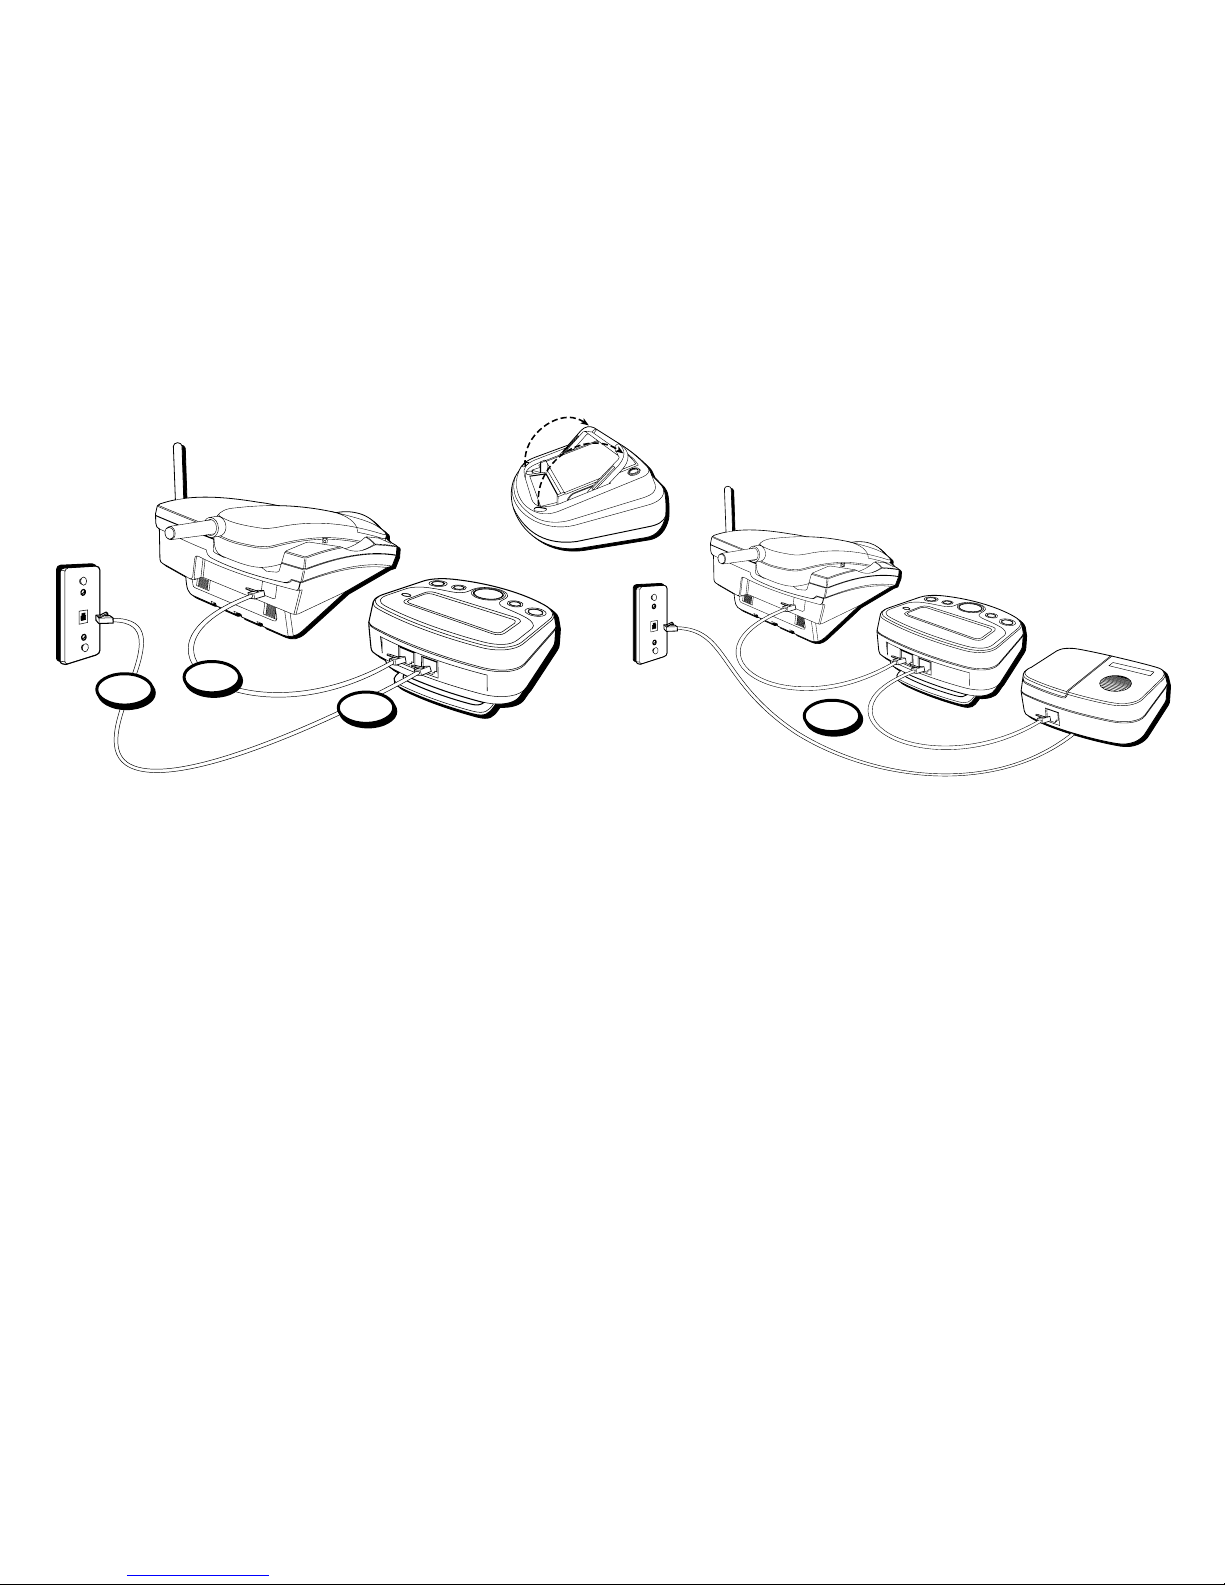
CONNECTING A T ELEPHONE .................................. 9
OPTIO S ME U ................................. 10
SETTING THE CID LANGUAGE ............................. 11
SETTING THE LCD CONTRAST ............................ 11
SETTING THE LOCAL AREA CODE ........................ 12
SETTING THE 10-DIGIT REGIONAL AREA CODES .... 12
EXITING THE OPTIONS MENU ............................ 13
OPERATIO ........................................ 13
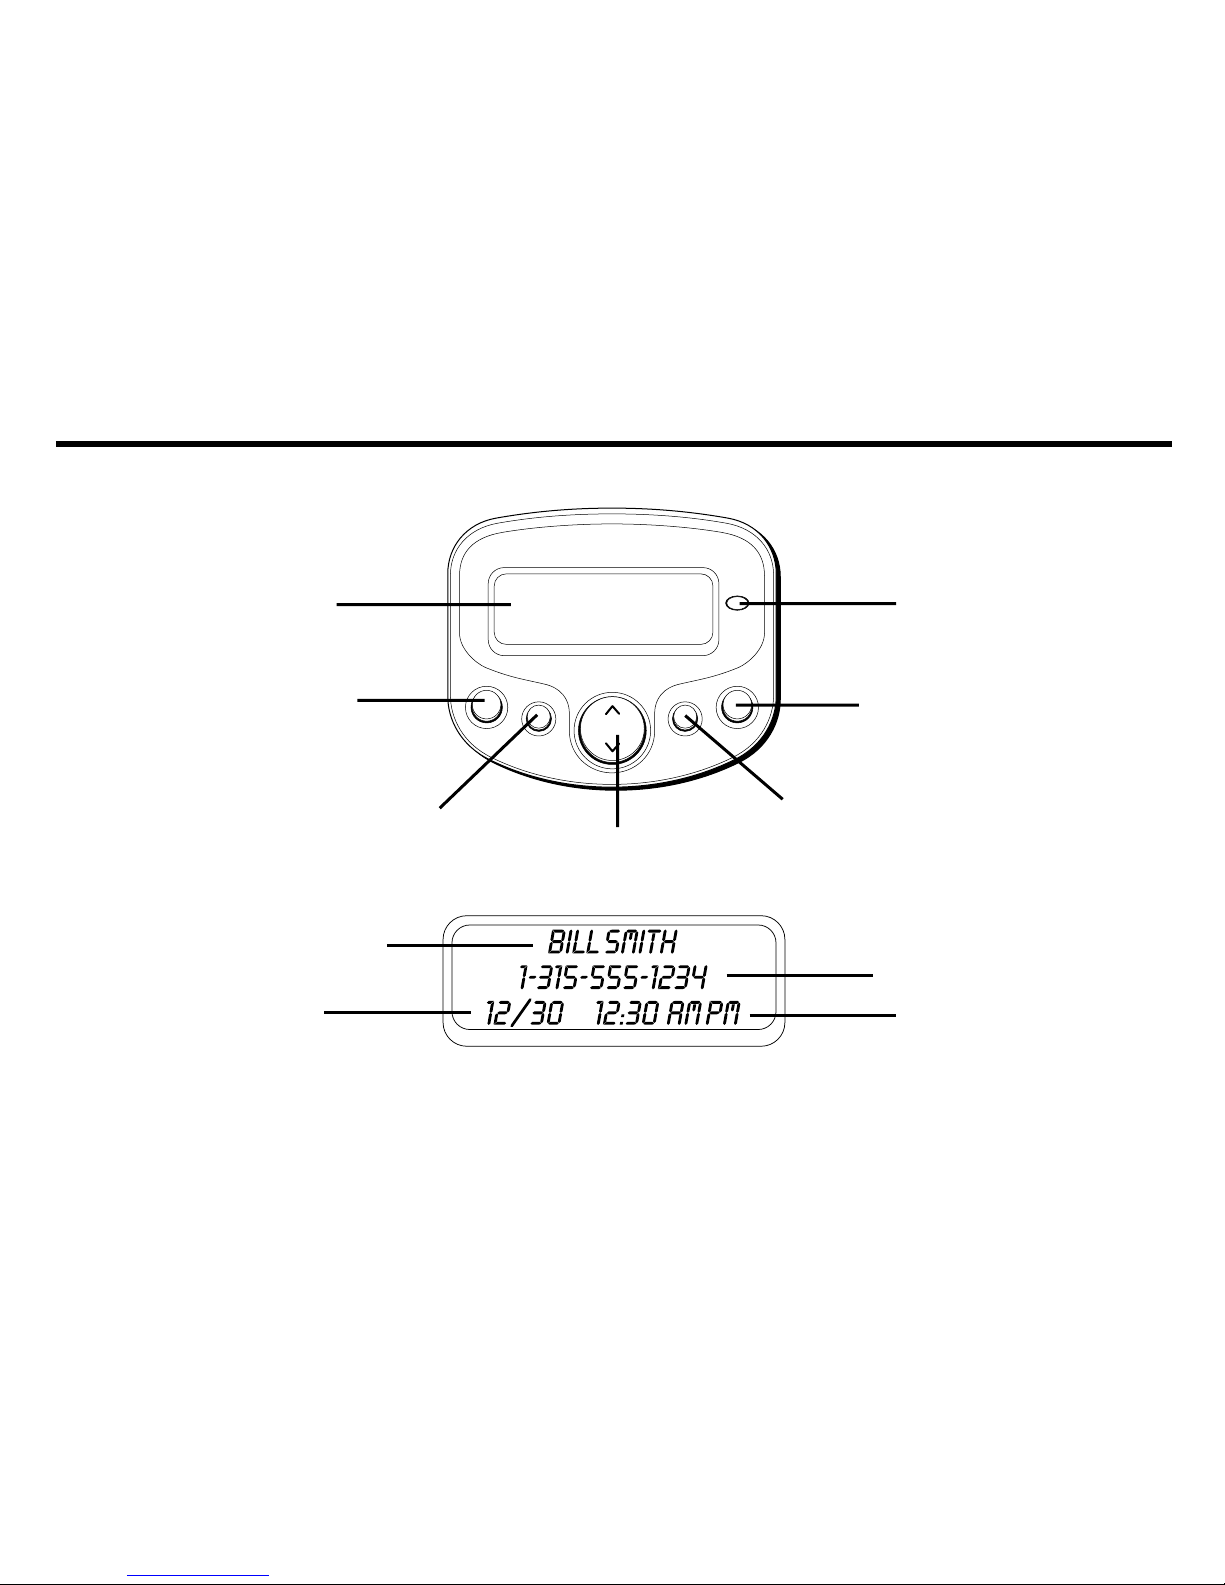
RECEIVING CALLS ............................................ 13
FLASH ........................................................... 14
CALL WAITING DISPLAY .................................... 14
REVIEWING CALL RECORDS ............................... 15
DELETING CALL RECORDS ................................. 15
TO DELETE AN INDIVIDUAL CALL ................... 15
TO DELETE ALL CALLS ................................ 15
DIAL ............................................................. 15
CHANGING THE NUMBER FORMAT ...................... 16
CALLER ID MESSAGES ........................ 16
TROUBLESHOOTI G T IPS ....................... 17
GE ERAL PRODUCT CARE ..................... 17
IDEX ............................................... 18
LIMITED WARRA TY ............................. 19

6
Caller ID unit Telephone line cord
delete
options
new
flash
review
dial
BEFORE YOU BEGIN
PARTS CHECKLIST
Make sure your package includes the following items:
VERY IMPORTANT: You must call your local phone company and tell the representative that you have a Caller
ID/Call Waiting device that integrates the two services (called Type II Caller ID). Some phone companies aren't
equipped to integrate the two services, which means only the Caller ID part of your unit will work. The phone
companies that do have the ability to integrate Call Waiting and Caller ID must program your telephone line so
the two services work together. You need to call and ask them to do this.
CAUTION: When using telephone equipment, there are basic safety instructions that should always be
followed. Refer to the IMPORTANT SAFETY INSTRUCTIONS provided with this product and save them
for future reference.

7
INTRODUCTION TO CID SERVICE
Congratulations on purchasing this Caller ID unit.
This system has been designed to be simple to
use however you can reach its full potential
more quickly by taking a few minutes to read this
User’s Guide.
This Caller ID system is a multifunction product for
use with the Call Waiting and Caller ID services
available from your local telephone company.
YOUR CALLER ID CALL WAITING
UNIT ALLOWS YOU TO:
• View the telephone number and name of a
waiting caller (Call Waiting Caller ID).
• Review all calls to your phone; the unit stores
up to 70 call records.
• Screen unwanted calls eliminate harassment
from annoying calls or to get prepared before
answering a call.
INSTALLATION
IMPORTANT INSTALLATION
INFORMATION
• Never install telephone wiring during a
lightning storm.
• Never touch uninsulated telephone wires or
terminals unless the telephone line has been
disconnected at the network interface.
• Use caution when installing or modifying
telephone lines.
MODULAR JACK REQUIREMENTS
You need an RJ11C type modular jack
which is the most common type of phone
jack and might look like the one pictured
here. If you don’t have a modular jack call
your local phone company to find out
how to get one installed.

8
INSTALLING THE BATTERIES
Your Caller ID uses 3 AA-size alkaline batteries (not
included) for receiving and storing Caller ID records.
IMPORTANT: You have approximately 60 seconds
to replace the batteries before the call records are
lost. Please read the instructions before replacing
the batteries and have them ready to be inserted
beforehand. You may want to write down any stored
information you do not want erased.
1. If the telephone line cord or a phone is
connected to the unit disconnect it from the
unit.
2. Use a screwdriver or other flat tool to open the
battery compartment door.
3. Insert 3 AA-size alkaline batteries (not
included) as shown on the diagram in the
battery compartment.
4. Replace the battery compartment door
securely.
5. If the line cord was previously connected
reattach it to the unit.
NOTE: If the low battery icon appears in the
display, you need to replace the batteries. It is
important that you replace the batteries as soon as
possible in order to maintain Caller ID operation.
IMPORTANT: If you’re not going to use the unit
for more than 30 days, remove the batteries because
they can leak and damage the unit.
Battery door

9
CONNECTING ATELEPHONE
1. To install this unit disconnect your telephone
by removing the plug at the end of its line cord
from the telephone wall jack.
2. Plug the line cord from your telephone into the
jack marked PHONE on this unit.
3. Plug one end of the line cord supplied with
your Caller ID unit into the jack marked LINE
on this unit.
4. Plug the remaining end of the line cord
connected to this unit’s LINE jack into the
telephone wall jack.
5. If this unit is connected with an answering
machine please refer to the following drawing
and set your answering machine to answer the
phone for at least 2 rings. This will assure that
this unit will receive the CID information
correctly.
2
3
4
5

10
OPTIONS MENU
delete
options
new
flash
review
dial
NEW CALL
indicator
dial button
flash button
review button
options button
delete button
display
Caller ID name
Caller ID number
Time
Date

11
SETTING THE CID LANGUAGE
This adjustment let's you view the Caller ID
messages in English French or Spanish.
1. To enter the options menu press the options
button.
OPTIONS MENU SET
^ or v appears.
2. Press the up or down arrow button until
CID
LANGUAGE
appears.
3. Press the options button to show the current
language setting. The default is English.
4. Press the up or down arrow button to change
the language.
5. Press options again to store the language and
return to the
CID LANGUAGE
display.
SETTING THE LCD CONTRAST
This adjustment allows you to adjust the contrast
and viewing angle of the display.
1. To enter the options menu press the options
button.
OPTIONS MENU SET
^ or v appears.
2. Press the up or down arrow button until
LCD
CONTRAST
appears.
If there is a transparent overlay label covering the
display remove it prior to use.
When applying power for the first time the
summary screen appears.
NOTE: Proceed immediately to change any of the
following factory preset settings as required.
1. To enter the options menu press the options
button.
OPTIONS MENU SET
^ or v appears.
2. At this point you can press either arrow button
to scroll through 5 menu screens:
CID LANGUAGE (default English)
LCD CONTRAST (default 3)
LOCAL AREA CODE (default ---)
10 DIGIT ACs (default --- --- ---)
EXIT
• You have 10 seconds following any key press
before the unit will automatically return to the
summary screen.
NOTE: You can save a change and exit the options
menu by pressing the options button.

12
3. Press the options button to show the current
contrast setting. There are 5 levels of contrast
with the default set to 3.
4. To decrease the contrast press the down arrow
button. To increase press the up arrow button.
5. Press options again to store the contrast setting
and return to the
LCD CONTRAST
display.
SETTING THE LOCAL AREA CODE
The Caller ID unit uses the programmed area
code to determine the number format to display
when a valid Caller ID signal is received. The
programmed area code is also used for the Dial
Back feature.
1. To enter the options menu press the options
button.
OPTIONS MENU SET
^ or v appears.
2. Press the up or down arrow button until
LOCAL
AREA CODE
appears.
3. Press the options button to show the current
local area code. The default is ---. The first digit
flashes indicating it is ready to accept the area
code entry.
4. Press the down arrow button to choose 9-0 for
the first digit.
5. When the desired number is flashing press the
up arrow button to advance to the next digit.
6. Repeat steps 4 and 5 until all the digits for your
area code are correct.
7. Press options again to store the local area code
and return to the
LOCAL AREA CODE
display.
NOTE: If you make a mistake while setting the local
area code, you can delete the displayed area code
by pressing the delete button.
SETTING THE 10-DIGIT REGIONAL
AREA CODES
Depending on your telephone company and your
location it may be required that you dial a
10-digit number (area code + local number) to
complete some calls. You can store up to six 10-
digit regional area codes in this unit.
1. To enter the options menu press the options
button.
OPTIONS MENU SET
^ or v appears.

13
2. Press the up or down arrow button until
10
DIGIT AC's
appears.
3. Press the options button to show the current
regional area code. The default is --- --- ---. The
first digit flashes indicating it is ready to
accept the area code entry.
4. Press the down arrow button to choose 9-0 for
the first digit.
5. When the desired number is flashing press the
up arrow button to advance to the next digit.
6. Repeat steps 4 and 5 until all the digits for your
regional area code are correct.
7. Press options again to store the regional area
code and return to the
10 DIGIT AC's
display.
NOTE: If you make a mistake while setting the 10-
digit AC's, you can delete the selected set of the
area code by pressing the delete button.
EXITING THE OPTIONS MENU
1. Press the up or down arrow button until
EXIT SETUP
appears.
2. Press the options button to exit the options
menu.
OPERATION
RECEIVING CALLS
This unit has a built-in real time clock that
accurately keeps the current time and date. The
clock is automatically set and updated each time
Caller ID information is received.
IMPORTANT: Allow at least two rings to occur
prior to answering calls. This will assure that the
unit will receive the Caller ID information correctly.
• When the telephone is not in use and a new
call is received the display displays the phone
number the caller’s name and time and date
of the call for 20 seconds. The
NEW
(new call)
symbol comes on.
• The red NEW CALL indicator comes on
confirming new calls have been received.

14
• After 20 seconds without activity the display
changes to the summary screen which remains
until another call is received or any button is
pressed. You can see the total number of calls
stored and how many of the new calls have not
been reviewed.
FLASH
Press the flash button instead of using the hook
switch to activate customer calling services such
as call waiting or call transfer which are provided
by your local telephone company.
CALL WAITING DISPLAY
To utilize the full capabilities of this unit you must
subscribe to Caller ID with name and number
service and Call Waiting with Caller ID service. This
unit lets you know when a call is waiting as well as
who is calling before you answer.
This unit cannot provide Caller ID and Call
Waiting features unless you are subscribed to
receive the services from your local telephone
company. Check with your local telephone
company to confirm both of these services are
available. If you only have Caller ID service this
unit will not receive and display Call Waiting with
Caller ID information. If you have Call Waiting
Caller ID service a tone alerts you there is a new
call coming while you are on an existing call. You
will experience a short period of silence as the
Caller ID information is processed by the unit.
• When a call waiting signal is received
CALL
WAITING
flashes in the display. Then the name
and telephone number of the person calling
appears in the display for 20 seconds.
• Press flash to put the existing call on hold and
answer the new call.
• When you finish with the new call press flash
to return to the original call.
• If you choose not to answer the new call the
Call Waiting ID information is stored for future
reference.

15
TIP: If you choose not to use any of the Call
Waiting options, you may simply ignore the call
waiting beeps and continue your conversation. The
person calling will hear a continuous ring, as if you
are not home, or may be transferred to a voice mail
account if available.
IMPORTANT: To use the Call Waiting feature of
this unit, the phone you are using must be
connected directly to the unit.
REVIEWING CALL RECORDS
• When the red NEW CALL indicator is on you
have received new incoming calls. Next to
the
NEW
symbol is the total number of calls.
Press the up or down arrow button to review
the stored calls. After the new call records
are reviewed the indicator turns off.
• When you reach the end of the call records the
display shows
START/END
confirming you
have reviewed all the records.
DELETING CALL RECORDS
TODELETE AN INDIVIDUAL CALL
When reviewing calls you may delete an individual
call by pressing the delete button once. The
contents of the display will be erased and the
remaining Caller ID records are renumbered.
TODELETE ALL CALLS
1. When reviewing calls you may delete all calls
by pressing and holding the delete button for
more than 3 seconds.
DELETE ALL?
appears in
the display.
2. Press delete again to confirm.
DIAL
If your phone and Caller ID unit is connected to a
touch tone line you may use the dial button to
dial any telephone number shown in the display.
IMPORTANT: All phones on the line must be on
the hook for this feature to work.

16
CHANGING THE NUMBER FORMAT
The options button lets you change the format of
the displayed number. The available formats are
as follows.
7-digit 7-digit telephone number.
10-digit 3-digit area code+ 7-digit telephone
number.
11-digit long distance code “1” + 3-digit area
code + 7-digit telephone number.
1. Use the arrow buttons to scroll to the number
you want to call back.
2. Press the dial button. If the number is 7 10 or
11 digits
ADJUST
shows in the display.
NOTE: If the number does not dial as shown, press
the options button. Repeat if necessary, until the
correct number of digits is shown.
3. If the phone is off the hook the display counter
counts down from three to zero seconds. During
this time you may press the options button and
adjust the number format. When you are
fininshed the number automatically dials.
IMPORTANT: All phones on the line must be on
the hook for this feature to work.
4. If the phone is on the hook the counter counts
down from ten to zero seconds. During this
time you may press the options button to
adjust the number format. Pick up the handset
before the phone turns to idle mode and the
phone number automatically dials.
5. Press the flash button to exit and return to
review mode.
CALLER ID MESSAGES
The following special messages indicate the
status of a message or the unit:
NO CALLS
The call record log is empty.
UNKNOWN
The incoming call does not
CALLER
have Caller ID service or its
service area is not linked to
yours. If
UNKNOWN CALLER
appears along with a calling
number the name
information for that number
is not available.

17
BLOCKED CALL
The caller is registered as
“Private Number” and the
Caller ID information is
withheld.
NO DATA
No Caller ID signal was
detected or Caller ID service
was not activated.
START/END
Indicates you are at the
beginning or the end of the
call record log.
Battery power is low.
TROUBLESHOOTING TIPS
NOINFORMATION IS SHOWN AFTER THE
PHONE RINGS
• Be sure to wait until the second ring before
answering.
• Check all cabling to make sure all connections
are secure and not damaged.
• Did you order Caller ID service from your local
telephone company? This unit requires that you
subscribe to Caller ID service in order to work.
GENERAL PRODUCT CARE
To keep your Caller ID unit working and looking
good follow these guidelines:
• Avoid putting it near heating appliances and
devices that generate electrical noise (for
example motors or fluorescent lamps).
• DO NOT expose to direct sunlight or moisture.
• Avoid dropping the unit and other rough
treatment.
• Clean with a soft cloth.
• Never use a strong cleaning agent or abrasive
powder because it will damage the finish.
• Retain the original packaging in case you need
to ship it at a later date.

18
INDEX
B
Before You Begin 6
C
Call Waiting Display 14
Caller ID Messages 16
Changing the Number Format 16
Connecting a Telephone 9
D
Deleting Call Records 15
Dial 15
E
Equipment Approval Information
2
Exiting the Options Menu 13
F
Features 4
Flash 14
G
General Product Care 17
I
Important Installation Information
7
Installation 7
Installing the Batteries 8
Interference Information 3
Introduction to CID Service 7
L
Limited Warranty 19
M
Modular Jack Requirements 7
O
Operation 13
Options Menu 10
P
Parts Checklist 6
R
Receiving Calls 13
Reviewing Call Records 15
S
Setting the 10-digit Regional Area
Codes 12
Setting the CID Language 11
Setting the LCD Contrast 11
Setting the Local Area Code 12
T
To Delete All Calls 15
To Delete an Individual Call 15
Troubleshooting Tips 17
Y
Your Caller ID Call Waiting Unit
Allows You To 7

19
What your warranty covers:
• Defects in materials or workmanship.
For how long after your purchase:
• One year from date of purchase.
(The warranty period for rental units begins with the first rental or 45 days
from date of shipment to the rental firm whichever comes first.)
What we will do:
• Provide you with a new or at our option a refurbished unit. The exchange unit
is under warranty for the remainder of the original product’s warranty period.
How you get service:
• Properly pack your unit. Include any cables etc. which were originally
provided with the product. We recommend using the original carton and
packing materials.
• ”Proof of purchase in the form of a bill of sale or receipted invoice which is
evidence that the product is within the warranty period must be presented
to obtain warranty service.” For rental firms proof of first rental is also
required. Also print your name and address and a description of the defect.
Send via standard UPS or its equivalent to:
ATLI KS USA, Inc.
c/o Thomson multimedia Inc.
11721 B Alameda Ave.
Socorro, Texas 79927
• Pay any charges billed to you by the Exchange Center for service not
covered by the warranty.
• Insure your shipment for loss or damage. ATLINKS accepts no liability in
case of damage or loss.
• A new or refurbished unit will be shipped to you freight prepaid.
What your warranty
does not
cover:
• Customer instruction. (Your Owner’s Manual provides information regarding
operating instructions and user controls. Any additional information should
be obtained from your dealer.)
• Installation and setup service adjustments.
• Batteries.
• Damage from misuse or neglect.
• Products which have been modified or incorporated into other products.
• Products purchased or serviced outside the USA.
• Acts of nature such as but not limited to lightning damage.
Limitation of Warranty:
• THE WARRANTY STATED ABOVE IS THE ONLY WARRANTY APPLICABLE TO
THIS PRODUCT. ALL OTHER WARRANTIES EXPRESS OR IMPLIED
(INCLUDING ALL IMPLIED WARRANTIES OF MERCHANTABILITY OR FITNESS
FOR A PARTICULAR PURPOSE) ARE HEREBY DISCLAIMED. NO VERBAL OR
WRITTEN INFORMATION GIVEN BY ATLINKS USA INC. ITS AGENTS OR
EMPLOYEES SHALL CREATE A GUARANTY OR IN ANY WAY INCREASE THE
SCOPE OF THIS WARRANTY.
• REPAIR OR REPLACEMENT AS PROVIDED UNDER THIS WARRANTY IS THE
EXCLUSIVE REMEDY OF THE CONSUMER. ATLINKS USA INC. SHALL NOT BE
LIABLE FOR INCIDENTAL OR CONSEQUENTIAL DAMAGES RESULTING FROM
THE USE OF THIS PRODUCT OR ARISING OUT OF ANY BREACH OF ANY
EXPRESS OR IMPLIED WARRANTY ON THIS PRODUCT. THIS DISCLAIMER OF
WARRANTIES AND LIMITED WARRANTY ARE GOVERNED BY THE LAWS OF
THE STATE OF INDIANA. EXCEPT TO THE EXTENT PROHIBITED BY APPLICABLE
LAW ANY IMPLIED WARRANTY OF MERCHANTABILITY OR FITNESS FOR A
PARTICULAR PURPOSE ON THIS PRODUCT IS LIMITED TO THE APPLICABLE
WARRANTY PERIOD SET FORTH ABOVE.
How state law relates to this warranty:
• Some states do not allow the exclusion nor limitation of incidental or
consequential damages or limitations on how long an implied warranty
lasts so the above limitations or exclusions may not apply to you.
• This warranty gives you specific legal rights and you also may have other
rights that vary from state to state.
If you purchased your product outside the USA:
• This warranty does not apply. Contact your dealer for warranty information.
LIMITED WARRANTY

Model 29096
15861690 (Rev. 1 E/S)
02-20
Printed in China
ATLI KS USA, Inc.
101 West 103rd Street
Indianapolis IN 46290
© 2002 ATLINKS USA Inc.
Trademark(s) ® Registered
Marca(s) Registrada(s)
Other manuals for 29096
1
Table of contents
Languages:
Other GE Caller ID Box manuals