GE JP968 User manual

vvvvw.GEAppliances.com
©
©
°_
©
Safety Instructions
Safety Precautions ......... 2 4
Operating lnstructions
Bridge Surface Unit ........... 8
Cookware Tips ........... 10-11
Dual Surface Unit ............ 7
Features of Your Cooktop ..... 5
Kitchen Timer ............... 9
Locking the Cooktop ......... 9
Pan Detection Feature ........ 9
Pan Sizing Feature ............ 9
Surface Units .............. 6-9
Warmer Surface Unit ......... 8
JP938
jP968
Care and Cleaning
Control Lock Pad .. _'_ 13
Glass Cookto i3-14
p ......... \,
Troubleshootin ,_Ti _ il ..........
_!i,," _ iiiiiiiiiiiiiiiiiiii_
Before YouCalt' : : : :
Write the model and serial
numbershere:
Model #
Serial #
You can find them on a
label under the cooktop.
164D4290P022 49-80060 01-01 JR

IMPORTANTSAFETYINFORMATION.
READALLINSTRUCTIONSBEFOREUSING.
WARNING!
Foryoursafe_ theinformation in this manual must be followed to minimizethe risk of fire or
explosion,electric shock, or toprevent property damage,personal injury, or loss oflife.
2
SAFETYPRECAUTIONS
Whenusing electrical appliances, basic safety precautions should be followed, including
the following."
i',_Use this appliance only for its intended use
as described in this manual.
@Do not attempt to repair or replace any
part of your cooktop unless it is specifically
recommended in this manual. All other
servicing should be referred to a qualified
technician.
N Before performing any service, disconnect
the cooktop power supply at the household
distribution panel by removing the fuse or
switching off the circuit breaker.
N Be sure your appliance is properly installed
and grounded by a qualified technician in
accordance with the provided installation
instructions.
N Have the installer show you the location of
the circuit breaker or fuse. Mark it for easy
reference.
N Do not leave children alone-children
should not be left alone or unattended
in an areawhere an appliance is in use.
They should never be allowed to sit or
stand on any part of the appliance.
ryTeach children not to play with the
controls or any other part of the cooktop.
_2._Do not allow anyone to climb, stand or
hang on the cooktop.
ryCAUTION:Itemsofinterestto
children should not be stored in cabinets
above a cooktop-children climbing on the
cooktop to reach items could be seriously
injured.
_ Always keep combusUble wall covenngs,
curtains or drapes a safe distance from
your cooktop.
ryAlways keep dish towels, dish cloths, pot
holders and other linens a safe distance
away from your cookiop.
ryAhvays keep wooden and plastic utensils
and canned food a safe distance away from
your cooktop. They may become hot and
could cause burns.
N Never wear loose-fitting or hanging
garments while using the appliance.
Flammable material could be ignited if
brought in contact with hot surface units
and may cause severe bums.
ryUse only dry pot holders--moist or damp
pot holders on hot surfaces may result in
burns from steam. Do not let pot holders
touch hot surface milts. Do not use a towel
or other bulky cloth. Such cloths can catch
fire on a hot surface unit.
ryDo not use water on grease fires. Never pick
up a flaming pan. Turn the controls off.
Smother a tlaming pan on a surface unit
by covering the pan completely with a well
fitting lid, cookie sheet or flat tray. Use a
multi-purpose dry chemical or foanaqype
extinguisher.
Flaming grease outside a pan can be put
out by covering with baking soda or,
if available, by using a mnifi-purpose dry
chemical or foana-type fire extinguisher.
ryWhen flaming foods under the hood,
turn the fan on.
COOKMEATANDPOULTRYTHOROUGHLY...
Cookmeatandpoultrythoroughly--meattoat leastanINTERNALtemperatureof 160°£andpoultry
toat leastan INTERNALtemperatureof 180°I:..Cookingto thesetemperaturesusuallyprotectsagainst
foedbemeillness.

vvvvw.GEAppliances.com
AWARNING]
SAFETYPRECAUTIONS
@Do not touch glass ceramic surface units
while cooking. This surface may be hot
enough to burn even though it may appear
dark in color. During and after use, do not
touch, or let clothing or other flammable
materials contact the cooking surface. Note
the hot indicator lights and allow sufficient
time for cooling first.
Hot surfaces may include both the cooktop
and areas facing the cooktop.
ai To minimize the possibility of burns,
ignition offlanamable materials and
spillage, the handle of a container should
be turned toward the center of the cooktop
without extending over any nearby surface
units.
N Always turn offthe surface unit control
before removing the cookware.
ai Use proper pan size--Select cookware
having flat bottoms large enough to cover
the surface unit heating element. The use
oftmdersized cookware will expose a
portion of the surface unit to direct contact
and may result in ignition of clothing.
Proper relationship of cookware to surface
unit will also improve efficiency.
K_Never leave surface units unattended at
high heat settings. Boilovers may cause
smoking and greasy spillovers may ignite.
ai Glass and cerantic cookware is not
recommended for use with your radiant
ceramic glass cooktop.
_ Keep an eye on foods being flied at high or
mediunl high heat settings.
ai Foods for frying should be as dry as
possible. Frost on frozen foods or moisture
on fresh foods can cause hot fat to bubble
up and over the sides of the pan.
ai Avoid placing any objects on or near the
keypads in order to prevent acddental
activation of the cooktop controls.
ai;Use little fat for effective shallow or deep-fat
frying. Filling the pan too full of fat can
cause spillovers when food is added.
ai ffa combination of oils or fats will be used
in frying, stir together before heating, or as
fats melt slowly.
ai Always heat fat slowly, mad watch as it heats.
Use a deep fat thermometer whenever
possible to prevent overheating fat beyond
the smoking point.
ai Never try to move a pan of hot fat,
especially a deep fat fryer. Wait until the fat
is cool.
ai Do not store flammable materials near
the cooktop.
ai Keep the hood and grease filters clean to
maintain good venting and to avoid grease
fires.
@Do not store or use combustible materials,
gasoline or other flammable vapors and
liquids in the vicinity of this or any
appliance.
ai Clean only parts listed in this Owner's
Manual.
Do not leave paper products, cooking
utensils or food on the cooktop when not
in use.
ai Keep cooktop clean and free of
accumulation of grease or spillovers
which may ignite.
ai Never heat unopened food containers.
Pressure buildup may make container
burst and cause injlwy.
g_Never leave jars or cans of fat drippings
on or near your cooktop.
ai Never use your appli_ace for warming or
heating the room.
3

IMPORTANTSAFETYINFORMATION.
READALLINSTRUCTIONSBEFOREUSING.
RADIANTSURFACEUNITS
Use care when touching the cooktop. Theglasssurface of the cooktop will retain heat afterthe
controls havebeen turned off.
iNAvoid scratching the glass cooktop.
The cooktop can be scratched with items
such as sharp instruments, rings or other
jewelry.
iNNever use the glass cooktop surface as a
cutting board.
!_Do not place or store items on top of the
glass cooktop stu£ace when it is not in use.
2_Be careful when placing spoons or other
stirring utensils on glass cooktop surface
when it is in use. They may become hot and
could cause burns.
N Avoid heating an empty pan. Doing so may
damage the cooktop and the pan.
_?,_Do not allow water, other liquids or grease
to remain on the cooktop.
iNDo not operate the glass surface units if
the glass is broken. Spillovers or cleaning
solution may penetrate a broken cooktop
and create a risk of electrical shock.
Contact a qualified technician immediately
should your glass cooktop become broken.
@Spilled or burnt-on foods may cause
accidental activation or deactivation of the
keypad. Clean the keypad thoroughly, and
controls will reslmae normal operation.
iNTo prevent acddental activation of the
cooktop, do not place any objects on or
near the keypad.
N Clean the cooktop with caution. Always
lock the control panel using the control
lock feature mad wait until the entire glass
surface is cool before attempting to clean
the cooktop. See the Locking the Cooktop
section for details, ffawet sponge or cloth
is used to wipe spills on a hot surface unit,
be careful to avoid steam bums, Some
cleansers can produce noxious fumes if
applied to a hot surface.
NOTE:We recommend that you avoid
wiping any s_Lrfaceunit areas until they
have cooled and the HOTindicator light has
turned off. Immediate special attention
must be paid to sugar spills. Please see the
Careand Cleaning:GlassCooktopsection for
detailed instrucdons on keeping your
cooktop clean.
N To avoid possible damage to the cooking
surface, do not apply the cleaning cream
to the glass surface when it is hot.
iNAfter cleanuag, use a dry cloth or paper
towel to remove all the cleaning cream
residue.
N Read and follow all instructions and
warnings on the cleaning cream labels.
iNUse care when touching the cooktop. The
glass surface of the eooktop will retain heat
after the controls have been turned OFF.
N Do not stand on the glass cooktop.
_l Jj
SAVETHESEINSTRUCTIONS
4

Featuresofyourcooktop.
Throughout this manual, features and appearance may vary from your model
mmo®m_®
JP938
Feature Index (Featuresand appearancesmay vaN) Explained on page
O Single Surface Unit 6
O Single/Bridge Surface Unit(s) 8
Warmer Surface Unit 8
Dmd Surface Unit 7
Single Surface Unit Control Pad 6
Dmd Surface Unit Conm)l Pad 7
Warmer Sm_ace Unit Control Pad 8
O Single/Bridge Surface Unit Control Pad 8
Kitchen Timer Control Pad 9
Pan Sensor Control Pad 9
Conuol Ia)ck Pad 9
Hot Sufface Indicator IJghts (one foreach surface unit] 9
5

Usingthesurface units. GEApptia.o oom
YournewProfileCooktopmakesan eloquentstatementof style,convenience,andkitchenplanningflexibility Whetheryou
choseit for itspurity of design,assiduousattentiontodetail,or for bothofthesereasons- you71find thatyour Profile
cooktop'ssuperiorblendofform andfunctionwill delightyoufor yearstocome.
Thiscooktopcontainsseveralnewfeaturessuchaspan detectionandpan sizing.Thetouchcontrolsgiveyouprecise
control of thesurfaceunits.Youcan quicklyswitch between asteadylowheat andfullpower or anysettingin between.
Theinformationon thefollowing pageswillhelp youoperateand maintainyourcooktopproperly.
NOTE:Throughoutthismanual,featuresandappearancemayvaryfromyourmodel
Never cook directly on the glass.
Always use cookware.
Abvays place the pan in the center of
the surface unit you are cooking on.
Donotslidecookwareacrossthe
controlor coo_og surfacebecause
it canscratchtheglass. The glass is
scratchresistant,notscratohproof
About the radiant surface units...
The radiant cooktop features heating
units beneath a smooth gl_.ss surface.
Cooktop temperatures increase with
the number of surtZace units that are
on. With 3 or 4 uniLs turned on, surface
temperatures are high. Always use
caution when umching the cooktup.
The ON/OFFindicator lights will come
on next tu the Bridge, Warmer and Dual
burnel_when activated. Lights _dso
activ-atefor the Pan Detect and Control
Lock features when they are turned on.
The indicator lights will go offwhen the
surt:ace refitor feature isturned off.
The appropriate HOTSURFACEindicator
light will glowwhen its corresponding
radiant element is turned on, and win
remain on until the sur[Zace has cooled
below 150°F.
NOTE:
Hot surface indicator light will:
_,_Comeonwhenthesurfaceunitis
turnedon.
_,\_Stayonevenafter theunitis turnedofL
!_ Glowbrightlyuntil theunithascooled
below 150°E
NOTE:A slightodoris normalwhenanew
cooktopis usedforthefirst time.It iscausedby
theheatingofnewpertsandinsulatingmaterials
and will disappearin ashorttime.
It is safe tu place hot cookware from the
oven or surfaceon the gl_ss cooktop
when the surface is cool. Negerplage
cookware onthecontrolarea.
Even after the surface units are turned
off, the glass cooktop retains enough
heat to continue cooking. To awfid over-
cooking, remove pans from the surface
units when the food is cooked. Awfid
placing anything on the surface unit
until it has cooled completely.
@Waterstains(mineraldeposits)areremovable
usingthecleaningcreamor full strengthwhite
vinegar.
_Useof windowcleanermayleavean
iridescenthTmonthecooktop.Thecleaning
creamwill removethisdiscoloration.
_. Don'tstoreheavyitemsabovethecooktop.
If theydropontothecooktop,theycancause
damage.
Donot usethesurfaceasacutting beard.
Radiant Surface Units
The controls for the radiant surface units
allow for l l different heat settings: I_w,
1-9. and High. The headng element may
not visibly glow at low heat settings.
NOTE"Thiscooktophasa rapidbeat-gOfeature.
If thecooktngis coolwhenturnedon,it will glow
redfora shortperiodof timeuntil thedesired
powersettingisreached.If thecooktopis already
warm,therapidheat-upfeaturemaynot activate.
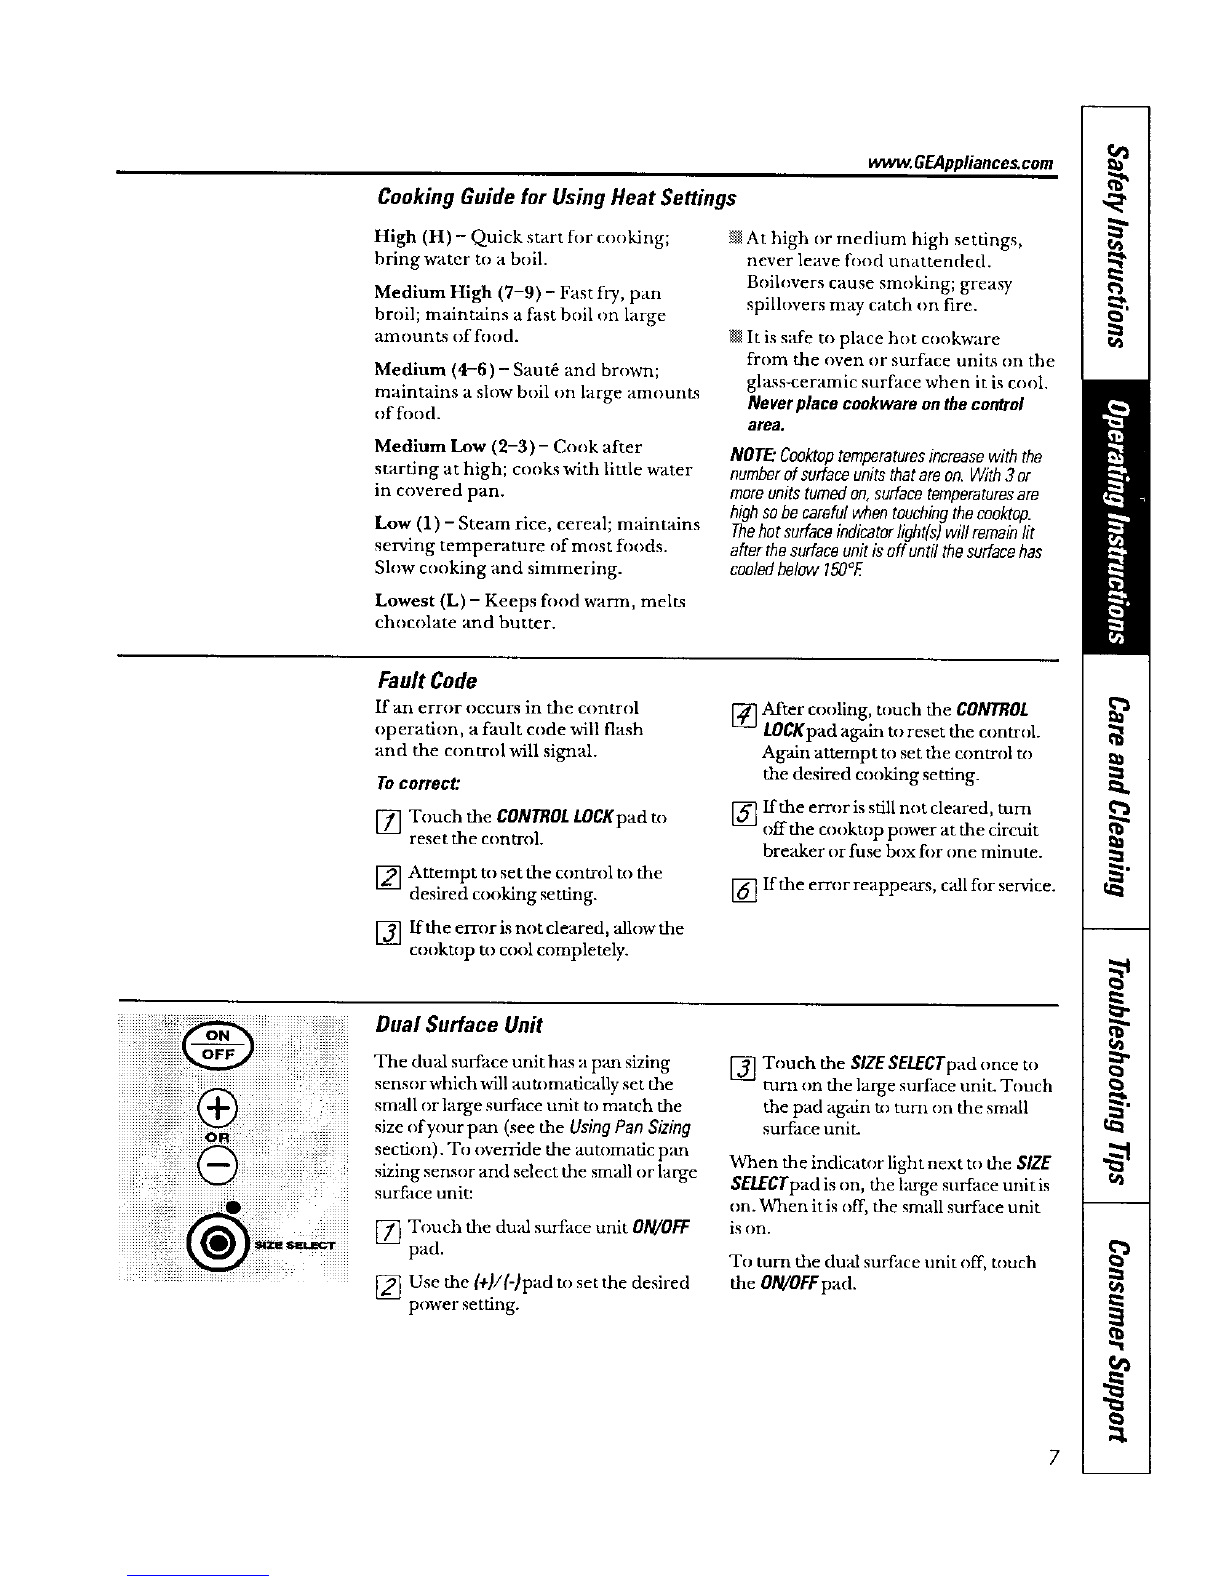
Single Surface Unit
!!i iliilQ iil ,tumooasinglesor counit
..... .................................. [] Touch the ON/OFFpad, then tuuch
the 1+)/(-)pad. The surface unit will
turn on to power setting 5.
_iiiiiiiiiiiiiiiiiiiiiiiiiioFli iiiiiiii :
i_ _i!iiiiiiii_i_i _ _
6
[] Use the (+)/(-)pad to choose the
desired power setting. The control
will beep each time a pad is touched.
To turn offa standard surface unit, touch
the ON/OFEpad again.

Cooking Guide for Using Heat Settings
wwvz GEAppliances_com
High (H) -Quick start for cooking;
bring water to a boil.
Medium High (7-9) -Fast fly, pan
broil; maintains a fast boil on large
amounts of food.
Medium (4-6) - Saut_ and brown;
maintains a slow boil on large amounts
of food.
Medium Low (2-3) -Cook after
starting at high; cooks with little water
in covered pan.
Low (1) -Steam rice, cereal; maintains
serving temperature of most foods.
Slow cooking and simmering.
Lowest (L) -Keeps fired warm, melts
chocolate and butter.
At high or medium high settings,
never leave food unattended.
Believers cause smoking; greasy
spillovers may catch on fire.
It is s_ffe to place hot cookware
from the oven or surface units on the
glass-ceramic surface when it is cool.
Neverplace cookware onthecontrol
area.
NOT£"Cooktoptemperaturesincreasewith the
numberofsurfaceunitsthatam on. With3 or
mereunitsturnedon,surfacetemperaturesare
highsobe carefulwhentouchingtheeooktop.
Thehot surfaceindicatorlight(s)will remainlit
after thesurfaceunitiseft until thesurfacehas
cooledbelow 150°fi
Fault Code
If an error occurs in the control
operation, a fault code will flash
and the conrail will signal.
Tocorrect:
[] Touch the CONTROLLOCKpad to
reset the control.
[_] Attempt to set the control to the
desired cooking setting.
[] ffthe error is not cleared, allow the
cooktop to cool completely.
[] After cooling, touch the COhlTROL
LOCKpad again to reset the control.
Again attempt to set the control to
the desired cooking setting.
[] ffthe error is still not cleared, mm
offthe cooktop power at the circuit
breaker or fuse box for one minute.
[] ff the error reappears, call for service.
Dual Surface Unit
The dun surface unit ha_sa pan sizing
sensor which will auU)madcally set the
small or large surt_ace unit to match the
size of your pan (see the Using Pan Sizing
section). To override the automatic p_m
sizing sensor and select the small or large
surface unit:
[] Touch the dual surt:ace unit O/V/OFF
pad.
............................................. [] Use the (+!/(-)pad to set the desired
power setting.
[] Touch the SIZE SEI.£CTpad once to
turn on the large surtZace unit. Touch
the pad again m turn on the small
surlZace unit.
When the indicator light next to the SIZE
SELECTpad is on, the large surface unitis
on. When it is off, the small surface unit
is on.
To tum the dual surface unit off, touch
the OIWOFFpad.

Using the surface units.
Q
®
OR
G
Bridge Surface Unit
To turn (m the bridge surface unit:
[] Touch the ON/OFFpad of file left
front surface unit.
[]
[]
Use the (+)/(-)pad tu set the desired
power setting.
Touch tile BRIDGEselector pad to
turn on the center bridge surface
unit. NOTE:Theloft frontandbridge
surfaceunitsarecontrolledtogethe_
To turn offthe bridge surface unit, touch
the BRIDGEselector pad again. To turn
off the bridge and left front surface unit.s,
touch the 0N/0FF pad fl)r the left front
surface unit.
Thebackleftsurface........._.#_
unit iscontrolled
independentlyby i_s Both the fron_left and
surface unit pad I _/[ _idge suflace un ts a e
• on when the Ixidpe
Oun_fytehef_:'slenRwheniI_'_ indicator,,ghtison.
isoff. _ togetherw=tnme
samepads.
Warmer Surface Unit
To turn on the vrarmer surtZaee unit:
[] Touch the ON/OFFpad, then touch
the WARMERpad. The surface unit
wiU turn on to W_l_ll0_er power setting
W1 (low).
sotho
R additional settings of W2(medium)
dW3high .
To turn offthe warmer power settings,
touch the ON/o/_'pad. To change from
the warmer settings m regular cooking
settings, press the WARMERpad. The
surface unit will be on power setting
L (low). The surface unit may then be set
to the desired setting using the {+1/t-}
pads. To turn offthe surface unit, much
the ON/OFFpad again.
FoodType ControlSetting
Broads/Pastties Wt (LOW)
Sauces W2 (Medium)
Soups(cream) W2 (Medium)
Stows W2 (Medium)
Vegetables W2 (Medium)
HotBeverages [4/3 (HIGH)
Soups(liquid) W3 (HIGH)
Thechartaboveshowsinitialsuggestedsettings
onlyThetemperature,typeaedamouotoffood,
andthetimeheldwillaffectthequafityofthe
foocL
CAUTION:Donot_rm foodontheWARMER
formorethan_hours.
Donot useplasticwrapto coverfood.Plastic
maymeltontothesurfaceandbeverydifficult
to remove.
Useonlycookwamrecommendedfortop-of-range
cooking.
The WARMERwillkeep hot, cooked food
at serving temperature. Always start with
hot food. Do not use to heat cold food.
Placinguncookedor coldfoodonsurface
warmercouldresultin food-borneillness.
For best results, all fired on the WARMER
should be covered with a lid or aluminum
foil. When warming pastries or breads,
the cover should be vented to anew
moisture tu escape.
Ah_,tys use potholders or oven mitts when
removing food h-am the WARMER _.s
cook,-are and plates will be hot.
A hot surface indicatur light will glow
when the glass surface is hot and will
remain on until the surface htLscooled
below 150°F.
8

www.GEApptianees.com
_i_ _ __ _ _ _
How to Lock the Cnoktop
IMPORTANT'Asa convenience, you cam
lock the entire cooktup at _my time when
it is not in use or betore deaning. Iamking
the cooktop will prevent surface units
from being turned on accidentally.
Tolock thecooktop:
Touch and hold the CONTROLLOCKpad
for 3 seconds.
Atwc_beep signal will sound, the word
"LOCK" will appear in the TIMERdisplay,
and the Control Lock lightwill turn on,
indicating that the cooktop is locked.
ffthe cookmp is locked while the surface
units or timer are in use, they will
autumatcally turn off.
Tounlock:
Touch and hold the CONTROLLOCKpad
again fi_r 3 seconds.
A two-beep signal will sound, and the
Control D)ck light will go out, indicatng
that the cookmp is unlocked.
o_
9
i i Q i (o0.
NOTE."Thekitchentimerwill NOTtum off the
Surface units when the time reaches 00.00.
To operate the kitchen timer, use the
pads below the 77MERdisplay.
Touch the 0/W0k'Tpad and then touch
the (+)/(-)pad to choose the desired time
setting. If the (+)/(-) pad is held for several
seconds, the fimerwill increase or
decrease at a faster rate.
After you have chosen your desired time,
the timer will automatically start tu count
down from the hours/minutes thatyou
have selected. When the timer count.s
down to the last minute, the control will
beep once and the dmer will count down
in seconds until 00:00. Then the control
will beep twice every five seconds until the
timer is turned off. Touch the 0N/0/T pad
tu turn the timer off.
UsingthePanOetectionFeature
iil iiiiiiiiiiiii¸ ¸ i!!iiiiiiiiiiThis atureaut,,maticallytu ,, .
................ surface refit after 60 seconds ira pan is
absent from the surface unit. The power
level display will flash until the surface
unit is turned offwhen the control detects
the absence of a pan.
Toactivate anddeactivatepan detectionfor
all surfaceunits:
Touch the PAN pad. (At least one surface
unit must be on.) The display will flxsh
"PAN ON" when the pan detection
feature is on.
A signal will sound and a light next at
the PANpad will indicate whether the
feature is active. If the light is on, paaa
detection is on and if the light is off,
pan detection is off When the pan
detection feature is disabled, the pan
sizing feature is also disabled.
NOTES:
For this feature to work properly, the
pan diameter must be greater than 4.0
inches and centered on the surface
unit.
This feature may not operate properly
with rounded, curved or warped pan
bottums (see the Typesof Cookware
secton),
@This feature will nat work with glass
cookvrare (see the Typesof Cookware
section).
Using Pan Sizing
This feature is only used on the dual
surface unitwhen the pan detecton
feature is enabled. When a small pan is
placed on the surface unit, the small
surf, tce unit win activate. When a pan
larger than 6.0 inches is placed on the
surface unit, the large surface unit will
automatically acfi'aate. This feature may
be ovmsdden for a single cooking session
while leaving the pan detection feature
active (see Dual Surface Unitsection).
Totom offthis featureand thepan detection
feature:
Touch the PANpad.
The light next to the pad will go out,
indicating that pan features are turned
off.
NOTE"Thepanmustbecenteredoverthe
surfaceunitfor thisfeatureto workproperly

Selecting typesofcookware.
Thefollowing information will help you choose cookware which will give good performance on glass cooktops.
Stainless Steel: G"
recommended
L
Check pans for flat bottoms by heavyweightrecommended
usingastraightedge. Good conductivity. Aluminum residues
.... sometimes appear as scvatches on the
....... ...............: .................. cooktop, but can be removed if cleaned
immediately. Because of its h)w mehing
point, thin weight aluminum should not
.................. be used.
}{{.....
CopperBottom: G"
recommended
PorcelainEnamelCoveredCookware:G°
not recommended
Sorlle porcelain_2overed cookware can
bond to the hot cooking surface.
Glass-ceramic/Stoneware:
riot recommended
Poor performance. May scratch the
suriZace.
Use pans that match the diameter of
the surface unit. Cooking performance
will not be as good if the cookware is
either smaller or larger than the surface
unit.
Copper may leave residues which can
appear as scratches. The residues can be
removed, as hmg as the cooktop is
cleaned immediately. However, do notlet
these pots b,,il dry. Overheated metal can
........................ bond to glass cooktops. An overheated
copper bottom pot will leave a residue
that will permanently stain the cooktop if
not removed immediately.
iii!iii;iiiiiiiiiiiiii:i:!!i:i!iiiiiiiiii!i%%ii!iiiiiiiiiiiiiiiiiiiiiiiiiiiii
Pans _th rounded, curved,
ridged or warped bottoms are not
recommended Pan Detection/Sizing
may not work prop erly with these
types ofpans.
Pan Detection/Sizing will work properlywith these types of cookware.
Pan Detection/Sizing will not workwith these types of pans.
........... For Best Results
Place only dry pans on the surface
unit_. Do not place lids cm the surlSme
units, parficularlywet lids.
_i_Do not use woes that have support
rings. This type of wok will not heat on
_ _ _!_S__P- glass surface units.
Use only a fiat-bottomed wok,
available from many popular cookvrare
manutkcturers. The bottom of the wok
should have the same diameter _Lsthe
surtZace unit to insure proper contact.
Some special cooking procedures
require specific cookw'are such as
pressure cookers, deep Pat fryers, etc.
All cook_are must have fiat bottoms
that match the size of the surface units.
lO

Wrongl
Note: Flat-bottomed canners are
required for glass cooktops.
vvww.GEAppliances.eom
Observe the Following Points in Canning
When canning with water-bath or
pressure canner, larger<liameter pots
may be used. This is because boiling
water temperatures (even under
pressure) are not harmful tu the
cooku)p surfaces surrounding file
surface uniLs.
HOWEVER, DO NOT USE LARGE
DIAMETER CANNERS OR OTHER
LARGE DIAMETER POTS FOR
FRYING OR BOILING FOODS
OTHER THAN WATER. Most syrup or
sauce nlixtures---and 'alltypes of frying-
cook at temperatures much higher than
boilingvrater. Such temperatures could
eventually harm the glass cooktop
Surfaces.
[] Be sure the canner fits over the
center of the surface unit. If your
cookmp or its location does not
allow the canner to be centered
on the surface unit, use smaller
diameter pots for good canning
results.
[]
[]
Flat-bottumed canners must be
used. Do not use canners with
flanged or rippled bottoms (often
found in enamelware) because
they don' t make enough contact
with the surface units and take a
long time to boil water.
When canning, use recipes and
procedures from reputable
sources. Reliable recipes and
procedures are available from the
manufacturer of your canner;
manufacturers of glass jars for
canning, such as Ball mad Kerr
brand; and the United States
Department of Agriculture
Extension Service.
[] Remember that canning is a
process that generates large
amounts of steam. To avoid burtzs
from steam or beat, be careful
when canning.
NOTE:If your house has low voltage,
canning may take longer than expected,
even though directions have been
carefully followed. Theprocess time will
be shortened by:
(I) using a pressure canner, and
(2) starting with HOTtap water for fastest
heating of large quantities of wate_
CAUXO_
@Safe canning requires that harmful
microorganisms are destroyed and that
the jars are sealed completely. When
canning foods in a water-bath canner,
a gentle but steady boil must be
maintained for the required time. When
canning foods in apressure canner, the
pressure must be maintained for the
required time.
_After you have adjustedthe controls,
it is very important to make sure the
prescribed boil or pressure levels are
maintained for the required time.
_:_Since you mustmake sure to process
the canning jars for the prescribed time,
with no interruption in processing time,
do not can on any cook'top surface unit
if your canner is not flat.
11

Careand cleaning ofthe cooktop.
Be sure electrical po wer is off and all surfa ces are cool before cleaning any part of the cooktop.
How toRemove Packaging Tape
To assure no damage is done to the finish
of the product, the safest way u) remove
the adhesive left from packaging tape _md
cookmp labels on the new appliances
is an application ofa hcmsehold liquid
dishw'ashing detergent, mineral oil or
cooking oil.
Apply with a soft clc)th and allow u) s(rak.
Wipe thT and then apply an appliance
polish to thoroughly clean and protect
tile surface.
NOTE:Theadhesivemustberemovedfromaft
partsbeforeusingthe cooktop.It cannotbe
removedif it is bakedon.
12

Cleaning the glass cooktop. , .GEApp,o,cos.co=
Control Lock Pad
Begin by locking the cooktop; see
the Locking the Cooktop section. Use
the same cleaning methods as those
described for the glass ceramic top.
Clean your cooktop after
each spill
Normal Daffy Use Cleaning
ONLY use file recommended cleaning
cream, Cerama Btyte ®,on the glass
cooktop. Other creams may not be __s
effective.
To maintain and protect the surface of
your glass cooktop, follow these steps:
[] Befitre using the cooktop for the
first time, clean it with the cooktop
deaning cream. This helps protect
file top and makes clean-up easier.
[] Daily use of the cooktop cleaning
cream will help keep the cooktop
looking new.
[] Shake the cleaning cream well.
Apply a few drops of the cream
directly to the cooktop+
[] Use a paper towel or sponge m clean
the entire cooktop surface.
NOTE:It is vary important that youDONOT
heat the cooktopuntil it has beencleaned
thoroughly
Scotch-Brite_MuRi-Purpose
NoScratch scrub sponge
Burned-On Residue
WARNING: DAMAGEto yourglass surface
may occurif youusescrubpads other than
BLUEScotch-Brite_Multi-Purpose No Scratch
scrubspongesby3M.
[] Allow the cooktop tit cool.
[] Spread afewdrops of Cerama
Bryte ®to the entire burned residue
area+
[] Using the scrub sponge, rub the
residue area, applying pressure as
needed.
[] If any residue remains, repeat the
steps listed above as needed.
[] For additional protection, after
all residue has been removed,
polish the entire surface with
Cer0xna Bryte ®and a paper tt)wel.
+++++++++++++++++++++++;+:+++Heavy, Burned-On Residue
[] All+theo++kt+t,, []
p2t?°t,,the+,,tirebu,,,edresidue []
] Iqold the razm- scraper at
NOTE:Razorbladeispacked
invertedforsafety reasons. Priorto
use,theblademustberotatedand
reinsertedintoslot,Donotusea
dullornickedblade.
The RAZOR SCRAPER is available
through our Parts Cente_ See
instructions under "To Order Parts"
section on next page.
apprctximately a 45 ° angle against
the glass surface and scrape the
soil. It will be necessary tit apply
pressure to the razor scraper in
order to remove the residue.
Keep a small amount of cream oi1
the residue asyou scrape.
After scraping with the razor
scraper, use the scrub sp<mge to
remove any remaining residue.
For additional protection, after
all residue has been removed,
polish the entire surface with
Cerama BzTte ®and a paper towel.
13

Cleaningtheglass cool{top.
Metal Marks and Scratches
[]
[]
Be careful not to slide pots and
pans across your cookt()p. It will
leave metal markings on the
cooktop surface.
These marks are removable using
the cleaning cream with a scrub
sponge and/or razor scraper.
If pots with a thin overlay of
aluminum or copper are allowed
to boil dry, the overlay may leave
black discoh)ration on the
cooktc)p.
This should be removed
immediately before heating again
or the disc(doration may be
permanent.
WARNING: Carefullychecktile bottom of
pans forroughnessthat wouldscratch
the cooktep.
Glasssurface-potentialforpermanentdamage.
Ourtesting shows that it
youare cooking high sugar
mixtures suchas jelly or
fudge and have a spillover,
it can cause permanent
damage tothe glass surface
unless the spillover is
immediately removed.
Damage from Sugary Spills and Melted Plastic
[] Turn offall surface units. Remove
hot pans.
[] Wearing an cwen mitt:
a. Use the razor scraper to move
the spill to a cool area on the
cooktop.
b. Remove the spillwith
paper towels.
[] Any remaining spill(_ver should be
left until the surface of the cooktop
has cooled.
] Don't use the surface units again
until all of the residue has been
completely removed.
NOTE:If pitting or indentation in the glass
surfacehas alreadyoccurred,the cooktop
glass will haveto bereplaced.In thiscase,
servicewill be necessary
To Order Parts
To order Cerama Bryte ®cream and
the razor scraper, please call our
toll-free number:
National Parts Center 800-626-2002.
Cerama Bryte_Cream ....... #WXIOX3OO
RazorScraper ............. #WXSX1614
Kit ...................... #WB64X5027
(Kitmcludescreamandmzorse_pe_
14

Before YouCall ForService...
_Troubleshootingtips
_3 Save time and money!Review the charts on the following
:_ ages first and youmay not need to call for service,
_}?toblem%_ o .--,_,,_;i_ Possible Causes What ToDo
Surface units will not Improper cookware • Use pans which are absolutely flat and match
maintain arollinghoil being used. the diameter of the surface unit selected.
or cooking is slow
Surface nni/s do Afuse in your home maybe •Replace the fuse or reset the circuit breaker.
not workproperly blown or the circuit breaker
tripped.
Cooktop controls • Check to see the correct control is set for the surface
improperly set. unit you are using.
Scrntches(mayappear Incorrect deaning o Scz'atches are not removable. Tiny scratches wiUbecome
ascracleMot_coolaop methods being used. less visible in time as a result of cleaning.
glasssurface Co_kware with rough bottoms • To avoid scratches, use the recolnmended cleaning
being used or coarse par'tides procedures. Make sure bottoms of cookw'are are clean
(salt or sand) were between befi)re use, and use cookware with smooth bottoms.
the cookware and the surface
of the cooktop.
Cookware has been slid
across the cooktop surface.
Areas ofdiscoloratiou Food spUlovers not cleaned * See the Cleaning the glass cooktop secdon.
on the cooktop before next use.
Hot surface on a model * This is normal. The surface may appear discolored
with a white glass cooktop, when it is hot. This is temporary and will disappear
as the glass cools.
Plastic melted to Hot cooktop came into • See the Glass surface--potential for permanent damage
the surface contact with plastic placed secdon in the Cleaning the glass cooktop section.
on the hot cooktop.
Pitting (or indentation) Hot sugar mixture spilled • Call a qualified technician for replacement.
of the cooktop on the cooktop.
Frequent cycling Improper cookware • Use only flat cookware to nfinimize cycling.
off and onof being used.
surface units
Cooktop feels hot Improper cookware •The glass cooktop surface may seem hotter than you
being used. ;:re used to. This is normal. Use pans which are
absolutely flat.
Unresponsive keypad Keypad is contaminated. • Clean the keypad.
Pae detention/sizing Improper cookware • Use aflat, metallic pan that is 4.0" or larger.
not working properly being used.
Pan is improperly placed. • Make sure the pan is centered on the corresponding
surPace unit.
15

Before YouCarlForService...
_NJ Save time and money! Review the charts on the fellowing
_pages first and you may not need to call for service.
=====================....... Possible Causes What To Do
TEMP_appea_ Time-Out feature activated. * Allow the surface unit(s) to cool for 1/2 to 1 hour
intbe_ispla_ bef(,re using again.
iiiiiiiii_:ii iiiiiliiiiiiiiii_i_ii !_i!i_i!!ii
_Utfac_ unit is Cooktop feature activated. • The cooktop has a rapid heat-up feature and is
g!owingh_twhenit designed to do this.
You have a function
error code.
and _c_bktop beep_
•Write d )wn the F--- and t )uch the CONTROL
LOCKpad. Disconnect the power to the cooktop and
then reconnect. If an F-code appears again, call for
service.
]6

GE Service Protection Plus"
GE, a name recognized worldwide tbr quality and dependability, offers you
Service Protection Plush--comprehensive protection on all your appliances--
No Matter What Brand!
Benefits Include:
•Backed by GE
•All brands covered
•Unlimited service calls
•All parts and labor costs included
•No out-of-pocket expenses
•No hidden deductibles
•One 800 number to call
We'll Cover Any Appliance.
Anywhere. Anytime.*
You will be completely satisfied with our service protection or you may request your money back
on the remaining value of your contract. No questions asked. It's that simple.
Protect your refrigerator, dishwasher, washer and dryer, range, TV, VCR and much more-any brand!
Plus there's no extra charge for emergency service and low monthly financing is available. Even icemaker
coverage and fi)od spoilage protection is offered. You can rest easy, knowing that all your valuable
household products are protected against expensive repairs.
Place your confidence in GE and call us in the U.S. toll-free at 800-626-2224
for more information.
*All brands covel _'d_ up to 20 yeals old, in the ¢_on tinental U.S.
Cuthere
Pleaseplace in envelope and mail to:
General Electric Company
Warranty Registration Department
P.O. Box 32150
Louisville, KY 40232-2150
17

Consumer Product Ownership Registration
Dear Customer:
Thank you for purchasing our product and thank you tor placing your confidence in us.
We are proud to have you as a customer!
Follow these three steps to protect your new appliance investment:
1Complete and mail
your Consumer
Product Ownership
Registration today.
llave the peace of
mind of knowing we
Call contact yo{l in the
unlikely event of a
gaiety moddication, 2Alter mailing the
regiMration below,
store this document
in a sate place. ]t
contains illtOrnlation
you will need should
you require service.
Our service illamher is
800 GE CARES
(800432-2737). 3Read your Owner's
Manual carefully.
It will help you
operate )'our new
appliance properly.
Model Number Serial Number
Important: If you did not get a registration card with your
product, detach and return the form below to
ensure that your product is registered, or register
online at www.GEAppliances.com.
................................................................................................. _*=,_ Cut here
Consumer Product Ownership Registration
Model Number Serial Number
I, I,,,, ,,,,,I I, , , , , , , I
Mr. _ Ms. _ M_, [] Mira []
N_I , i , i i , i i i I_'1N_e]lil[ll IIPIrl
_eet [
Addre_slllll!llllllllllllll!!ll
Apt. # I I I!IIII I E-mail Addrex_
c,,,! i, i ! r I I I I p, i ! I _=,el_ C_,;I,, I , I
DinepL3ced N.m_l_-_J-_-I , , ,
Occ:_ionally, we Ilia)' allow selected cornpallieg to gelid )'oil in:[hrlllatio n.
[] Check here if you do not wanl this information.
GEAppliances
G_,z_ml E_cttic Carsh_n V
_isvitls, ¥#oto_kv
w_,*_ €,EApplitacms com
78

GEElectric CooktopWarranty
All warranty service provided by our Factory Service
Centers, or an authorized Customer Care® technician.
Toschedule service, on-line, 24 hours a day, contact us
at ww_zGEAppliances.com, or call 800-GE-CARES.
Staple your receipt here.
Proof of the original purchase
date is needed to obtain service
under the warranty.
_e"
OooYe_ :Anypartofthecooktopwhichf_filsduetoadefectinmaterialsorw,,rkalanship.
During this fullone-yearwarranty,GEwill alsoprovide, freeofcharge,all labor
original_ur_O_e m,d in-home service to replace the defective part.
Areplaoement glass coelaop if itshould: crack due to thermal shock; discolor;
or if the pattern wears off.
Areplaoementradiantsurfacounitif it should burn ouk
.... Dunng this limited additionalfuur-year watranty,you will be responsible for any labor or
in-home service.
g_Service trips to your home to teachyou how to use the
producL
_Improper installation.
NFailure of the product if it is abused, misused, or
used for other than the intended purpose or used
commercially.
NDamage to the glass cooktop caused by use of cleaners
other than the recommended cleaning creams.
Damage to the glass cooktop caused byhardened spills
of sugary materials ormalted plastic that are notcleaned
according to the directions in the Owner's Manual.
NReplacement of house fuses or resetting of circuit
breakers.
N Damage to the product caused by accident, fire, floods
or acts of God.
L_Incidental or consequential damage caused by possible
defects with this appliance.
This warranty is extended to the original purchaser and any succeeding owner for products purchased for
home use within the USA. In Alaska, the warranty excludes the cost of shipping or service calls to your home.
Some states do not allow the exclusion or limitation of incidental or consequential damages. This warranty
gives you specific legal rights, and you may also have other rights which vary from state to state. Toknow
what your legal rights are, consult your Iocal or state consumer affairs office or your state's Attorney General
Warrantor: GeneralElectricCompany.Louisville,KY40225
19

ConsumerSupport.
GEAppliancesWebsite vvwvv.GEAppliances.com
Havc aquestion or need a.ssistance with your appliance? Try the GE Appliances Website 24 hours a clay,
any clay of the year! For greater convenience and faster service, you can now download Owner's Manuals,
order parts, catah)gs, or even schedule service on-line. You can also "Ask Our Team of Experts T_''your
questions, and so much more...
ScheduleService vvvvw.GEAppliances.com
Expert GE repair service is only one step away from your door. Get on-line and schedule your service at
your convenience 24 hours any (lay €ffthe year[ Or call 8004F,E_IARES (800432 2737) during nomlal
business hours.
RealLifeDesignStudio www.GEAppliances.com
GE supports the Universal Design concept--products, services and environments that can be used by
people of all ages, sizes and capabilities. We recognize the need to design fi_r a wide range of physical and
mental abilities and impairments. For details of GE's Universal Design applications, including kitchen
design ideas for people with disabilities, check out our W'ebsite today. For the hearing impaired, please
call 800-TDDGEAC (800413.%4322).
ExtendedWarranties wvvvv.GEAppliances.com
Purchase a GE extended warranty and learn about special discounls that are available while your warranty
is stillin effect. YIm can purchase it on-line anytime, or call 8004526-2224 during normai business hours.
GE Consumer Home Services will still be there "after your warranty expires.
qPartsandAccessories www. GEAppliances.com
Individuals qualified to service their _nvn appliances can have parts or accessories sent directly to their homes
(VISA, MasterCard and Discover cards are accepted). Order on-line today, 24 hours every day or by phone at
8004526-2002 during normai business hours.
Instructionscontainedin this manual coverproceduresto be performedby any user.Otherservicinggenerally
shouldbe referred toqualifiedservice personnel.Cautionmustbe exercised, since improperservicingmaycause
unsafeoperation.
ContactUs vvww.GEAppliances.com
ffyou are nc)t satisfied with the service ycm receive from GE, contact us on our Website with all the deufils
including your phone number, or write to: General Manager, Customer Relations
GE Appliaxlces, Appli:mce Park
Lcmisvine, KY 40225
RegisterYourAppliance www.GEAppliances.com
Register your new appliance on-line--at your convenience! Timely product regis rraTion will allow fi)r
enhanced comnmnication and prompt service under the terms of your warranty, shcmld the need arise.
Ycm may also) m_fil in the pre-printed registraticm card included in the packing material, or detach and
use the form in this Owner's Manuai.
Printed in LaFayette, 6A
Other manuals for JP968
1
This manual suits for next models
1
Table of contents
Other GE Cooktop manuals

GE
GE Monogram ZGU48N4G User manual

GE
GE JGP989 Original instructions

GE
GE Profile PGP990DENBB Original instructions

GE
GE PGP9830 Operating instructions

GE
GE Profile CleanDesign PHP960DM Manual

GE
GE JP328 Manual

GE
GE Profile JP340 User manual

GE
GE JP939 User manual

GE
GE JP3021DPBB Operating instructions

GE
GE 169215 User manual
Popular Cooktop manuals by other brands

BOMANN
BOMANN DKP 5033 E CB instruction manual

Whirlpool
Whirlpool 30" ELECTRIC MODULARDOWNDRAFT COOKTOP Service manual

Whirlpool
Whirlpool RCS3014RQ04 installation instructions

Frigidaire
Frigidaire FEC32S6AB - on 32" Smoothtop Electric... Specifications

Springlane
Springlane 130032 instruction manual

LG
LG Studio LSCE305ST owner's manual