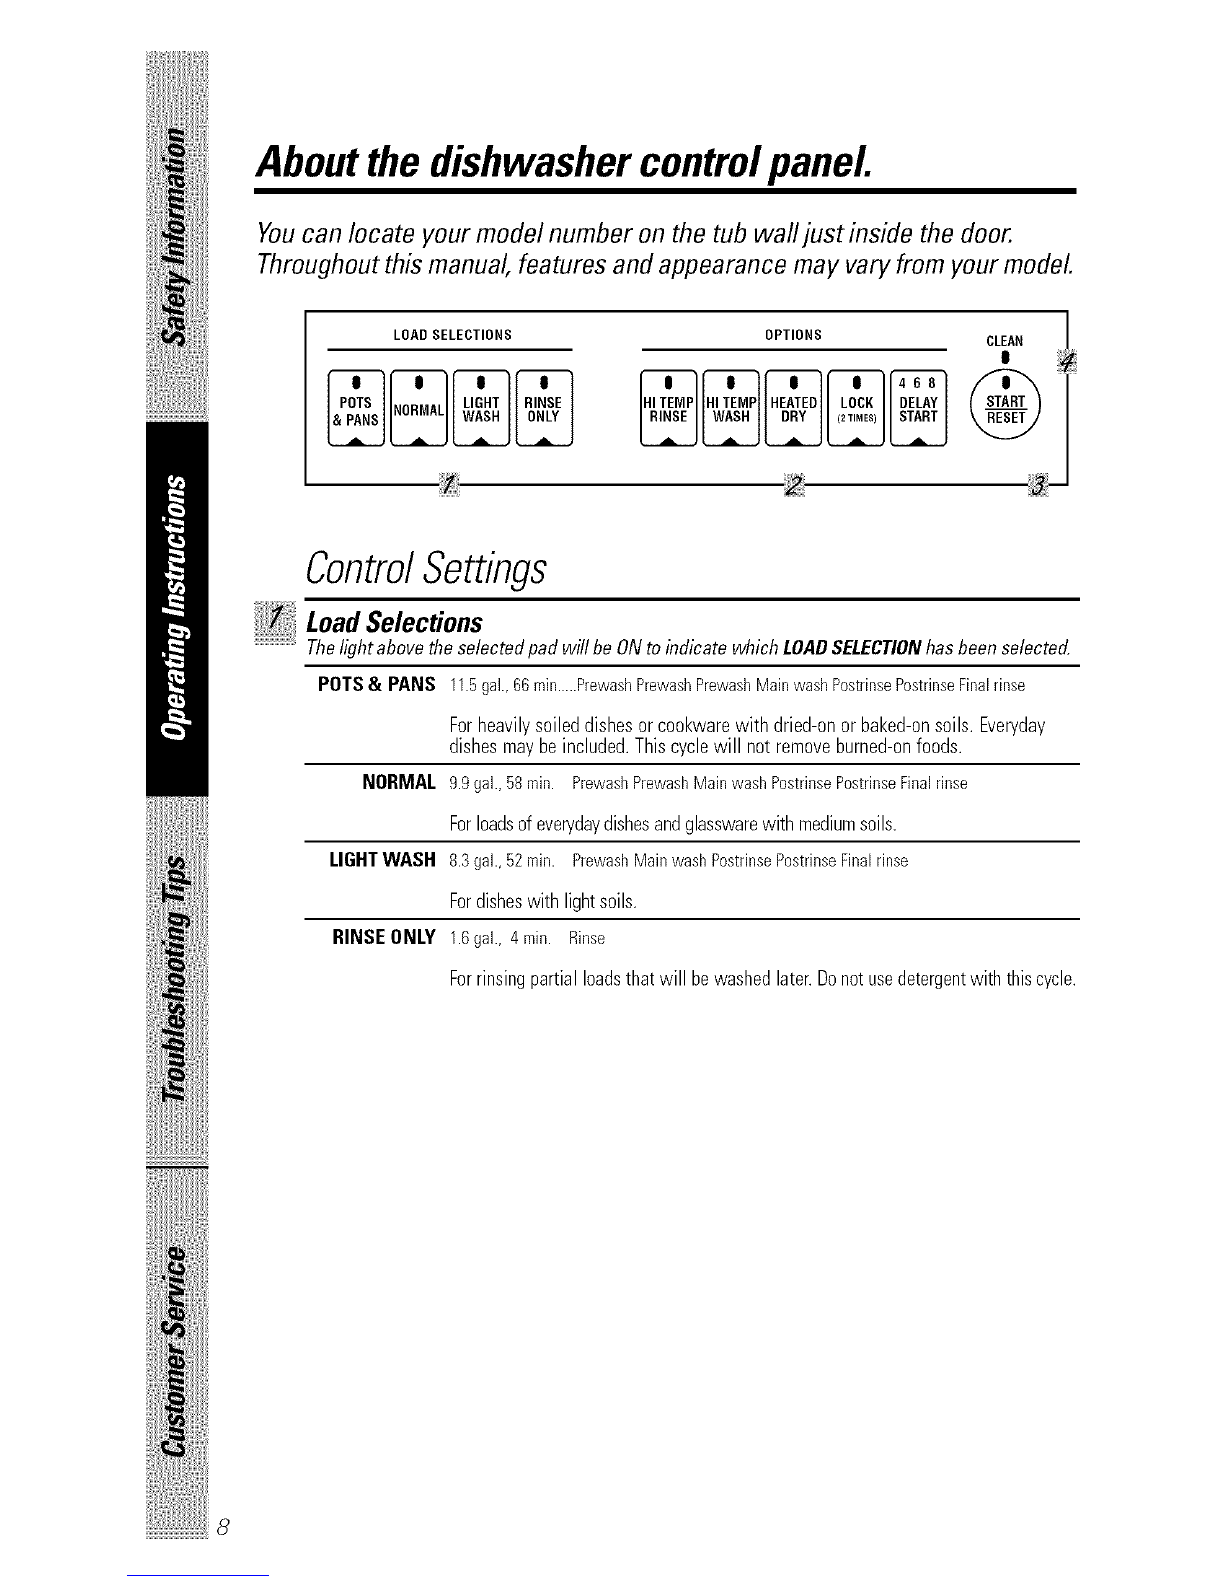
GE Appliances Nautilus GSD4500series User manual

GEAppliances
GSD4500series
www.GEAppliances.com 165D#700P22749-5901 12-00JR

Congratulations!
YouAm Now Partof theGEFamily.
Welcome to file GE t?unily.
We're proud of our quality
products and we are
committed toproviding
dependable service. You'll
see it in this easy-to-use
O_mer's Manual and you'll
hem it in tile flJendly voices
of our customer service
department.
l_st of all, you'll experience
tllese values each time you
use your dishwasher. That's
important, because your new
dishwasher will be part of
your tamily tot many years.
And we hope you will be part
of ours tbr a long time to
coIne.
Wethank you tk)rbuying
GE.We appreciate your
purchase, and hope you
_ll continue 1orelyon us
whenever you need quality
appliances for your home.
Important!
Fill out and remm the Consumer Product
isuafion Card. There are t_x)easy wws to
register your appliance.
Through tile Inlernet at
_w.GEAppliances.com.
Complete and mail the enclosed card.
Write themodel and serial numbers
here.
#
#
Youcan find them on the tub waft just
inside the door.
Staple sales slip or cancelled check
here.
Proof of the original purchase date
is needed to obtain service under the
warrantlz

GE& You,
A Service Partnership.
Ask any GEappliance owner and they will
tell you we stand behind our products with
unmatched quality service. However, did
you know that most questions result from
simple problems that you can easily fix
yourself in just a few minutes? This
Owner's Manual can tell you how
ReadthisManual
Inside }sin xdll find many
helpful hinls on how lo use
and mainlain }_mr dishwasher
properly..lust a liule preventive
cm-eon your pmt can save >xma
gTeat deal of time and money
over lhe life of)_)ur dishwasher.
ReviewtheSection
on Troubleshooting
Tips
find many answers 1o
common problems here.
If Din review our chin1 of
Troubleshooting Tips firsl,
yOUInWnol need 1ocall tbr
sel_ice al all.
If YouNeedService
lf}_m do need sel_-ice, }_mcan
relax knoxdng help is only a
phone call awW. A lisl of loll-tiee
cusR)Iney se_ice numbers is
included in the back section.
()r >m can alwws call the
GE Answer Cenler ®at
800.626.2000, 24 hours ad W,
7 days a week.
Safety Information ...... 4-7
OperatingInstructions
Careand Cleaning ...... 15,16
ControlPaneland
Settings............... 8-10
LoadingtheRacks ...... 13,14
OptionalAccessories .... 17,18
Usingthe Dishwasher ... 11,12
Troubleshooting77ps
Before You
CallForService ....... 19-23
CustomerService
ProductRegistration ..... 29,30
ServiceTelephone
Numbers .......... BackCover
Warranty ............... 31
3

IMPORTANTSAFETYINFORMATION.
READALLINSTRUCTIONSBEFOREUSING.
WARNING!
For your safety, the information in this manual must be
followed to minimize the risk of fire, explosion, electric
shock, or to prevent property damage, personal injury,
or loss of life.
:i°
ili!}i{iiiiii!iii!'iiii!il!_l¸
i_i!iiiii{/ii/iiiHii!!!!!!iiHiii
ii/i!_i'i_iiiii'
iiiii!iiiH!!_iiiiiHiil
4
WATERHEATERSAFETY
Under certain conditions hydrogen gas may be produced in
a water heater that has not been used for two weeks or
more. HYDROGEN GAS IS EXPLOSIVE.
If lhe hot waler has not been used for l_x) weeks or more, prevenl
lhe possibilily of damage or in.juUbyluming on all hot waler
f_tucels and allow flmm u) nm for several minules. Do this before
using aW eleclfical appliance which is connecled 1othe hol wamr
syslem. This simple procedure xdll allow aW buih-up h},trogen gas
1,7escape. Since lhe gas is flammable, do no! smoke or use an open
flame or appliance during lifts process.

Use this appliance only for its intended purpose as
described in this Owner's Manual
PROPERINSTALLATION
ANDMAINTENANCE
This dishwasher must be properly installed and located in
accordance with the Installation Instructions before it is
used. If you did not receive an Installation Instructions
sheet with your dishwasher, you can receive one by calling
us toll-free at the GEAnswer Cente_ 800.626.2000.
Connecl lo a grounded
melal, permanent _dfing
sysleln; or nln an equipmenl_
gTounding conductor _dlh
lhe circuil conduclors and
connect lo lhe equipmenl:
gTounding lenninal or lead
oflhe appliance.
hnproper connection of
the equipmenl-grounding
conduclor can result in arisk
ofeleclfic shock. Check xdlh
a qualitied eleclfician or
se_ice represenlafive if
>m are in doubt whelher
lhe appliance is properly
gTounded.
Dispose of discarded
appliances and shipping or
packing malerial properly.
Do not allempl to repair
or replace aW pan of your
dishwasher unless it is
specifically recommended
in lifts manual. All oflmr
sel_icing should be refened
u) a qualified lechnician.
To minimize lhe possibilily of
eleclfic shock, disconnect this
appliance flom the power
supply before anempfing any
mainlenance. NOTE"Turning
the dishwasher offdoes not
disconnecl tim appliance
flom tim power supply.
We recommend having a
qualified lechnician sel_@e
your appliance.
5
iiiiiiliii!/iiHi!iii:i_

IMPORTANTSAFETYINFORMATION.
READALLINSTRUCTIONSBEFOREUSING.
WARNING!
:i°
ili!}i{iiiiii!iii!iiii!il!l¸
i_i!iiiii{/ii/iiiHii!!!!!!iiHiii
ii/i!_ii_iiiii
iiiii!iiiH!!_iiiiiHiil
6
DONOT...
Do nol lamper wilh conll-ols. Do nol allow children 1o
} Do nol abuse, sit on, or stand play inside, on or xdlh this
on the door or dish rack of appliance or any discarded
the dishwasher, appliance.
Do not discaM a dishwasher
withoul first removing the
door of the washing
comparllnenl.
Do not skJre or use
combustible mamrials,
gasoline or other flmnmable
vapors and liquids in the
xicinity of this or aW other
appliance.

WHENUSINGYOURDISHWASHER
Use only powder, labs,
liquid delergenls or rinse
agenls recommended for use
in a dishwasher and keep
lhem out of tim reach of
children. Cascade"
Auu)malic Dishwashing
Delergent has been approved
for use in all GE dishwashers.
Locale sharp ilems so lhal
flmy are not likely lo damage
the door seal.
Load shin 1)knives xdth the
handles up lo reduce ll_e risk
of cul-lype injuries.
iiiiiiiiiiiii_iil
Do not wash plastic ilems
unless marked dishwasher
safe or lhe equivalenl. For
plastic ilems nol st)marked,
check lhe manufaclurer's
recommendations.
Non-Dishware Ilems: Do nol
wash ilems such aselecmmic
air cleaner fillers, filmace
filmrs and painl brushes in
your dishwasher. Damage U)
dishwasher and discoloration
or slaining of dishwasher
m Wresuh.
Do not touch the heating
element during or
immedialeb, afler use.
Do not operate your
dishwasher unless all
enclosure panels are properly
in place.
(_lose supe_Yision is necessm T
if this appliance is used by or
near children.
Ix)ad light, plastic imms
so flmy will not become
dislodged and drop lo lhe
bolk)m of lhe dishwashel_
lhey mighl come inl,) conlact
_dth tim healing elemenl and
be dmnaged.
READAND FOLLOWTHIS
SAFETYINFORMATIONCAREFULLY.
SAVETHESEINSTRUCTIONS
7

il!i ilii
111111111111111111111111111111111111111111111_
Aboutthe dishwasher controlpanel
Youcan locate your model number on the tub wall just inside the door.
Throughout this manual, features and appearance may vary from your model
LOAD SELECTIONS OPTIONS CLEAN /
LIGHT RINSE HI TEMP HEATED LOCK
ii!J
ControlSettings
LoadSelections
Thelightabovetheselected padwill beONto indicate whichLOADSELECTIONhasbeen selected.
POTS&PANS 11.5oak,66min.....PrewashPrewashPrewashMainwashPostrinsePostrinseFinalrinse
Forheavilysoiled dishesorcookwarewith dried-onor baked-onsoils. Everyday
dishesmaybeincluded.Thiscyclewill notremoveburned-onfoods.
NORMAL g.9gal.,58min. PrewashPrewashMainwashPostrinsePostrinseFinalrinse
Forloadsofeverydaydishesandglasswarewith mediumsoils.
LIGHTWASH 8.3gal.,52rain. PrewashMainwashPostrinsePostrinseFinalrinse
Fordisheswith lightsoils.
RINSE ONLY 1.6gah,4min. Rinse
Forrinsingpartialloadsthatwill bewashedlater.Donotusedetergentwith thiscycle.
ii/i! i'i iiiii'
iiiii!iiiH!! iiiiiHiil
111111111111111111111111111111111111111111111_(_

Options
Thelight abovetheselected pad will beON to indicate which OPTIONhasbeenselected.
HI TEMP Turnsonthe heaterin all postrinseandfinal rinsecyclesto helppreventspotting
RINSE ondishware.Thisoptionmaybeturned ONor OFFduringthewash cycle.
HI TEMP Energizestheheaterto boostwatertemperaturein all prewashand mainwashfill
WASH cycles.Recommendedfor usewith heavilysoileddishes.Optionmaybeturned ON
or OFFduringthewash cycle.
HEATEDDRY Shutsoff thedryingheat option.Dishesairdrynaturallyandenergyissaved.You
OFF canpropthedooropenafterthe CLEANlightilluminates.
HEATEDDRY Turnsthe heateronfor fast drying.Thiscyclewill extendthe timeto yourwash
ON cycleby30 minutes.NOTE:Cannotbeselectedwith RINSE ONLYcycle.
LOCK WhentheLOCKpadistouchedtwicewithin3seconds,allpadsbecomeinoperative.
Youcanlockthecontrolstopreventanyse/ectionsfrombeingmade.Oryoucanlockthe
controlsafteryouhavestartedacycleorse/ectedDEZAYSTARTsothecycleorDELAY
STARTisnotinterrupted
Children cannot accidentafly start dishwasher by touching pads with this
option selected.
Tounlockthedishwasherafterit hasbeenlocked,touchtheLOCKpadtwicewithin
3seconds.ThelightabovetheLOCKpadwill turnoff.
DELAYSTART Youcandelaythe start of awash cyclefor upto 8 hours.Pressthe DELAYSTART
padto choosethenumberof hoursyou wantto delaythestart ofthecycle.The
machinewill countdownandstartautomaticallyatthe correcttime. Pressing the
START/RESETbuttonwill cancel the DELAYSTARTselection,
NOTE:If youforgetto latchthe doora remindersignalwill beepuntilyou doso.
RESET Tochangea cycleafter washingstarts,touchtheSTART/RESETpadto cancel
thecycle.Afterwater is pumpedoutandthe motorstops,you canreprogramand
restartthe dishwasher.Thiswill take approximately90seconds.
li ii
Close and latch the door. Touch the START/RESETpadto begin the cycle. Water
fill begins and approximamly 40 seconds later the wash action begins.
NOTE.'The dishwasher remembers your last cycle so you don't have to reprogTam
each time. When the dishwasher is loaded and the door latch is in the locked
position, the conuol panel lights will be 0N and displ W the last settings you
selected.
If you don't want to change any of the settings, simply touch the START/RESET
pad to begin the cycle.
Also, ira power t_dlure occurs, NORMALand HEATEDDRYwill automatically be
programmed. Make any new selections and l,)uch the START/RESETpad_,_be_n
the cycle.
This light isilluminamd when awash c}vleis complete. The light willstay ON
until the door is opened. 0

il!i ilii
Flashingdisplay lights.
L_h_ WhatIt Means
This isnomml.
TheStARt/RESETpad
has been pressed.
What ToDo
Allow the dishwasher to drain and
reset beik_re you start a new wash
_Tcle.
CLEAN
PLUS A
BEEPING
SOUND
PLUS A
BEEPING
SOUND
Control Error Press the START/RESETpad toturn
off the beeper. If the CLEANlight
continues to tlash, call t_r se_qce.
Control Error Press the START/RESETpadto mrn
offthe beeper and tl_e dishwasher
will attempt to reset. Then restmt the
wash cycle. If Ibisenor continues,
call t)_rse_,ice.
ii/i! ii iiiii
iiiii!iiiH!!_iiiiiHiil

Usingthedishwasher.
ChecktheWaterTemperature
The entering water must be at least 120°F. and not more titan
150°F., tor ett(ctive cleaning and lo prevent dish damage. Check
the water temperature xdth a candy or meat thermometer. Turn on
the hot wamr faucet nearest tim dishwasher, place tim flmnnomemr
in a glass and let the wamr nm continuously into the glass until the
temperature stops vising.
UseJet-Dry®RinseAgent
Jet-Dry®rinse agent removes spols and prevents new fihn build-up
on >mr dishes, glasses, flat,rare, cookware and plastic.
Fill tim rinse agent dispenser
until it reaches tim bottom of lip
inside the opening. Do not oved]ll
the dispenser. Replace cap.
To check if rinse agent is needed,
press the clear center of the fill ca[
2 or 3 times. If rinse agent fills the center of the fill cap, you have
enough.
A full dispensershould lastaboutone month.
Ifrinseagentis spilled,wipe up the excess.
li ii
DishPreparationPriorto Loading
_, No preqinsing of normal fbod soil is required.
_rape off hard soils, including bones, toothpicks, skins and
seeds.
_, Remove large quantities of any remaining food.
Remove lealj-vegetables, ineat uimmings, and excessive ainounts
of gTease or oil.
Remove acidic f{)od soils that can discolor stainless steel.
UsingtheDishwasherDoor
The door must be closed and locked into place to select a
LOADSELECTIONor an OPTION.
If the door is opened during a cycle and left open, thedishwasher
willbeeponce everyminuteuntil lhe door isclosed andlatched
into place.
77

il!i ilii
Usingthe dishwasher.
%ProperUseof Detergent
Use only delergent specifically made for use in dishwashers. Cascade<_
Aulonlalic Dishwashing Delergenl has heen approved for use in all (;E
dishwashers. Keep your delergent ftesh and &T. Don't put detergenl
inlo lhe dispenser unlil you're ready 1owash dishes.
You'll find two delergent dispensers on lhe
iusidedoorof, ..u,dish,,.asher*ll,,a l., les
except _lNS_0N_l/iequiie deleigen[ ill lhe inaiu ode, e[J.p
cup. Wash cycles wi,ha t)re-wash and a In ain 1_
wash will also use lhe open cup. Tile amount of
detergent to use depends on whether your
water is hard or soft. Wilh hard water, fill the
main cup and open cup complelely. With soft
waler, fill bolh cups haltkvay. V_31enusing aulomalic dishwashing
delergenl labs, simply place one tab in lhe main cup and close.
Prolect your dishes and dishwasher 1)yconlacling your waler
departmenl and asking how hard your waler is. Tx_elve or more gTains
is exll-emely hard waler. A water softener is recommended. Without
il, lime can build up in the water vah_e,which could slick while open
and cause flooding. Too much delergent wilh soft water can caum a
pemlanent cloudiness ofglass_vam, called etching.
NOTE."To open delergent cup after it has /.I
been closed, unlatch lhe door. Press lhe ,___
START_ESETpad three times wilhin lx_,)
seconds and lhe detergent cup xdll release.
You may also 111111lhe delergenl cup handle
counler-clock_se unlil il releases. A snapping sound may be heard.
iili! ii iiiii
iiiii!iiiH!! iiiiiHiil
12
ForgettoAdd a Dish?
A forgolten dish can be added any lime befbre the main wash.
Push lhe door lalch to lhe left.
Do nol open lhe door until tile waler spray acdon slops. Sleam
....-- ' Inay lJse ()Ill of lhe dishwasher.
Add R)rgollen dishes.
_ Close lhe door and push lhe lalch lo lhe far righl.

Loadingthe dishwasher racks.
For best dishwashing results, follow these loading guidelines. Features and
appearance of racks and silverware baskets may vary from your model
UpperRack
Tile upper rack is for glasses, cups and saucers.
Cups and glasses fit best along lhe sides. This is
also a secure place for dishwashe>safe plastics.
The upper rack is good for all kinds of odd-
shaped utensils. Saucepans, mixing bowls and
other items should be placed tace doom.
The cup shelf (on some models) may be placed in
tile up or doom position lo add flexibilily.
Securelargerdishwasher-safeplasticsovertwo fingers
whenpossible.
Makesuresmaflplasticitemsaresecuresotheycan'tfail
ontotheheatinge/emen_
Anupperwasharm(onsomemodels)islocatedabovethe
toprack.Checktomakesurethat taftitemswillnotblock
mtat/bnof thisarm.
li ii
The Wash Tower
Keepthecenterareac/earin the/owerrack.
Tile wash tower rises through file center of tile
lower rack during the wash and rinse portions of
tile c}vle.
A secondwash tower (on some models) is localed
in tile lop rack. Water flom tile wash tower in tile
lower rack shoots up into this wash tower and oul
lhe openings at lhe lop. "_'_11enloading ilems
around thisu_tsh l,)wer &) nol block lhe l,)p
openings.
Don'tblockorloadtall thingsnexttothe
WashTower
Also, be cmeflfl not to let a portion
of an imm such as a pot or dish
handle extend lhrough lhe bolu)m
rack. This could block lhe wash man
and caum poor washing resuhs.
/3

il!i ilii
Loadingthe dishwasher racks.
Lower Rack
When/oading the/ower rack,do not load large platters or
trays le the front right comer Theymay prevent detergent
from circulatleg during the wash cycle.
The lower rack is best used fbr plains, saucers and
cookware. Large items such as broiler pans and
racks should go along the sides. D)ad platters,
pols and bowls along lhe sides, in comers or in
the back. The soiled side of items should fkwe the
center of the rack.
iili! ii iiiii
iiiii!iiiH!! iiiiiHiil
Don't let any
item extend
Singlebasket
(onsomemodels)
Split basket
(onsomemodels)
14
Silverware Basket
Put flatware in the removable basket xdlh fork and
knite handles up It promct your hands. Place
spoons in lhe basket x_lh handles doxm. Mix
knives, forks and spoons so they don'l nest
togeflmr. Distribute evenly. Small plastic items,
such as measuring spoons and lids flom small
containers, should go in lhe bollom of the
silverware basket _dlh silverware on u)p.
To increase tim flexibility of the lower rack, the
silverware basket may be split (on some models).
(;rasp the basket at opposim comers and slide
apart. The basket sections should be placed in the
lower rack by hanging them on the top hoop.
A cover can be lowered to
eilher side it secure
lighlweight ilems flom
the effects of flae
vigorous wash action.

Caringforthe dishwasher.
Toclean the control panel, use a lightly dampened cloth then dry
thoroughly. Toclean the exterior, use a good appliance polish wax.
Never use sharp objects, scouring pads or harsh cleaners on any
part of the dishwasher.
Sum[)coverscrews
Protect Against Freezing
If your dishwasher is left in an unheated place during
tim _dnter, ask a service technician to:
Cut off electrical power to the dishwasher. Remove
fl_sesor llip circuit breaker.
Turn off the water supply and disconnect the water
.......-' inlet line flom the water valve.
{{{_Drain water from the inlet line and water valve.
(I Jse a pan to catch the water.)
Reconnect the water inlet line to the water valve.
{{
{_ Remove the plastic sump cover in the tub
l)ollom and use a sponge to soak up water in the
robber boot.
li ii
15

Caringforthe dishwasher.
Checktheair gapany timeyour
dishwasher isn't drabbg well
Does YourDishwasher Have anAir Gap?
An air gap protects your dishwasher against water
backing up into itif adrain clogs. The air gap is not a
[)artof the dishwasher. 11is not covered by your
wananty. Not all plumbing codes require air gaps, so
yOU Ilia}" not have ()lie.
The air gap is easy to clean.
',_""Turn offlhe dishwasherandliflofflhe chronle
:::::::::::::::::::::cover.
i!_ii'_"_IJnscrew....... the plaslic cap and clean with a toothpick.
!iiliH{iiiHiiiiiil!i!iiiiHiiiiH

Aboutoptional accessories.
Youcan change the door and lower access panel appearance of your
dishwasher by ordering one of these optional accessories:
Color Panels
1/4" Wood Panel TrimKit
3/4" Trimless Panel Kit
These accessories are available at extra cost (VISA, MasterCard or Discover
cards accepted) by calling 800-626-2002.
Specify accessory number when ordering.
li ii
Descriptionsof OptionalAccessories
Colorpanels--Replacement door panels and lower access panels
are available in the fbllowing colors:
_GPF4OOA(Almond)
GPF4OOB(Black)
GPF4OOW(White)
Wood panel trim kit--This accessory contains trim and instructions
for you It) supply and install a 1/4" thick decorative _ot-] door and
lower access panel:
GPF425A (Almond)
:, GPF425B (Black)
GPF425W (White)
NOTE."The GPFIO0 dishwasher door spring kit must also be ordered
and installed when the door panel weighs four Ibs. or more.
Trimless panel kit--This accessoly contains parts and instructions
fin" you to supply and install a 3/4" thick decorative wood door and
lower access panel:
GPF475
NOTE."The GPFIO0dishwasherdoorspring kit_ll be included with
the trimlesspanel kitand must be installed with it.
77

il!i ilii
Aboutoptional rack accessories.
Forbest results,
the Baby Bottle
Holder should
be installed on
the upper rack
of the dishwasher.
Baby Bottle Holder
PartNumber."WX69X200
Preventsmovementof babybottles during the
dishwashercycle
Snapseasilyonto anydishwasherupperrack
Eliminateshandwashing
Fitsaftbaby bottles
Youcan order a package of5 Baby BottleHolders,atextra
cost, bycalling800-626-2002,or through the Intemet at
www.GEAppliances.com(Visa,MasterCardor Discover
cards accepted).
ii/i! ii iiiii
iiiii!iiiH!!_iiiiiHiil

Beforeyou call for service...
Troubleshooting -tips
Review the charts on the following pages first and you may not
need to call for service.
Controlpanellightsgo
offwhenyou'resetting
controls
Noise
Possible Causes What ToDo
Time too long between
touching of selected pads Each pad must be touched
_dflfin 30 seconds of tile
()tilers. To relight, touch
any pad again, or unlock
and relatch door.
Some of the sounds
you'll hear are normal
Utensils are not secure
in the rack or something
small has dropped into
the rack
HaM tbod disposal
shredding action.
Drain valve opening to
pump water out.
Timer conu-ol as c)vle
progTesses.
Detergent cup opening.
Tile molv)r slopping during
the duing period.
Water dFaining out of the
tub immediamly _ler >m
lotlC}l START/RESETpad.
Make sure evelything is
secured in dishwasher.
Motor hums Dishwasher has not been
used on a regular basis. If
you do nol use )xmr
dishwasher often, sel it to
fill and pump oul once
eveU x_ek. This xdll help
keep tile seal moisl and
the gmbage disposer clear.
Detergentleft in Dishes are blocking the Reposilion lhe dishes.
dispensercups detergent cups
Detergent cup lid
latched accidentally
by user
Unlatch file door. Press
tile START/RESETpad
three limes x_thin l_vo
seconds. The detergent
cup _dll uip.
79

ii{iiiiii_i_iii/ii}ii_igii;i;i{iiiii/ii
2O
Beforeyou call for service...
PossibleCauses
Waterstandingin This isnormal
thebottomofthetub
Water won"tpump
out of the tub Drain is clogged
Suds in the tub Correct detergent
wasn't used
Rinse agent
was spilled
Stainedtubinterior Detergent with
colorant was used
Some tomato-based
foods can stain
What ToDo
A small amount of clean
water around the outlet on
the mb bottom at rim back
of the tub keeps the water
seal lubricated.
If you have an air gap,
clean it.
Check to see if}xmr kitchen
sink is draining well. If not,
)xm may need a plumber.
If lhe dishwasher drains into a
disposer, nm disposer clem.
Use only automa/ic dishwasher
detergents lo avoid sudsing.
Cascade" Au/omatic
Dishwashing Detergent has
been approved for use in all
GE dishwashers.
To remove suds flom the rob,
()pen the dishwasher and let
suds dissipate. Add 1 gallon
of cold water t,) lhe rob. Close
the door until it locks into
place. Pump out water by
pressing START/RESET,then
immediately press START/RESET
again. Repeat ifnecessmy.
Alwaysxdpe up rinse agent
spillsimmediately.
Some delergenls contain
colorant (pigment or dyes)
thai xdll discolor the tub
inmrior xdth extended use.
Check the detergent cup
R)rsigns of any discoloration.
If cup is discolored, change to
detergent whhout any colorant.
Cascade" Auu)mafic
Dishwashing Detergent has
been approved for use in all
GE dishwashers.
Use of the RINSEONLYc}vle
(on some models) _ler adding
lhe dish to/he load can
decrease the level of staining.
This manual suits for next models
1
Table of contents
Other GE Dishwasher manuals

GE
GE GSC820 User manual

GE
GE Triton XL GSD6900 Series User manual

GE
GE Profile Series Manual

GE
GE Triton GSD5110 User manual

GE
GE HLD4000 Series User manual

GE
GE GLD6200L User manual

GE
GE Profile PDW8680N User manual

GE
GE Profile PDW8800L User manual

GE
GE Built-In Dishwasher User manual

GE
GE GSC3500N User manual