manuals.online logo
Brands
  1. Home
  2. •
  3. Brands
  4. •
  5. GE
  6. •
  7. Dishwasher
  8. •
  9. GE GSD660P User manual

GE GSD660P User manual

Other GE Dishwasher manuals

GE Triton XL EDW4000 User manual

GE

GE Triton XL EDW4000 User manual

GE Stainless Steel Tub Dishwashers User manual

GE

GE Stainless Steel Tub Dishwashers User manual

GE GSD1230 User manual

GE

GE GSD1230 User manual

GE Profile CDW9000 Series User manual

GE

GE Profile CDW9000 Series User manual

GE Appliances GSD4410 User manual

GE

GE Appliances GSD4410 User manual

GE GSC870 User manual

GE

GE GSC870 User manual

GE GDT530PSDSS Manual

GE

GE GDT530PSDSS Manual

GE Profile PDW9000 Series User manual

GE

GE Profile PDW9000 Series User manual

GE Profile PDW8900 Series User manual

GE

GE Profile PDW8900 Series User manual

GE GSD2800 Series User manual

GE

GE GSD2800 Series User manual

GE GSC3500DWW User manual

GE

GE GSC3500DWW User manual

GE Profile PDW8900 Series User manual

GE

GE Profile PDW8900 Series User manual

GE GLC4100 Series User manual

GE

GE GLC4100 Series User manual

GE GSD2200 series User manual

GE

GE GSD2200 series User manual

GE GSD750 User manual

GE

GE GSD750 User manual

GE GSD4800J Series User manual

GE

GE GSD4800J Series User manual

GE Profile PDW8100 Series User manual

GE

GE Profile PDW8100 Series User manual

GE Monogram ZBD6800KBB User guide

GE

GE Monogram ZBD6800KBB User guide

GE GDF410 User manual

GE

GE GDF410 User manual

GE GSD2100R User manual

GE

GE GSD2100R User manual

GE Dishwasher User manual

GE

GE Dishwasher User manual

GE Naturals GHD3800 Series User manual

GE

GE Naturals GHD3800 Series User manual

GE GSD500 User manual

GE

GE GSD500 User manual

GE Monogram ZBD1850NII User manual

GE

GE Monogram ZBD1850NII User manual

Popular Dishwasher manuals by other brands

Samsung DW-FN320T user manual

Samsung

Samsung DW-FN320T user manual

LG LDS 5811WW Service manual

LG

LG LDS 5811WW Service manual

Elba EDW-B1462D owner's manual

Elba

Elba EDW-B1462D owner's manual

VESTEL NOVUS Series Service manual

VESTEL

VESTEL NOVUS Series Service manual

Bosch SMS4EMW00E Instructions for use

Bosch

Bosch SMS4EMW00E Instructions for use

Global-Tek GT-CR 2 manual

Global-Tek

Global-Tek GT-CR 2 manual

Smeg Dishwasher 85028 Instructions for installation and use

Smeg

Smeg Dishwasher 85028 Instructions for installation and use

LG LD-4080W Service manual

LG

LG LD-4080W Service manual

Bauknecht GCF 625 operating instructions

Bauknecht

Bauknecht GCF 625 operating instructions

Sharp QW-HX13F47EI-EU user manual

Sharp

Sharp QW-HX13F47EI-EU user manual

Asko D5536XLFI operating instructions

Asko

Asko D5536XLFI operating instructions

Modena WP 7134 WVM User manual book

Modena

Modena WP 7134 WVM User manual book

Beko DFN39340X instruction manual

Beko

Beko DFN39340X instruction manual

AEG FAVORIT 65050 VI1P user manual

AEG

AEG FAVORIT 65050 VI1P user manual

Siemens SN23HI37VE user manual

Siemens

Siemens SN23HI37VE user manual

Maytag MDB4651AWB - Tall Tub Dishwasher User instructions

Maytag

Maytag MDB4651AWB - Tall Tub Dishwasher User instructions

Hotpoint Ariston LL 42 Instruction book

Hotpoint Ariston

Hotpoint Ariston LL 42 Instruction book

Siemens SN45ZW56CS user manual

Siemens

Siemens SN45ZW56CS user manual

manuals.online logo
manuals.online logoBrands
  • About & Mission
  • Contact us
  • Privacy Policy
  • Terms and Conditions

Copyright 2025 Manuals.Online. All Rights Reserved.

)
Ckmtents
AirGap 14 ProblemSolver 11-13
ApplianceRegistration 2RinseAgent 6
CareandCleaning 14 SafetyInstructions 3
China,Crystal,Sterling 10 UserMaintenanceInstructions 14
ConsumerServices 19 Warranty BackCover
CycleFeatures 5WaterTemperature 6
Detergent,DetergentGuide 6,7 WinterStorage 14
DispenserCups 7
Energy-SavingTips 2
Features 4
FrontPanelColorChange 15
Loading 8,9
ModelandSerialhTumbers 2
OperatingGuide 4,5
CycleSelection 4,5 GE#bswiwCentera
DrvimzO~tions 4,5 8(M626,200D
Built-in Model IGSD660 ~
Before Usingyour
dishwasher,read this
btmk Carefully.
Itisintendedtohelpyou
operateand maintainyournew
dishwasherproperly.
Keepithandyforanswersto
yourquestions.
If you don’tunderstandsomething
or need more help, write (include
yourphone number):
ConsumerAffairs
GE Appliances
AppliancePark
Louisville,KY 40225
writedown the model and
said nm-h’x’s.
You’llfind them on alabel
fastened to the tub walljust inside
the dishwasherdoor.
These numbers are also on the
Consumer Product Ownership
Registration Card that came with
your dishwasher.Before sending
in this card, please write these
numbers here:
ModelNumber
SerialNumber
Use these numbers in any
correspondence or service calls
concerning your dishwasher.
If you receiveda
damageddishwasher...
Immediately contact the dealer
(or builder) that sold you
the dishwasher.
2
savetimeand money.
Beforeyumrequest
service...
Check the ProblemSolver(pages
11through 13).It listscauses of
minor operatingproblemsthat you
can correctyourself.
To obtainaSpanishlanguage
versionof this book,call
GE Answer Centero
800.626.2000
consumer informationservice.
Para obtenerla versi6nen
espaiiolde este manual,
name a
GE Answer Center?
serviciode informaci6n
para el consumidor,
tel~fono800.626.2000.
E’youneedservice
Toobtainservice,see the
ConsumerServicespage in the
back of thisbook. - -
We’reproudof ourserviceand o
wantyhu to be pleased.If for some
reason you are nothappywith the
serviceyou receive,here are three
stepsto followfor furtherhelp.
FIRST’,contactthe people who
servicedyourappliance.Explain
why you are notpleased. In most
cases, this will solvethe problem.
NEXT, if you are stillnot pleased,
write all the details—including
yourphone number—to:
Manager,ConsumerRelations
GE Appliances
AppliancePark
Louisville,Kentucky40225
FINALLY,if yourproblem is still
notresolved, write:
Major ApplianceConsumer
Action Panel
Energy”savingtips 20 North WackerDrive
Chicago, Illinois60606
The power consumptionof your
dishwasher can be rninirnizedif
you follow these suggestions:
~Operate dishwasher only when
it’s full. Let the dishes accumulate
in dishwasher.When you put in
only apartial load, use the RINSE
&HOLD cycle to rinse off heavy
soils. Be sure to latch the door
when waiting for afull load.
This helps keep soilsmoist, easier
to remove.
~If you don’tneed your dishes
right away, use your ENERGY
SAVER no-heat boost drying
feature that turns the drying heater
off automatically. Dishes dry
naturally over alonger period
such as overnight.
~Always select the Cyck?that
R.Iseskast amountof water that
will remove the soil from the
kind. See pages 4and 5.
—
P
cl
o’
IMPORTANTSAFETY INSTRUCTIONS
Read .minstructionsbefore IL-Angthis appliance
WARMNG—-Whenusing this
appliance,alwaysexercisebasic
safetyprecautions, including
the following:
0Usethisapplianceonlyforits
intendedpurpose,as you will find
described in this Use and Care
Book.
eThis dishwasher must be
properly installed and
located in accordance with
the Installation Instructions
before it kused. If you did
notreceive an Installation
Instructionssheet with your
dishwasher,you can obtain one
bycontacting the service
!ocationnearest you.
—Thisappliance must be
~onnecteclto agrounded metal,
]ermanent wiring system; or an
!quipment-grounding conductor
nust be run with the circuit
onductors and connected to the
quipment-grounding terminal
rlead of the appliance.
--Connect to aproperly rated,
rotected and sized power-supply
ircuit to avoid electrical
verload.
Do not store O’lrllse
]mbustible materiak+
lsohe or other flammable
hpors and!!k@ds in the
cinity of this or any other
apphmce.
*Use only powder or liquid
detergents or wetting agents
recommended for use in a
dishwasher.
oDOnot wash plasticitemsunless
marked “dishwashersafe” or the
equivalent.l?orplasticitemsnot so
marked, check themanufacturer’s
~-eco]ll]nelldations.
~Load lightplasticitems so
they will not becomedislodged
and drop to the bottomof the
dishwasher—they might come
into contact with the heating
unit and be damaged.
To minimize the possibility
d’ injury.
0When loadingitems to be
washed:
A. Locate sharp items so that
they are not likely to damage
the door seal, and
B. Load sharp knives with the
handles up to reduce the risk
of cut-type injuries.
~Do not touch the heating
element during or immediately
after use.
~Do not operateyourdishwasher
unless all enclosure panels are
properly in place.
~Do not tamper with controls.
~Do not abuse, sit on, or stand
on the door or dish rack of the
dishwasher.
@Close supervision is necessary
if this appliance is used by or
near children. Do not allow
children to play inside, on or
with this appliance or any
discarded appliance. Dispose
of discarded appliances and
shipping or packing material
properly. Before discarding a
dishwasher, remove the door
of the washing compartment.
@Keep all washing detergents
and wetting agents out of the
reach of children, preferably in
alocked cabinet. Observe all
warnings on container labels to
avoid personal injury.
~To minimizethe possibility
of electricshock,disconnect
this appliamcefrom the power
supplybefore attemptingany
maintenance.
‘Note:Turningthe controldial
to the OFF positiondoes not
disconnectthe appliance
from the power supply,We
recommendhaving aqualified
technicianserviceyourappliance.
WAHG–mROGEN GAS
is producedby the chemical
action within your water heater.
It can accumulatein the water
heater and/orwater pipes if hot
water has notbeen used for a
period of two weeks or longer.
HYDROGEN GAS IS
EXPLOSIVE. To prevent the
possibility of damage or injury,
if you have not used hot water
for two weeks or more, or
moved into aresidence in which
the hot water system may not
have been used for some time,
turn on all hot water faucets and
aHowthem to run for several
minutes before using any
electrical appliancewhich is
connected to the hot water
system. This will allow any
hydrogen gas to escape. Also,
since the gas is flammable, do
not smoke or use an open flame
or appliance during this process.
SAVETHESE
INSTRUCTIONS
“2
.J
—
Howtooperateyour dishwasher
“~or ~~~~~ WASHCycle:
a. Be sure door is unlatched.
b. Push NORMAL WASHbutton.
STEP LLoad your dishwasher
with dishes, silverware,pots,
pans, bowls, etc. accordingto
instructionson pages 8and 9.
STEP 2. Add detergentto the
detergentdispenser.Make sure
the Cycle Indicator Dial is at OFF
positionbefore adding detergent.
(See pages 6and 7.)
Use rinse aid agent to help prevent
spotting.occasionally check to
make sure the rinse agent container
STEP 4. Select the wash cycle and
start dishwasher.(SeeCycle
Selection Hints on nextpage.)
If your dishwasherdrainsinto a
food waste disposer,operate the
disposer until it is empty before
starting the dishwasher.
eFor POTSCRUBBER and
NORMAL WASHcycles:
“m “m
El& UOHTWASH
@
/
WASHING
ORVING S
nRINSE&HOLD IuSE%%? OPTIONI
POT- NORMAI.
SCRUBBER WASH c. Slowly turn Cycle IndicatorDial
to LIGHT WASHposition.
d. Latch door to startthe cycle.
is at least half full. (See page 6.)
STEP 3. Select DRYING HEAT
Option. oFor RINSE &HOLD qck:
a. Be sure door is tmlatddo
b. Select ENERGY SAVERdrying
a. Push selected cycle button.
b. Latch the door. option.
OFF ON
❑mLIGHTWASH
@
e
WASHING
DRYING 0
I
m~e LIGHTWASH
B
4“
WASHING
ORYING S
S3 RINSE&HOLO (USE %f~ OPTIONI
HEATED DRY.Turns the drying
heater on for fast drying.
ENERGY SAVER (no heat boost).
Turns the drying heater off to save
energy. Dishes will dry naturally
over alonger period such as
overnight.
c. Slowly turn Cycle IndicatorDial
to ON position to startthe cycle.
Youwill hear the motorstart.
There is atime delaybetween
start-up and water fill so you
will not hear any wash action
right away.
c. Slowly turn Cycle Indicator Dial
to RINSE &HOLD position.
d. Latch door to start the cycle.
lf yOLIneed your dishes sooner,
open the dishwasher door after the
cycle is complete to reduce the
natural drying time. To obtain the benefits of acomplete
cycle, be careful thatyou do not
turn the dial any fwther than
necessary to start the dishwasher.
Use of this option reduces the
electrical energy used by this
model approximately 790 for the
NORJMALWASH cycle.
4($ –
-— —
cycle Sekdiumhints
It is importantto followthe loading
instructionsonpages 8and9.
P0TSCRU1313ERis for items such
as pots, pans and casseroleswith
dried-onor baked-on soils.
Everydaydishesmay be included.
NORMAL WASHis forloads of
everyday dishes,glassesand
cookware.
LIGHT WASHis for dishesthat
are lightly soiledwith soilsthat
have not dried on. Also for
everyday dishesthat haveextra
preparationbefore loading.
RINSE &HOLD is for rinsing
partial loads which will be washed
later.Do nof use detergent.
mathappeHIsheachCyCk
~You’llhear occasional clicking
sounds:
—Soft food disposer shredding
action.
—Drain valveopening to pump
water out.
—Timer control as cycle
progresses.
—Detergent cup opening.
eDuring the drying period:
—The motor stops.
—Water vapor comes through the
vent by the door latch during
drying and when water is being
pumped out.
Was+
Water Use Cycle Time
Gallons Minutes
Wash Cycles (approx.) (approx.) Cycle Sequence
IWI’SC.RUBBER 74
NORMALWASH 59
lEEilBMFaiEIE
———
10.3 53
Rinse Rinse Rinse
MW5E &HOLD 4.9 14
hying options:
HEATEDDRY.Available on all wash cycles except RINSE& HOLD, Add 24 minutes to wash cycle time,
ENERGY SAVER.Drying IIeakr is turned off. Dishes dry naturally.
&-1
m=.-.
.
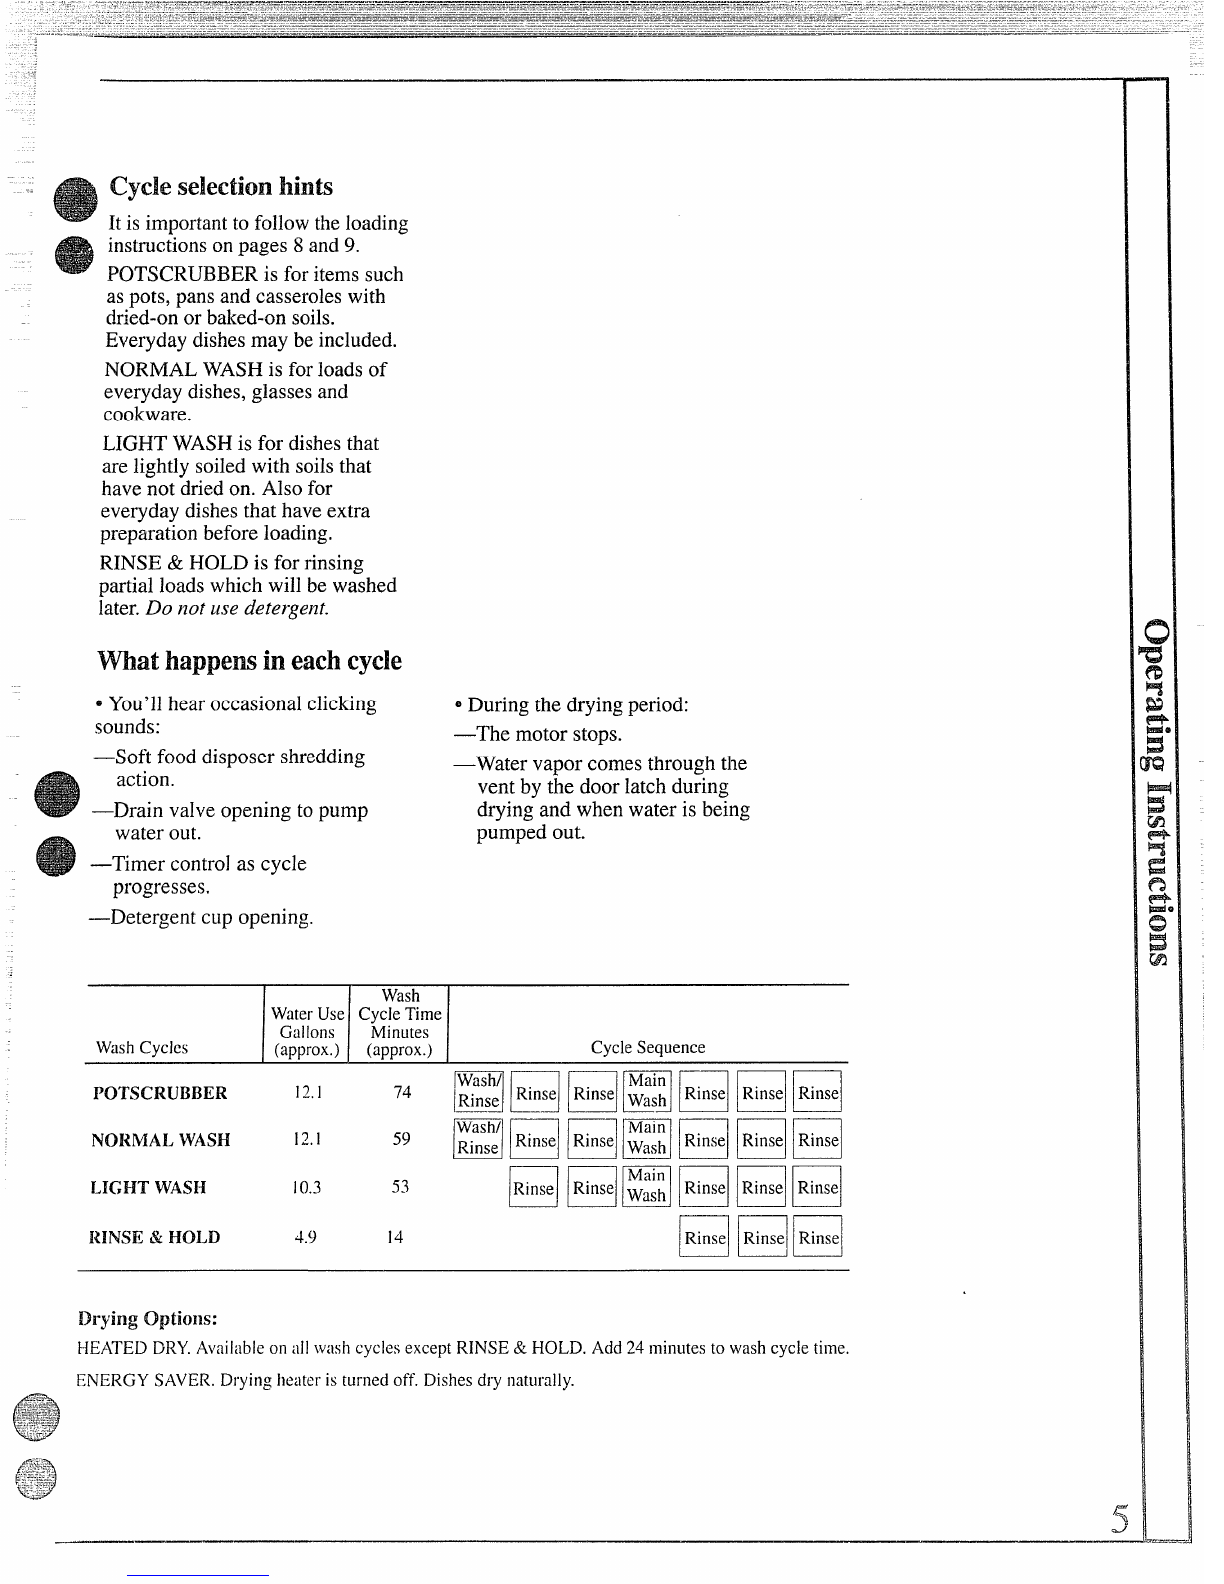
GWMl!dishwashingstarts
with HOT’water,
Toget dishesclean and dry,you
ileedhoi water.Tohelpyouget
waterof thepropertemperature,
yourdishwasherautomatically
heatsthe waterin the washcycle.
Forgood washingand drying,the
enteringwatermustbe atleast
120°ETopreventdishdamage,
inletwater shouldnotexceed 150”F.
How totest water temperature:
Check the water temperature
insideyour dishwasherwith a
candy or meat thermometer.
Let the dishwasherrun through
one fill and pump out cycle, then
let the dishwasherfill with water
the second time.
When you hear the water stop
filling, unlatch the door and slowly
open it.
Measure the temperature of the
water in the bottom of thetub this
way:
Remove the silverware basket and
place acandy or meat thermometer
in the water towards the middle of
the tub. If the temperature is less
than 120”F,you will not get good
washing results. Higher water
temperature is needed to dissolve
grease and activate powder
detergents.
Helpful hints: Ifoutside
temperaturesareunusuallylow,or
ifyourwatertravelsalongdistance
fromwaterheatertodishwasher,
youmay needto setyourwater
heater’sthermostatup.Ifyouhave
notusedhotwaterforsometime,
thewaterin thepipeswillbecold.
Turnon thehotwaterfaucetat the
sinkandallowit torununtilthe
waterishot.Thenstartthe
dishwasher.If you’verecently
donelaundryor runhotwaterfor
showers,giveyourwaterheater
time torecoverbeforeoperating
thedishwasher.
To improvewashabilityif the
water is less than 120”Fand you
cannot adjustyour waterheater:
Select alongercycle and fill both
detergentcups at leasthalf-full
with detergent.
HOW ~0 usearinseagent.
Arinse agentmakes water flow
off dishesquicker thanusual. This
lessens water spottingand makes
drying faster, too.
For best dishwashingperformance,
use of arinse agent such as JET-
DRY brand is recommended.
Rinse agents come in either liquid
or solid form. Yourdishwasher’s
dispenser uses the liquid form.
How to fill the rinse agent
dispenser. Unscrew the cap. Add
the liquid rinse agent until itjust
reaches the bottom of the lip inside
the dispenser opening.Replace the
cap. The dispenser automatically
releases the rinse agent into the
final rinse water.
If you accidentally spill:Wipe
up the rinse agent with adamp
cloth. Don’t leave the spillin the
dishwasher. It can keep your
detergent from working.
If you.can’t find any rinse agent,
write:
13ENCKISER CONSUMER
l?RODUCTS, INC.
(“JET-DRY”)
411 W. Putnam Ave.
Greenwich, CT 06830
Yourdishwasher’srinse agent
containerholds4!4ounces,This
shouldlast about3months.Fill as
needed. Do not ove~fill.
How tochow andwe the
rightdetergent.
First, use only powder or liquid
detergent specifically made for
use in dishwashers. (Mm types
will muse oversudsing.
Second, check the phosphate
content. Phosphatehelps prevent
hard-water materialsfrom forming
spotsor film on your dishes. If
your water is hard (7 grains or
more), your detergenthas to work
harder.Detergents with ahigher
phosphate level will probably work
better. If the phosphatecontent is
low (8.7% or less), you’ll have to
use extra detergent with hard water.
Yourwater department can tell
youIhow hard your water is. So
can yourcountyextensionagent
oryourarea’swatersoftener
company.Justcallandaskthem
howmany“grainsofhardness”
arein yourwater.
Howmuch detergent shmdd yml
use? That depends. Is your water
“hard” or “soft”? With hard water,
you need extra detergent to get
dishes clean. With soft water, you
need less detergent.
Too much detergent with soft water
not only wastes money,it can be
harmful. It can cause apermanent
cloudiness of glassware, called
“etching.” An outside layer of
glass is etched away! Of course,
this takes some time. But why take
achance when it’seasy to find out
the hardness of your water?
6
Keep your detergentfreshand
dry.Under the sink isn’tagood
place to storedetergent.Toomuch
moisture,Don’tput powder
detergentinto the dispenseruntil
you‘re ready to wash dishes,
either.(It won’tbe fresh C)Rdry.)
If your powder detergentgets
old or hmpy9 throw it away.It
won’twash well. Old detergent
often won’tdissolve.
If you use aliquid dishwasher
detergent,theseprecautionsare
not necessary because liquid
detergentsdon’t “lump”as they
age or come in contact with water.
You’llfind two detergent
dispensers on the insidedoor of
your dishwasher.There are two,
because some cyc\es use two
washes. 1
I//I
/.
Always close the main cup tightly.
I@
OPEN CUP :Iifyou’re-replacingamuch older
m4! model, you may wonderhow much
W%eriit isfirmly latched,-you will
hear aclickingsound.Do not
overtighten.
NOTE: Detergentcup may be
opened manually withno harm.
Turnhandle counterclockwise
until it releases.Asnappingsound
is normal when it opens.
How to plx!pare the dishes
forwashing
If thisis your fiist dishwasher,or
See “DetergentUsageGuide”
below.(Be surethe CycleIndicator
Dial isat OFFposition before
addingdetergent.Otherwise,the
detergentcup lid willnotcloseand
latchproperly.)
preparationyour dishesneed.
Actuallyvery little.Pre-rinsingof
normalfood soilsis notnecessary.
With common senseand alittle
practice,you’llsoonknow what
foodsto remove. Here are some
guidelines:
1. Scrapeoff bones,seeds,stins,
toothpicksand otherhard solids.It
is alsobestto removehzudshelled
vegetables,meat trimmings,leafy
vegetablesand crusts.Remove
excessivequantitiesof oilor grease.
Detergent usage Guide(powder‘or liquid)
2.Removelargequantitiesof any
food.Yourdishwasherhasabuilt-in
softfooddisposerthatpulverizes
softfoodbitsandflushesthem
away.Itcanhandlesmallamounts
of softfoods,butlargeamountswill
bedifficulttohandle.
3.Tryto removefoodscrapsand
placedishesindishwasherbefore
soilshaveachancetodryand
becomehard.Disheswithdried-on
soilsaremoredifficultto wash
andmaynotcomecleaninthe
NORMALWASHcycle.Remember
touseyourRINSE& HOLDcycle
forsmall“holding”loads.
Note:Thefoodsmentionedabove
areexamplesonly.Otherfoodsnot
mentionedmayalsoneedtobe
removedfromyourdishes.Youmay
alsowantto considerremoving
foodssuchasmustard,mayonnaise,
vinegar,lemonjuiceandotherfoods
thatcancausediscolorationof
stainlesssteelifallowedto remain
on dishesfor alongperiodoftime.
WhenusingtheKH’SCRUB13ER
cycle,lesspreparationis required
beforeloading.ThePOTSCRUBBER
cyclecan washheavily-soiled
dishesand removedried-onand
baked-onsoilsfrompots,pans
andcasseroles.However,items
withburned-onsoilsmay not come
clean,and thedishwashercannot
removebulmmarksor restore
fadingcausedby overheating
during cooking.
ISOFT WATER IMEDIUM WATER IHARD WATER l____l
I(O-3grains hardness) I(3-7 grains) I(7-12 grains*)
CYCLES Main ~Llp$ Open Cup* Main CLlp$ Open Cup* Main Cup* open cup%
IQ?’SCRUB13ER&!1Tablespoon ~1Tablespoon Half Fu1l ~Half Full Completely ~Completely
NORMALWASH Minimum IMinimum IFull IFull
LIGHT WASH 1Tablespoon None Half Full None Completely None
Minimum ~Lll~
RINSE &HOLD use no detergent Use no detergent use no deteqgent
*12grainsandupisextreme[yhardwater.Awatersoftenerisrecommended.Withoutit,limecanbuildup inthewatervalve.
Thewatervalvemay stickwhileopenandcauseflooding.
$FillcdMainCupholds3tablespoons;FilledOpenCLipholds2tablespoons. 7
—
How ‘tolkxid‘your dishwasher
-—
Thisis arandommixed load, the most common type
you will have.
Make sure dishesare properly loaded to insure that
water can reach the soiled surfaces. The wash arm in
the bottom sprays water up. The tower that rises in the
center sends water out over the dishes to wash the
items in the upper rack. Aspray arm in the top washes
down also. Make sure to place tall items to the outside
so the upper wash arm is not blocked.
“
WATCH OUT FOR THIS.
The wash tower rises through the center of the bottom
rack during the wash and rinse portions of the cycle.
Don’t block it or load tall things next to it. Also, be
careful not to let aportion of an item such as apot or
dish handle extend through the bottom rack. This could
block the wash arm and cause poor washing results.
8
How tohxd!theml? RACK
I
The top rack isbestfor glasses,cups and saucers.Cups
and glassesfit best along the sides.This is the placefor
dishwasher-safeplastics,too. Make sure smallplastic
items are lodgedin tightlyso they can’tfall onto the
Calrod@heatingunit.Arrange stemware so that it cannot
move easily.Don’tlet the glassestouch each other.
o
Sauce pans, mixing bowls and other small items may
be placed—face down—in the top rack. The top rack
is handy for all kinds of odd shapes.
Hwv tobd the!BOTTOM RACK
Load platters,pots, pans and bowls along the sides, in
comers or in the back All large items, such as pitchers,
salad bowls and mixing bowl~,should be washed in the
lower rack.
r
& I
Putflatwarein the removablebasket with handlesup to
protectyourhands.Mix knives,forksand spoonsso they
don’tnest together.Distributeevenly.Smallplastic
items,suchas measuringspoonsand lids from small
containersare notrecommendedfor automatic
dishwashing.If placed in thedishwasher,they should
in the bottomof silverwarebasket with silverwareon go
top.
1
Heavily soiledpots,pans and casserolesMUST be
loaded in the bottomrack, facing down. Prop broiler
pans and racks along the edge.
Don’t
item extend-
through bottom.
Precaution!
Take out anything that may fall or extend through the
bottom of the basket.
what ‘you canusuallywashsafelyinyourdishwasher.
AndwhatyouCan’t.
usually
safeMaterial
Aluminum
Exceptions(notsafe) Special Instructions
Somedarkeningor spotting possible. Remove by
scouringwith soap-filled steel woolpads.
Hin doubt, check with the manufacturer,or test wash
one piece daily for at least amonth.Compare with the
rest of the set.
Load securely to prevent movement.Check
manufacturer’sinstructions for yourcrystal.
YES Somecolored anodizedaluminumcan
fade.
Antique, metal-trimmed, hand-painted
or over-the-glaze patterns fade, Gold
leaf will discolor.
China/Stoneware YES
Crystal Antique, metal-trimmed or hand-
painted patterns fade, Gold leaf will
discolor.
YES
Non-dishware
items-such as
electronic air cleaner
filters, furnacefilters,
paint brushes, etc.
Glass
Do not wash in dishwasher. Damageto dishwasher and
discoloration or staining of dishwasher may result.
NO
YES Milk glass may yellow.
NO Iron will rust.
Pewter tarnishes.
Iron
Pewter NO
If it doesn’t say DISHWASHERSAFE, test one piece in
the top rack before dishwashing an entire set. Wash in
top rack only.
YES
Plastics
Stainless steel YES Rinse if not washing immediately. Salty or acid foods
can stain if left on.
Sterling silver
and silver plate Rinse if not washing immediately. Salty or acid foods
can stain if left on. Dry detergent can cause difficult-to-
remove black spots. Place in back section of silverware
basket to avoid exposure to detergent from the detergent
cup.
Don’t put in same silverware basket
with stainless steel. Contact between
metals can damage silver. Don’t wash
copper utensils in the same load. Silver
mayget abrown film. Adhesive used
toattach some hollow-handle knives
:an loosen.
YES
After washing, wipe the non-stick coating area with
vegetable oil to keep it from losing its non-stick quality.
Non-stick
coatings
Tin
YES
NO Tin can rust.
wood NO Woodcan warp, crack or lose its
finish with any type of washing.
RMget adish?Here’s
whenyml! can addfit.
Add dishesanytimeduringthe
RINSE &HOLDcycle.With
otherwashcycles,youcanadd
However, opening the door during 2. Wait afew seconds until the
any cycle lessens cleaning power water calms. Then open the door.
because the temperature inside the
dishwasher is lowered. So try to 3. Add dishes you’ve forgotten.
load everything at the beginning. 4. Close the door and push the
— —
Here’s how to add aforgotten dish: latch to the far right. when the
dishesat any-timeBEFOREthe main door is locked, washing will
detergentwish po~lionof thecycle. 1.Push the door latch to the left. continue,
Washing will stop.