GE 169104 User manual

HALOGEN OVEN
Model Number: 169104
UPC: 681131691048
Customer Assistance
1 877 207 0923 (US)
1 877 556 0973 (Canada)
Thank you for purchasing a GE small appliance.
In eeping with the GE ecomagination initiative, please consider the option to recycle
the pac aging material and donate the appliance you are no longer using.
To read about GE’s ecomagination commitment, visit
http://ge.ecomagination.com

2
IMPORTANT SAFEGUARDS
When using electrical appliances, basic safety precautions should always be followed,
including the following:
•Read all instructions.
•Do not touch hot surfaces. Use handles or nobs.
•To protect against electrical shoc , do not immerse cord, plug or oven in water or
other liquid.
•Close supervision is necessary when any appliance is used by or near children.
•Unplug unit from the outlet when not in use and before cleaning. Allow to cool before
putting on or ta ing off parts and before cleaning.
•Do not operate appliance with a damaged cord or plug, or after the appliance
malfunctions or has been damaged in any manner. No user-serviceable parts inside.
Call our toll-free customer service number for information on examination, repair or
adjustment.
•The use of accessory attachments not recommended or sold by the manufacturer
may cause injuries.
•Do not use outdoors.
•Do not let cord hang over edge of table or counter, or touch hot surfaces.
•Do not place on or near a hot gas or electric burner, or in a heated oven.
•Extreme caution must be used when moving an appliance containing hot oil or other
hot liquids.
•Use extreme caution when removing rac , ba e tray, drip pan, crumb tray or
disposing of hot grease. Always use oven mitts or hot pads when removing items
from the oven.
•Oversize foods or metal utensils must not be inserted in the halogen oven as they
may create a fire or ris of electric shoc .
•A fire may occur if the halogen oven is covered or touching flammable material,
including curtains, draperies, walls, and the li e, when in operation. Do not store any
item on top of the appliance when in operation.
•Do not clean with metal scouring pads. Pieces can brea off the pad and touch
electrical parts creating a ris of electric shoc .
•Extreme caution should be exercised when using containers constructed of other
than metal or glass.
•Do not store any materials, other than manufacturers recommended accessories, in
this oven when not in use.
•Do not place any of the following materials in the oven; paper, cardboard, plastic, any
other material that may catch fire or melt.
•Do not cover crumb tray or any part of the oven with metal foil. This will cause
overheating of the oven.
•To disconnect, press the Stop ey twice, then remove the plug from wall outlet.
•Do not use appliance for other than intended use.
•For Household Use Only.
SAVE THESE INSTRUCTIONS!

3
This appliance is for HOU EHOLD U E ONLY. It may be plugged into an AC electrical
outlet (ordinary household current). Do not use any other electrical outlet.
DO NOT OPERATE APPLIANCE IF THE LINE CORD HOW ANY DAMAGE, OR IF APPLIANCE
WORK INTERMITTENTLY OR TOP WORKING ENTIRELY.
A short power-supply cord is provided to reduce the ris resulting from becoming entangled
in or tripping over a longer cord. Longer detachable power-supply cords or extension cords
are available and may be used if care is exercised in their use. If a longer detachable power-
supply cord or extension cord is used;
1) The mar ed electrical rating of the cord set or extension cord should be at least as great
as the electrical rating of the appliance, and
2) The cord should be arranged so that it will not drape over the countertop or tabletop
where it can be pulled on by children or tripped over unintentionally.
If the power-supply cord is a grounding-type-3-wire cord with a grounding prong on the plug,
the extension cord should also be a grounding-type-3-wire cord.
GROUNDING IN TRUCTION
This appliance must be grounded while in use to protect the operator from electrical shoc .
The appliance is equipped with a 3-conductor cord and a 3-prong grounding-type plug to fit
the proper grounding-type receptacle.
GROUNDING IN TRUCTION – U ONLY
The appliance has a plug that loo s li e Figure A. An adaptor, as shown in Figure B, should be
used for connecting a 3-prong grounding plug to a 2-ground receptacle. The grounding tab,
which extends from the adaptor, must be connected to a permanent ground such as a
properly grounded outlet box as shown in Figure C, using a metal screw.
LINE CORD AFETY TIP
1. Never pull or yan on cord or the appliance.
2. To insert plug, grasp it firmly and guide it into outlet.
3. To disconnect appliance, grasp plug and remove it from outlet.
4. Before each use, inspect the line cord for cuts and/or abrasion mar s. If any are found,
this indicates that the appliance should be serviced and the line cord replaced.
5. Never wrap the cord tightly around the appliance, as this could place undo stress on
the cord where it enters the appliance and cause it to fray and brea .

4
PARTS
Accessories
7. Pizza Pan
8. Ba ing Rac
9. Ba ing Tray
10. Broil Pan
11. Tray Handle
Digital control panel
1. Time/Temp -
2. Temperature
3. Toast Function
4. Ba e Function
5. Cloc Function
6. Start
7. Stop/Pause
8. Convection
Function
9. Defrost Function
10. Broil Function
11. Time/Temp +
12. Time
13. Digital Display
14. Function Icon
14a. Broil
14b. Ba e
14c. Toast
14d. Convection
14e. Defrost
12
9
1
2
5
6
3
8
14
13
11
4
7
10
7
10
9
11
5
3
2
4
1
6
1. Door Handle
2. Door
3. Crumb Tray
4. Stainless Steel Housing
5. Digital Control Panel and Display
6. Side Handle
8
14c
14a
14b
14d
14e

5
INSTRUCTIONS FOR USE
For your safety, always read and understand this Instruction Manual before attempting to
use the Halogen Oven.
Before Using:
1. Carefully unpac the oven. Remove all pac aging materials.
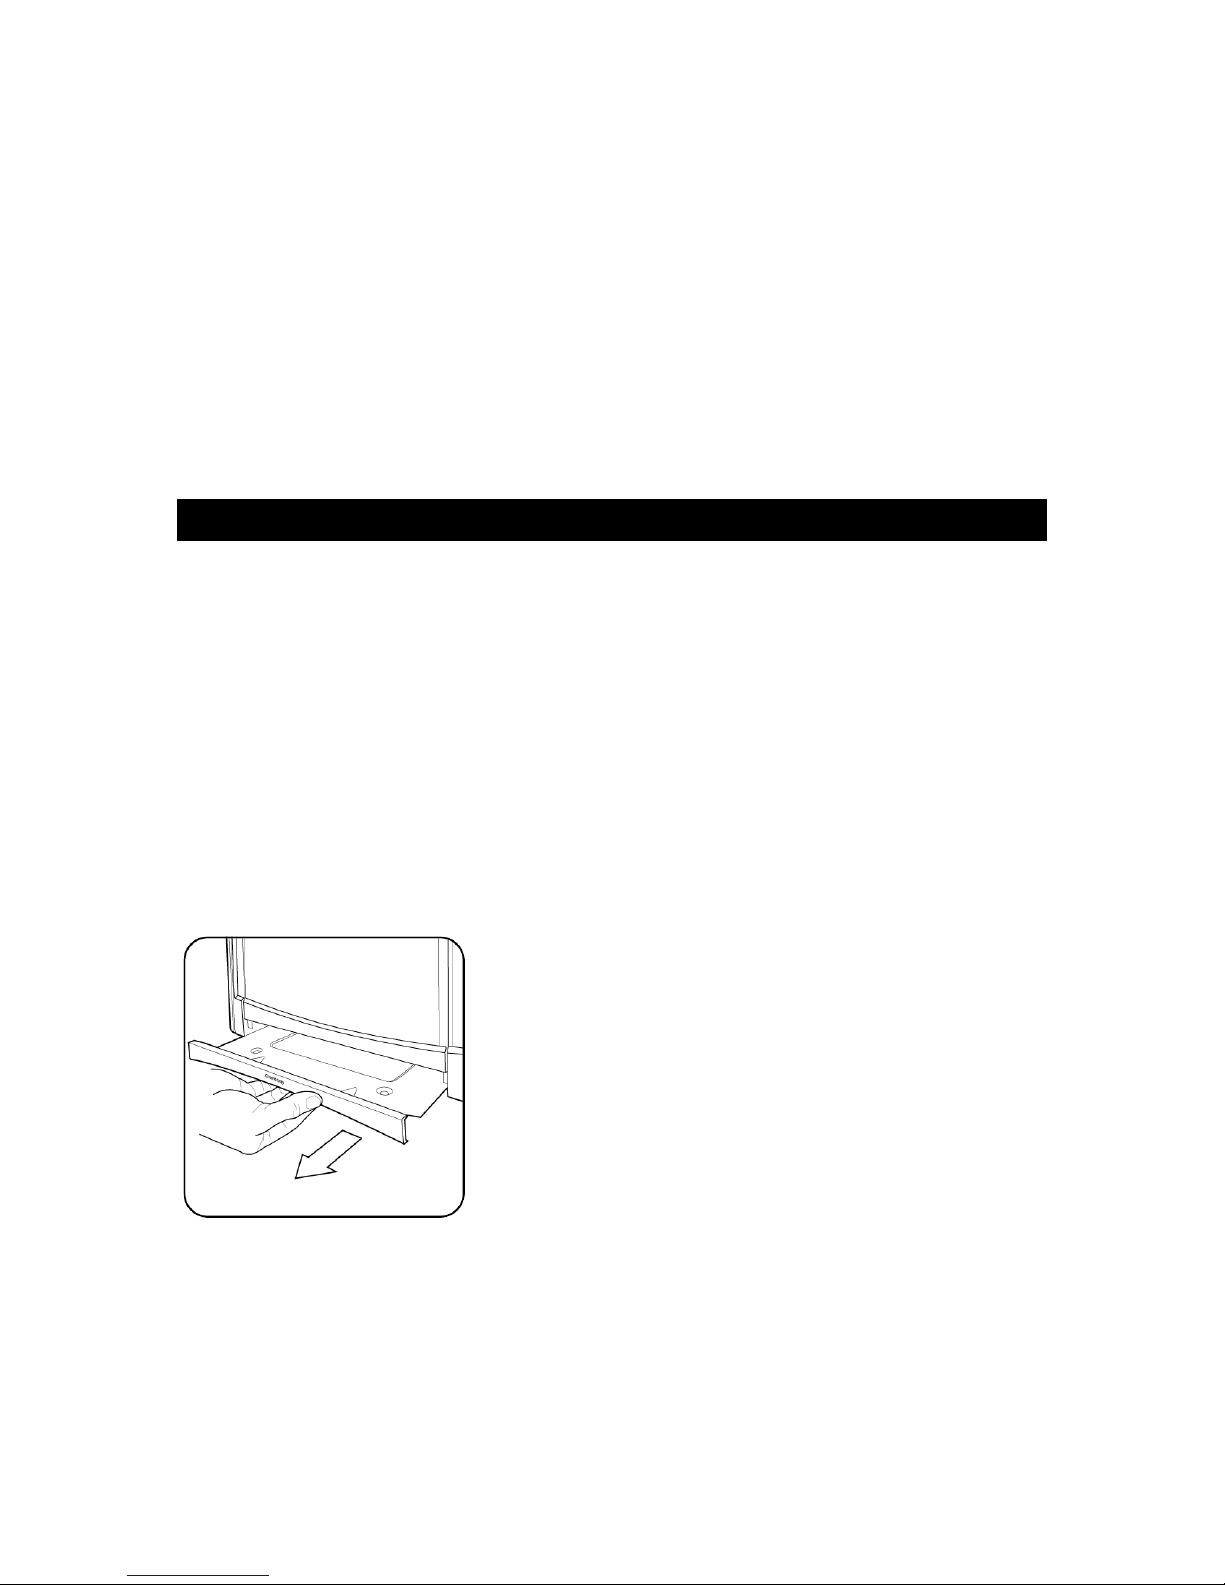
2. Wash the rac , ba e tray, drip pan, pizza pan, crumb tray and handle in hot soapy
water. Dry thoroughly. Wipe the inside of the oven with a damp cloth or sponge. Blot
dry with paper towels to be sure the oven is dry before using.
3. Wipe exterior surfaces of the oven with a soft, moist cloth to remove dust particles
collected during pac ing and handling. Dry thoroughly. Do not use abrasive
cleaners. NEVER IMMERSE THE OVEN, CORD OR PLUG IN WATER OR ANY OTHER
LIQUID.
4. Place oven on a flat counter or other stable surface.
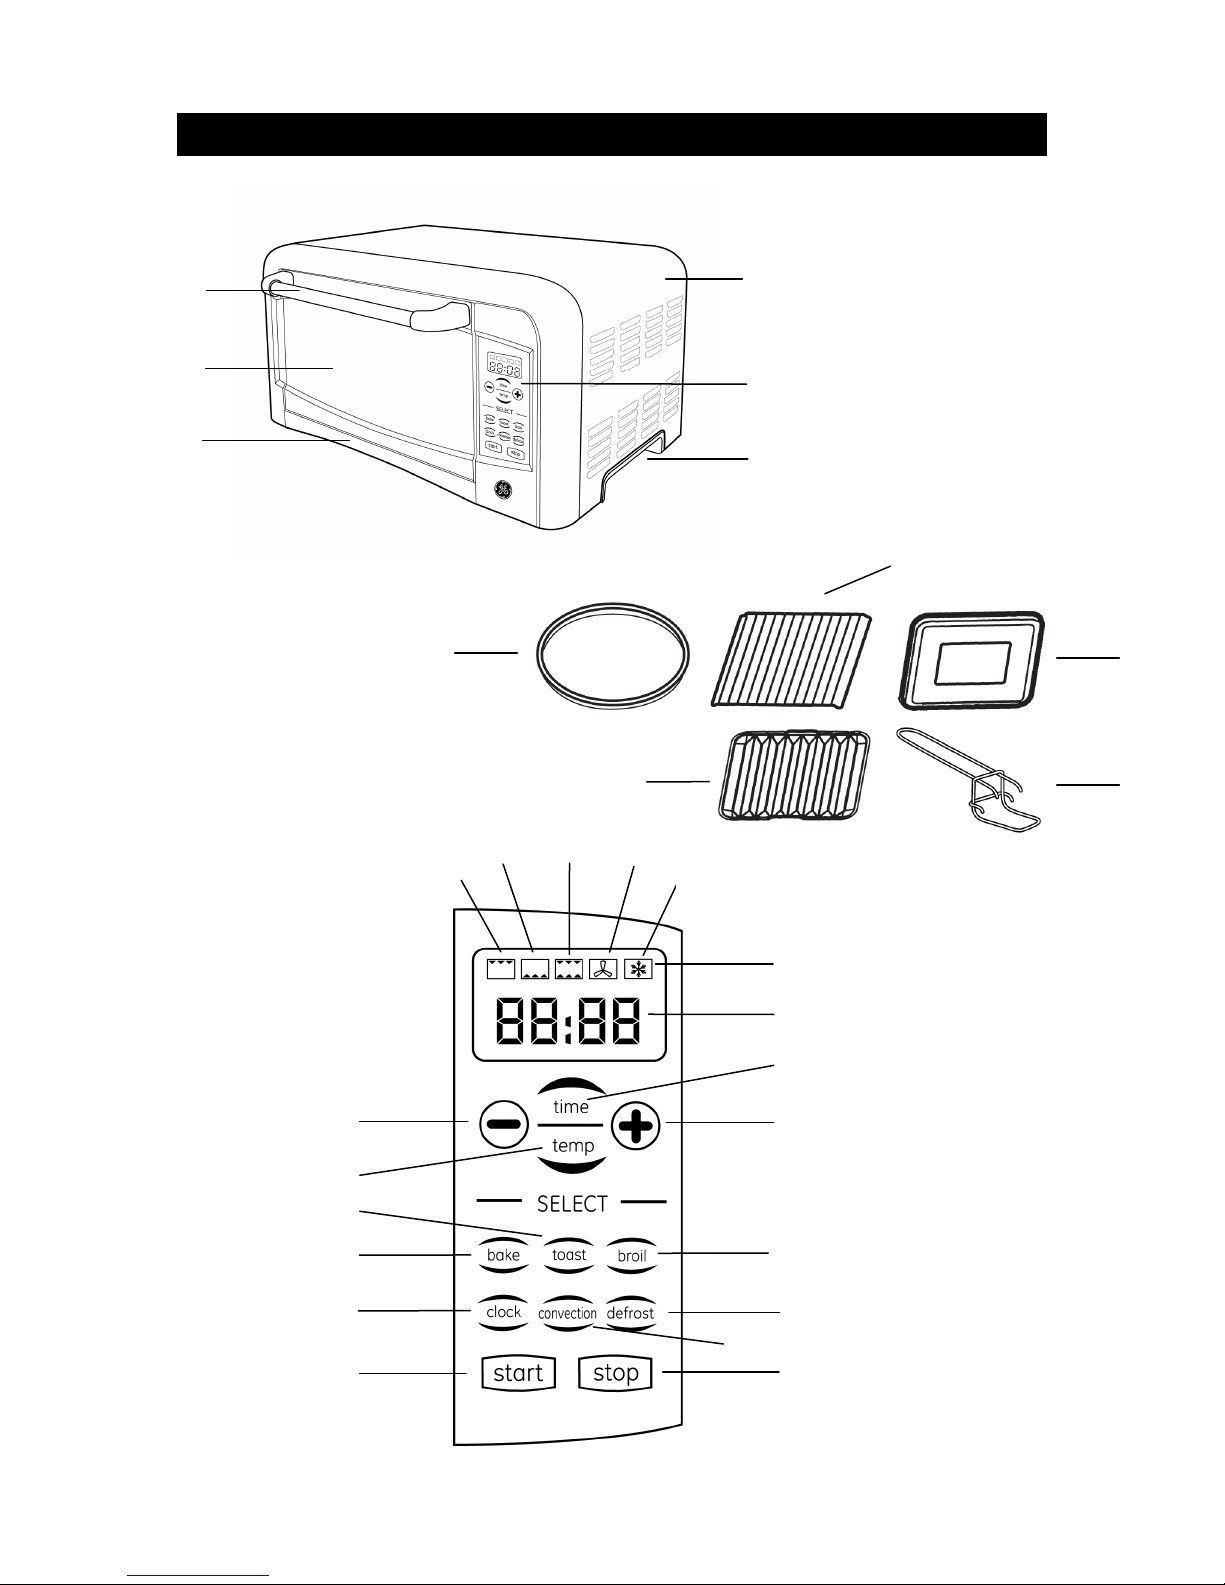
5. Be sure all parts are properly assembled and in place before use. (See illustrations).
6. For the first time only, set the function to Toast and the dar est setting (See section
under Toast). This will burn off any residue or oils still on the oven. Note; The oven
may smo e during this process. This is normal and will not last longer than 10-15
minutes.
7. Your oven is now ready to use.
Halogen coo ing technology provides instantaneous light and heat. There is no
preheating required and there is an instant visual indication that the oven is coo ing.
Functions:
In all functions, both the top (Halogen) and bottom (Quartz) heating elements
will cycle on and off to maintain the desired cooking temperature.
Toast: Both top (Halogen) and bottom (Quartz) heating elements operate. The Toast
function has 3 different default settings. The screen displays the different
settings with a series of bars. A single bar represents light toast, 2 bars
represent medium toast and 3 bars represent dar toast.
When Toast and Convection is selected the default time and temperature is
350°F for 30 minutes. Temperature can be manually set from 150°F to 450°F.
Time can be manually set from 1 to 99 minutes.
Bake: The lower Quartz heating elements operate. Default time and temperature is
350°F for 30 minutes. Temperature can be manually set from 150°F to 450°F.
Time can be manually set from 1 to 99 minutes.
Broil: The top Halogen heating elements operate. Default time and temperature is
350°F for 30 minutes. Temperature can be manually set from 150°F to 450°F.
Time can be manually set from 1 to 99 minutes.
Defrost: Used for warming or defrosting frozen food. Both elements are energized and
the convection fan is operating. Default time is for 30 minutes. Time can be
manually set from 1 to 99 minutes. Temperature cannot be adjusted.
Convection: The convection fan may be operated on Ba e, Broil, or Toast. To use
convection simply select the convection ey after selecting the Ba e, Broil, or
Toast ey. The fan will operate throughout the entire coo ing cycle.
Cancel: If you select a function but then want to change to another, you must cancel
your initial selection by pressing the ‘STOP’ ey, then you can select a new
function.
Pause: To Pause in any function, press the Stop ey once. To resume, press the Start
ey. Pressing the Stop ey twice will stop all coo ing functions.

6
Please note: When ba ing in a toaster oven, rather than a conventional oven, time and
temperature may need to be adjusted.
This oven comes with a Tray Handle. Use this handle to safely insert and remove the ba ing
or pizza trays.
etting the clock:
1. Plug oven into wall outlet.
2. The digital screen will flash “00:00”.
3. Press the cloc ey, and then press the + or – eys to adjust to the correct hour. Press
the cloc ey again and use the + or – eys to adjust to the correct minute.
4. Press the cloc ey a third time to set the cloc .
Toast:
1. Insert the Baking Rack into the upper rack guide
2. Select Setting:
ight SettIng: Select Toast once. A single bar is displayed.
Medium SettIng: Select Toast twice. Two bars are displayed.
Dark SettIng: Select Toast three times. Three bars are displayed.
3. Press the Start ey. The oven will begin operating and the screen will show the count
down time. When the time reaches 00:00 the oven cycle is complete and 3 tones will
sound.
Note: The Toast time and temperature cannot be adjusted.
Toast with Convection:
1. Insert the Baking Rack into the upper rack guide
2. a. Press the Toast ey.
b. Press the Convection ey. The default time is 30 minutes. Use the “+” or “-“ eys to
adjust for desired coo ing time. Press the time ey to loc in the selected time.

7
c. Press the temperature ey. The default temperature is 350 degrees. Use the “+” or
“-“ buttons to adjust for desired temperature. Press the temperature ey to loc in the
selected temperature.
d. Press the Start button. The oven will begin operating and the screen will show the
count down time. When the time reaches 00:00 the cycle is complete and 3 tones will
sound.
Bake:
1. Insert the Baking Pan into the lower rack guide. For cooking pizza, insert the
Baking rack into the upper or lower rack guide and use the Pizza Pan.
2. Select time and temperature:
a. Press the Ba e ey. The default time is 30 minutes. Use the “+” or “-“ eys to adjust
for desired coo ing time. Press the time ey to loc in the selected time.
b. Press the temperature ey. The default temperature is 350 degrees. Use the “+” or
“-“ buttons to adjust for desired temperature. Press the temperature ey to loc in the
selected temperature.
c. Press the Convection ey if desired
d. Press the Start button. The oven will begin operating and the screen will show the
count down time. When the time reaches 00:00 the cycle is complete and 3 tones will
sound.
Broil:
1. Insert the Baking Tray with Broil Pan into the top rack guides
2. Select time and temperature:
a. Press the Broil ey. The default time is 30 minutes. Use the “+” or “-“ eys to adjust
for desired coo ing time. Press the time ey to loc in the selected time.
b. Press the temperature ey. The default temperature is 350 degrees. Use the “+” or
“-“ buttons to adjust for desired temperature. Press the temperature ey to loc in the
selected temperature.
c. Press the Convection ey if desired
d. Press the Start button. The oven will begin operating and the screen will show the
count down time. When the time reaches 00:00 the cycle is complete and 3 tones will
sound.
Defrost:
1. Insert either the Baking Tray or Baking Rack in the upper or lower rack guides.
2. Select time:
a. Press the Defrost ey. The default time is 30 minutes. Use the “+” or “-“ eys to
adjust for desired coo ing time. Press the time ey to loc in the selected time.
Note: In defrost mode, the temperature cannot be adjusted.

8
b. Press the Convection ey if desired
c. Press the Start button. The oven will begin operating and the screen will show the
count down time. When the time reaches 00:00 the cycle is complete and you will
here 3 audible tones.
Display features:
1. When adjusting the time and/or temperature with the + or – eys, the display will
advance with each press of the ey. If a rapid advance is desired, press and hold the
ey. The display will begin to rapidly advance in 10 minute increments after 1 or 2
seconds.
2. The default temperature display is Fahrenheit. The temperature may be displayed in
Fahrenheit or Celsius. Press and hold the Temperature ey for 3 seconds and the
display will shift to Celsius. To return to Fahrenheit, press and hold the Temperature
ey again for 3 seconds.
CLEANING AND STORAGE
This appliance requires little maintenance. It contains no user-serviceable parts. Do not
attempt to repair it yourself. Any servicing that requires disassembly, other than cleaning,
must be performed by a qualified appliance repair technician.
To Clean:
1. Unplug unit and allow it to cool fully. After each use, when oven has cooled, clean
food particles off with a damp sponge or cloth. Never immerse oven in water or any
other liquid. Do not use abrasive cleaners, as they may damage unit.
For more thorough cleaning, wash rac and ba e tray, drip pan, pizza pan and crumb
tray in hot, soapy water.
2. Periodically, remove the crumb tray and empty crumbs into a waste bas et. Allowing
crumbs to build up increases the chance of fire.
To tore:
Be sure all parts are clean and dry before storing. Store appliance in its box or in a clean, dry
place. Never wrap cord tightly around the appliance; eep it loosely coiled or use the cord
wrap behind the oven.

9
Table of contents
Other GE Oven manuals

GE
GE Profile PT970WM Manual

GE
GE Profile Advantium SCA2001BSS Owner's manual

GE
GE Advantium SCB2000 User manual

GE
GE Profile PK916 User manual

GE
GE Advantium PSB9240BL User manual

GE
GE G9OCAASSPSS User manual

GE
GE CK7000 User manual

GE
GE JCK1000 User manual

GE
GE Built-In Dishwasher User manual

GE
GE Advantium CSB913 User manual
Popular Oven manuals by other brands

Zanussi
Zanussi ZOB 641 Instruction booklet

Philco
Philco POC 828 user manual

Bosch
Bosch HBG517E 1R Series User manual and installation instructions

Bosch
Bosch HBG656R 6B Series instruction manual

Bosch
Bosch VGD553FB0 User manual and installation instructions

Hamilton Beach
Hamilton Beach 31508-220 use & care