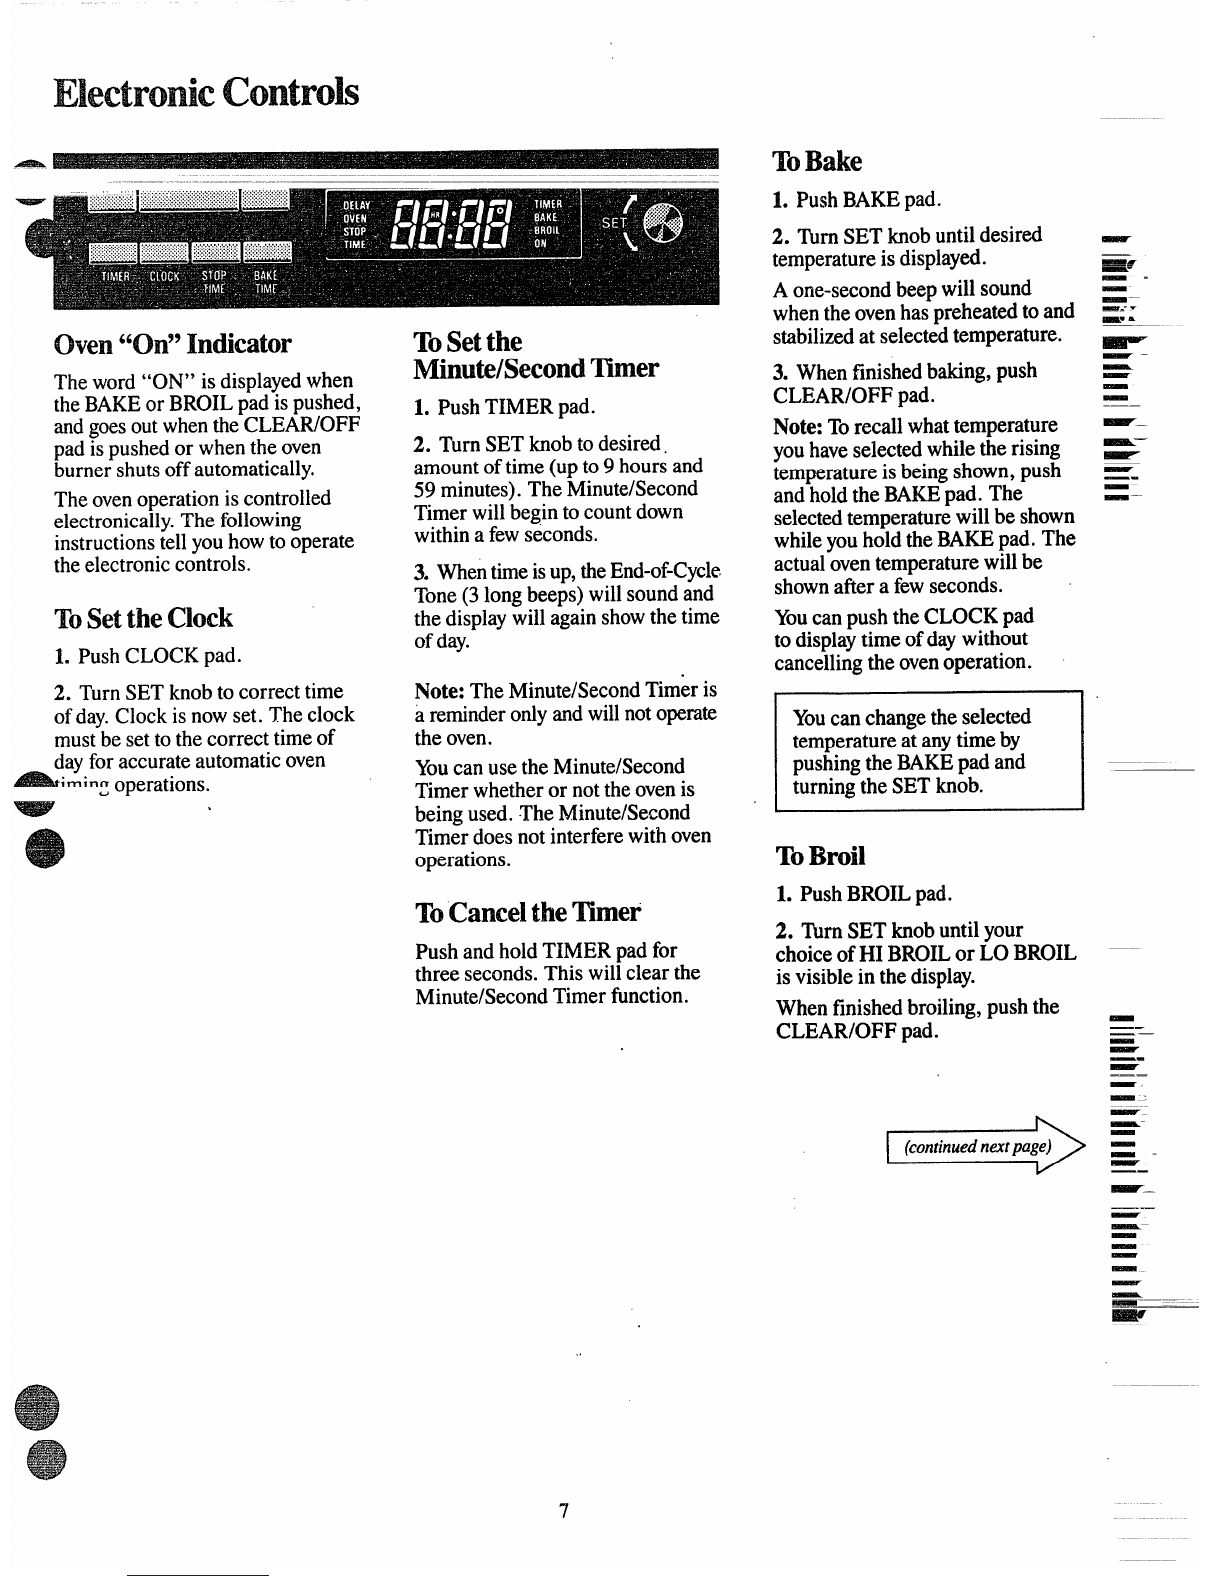
GE JGRS15GEL User manual

—
contents
AluminumFoil 9Preheating 10
ApplianceRegistration 2ProblemSolver 18
Baking,BakingGuide 9,10 RepairService 19
Broiling,BroilingGuide 12,13 Roasting,RoastingGuide 11
Careand Cleaning 14-17 SafetyInstructions 2-4
Clock 7Shelves 6,15
ContinuousCleaningCare 14~ThermostatAdjustment 16
DoorRemoval 15 Warranty BackCover
ElectronicControls 7,8
Energy-SavingTips 4
Features 5
light; BulbReplacement 6,15
MinorAdjustmentsYouCanMake16 GEAmwer Centerm
Modeland SerialNumbers 2“ $fl~62E2000

Itisintendedtohelpyouoperateand
maintainyournewovenproperly.
Keepithandyforanswerstoyour
questions.
Ifyoudon’tunderstandsomething
orneedmorehelp,write(include
yourphonenumber):
ConsumerAffairs
GEAppliances
AppliancePark
Louisville.KY40225
writedownthemodel
and serialnumbers.
You’llfindthemonalabelonthe
frontframebehindthebroilerdoor.
Seepage5.
Thesenumbersarealsoonthe
ConsumerProductOwnership
RegistrationCardthatcamewith
youroven.Beforesendinginthis
card,pleasewritethesenumbers
here:
Model Number
Serial Number
lJsethesenumbersinany
correspondenceorservicecalls
concerningyouroven.
If you received
adamagedoven.●o
Immediatelycontactthedealer(or
builder)thatsoldyoutheoven.
savetimeandmoney.
Beforeyou request
service.*e
ChecktheProblemSolveron
page18.Itlistscausesofminor
operaiingproblemsthatyoucan
correctyourself.
FORYOUR SAFETY
Isopenwindows.
2. Don’ttouch
electricalswitches:
4.Immediately call
yourgassupplier=
:Don’t~urnele~tricswitches
onoroffpecausesparksmay
ignitethegas. “
IMPORTANT
SAFETY
INSTRUCTIONS
Readal!imtructiom
beforeusingthis
appliance.
SAFETYNmIcE
The”CaliforniaSafeDrinking
WaterandToxicEnforcement
ActrequirestheGovernorof
Californiatopublishalistof
substancesknowntothestate
tocausecancerandrequires
~usinessestowarncustomers
ofpoieniialexposuretosuch
substances.~.
. .
Gas‘aDDliancescancause
mitio;;xposuretothreeofthese
‘.s,~bstatices,namelybenzene,
‘fotnialdehvdeandsoot,caused
n~cessary.-
@~~~e
jouroveninstalled
andproperlygroundedbya
qualifiedinstaiier9inaccordance
withtheInstallationInstructions.
Anyadjustmentandserviceshould
beperformedonlybyqualified
gas rangeinstallersOrservice
!
2

—
—
e
—
-
—-
@
oplugyourovenintoa
U&voltgroundedoutletonly.
Donotremovetheround
groundingprongfrom the plug. If
indoubtaboutthegroundingof
thehomeelectricalsystem,itis
yourpersonalresponsibilityand
obligationtohaveanungrounded
outletreplacedwithaproperly-
groundedthree-prongoutletin
accordancewiththeNational
ElectricalCode.Donotusean
extensioncordwiththisappliance.
@Besureallpackingmaterials
areremovedfromtheoven
beforeoperatingit,topreventfire
orsmokedamageshouldthe”
packingmaterialignite.
eBesureyouroveniscorrectly
adjustedbyaqualifiedservice
technicianorinstallerforthe
typeofgas(NaturalorLP)on
whichitistobeused.Youroven
canbeconvertedfor useoneither
typeofgas.SeeInstallation
Instructions.
Using Your Oven
oDon’tleavechildrenaloneor
unattendedwhereanovenis
hotorinoperation.Theycould
beseriouslyburned.
oDon’tallowanyonetoclimb,
standorhangonthedooror
broilercompartment.They
coulddamagetheoven.
e~~uT’~~: ITEMS OF
INTEREST~CHILDREN
SHOULDN~ BESTORED
INCABINETSABOVE
ANOVEN–CHILDREN
CLIMBINGONTHEOVEN
TOREACHITEMSCOULD
BESERIOUSLYINJURED.
eNeverwearloosefittingor
hanginggarmentswhileusing
theappliance.Flammable
materialcouldbeignitedif
broughtincontactwithflameor
hotovensurfacesandmaycause
severeburns.
oNeveruseyourappliancefor
warmingorheatingtheroom.
Prolongeduseoftheovenwithout
adequateventilationcanbe
hazardous.
oDonotusewaterongrease
fires.Neverpickupaflaming
pan.Turnoffburner,then
smotherflamingpanbycovering
pancompletelywithwellfitting
lid,cookiesheetorflattray.
Flaminggreaseoutsideapancan
beputoutbycoveringwith
bakingsoda,or ifavailable,a
multi-purposedrychemicalor
foamtypefireextinguisher.
oDonotstorefla~mab~e
materialsinanoven.
eDonotletcookinggrease
orotherflammablematerials
accumulateinorneartheoven.
eDonotuseovenforastorage
area.
eWhencookingpork,follow
thedirectionsexactlyandalways
cookthemeattoaninternal
temperatureofatleast170”F.This
assuresthat,intheremote
possibilitythattrichinamaybe
presentinthemeat,itwillbe
killedandmeatwillbesafetoeat.
eStandawayfromovenwhen
openingovendoor.Thehotair
orsteamwhichescapescan
burnhands,faceand/oreyes.
eDon’theatunopenedfood
containemintheoven.fiessure
couldbuildupandthecontainer
couldburst,causinganinjury.
●Keepovenventducts
unobstructed.
●Keepovenfreefromgrease
buildup.
ePlaceovenshelfindesired
positionwhileoveniscool.
Ifshelvesmustbehandledwhen
hot,donotletpotholdercontact
heatingunitsintheoven.
oPullingoutshelftoshelfstop
isaconvenienceinliftingheavy
foods.Itisalsoaprecaution
againstburnsfromtouching
hotsurfacesofdoororoven
walls.
eWhenusingcookingor
roastingbagsinoven9followthe
manufacturer’sdirections.
eDonotuseyouroventodry
newspapers.Ifoverheated,they
cancatchfire.
-
-
—-
-–
~–
—
—
—
—-
-
—
—
—
—
—-
——
——
—
—
me
—=
v
—
—

I
IWIPORTANTSAFETYINSTRUCTIONSI
Emewy-Saviwll
(continued)
@Don9tusealuminumfoil
anyw’hereintheovenexceptas
describedinthisbook.Misuse
couldresultinafirehazardor
damagetotheoven.
~~~e~~]yg]a~~
cookwarethatis
recommendedforuseingas
ovens.
oAlwaysremovebroilerpan
fromthebroilercompartment
assoonas youfinishbroiling.
Greaseleftinthepancancatch
fireifovenisusedwithout
removingthegreasefromthe
broilerpan.
@Whenbroiling,ifmeatistoo
closetotheflame9thefatmay
ignite~Trimexcessfattoprevent
excessiveflare-ups.
~Makes~~ebroilerpanis in
place
correctlytoreducethe
possibilityofgreasefires.
@If youshould!
haveagrease
fireinthebroilerpan,turnoff
oven,andkeepbroilerdoorclosed
tocontainfireuntilitburrisout.
Cleanonlyparklistedinthis
UseandCareBook.
IfYouNeedservice
@Read66TheProblemSolver’9
on page18ofthisbook.
~Don9tattemptto irepair
orreplaceanypartof your
rangeunlessit isspecifically
recommendedinthis book. All
otherservicingshouldbereferred
toaqualifiedtechnician.
SAW THDE
INSTRUCTIONS
1’
1
?~=w., ...- ------
nd:ii~~prbxifiatel~

-
=–
FeaturesofYouroven ——
-
—=
-
-
—-
—
—.
—
_.
—.
IIn
Ilu
—.
-
--
JGRS15GELwithstindardoven
JGRC16GELwithContinuowcleaningoven _-
-.
M
Explained
FeatureIndex onpage
1ModelandSerialNumbers 2
‘2OvenLightSwitch(letsyouturn 6
interiorovenlightonandof~
3ElectronicControls 7,8
AutomaticOvenTimer 8
(turnsyourovenonandofffor
youautomatically)
Clock ,
Minute/SecondTimer ,
(letsyoutimeanykitchen
function,evenwhentheoven
isinuse)
4CLEAR/OFFpad 8
(pushittocancelanyoven
operation)
Explained
onpage
FeatureIndex
5ElectronicDisplayPanel 7
6Oven“On” Indicator 7
7SETKnob 7,8
8OvenVent -
~-
—.
—.
—
—
—
—
-
-
—
9OvenInteriorLight 6, 15
10 OvenShelves(easilyremoved
or repositionedonshelfsupports) 6, 15,17
7
711 OvenShelfSupports 6, 15
12 RemovableOven& BroilerDoors
(easilyremovedforovencleaning) 15
13 BroilerPanandRack 12,13,15,17
14 RemovableOven~ottom 15,17

usingYouroven
AutomaticIgnition shelfPositions
Theovenburnerandbroilburner Theovenhasfourshelfsupports—
arelightedbyelectricignition. A(bottom),B,CandD(top).Shelf
Tolighteitherburner,pushthe positionsforcookingaresuggested
onBakingandRoastingpages.
Dadforthedesiredfunctionand
turntheSETknobuntilthedesired
temperatureisdisplayed.The
burnershouldignitewithin60
seconds.
Poweroutage?
Theovenandbroilerburnerswill
notlightintheeventofanelectrical
poweroutage.Do notattemptto
lightthemmanuallywithamatch.
OvenShelves
1
Hook stop
Theshelvesaredesignedwithstops
andhookssowhenplacedcorrectly
ontheshelfsupports,theywillstop
beforecomingcompletelyoutof
theovenandwillnottiltwhenyou
areremovingfoodfromthemor
placingfoodonthem.
Whenplacingcookwareonashelf,
pulltheshelfouttothe “stop”
position.Placethecookwareon
theshelf,thenslidetheshelfback
intotheoven.Thiswilleliminate
reachingintothehotoven.
l—
Toremoveashelffromtheoven,
pullittowardyou,tiltfrontend
upward,raisingrackstoptoclear
shelfsupportandpullitout.
Toreplace,placeshelfonshelf
supportwithraisedextensionof
shelffacingupandtowardrearof
ovengettingshelfhookstarted
underselectedshelfsupport.Keep
frontofshelftiltedupandpush
towardbackofovenuntilshelfstop
canengageinsideshelfsupport.
Thenlowerfrontofshelfandpush
itallthewayback. m
Oven~ig~t
Usetheswitchonthecontrolpane
toturnthelightonandoff. *
OvenVent
Whentheovenison, heatedair
movesthroughaventbelowthe
controlpanel.
Theventareacouldgethotduring
ovenuse.
Theventisneededforproperair
flowintheovenandgoodbaking
results.Donotblockthisvent.
Doingsomaycausefailure,fire
ordamagetotheoven.
6,,

ElectronicControk
Oven“On”Indicator
Theword“ON” isdisplayedwhen
theBAKEor BROILpadispushed,
andgoesoutwhentheCLEAR/OFF
padispushedor whentheoven
burnershutsoffautomatically.
Theovenoperationiscontrolled
electronically.Thefollowing
instructionstellyouhowtooperate
theelectroniccontrols.
To set the clock
1. PushCLOCKpad.
2. TurnSETknobtocorrecttime
ofday.Clockisnowset. Theclock
mustbesettothecorrecttimeof
dayforaccurateautomaticoven
a~rni.~ operations.
.
ToSet the
Mnuk/Second~mer
1. PushTIMERpad.
2. TurnSETknobtodesired.
amountoftime(upto9hoursand
59minutes).TheMinute/Second
Timerwillbegintocountdown
withinafewseconds.
3. Whentimeisup,theEnd-of-Cycle
Tone(3longbeeps)willsoundand
thedisplaywillagainshowthetime
ofday.
Note:TheMinute/SecondTimeris
areminderonlyandwillnotoperate
theoven.
YoucanusetheMinute/Second
Timerwhetheror nottheovenis
beingused.TheMinute/Second
Timerdoesnotinterferewithoven
operations.
TOCancelthe~mer
PushandholdTIMERpadfor
threeseconds.Thiswillclearthe
Minute/SecondTimerfunction.
ToBake
1. PushBAKEpad.
2. Wm SETknobuntildesired
temperatureisdisplayed.
Aone-secondbeepwillsound
whentheovenhaspreheatedtoand
stabilizedat selectedtemperature.
3. Whenfinishedbaking,push
CLEAR/OFFpad.
Note:Torecallwhattemperature
youhaveselectedwhiletherising
temperatureisbeingshown,push
andholdtheBAKEpad.The
selectedtemperaturewillbeshown
whileyouholdtheBAKEpad.The
actualoventemperaturewillbe
shownafterafewseconds.
YoucanpushtheCLOCKpad
todisplaytimeofdaywithout
cancelingtheovenoperation.
—–
—
—
-
-
~
—.
-
_—
Youcanchangetheselected
temperatureatanytimeby
pushingtheBAKEpadand
turningtheSETknob.
ToBroil
1. PushBROILpad.
2. ~m SETknobuntilyour
choiceofHI BROILor LOBROIL
isvisibleinthedisplay.
Whenfinishedbroiling,pushthe ~
CLEAR/OFFpad. —.
——
-
~
—.
~
———
——
—
——
-
-
—
--
~———z-y.
,,
7

Automaticovenmmer
Theoventimerwillautomatically
startandstopyourovencookingor
self-cleaningoperationforyou.
Forautomaticovencooking:
1. PushBAKETIMEpad.
2. TurnSETknobto setlengthof
bakingtime.
3. PushBAKEpad.
4. TurnSETknobto setdesired
temperature.
Whencooktimeisreached,the
End-of-CycleTonewillsoundand
theovenwillturnoff.
Duringautomaticcooking:
~YoucanpushtheSTOPTIME
padtofindoutwhentheEnd-of-
CycleTonewillsoundandtheoven
willturnoff.
~YoucanpushtheCLOCKpadto
displaytimeofdaywithout
cancelingtheovenoperation.
ToDelayStirtingan
AutomaticOvenOpemtion
If adelayedcookingoperation
isdesired:
1. PushS~P TIMEpad.
2. TurnSETknobtotimeofday
whenbakingshouldbecompleted.
Stoptimemustbeequaltoor
greaterthanthecooktimeplusthe
currenttimeofday.
3. PushBAKETIMEpad.
4. Setlengthofbakingtimewith
SETknob.
5. PushBAKEpad.
6. TurnSETknobtodesired
temperature.
Whenstoptimeisreached,the
End-of-CycleTonewillsoundand
theovenwillturnoff.
Caution:Neverletfoodsitinthe
ovenformorethan4hoursbefore
cookingstarts.Roomtemperature
isidealforthegrowthofharmful
bacteria.Besureovenlightisoff
becauseheatfromthebulbwill
speedbacteriagrowth.
Note:YoucanpushtheS~P
TIMEPadtofindoutwhenthe
ovenwillturnoff. Pushandhold
theBAKETIMEpadtofindout
whentheovenwillturnon.
Howtochange
aRogram
Whenafunctionhasbeen
entered,youcanrecallwhathas
beenprogrammedbypushingthe
correspondingfunctionpad.
Themessagesinthedisplayshow
youwhichfunctioniscurrently
beingdisplayed.Whilethe
functionisdisplayed,youcan
changeitwiththeSETknob.
Youcanchangeanyprog~ed
functionatanytime.
Tones ~
End-of-CycleTone(3longbeeps– ~
onesecondon, onesecondof~:
showsthatatimedovenoperation
hasreachedS~P TIMEor that e
theMinute/SecondTimerhas
counteddown.
AttentionTone(seriesofshort
beeps,l/4-secondon, l/4-second
off, untilproperresponseisgiven):
willsoundifovenhasonlybeen.
partiallyprogrammed.Forexample,
ifyouhaveselectedacooktimebut
notemperature,youwillhearthe
AttentionToneuntilyouselecta
temperatureor pushthe
CLEAR/OFFpad.
NotificationTone(single,one-
secondbeep):indicatesovenhas
stabilizedat selectedtemperature.
KeyTone(single,l/10-second
beep):soundswhenanypadis
pushed.
FunctionErrorTone(seriesof
veryrapidbeeps, l/8-secondon, m
l/4-secondoff):displaywillshowa---
failurecode.CancelFunctionError =
TonebypushingtheCLEAR/OFF
pad.IftheFunctionError Tone e
startsagain(afierabout15
seconds),callforservice.
Disconnecttheovenelectrical
supplytostopthetone.
If thefunctionerroroccurred
whileyouwereprogrammingthe
ElectronicControl,pushthe
CLEAR/OFFpadandtry again.
ToCanceltheTone...If youdon’t
wantanaudibletonewhenyoupush
apad,youcaneliminatetheKey
Tonebypushingandholdingthe
CLEAR/OFFpaduntilyouheara
shortbeep(inapproximatelytwo
seconds).Toactivatethetoneagain,
pushandholdtheCLEAR/OFFpad
oncemoreuntilyouhearashort
beep.Canceling or activatingthe
toneshouldonlybedonewhenthere
isnoovenoperationprogrammed.
PushingtheCLEAR/OFFpadwill
clearallfunctionsexcepttheClock
andMinute/SecondTimer. a

Baking
-How tosetYouroven
:::Baking
Positiontheshelfor shelvesin
Ieoven.Ifcookingontwoshelves
atthesametime,placeshelves
about4inchesapartandstagger
foodonthem.
2. Closeovendoor.
3. PushtheBAKEpadandturnthe
SETknobuntildesiredtemperature
isdisplayed.Ifpreheatingisdesired,
donotputfoodintheovenuntila
one-secondbeepsoundstotellyou
theovenhasstabilizedatthe
selectedbakingtemperature.
4. Opendoorandplacefoodin
ovenoncenterofshelf.Allowat
least2inchesbetweenedgeof
bakewareandovenwallor adjacent
cookware.
5. Closeovendoor.
-6. Checkfoodfordonenessat
minimumtimeon recipe.Cook
longerif necessary.Push
LEAR/OFFpadandremove
helfPositiom
Mostbakingisdoneonthesecond
shelfposition(B)fromthebottom.
Whenbakingthreeor fouritems,
usetwoshelvespositionedonthe
secondandfourthsetsofsupports
(B& D) frombottomofoven.
Bakeangelfoodcakeson firstshelf
position-(A)frombottomofoven.
ovenMokture
Asyourovenheatsup,the
temperaturechangeoftheair
intheovenmaycausewater
dropletsto formonthedoor
glass.Topreventthis,openthe
ovendoorforthefirstminute
ofovenheat-upto letthemoist
air out.
/
/
BaM~ mps
~FO11OWatestedrecipeand
measuretheingredientscarefully.
Ifyouareusingapackagemix,
followlabeldirections.
~Donotopentheovendoorduring
abakingoperation—heatwillbelost
andthebakingtimemightneedto
beextended.Thiscouldcausepoor
bakingresults.Ifyoumustopenthe
door,openitpartially-only
3or4
inches—andcloseitasquicklyas
possible.
.Donotdisturbtheheatcirculation
intheovenwiththeuseofaluminum
foil.Iffoilisused,placeasmall
sheetofit,about10by12inchesat
themost,onalowershelfseveral
inchesbelowthefetid~Donotplace
fd~ontkeovenbottom.
..
.,.
Com’rnOfiB~titigRoblem
andPossibleSolutiom
Pms
Burningaroundedges
eOventoofull;avoidovercrowding.
oEdgesofcrusttoothin.
@Incorrectbakingtemperature.
Bottomcrustsoggyandunbaked
oAllowcrustand/orfillingtocool
sufficientlybeforefillingpieshell.
eFillingmaybetoothinorjuicy.
eFillingallowedtostandinpieshell
beforebaking.(Fillpieshellsand
bakeimmediately.)
.Ingredientsandpropermeasuring
/
affectthe ualityofthecrust.Usea
testedripeandgoodtechnique.
Make uretherearenotinyholesor
tear nabottomcrust. “Patching”
ap“ecrustcouldcausesoaking.“
He fillingrunsover
@
Topandbottomcrustnotwell
sealedtogether.
~Edgesofpiecrustnotbuiltup
highenough.
@Toomuchfilling.
@Checksizeofpieplate.
Wstryistough;crustnotflaky
~TOOmuchhandling.
eFattoosoftorcutintoofine.
Rolldoughlightlyandhandleas
littleaspossible.
CAW
Cakeriseshigherononeside
~Batter
spreadunevenlyinpan.
*Ovenshelvesnotlevel.
~Usingwarpedpans.
@Incorrectpansize.
Cakescrackingontop
~Oventemperaturetoohigh.
~Battertoothick,followrecipe
orexactpackagedirections.
sCheckforpropershelfposition.
oCheckpansizecalledforinrecipe.
oImpropermixingofcake.
Cakefalls
eTOOmuchshortening,sugaror
liquid.
.Checkleaveningagent,baking
powderorbakingsodatoassure
freshness.Makeahabittonote
expirationdatesofpackaged
ingredients.
eCakenotbakedlongenoughorat
incorrecttemperature.
~Ifaddingoiltoacakemix,make
certaintheoilisthetypeand
amountspecified.
Crustishard
eChecktemperature.
eCheckshelfposition.
Cakehassoggylayerorstreaksat
bottom
~Underminingingredients.
*Shorteningtoosoftforproper
creaming.
eTOOmuchliquid.
Coowm &Blscm
Doughycenter;heavycruston
surface
ochecktemperature.
eCheckshelfposition.
eFO11OWbakinginstructions
carefullyasgiveninreliablerecipe
oronconveniencefoodpackage.
eFlatcookiesheetswillgivemore
evenbakingresults.Don’tovercrowd
foodsonabakingsheet.
eConveniencefoodsusedbeyond
theirexpirationdate.
Browningmorenoticeableon
oneside
eOvendoornotclosedproperly,
checkgasketseal.
eCheckshelfposition.
9

BakingGuide
1. Reheatingisveryimportant Preheatingisnotnecessarywhen 3. Darkor non-shinyfinishes,also
whenusingtemperatures below roastingor forlong-timecookingof glassandPyroceram@cookware,
225*Eandwhenb- foodssuchas wholemeals. generallyabsorbheatwhichmay
biscuits,cookies, ca~esand other 2. Aluminumpansconductheat resultindry,crispcrusts.Retiuce
pastries. AfterpushingtheBAKE ovenheat25°F,iflightercrustsare
padandturningtheSETknobtothe quickly.Formostconventional desired.Rapidbrowningofsome
desiredtemperature,besuretowait baking,light,shinyfinishesgivebest foodscanbeachievedbypreheating
fortheone-secondbeepbefore resultsbecausetheyhelpprevent castironcookware.
puttingfoodintotheoven. overbrowning.Werecommenddull
bottomsurfacesforcakepansand
pieplates.
Shelf Oven Time,
Food Cookware Positions Temperatures Minutes Comments
Bread
Biscuits(Yz-in.thick) ShinyCookie Sheet B, C400°-4750 15-20 Canned, refrigeratedbiscuitstake 2tf>4
minutes less time.
Coffeecake Shiny Mek! Panwith B. A350°-4000 ~()-3(3
satin-finishbottom
Corn breador muffins Cast Iron or Glass Pan B400°-4500 20-40 Preheat cast iron pan forcrisp crust.
Gingerbread ShinyMetal Panwith B350° 45-55
satin-finishbottom
Muffins ShinyMetal Muffin Pans A. B400°-4250 20-30 Decrease about5minutes for muffin mix.
Popovers DeepGlass or Cast Iron Cups B375° 45-60 Or bake at 450°F. for 25 minutes. then at
350°F. for 10to 15minutes.
Quick loafbread Metal or Glass Loaf Pans B350°-3750 45-60 Dark metal or glass givesdeepest
Yeastbread (2 loaves) Metal or Glass Loaf Pans A. B375°-4250 45-60 browning.
Plain rolls ShinyOblongor Muffin Pans A. B375°-4250 IO-25 For thin rolls, Shelf Bmaybe used.”
Sweet roils ShinyOblongor Muffin Pans B. A350°-3750 20-30 For thin rolls, Shelf Bmaybe used.
Cakes
(withoutshortening)
Angelfood AluminumTube Pan A325°-3750 30-55 Twopiece pan is convenient.
Jelly roll MetalJelly Roll Pan B375°-4000 1o-15 Line pan with waxedpaper.
Sponge Metal or Ceramic Pan A325°-3500 45-60
Cakes
Bundtcakes Metal or Ceramic Pan A. B3~50-35fj0 45-65
Cupcakes ShinyMetal Muffin Pans B350°-3750 ~0-25 Paper liners produce more moist crusts.
Fruitcakes Metal or Glass Loaf or A, B2750-3000 Z-4hrs. Use 300°F.and Shelf Bforsmall or
TubePan individual cakes.
Layer ShinyMetal Panwith B350°-3750 20-35 If baking fourlayersuse
satin-finishbottom shelves Band D.
Layer.chocolate ShinyMetal Pan with B350°-3750 25-30
satin-finishbottom
Loaf Metalor Glass Loaf Pans B350° 40-60
Cookies
Brownies Metal or Glass Pans B, C325°-3500 25-35 Bar cookies from mix use same time.
Drop Cookie Sheet B.C350°-4000 10-20 Use Shelf Cand increase temperature
25 to 50”F.for more browning.
Refrigerator Cookie Sheet B. C400°-4250 6-12
Rolledor sliced Cookie Sheet B. C375°-4000 7-12
Fruits.
OtherDesserts
Bakedapples Glass or Metal Pans A, B, C350°-4000 30-60
Custard Glass Custard Cups or B300°-3500 30-60 Reduce temperature to 300°F, for large
Casserole (set in pan of hot water) custard.
Puddkgs. rice Glass Custard Cups or B325° 50-90 Cook bread or rice pudding with custard
andcustard Casserole base 80 to 90 minutes.
Pies
Frozen Foil Pan on Cookie Sheet A400°-4250 45-70 Large pies use 400”F. and increase time.
Meringue Spreadto crust edges B, C325°-3500 15-25 Toquickly brown meringue use 400°F. for
9to 11minutes.
Onecrust Glass or Satin-finish Metal Pan A, B400°-4250 45-60 Custard fillings require lowertemperature,
l-wocrust Glass or Satin-finish Metal Pan B400°-4250 40-60 longer time.
F’ast~shell Glass or Satin-finish Metal Pan B450° 1~-16
Miscellaneous
Bakedpotatoes Set on Oven Shelf A, B,C325°-4000 60-90 Increase time for large amount or size.
Scallopeddishes Glass or Metal Pan A,B, C325°-3750 30-60
Souffles Glass Pan B300°-3500 30-75
10

—
—
Roasting
Roastingiscookingbydryheat.
Tendermeatorpoultrycanbe
roasteduncoveredinyouroven.
Roastingtemperatures,which
shouldbelowandsteady,keep
spatteringtoaminimum.When
roasting,it isnotnecessarytosear,
baste,cover,oraddwatertoyour
meat.Roastingiseasy,justfollow
thesesteps:
Step1.Positionovenshelfat
secondfrombottomPosition(B)
Step2:Checkweightofroast.
Placemeatfat-side-upor poultry
breast-side-uponroastingrackina
shallowpan.Themeltingfatwill
bastethemeat.Selectapanas
closetothesizeofmeataspossible.
(Broilerpanwithrackisagood
panforthis.)
Step3:PushBAKEpadandturnSET
knob until desired temperature
isdisplayed,ChecktheRoasting
Guidefortemperaturesand
Step4: Mostmeatscontinueto
cookslightlywhilestandingafter
beingremovedfromtheoven.For
rareor mediuminternaldoneness,
YOUmay wishtoremovemeatfrom
theovenjust beforeitisdoneifitis
tostand10to20minuteswhileyou
makegravyor attendtootherfoods.
Ifnostandingisplanned,cook
meattosuggestedtemperature.
_–
-—.
-.
frozenRoasts
forsmallsizeroast(3to5lbs.)and .
approximatecookingtimes. -=
Frozenroastsofbeef,pork, ~
atbottomposition(A)forlarger lamb,etc., canbestartedwithout ~~
roasts. I
—
@
RoastingGuide
thawing,butallow15to25 minutes
per poundadditionaltime(15
minutesper poundforroastsunder
5pounds,moretimeforlarger
roasts).
Thawmostfrozenpoultrybefore
roastingtoensureevendoneness.
Somecommercialfrozenpoultry
canbecookedsuccessfullywithout
Ithawing.Followdirectionsgiven
onpacker’slabel.
Oven ApproximateRoastingTime Internal
‘Iype Temperature Doneness inMinutesper Pound Temperature“F
Meat 3to5-lbs. 6to8-lbs.
Tendercuts; rib, highquality 325° Rare: 24-33 18-22 130°-140°
sirloin tip, rump or top round* Medium: 35-39 22-29 150°-1600
WellDone: 40-45 30-35 170°-1850
Lamb legor bone-in shoulder* 325° Rare: 21-25 20-23 130°-140°
4. Medium: 25-30 24-28 150°-1600
WellDone: 30-35 28-33 170°-1850
Vealshoulder, legor loin* 325° Well Done: 35-45 30-40 170°-180°
Pork loin, rib or shoulder* 325° WellDone: 35-45 30-40 1700-180°
Ham, pre-cooked 325° ToWarm: 17-20minutesper lb. (anyweight) 115°-1250
Under 10Ibs. 10to 15-lbs.
Ham, raw 325° WellDone: 27-35 24-27 170°
*For boneless rolled roastsover6-inches
thick, add 5to 10minutesper lb. to times
given above.
Poultry 3toS-lbs. Over5Ibs.
Chicken or Duck 325° WellDone: 35-40 30-35 185°-1900
Chicken pieces 375° WellDone: 30-35 185°-190°
10to 15-lbs. Over 15lbs. In thigh:
Turkey 325° Well Done: 18-25 15-20 185°-190°

Broiling
Broilingiscookingfoodbydirect
heatfromabovethefood.Your
ovenhasaconvenientcompartment
belowtheovenforbroiling.A
speciallydesignedbroilerpanand
rackallowsdrippingfattodrain
awayfromthefoodsandbekept
awayfromthehighheatofthe
gasflame.
Distancefromtheheatsourcemay
bechangedbypositioningthebroiler
panandrackononeofthreeshelf
positionsinthebroilercompartment—
A(bottomofbroilercompartment),
B(middle)andC(top).
How to Broil
1. Ifmeathasfator gristlenearthe
edge,cutverticalslashesthroughit
about2inchesapart,butdon’tcut
intomeat.Wer~cornmendthat
trimfattopreventexcessive
smoking,leavingalayerabout
l/8-inchthick.
2. Arrangefoodonrackand
positionthebroilerpaninthe
you
compartment.Placingfoodcloser
toflameincreasesexteriorbrowning
offd, butalsoincreasesspattering
andthepossibilityoffatsandmeat
juicesigniting.
3. Closethebroilerdoor.
4. PresstheBROILpadandturn
theSETknobuntilyourchoice
ofHIBROILor LOBROILis
displayed.Note:Chickenandham
arebroiledatLOBROILinorder
tocookfoodthroughwithout
overbrowningit.
5. Turnmostfoodsonceduring
cooking(theexceptionisthinfillets
offish;oiloneside,placethatside
downonbroilermckandcookwithout
turninguntildone).~lmefoodsfor
aboutone-halfthetotalcooking
time,turnfood;thencontinueto
cooktopreferreddoneness.
6. PushCLEAR/OFFpad.Remove
broflerpanfrombroilercompartment
andservefoodimmediately.Leave
panoutsidethecompartmenttocool.
Questiom&Amwers ~
Q.Whenbroiling,isitnecessary -
to alwaysusearackinthepan?
A. Yes.Usingtheracksuspends
themeatoverthepan.Asthemeat
cooks,thejuicesfallintothepan,
thuskeepingmeatdrier.Juices
areprotectedbytherackandstay
cooler,thuspreventingexcessive
spatterandsmoking.
Q.ShouldIsaltthemeatbefore
broiling?
A. No.Saltdrawsoutthejuices
andallowsthemtoevaporate.
Alwayssaltaftercooking.Turn
meatwithtongs;piercingmeat
withaforkalsoallowsjuicesto
escape.Whenbroilingpoultry
or fish,brusheachsideoften
withbutter.
Q.Whyaremymeatsnotturning
outasbrownastheyshould?
A. Checktoseeifyouareusingthe
recommendedshelfposition.Broil
forlongestperiodoftimeindicated
intheBroilingGuide.Turnfood
onlyonceduringbroiling.
Q. Do1needtogreasemybroilere
racktopreventmeatfromsticking?
A. No.Thebroilerrackisdesigned
to reflectbroilerheat,thuskeeping
thesurfacecoolenoughtoprevent
meatstickingtothesurface.However,
sprayingthebroilerracklightlywith
avegetablecookingspraybefore
cookingwillmakecleanupeasier.
12

BroilingGuide
*Whenarrangingfoodonpan,
donotletfattyedgeshangover
sides,whichcouldsoilbroiler
compartmentwithfatdripping.
eAfterplacingfoodon the
broiler pan, put the pan in the
broiler compartment inthe proper
position. The recommended shelf
position and cooking timecan be
found in the guide below.
The closer the food isto the broil
clement the fiasterthe meat browns
on the outside, yet staysred to pink
inthe center. Movingthe meat
~drtherawdyfrom the flame letsthe
meat cook to the center while
—
~Broiling isalwaysdone with oven
i~ndbroiler doors closed.
~Usctongsto turn meat ovcr-
picrccd mci.ttlosesjuices. ~Broiler does notneedto be
preheated. However,for very thin
foods,or to increasebrowning,
preheat ifdesired.
~Steaksand chops should be al
Ic:istIinch thick for best broiling
results. P~nbroil thinner ones. @FrozenSteakscan be
conventionallybroiledbypositioning
the broiler pan andrack at next
~Alwaysusc broiler pan and rack
thtitcomes with vouroven. It is lowestposition and increasing
cookingtime givenin this guide
1%times per side.
~csigncd to min;nlizcsmokingand browning outside.
~If desired, marinate meatsor
chicken before broiling. Or brush
with barbecue sauce last5to 10
minutes only.
spat;cring bytrappingjuices in the
shielded lower part of the pan.
SecondSide
Time,Minutes
3%
Shelf
Position
c
Qu:lntityand/or
Food ‘1’hickncss 1+1or 1.0
llr{)il
HI
VirstSide
‘lime,Minutes Comments
Arrange in singlelayer.
3‘/’2
llilColl ‘/2-lb.(ilhoUl8
[binslices)
Spaceevenly.Up to 8patties take
about same time.
7-8
1HI 9-10
c
Steaks lessthan l-inchcook through
beforebrowning.Panfrying is
recommended.
Slash fat.
g
12
13
Io
15
25
7
5-6
8-9
6-7
]2-14
16-18
—–
-“
-
--
-
RiirC
Mcdiutl] l-in. thick
(110lY2-lhs.)A
A
A
A
A
A
Reducetimes about5to 10minutes
per side for cut-upchicken. Brush
each side with meltedbutter. Broil
with skin sidedownfirst and broil
with door closed.
25-30
(’hicken(450@) IWhole ILO
(2[()2Y~-lh\.), A
c
c
30-35
split Icngthwist
!I:lker}Products
f3r~ildi-fi)ilst)or
Ti)iis[~rPiistrics
English Muffins
Ix)hsterI’ails
(6[()8-OZ.
C:lch)
HI Spaceevenly.Place English muffins
cut-side-upandbrush with butter if
desired.
l/2-]
Z-3
3-4
13-16
2-spli( IDo not turn over. Cut through backofshell, spread
open. Brush with meltedbutter before
and after half[ime.
BHI
5Handle and turn verycarefully. Brush
with lemon butterbeforeand during
cooking ifdesired. Preheat broiler to
increase browning.
l-lb. I“illcts
1Ato I/z-in.[hick HI c5
1Increase times 5-10minutes per side
for 1l/~-inchthickor home cured.
8 8
Ham Slices(4500) l-in. [hick
Prccookcd” LO B
A
A
B
B
B
B
10
13 4-5
10-12 Slash fat.
I]t)rkChops 2(’/2in.)
WCllDone 2(l-in. thick),
ahout 1lb.
HI
HI
Lambchops
Medium 2( Iin.)
WellDt)nc about 10(012-(YZ.
Medium ‘2(IYz in.),
Well Done about 1lb.
*- *Wieners, l-lb. pkg. (lo)
sin]itiirprccookcd”
stiuiagcs,br~ltwursl
8
10
10
17
6
4-7
10
4-6
12-14
1-~
Slash fat.
If desired, splitsausagesin half
lengthwise:cut into5to 6-inch pieces.
HI c
13

CaremdCleati~
spidcamof
oven
hkrior
ModelJGRC16GEL
TheContinuous-Cleaningoven
cluns itse!fwtilecooking.The
insideoftheoven—top,sidesand
back—isfinishedwithaspecial
coatingwhichcannotbecleaned
intheusualmannerwithsoap,
detergents,steelwoolpads,
commercialovencleaners,coarse
abrasivepadsor coarsebrushes.
Useofsuchcleanersand/ortheuse
ofovensprayswillcausepermanent
damage.
Thespecialcoatingisaporous
ceramicmaterialwhichisdarkin
colorand feelsslightlyroughtothe
touch.If magnified,thesurface
wouldappearaspeaks,valleys,and
sub-surface“tunnels:’Thisrough
finishtendstopreventgrease
spattersfromforminglittlebeads
or dropletswhichrundownthe
sidewallsofahard-surfaceoven
linerleavingunsightlystreaksthat
requirehandcleaning.Instead,
whenspatterhitstheporousfinish
itisdispersedandispartially
absorbed.Thisspreadingaction
increasestheexposureofoven
soilto heatedair,andmakesit
somewhatlessnoticeable.
%Umaynotdisap~r completely
andat sometime afterextended
usage,stainsmayappearwhich
cannotberemoved.
Thespecialcoatingworkbeston
smallamounb ofspatter.It does
notworkwellwithlargerspills,
especiallysugars,eggor dairy
mixtures.
Thespecialcoatingisnotused
onovensheBves.Shelvesshouldbe
cleanedoutsidetheoventoavoid
damageto thespecialcoating
insidetheoven.
Tocleanthecontinuom-
cleani~ oven:
1.Letovenpartscoolbefore
handling.Werecommendrubber
glovesbewornwhencleaning.
2. Removeshelvesandcookware.
3. Soilvisibilitymaybereducedby
operatingtheovenat4W”F.Close
thedoorandpushtheBAKEpad.
ThenturntheSETknobuntil4(X)°F.
isdisplayed.Timeforatleast4
hours.Repeatedcyclesmaybe
necessarybeforeimprovementin
appearanceisapparent.
mMEmER: DURINGTHE
OPERATIONOFTHEOVEN,THE
DOOR,WINDOWAND(YI’HEROVEN
SURFACESWILLGETHCYI’ENOUGH
~CAUSEBURNS.DON~ ~UCH.
LETTHEOVENCOOLBEFORE
REPLACINGOVENSHELVES.
4. If aspilloveror heavysoiling
occursontheporoussurface,as
soonastheovenhascooled,
removeasmuchofthesoilas
possibleusingasmallamountof
waterandastiffbristlenylon
brush. Usewatersparinglyand
changeitfrequently,keepingitas
cleanaspossible,andbesureto
blotitupwithpapertowels,cloths,
or sponges.Do notruborscrub
withpapertowels,clothsor
sponges,sincetheywillleave
unsightlylintontheovenfinish.If
waterleavesawhiteringonthe
finishasitdries,applywateragain
andblotitwithacleansponge,
startingattheedgeoftheringand
workingtowardthecenter.
IDonotusesoap,detergent,
steelWOOIpads,commercial
ovenc~eaner,siliconeoven
sprays,coarsepadsorcoarse
brushesontheporoussurface.
Theseproductswillspot,clog,
andmartheporoussurfaceand
reduceitsabilitytowork.
Donotscrapetheporous
stiace withaMe orspatda—
theycouldpermanentlydarnageit.
PomelainOvenInkrior ~
ModelJGRSBGEL
Withpropercare,theporcelain
enamelfinishontheinsideofthe
oven—top,bottom,sides,backand
insideofthedoor—willstaynew-
lookingforyears.
Letovencoolbeforecleaning.We
recommendthatyouwearrubber
gloveswhencleaningtheoven.
Soapandwaterwillnormally
dothejob. Heavyspatteringor
spilloversmayrequirecleaning
withamildabrasivecleanser.
Soapy,wetmetalpadsmayalsobe
used.Do notallowfoodspillswith
ahighsugaror acidcontent(such
asmilk,tomatoes,sauerkraut,fruit
juicesor piefilling)to remainon
thesurface.Theymaycauseadull
spotevenaftercleaning.
Householdammoniamaymakethe
cleaningjob easier.Place1/2.cupin
ashallowglassor potterycontainer
inacoldovenovernight.The
ammoniatimes willhelploosen
theburned-ongreaseandfood. a
If necessary,youmayuseacaustic
cleaner.Followpackagedirections.
14

—_
—oven shelves RemovableOvenand
BroilerDoon .
Ovenshelvesmaybecleanedwith
amildabrasivecleanserfollowing
manufacturer’sdirections.After
cleaning,rinsetheshelveswith
cleanwateranddrywithaclean
cloth.
Toremoveheavy,burned-onsoil,
soapymetalpadsmaybeused
followingmanufacturer’sdirections.
Afterscrubbing,washwithsoapy
water,rinseanddry.
Theovenandbroilerdoorsare
removabletomakeovenandbroiler
compartmentmoreaccessible.
Toopeneitherdoor, opendoor
fullyandraisethereleasetabon
eachdoorhinge. ,
IFront Frame
—
Toreplace,slidetheovenbottom
sothatthebackedgeoftheoven
bottomrestsontheridgeinthe
backovenwall.Thenlowerthe
frontoftheovenbottomintoplace
behindtheovenfrontframe.
closed open
OvenShelfSupporb BroilerWn&Rack
Toremoveshelfsupports,lifithe
frontofthesupporttounhookit
fromtheovenwall.Thenpullthe
supportpegsoutoftheholesin
thebackwalloftheoven.-
Afterbroiling,removethebroiler
rackandcarefullypouroffthe
grease.Washandrinsethepan
andrackinhot, soapywater. Rele;se Tab ——
—-
-
-
=
If foodhasburnedon, sprinkle
therackwhilehotwithdetergent
andcoverwithwetpapertowelsor
adishcloth.Thatway,burned-on
foodswillsoakloosewhilethe
mealisbeingserved.
Slotfor
FrontHook
\
Rotatethereleasetabstowardthe
ovenasfar astheywillgo,then ‘-
closethedooruntilyoureachthe =
specialstoppositionwhichholds
thedooropenafewinches.
,,
Do notstoreasoiledbroiler
panandrackinthebroiler
compartmentor in theoven.
OvenLi@tBulb
Replacement
Toreplaceshelfsupports,insert
thepegsontheendoftheshelf Beforereplacinganylightbulb,
disconnectelectricpowertothe
rangeatthemainfuseorcircuit
breakerpanel.Letthebulbcool
completelybeforeremovingit. Do
nottouchahotbulbwith.adamp
cloth—thebulbwillbreak.
suDDortintotheholesintheoven
ba;k. Thenlockthefronthookin
theslotintheovenside.
Ovenshelfsupportscanbecleaned
thesameway oven shelvesare
cleaned.
Removableoven Bottom
Theovenbottomcanberemoved
foreasiercleaning.
Graspthedoorfirmlyatthesides
and,~otatetheloweredgeofthe
doorawayfromtheovenandliftit
offthehingearms.
Toreplace,slipthehingearmsinto
theupperendoftheslotsinthedoor.
Toremove,takeouttheoven
shelvesandshelfsupports(see
above).Liftthefrontoftheoven
bottomenoughtoclearthefront
frame,thenpullout.
LowerthedoortotheMy open
positionandrotatethe~leasetabsto .-=..=
theoriginalposition.
Thelightbulbin yourovenis
locatedintheupperrightcorner.
Reachinandunscrewitafter
takingprecautionsmentioned
above.Replaceitwithahigh-
temperatureappliancebulbof
thesamewattage.
—
. ......... 15
.,, , ..
..
—-——.—
..-..

MinorAdjwtmen6YoucanMake
ovenThermostat
Adjmtment
The temperature inyournewoven
hasbeensetcorrectlyatthefactory,
sobesuretofollowtherecipe
temperaturesandtimesthefirstfew
timesyoubakeinyournewoven.
Ifyouthinktheovenshouldbe
hotterorcooler,youcanadjustit
yourself.Todecidehowmuchto
changethetemperature,settheoven
temperature25”F.higherorlower
thanthetemperatureinyourrecipe,
thenbake.Theresultsofthistest
shouldgiveyouanideaofhow
muchthetemperatureshouldbe
changed.
Toadjusttemperature:
1. PushtheBAKEpad.
2. Selectatemperaturebetween
500”F.and550”F.withtheSET
knob.
3. Quickly(withintwoseconds,
beforetheBAKEfinctionenergizes)
pushandholdtheBAKEpadfor
about5seconds.
Thedisplaywillshownumber
ofdegreesdifferencebetweenthe
originalfactorytemperaturesetting
andthecurrenttemperaturesetting.
Iftheoventemperaturehasnever
beenadjusted,thedisplaywill
read00.
4. TurntheSETknobtoadjustthe
temperaturein5“F.steps.Youcan
raiseit25”F.orlowerit25”F.A
minussign(–) beforethenumber
meansthattheovenwillbecooler
bythedisplayedamountofdegrees.
Ifthecontrolbeepsandflashes,push
theCLEAR/OFFpadandstartover.
5. Whenyouhavemadethedesired
adjustment,pushtheCLOCKpad
togobacktothetimeofdaydisplay
ortouseyourovenasyouwould
normally.
BroilandOvenBurner
AirAdjwtmentShutters
Air adjustment shuttersfor the
broil and ovenburners regulatethe
flowof air to the flame.
Toadjusttheairshutters,remove
theovenbottom(seepage15).Turn
burnerfullonandchecktheflames.
Burnerflamesshouldnotflutteror
blowawayfromtheburner.They
shouldbeblueincolorwithno
traceofyellow.Foreignparticlesin
thegaslinemaycauseanorange
flameatfirst, butthiswillsoon
disappear.If theflamesareyellow
or flutter,opentheairshutter
more.Iftheyblowawayfromthe
burner,closetheairshuttermore.
If necessary,useascrewdriverto
loosentheair shutterscrew.Then
adjusttheairshutterand,whenthe
flamesareright,retightentheair
shutterscrew.
8~Air ShutterScrew
~
Toadjusttheorificehoods,check
theinnerconeoftheflame.
WARNING:Ifyouattemptto
measuretheinnerconeofthe
flame,pleaseusecaution.Burns
couldresult.
InnerCone of Flame
Theinnerconeoftheflameshould
beabout 1/2”long.If theflameis
notright,usea1/2”openend
wrenchor adjustablejointpliersto
adjusttheorificehood.
.
rNAT
Toshortenthecones,tightenthe
orificehoodbyturningintheLP
direction.Tolengthenthecones,
loosentheorificehoodbyturning
intheNATdirection.
Note:Theadjustmentdescribed
abovewillnotchangetheself-clean
temperature.
16

cleaningGuide
Note:Letovenpartscoolbeforecleaning. —
—
—
PA~ MATERIALS~USE GENERALDWIONS
BroilerPanand Rack oSoapandWater Drainfat,coolpanandrackslightly.(Donotletsoiledpanandrackstandinbroiler
eSoap-FilledScouringPad compartmenttocool.)Sprinkleondetergent.Fillthepanwithwarmwaterandspread
oCommercialOvenCleaner clothorpapertowelovertherack.Letpanandrackstandforafewminutes.Wash;scour
ifnecessary.Rinseanddry.OFf’ION:Thebroilerpanandrackmayalsobecleanedina
dishwasher.
ControlPanel oMildSoapandWater Washcontrolpanelwithsoapandwater,usingasoftcloth.Donotuseabrasivecleaners.
Rinseanddrywithasoftcloth.
OutsideGlassFinish oSoapandWater Cleanoutsideofcooledblackglassdoorwithaglasscleanerthatdoesnotcontain
ammonia.Washotherglassw’ithclothdampenedinsoapywater.Rinseandpolishwitha
drycloth.If knobsareremoved,donotallowwatertorundowninsidethesutiaceofglass
whilecleaning.
Metai,inciuding ~SoapandWater Wash,rinse,andthenpolishwithadrycioth.DON~ USEsteeiwooi,abrasives,
SideTrimsand ammonia,acids,orcommercialovencleanerswhichmaydamagethefinish.
fiim Strips
PbrceiainEnamei ePapr Towel Avoidcleaningpowdersorharshabrasiveswhichmayscratchtheenamei.Ifacidsshouid
Finish ●DryCloth spiliontheovenwhileitishot,useadrypapertowelorciothtowipeuprightaway.When
●SoapandWater thesurfacehascooied,washandrinse.Forotherspiiis,suchasfatsmatterings,etc.,wash
withsoapandwaterwhencooledandthenrinse.Polishwithdrycioth.
mintedSurfaces *SoapandWater Useamildsolutionofsoapandwater.Donotuseanyharshabrasivesorcleaningpowders
whichmayscratchormarsurface.
InsideOvenDoofi oSoapandWater Tocleanovendoor;removeitfoliowinginstructionsonpageiS.Ciean”withanyandaii
~Soap-FilledScouringPad mentionedmaterials.
~CommercialOvenCleaner
OvenInteriofi— oStiffBristleNyionBrush Coolbeforecleaning.
Top,SidesandBack
modei JGRC16GEL) Ifheavysoiiinghasoccurredontheporohssu”~ace,removeasmuchofthesoiiaspossibie
(CAUTION:Whenirh usingasmallamountofwaterandastiffbristienyionbrush.Usewatersparingiyand
use,lightbulbscan changeitfrequently,keepingitascieanaspossibie,andbesuretobiotitupwithpaper
becomewarmenoughto towels,cloths,or sponges.DonotMborscmbwithpapertowels,ciothsorsponges,since
breakiftouchedwith theywiilleaveunsightlylintoiltheovenfinish.Ifwaterieavesawhiteringonthefinishas
moistclothortowel. ‘itdries,applywateragainandblotitwithacleansponge,startingattheedgeofthering
Whencleaning,avoid andworkingtowatithecenter.
touchingwarmlamps Forspeciaicieaninginstructions,seepage14.
withcleaningcloths.)
OvenLined oSoapandWater Coolbeforecleaning.
(ModeiJGRS15GEL) eSoap-FilledScouringPad
(CAUTION:Whenin eCommercialOvenCleaner FORLIGHTSOIL:Frequentwipingwithmiidsoapandwater(especiaiiyaftercooking
use,iightbulbscan meat)wiliprolongthetimebetweenmajorcleaning.Rinsethoroughly.N~E: Soapieft
becomewarmenoughto onlinercausesadditionalstainswhenovenis reheated.
breakif touchedwith ~FORHEAVYSOIL:Chooseanonabrasivecieanerandfoliowiabeiinstmctions,using
moistclothortowel. thinlayerofcieaner.Useofrubberglovesis recommended.Wipeorrubiightiyon
Whencleaning,avoid stubbornspots.Rinseweli.Wipeoffanyovencieanerthatgetsonthe~ostat buib.When
touchingwarmlamps rinsingovenaftercieaningaisowipethermostatbuib.
withcleaningclothsif
lampcoverisremoved.
RemovabieOven ●SoapandWater Theovenbottompanelcanberemovedforeasycleaning(seepagei5).Usethesame
Bottom eSoap-FilledScouringPad directionsforcleaningasexplainedaboveforPorceiainEnameiFinish.
(Non-metallic)
Sheivesand eSoapandWater Removeshelvesandshelfsupportsandcleanthemoutsideoftheoventoavoiddamaging
SheifSupprE eSoap-FilledScouringPad thespeciallycoatedoventop,sidesandback.Useanyandailmentionedmaterials.Rinse
OCommercialOvenCleaner thoroughlytoremovealimaterialsaftercleaning.NCYfE:Somecommercialovencieaners
causedarkeninganddiscoloration.Whenusingforfirsttime,testcieaneronsmaiipartof
sheifandcheckfordiscolorationbeforecompletelycleaning.
. . . . —... . .. . . . . .. . ...
—
—
--
—
—
—
—-
—
—
——----
—
—
—.
—–
—
—
z
——
—
—
—
—-
—
—
—
———
—-
—
—
*sPi]iageofmarinades,fmitjuices, and basting materials Conumlngacidsmaycausediscoloration.SpilloversshouldMblottedUp lmme(lla~ly,WIUl Cam
beingtakennottotouchanyhotportionoftheoven,Whenthesurfaceiscool,cleanandrinse.
17

Questiom?
useThkRoblemsolver
PROBLEM
OVENDOES~~
COOKPROPERLY~
.
,.
CLOCKA~D ,>’I
MINUTE(SECO~D<-:
TIMERw~~WO~:
OVENLIGHTDOES’‘::
~~ C~M~ ON ‘:~.
>,,
..
OVE~~S”BEEPIN-Gr,, -
.“
,,.
s~ktiN”qODOR<.“‘2‘;
,-
POSSIBLECAU~EA~D/OR WHATTODO
I
Ifyouneedmorehelp..call, tollfree:
GEhswer Center”
8W.6242M
consumerinformationservice
18

IfYouNeedservice
Toobtainservice,seeyourwarranty
onthebackpageofthisbook.
We’reproudofourserviceand
wantyoutobepleased.If forsome
reasonyouarenothappywiththe
serviceyoureceive,herearethree
stepstofollowforfurtherhelp.
FIRST,contactthepeoplewho
servicedyourappliance.Explain
whyyouare notpleased.In most
cases,thiswillsolvetheproblem.
NEXT,if youarestillnotpleased,
writeallthedetails-including
yourphonenumber—to:
ConsumerAffairs
GEAppliances
AppliancePark
Louisville,Kentucky40225
FINALLY,if yourproblemisstill
notresolved,write:
MajorAppliance
ConsumerActionPanel
20NorthWackerDrive
Chicago,Illinois60606
19

YOURGENERALELEmRICRANGE
WARRANTY
Saveproof of original purchase datesuch asyour sales slip or cancelled check to establish warranty period.
WHATISCOVERED FULL ONE-YEARWARRANTY
Forone yearfrom date of original
purchase, we will provide, free of
charge, parts and service labor
in your home to repair or replace
anypaff of the range that f~iis
because of amanufacturing defect.
This warranty isextended to
the original purchaser and any
succeeding owner for products
purchased for ordinary home use
in the 48 mainland states, Hawaii
and Washington, D.C.In Alaska the
warranty isthe same except that it is
LIMITED because you must payto
ship the product to the service shop
or for the service technician’s travel
coststo your home.
All warranty service will be provided
byour Factory Service Centers or
byour authorized Customer Care”
servicers during normal working
hours.
Look in the White or Yellow Pages
of your telephone directory for
GENERAL ELECTRIC COMPANY,
GENERAL ELECTRIC FACTORY
SERVICE, GENERAL ELECTRIC-
HOTPOINT FACTORYSERVICE or
GENERAL ELECTRICCUSTOMER
CARE@SERVICE.
WHATISNm COVERED oService trips to your home to
teach you howto use the product.
Readyour Useand Care material.
If youthen haveany questions
about operating the product,
please contact your dealer or our
Consumer Affairs office at the
address below,or call, toll free:
GE Answer Center@
800.626.2000
consumer information service
@Improper installation.
If you havean installation problem,
contact your dealer or installer.
Youare responsible for providing
adequateelectrical, gas,exhausting
and other connecting facilities.
.Replacement of house fuses or
resetting of circuit breakers.
~Failureof the product if it is used
for other than its intended purpose
or used commercially.
●Damage to product caused
by accident, fire, floods or acts
of God.
WARRAN~R ISNOTRESPONSIBLE
FOR CONSEQUENTIAL DAMAGES.
Some states do not allow the exclusion or limitation of incidental or consequential damages, so the above limitation or exclusion
may not apply to you. This warranty gives you specific legal rights, and you may also have other rights which vary from state to state.
Toknow what your legal rights are in your state, consult your local or state consumer affairs office or your state’sAttorney General.
Warrantor: General Electric Company
if further help is needed concerning this warranty, write:
Manager—Consumer Affairs, GE Appliances, Louisville, KY 40225
1MNL134(343523)
..
.———
DI
JGRS15G
JGRC16GEL
This manual suits for next models
1
Table of contents
Other GE Oven manuals