GE JRP 28 User manual

0ge.com
Safety Instructions ....... 2-4
Operating lns_tructions
Clock and Timer ............ 8
Oven .................. 5-1 7
Sabbath Feature ......... 13, 14
Self'Cleaning ........... 16, 17
Special Feanlres ......... l 0-I 2
Thermostat ............... 15
Timed Baking and
Roasting ................... 9
Care and Cleaning
Control Panel ............. 21
Door . ................... 18
(;lass Surfaces ............. 21
Heating Element ........... 20
Knob .................... 21
I,ifl-Off Oven Door . ........ 18
l[,igh t .................... 20
Oven Interior. ............. 20
Painted Surfaces ........... 21
Shelx es ................... 19
Stainless Steel Surfaces ...... 21
Troubleshooting Tips .... 22-24
Consumer Support
Consmner Support... Back Cover
Product Registration ...... 25, 26
_\hrranty' ................. 27
Write the model and serial
numbers here:
Model #
Serial#
You can find them on a label on
the front of the lower oven behind
the oven door.
JRP28
49-80479 O&07 JR

iMPORTANTSAFETYiNFORMATiON.
READALLiNSTRUCTiONSBEFOREUSING.
For your safeN the information in this manual must be followed to minimize the risk of fire or
explosion, electric shock, or to prevent property damage, personal injury, or loss of fife.
IMPORTANTSAFETYNOtiCE
The California Safe Drinking Water and ToxicEnforcement Act requires the Governor of California to
publish a list of substances known to the state to cause cancer, birth defects or other reproductive
harm, and requires businesses to warn customers of potential exposure to such substances.
The fiberglass insulation in self-clean ovens gives off a very small amount of carbon monoxide during
the cleaning cycle. Exposure can be minimized by venting with an open window or using a ventilation
fan or hood.
SAFETYPRECAUtiONS
When using electrical appflances, basic safely precaufions should be followed, including the following:
_{_:Use this appliance only tbr its intended
purpose as described in this Owner's
Manual.
_t_::Be snre your appliance is properly
installed and grounded by a qualified
mchnician in accordance ,vith tile
provided installation insunctions.
_{::Do not atmmpt to iepair or replace any
part of your oven unless it is specifically
recommended in this manual. All other
servicing should be refeiTed to a qualified
mchnician.
_fi:,:Ha_e the installer showyou die location
of tile circuit breaker or fllse. Mark it for
easy reference.
_fi:,:Before performing any service, disconnect
the oven power supply at tile household
disuibudon panel by removing the fllse or
switching off tile circuit breaken
_:_Do not leaxe children alone---children
should not be left alone or unatmnded
in an area where an appliance is in use.
They should nexer be allowed m sit or
stand on aW part of tile appliance.
_{_Do not allow anyone to climb, stand or
hang on the doon They could damag> die
o_en, or cause se_ie personal iI_jm>
q?{:_Be snle the ox>n is securely installed in a
cabinet that is firmly attached to the house
struculre. Nexer allow anyone to climb, sit,
stand or hang on tile ox>n door
_:_Nexer leaxe the oven door open when you
are not watching tile oxen.
_fi:,:Alwws kee I) combnsfible wall cox_ring,
curtains or drapes a safe distance flom
vonr o\_n.
_?{:_Alwws kee I) dish towels, dish cloths, pot
holders and oilier linens a sad distance
fron] vonr oxen.
_{_Always kee I) wooden and plastic umnsils
and canned food a safe distance away from
vonr oven.
_?{:_Teach children not to p] W with file
controls or any oilier part of die oxen.
_fi:,ii,arge scratches or impacts m glass doors
can lead to broken or shatmied glass.
2

ge.com
WARNING!
SAFETYPRECAUTIONS
_; Do not store flammable mateiia]s in
an o'_en.
_CAUTION:Items of interest to
children should not be stored in cabinets
above an oven; children climbing on the
oven to reach items could be seiiouslv
ii_nred.
_; Never wear loose-fitting or hanging
gamlents while nsing die appliance.
Be careflll when reaching for imms stoied
in cabinets o_er file oven. Flamnlable
mateiia] could be ignited if brought ill
contact with hot surt_aces or heating
elements and may cause se\ere bnfns.
E:,IUse only dW pot holders--moist or damp
pot holders on hot snilaaces ii_ay iesult in
bums from smam. Do not let pot holders
touch hot heating elements. Do not use
a towel or other bulky cloth.
_t{;_For your safely, nexer use your appliance
for wam/ing or heating the ioom.
_t{;_Do not let cooking grease or other
flamnlable materials accumulate in
or ileal the oxen.
ro
_{;:Do not use x_ater on gTease fires.
Nexer pick up a flaming pan.
Turn the controls off:
Flame in die oven call be smothered
completely by closing the oven door and
turning the oven off"orby nsing a mulfi-
pm])ose dUchemical or foam-type fire
extinguisher
E:,INever leaxejars or cans of fi_t drippings
in or near vonr oxen.
_]{;_Stand away from the oven when opening
the oxen doon Hot air or smam which
escapes can cause burrls to hands, lace
and/or eyes.
E:,IDo not heat unopened food containers.
Pressure could build up and the container
could burst, causing an irljni>
E:,IKee I) the oxen lent unobstrncted.
E:,IKee I) the oven flee flom gTease buildup.
E:,IPlace dm oxen shelf in the desired position
while the oven is cool. If shelxes must be
handled when hot, do not let pot holder
contact file heating elements.
E:,:SAllen using cooking or roasung bags in
the oven, fbllow the manufacturer's
diIecfions.
@Do not touch die heating elements or the
interior surPace of die oven. These surPaces
may be hot enougtl to burn even thougtl
they are dark in colon Duling and after
use, do not touch, or let clothing or other
flammable materials contact any inteiior
aiea of the oxen; allow sufficient time for
cooling first.
Potentially hot surfaces inchlde oven lent
openings, surPaces near the openings,
crevices around the oxen dooi, the edges
of the window and metal trin/parts above
tile door
REMEMBER: Tile inside surPace of tile oxen
may be hot when the door is opened.
_;:Do not store or use combustible mamrials,
gasoline or other flammable vapors and
liquids ill the vicinity of this or any other
appliance.
3

IMPORTANTSAFETYINFORMATION.
READALLINSTRUCTIONSBEFOREUSING.
WARNING!
SAFETYPRECAUTIONS
Pulling out the shelf to the stoi>lock is
a com.enience in lifting hemy' %ods.
It is also a precaution against bmns flom
touching hot snrfaces of the door or
ox.en walls.
Do not use the oxen to d_T newspapers.
[t'oxerheated, they can catch on fire.
Do not use the oxen foi a storage area.
Items stored in an oxen can iga_ite.
Do not leme paper products, cooking
utensils or food in the oxen when
not in use.
q_{::'After broiling, always rake any broiler pan
out of the oven and clean it. Leftover
gTease in a broiler pan can catch rit.e
next time you use the pan.
_{::Clean only parts listed in this Owner's
Manual.
;f; Do not use aluminum foil to line
oxen bottoms, hnproper installation
of ahm/inum foil may resuh in a risk
of electric shock or fire.
COOKMEATANDPOULTRYTHOROUGHLY...
Cookmeatandpoultrythoroughly--meat to at leastan INTERNALtemperatureof 160°Fandpoultry
toat least an INTERNALtemperatureof 180°ECookingto thesetemperaturesusuallyprotectsagainst
foodboroeilbess.
SELF-CLEANINGOVEN
_ Do not clean die door gvtsket. The door
gasket is essential for a good seal. Care
should be taken not to rub, damag.e or
mox.e the gasket.
E:.IDo not use ox.en cleaners. No comme,vial
ox.en cleaner or oven liner protective
coating of any kind should be used in or
around any part of die ox.en. Residue from
ox.en cleaners will damag> the inside of the
ox.en when the self-clean cycle is used.
q_:;Before self-cleaning the oxen, remoxe
shiny, siher-colored oxen shelxes (on some
models) and all other cookware.
_t{:;Be sure to wipe up excess spillag.e be%re
starting the self-cleaning operation.
;_i:,:If the self-<'leaning mode malfunctions,
mrn the ox.en off and disconnect
die power supply. Have it serviced by
a qualified mchnician.
READANDFOLLOWTHISSAFETYINFORMATIONCAREFULLY.
SAVETHESEINSTRUCTIONS
4

Usingthe ovencontrols, gecom
Throughout this manual, features and appearance may vary from your model.
BAKE BROIL
??
UpperOvenControl,ClockandTimerFeaturesandSettings
BAKEPad
Touch this pad to select the bake fimcfion.
BAKELight
Flashes \dlile ill edit mo(le--_ou can change tile
o_en temperatul_ at this poi_m Glo_:s when tile
o_en is ill bake nlode.
BROILHI/LOPad
Touch this pad to select file broil function.
BROILLight
Flashes \dlile iI1edit 1T|odeI\Oll c}lI/switch
fl'on/HI to LOBROILat this p(hnt. Glo_s \d_en
file o_en is ill broil mode.
ODisplay
Sl/o_:s the open_fions you have selected,
the time of dat and tile cooking slams.
COOKINGTIMEPad
Touch this pad and then touch tile +or - pad
to set tile kll//otlnt of time you want your toed to
cook. Tile oven will shut off \_hen tf/e cooking
time has run out.
ODELAYSTARTPad
Use along with tile COOKINGTIME or
SELFCLEANpad to set file o_en to start and stop
automatically at a tin/e you set.
OOVENLIGHTON/OFFPad
Touch this pad to turn tile ()\ell light on
or O___
OTIMER/CLOCKPad
Touch this pad to select the timer teatul_. Titan
touch +and - pads to at!jUst tin/e.
To set tile clock, touch this pad t\Jce and hold 3
seconds and then touch tile +and - pads. Tile
time of dm will flash ill fl_e display \allen tile
o_en is fil_t turned on.
OSTARTPad
MtlSt be touched to start an} cooking _'t/I/('dOI/.
-Pad
Short taps to this pad will decrease tile fin/e
or temperature b_ small amount.s. Touch
and hold the pad u/decrease file time or
tel// l)erature bx, larger, alllOtllltS
O+Pad
Short taps to fllis pad will increase fl_e dine
or mmperaulre b? small amount.s. Touch
and hold tile pad u/increase tile fin/e or
[el// })erature bx, larger, alllOUil[s
OCLEAR/OFFPad
Touch this pad to cancel ALL men operations
except the clock and timel:
SELFCLEANPad
Touch this pad to select tile seltkleaning
fimcfion. See fl_e Usingtheself-cleaning oven
section,
CLEANLight
Iqashes \dlile ill edit n/ode--?ou can change tile
length of time tar the selL:clean cycle at this
point. Glo_:s when the o_en is ill tl/e sell:clean
cycle. After d_e seltMean wcle, the light will turn
(;ttl Unlatch the door
If %anda numberorletter"flashin thedisplayand theoven
controlsignals,thisindicatesafunctionerrorcode.
TouchtheCLEAR/OFFpad.Allow theoventocoolforonehour
Puttheovenbackintooperation.
If functionerrorcoderepeats,disconnectpowertotheovenand
callforservice.
Lower OvenControl
OVENTEMPKnob LowE.OWN
Turn dlis knob to
fl_e temperatulv
setting you want. =_.
_ob
OFF OVEN CYCLE TheOVENCYCLElightgbwsuntiltheovenreachesyoursebcted
temperature,thengoesoffandonwiththeovenelement,s)during
cooking.

Usingtheoven.
Toavoid possible bums, place the shelves in the desired position before you turn the oven on.
Illl
Before you begin...
The shelves have stop-locks, so that when
placed correctly on the supports, they will
stop before coining conlpletely out, and
will not tilt.
_._hen placing and reino_ing cookware,
pull the shelf ()/it to the bunlp on the
shelf support.
To remove a sheff, pull it towaM you,
tilt the fl'ont end up and pull it out.
To replace, place the end of the shelf
(stoi>locks) on the support, tilt up the
fi'ont and push the shelf in.
The oven has 4 shelf positions.
How to Set the Oven for Baking or Roasting
[] Touch the BAKE pad.
] Touch tile ÷or - pad to set tile
desired temperature.
[] Touch tile START pad.
[] Check fi)od for aloneness at
minim tall time (mrecil _ " (;o()kl()nger
if necessm):
[] Touch tile CLEAR/OFFpad when
cooldng is complete.
NOTE"Thelower ovenis controlledwith a knob.
Toset the ovenfor baklbgturn theknobto the
desiredsett/bg or temperature, fiJrnthe knob to
OFFwhen baklbgi_ complete.
Typeof Food Shelf Position
Frozenpies(oncookiesheet) B orC
Angelfoodcake, A
bundtorpoundcakes
Biscuits,muffins,brownies, B orC
cookies,cupcakes,
layercakes,pies
Casseroles BorC
NOTE:A cool/#gfanmayautomatballyturnon
andofftocoolbterna/parts.This/snornTal,and
thefanmaycent/huetorunevenaftertheoven/_
turnedoff.
Preheating and Pan Placement
Preheat tile ()veil if tile recipe calls for it.
To preheat, set tile oven at tile correct
teinperature. Preheating is necessaiw for
good results when baking cakes, cookies,
pastI T and breads.
Forovenswithout a preheat indicator fl)ht or
tone,preheat 10minutes.
Baking results will be better if baking pans
aI'e centei'ed in tile ()veil as Illtlch _lS
possible. Pans should not touch each
other or tile walls of tile oven. If you need
to use two shelves, stagger the pans so one
is not directly above tile otheI; and leave
approMniately 1½" between pans, fl'oni
the ti'ont, back and sides (ff the wall.
Aluminum Foil
Do not usealuminum foil on the bottom
of the oven.
Never entirely cover a shelf with
ahmlinuni foil. This will disturb tile heat
circulation and result in poor baking.
A sinaller sheet of ti)il nlav be used to
catch a sl)illox er bv,l)lacing, it on a lower
shelf several inches below the toocl.

ge.com
Leave the door open to the broil
stop position. The door stays open
by itself, yet the proper temperature
is maflTtaflTedf17the oven.
How to Set the Oven for Broiling
[] Place the meat or fish on a broiler
,grid in a broiler I)an designed,
for broiling.
[] Follow suggested shelf positions in
the Broiling Guido.
If your oven is connected to 208 volts,rare steaks
may be broiled bypreheatingthe broiler and
pos/tioning the oven shelf one pos/t/on higher
[] Touch the BROILHI/LOpad once for
HIBroil
[]
[]
To change, to LOBroil, touch the
BROIL HI/LO pad again.
Touch the START pad.
_4_en broiling is finished, touch the
CLEAR/OFFpad.
NOTE."Theloweroveniscontrolledwithaknob.
TosettheovenforbroilingturntheknobtoBROIL.
TurntheknobtoOFFwhenbroilingiscomplete.
Broiling Guide
Quantity and/ Shelf First Side Second Side
Food or Thickness Position Time (rain.) Time (min.) Comments
GroundBeef 1 lb.(4 patties) C 10 7 Spaceevenly.Up
Well Done 1/2to 3/4" thick to8 pattiestake
aboutthe same
time.
Beef Steaks
Rare
Medium
Well Done
Rare
Medium
Well Done
Chicken
LobsterTails
Fish Fillets
1" thick
1to 11/LIbs.
Pork Chops
Well Done
LambChops
Medium
Well Done
Medium
Well Done
1I/2"thick
2to 21/LIbs.
1whole
2to 2½ibs.,
splitlengthwise
24
6to Boz.each
1/4to I/2" thick
C
C
C
C
C
C
A
6
8
12
10
15
25
35
1316
5
B
11
78
14 16
20_5
10 15
Donot
turn over.
Ham Slices 1" thick B 8 8
(precooked)
2(1/2" thick) C 10 10
2(1"thick)about1lb. B 13 13
Slashfat.C
C
C
B
2{1" thick)about 10
to 12oz.
1
2(1½"thick)about1lb.
10
12
14
17
9
10
12
12 14
Steakslesstitan
1" thickcook
throughbefore
browning.
Panfrying is
recomroended.
Slashfat.
Reducetimeabout
5to 10minutes
persideforcut-up
chicken.Brush
eachsidewith
meltedbutter.
Broilskin-side-
downfirst.
Cutthroughbackd
shell.Spreadopen.
Brushwith melted
butter before
broilingandafter
half of broiling
time.
Handleandturn
verycarefully.
Brashwith lemon
butterbeforeand
duringcooking,if
desired.Preheat
broilerto increase
browning.
Increasetime5to
10minutesper
sidefor 1½"thick
orhomemuredham.
Slashfat.

Usingthe clock and timer.
Not all features are on all models.
Make sure the clock is set to flTe
correct time of day.
To Set the Clock
Tile clock must be set to tile correct time
of day fin" tile autonmtic oven tinting
timcfions to work properly: Tile time of
day cannot be changed durhlg a delayed
cooking or a delayed self-cleaning cycle.
[] Touch tile TIMER/CLOCKpad twice.
[] Touch tile ÷or-pad.
If tile +or - pad is not touched
within one minute after )ou touch tile
TIMER/CLOCKpad, tile display rexerts to
tile original .settin ,_ If this happens, touch
tile TIMER/CLOCKpad t\dce and reenter
tile time of day.
[] Touch tile START pad until tile time
of day shows in tile display: This
ente_ tile time and starts tile clock.
Tocheckthetimeofdaywhenthedisp&yis
showl))gotherinformation,simplytouchthe
TIMER/CLOCKpad Thetimeofdayshowsuntil
anotherpadistouched
ToTurnOffthe Clock Display
If you have several clocks in yet:u" kitchen,
you may wish to turn off tile dine of day
clock display on your oven.
[] Touch tile TIMER/CLOCKpadonce
tO ttlI'n off tile time of day display.
Mthough you will not be able to
see it, tile clock maintains tile correct
time of din.
[] Touch tile TIMER/CLOCKpad twice to
recall tile clock display:
Thetimer is a minute timer only.
TheCIEAR/OFFpad does not affect
the time_
To Set the Timer
ThetlYnerdoes not control ovenoperations.
ThemaxlYnumsemng on the timeris 9hours
and59 minutes.
[]
[] Touch tile TIMER/CLOCKpad.
Touch tile +or-pad until tile
_lIllO/lnt Ol_ tiIlle FOil W_lIlt shows in
tile display. Tile maximum time that
can be entered in minutes is 59.
Times more than 59 minutes should
be changed to hom_ and minutes.
Ifyoumakeamistake,touchtheTIMER/CLOCK
padandbeg1))agalk
[] Touch tile STARTpad. Tile time
will staxt counting down, althouoh
tile displa) does not ch'ln,,e,_ tmtil
one minute has passed.
[] X4q/en tile timer reaches :00, tile
control will beep 3 times tollowed by
one beep exer_ 6 seconds tmfil tile
TIMER/CLOCKpad is touched.
To Reset the Timer
If tile display is still showing tile time
remaining, you may change it by touching
tile TIMER/CLOCKpad,then touching tile
+or -pad until tile time um want
appea_ in tile display:
If tile remaining time is not in tile display
(clock, start time or cooking time are in
tile display), recall tile remaining time by
touching tile TIMER/CLOCKpad and then
touching tile +or -pad to enter tile new
[iII/e vo/i w_l nt.
ToCancel the Timer
Touch tile TIMER/CLOCKpad twice.
8

Usingthe timedbakingand mastingfeatures.
(These features are not available for the lower oven.) (on some models) ge.com
NOTE:Foods that spoil easily--such as milk, eggs, fish, stuffings, poultry and pork--should not be allowed to sit for
more than 1hour before or after cooking. Room temperature promotes the growth of harmful bacteria. Be sure that
the oven light is off because heat from the bulb will speed harmful bacteria growth.
How to Set an Immediate Start and Automatic Stop
Theoven will turnon lYnmediatelyandcookfor a
selectedlengthof tlYne.At the end of thecooking
time the ovenwill turnoff automatically
to hom_ and minutes. _%r example,
enter 90 minutes as 1 hem, 30
minutes.
Make sm'e the clock shows the correct
time of day.
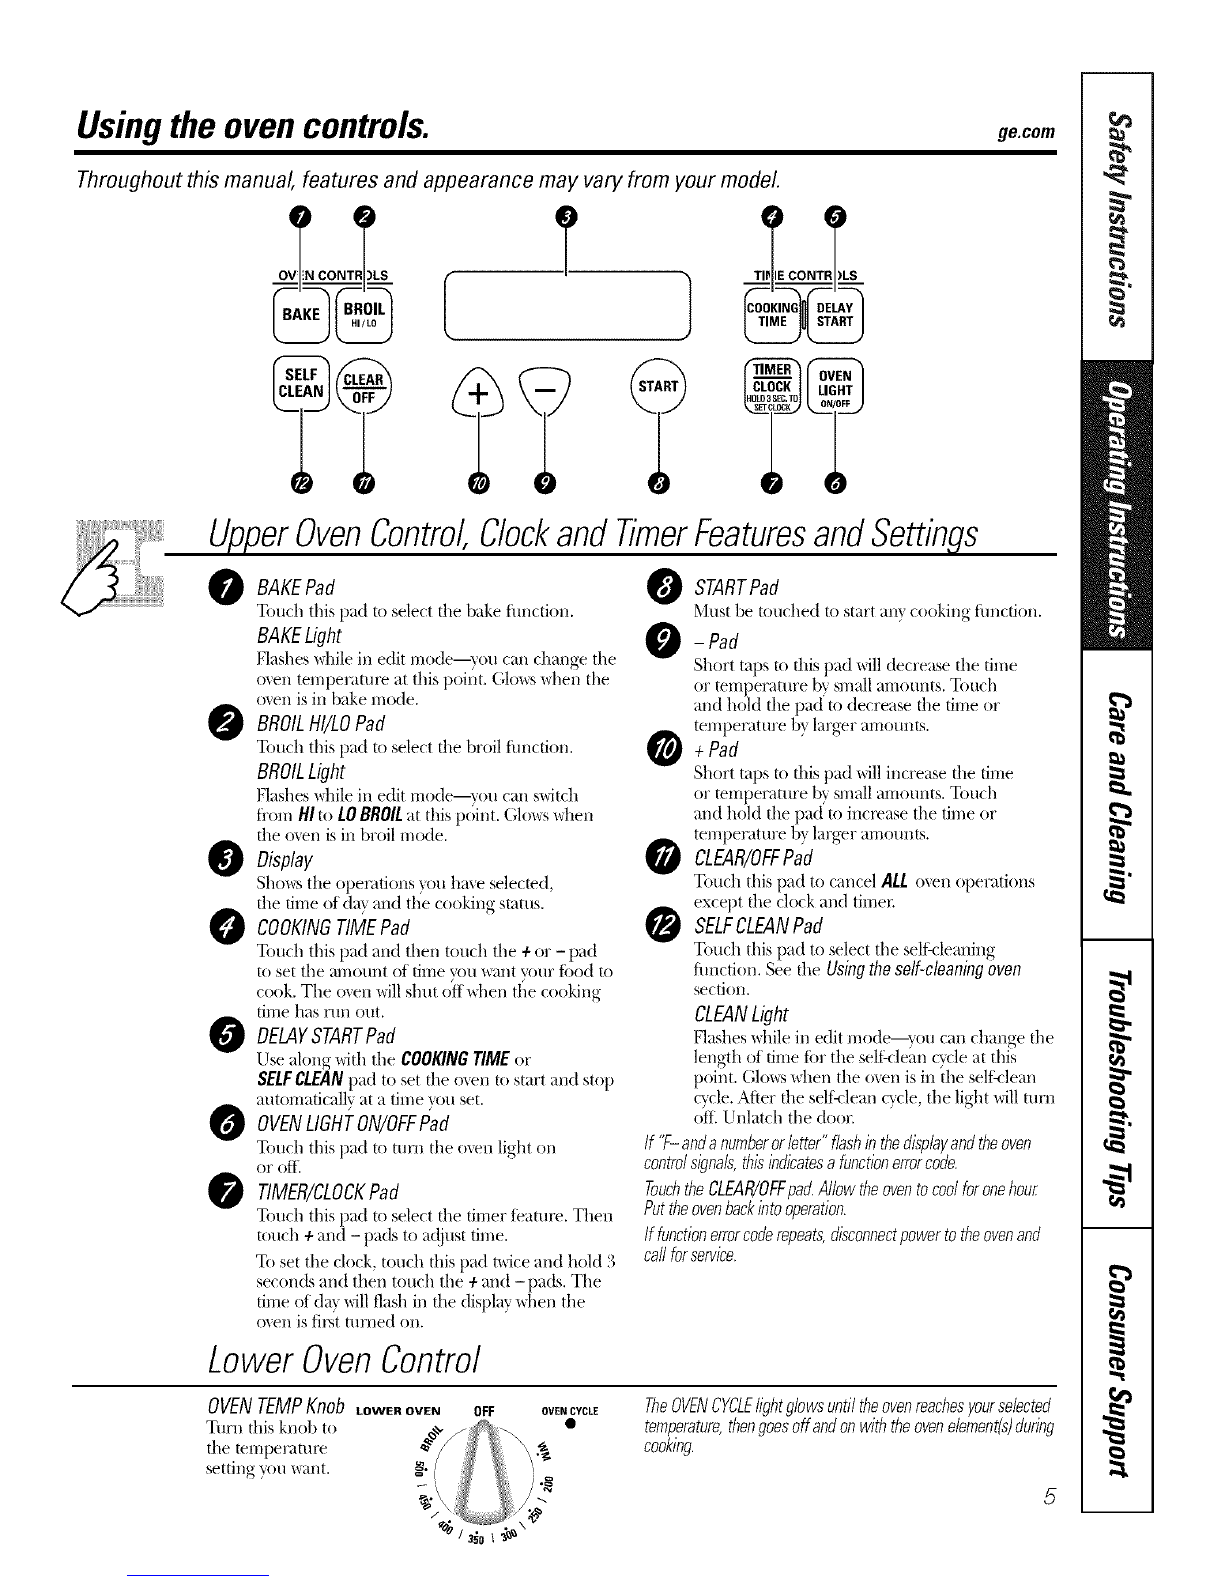
[] Touch the BAKEpad.
[] Using the +or - pad, enter the
desired temperatm'e.
[] Touch the COOKING TIME pad.
NOTE:If yourreciperequkespreheatl)_g,you
mayneedtoaddadditionaltimeto thelengthof
thecookingtime.
[] Llsing the 4-or -pad, enter the
desired baking time. Tile maximmn
time _ou can enter in minutes is 59.
Cooldm, times more than 59
minutes should be chan,,ed
The oven temperatm'e and the cooking
time that w_u entered will be displayed.
[] Touch the START pad.
Tile display sho_vs tile oven temperatm'e
that you set and tile cooking time
co/mtdown. The display starts changing
once tile temperatm'e reaches lO0°E
Tile oven will confintle to cook for tile
programmed alnount of tilne, then shut
off automatically; tmless the Cook and
Hold teattu'e was set. See the Special
features of your oven control section.
Touch tile CLEAR/OFFpad to clear die
display:
How to Set a Delayed Start and Automatic Stop
Youcanset theoven control to delay-startthe
oven,cook for aspecific lengthof time and then
turnoff automatlca//g
NOTE:An attention tonewill soundif youare
using timedbakinganddo not touchthe START
pad after enten))gthe bakl))gtemperature.
Make sm'e tile clock shows tile correct
time of day.
[] Touch tile BAKEpad.
Using tile 4- or - pad, enter tile
[] desi_2ed temperatm'e.
[] Touch tile COOKINGTIMEpad.
NOTE:If yourreciperequkespreheatl)_g,you
may needto addaddiflona/time to the lengthof
the cookl))gtime.
[] Using tile 4-or -pad, enter tile
desired baking time. Tile maximmn
time xou can enter in minutes is 59.
Cook]n,, times more than 59
minutes should be changed to hom_
and minutes. For example, enter 90
minutes as 1 horn; 30 minutes.
Tile oven temperature and tile cooking
time that _ou entered will be displayed.
[] Touch tile DELAYSTART pad.
[] Using tile 4-or - pad, enter tile time
of (lay _o/I _V}lIlt tile o_en to tllI'n on
and start cooking.
[] Touch tile STARTpad.
If you would like to check tile times you
haxe set, tot Ich th e DELAgSTART I)',1d t()
check tile start time _ou haxe set, or
touch tile COOKING TIME pad to check
the length of cooking time you haxe set.
"_3/en tile oven turns on at tile time of
da) )ou haxe set, tile displa) will show tile
changing temperatm'e (starting at 100°F)
and tile cooking time co/mtdown.
Tile oxen will continue to cook for tile
l)I'Ogl'alllI//, ed all/o/Int of till/e, th ell sh tit
off automaticall), tmless the Cook and
Hold teatm'e was set. See tile Special
features of your oven control section.
At tile end of timed baking, tile oven
will tm'n off. Tile end of c',cle tone will
So//nd,
Touch tile CLEAR/OFFpad to clear tile
display.
9

Special featuresofyour ovencontrol.
Yournew touch pad control has additional features that you may choose to use. The following are the features
and how you may activate them.
Thespecial feature modes can only be activated while the display is showing the time of day. They remain
in the control's memory until the steps are repeated.
When the display shows your choice, touch the $TARTpad. Thespecial features will remain in memory after
a power failure, except for the Sabbath feature, which will have to be reset.
12Hour Shut-Off
VViththisfeature,shouldyouforgetandleavethe
ovenon,thecontrolwillautomat/2allyturnoff the
ovenafter12hoursdunngbakingfunctionsor
after3 hoursdonngabroilfunction.
If xou wish to turn OFFthis rearm'e,
tbllow tile steps below.
[] Touch tile BAKE and BROIL HI/LO
pads at tile stone time for 3 seconds
mltil the displa_ sho_s SE
[] Touch tile BELAYSTART p:M tmfil
no shdn (no shut-off) appem_ in tile
disp]:%
[] Touch tile SNRT pad to lock in tile
uo shdu (no shut-off )featm'e and
lea_e tile control set in this special
f_:ltt II'eS I//ode.
NOTE"Thisfeature/snotavailableforthe
loweroven.
Fahrenheit or Celsius Temperature Selection
Yourovencontrol is set touse the Fahrenheit
temperatureselectionsbut youmay changethis
touse the Celsiusselections.
[] Touch the BAKE ;rod BROILHI/LO
pads at the same time for 3 seconds
tmtil the displa} shows SF
[] Touch the BROILHI/LO ;rod
COOKING TIMEpads at the same time
for 2 seconds. The displa} will show
F (Fahrenheit).
[] Touch the BROILHI/LO ;rod
COOKING TIMEpads again at the
• -) c
same rune flr 2 seconds. The displa}
will show C (Celsius).
[] Touch the STARTpad.
NOTE"Thisfeatureisnotavailableforthe
loweroven.
iiiiii!
}7 i( i i ill iii
10
Control Lockout
Yourcontrol will allow you tolock down the touch
pads sothey cannotbe activated when touche&
[] Touch the BAKE and BROILHI/LO
pads at the same time for 3 seconds
tmtil the display shows SF
[] Touch the SELFCLEAN pad. The
display _dll show LOCOFF.
Touch the SELFCLEANpad again.
The displa_ _dll show LOCON.
[] Touch the START pad to acfix _te
the control lockout teature and
leave the control set in this special
Je;Itt II'_ i/lode.
_¥hen this featm'e is on and the touch
pads are touched, the control will beep
and the displa} will show LOC.
To tmh)ck the control, repeat steps 1 and
2. Touch the START pad when the display
shows LOCOFF.
NOTE"
_; Thecontrollockoutmodewill notaffectthe
TIMER/CLOCKandOVENLIGHTON/OFF
touchpads.
;;Ji::Thisfeatureisnotaval/ab/efortheloweroven.

ge.com
Tonesat the End of a Timed Cycle
At theendofatimedcycle,3shortbeepswill
soundfollowedbyonebeepevery6secondsuntil
theCLEAR/OFFpadistouche_Thiscontinuous
6secondbeepmaybecanceled
To cancel the 6 second beep:
[] Touch the BAKE and BROILHI/LO
pads at the sanle time f'm 3 seconds
until the displa) shows SE
[] Touch the BROILHI/LOpad. The
displa} shows CONBEEP(continuous
beep). Touch the BROILHI/LOpad
again. The display shows BEEP.
(This cancels the one beep
e\'exT 6 seconds.)
[] Touch the STARTpad.
NOTE: Thisfeatureisnot availablefor the
lower oven.
12 Hour, 24 Hour or Clock Black-Out
Yourcontrol is set to usea 12hourclock.
If you would prefer to have a 24 ham"
militmw time clock or black-out the clock
display, fi)llow the steps below.
[] Touch the BAKE and BROILHI/LO
pads at the same time fi)r 3 seconds
until the display shox_s SF.
[] T(>uch the TIMER/CLOCK pad once.
The display will show 12hr. If this
is the choice wm want touch the
STARTpad.
T(>uch the TIMER/CLOCKpad again
to change to the 24 hour militm_'
time clock. The display will show 24
hr. If this is the choice you want
touch the START pad.
Touch the TIMER/CLOCKpad again
to black-out the clock display.
The display will show OFF.
If this is the choice you want
touch the START pad.
NOTE."If the clock isin the black-outmode you
will not beable to usethe DelayStart function.
11

Special featuresofyourovencontrol.
Cook and Hold
Yournewcontrolhasacookandholdfeaturethat
keepscookedfoodswarmforupto3hoursafter
TinTedBakingor Roastingisfinished.
NOTE" Thisfeaturecanonly beprogrammedto
work with TknedBakbg or Roastbg. (Seethe
Usingthe tintedbak/ngandroasting features
section.)After timedBakingor Roastinghas
automat/2a/lystopped,the programmedCook
andHo/dwill automatica//ystart.
To activ;ffe this featm'e for use a!,ter
Timed galdno, _ or Roasting, follow the
steps below.
[] Touch the BAKE and BROIL HI/LO
pads at the same time tbr 3 seconds
mltil the displa_ shows SE
[] Touch the COOKING TIME pad. The
displa) will sho_ Hid OEE
Toud_ the COOKING TIME pad again
to activate the teatm'e. The disp]a_
will sho_ Hid ON.
[] Touch the STARTpad to activate the
cook and hold feature and leave the
control set in this special ieatures
mode.
NOTE: Thisfeature/_ not available for the
lower oven.
Changing the Speed of the + or- Pads
Asyouusethe+ or-pad whensettinga timeor
temperature,youmaynoticethedisplaychanges
s/ow/_zThisspecialfeatureallowsyoutochange
thespeec_Tosetthespeedyouprefer,followthe
stepsbelow
[] Touch the BAKE and BROILHI/LO
pads at the salne time Ira" 3 seconds
tmtil the displa) shows SE
[] Touch the +pad. The displa) will
show )ou a set speed between
1 and 5.
] Touch the ÷pad to increase the
speed up to the nmnber 5.
Touch the - pad to decrease the
speed down to the nmnber l.
[] Touch START to activate the ,setfino
and leaxe the control set in this
special featm'es mode.
12

Usingthe SabbathFeature.(Thisfeatureisnot available for the lower oven.)
(Designed for use on the Jewish Sabbath and Holidays.) (onsomemodels) ge.com
The Sabbath feature can be used for baking/roasting only. It cannot be used for broiling, self-cleaning,
or Delay Start cooking.
NOTE: The oven light comes on automatically (on some models) when the door is opened and goes off when
the door& closed. The bulb maybe removed. See the Oven Light Replacement section. Onmodels with a light
switch on the control panel, the oven light may be turned on and left on.
i @! iiiil;iii!i
[]
/i ;@ i¸¸i ¸ []
[]
When the display shows Dthe
oven is set in Sabbath. When the
display shows D c the oven is
bakflTg/roasting.
How to Set Sabbath Feature for Regular Baking/Roasting
NOTE."Tounderstandbow theoven control works,
practice usingregular baking (non-Sabbatb) before
entedng Sabbathmode.
Make surethe clocksbows thecorrect time of da}_
] "Foudl and hoM both the BAKE and
BROIL HI/LO pads, at the same time, until
the dist)la } shows SF.
Tap die DELAYSTARTtrad until SAb bAtH
at)t)ears in the dist)laT_
"Ibuch the START pad and D will appear
in il/e display.
"Ibudl die BAKE pad. No signal *,*,rill
be _,,i",en.
[]
] Touch die START pad.
] \tier a nmdon/delay period of
al)t)loximamlT_ 30 seconds to 1 minute,
D c will appear in die distflay indicating
that the oven is baking!roasting.
IfD c does not appear in die disl)la },
start ag;dn at step 4.
"Ib a(!iusi tile ()\ell teml)e_mn:e, touch
the BAKEtrad and mp the 4-or -pad to
increase or decrease the temt)emtm:e in 5 °
increments. "Ibuch die STARTpad.
NOTE:The CLEAR/OFF'and COOKING TIMEpads
arc acti*,'c(tufiHg the Sabbath {;t'atm'e.
The t)l'eSe[ startill}4 tel//l)el_ltllre
will amonmticall'v be set to 35() '. "[hl)
tile +or -pad to increase or decrease
the temt>emture ill 5 ° increments. The
temt>emture can l>e set between 170 °
and 550 °. No sigl/al or teml)el';iture
will be given.
@
@
Whel7 TlTe OlSOlal $17ows _tlTo
oven Is serm Sabbath. When the
alSOl8_ SITOWS _ C rite over Is
baking/roasting.
How to Set Sabbath Feature for Timed Baking/Roasting--
Immediate Start and Automatic Stop
NOTE."Tounderstandbow theoven control works,
practice usingregular (non-Sabbath)ImmediateStart
andAutomatic Stop before entering the Sabbathmode,
Make surethe c/ocksbows the correct time of da}_
]"lbuch and hold both the BAKE and
BROIL HI/LO pads, at the same time, m/til
the display shows SF.
F2] Tap the DELAYSTARTpad until SAb bAtH
at)l)em:s in the displa}'.
]"lbudl the START pad and : will appear
in die displaT_
]"lbudl the COOKING TIME pad.
]"Ibuch the +or -pad to set the desired
length at looking time t)etweell 1
minute and 9 hours and 59 n/il/utes. The
looking time that _ou (!llt(!Fed will be
displaT_ed.
] "lbudl the START pad.
] "lbu/h dw BAKEt)ad. No sig_lal *,,,rill
1)(! gJvel/.
] The preset starting temperature will
automati(allv be set to a'50 °. "]hp the
4-or - pad to increase or decrease the
temperature in 5° increments. The
tel/ll)eratlll:e C_tl/t)e set t)etweell ]70 °
and 5.50°. No signal or mmperamre
will be given.
] "['oudl die START pad.
[_ After a l_mdon/delay period of
at)t)1 oximatel)30 seconds to 1 minute,
D c will appear in die displa} indicating
that tile o*,_'n is baking! roasdng. IfD c
does not al)l)ear in tile dist)lay, start ag_ain
_tt step 7.
To a(!iust tile o\en temt)e_mn:e, touch tile
BAKE pad and tap the 4- or -pad to increase
or decrease tile teml)erature in 5' increments.
Touch the STARTpad.
When cooking is tinished, the displa? will
change/i:om m m to m and 0:_0will appear,
indk ating d/at ille o*,en has turned OFEbut is
still set in Sabbadl. Remove ille cooked load.
13

Usingthe Sabbathfeature.
How to Exit the Sabbath Feature
@
[] Touch the CLEAR/OFFpad.
[] I_ the o\en is, rooldno_, _ait for
arandom dela_ peI_iod of
approximate F BOseconds to
1 minute, until only D is in the
display,
[] Touch and hokl beth the BAKE and
BROIL HI/tO pads, at the same time,
until the display shows SE
[] %q_ the DELAY STARTpad until
12shdn or no shdn appea,_ in the
display. 12shdn indicates that the
oven will automatically turn off after
12 hom_. no shdfl indicates that the
oven will not automatically turn off.
[] Touch the STARTpad.
NOTE" If a power outage occurred while
the o\en was ill Sabbath mode, tile o\en
will automatically turn off and tile oven
control Ill tlSt be reset,
14

Adjust the oven thermostat--Do it yourself! ge.com
Youmay find that your new oven cooks differently than the one it replaced. Use your new oven for a few weeks to
become more familiar with it. If you still think your new ovenis too hot or too cold, you can adjust the thermostat yourself.
Do not use thermometers, such as those found in grocery stores, to check the temperature setting of your oven.
These thermometers may vary 20_40 degrees.
NOTE: This adjustment will not affect the broiling or the self-cleaning temperatures. The adjustment will be
retained in memory after a power failure.
ToAdjust the Oven Thermostat (onthe upperoven)
[] Touch tile BAKE and BROILHI/LO
pads at tile same time f'o_ 3 seconds
until tile display shows BE
[] Touch tile BAKE pad, A two digit
munl)er shows in tile displa}:
[] _,_q/en you haxe made tile
ac!justment, touch tile STARTpad
to go 1)ack to tile time ot (Ira
display: Use }our oxen as xou
would normally:
[] Tile o_,en teillpei'atlli'e C}lIl be
a(!justed up to (+) .: P hotter or
(-) 35°F coole_: Touch tile ÷pad
to increase tile temperature in 1
degree increments. Touch tile
- pad to decrease tile temperature
in 1 degree increments.
Turnthe diskcounterclockwiseto
ilTcreaso the over temperature.
ToAdjust the Oven Thermostat (onthe Ioweroven)
Pull tile OVEN knob oft tile shaft, look Ym will hear and feel tile notches as )ou
at tile back of tile knob and note tile t/Irn tile knob. Each notch chan,,es
current settino befl)re making any temperature about 10° Fahrenheit.
ac!jusnnent. Tile knob is tactory set with
the top screw directly under the pointer [] Tighten the screws.
[] Pull off tile OVEN knol). [] Return tile OVEN knob to tile oxen.
]I,oosen both screws on back of Re-checkovenperformancebeforemak/)_gany
tile knob. addifiona/adjustments.
[] Hold both parts of tile knob as
shown in tile illustration ot tile ba{k
ot tile OVEN knob and turn so tile
lower screw moves in tile desired
direction.
Turn the disk clockwise to decrease
the over temperature.
Thetypeofmargarine will affect bakingperformance!
Most recipes for baking have been developed using high fat products such as butter or margarine (80% fat). If you
decrease the fat, the recipe may not give the same results as with a higher fat product.
Recipe failure can result if cakes, pies, pastries, cookies or candies are made with low fat spreads. Thelower the fat
content of a spread product, the more noticeable these differences become.
[_edei'al standards require products labeled "illai'gai'ine" to {'ont;lin at least 80% tilt by weight. I,ow tilt spreads, Oil tile
other hand, contain less lilt and more water Tile high moisture content of these spreads afti_ct tile mxture and flavor
of baked goods. For best results with your old tm.o_ite recipes, use margarine, butter or stick spreads containing ]
at least 70% vegetable oil.

Usingthe self-cleaning oven.
(Thisfeatureisnot availablefor the loweroven,)
The oven door must be closed and all controls must be set correctly for the cycle to work properly.
Wipe up heavy soil onthe oven
bottom. (appearance may vary)
Before a Clean Cycle
Theovenmust becool/n order toset the
self-clean cycle.
_'_Terecommend venting ")our ldtchen
with an open _dndo*_ or using a
"_entilation fan ,% hood dining tile
fil>t selgclean c}cle.
Remox e broiler pml, broiler g_d,
all cookware and an} aluminum foil
fl'om tile ()veil,
Tile shiny, silxe>colored oven shelves
(on some models) can be self:deaned,
but tile}'will darken, lose their luster
and become hard to slide.
Do IlOt rise abrasives or o\_11 cleanei_.
Clean tile top, sides and outside of tile
oven door with soap and watel:
Make sure tile (wen lightbulb cover
(on some models) is in place and tile
oven light is oiE
IMPORTANT'. Tile health of some birds
is extremely sensitive to tile fumes given
off during tile self:cleaning wcle of any
o\en. Move birds to another well
ventilated room.
@Hew to Set the Oven for Cleaning
[] Touch tile SELFCLEANpad.
[] Using tile +or - pad, enter tile
desired clean time, if a time other
than 4 hom_ is needed.
Clean cxcle time is nommllx 4 hom_.
_O/l can ch'lnoe tile clean tillle to ail_
time between 3 hom_ and 5 hom_,
dei)ending, on how dirt_, your, oxen is.
[] Touch tile START pad.
Tile door locks automatically. Tile display
will show tile clean time remaining. It will
not be possible to open tile oven door
tmfil tile mmi)eratme drops below tile
lock temperature and tile LOCKEDlight
goes off.
When tile LOCKEDlight is oIt_ open
tile dooi:
::Ji::Tile word LOCKwill flash and tile oven
control will signal if you set the clean
cycle and forget to close tile _wen door.
_: To stop a clean cycle, touch tile
CLEAR/OFFpad. When tile LOCKEDlight
goes oft indicating tile oven has cooled
below tile locking temperature, open
tile dooi:
16

ge.com
The oven door must be closed and all controls must be set correctly for the cycle to work properly.
@
@
How to Delay the Start of Cleaning
[] Touch the SELFCLEAN pad.
[] Using the 4- or -pad, enter the
desired clean time.
[] Touch the DELAYSTARTpad.
[] Using the 4- or - pad, enter the dine
of (ID_ VOtl want the clean cycle to
start.
[] Touch the STARTpad.
The door locks automatically: The display
will show the start time. It will not be
possible to open the oven door tmfil
the temperature drops below the lock
temperature and the LOCKED light
goes off.
_4]_en the LOCKED light is off, open
the dooI;
After a Clean Cycle
You may notice some white ash in the
oven. _,_]i)e it up with a damp cloth after
the (wen cools.
If whitespotsremain,removethemwitha
soap-filledscounngpadandnnsethoroughlywith
awnegarand watermixture.
These deposits are usually a salt
residue that cannot be removed by
the clean cycle.
If the oven is not clean after one clean
cycle, repeat the cycle.
!i_:Ym cannot set the oven fin" cooking
tmtil the oxen is cool enough fin" the
door to tlnlock,
!i_:If the shelxes become hard to
slide, wipe the shelf supports with
cooking oil.
/7

Careand cleaningoftheoven.
Be sure electrical power is off and aft surfaces are cool before cleaning any part of the oven.
How toRemoveProtectiveShippingFilmand Packaging Tape
Careflllly grasp a corner of the protective
shii)ping film with your finge_ and slowly
peel it from the appliance surfi_ce. Do
not rise any shaI]) items to remove the
fihn. ReInove all of the fihn befi)re using
the appliance fin" the fi_t time.
To asstlre no daillage is done to the
finish oI the product, the saiest way to
remove the adhesive fl'om packaging
tape on new appliances is an application
ot a household liquid dishwashing
detergent. Apply with a sott cloth and
allow to soak.
NOTE:Theadhesivemustberemovedfromaft
parts.It cannotberemovedif it/s bakedon.
Lift the door straight up and off
the hinges,
Lift-Off Oven Door
The oven door is removable tot easier
access to the light bulb.
Donotlift thedoorbythehand&.
To remove the door, open it to the broil
stop position. Grasp fimflv on each side
and lift the door straight up and off' the
hinges.
Donot p/ace handsbetween the hingeand the
ovendoor frame.
Toreplace the deer, make sure tile hinges
are in the broil stop position. Position
the slots in the bottom of the door
squarely over the hinges and slowly lower
it over both hinges.
Thegasketis designedwitha gapat the
bottomtoallowfor properair circulation.
Donot rubor cleanthedoorgasket-
#has an extremelylow resistanceto
abrasion.
If younoticethegasketbecomingworn,
frayedor damagedinany wayor ffit has
becomedisplacedonthedoor,youshould
haveit replaced.
Door (on the upper oven)
To clean the inside of _e door:
Because the area inside the gasket is
cleaned dtwing the sel6clean cycle, you
do not need to clean this by hand.
;;Ji::The area outside the gasket and
the door liner can be cleaned with
a soap-filled or plastic scotwing pad,
hot water and detergent. Rinse well
with a vinegar and water solution.
To clean the outside of the door:
_: Use soap and water to thoroughly
clean the top, sides and fl'ont of the
()veil door. ]_dnse well. Y)u Ill,IV [llso
use a glass cleaner to clean the glass
on the outside (ff the door. Do not let
water drip into the vent openings.
_: If any stain on the door vent trim is
persistent, use a soft abrasive cleaner
and a sponge-scrubber fin" best results.
_: Spillage of marinades, fl'uit
juices, minato sauces and basting
materials containing acids may cause
discoloration and should be wiped up
immediately. \_]_en stlIbf_lce is cool,
clean and rinse.
_: Do not use oven cleanet_, cleaning
l)ow(le_ or hm_h abrasives on the
outside of the door.
Do not allow foodspills with ahigh
sugar or acid content (such as
tomatoes, sauerkraut, fruit juices or
pie fillflTg)to remafl7 on thesurface.
Theymay cause a dull spot even
after cleanflTg.
18
Door (on the lower oven)
Tocleantheinsideofthedoor'.
_: Soap and water will nommlly do the
job. Heavy spattering or spillove_s may
require cleaning with a mild abrasive
cleane_: Soap-filled scouting pads
may also be used.
If necessary,, you may use an oven c/eane_
Followthepackagedirections.
::Ji::Clean the inside of the oven window
with a mild non-scratching cleaner and
a damp cloth.
To clean the outside of the door:
_: Use soap and water to thoroughly
clean the top, sides and ti'ont of the
oven doo_: Rinse well. You may also use
a glass cleaner to clean the glass on the
outside of the doo_: Do not let water
drip into the vent openings.
::Ji::Spillage of marinades, fl'uit
juices, tomato sauces and basting
materials containing acids may Catlse
discoloration and should be wiped
up immediatel)'. \_]_en surii_ce is
cool, clean and rinse.
::Ji::Do not use oven cleaners, cleaning
pow(le_ or hm_h abrasives on the
outside of the doo_:

ge.com
Oven Shelves
Clean the oven shelves with an abrasive
cleanser or steel wool. After cleaning,
rinse the shelves with clean water and dry
with a clean cloth.
NOTE."Thesh/by,silver-coloredovenshelves
{onsomemodels)may becleaned inthe self-
cleaningoven.However,the shelveswill darken
in color,losethek lusterandbecomehard toslide
if cleaneddunbg theself-cleaningcycle.
To make the shelves slide more easily,
apply a small am(rant of vegetable oil
or cooking oil to a paper towel and wipe
the edges of the oven shelves with the
paper towel,
Oven Heating Elements
Donotcleanthebakeelementor thebroil
elementAnysoilwillburnoff whenthe
elements are heated
To clean the oven floor, genfl) lili
the bake element. Clean with wam_
soapy wateI;
19

Careandc/eaMngoftheoven.
Non-Self-Clean Oven Interior (ontheIoweroven)
With proper care, tile porcelain enamel
finish on tile inside of tile (well--top,
bottom, sides, back and inside of tile
dool--will stay new-looldng fi)r years.
Let the oven Ct)o1 betore cleaning.
We recommend that vou wear robber
glo\ es when cleaning the oven.
Soap and water will mmnallv do tile
job. Hea\ T spattering or spillove_s may
require cleaning with a mikl abrasive
cleanel; Soap-filled scouring pads may
also be ttsed.
Do not allow foodspills with ah/)h sugaror acid
content (suchas tomatoes,sauerkraut,fruit juices
orpie filling) to remab on thesurface. Theymay
causea duffspot evenafter cban/bg.
Household ammonia may make the
cleaning.job easien Place l/2 cup in a
shallow glass or pottery container in a
cold oven overnight.
Tile ammonia flmles will help loosen tile
burned-on grease and %od.
If necessary, yc,u may use all oven cleanel:
Follow tile package directions.
_Ji::Donotsprayovencleanerontheelectrical
controlsandswitchesbecauseit couldcause
a shortckcuitandresultin sparkingorfke.
_Donotallowa filmfromthecleanertobum up
onthetemperaturesensor--itcouldcausethe
oventoheati_nproperly(Thesensorislocated
at thetopoftheoven.)Carefullywipethe
sensorcleanaftereachovencleaning,being
carefulnottomovethesensorasachangein
itspositioncouldaffecthowtheovenbakes.
_Donotsprayanyovencleanerontheoven
door,handlesoranyexteriorsurfaceofthe
oven,cabinetsorpaintedsurfaces.Thecleaner
candamagethesesurfaces.
Wire cover holder
Oven Light Bulb
CAUTION..Beforereplacingyourovenlightbulb,
disconnecttheelectricalpowertotheovenat the
mainfuseorcircuitbreakerpanel.
Be sure to let tile light cover and bulb
cool colnpletel>
Toremovethecover:
[] Hold a hand under tile co_er so it
doesn't fidl when released. _'_ith
fingers of tile salne hand, firefly
push back tile wire cover holdei:
lift off tile covei:
Donot removeanyscrews to removethe cover
[] Replace bulb with a 404vatt
appliai_ce bull).
Toreplace the cover:
[] Place it into grooxes of the light
receptacle. Pull wire forward to
tile center of tile cover until it
snaps into place.
[] Colmect electlical power to
tile oxen.
20
Other manuals for JRP 28
2
Table of contents
Other GE Oven manuals

GE
GE ZET9550 User manual

GE
GE TWIN FLEX PTS9200 User manual

GE
GE JCKP30 User manual

GE
GE Monogram ZET2RM Manual

GE
GE Monogram ZET2SL Manual

GE
GE Profile PT920DR User manual

GE
GE Profile PSB9100EF User guide

GE
GE Profile advantium SCB1000 User manual

GE
GE Monogram ZTS90DSSNSS User manual

GE
GE 169059 User manual
Popular Oven manuals by other brands

AEG
AEG COMPETENCE D8100-1 operating instructions

Frigidaire
Frigidaire FFEW2725L S Specifications

Atag
Atag OX6211E Instructions for use

Fisher & Paykel
Fisher & Paykel Aerotech OB30 Series user guide

Technika
Technika TGSO618TSHL Instructions for use and installation

Electrolux
Electrolux ECWM3011AS User & care manual