GE RADIANT PB970 User manual

_&com
o_
Safety Instrudions ............. 2-5
Operating Instructions
Broiling ........................ 14
Clock, Kitchen Timer and
Control l[z)ck .................... 17
Com_ction Oven ............. 19-23
Roasting Guide ................ 23
Timed Feaulres ............. 21,22
Cookware ....................... 7
l[zmer Oxen .................... 1,3
Oven Controls ............... 10, 11
Probe .......................... 16
Sabbath Feature ................. 30
Self:Cleaning ................. 26, 27
Slow Cook, Pizza
and Wanning Features ......... 24.-25
Special Features .............. 28-29
Surfi_ce Units .................. 6-9
Thermostat Adjustment--
Do It Yourself ................... 18
Timed Baking and
Roasting Features ................ 15
Upper Oven .................... 12
Care and Cleaning .......... 31-37
Troubleshooting Tips ........ 38-41
Accessories .................... 46
Consumer Support
Consumer Support ...... Back Co_r
Product Registration .......... 43, 44
Warranty ...................... 47
PB970
PB975
Write the model and serial
numbers here:
Model #
Serial #
You can lind them on a label
behind the storage drawer
on the range fl'ame. 49-80444-1 03-07 Jfl

iMPORTANTSAFETYiNFORMATiON.
READALLiNSTRUCTIONSBEFOREUSING.
A '!
For your safeN the information in this manual must be followed to minimize the risk of fire, electric
shock, or to prevent property damage, personal injury, or loss of fife.
AWARNINGANti-TIPDEVICE
All ranges can tip and injury could result.
Topre vent accidental tipping of the range, attach it to the wall and floor by installing the Anti--tip
device supplied.
To check if the device is installed and engaged properly, look underneath the range with a flashlight
to make sure one of the rear leveling legs is properly engaged in the bracket slot.
If you pull the range out fl'om the wall fin" any reason, make sure the device is properly engaged when
you push the range back against the wall. If it is not, there is a possible dsk of the range tipping over
and causing iqiury if you or a child stand, sit or lean on an open dam:
Please relier to the Anti-Tip device infimnation in this manual. Failm'e to take this precaution could
result in tipping of the range and iqiury.
IMPORTANTSAFETYNOtiCE
The California Safe Drinking Water and ToxicEnforcement Act requires the Governor of California to
publish a list of substances known to the state to cause cancer, birth defects or other reproductive
harm, and requires businesses to warn customers of potential exposure to such substances.
The fiberglass insulation in self-clean ovens gives off a very smafl amount of carbon monoxide during
the cleaning cycle. Exposure can be minimized by venting with an open window or using a ventilation
fan or hood.
SAFETYPRECAUtiONS
When using electrical appflances, basic safety precautions should be followed, including the following:
_: Use this appliance only fin" its intended
pml)ose as described in this Owner's Manual.
::Ji::Be sm'e w>m"appliance is properly installed and
gr()tmded by a qualified installer in accordance
with the provided installati(m instructions.
_: Have the installer show u)u the location of
the drcuit breaker ()r Rise. Mark it fin" easy
reference.
_: Do not attempt to repair or replace any
part of your range unless it is spedfically
recomn_ended in this malmal. _M1other
servicing should be reterred to a qualified
technidan.
_: Deft)re pedomfing any service, discom_ect
the range power supply at the household
distribution panel by removing the fllse or
switching off the circuit breakei:
::Ji::Do not leave children aloi_e---childrei_ should
not be left alone or tmattended in an area
where an appliance is in use. They should
never be allowed to sit or stand on any part
of the appliance.
::Ji::Do not allow anyone to climb, stand or hang
on the door or cooktop. They could damage
the range and even tip it (),,'el',causing severe
personal injm>
2

_e.com
WARNING'!
SAFETYPRECAUTIONS
Donot operate the oven or cooktop controls ff the glass is broken. Food splatter or cleaning solution
may penetrate a broken control panel or cooktop and create a risk of electrical shock. Contact a
qualified technician immediately should your glass control panel or cooktop become broken.
_: Do IIOt stoI'e flalllI/lable Illatellals iI1 _lIl ()veil
OF IleaI" tile cooktop.
CAUTION:]teIllSofinteresttochildren
should not be stored in cabinets above a range
or on tile back of a rang_hiMi'en cliinbing
on tile range to reach iten/s could be seriously
ii_jui'ed.
_: Never wear loose-fitting or hanging gamlents
while using the appliance. Be carefli1 when
reaching for iteins stored over the range.
Flanlnlable inatefial couM be ignited if
brought in contact with hot suibfhce units or
heating eleinents and nlav cause severe burns.
::J?::Use only dry pot holdei_--nloist or dan/p
pot holdeIs Oil hot SUll'ilces nlav result in
burns ti'oin steanl. Do not let pot holdeis
touch hot sui_i_ce units or heating elenlents.
Do not use a towel or other bulky cloth in
place of pot holdei_.
_: Do IIOt rise water Oil grease fires. Never pick
up a flanling pan. Turn tile controls off.
Sinother a flanling pan on a suF[ilce unit
by covering tile pan coinpletely with
a well-fitting lid, cookie sheet or fiat tray:
Use a inulti-puil)ose dry chenlical or
fi)an/-t,ipe fire exfinguishei:
Flan/ing grease outside a pan can be put
out by covering it with baking soda oi; if
a*:filable, by using a n/ulti-puil)ose dry
chen/ical or ti)ain-type fire extinguishei:
Name in the oven can be sn/othered
con/plemly by closing tile oven door and
turning tile oven off or by using a inulti-
puq)ose (li T chen/ical or fi)an/-type fire
extinguishei:
N For your s'alb'Q:,never use your appliance
for wam/ing or heating tile roonl.
_: Do not let cooking grease or other flanmlable
inaterials accunlulate in or near the range.
::Ji::Do not touch tile sui_i_ce units, tile heating
elen/ents or tile interior suiqfi_ce of tile oven.
These surli_ces nlav be hot enough to burn
even though tile*' are dark in coloi: During and
atter use, do not touch, or let clothing or other
flanmlable inaterials contact tile suil'_lce units,
areas nearby tile surfi_ce units or anv interior
area of tile ()veil; allow sufficient dine for
cooling fii_t.
Potentially hot sudhces inchide the cooktop,
areas fi_cing the cooktop, oven vent opening,
sudi_ces near the opening, crevices around the
ovell dooi:
REMEMBER:Tile inside suI{hce (ff tile oven
n/av be hot when tile door is opened.
::Ji::Do not store or use conlbustible inateiJals,
gasoline or other flanlnlable vapoi_ and liquids
in tile vicinity of this or any other appliance.
_: Keep tile hood and grease filtei_ clean
to nlaint;fin good venting and to avoid
grease fires.
::Ji::Teach children not to play with tile controls
or any other part of tile range.
::Ji::Mways kee I) dish towels, dish cloths, pot
holdeI_ and other linens a safi_distance
fi'oIll your range.
_: Mwa D kee I) wooden and plastic utensils and
canned food a sale distance fl'onl p)ur range.
::Ji::Mways kee I) con/bustible wall coverings,
curtains or drapes a safe distance fl'onl
VO/lI" KIIlge.
COOKMEATANDPOULTRYTHOROUGHLY...
Cookmeat and poultry thoroughly--meat to at least an INTERNAL temperature of 160°Fand poultry to at least
an iNTERNAL temperature of 180°E Cooking to these temperatures usually protects against foodbome illness.
3

iMPORTANTSAFETYiNFORMATiON.
READALLiNSTRUCTiONSBEFOREUSING.
RADIANTSURFACEUNITS
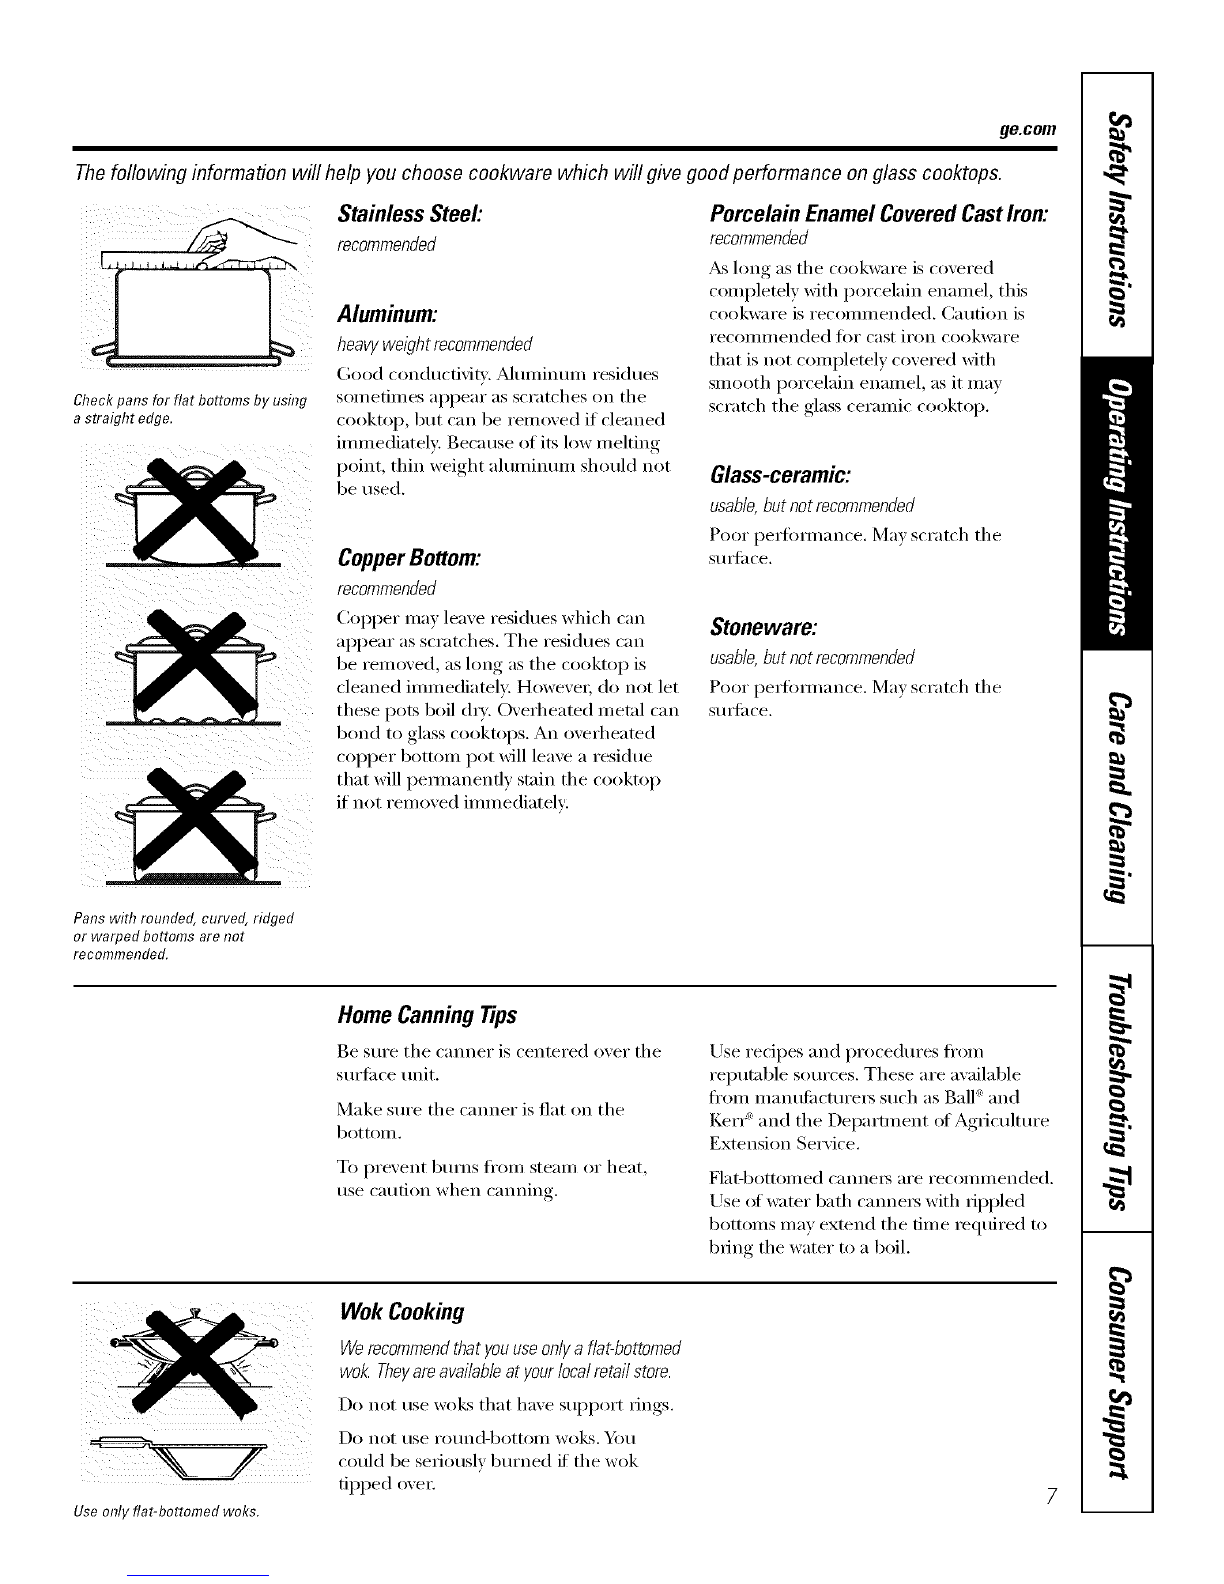
Useproper pan size--select cookware having flat bottoms largo enough tocover the surface unit heating
element.Theuse ofundersized cookware will exposea portion ofthe surface unit todirect contact andmav
result in ignition of clothing. Proper relafionship of cookware tosurface unit will also improve efficiencv.
_: Never leave the surfl_ce units unattended at
high heat settings. Boilove_ cause smoking
and greasy spillove_ that may catch on fire.
_: Only certain b'pes of glass, glassX eramic,
earthenware or other glazed containe_ are
suitable for cooktop service; othe_ may break
because of the sudden change in temi)eratm'e.
_: To minin/ize the possibiliQ' of burns, ignition
of flammable materials and spillage, the handle
of a container should be turned toward the
center of the range without extending over
nearby SUll'ilce units.
_: Mwavs turn the surIilce units off before
i'ei/loving cookware.
::Ji::X4]_en preparing flaming foods under the
hood, turn the tim oil.
::Ji::LIse care when touching the cooktop.
The glass stwIilce of the cooktop will retain
heat after the controls have been turned ofk
_: Kee I) an eve on foods being fl_ied at high or
mediunl high heat settings.
_: Foods for fiTing should be as di_' as possible.
Frost on [i'ozen [0o(ls or IllOiStuI'e on ti'esh
foods can cause hot lilt to bubble tip and
over the sides ot the pan.
::Ji::Use little elt t0r effective shallow or deep
lilt ti'ying. Filling the pan too flfll of elt can
cause spilh)veIs when food is added.
NIf a combination of oils or fats will be used
in flying, stir together before heating, or
as lilts melt slowly.
::Ji::Alwm:s heat lilt slowly, and watch as it heats.
::J?::Use a deep tilt themlometer whenever
possible to prevent oveit_eating tilt beyond
the smoking point.
_: Avoid scratching the glass cooktop. The
cooktop can be scratched with imms such
as shaq) instrmnents, rings or otherjeweh T,
and rivets (m ch)thing.
_: I_lIge scratches or impacts to glass dooI_ or
cooktops can lead to broken or shattered glass,
_: Do not operate tile radiant surlilce units if the
glass is broken. Spillovei_ or cleaning solution
may penetram a broken cooktop and cream a
risk of electrical shock. Cont;ict a qualified
technician immediately should your glass
cooktop 1)ec()me broken.
_: Never use tile glass cooktop SUll'ilce as a
cutting board.
::Ji::Do not place or store items that can melt or
catch fire on the glass c()()ktop, even when it
is not being used.
N Be careful when placing spoons or other stin_ing
utensils oil glass cooktop surtilce when it is in ttse.
They may become hot and could cause bums.
::Ji::Clean the cooktop with caution. If a wet
sponge or cloth is used to wipe spills on a hot
surfilce unit, be carefifl to a\_fid steam burns.
Soiile cleanei_ can l)i'o(hice noXiO/IS liliiles i[
applied to a hot surface.
NOTE'. We reconmlend that vou avoid wilting
any surfilce unit areas until they have cooled
and the indicator light has gone off. Sugar
spills are the exception to this. Please see the
Cleaning the glass cooktop section.
_: _l_en the cooktop is cool, use only the
CEIL_dMA BRYTE ':Ceramic Cooktop Cleaner
and the CEIL_4A BRYTE Ceramic Cooktop
Cleaning Pad to clean the cooktop.
_: To avoid possible danmge to the cooking
stlrfilce, do not apply cleaning creanl to
the glass surth(e when it is hot.
_: _Mier cleaning, use a (hw cloth or paper towel
to remove all cleaning cream residue.
::Ji::Read and follow all instructions and warnings
oil the cleaning cream labels.
::Ji::Do not use plastic wrap to cover rood. Plastic
may melt onto the surface and be very difficult
to i'eillove.
4

ge.com
WARNING!
OVEN
Stand away from the range when opening the oven door. Hot air or steam which escapes can cause
bums to hands, face and/or eyes.
_: Do not heat unopened food ('ontaine_.
Pressure could build up and the container
could bmst, causing an iqjmy:
!_:iKeep the oven vent unobstructed.
_: Keep the oven fl'ee fl'om grease buildup.
::Ji::Place the oven rack in the desired position
while the oven is cool. If racks IlltIst be handled
when hot, do not let pot holder contact the
heating elements.
_: \._]_en using cooking or roasting bags in the
oven, fi)llow the inanuthcturer's directions.
_: Pulling out the rack to the stop-lock is a
convenience in litfing heavy toods. It is also
a precaution against burns fl'om touching
hot stmfhces of the door or oven walls.
::Ji::Do not use the oven to (li T ne_vspapeis.
If overheated, they can catch on fire.
_: Do not use the oven fi)r a storage area. Items
stored in an oven can ignite.
::Ji::Do not leave paper products, cooking utensils
or food in the oven when not in use.
::Ji::Do not use aluminum toil to line oven bottoms,
except as suggested in this manual, hnproper
installation of ahuninum foil may result in a
risk of electric shock or riie.
SELF-CLEANINGUPPEROVENANDLOWEROVEN
Do not use oven cleaners. No commercial oven cleaner or oven liner protective coating of any kind
should be used in or around any part of the oven. Residue from oven cleaners will damage the inside
of the oven when the self-clean cycle is used.
_: Do not clean the door gasket. The door gasket
is essential fi)r a good seal. Care should be
taken not to rub, damage or move the gasket.
::Ji::Befi)re selfk'leaning the oven, remove shin>
silvei_colored oven racks (oil some Inodels)
and all other cookware.
::Ji::Gray porcelain-coated oven raclcs (on some
models) may be cleaned in the oven during
the self:clean cycle.
_: Be sure to Mpe up excess spillage before
starting the sell:cleaning operation.
_: If the self_cleaning mode malfunctions, mrn
the oven off and disconnect the power supply.
Have it serviced by a qualified technician.
_: Clean only parts listed in this Owner's Manual.
READANDFOLLOWTHISSAFETYINFORMATIONCAREFULLY.
SAVETHESEINSTRUCTIONS

Abouttheradiantsurface units.
NOTE:Throughoutthismanual,featuresand appearancemay varyfromyourmodel
;URFAC_?_
;OOKING _,
Never cook directly on the glass.
Always use co&ware.
Always place thepan in thecenter of
the surface unit youare cooking on.
About the radiant surface units
The radiant cooktop features heating
milts beneath a smooth glass surli_ce.
Cooktop temperatures increase with
the number of surli_ce units that are
on. With 3 or 4 units turned on, surti_ce
temperatures are high. _wavs use
caution when touching the cooktop.
An indicator light will come on when the
surti_ce unit is turned on.
The appropriate HOTSURFACEindicator
light will glow when its corresponding
radiant element is turned on and will
remain on until the surti_ce has cooled
below 150°E
iIi:
Do not sfideco&ware across the
control or cooktop surface because it
can scratch theglass. Theglass is
scratch-resistant, not scratchprooL
NOTE."
Hot surti_ce indicator light will:
_'_Comeon when the surface unit is
turnedon.
;;Ji:_Stay oneven after theunit is turnedoff
_Glow brightly until theunit has cooled
below 150°£
NOTE."AshghtodorIsnormalwhenanew
cooktopisusedforthefirsttime.It iscausedby
theheatlbgofnewpartsandinsu/atlbgmatena/s
andwi//disappearina shorttime.
NOTE:Onmodels with/ighbcoloredg/ass
cooktops,it is normalfor thecook/bgzonesto
changecolor when hot or coding down. Thisis
temporaryand wi// disappearas the glasscools
to roomtemperature.
It is safe to place hot cookware ti'om the
oven or surface on the glass cooktop
when the surlhce is cool.
Even after the surli_ce units are turned
off, the glass cooktop retains enough
heat to continue cooking. To avoid
overcooking, remove pans fl'om the
surIi_ce units when the toed is cooked.
Avoid placing anything on the surlhce
unit until it has cooled completel>
::Ji::Waterstains (mineraldeposits)areremovable
us/bgthecleaningcream or fu// strength white
vinegar
_Useof window cleanermay leavean iridescent
film on the cooktop. Thecleaningcreamwill
removethisdiscoloration.
_; Don'tstoreheavyitemsabovethecooktop.
If theydropontothecooktop,theycancause
damage.
_Donotusethesurfaceasa cuttingboard
Temperaturetimiter
Every radiam sm_hce unit has a
temperature limiter.
The temperature limiter protects the
glass cooktop fl'om getdng too hot.
The temperature limiter may cycle the
units off flw a tim e if_
_Ji::Thepanboils dry.
_Thepanbottom is not f/a£
;;Ji::Thepan is off center
_Thereisno pan on the unit.

ge.com
Thefoflowing information will help you choose cookware which will give good performance on glass cooktops.
Stainless Steel:
,recommended
Aluminum:
heavy weight recommended
(;god conducfidq'. Muminun/ residues
Check pans for flat bottoms by using SOlUetilnes appear ;is scratches on the
a straight edge. cooktop, but can be removed if cleaned
immediately. Because of its low melting
point, thin weight aluminum should not
be used.
CopperBottom:
recommended
Copper ma) leaxe residues which can
appear as scratches. The residues can
be remoxed, as hmg as the cooktop is
cleaned imlnediatelv: Howevei, do not let
these pots boil (h). O\ erheated metal can
bond to glass cooktops. An oxerheated
copper bottom pot will leaxe a residue
that will pemmnenfl) stain the cooktop
if not remoxed immediately:
Porcelain EnamelCoveredCastIron:
recommended
_ hmg as the cookware is covered
completely with porcelain enamel, this
cookware is recommended. Caution is
recollllilended tor cast ii'on cookware
that is not completely covered with
smooth porcelain enamel, as it may
scratch the glass ceramic cooktop.
Glass-ceramic:
usable,butnotrecommended
Poor pe_bmmnce. IMa_ scratch the
StllS_il ce,
Stoneware;
usable, but not recommended
Poor perlimnance. Mm scratch the
StlIS_il ce.
Pans with rounded, curved, ridged
or warped bottoms are not
recommended.
Home Canning Tips
Be sure the canner is centered oxer the
surtilce unit.
Make sure the canner is fiat on the
bottOIll.
To prexent bui_ns ti'om stealn or heat,
use caution when canning.
Use redpes and procedures fl'om
reputable sources. These are a\_filable
fl'om n/anttfilcturei_ such as Ball®and
Ker_ _ and the Department of Agriculture
Extension Service.
Flat-bottoi/led cannels ai'e recollllllended.
Use _ff wamr bath canne_ with rippled
bottoms may extend the time required to
bring the water to a boil.
Use only flat-bottomed woks.
Wok Cooking
Werecommendthatyouuseonlya flat-bottomed
wok.Theyareavailableatyourlocalretailstore.
Do not rise wolds that have support rings.
Do not rise i'otlnd-bottoill wo]Ls. _J_)tl
could be seriously burned if the wok
tipped ovei:

Usingthesurface units.
i¸ ; :
LO HI
i 9
8
3
Be sure you turn flTecontrol knob to
OFF when you finish cooking.
How to Set
Push the knob in and turn in either
direction to tile setting you want.
At both OFF and HI the control
clicks into position. You may hear
slight clicking sounds during cooking,
indicating the control is keeping the
power level you set.
AHOTSURFACEindicator light, on tile
cooktop, will glow when any radiant
element is turned on. It will remain
on tmfil tile sm_hce is cooled to
approximately 150°E
Hot surface indicator light will:
_comeon when the unit ishot to the touch.
_Ji::stay on evenafter the unit is turnedoff
::Ji::glow until the unit is cooledto approximately
150°E
I_lO0
W @
FRONT _BRIDGE
BURNER (0_,_ BURNER
I
FRONT
Using the Bridge Burner (on some models)
W,.,l_etheb_dgeb/.'.e_;t,.'. the
leli fl'ont cont_x)l knob to tile BRIDGE ....
BURNER settings.
For fifll bridge surti_ce unit operation,
also mrn on tile left rear smti_ce unit.
To use only tile fl'ont sm_hce unit, turn
the control knob to the FRDllrrBURNER
settings.
Tri-RingSurface Element(onsomemodels)
Thefront right surfaceelementoffers 3 cooking
areasto match thes/2eof the cookwareyou
areusing.
To use tile largest cooking area, push in
and turn tile SELECTOR knob to 12". Push
and tt/rn tile control knob to tile desired
setfin ,
To use tile smallest cooking area, turn
tile SELECTORknob to 6". Push and turn
tile control knob to tile desired setting.
This will activate only the smallest inside
heating area.
To use tile medium cooking area, press
and tt/Fn tile SELECTORknob to 9". Push
down and tt/rn tile control knob to tile
desired setting.
8

ge.com
0%
OFF
WARNING ZONE
Using the Warming Zone (onsome models)
Tile WARMING ZONE is located in tile
back center of the glass smii_ce. _Mways
start with hot tood. Do not use to heat
cold food. Placing uncooked or cold food
on the WARMING ZONE could result in
ioodborne illness.
To use tile WARMINGZONE:
Turn tile WARMING ZONE knob to tile
setting you want from HIto tO.
Food Type Control Setting
Sauces LO
Soups (cream) MED
Stews MED
Vegetables MED
Hot Beverages HI
Soups (other than cream) HI
Breads/Pastries LO
Thechart above showsinitial suggestedsettings onl,/
Thetemperature,type and amountoffoog type ofpan
and flTetimeheld will affect flTequafityofflTefood.
To mrn off the WARMING ZONE:
Turn the WARMINGZONEknob to OFF. CAUTION:Donotleavefoodonthe
WARMINGZONEformorethan2 hours.
For best results, all fi)ods on the
WARMING ZONEshould be co',ered with
a lid or aluminum foil.
iJi:_Donot useplastic wrap to coverfood Plastic
may melt onto the surfaceand be ven/difficult
todean.
_ways use pot holders or oven
mitts when removing fl)od fl'om tile
WARMINGZONE,as cookware will be hot.
AHOTsmti_ce indicator light will glow
when tile glass smii_ce is hot and will
remain on lmtil tile smii_ce is cool
enough to touch. I,ower settings may
not heat tile glass smti_ce enough to
cause the HOTsurti_ce indicator light
to COllie on,
!i>Useonlycookwarerecommendedfor
top-of-rangecooking.
NOTE"TheWARMINGZONEwillnotglowred
likethecookingelements.

Usingtheovencontrols.
NOTE:Throughoutthismanual,featuresandappearancemayvary fromyourmodel
/0
OvenControl Clockand TimerFeaturesandSettings
0
0
@
0
0
0
0
BAKE Pad
Touch to sdect tile bake flulction.
BROIL HI/LOPad
Touch to select tile broil flulction.
PIZZAPad
Touch to select tile Pizza flulction.
0 YENLIGHTPad
Touch to turn tile oven light oil or off'.
SELFCLEANHI/tO Pad
Touch to select sel6cleaning flulcfion. See
tile Using the self-cleaning upper and lower
ovens section.
WARM Pad
Toud/to kee I) cooked fi)ods waml. See tile
How to Set the Lower and Upper Ovens for
Warming section.
HELPPad
Touch to get hel I) on a spedfic flulcfion or
to change options.
TIMER/CLOCK Pad
Touch to select tile diner featuI'e or to set
tile clock. Touch once fi)r tinier. Hold fi)r
3 seconds to set clock.
CONTROLLOCKPad
Hold this I)ad fi)r 3 seconds to lock/unlock
tile range touch l)ad controls and cooktop
controls.
STARTPad
Must be touched to start [llly cooking or
cleaning flinction.
CLEAR/OFF Pad
Touch to cancel ALL oven operations
except tile clock and fiIneI:
DELAYSTARTPad
Use along with COOKTIME or
SELFCLEANHI/tO pads to set tile oven
to start and stop autoinaficallx at a fin/e
VO// set.
COOKTIME Pad
Totlch this l)ad and then totlch the ntli//bei"
pads to set tile anlount of tiine yiiu want
your flied to cook. Tile oven will shut off
when the cooking tinIe has run out.
Display
Show_ tile dine of (la}; oven teilll)ei'attli'e ,
whether tile ()veil is in tile bake, broil or
selfXcleaning inode and tile dines set fi)r
tile [iI/ler or atltOillatic ()veil ol)ei'ations.
Number Pads
Use to set }lily {illl('{ion I'eq/lilJng n/llllbei's
such as the dine of day oil the clock, the
tiIneI; tile ()veil tenil)erature, tile internal
flied tenll)erature ,tile start tiIne and
length of oi)eration fin" finied baking
and self-cleaning.
ffyour oven was set for a timed oven operation
and a power outage occurred, theclock anda//
programmedfunctionsmustbe reseL
The time of day will flash in the display when there
has been a power outage.
CONVECTIONBAKE Pad
Touch to select baking with tile con',ection
flulction.
CONVECTIONROASTPad
Touch to select roasting with tile
con'_ ection [ilnction.
SLOWCOOKPad
Touch to select tile Slow (look fiulcfion.
PROBEPad
Touch when using tile l)robe to cook flied.
NOTE:Whensem)_gt#nes,youaresemnghoursand
minutesonly Thelowestt/meyoucansetisoneminute.

ge.com
OvenControl,ClockandTimerFeaturesandSettings
0
@
@
0
0
O
0
0
BAKE Pad
Touch to select the bake timcfion.
BROILHI/LO Pad
Touch to select file Ix'oil fimcfion.
PIZZA Pad
Touch to select tile Piz/_l tunction.
OVENLIGHTPad
Touch to turn tile oven light (m or off.
SELFCLEANHI/LO Pad
Touch to select selGcleaning flmcdon. See
the Using the self-cleaning upper and lower
ovens section.
WARM Pad
Touch to kee I) cooked foods wamL See tile
How to Set the Lower and Upper Ovens for
Warming section.
HELPPad
Touch to get hel I) on a specific flmction or
to change options.
CONTROLLOCKPad
Hold this pad for 3 seconds to lock/tmlock
the range touch pad controls and cooktop
controls.
STARTPad
Must be touched to start any cooking or
cleaning flmction.
CLEAR/OFF Pad
Touch to cancel ALL oven operations
except the clock and timer.
OELAYSTARTPad
Lrse along with COOKTIME or SELFCLEAN
HI/I.O pads to set the oven to start and stop
automatically at a time you set.
COOKTIME Pad
Touch _lIl(l then touch tile ntlIllbeI" pads to
set tile _lI//O/lnt of tiIlle _O/l W_IIIt VO/II" i()()d
to cook. The o',en will shut offwhen the
cooking time has run out.
Display
Sho_:s tile tiIlle of day, oven tei/ipei'attli'e,
whether the oven is in the bake, broil or
self:cleaning mode and the times set fi:,r
the tii/ler or atltoIllatic oven opei'ations.
If your oven was set for a timed oven operation
and a power outage occurred, the clockand a//
programmedfunctionsmustbe reset
The time of day will flash in the display when there
has been apower outage.
Number Pads
Use to set any flmcfion requiring numbe_
such as the time of day on the clock, the
time_; the oven temperatm'e, the internal
ti)o(1 temperature, the start time and
length of operation fin" timed baking
and self:cleaning.
SLOW COOKPad
Touch to select tile Slow Cook flmcfion.
TIMER Pad
Touch to select tile tinier feature.
CLOCK Pad
Touch before setting tile clock.
NOTE."Whensetting t#nes,youaresettl))ghoursand
minutes only Thelowest ttme youcan set is oneminute.
11

Usingtheupperoven.
Toavoid possible bums, place the racks in the desired position before you turn the oven on.
Before you begin...
Tile upper rack, with two ti'ont handles,
has stops, so that when placed correctly
on tile supports, it will stop befi)re
coming, coml)leteE, out, and will not tilt.
NOTE: Usethe rack with the two fronthandles in
the upperoven.
_\]/ell placing and removing cookware,
pull the rack out tmtil it stops.
Toremove a rack, pull it toward you
tilt the ti'ont end up and pull it out.
The oven has 2 rack positions.
To replace, place tile end of tile rack
(stop-locl_s) on tile support, flit up tile
ti'ont and push the rack in.
CAOTlON:whenyouarausinga
rack in the lowest position (A),you will need to
use cautionwhen pu/hhg therack ou£(Besure to
use thehandles on therack.) Werecommendthat
youpuffthe rack out severalinchesand then,
using two pot holders,puff therack out byholding
thesides ofiL Therackis low and youcould be
burnedif youplace yourhandin the middle of the
rack andpu// aft the way ou_Be verycarafu/not
toburn yourhand on the doorwhen using the
rack in the/owestposition (A).
How to Set the Upper Oven for Baking
[] Touch tile BAKE pad.
[] Touch the number pads to set
the desired temperature.
[] Touch the START pad.
[] Check fi)od fin" doneness at
minimum time on recipe. Cook
hmger if necessar).
[] Touch the CLEAR/OFFpad when
cooking is colnplete.
Flatrack
Handles
Use the rack with the two front
handles in the upper oven.
Do not place foods directly on the
oven floo£
Preheating and Pan Placement
Preheat tile oven if tile recipe calls fin" it.
Preheating is necessary for good results
when baking cakes, cookies, pastry and
breads.
Topreheat,set theovenatthecorrect
temperature.Thecontrolwillbeepwhen
theovenispreheatedandthefllsplaywill
showyoursettemperature.Thiswilltake
approximately4-6 minutes.
Baking results Mll be better if baking
pans are centered in tile oven as nluch
as possible. If baking with more than one
pan, place the pans so each has at least
1" to 1½" of air space aro/md it.
TypeofFood Rack Position
Frozenpies(on cookie sheet) A
Biscuits,muffins,brownies, A
cookies,cupcakes,
layer cakes,pies
Casseroles A
Pizza-Freshsuppliedw/baking tray B
Pizzaplaceddirectly onrack B
Pizzaonmetaltray A
NOTE: TobakeangelfoodcakeandBundtcake,
it is recommendedthat youonlyuse the lower
oven.
12

Usingthe lower oven. gecom
Toavoid possible bums, place the racks in the desired position before you turn the oven on.
Theovenhas6rack oosifions.
Before you begin...
The racks have stops, so that when placed
correctly oil the supports, they will stop
beflwe coming colnpletely out, and will
not tilt.
_Ahen I)lacim"_ and removing, cookware,
pull the rack ()tit until it stops.
Oil some models, the bake heating
element is under the o;en flooi: D0 not
place foods on the o;en bot[oii1 [i)I"
cooking.
Toremove a rack, pull it toward ;ou
tilt the fl'ont end up and pull it out.
Toreplace, place tile end of tile rack
(Stol>locl<s) oil tile support, tilt up tile
fi'ont and push tile rack in.
CAUTION:Whenyouareusinga
rack in the lowest position (,4),youwi// need
tousecaution when puffing therack ou_ We
recommendthatyoupuff the rackout several
inchesand then,using twopot holders,puff the
rack out byholding thesides ofi_ Therackis low
and youcould be burnedif youplace yourhand
in the middleof the rack andpuffaft the way ouL
Be verycarefulnot toburn yourhandon the door
when usingthe rack in the/owestposition (A).
How to Set the Lower Oven for Baking or Roasting
[] Touch the RAKE pad.
[] Touch tile munber pads to set
the desired teml)erature.
[] Touch the STARTpad.
NOTE."Oil some models, you _dll
hear tile c'_mvection £m while tile oven is
preheating. Tile tim will stop after tile oven
is I)reheated and tile (fisl/lay sl/o_:s your set
temi)emture. This is hernial.
[] Check fi)od fin" doneness at
nfininmm time on recipe. Cook
longer if' necessaD'.
[] Touch the CLEAR/OFFpad when
cooking is coinplete.
Flatrack
Do not place foods or baking stone
directly on tlTeoven floo_
Preheating and Pan Placement
Preheat the oven it the recipe calls for it.
Preheating is necessai y fi)r good results
when baking cakes, cookies, l)astiy and
breads.
Topreheat,set the ovenat the correct
temperature.Thecontrol will beep when
the ovenispreheated and the &splay will
show yourset temperature. Thiswill take
approximately 10-15minutes.
Baking results will be better if baking
Type of Food Rack Position
Frozen pies (on cookie sheet) C
Angel food cake A
Bundt or pound cakes C
Biscuits, muffins, brownies, C
cookies, cupcakes,
layer cakes, pies
Casseroles C
Turkey A
l)}lns ai'e centered in tile o;en as illtich
as possible. If baking with more than one
pan, place the pans so each has at least
1If - ,
1" to 1½ of mr space around it.
If baking four cake layers at the same time, place
two layers on rack B and two layers on rack D.
Stagger pans on the rack so one is not directly
above the other.
13

Usingtheupperand lower ovens.
If yourrangeis connectedto208volts,
raresteaksmaybebroiledbypreheating
thebroiler andpositioning theovenrack
oneposition higher
How to Set the Upper and Lower Ovensfor Broiling
Leavethe dooropen to thebroil stopposition.
Thedoorstays openbyitself, yet theproper
temperatureis maintained in the oven.
[] Place the meat (rr fish on a broiler
grid in a broiler pan.
[] Follow su_gested_, rack positions in
the Broiling Guide.
[] Touch the BROILHI/LO pad once fi)r
HI Broil
Use LO Broil to cook fi)ods such as
poultx T or thick cuts of meat thoroughly
without ove_4)rowning them.
[] Touch the START pad.
[] "_'_hen broiling is finished, touch the
CLEAR/Off pa d.
NOTE:Broil andself-cleansettings will not work
if the temperatureprobeisplugged in.
To change to LOBroil,touch the
BROILHI/LOpad again.
Broiling Guide
Food
UpperCavity LowerCavity
Back Time Time Back Time Time
Position_ide 1 Side2 Positian Side 1 Side2 Comments
GroundBeef
Beef Steaks
Clficken
LobsterTails
FisllFillets
Ham Slices
(precooked)
Pork Chops
LambChops
WellDone
Raret
Medium
WellDone
Raret
Medium
WellDone
WellDone
WellDone
83/4" patties A
1" thick 1 lb. A 9
1" thick 1 lb. A 11
1" thick 1 lb. A13
1W'thick 2 Ibs. A15
11//'thick 2 Ibs. A 17
11//'thick 2 Ibs. A 20
1whole 3 4 Ibs A 20
split leogtbwise
2_4 A
10to 12oz.each
1/4to 1/2" thick A
1" thick A
19 21
B
6
WellDone 2(1/U thick) A 10
WellDone 2(I" thick) A 14
Medium 2(1" thick) A 9
WellDone 2(1" thick) A11
Medium 2 (1W'thick) A 13
WellDone 2 (11//'tbick) A 16
The size, weight, thickness, starting temperature
is based on meats at reii-igerator temperature.
9 10 F 10 6 7
_6 F 7 4 5
5_ F 9 5_
79 F 11 79
6 8 F 14 5_
79 F 16 68
8 10 F 19 8 10
R 13 D 25 10 15
Do riot
turn.
45
67 F 9 56
78 F 13 79
67 F 10 89
7 R F 12 9 10
9 10 F 14 11 12
10 12 F 17 12 14
Spaceevenly•Upto 8 patties takesabout tbe
sametime.
Steakslessthan1" thick cookthroughbefore
browning.Panfrying is recommended.Slashfat.
REDUCETIMEABOUT2 3 MINUTESPERSIDEFOR
CUT-UPCHICKEN•Brusheachsidewith melted
butter•Broilskimside-dowofirst•
D 18_0 Donot Cutthroughbackof shell•Spreadopen•
turn. Brushwith meltedbutterbeforebroilingandafter
half of broilingtiroe, if desired.
F 5 4 5 Handleandturnverycarefully•Brushwith lemon
butterbeforeandduringcooking,if desired•
E 6 6 Increasetime 2 5minutesper sidefor 11/z"thick
ham.
Slashfat.
Slashfat.
and )our preference of doneness will affect broiling times. This guide
+ 7h_, l:.',. l)_jmmm, nt oJAgricullum scOs "t,_an,I)_e/i._/_o]mlm; but )ou should know llml cooking it lo onl_ 14t)°F m_an_ wine/ood /_oiwnin_, m2ani_m_, mc9
sul,,_ (_. (5oul_¢,.Saje l'ood Bootc. }i)ur Kilctu n (;uide. [ '_l)AR_*,,J..]UlI¢,I g_55.)
14

Usingthe timedbakingand mastingfeatures.(o,somemodels) go.corn
NOTE" Foods that spoil easily--such as milk, eggs, fish, stufings, poultry and pork--should not be allowed to sit for
more than 1hour before or after cooking. Room temperature promotes the growth of harmful bacteria. Be sure that
the oven light is off because heat from the bulb will speed harmful bacteria growth.
iir-qFqFqrq E]
iiFqE] % E] Fq
iFqFqFq rq
[-qFqFqFqiFqi
How to Set an Immediate Start and Automatic Stop
Theoven will turnon/nTmed/atelyandcookfor
a selectedlengthof t/riTe.At the end of the
cook/)_gt/?netheoven will turnoff automatically.
[] Touch tile BAKEpad.
] Touch tile munber pads to set tile
desired o_en temperature.
[] Touch tile COOKTIME pad.
NOTE.."/fyour rocl)gemqukes preheatlk_g,you may
need toadd additiona/ t/?neto the length of the
cook/)_gt/?ne.
] Touch tile munber pads to set tile
desired length of cooking time. Tile
Illilli/ll[[Ill CO(}ldllg tiI//e }oil Call set
is 1 minute.
Tile oven tenlperatm'e that }ou set
and tile cooldng dine that )ou
entered will be in tile display.
The oven will turn ON, and file display will
show tile cooking time cotmtdown and tile
changSng tempemtm'e starting at 100°E
(Tile tempeIamIe (fisplay will start to
change once tile oven tempen|ture reaches
100°El _'_]len tile o\vn reaches file
temperature you set, 3 beeixs will sound.
The oven will continue to cook fiw
tile set amount oi time, then turn off
automatically, mfless tile _]k[_2_] tbature
was set. See tile HOWtOSet the Ovenfor
Warml)lgsection.
[] Touch tile CLEAR/OFFpad to clear
tile displa} if necessal T. Remove tile
food fl'om tile oven. I),emenlbel;
even though tile oven turns off
automatically, fi)od lett in tile oven
will continue cooldng alter tile o\vn
[[IFnS (}l_.
[] Touch tile STARTpad.
NOTE"Anattent/bntonew/7/soundifyouareus/by
tbTedbakbganddonottouchtheSTARTpad
iii%D 18-1D D ¸
ii[E]D D IEID
How to Set a Delayed Start and Automatic Stop
Theoven will turnon at the t/kneof dayyouset,
cook for aspecificlength of time and thenturn off
automatically
Make stlI'e tile clock sho_:s tile correct
time ot dav.
[] Touch tile BAKEpad.
[] Touch tile nunlber pads to set tile
desired o_en teinperature.
[] Touch tile COOKTIME pad,
NOTE."If yourreciperequirespreheating,youmay
need toadd additiona/ time to the length of the
cookbg time.
[] Touch tile nunlber pads to set tile
desired length of cooking tiine. The
II/inil/ltllIl cooking tilI/e yell can set
is ] nlinute.
Tile oven teinperature that you set
and tile cooking tiIne that you
entered will be in tile display:
[] Touch tile DELAYSTARTpad.
[] Touch tile nunlber pads to set tile
tiIne of day )ou want tile o_en to
tt/Yn on and st;lI't cooking.
[] Touch tile STARTpad.
NOTE"Anattentiontonewff/soundif youareusbg
timedbakIw anddonottouchtheSTARTpad
NOTE."Ifyouwould117_etocheckthetlknesyou
haveset,touchtheDELAYSTARTpadtocheck
thestarttimeyouhavesetor touchtheCOOK
TiMEpafltocheckthelengthofcookbgtime
youhaveseL
_'_]leI1 tile oven turns ONat tile tiine
of day you set, the display will show the
ct)oking tiIne countdown and tile
changing teinpeiamre starting at 100°E
(Tile tenlperature display will start to
change once tile ()veil tellll)eI';IttlI'e
reaches 100°El X&l/eI1 tile oven reaches
tile tenlperature )_)u set, beeps will sound.
The oven will continue to cook tor
tile set an/ount ot tilne, then turn off
autoinaficall> unless tile _,\;&RM featuI'e
was set. See tile How to Set the Ovenfor
Warml}?gsection.
[] Touch tile CLEAR/OFFpad to clear
tile displa) if' necessary. Reinoxe tile
food ti'oin tile oven. I_einenfl)ei;
even though tile oven turns off
aut/Ânlaticall 5 filed lett in tile oven
will continue cooking after tile oven
ttlI'ns Off'. _ 5

Usingtheprobe onthe lower convectionoven.(onsomemodels)
Formany foods, especially roasts and poultry, internal food temperature is the best test for doneness. The
temperature probe takes the guesswork out of roasting by cooking foods to the exact doneness you want.
The temperature probe has a
skewer-like probe at one end and
a plug at the other end that goes
into the outlet f17the oven.
Use of probes other than the one
provided with this product Inay result in Plug
dainaoe to the pi'obe (1I" oxen control,
Use the handles of the probe and plug
xd_en inserting and remoxing them fl'om
tile fi)od and outlet.
_!_:Toavoid damagingyea probe,donot use
tongsto puff on the cablewhen removingit.
:_; Toavoidbreak/bgthe probe,makesure food
is completelydefrostedbeforeinsert/bg.
Alter preparing the meat and placing
it on a trivet or a broiler pan grid, follow
these directions for proper probe
placemelm
Insert the probe completely into the
meat. It should not touch bone, fat
or gristle.
NOTE: Failureto fully insert theprobeinto the
meat mayresult in poor cooklbgperformance
becausethe probewill sense the ovenair vs.
the foodtemperature.
_Never &ave your probe inside the oven dunbg
aself-cleaningabroil cycle.
_Do not store the probe in the oven.
CAUTION:repreventpossibleburns,
do not unplug the probe from the oven outlet until
theovenhascooled
For roasts Mth no bone, insert the probe
into the ineatiest part of the roast. For
bone-in haln or lamb, insert the probe
into the center of the lowest large 11/uscle,
Insert the probe into the center of dishes
such as llleat loat oi" casseroles.
Insert the probe into the ineatiest part of
the iimer thigh fl'oln below and parallel
to the leg of a whole turkex.
NOTE:Self-cleanand Broilsembgs will not work
if the temperatureprobeisplugged lb.
16
How to Set the Lower Oven ForBaking/Roasting When Using the Probe
(on some models)
] Insert the probe full} into the fi)od. _Mter the internal temperature oi the
food reaches 100°K the changing internal
[]
[]
[]
[]
[]
[]
Plug the probe into tile outlet in the
oven. Make sure it's pushed all the
',_a'_ in, Close the o_en door_ Make
stlle the probe cable is not touching
the broil element.
Touch tile PROBEpad. Displa} Mll
sho_,_ "Set Probe Temperature."
Touch tile number pads to set the
desired internal food or meat
temperature. The ma_mum
internal temperature for the ibod
that xou can set is 200°E
Touch the BAKEpad.
temperature Mll be shown in the display.
] _hen tile internal temperature of
tile food reaches the mm_ber ,ou
have set, tile probe and tile oxen
turn off and the oven control signals.
To stq) the signal, touch tile
CLEAR/OFFpad. Use hot pads to
remo\ e the probe fi'om the ibod.
Do not use tongs to pull on it--they
might damage it.
iJi::If theprobeIs removedfrom the ovenwhile
probecooking,the oven will not automatically
turnoK
Touch the ram/beT pads to set the
desired ovell teI//})el';tttll'e,
Touch the START pad.
To change the oven tetnperature dtuJng
the Bake/Roast cycle, touch the BAKE
pad and then the nunlber pads to set the
new telnperature.
!i>YoucanusetheKitchenTimereventhough
youcannotuset/Ynedovenoperations
whileusingtheprobe.

Usingthe clock,kitchen timerand controllock. gecom
(on some models)
(onsomemodels)
Makesuretheclockis settothe
correctt#neofda_
ToSet the Clock
The clock must be set to the correct time
of day fin" the autonmfic oven timing
fimctions to _x)rk properly. The time of
day cannot be changed during a timed
baking or self-cleaning cycle,
]On somemodels, touch the
TIMER/CLOCKpad and hold for
3 seconds. On other models, touch the
CLOCKpad.
[] Touch the number pads.
[] Touch the STARTpad,
(onsomemodels)
(on some models)
The Kitchen 77meris f17hours and
minutes.
The Kitchen Timer does not control
oven operations. The maximum
se#ing on the Kitchen Timer is
9 hours and 59 mhn_tes.
To Set the Kitchen Timer
[] T(>uch the TIMER/CLOCKer TIMER
pad (depending on model).
[] Touch the number pads until the
_lIllOtlnt ()t [lille Veil want shows
in the displa); For example, to set
2 hom_ and 45 minutes, much 2, 4
and 5in that order: If you make a
mistake touch the TIMER/CLOCKer
TIMER pad (depending on model)
and begin again.
[] Touch the STARTpad,
After touching the STARTpad, SET disappears,
thistells youthe time iscountl#g down, although
the displaydoesnot change until onemlEutehas
passed SecondswH/not beshown i# the display
until the/astml#ute is counflw down.
[] _,_3_enthe I_Jtchen Timer readies .90,
the control will beep 3 times fi)llowed
b)' one beep every 6 seconds tmti]
the TIMER/CLOCKer TIMER pad
(depending on model) is touched.
The&second tonecanbecanceledby following
thesteps in the Specialfeaturesof youroven
control section underTonesat the Endof a
TimedCycle.
ToReset the Kitchen Timer
If the display is st.ill showing the
time remaining, you may change it by
touching the TIMER/CLOCKer TIMER pad
(depending on model), then touch the
ntli/lbei" pads tmtil the time you want
appea_ in the display.
If the remaining time is not in the
display (clock, delay start or cooking
time are in the display), recall the
remaining time by touching the
TIMER/CLOCKer TIMER pad (depending
on model) and then touching the
ntli/lber pads to enter the new
[lille Veil W;lllt,
ToCancel the Kitchen timer
Touch the TIMER/CLOCKor TIMER pad
(depending on model) twice.
Control Lock (on some models)
Yourcontrol wi// a/low you to lockout the touch
pads andthe cooktopsothey cannotbe activated
when touched
To l(>(k/unl(>d¢ the controls and cooktop:
[] Touch and hold the CONTROLLOCK
p_d fi)I 3 seconds.
The oven display will show "Oven
controls and burners locked" fl>r
several seconds, then "Range
Locked."
[] To unlock the control, touch and
hokl CONTROL LOCKfor .,'2seconds.
!;>TheCONTROLLOCKmodeaffectsall
touchpads.Notouchpadswi//workwhen
thisfeatureisactivatecL
17

Adjust the upper or lower oven thermostat--Do it yourself!
Youmay find that your new oven cooks differently than the one #replaced. Use your new oven for a few weeks to
become more familiar with it. If you still think your new oven is too hot or too cold, you can adjust the thermostat
yourself.
Do not use thermometers, such as those found in grocery stores, to check the temperature setting of your oven.
These thermometers may vary 20_40 degrees.
NOTE"This adjustment will only affect baking and roasting temperatures; #will not affect broiling, convection or
self-cleaning temperatures. The adjustment will be retained in memory after a power failure.
i!!/ //4¸i i i i
iirq FqFqrq Fq
iD Fq[] FqFq¸
To Adjust the Thermostat
[] Touch the BROIL HI/LO and BAKE
pads at tile same time until tile
displa? sho_s SE
[] Touch tile BAKE pad, _a,t_o clioit
nmnber shm_s in the display.
Touch BAKE again to akernate
between increasing and decreasing
the ()_,e_l temperature.
To ac!iust the upper o\vn
them/ostat, touch tile upper Oxen
BAKE pad. To ac!iust the lower oxen
them)ostat, touch the lower Oven
BAKE pad.
[] Tile ()veil ten/pel';ttHl'e c;lIl be
a(!iusted up to (+) . :) I_ hottel ol (-)
35°F coole_: Touch the munber pads
tile same way you iead them. For
example, to change the o_vn
temperature l_'_°Ktouch I and 5.
[] _qlen }ou hme made the
ac!jusunent, touch the STARTpad
to go back to the time of da} displa_
Llse }our oven as ?ou woukl nora/all}
Thetype ofmargarine will affect bakingperformanc!!
Most recipes for baking have been developed using high fat products such as butter or margarine (80%fat). If you
decrease the fat, the recipe may not give the same results as with a higher fat product.
Recipe failure can result if cakes, pies, pastries, cookies or candies are made with low fat spreads. Thelower the
fat content of a spread product, the more noticeable these differences become.
Federal standards require products labeled "margarine" to contain at least 80% tat by weight. I,ow tat spreads, on tile
other hand, contain less tat and more water: The high moisture content (ff these spreads affects tile textm'e and flavor
at baked goods. For best results with veto" old tm'orite recipes, use margarine, butter or stick spreads containing at least
70% vegetable oil.
18

Usingthe convectionoven.(onsome models) ge.com
Convection Fan Operation
In aconvectionoven,a fan c/Tculateshot air over,
underand aroundthe foocL
Thiscirculatinghot al?is evenly distributed
throughoutthe ovencavity As aresult, foodsare
evenlycookedand browned_often in less time
with convectionheat
NOTE'T(> ina_inize cooking evenness,
tile fire is designed to rotate in both
directions, with a pause in between.
This is nomml.
Tile convection tim shuts offwhen tile
oven door is opened. DO NOTleave tile
door open for long periods of time while
using convection cooking or you may
shorten the lif0 ot the convection heating
element.
Introduction
Tile convection oven coi//es with two
convection baking inodes: Convection
Bake Multi and Convection Bake 1 Rack:
MULTI--for convection cooking on more
than one rack. Touch tile CONVECTION
BAKEMULTI/1RACKpad and then tile 2
pad. See tile Multi-Rack Convection Baking
section below.
IRACK---for convection cooking on one
rack onk Touch tile CONVECTION BAKE
MULTI/1 RACKand then tile Ipad. See tile
1-Rack Convection Baking section below.
Multi-rack position.
Multi-Rack Convection Baking
Because heated air is circulated evenly
throughout tile oven, foods can be
baked with excellent results using
multiple m c)<s.
Multi-rack baldng may increase cook
times slighdy ti)r some foods but tile
overall result is time saved. C(>oMes,
muflins, biscuits and other quickbreads
give vexT good results with multi-rack
baldng.
To COOk ]_k)od OlX n/ol'e thall ()lie rack ill
comecti(>n bake, use CONVECTIONBAKE
MULTI.
When baldng (>n 3 racks, place one
rack in tile second (A) positi(>n, another
rack in tile fourth (C) position and tile
third rack in tile sixth (El position.
For two-rack baMng, place one rack in tile
second (B) rack position, Place tile other
rock in tile fifth (E) rock position,
1-Rack Convection Baking
Whenconvectionbaklbgwith only Irack,use
CONVECTIONBAKE IRA CKand follow the
rackpositions recommendedin the Usingthe
oven section.
!i>Idealforbakedfoodscookedon I rack.
Adapting Recipes...
You can use your fi_orite recipes in tile
con_, ection o_, ei1.
When convection baking, the Auto
Recipe _'_Conversion teatm'e automatically
reduces the set regular baking temperature
b\' the recommended 25°E See Auto
Recipe _ Conversion in tile Special
Features section.
_: Usepansize recommendec{
::Ji::Somepackage instructions for frozen
casserolesor main disheshavebeen
developedusingcommercialconvection ovens.
Forbest results in this oven,preheat the oven
andusethe temperatureon thepackage.
19

Usingtheconvectionoven.(o,some models)
Grid
Broilerpan
Convection Roast
i_ Goodforlarge tendercutsof meat, uncovered
Tile convection tim circulates tile heated
air evenly over and around the filed.
Meat and i)oulttT are browned on
all sides as if they were cooked on a
rotisserie, Tile heated air seals in juices
quickly fin" a moist and tender product
while, at tile same time, creating a rich
golden brown exterior.
X,_]/en volt are convection roasting it is
important that you use a broiler pan and
grid fi)r best convection roasting results,
The pan is used to catch grease spills
and the grid is used to prevent grease
sl)attet_.
DE][E]E]E]
DE]K]E]E]
B
How to Set the Lower Oven for Convection Baking or Roasting
[] Touch tile CONVECTIONBAKEMULTI/
I RACKpad and then tile 2pad fin.
multi-rock convection baking. Tiffs
mode is used fi)r cooking fi)od items
on morn tban one rock (i.e., 2, 3 or
more rocks) at tile same time in
con;'ection bake. See file Multi-Rack
Convection Baking section fi)r more
infommfion.
To uch the CONVECTIONBAKEMULTI/
I RACKI/ad and then tile Ipad fi)r
one-rack convectkm baking. This
mode is used fbr cooking fi)od items
on on b one tack in COIl\rectiott bake,
Touch the CONVECTION ROAST pad
fi)r convection roasting,
[] Touch tile nmnber pads to set tile
oven tellll)et_lttt t'e.
[] Touch tile STARTpad.
NOTE: Ifthe Auto Recipe_ConversionFeature
is on, it wi// automaticallyreduce the setregular
bakingtemperatureby25°F to theapproprbte
convection temperaturein convectionbakemode.
SeeAuto Recipe_Conversionin the Specbl
Featuressection.
To change tile oven teml)erature , touch
tile CONVECTIONBAKEMULTI/I RACKor
CONVECTIONROASTpad and then tile
mmlber pads to set tile new teml)emmre.
_._]/en tile oven starts to beat, tile
changing teml)eramre, starting at 100°E
will be displayed. X._l/en oven reaches the
teml)erature you set, 3 beeps will so/md.
[] Touch CLEAR/OFFpad when finished.
_: Youwi// heara fan while cookingwith
convection.Thefan will stop when the door
isopened,but theheat will not turn off.
_Youmay hear the ovenclicking during
baking. Thisisnormal.
iJGInconvectionbakemodes,formaxlknumcooking
evenness,the fan is designed torotate in
both dkections, with a pausein between.
Thisis normal.
When bakflTgcookies, you will get
the best results if you use a flat
cookie sheet hTsteadof apan with
low sides.
Cookware for Convection Cooking
Befiwe using yore" convection oven, check
to see if your cookware leaves i'OOtll [()t"air
circulation in tile oven. If volt are baking
with several pans, leave space between
them. Mso, be sine tile pans do not touch
each other or the walls ot the oven.
Paper and Plastic
Heat-resistant paper and plastic
container's that at'e t'eCOllll//ended ]'()t"
use in regular baking can also be used
for convection baking, but should not
be used at teml)eratures lfigher than
tile teml)eramre recommended by tile
cookware t/lantL[ilCttll'ei'. Plastic cookware
that is beat-resistant to temperatm'es of
400°F can also be used.
Metal and Glass
Any t)'l)e of cookware Mll work in wmr
convection oven, However; ii/etal l)ans
heat tile filstest and are recommended
fi:,r convection baking.
_Darkenedor matte-finishedpans will bake
faster thanshinypans.
iJGGlassor ceramicpans cookmoreslowly
For recipes like ovenq)aked cbicken,
use a pan with low sides. Hot air
cannot circulate well aro/md food
in a pan with lfigh sides.
20
Other manuals for RADIANT PB970
3
This manual suits for next models
1
Other GE Range manuals