GE GSS25LSWJSS and Safety guide

GEApp/iances.com
|
,e.,_
0e,,,q
Safety Instructions ................ 2-3
Operating Instructions
Automatic Icemaker ................ 11
Care and Cleaning .............. 13, 14
Crispers and Pans .................. 10
ExpressChilF" ....................... 5
Ice and Water Dispenser .......... 12, 13
Refrigerator Doors .................. 9
Replacing the i,ight Bulbs ........... 15
Shelves and Bins .................. 7, 8
Temperature Controls ............... 4
TurboCool'" ........................ 4
Water Filter ........................ 6
Installation Instructions
Installing the Refrigerator ........ 21-24
Moving the Refrigerator .......... 17-20
Preparing to Install
the Refrigerator .................... 16
Water Line Installation ........... 25-27
Troubleshooting Tips ............ 28-31
Normal Operating Sounds ........... 28
Consumer Support
Consumer Support .......... Back Cover
Performance Data Sheet ............. 32
Ownership Registration
(Canadian) ..................... 33, 34
State of California Water
Treatment Device Certificate ......... 37
Warranty (Canadian) ............... 38
Warranty (U.S.) .................... 39
Mode/s 22, 23, 25 and 27
C6te a C6te
Rdfrigdrateurs
Lasection frangaisecommencea la page40
Lado aLado
Refrigeradores
La secci6n en espa_olempieza en la p&gina75
Writethe model andserial numbers here:
Model #
Serial #
Find these numbms on a label inside
the refYigerator compartment at the
top on the right side. 200DSO74P033 43-60534 03-09JR

IMPORTANTSAFETY/NFORMATION.
READALLINSTRUCTIONSBEFOREUSING.
AWA ,!
m
Use this appliance only for its intended purpose as described in this Owner's Manual
SAFETYPRECAUTIONS
When using electrical appliances, basic safety precautions should be followed, including the fofiowing:
}}_This refligerator must be properly installed
and located in accordance with the Installation
Instructions before it is used.
Do not allow children to climb, stand or hang
on the shelves in the refligerator They could
dmnage the refligemtor and seriously i_jure
themsekes.
}}{_Do not touch the cokt surfhces in the fleezer
compartment when hands are damp or wet. Skin
may stick to these extremely coM surfaces.
}}{_Do not store or use gasoline or other flammable
vapors and liquids in the vicinity of this or any
other appliance.
',_In refligerators widl automatic icemakers,
avoid contact with the moving parts of the
ejector mechanism, or with the heating element
located on the bottom of the icemaker Do
not place fingers or hands on the automatic
icemaMng mechanism while the refligerator
is plugged in.
',_ Keep fingers out of the "pinch point" areas;
clearances between the doors and between
the doors and cabinet are necessarily small.
Be careflfl closing doors when children are
in the area.
',_Unplug die refligemtor before cleaning and
making repairs.
NOTE:Westronglgrecommendthatan}/servicingbe
performedbyaquafifiedindividual
}}{_Do not refleeze flozen foods which have
thawed completely';
NOTE:Turningtherefrigeratoroffviathecontrolson
thetouchpaneldoesnotshutoff electricalpowertothe
refrigerator
2

AOF .D
GEAppliances.com
T
PROPERDISPOSALOFTHEREFRIGERATOR
Child entrapment and suffbcafion are not problems
of the past. Junked or abandoned refiigerators are
still dangerous...even if flley will sit Kw "just a few
days." If you are getting lid of your aM refligeratoi;
please follow file insuucfions below to help prevent
accidents.
Before You Threw Away YourOld Refrigerator
or Freezer:
} Take off the doors.
i_eave the shelves in place so that children may
not easily climb inside.
Refrigerants
All refiigeradon products contain refiigerants,
which under federal law must be removed prior
to product disposal. If you are getting rid of an
old refligerafion product, check with the
company handling the disposal about what
to do.
USEOFEXTENSIONCORDS
Because of potential safety hazards under certain conditions, we strongly recommend against the use
of an extension cord.
Howevei; if you must use an extension cord, it is absolutely necessaQ' that it be a UL-listed (in the United
States) or a CSA-listed (in Canada), _wire grounding type appliance extension cord having a grounding
type plug and outlet and that the electrical rating of the cord be 15 amperes (minimum) and 120 volts.
A
HOWTOCONNECTELECTRICITY
Do not, under any circumstances, cut or remove the third (ground) prong from the power cord. For
personal safety, this appliance must be properly grounded.
The power cord of dlis appliance is equipped
with a 3-prong (grounding) plug which maws
with a standard 3-prong (grounding) wall outlet
to minimize the possibilit), of elecnic shock h_tzard
flom this appliance.
Have the wall oudet and circuit checked by a
qualified electrician to make sure the outlet is
properly grounded.
If file outlet is a standard 2-prong oudet, it is
your personal responsibility and obligation to
have it replaced with a properly grounded
3-prong wall outlet.
The refligerator shouM ah.vays be plugged into its
own individual electrical outlet which has a voltage
radng dmt matches tl_e radng plate.
This provides the best performance and also
prevents overloading house wiring circuits which
coukt cause a fire hazard fiom overheated wires.
Never unplug your refligerator by pulling on
the power cord. Ah.vays grip plug firefly and pull
straight out flom the outlet.
Repair or replace immediately all power cords flint
have become fiwed or otherwise damaged. Do not
use a cord that shows clacks or abrasion damage
along its length or at either end.
X_,qlen moving the refligerator away flom the
wall, be carefhl not to roll over or damage the
power cord.
READANDFOLLOWTHISSAFETYINFORMATIONCAREFULLY.
SAVETHESEINSTRUCTIONS 3

Aboutthe temperaturecontrols.
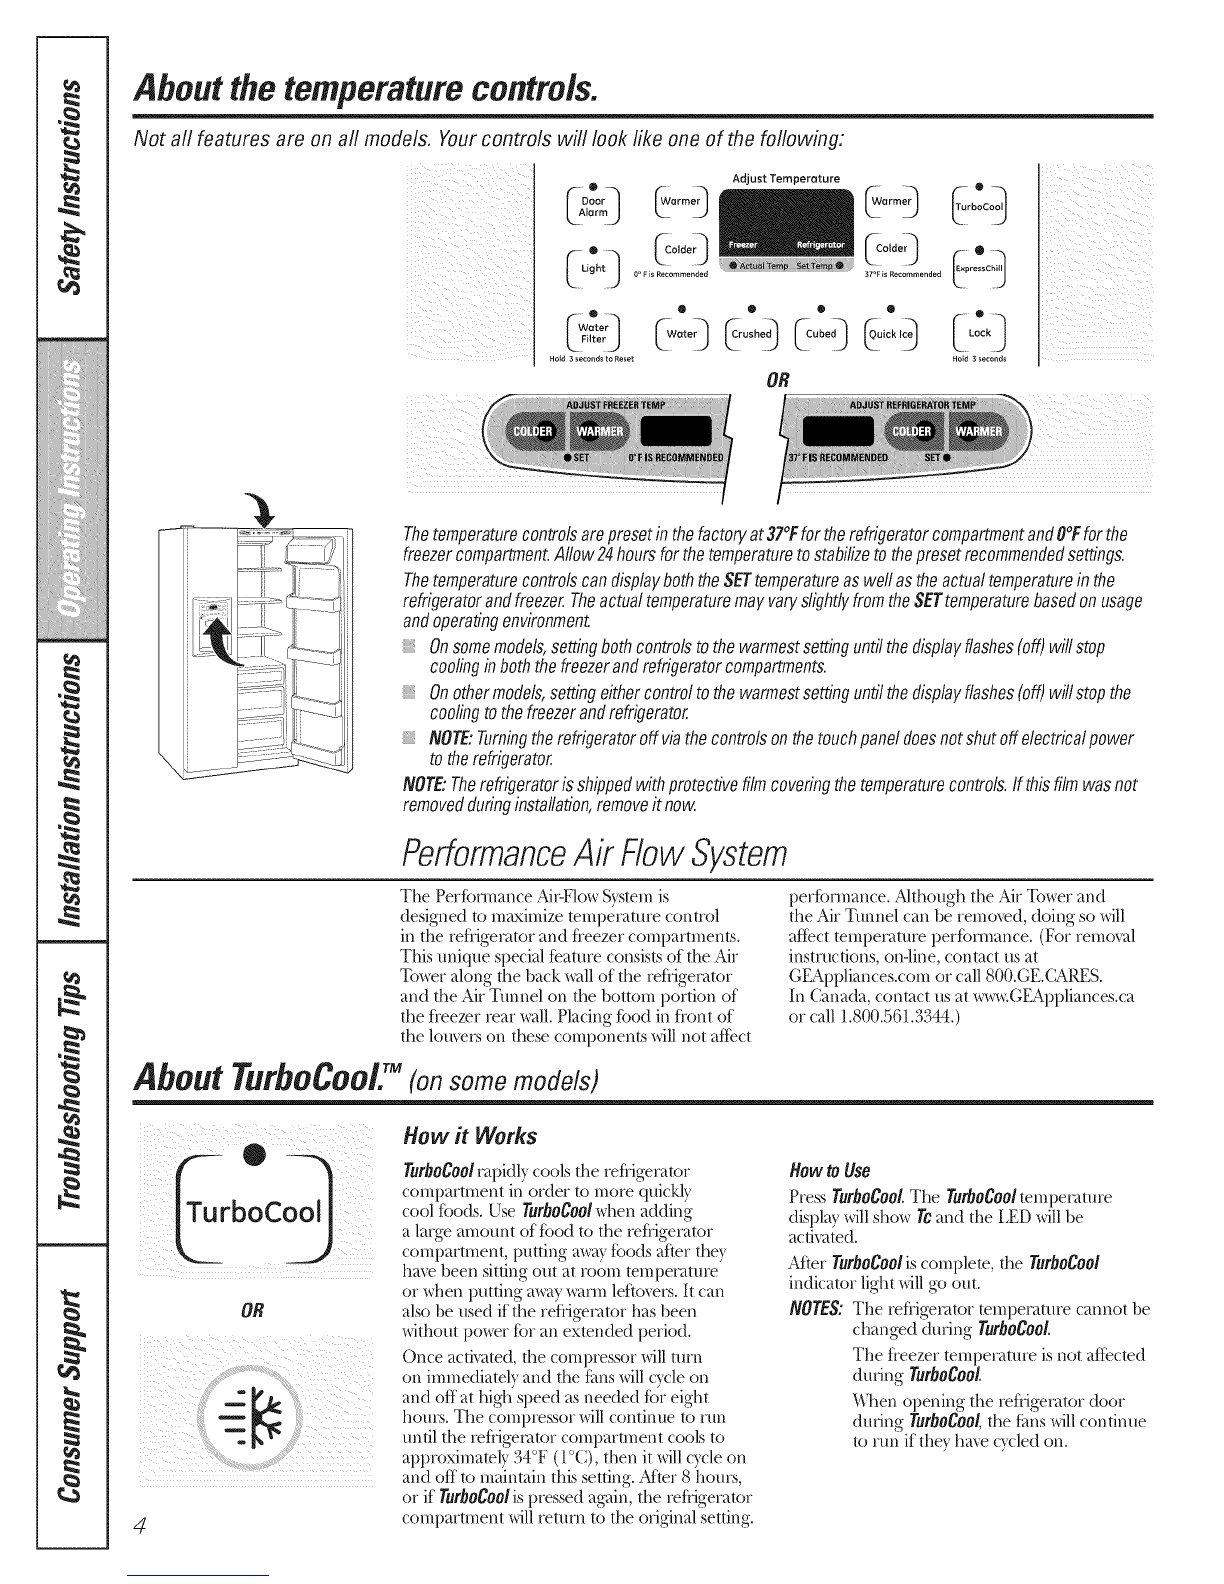
Not all features are on all models. Your controls will look like one of the following:
ii i i Adjust Temperature
_AEDa_cr_. .... __Warrner_ _ _arm_ T_urboOCoo_.
0o...........dod ,,o.............d .....
Filte! ote ushed ube ick I Loc k
Ho{d 3s_onds to Reset Hold 3 seconds
OR
ili ii_i/i __
Thetemperaturecontrolsarepresetin thefactoryat37°FfortherefrigeratorcompartmentandO°Fforthe
freezercompartment.Allow24hoursforthetemperaturetostabilizetothepresetrecommendedsettings.
ThetemperaturecontrolscandisplayboththeSETtemperatureaswellastheactualtemperatureinthe
refrigeratorandfreezer.TheactualtemperaturemayvaryslightlyfromtheSETtemperaturebasedonusage
andoperatingenvironment.
Onsomemodels,settingbothcontrolstothewarmestsettinguntilthedisplayflashes(off)willstop
coolinginboththefreezerandrefrigeratorcompartments.
Onothermodels,settingeithercontroltothewarmestsettinguntilthedisplayflashes(off)willstopthe
coolingtothefreezerandrefrigerator.
NOTE"Turningtherefrigeratoroffviathecontrolsonthetouchpaneldoesnotshutoffelectricalpower
totherefrigerator.
NOTE"Therefrigeratorisshippedwithprotectivefilmcoveringthetemperaturecontrols.If thisfilmwasnot
removedduringinstallation,removeit now.
PerformanceAir FlowSystem
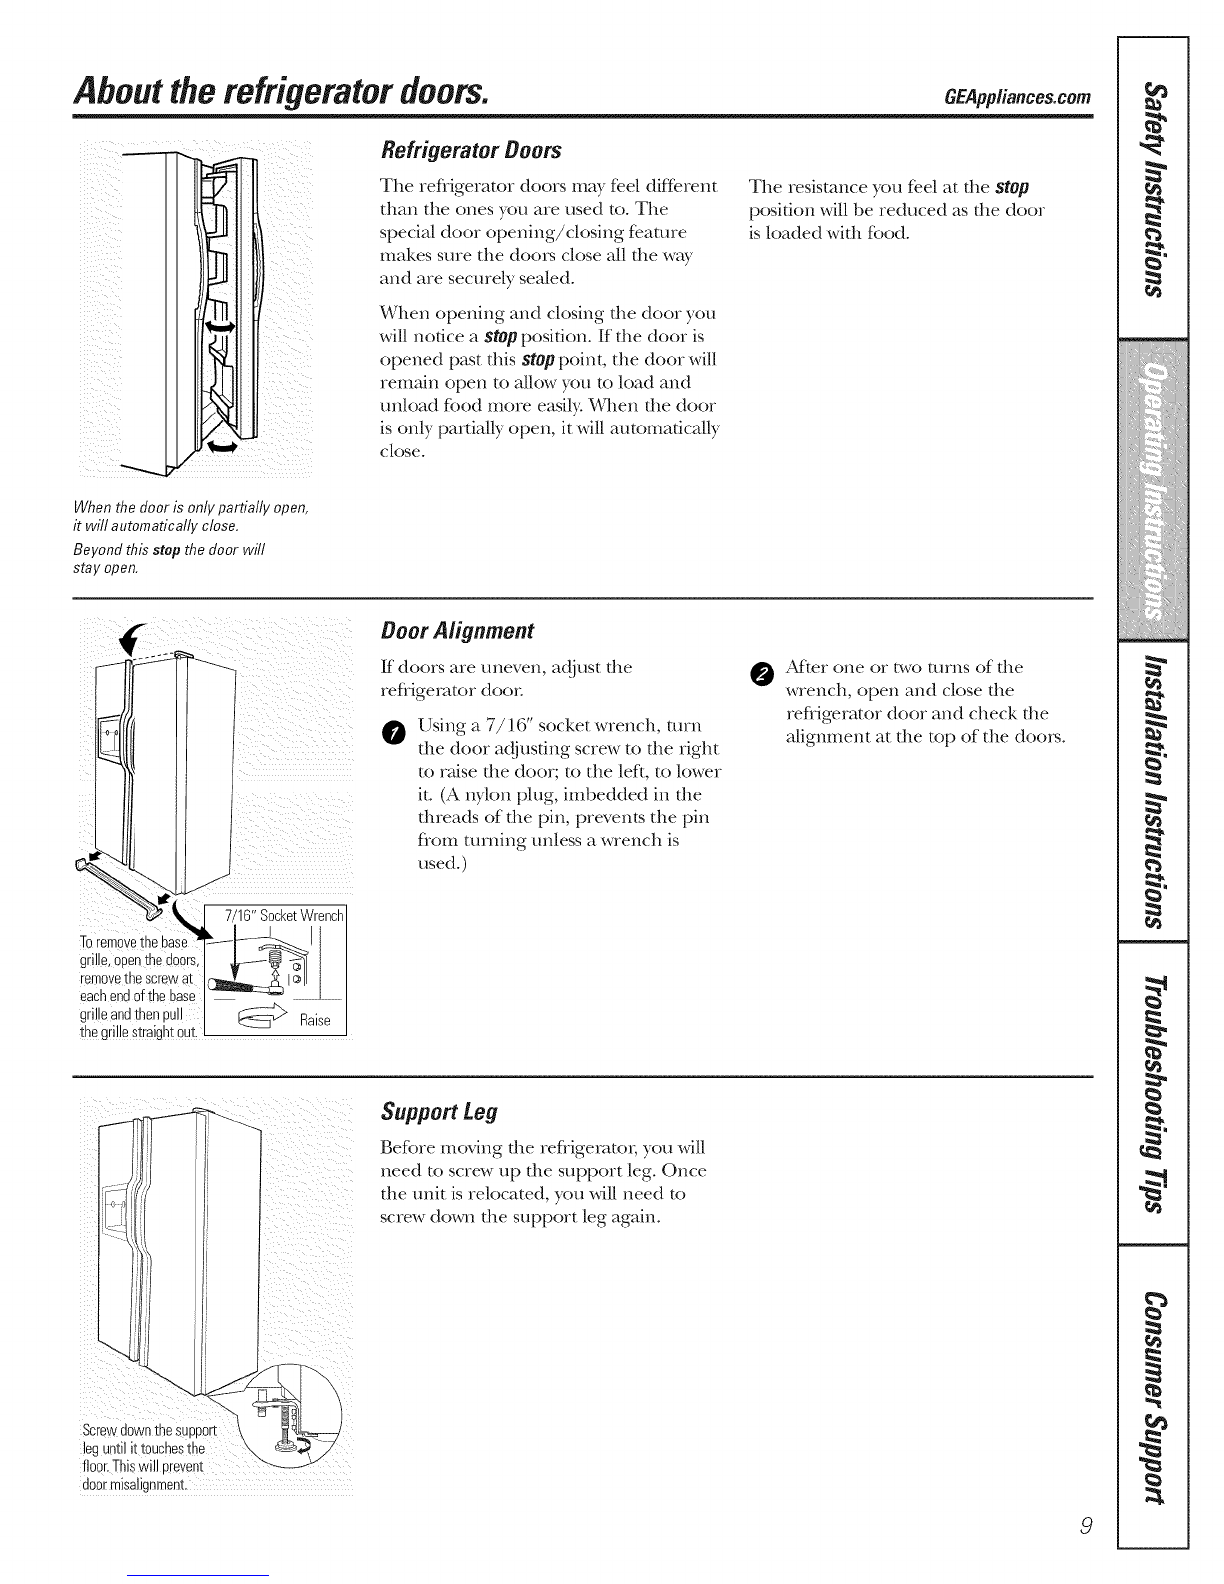
The Perfbm_ance Ai>Flow S}¢s/em is
designed to maximize/empecature control
in the refl_ge_>_tor and fleezer compartments.
This unique special feature consis/s of the Air
To_r along the back _;dl of the reflige_>_tor
and the Air Tunnel on the bottom portion of
the fleezer rear _;dl. Placing food in flont of
the lom_rs on these components will not affect
perfbm_ance. Although the Air Tower and
the Air Tunnel can be remoxed, doing so will
affectmmpecature perfbm_ance. (For removal
instructions, on-line, contact us at
GEAppliances.com or call 800.GE.(ARES.
In Canada, contact us at ,_GEAppliances.ca
or call 1.800.561.3344.)
About TurboCooL rM(on some models)
OR
4
How it Works
TurboCoolcapidl) cools the refligecator
compartment in order to more quickl_
cool foods. Use TurboCoo/whenadding
a large amount of food to the reh-igecator
compartment, putting awa) foods after the}
have heen sittingout at room tempecatme
or when putting _-tp_vty,_>tIInlefloxet_. Itcan
also be used ifthe reh{gecator has been
without pcmer fbr an exmnded period.
Once activamd, the compressor willturn
on immediamly and the f_mswillcycleon
and offat high speed asneeded for eight
hom_. The compressor willcontim_e/o run
until the reh{gecator compartment cools/o
approximately 34°F (I°C), then it willcycle on
and off to maintain this setting. After 8 hom_,
or if rurboeoo/ispressed again, the refi_gerator
compartment will return to the original setting.
HowtoUse
Press TurboCool.The TurboCooltempecatme
displa}will showTCand the[_EDwill he
activated.
After TurboCoolis complete, the TurboCool
indicator lightwill,goout.
NOTES:The refi-igetvttormmpecatme cannot be
changed dining TurboCoo/.
Thefieezertempe_vttureisnotaffec/ed
during TurboCooL
_en opening therehigecatordoor
during TurboCool,the fans willcontinue
to run if they ha,_ cycledon.

AboutExpmssChi//:%nsome models) GEAppliances.cem
0 15 MIN
ExpmssChill •ao
•45 MIN
.................................................................................................@ SET ...................
How it Works
The ExpressChi/F feature is a system
of dampers, a fan and a temperature
dlem_istor
The pan is fighdy' sealed to pim, ent tlle pan s
temperaune flom causing temperature
fluctuations in tile rest of tile refligerator
The controls for dfis pan are located in tlle
top of tile refligerator or on tlle dispenser
wkh tile temperature controls.
ExpressChill 'M
How to Use
0
0
Empb. die pan. Place die Chill m_y in
die pan. Place the imms on die nW and
close the pan completely.
Select tlle ExpressChill'_pad. On some
models, you can then select the chill
time (use chart to demm_ine best
setting). Other models will only have
one option (45 minutes). On models
with multiple settings, tap file pad until
the light appears next to the desired
setting.
To stop a feature before it is
finished, tap dmt feature's pad
until no options are selecmd and
die displ W is off:
During ExpressChill,the displW on
the controls will count down the time
in the cycle.
How toRemove and Replace the Drawer
Toremove:
Pull the drawer out to the stop position.
O Rotate all four swing locks to the unlock
position.
0 Lift file flont of file drawer tip and out.
Toreplace:
Make sure all four swing locks are in file
unlock position.
0 Place the sides of die drawer into the
drawer supports, making sure die swing
locks fit on the drawer slots.
Lock all fbur swing locks by rotating
them to the lock position.
ExpressChilF Chart
...................................... NOTE: Results may vary depending
015MIN
ExpressChill •aoMi. 15 Minutes
.... ] Beverage Can (12 oz)
.......... { 2 Small,Juice Boxes
(6-8 oz each) {
{{{iii_i;;;!
on packaging, starting temperature and other food traits.
30 Minutes 45 Minutes
2 to 6 Beverage Cans
(12 oz each)
2 Plastic 20 oz Bottles
of Beverage
4 to 6 Small Juice Boxes
(6-8 oz each)
3 Foil Juice Packets
Wine (750 ml bottle)
9 Liters of gexerage
1/2 Gallon of Juice
{ Gelatin--1 package
5
g.
25/111:::
<U;;T;T:I:]]
i;iiii_ii{iiii/!!!
g.

About the water filter. (onsomemodels)
Water Filter Cartridge
The water filter cartridge is located in the back upper right
corner of the refligerator compamnent.
When toReplace the Filter on Models With a
Replacement IndicatorLight
There is a replacement indicator light for the water filter
cartridge on the dispensen This light will turn orange to tell
you that you need to replace the filmr soon°
The filter cartridge should be replaced when the
replacement indicator light atrns red or if the flow of water
to the dispenser or icemaker decreases.
When toReplace the Filter on Models Withouta
Replacement IndicatorLight
The filter cartridge should be replaced eveQ six months
or earlier if the flow of water to the water dispenser or
icemaker decreases.
Removingthe Filter Cartridge
If ).ou are replacing the cartridge, first remove the old one
b}. slowly arming it to the left. 0o not pull down on the
cartridge. A small amount of wamr may drip down.
Installing theFilter Cartridge
Off you are replacing a SmartWater cartridge with
an adapter; it must be removed before installing the
cartridge. To remove the adapter; turn it to the left
about 1l/4 turn.
With adapter
ff you are replacing a Water by Culligan camidge,
leave the adapter in place. This adaptor will stay in the
refligetator when you replace furore cartridges.
Without ada_ter
(appearance may vary)
On models without a replacement indicator light,
appb,' the month and },'eat socket to the new cartridge
to remind you to replace the filter in six months.
Fill the replacement cartridge with water flom the mp
to allow for better flow flom the dispenser immediately'
after installation.
Line up the anow on the cartridge and the cartridge
hoMer Place the top of the new cartridge up inskte the
hoMer DOnot push it up into the hokler
Slowly turn it to the right undl the filter cartridge stops.
DONOTOVERTIGHTEN.As you atrn the cartridge, it will
atttomafically raise itself into position. The cartridge will
Illove about 1l/2 turn.
cartridg
ORun water flom the dispenser %r 3 minutes
(about 1-1/2 gallons) to clear the s}stem and prexent
sputtering.
Press and heM the WATERFILTERpad (on some models)
on the dispenser for 3 seconds.
NOTE:A newlyqnsmlled water filter cartridge may cause
water tOspurtflom the dispenser
FilterBypass Plug
You must use the filter bypass plug when a replacement
filter cartridge is not available. The dispenser and the
icemaker will not operate without the filter or filter
bypass plug.
i ter@
p gss-
SmartWater
Bypass
Plug i
WaterbyCufligan
To use the fiker bypass plug on Water by Culligan models,
y'ou must first remove the filter adapter flom the cartridge
holder by turning it to the |ell
If you have quesdons--
visit our X&;ebsiteat GEAppliances.com,
or call 1.800.GE.CARES (1.800.432.2737).
Replacementfilters:
Toorder additional filtercartridges in theUnitedStates,
visit our Wehsiteat GEAppliances.com,or call OEParts
andAccessories,800.626.2002.
MSWF
Suggested Retail $36.95-41.95
Customers in Canada shouM consult the y'ellow pages
for the nearest Mabe Service Center
6

Abouttheshelves andbins.
Not all features are on all models.
GEPppliances.com
f
qugger
I
Refrigeratorbin
Freezer bin
'I__ii
Freezer tilt-out bin
Refrigerator Boor Bins and Freezer Boor Tilt-Out Bins
LargeBins
The larger refligerator door bins and
fleezer flit-out door bins are adjusmble.
Toremove:l,iff the flont of the bin straight
up, then lift up and out.
To replace or relocate: Engage die back side
of the bin in file molded supports of the
door Then push down on the flont of the
bin. Bin will lock in place.
SmallBins
Toremove:Lift tile flont of tile bin suaight
up then out.
To replace: Posidon tile bin above tile
rectangular molded supports on the door
Then slide the bin down onto the support
to lock it in place.
Thesnugger helps prevent tipping, spilling
or sliding of small imms stored on the door
shel£ Place a finger on either side of the
snugger near the rear and move it back
and fbrrh to fit yore needs.
DonotNeck A CA UTION:
Onmodelswith an ice chute
inside the top freezerdoor
bin, becareful when placing
items in the bin.Make sure
that items donot block
or fall into the icechute.
Press tab andpull shelf
forward to remove
Slide-Out Spillproof Sheff
The slide-out spillproof shelf allows you
to reach imms stored behind otbe_. Tile
special edges are designed to help prevent
spills flom dripping to lower sheNes.
Toremove:
Slide tile shelf out until it reaches tile stop,
then press down on tile tab and slide tile
shelf straight out.
To replace or relocate:
Line tile shelf up wifll file supports and
slide it into place. The shelf can be
reposifioned when tile door is at 90 ° or
more. To reposidon the shelf, slide the shelf
past the stops and angle downward. Slide
shelf down to tlle desired position, line up
with the supports and slide into place.
Make sure you push the shelves all the wag back
in before you close the doo_
i!i iiiiiiiiiil!i!ii
""112,,11........
....:2:*:21!1111
i;iiii_iiiiiiiiii/!!!
i
g
r._
r_
r_
7I

Abouttheshelves andbins.
Not all features are on all models.
OuickSpace" Shelf (onsomemodels)
This shelf splits in half and slides under
itself for storage of tall imms on the shelf
below.
This shelf can be removed and replaced
or relocamdjust like Slide-Out Spillproof
Shelves.
On some models, dds shelf can not be used
in the lowest position.
i¸¸ i il)(
i
Freezer Baskets
Toremove, slide out to the StOpposition,
lift die fiont past the stop position, and
slide out.
Makesureyoupushthebasketsall thewayback
in beforeyouclosethedoor
Slide-Out Freezer Shelves
TOremove, slide out to the StOpposition,
lift the fiont past the stop position, and
slide out from _ib.
Makesureyoupushtheshelvesall the wayback
in beforeyouclosethedoor
Fixed Freezer Shelves
Toremove, lift the shelf up at the left side
and then b_ing the shelf out.
NOTE FORD/SPENSER MODELS."In order
to rake flfll advantage of the flit-out ice bin
(on some models), only store imms on the
shelf below the ice bin that are no taller
than the lowest point on the bin.
8

Abouttherefrigeratordoors. GEAppliances.com
Refrigerator Doors
The refligerator doors may feel different
than the ones you are used to. The
special door opening/closing feature
makes sure the doors close all the wa}.
and are securel}, sealed.
When opening and closing tlle door you
will notice a stop position. If the door is
opened past this StOppoint, the door will
remain open to allow you to load and
unload food more easily. When the door
is only partial1}, open, it will automatically
close.
The resistance you feel at the stop
position will be reduced as the door
is loaded with food.
When the door is only partially open,
it will automatically close.
Beyond this stop the door will
stay open.
7/16"SocketWrench
I
Toremovothobase
grille0penthed00rq _--_ -_ I
removetheScrewat IVa_,,,__ IEllI
eachendofthebaseI_
grilleandthenPull _ @ Raise
thegrillestraightout I
Door Alignment
If doors are uneven, adjust the
refligerator door
Using a 7/16" socket wrench, mrn
the door adjusting screw to the right
to raise the door; to the left, to lower
it. (A wlon plug, imbedded in the
threads of the pin, prevents the pin
flom turning unless a wrench is
used.)
O Af_er one or two turns of the
wrench, open and close the
refligerator door and check the
aligmnent at the top of the doors.
SupportLeg
Before re(wing die refligemtoi; you will
need to screw up the support leg. Once
the unit is relocated, you will need to
screw down the support leg again.
floor.Thiswill prevent
doormisalignmeot.
9
g.
ZiLi2:
?Z2T;T:I:]]
g.
g
r_
r_

About the crispersandpans.
Not all features are on all models.
iiil
Fruit and Vegetable Crispers
Excess water that may accumulate in the
bottom of file drawers should be wiped dry.
On some models, the bottom drawer h_L_
fifll exmnsion slides that allow Pill access
to the drawe_:
HI _ LO Adjustable Humidity Crispers
Slide the control all the way to the Hlsetfing
to provide high humidity recomlnended for
most vegetables.
Slide the control all the way' to the LO
setting to provide lower humidity levels
recommended for most fhdts.
i;ii( i:iii i Convertible Dell Pan (onsomemodels)
The convertible dell pan has its own cold
air duct to allow a stream of coM air flom
the fieezer compamnent or refiigemtor
compartment to flow to the pan.
The variable temperature control regulates
the air flow fiom the Climate Keeper:
Set the control to the coldest setting to
store flesh meats.
Set the control to COldto convert file pan
to nomm/refiigerator mmperamre and
provide extra vegetable storage space. The
cold Nr duct is turned off _,uiable settings
between these extremes can be selecmd.
About crisper removal
Not all features are on all models.
Crisper Removal
Crispers can easily be removed by pulling
the drawer straight out and lifting the
drawer up and over the StOp location.
If file door prevents you flom raking out
the drawers, first try to relilove the door
bins° If this does not off:er enough
clearance, the refiigerator will need to
be rolled fbrward undl the door opens
enough to slide the drawers out. In some
cases, when you roll the refiigerator out,
you will need to re(we the refiigerator
to the leh or right as you roll it out.
10

Abouttheautomaticicemaker, aappliances.com
A newly installed refrigerator may take 12to 24 hours to begin making ice.
Automatic Icemaker
PowerSwitch ._rArm
The icemaker will produce seven cubes
per cycle--approximately 100-130 cubes
in a 24-hour period, depending on fleezer
coiilpaltlnellt texllpelat/lle, iooxn
Wmperamre, nmnber of door openings
and oilier use conditions.
See below for how to access ice and reach
the power switch on dispenser models.
If the refligerator is operated before the
water connection is made to tile icemakex;
set tile power switch in tile OFFposition.
_,qlen tile refligerator has been connected
to the water supply, set the power switch to
the OJVposition.
Tile icemaker wll fill widl water when it
cools to 15°F (-10°C). A newly instaled
refligemtor ma}.take 12 to 24 hours
to begdn making ice cubes.
You will hear a buzzing sound each dine
the icemaker fills with water
Throw mvaytile first few batches of ice to
allow the water line to clear
Be sure nothing interferes with the sweep
of the re.clef arm.
_4,qlen file bin fills to file level of file feeler
arm, file icemaker will stop producing
ice. It is normal for several cubes to be
joined together
If ice is not used flequently, old ice cubes
will become cloudy, tasm stale and shrink.
Models without ashelf
abovetheice bin
Toaccess ice and reach the
icemaker power switch:
oLift the bin, then pull it
forward until the bin stops.
oowerthe bin to access ice
or reach thepower switch.
NOTE:In order to take full advantage
of the tilt-out ice bin, only store items
on the shelf below the ice bin that
are no rafter than the lowest point
on the bin.
Accessing Ice and Reaching the
Power Switch on Bispenser Models
Models with a shelf
abovetheice bin
Thereare twotypesof ice storagebinson
dispenser models. On ehasashelfabove _F_the bin, tile other does not.
Specialnote about dispensermodels
withouta shelf abovetheice bin: I <---_---O_.F- Ic-_e_
These models have a tilt-out ice bin.
Tile bin can be tilted out _s shown in
the illustrations, and it will hold itself
up while you rake ice out or mrn tile
icemaker power switch on and off Toaccess ice, pull the bin forward.
Be sure to put the bin back in phce
before closing tile door
To restore your ice level from an empty
bucket stage, the following steps are
recommended:
O ho.xs.f exthefixstbatchof
has fidlen into the bin, dispense
3 to 4 cubes.
After an additional 6 hours, dispense
3 to 4 cubes again.
i I
Toreach the power switch, pull the
shelf straight out. Always be sure to
replace the shelf.
These steps will restore y'om ice level
in tile shortest amount of time.
g.
_%7;T;T;]II
i;iii_iiiiiii/!i
.-g.
g
r.gztl
=1,
11

About the ice and water dispenser.(onsome models)
SpillShelf
To Use the Dispenser
SelectCUeEOiCE_, CnUSHEOICE
or WATER_.
Press tlle glass gently against tile top
of the dispenser cradle.
The spill shelf is not self:draining. To
reduce water spotting, the shelf and its
grille shouM be cleaned regularly:
Dispenser Light
®
If no water is dispensed when the refrigerator is
first installed, there may be air in the water line
system. Press the dispenser arm for at least two
minutes to remove trapped air from the water
line and to fill the water system. Toflush out
impurities in the waterline, throwaway the first
sixg/assfu/s0fwate
ACAUT/ON:Neverputfingers ick
or any other objects into the ice crusher
discharge opening.
LockingtheDispenser
0 Press thetOCKpad
_fbr 3 seconds to lock
the dispenser and
Loc co.t,-olpanel. To
unlock, press and
heM the pad again
Hold 3seconds for 3 seconds°
This pad turns the night
light in the dispenser on
and offl The light also
colIles on when the
dispenser cradle is
pressed° If this light
burns out, it should be
replaced with a 6 watt
12V maximum bulbo
9uickIce (on some models)
When you need ice
in a huriT, press this
pad to speed up ice
production° This will
increase ice production
for the following
48 hom_ or until you
press the pad again.
Door Alarm (on some models)
oorq
L21°rmj
To set tlle alarm,
press this pad until tlle
indicator light comes
on. This alarm will
sotlnd if either door
is open for more dmn
3 minutes. The light
goes out and the
beeping stops when
you close the doon
Important Facts About YourDispenser
Do not add ice flom trays or bags to
the storage drawe_: It may not crush
or dispense well.
Avoid overfilling glass widl ice and use
of narrow glasses. Backed-up ice can jam
the chum or cause the door in the chum
to fleeze shut. ff ice is blocking the chum,
poke it through with a wooden spoon.
Beverages and foods should not be
quick-chilled in the ice storage drawen
Cans, botdes or food packages in the
storage drawer may cause the icemaker
or auger to jam.
To keep dispensed ice flom missing
the glass, put the glass close to, but not
touching, the dispenser opening.
Some crushed ice may be dispensed even
though you selected CUBED ICE.This
happens occasionally when a few cubes
accidentally get directed to the crushe_:
}:_After crushed ice is dispensed, some
water may drip flom tile chute.
Sometimes a smaU mound of snow will
form on the door in the ice chum. This
condition is nomm[ and tlStla[ly occtlrs
when you have dispensed crashed ice
repeamdly: The snow will evenmNly
evapoIate.
12

GEAppliances.com
Models withouta shelf
abovetheice bin
Toremove:
oLift the bin. then pull it
forward until the bin stops.
Lift andpull forward again
to remove the bin.
Removing and Replacing the lee
Storage Bin on Bispenser Models
Thereare twotypesof icestoragebinson
dispenser models. One has a shelf above
the bin, the other does not.
Ah,vaysset the icemaker power switch to the
OFFposition before removing the ice bin.
Whenreplacingeither typeofice bin:
Ahvays be sure to press it fimlly into place.
If it does not go all the way back, remove it
and rotate the (hive mechanism 1/4 turn.
Then push the bin back again.
Driye {
Mechanism
Models with ashelf
abovetheice bin
Toremove:
1
Pull the bin straight out, then
thestopposition.
i!
iii_ii!i
lift _ast
Careandcleaningof therefrigerator.
Cleaning the Outside
Oispenserdr@ area.
Thedispenser drip area (on some models),
beneath the grille, should be wiped dpy. Water
lef_ in this area m W leave deposits. Remove
the deposits by adding tmdiluted vinegar to
the well. Soak until the deposits disappear
or become loose enough to _inse away:
Thedispenser cradle (on some models).
Before cleaning, lock the dispenser by
pressing and holding the LOCKpad for
3 seconds. Clean with warn1 water and
baking soda soludon - about a tablespoon
(15 ml) of baking soda to a quart (1 liter)
of'wa.m_: Rinse thoroughly and wipe dry.
Thedoortrim.Clean with a clodl dampened
with soapy water; Dry with a soS/cloth.
The stainless steel panels and door handles. Do
not use appliance wax, polish, bleach or other
products containing chlorine on stainless
steel.
Stainless steel (on some models) can be
clotured with a commercially a_dlable stainless
steel cleaner. A spray-on stainless steel cleaner
works best.
Keep theoutside clean. Wipe with a clean
clod1 lightly dampened widl kitchen
appliance wax or mild liquid dish demrgent.
DIT and polish with a clean, soft cloth.
Donotwipetherefrigeratorwith a soileddish
clothor wet towel Thesemayleavea residue
thatcanerodethepaint Donotusescouring
pads,powderedcleaners,bleachor cleaners
containingbleachbecausetheseproductscan
scratchandweakenthepaintfinish.
Cleaning the Inside
Tohelppreventodors,leave an open box
of baldng soda in the flesh ff_od and fleezer
comparmlents.
Unplugtherefrigeratorbeforecleaning. If this
is not practical, wIJng excess moisture out
of sponge or cloth when cleaning around
switches, lights or controls.
Use warm water and baking soda solution -
about a tablespoon (15 ml) of baking soda
to a quart (1 limr) of wam_:This both
cleans and neutralizes odo_. Rinse
and wipe d_>
Useof anycleaningsolution otherthanthat
which is recommended,especially thosethat
contain petroleum distillates,can crack or
damagethe interior ofthe refrigerator.
Avoidcleaningcoldglassshelveswith hotwater
becausetheextremetemperaturedifference
maycausethemtobreak.Handleglassshelves
carefull_Bumpingtemperedglasscancause
it toshatter
Donotwashan}/plasticrefrigeratorparts in
thedishwasher 13
e_
i!i i iiiiiiiiil!i!ii
""Z,,i........
....:2?::::iii!ii]i
i;iiii_iiiiiiiiii/!!!
g.
g

Careandcleaningoftherefrigerator.
Behind the Refrigerator
Be careflfl when m(Mng die refiigerator
away flom the wall. All types of floor
coverings can be damaged, particular b
cushioned coverings and those with
embossed surfaces.
Pull the refligerator straight out and return
it to position b}, pushing it straight in.
Moving the refligerator in a side direction
m W result in damage to the floor covering
or refligerator
Whenpushingtherefrigeratorback,makesure
youdon't roll overthepowercordor icemaker
supplyline (onsomemodels).
Preparing for Vacation
For long vacations or absences, reInove
food and unplug the refligerator Clean
the interior with a baking soda solution
of one tablespoon (15 ml) of baMng soda
to one quart (1 limr) of water Leave the
doors open.
Set die icemal<er power switch 1o
die OFFposifion and shut off die water
supply to the refligemtor
If die temperature can drop below
fleezing, have a qualified servicer drain
the water supply system (on some models)
to prevent serious proper V damage due
to flooding.
Preparing to Move
Secure all loose imms such as shelves and
drawers by taping them secure b, in place
to prevent damage.
When using a hand truck to move file
refiigeratoi; do not rest the flont or back
of the refiigemtor against the hand truck.
This could damage the refligerator Handle
on/}. flom the sides of the refligemtor
Besuretherefrigeratorstaysin anupright
positionduringmoving.
14

Replacingthe light bulbs, aami=,ce=.co=
NOTE: Turning the refrigerator off via the controls on the touch panel does not shut off electrical power to the
refrigerator.
Yourlightshield will look like
one of the following."
OR
Pocket
Refrigerator Compartment--Upper Light
0
@
@
Unplug tlle refiigerator.
The bulbs are locamd at file top
of file compartment, inside the light
shield. On some models, a screw
at the flont of the light shield will
have to be removed. On other models,
the screw is located in the pocket
located at the back of the shiekt.
To remove die light shield, on some
models, press in on the tabs on the sides
of the shield and slide fbrward and out.
On other models, j ust slide the shiekt
fbrward and out.
@After replacing the bulb with an
appliance bulb of rite same or lower
wattage, replace rite light shield and
screw. When replacing the light shieM,
make sure that the tabs at the back
of rite shield fit into the slots at
the back of the light shieM housing.
Plug the refligerator back in.
Refrigerator Compartment--tower Light
Thislightis locatedabovethetopdrawe_
Unplug the refligerator
Lift the light shieM up and pull it out.
After replacing the bulb with an
appliance bulb of the same or lower
wattage, replace the shield.
Plug the refligerator back in.
Freezer Compartment
Unplug the refligerator
Remove rite shelfj ust above die light
shield. (The shelf will be easier to
remove if it is emptied first.) Remove
the screw at the top of the light shiekt.
To remove the light shield, press in on
the sides, and lift up and out.
l_ Replace the bulb with an appliance
bulb of the same or lower wattage,
and reinstall the light shield. When
reinstalling the light shield, make
sure the top robs snap securely
into place. Replace the screw.
Reinstall the shelf and plug the
refrigerator back in.
Dispenser
Unplug the refligerator
The bulb is located on the dispenser
under the control panel.
Remove the light bulb by turning
it counterclockwise.
Replace the bulb with a bulb of the
same size and wattage.
Plug the refligerator back in.
g.
?Z2T;T:I:]]
i;iiii_iii_}iiiii/!!!
.-g.
g
/5

I st II ti
structi Refri rator
Models 22, 23, 25 & 27
Questions? Call 800.GE.CARES (800.432.2737) or Visit our Website at: GEAppliances.com
in Canada, call 1.800.561.3344 or Visit our Website at: www.GEAppliances.ca
BEFORE YOU BEGIN
Read these instructions completely
and carefully.
• IMPORTANT - Savethese
instructions for local inspector's use.
° IMPORTANT - Observeall
governing codes and ordinances.
• Note to Installer- Be sure to leave these
instructions with the Consumer.
Note to Consumer - Keep these
instructions for future reference.
Skill level -Installation of this appliance
requires basic mechanical skills.
Completion time- Refrigerator Installation
30 minutes
Water Line Installation
30 minutes
,, Proper installation is the responsibility
of the installer.
,, Product failure due to improper installation
is not covered under the Warranty.
If the refrigerator has already been installed,
remove the base grille (see Step 2in Moving
the Refrigerator), then skip to Step 5 in
Installing the Refrigerator.
PREPARATION
WATER SUPPLY TO THE ICEMAKER
If the refrigerator has an icemaker, it will have
to be connected to a cold water line. AGE
water supply kit (containing tubing, shutoff
valve, fittings and instructions) is available
at extra cost from your dealer, by visiting
our Website at GEAppliances.com (in Canada
at www.GEAppliances.ca) or from Parts and
Accessories, 800.626.2002 (in Canada
1.800.661.1616).
TOOLS YOU WILL NEED
3/8" and 5/16" Socket 1/2" and 7/16" Wrench
U
Plastic Putty Knife
Phillips Head Screwdriver
16

Installation instructions
MOVING THE REFRIGERATOR
E] LOADING THE REFRIGERATOR
ONTO A HAND TRUCK
Leave all tape and door pads on doors
until the refrigerator is in its final location.
To move the refrigerator, use a padded
hand truck. Center the refrigerator on the
hand truck and secure the strap around
the refrigerator. DO NOT OVERTIGHTEN
THE STRAP.
I_1REMOVE THE BASE GRILLE
Remove the grille by removing the two
Phillips head screws.
If the refrigerator must go through
any entrance that is less than 38"
wide, the doors must be removed.
Proceed to Step 3.
DO NOT remove the handles.
If all entrances are more than
38" wide, skip to Installing
the Refrigerator.
F3-]DISCONNECT THE WATER
COUPLING (on some models)
If the refrigerator has a water dispenser,
there is a water line from the cabinet into
the bottom hinge on the freezer door that
must be disconnected.
To disconnect, push in on the white collar
of the coupling and pull out the tubing.
White collar
Bottom
freezer
hinge
17

Installation instructions
MOVING THE REFRIGERATOR (CONT.)
DISCONNECT THE POWER
COUPLING (on some models)
if the refrigerator has a water dispenser,
there is a power line (harness) from the
cabinet into the bottom hinge on the
freezer door that must be disconnected.
To disconnect, pull apart at the coupling.
B9DISCONNECT THE ELECTRICAL
CONNECTORS (on some models)
if the refrigerator has a refreshment
center, there are electrical connectors
(harnesses) from the cabinet into the
bottom hinge on the refrigerator door
that must be disconnected.
To disconnect, pull apart each connector.
Bottom
refrigerator
hinge
[] CLOSE THE FREEZER AND
REFRIGERATOR DOORS
171REMOVE THE FREEZER DOOR
r_ Remove the freezer door top hinge cover
by either squeezing it and pulling it up or
by prying it off with a plastic putty knife.
r_ Remove the two 5/16" hex head screws,
then lift the hinge straight up to free the
hinge pin. 5/16" Hex Head
rc-] Open the freezer door to 90.°
90 °
18

Installation instructions
[] REMOVE THE
FREEZER DOOR (cont.)
[] As one person slowly lifts the freezer door
up and off the bottom hinge, the second
person should carefully guide the water
line and power line (harness) through the
bottom hinge.
==,_==
90°
_-_ Set the door on a non-scratching surface
with the inside up.
_-] REMOVE THE
REFRIGERATOR DOOR
_'] Remove the refrigerator door top hinge
cover by either squeezing it and pulling
it up or by prying it off with a plastic
putty knife.
[] REMOVE THE
REFRIGERATOR DOOR (cont.)
Remove the two 5/16" he× head screws,
then lift the hinge straight up to free the
hinge pin. 5/16" He× Head
[_ Open the refrigerator door to 90. °
.-...J
90 °
19

Installation Instructions
MOVING THE REFRIGERATOR (CONT.)
1-81REMOVE THE
REFRIGERATOR DOOR (cont.)
[] Lift the refrigerator door up and off the
bottom hinge.
If the refrigerator has a refreshment
center, one person should slowly lift the
door up and off the bottom hinge and the
second person should carefully guide the
electrical lines (harnesses) through the
bottom hinge.
u
\
90°
Refreshment Center Models only
[] Set the door on a non-scratching surface
with the inside up.
[] REPLACING THE DOORS
To replace the doors, simply reverse
steps 3 through 8.
However, please note the following:
•When lowering the doors onto the
bottom hinges, make sure the second
person carefully guides the tube and
harnesses through the holes in the
hinges.
• When connecting the water line, make
sure you insert the tubing all the way
to the mark.
\Mark
• Do not pinch the tubing and harnesses
when placing the doors on the bottom
hinges.
• When connecting the power line
and the electrical lines (refreshment
center models only), be sure that the
connectors are seated together fully.
20
Table of contents
Languages:
Other GE Refrigerator manuals

GE
GE Profile CustomStyle PSC23PSTSS Manual

GE
GE 19 Series Installation instructions

GE
GE Profile PGCS1NFZSS Manual

GE
GE GE Profile Arctica PSF26NGP User instructions

GE
GE PSE26KGEGEWW Safety guide

GE
GE GE Profile Arctica PSS27NHN User instructions

GE
GE 18, 19 Original instructions

GE
GE 22 Safety guide

GE
GE GSS25LGMBBB and Safety guide

GE
GE GTE18GSH Manual

GE
GE TBF18E Owner's manual

GE
GE GTS18KCP Manual

GE
GE Profile TBX22PABCC User instructions

GE
GE TFX24E Installation instructions

GE
GE GTL22JCPBS Manual

GE
GE ZIC360NRDRH User manual

GE
GE Monogram ZFGP21HYASS User manual

GE
GE Profile PFCF1NJW Manual

GE
GE CSCP5UGXSS - 24.6 Cu Ft. Refrigerator Manual

GE
GE Monogram Refrigerator User manual