GE Monogram ZFSB27DYSS User manual

2
Tools
Required
• Bucket • Tubing cutter • Drill and appropriate bits
• Safety glasses • Tin snips
Materials
Required
Flooring For proper installation, this refrigerator must be placed on a level surface of hard material that
is at the same height as the rest of the flooring. This surface should be strong enough to
support a fully loaded refrigerator.
CAUTION: Protect the finish of the flooring. Cut a large section of the cardboard carton and
place under the refrigerator while you are working.
Contents Installation Preparation
Water Connection Location, Electrical...................... 3
Product Dimensions & Clearances............................. 3
Grounding the Refrigerator ....................................... 4
Installation
Step 1, Remove Packaging .......................................... 5
Step 2, Install Water Line............................................ 6
Step 3, Connect Water Supply.................................... 6
Step 4, Connect Power ................................................ 7
Step 5, Start Icemaker ................................................. 7
Step 6, Roll Refrigerator into Position....................... 7
Step 7, Level The Refrigerator ................................... 7
Before you begin—Read these instructions completely and carefully.
IMPORTANT: Save these instructions for local inspector’s use.
IMPORTANT: OBSERVE ALL GOVERNING CODES AND ORDINANCES.
NOTE TO INSTALLER: Be sure to leave these instructions with the
Consumer.
NOTE TO CONSUMER: Keep these instructions with your Use and Care
Book for future reference.
• Water shut-off valve • Water filter • Copper tubing
(recommended) WR97X0214 • 1/4" O.D. Compression nuts
(recommended) and 2 ferrules (sleeves)

3
Installation Preparation
Stainless Steel Refrigerator
Water
Connection
Location,
Electrical
The water line can be routed through
the floor or through an adjacent cabinet, as
close to the back wall as possible.
A 115 volt, 60 Hz. 15 or 20 amp power supply
is required. An individual properly grounded
branch circuit or circuit breaker is recom-
mended, as noted on the rating plate. The
rating plate is located on the bottom of the
cabinet front of the fresh food compartment
and is visible when the door is opened.
Through floor
to basement
cold water pipe
Under sink
to cold
water pipe
Through wall to
utility room cold
water pipe
In crawl
space under
house
Product
Dimensions
& Clearances
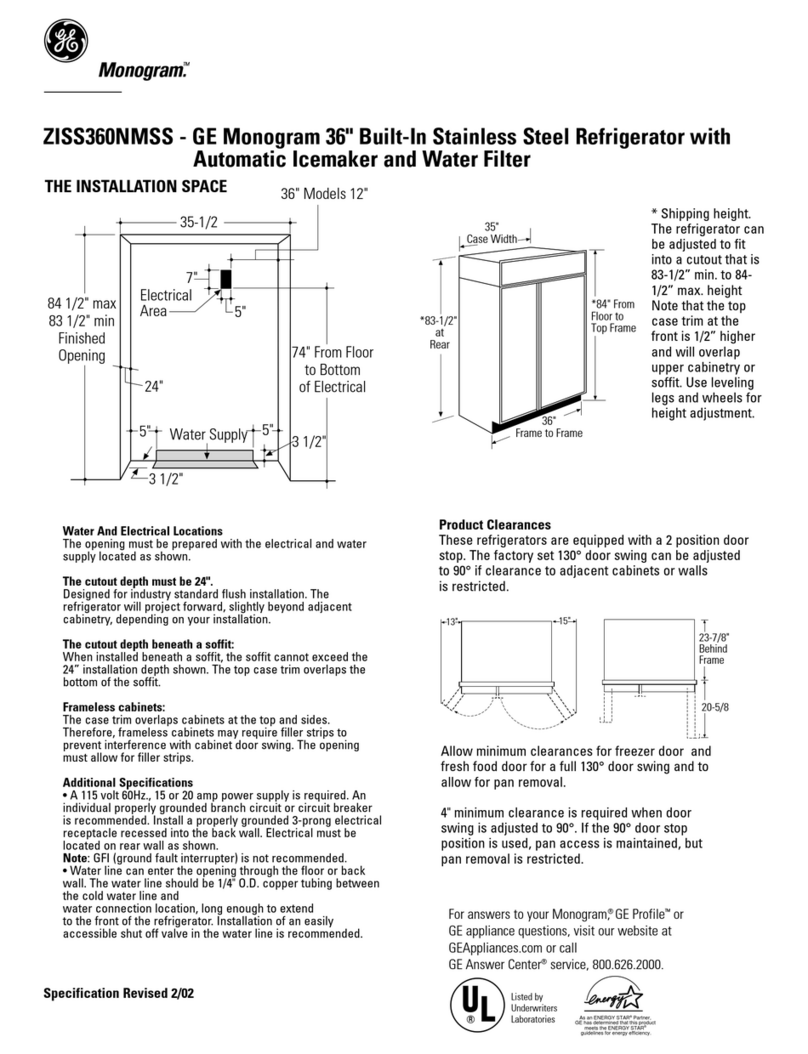
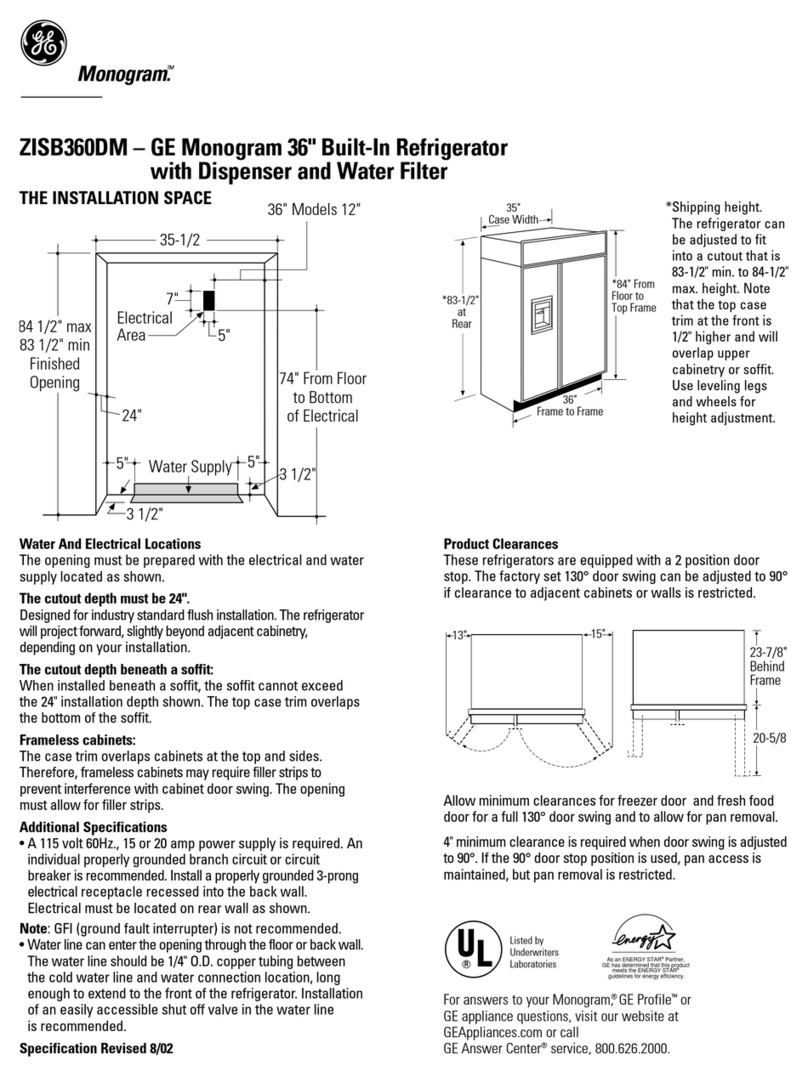
This monogram free-standing refrigerator
requires the following clearances for proper
air circulation, plumbing and electrical
connections.
Sides ................................ 5/8"
Top ..................................... 1"
Back ................................... 1"
If the refrigerator is to be installed in a corner:
• A 1-1/2" clearance between the case trim
and the adjacent wall on both sides of the
refrigerator will assure a 90°door opening
and access to all drawers.
• Allow 11-1/4" clearance on the freezer side
for removal of ice bin.
• On the fresh food side, drawers can be
removed by first disassembling door bins.
Or, allow 14" clearance to remove drawer
without disassembling the door bins.
36"
71"
35"
Including
Handles
32-1/2"
Case
Depth

4
Installation Preparation
Stainless Steel Refrigerator
Grounding
the
Refrigerator
IMPORTANT - (Please read carefully)
FOR PERSONAL SAFETY, THIS APPLIANCE
MUST BE PROPERLY GROUNDED.
The power cord of this appliance is equipped
with a three-prong (grounding) plug which
mates with a standard
three-prong (grounding)
wall receptacle to minimize
the possibility of electric
shock hazard from this
appliance.
Have the wall outlet and circuit checked by a
qualified electrician to make sure the outlet is
properly grounded.
Where a standard 2-prong wall outlet is encoun-
tered, it is your personal responsibility and
obligation to have it replaced with a properly
grounded 3-prong wall outlet.
DO NOT, UNDER ANY CIRCUMSTANCES,
CUT OR REMOVE THE THIRD (GROUND)
PRONG FROM THE POWER CORD.
Use of Adapter plug
Because of potential hazards under certain
conditions, we strongly recommend against
use of an adapter plug. However, if you still
elect to use an adapter, where local codes
permit, a TEMPORARY CONNECTION, may
be made to a properly grounded 2-prong wall
outlet by use of a UL listed adapter available
at most hardware stores.
The larger slot in the adapter must be aligned
with the larger slot in the wall outlet to
provide proper polarity in the connection of
the power cord.
Use of an adapter plug will increase the
clearance needed for the back of the refrig-
erator.
CAUTION: Attaching the adapter ground
terminal to a wall outlet cover screw does not
ground the appliance unless the cover screw is
metal, and not insulated, and the wall outlet is
grounded through the house wiring. You
should have the circuit checked by a qualified
electrician to make sure the outlet is properly
grounded.
When disconnecting the power cord from the
adapter, always hold the adapter in place with
one hand and pulling the power cord with the
other hand. If this is not done, the adapter
ground terminal is very likely to break with
repeated use.
Should the adapter ground terminal break, DO
NOT USE the appliance until a proper ground
has again been established.
Use of Extension Cords
Because of potential safety hazards under
certain conditions, we strongly recommend
against the use of an extension cord. However, if
you still elect to use an extension cord, it is
absolutely necessary that it be a UL listed 3-wire
grounding type appliance extension cord
having a grounding type plug and outlet and
that the electrical rating of the cord be 15
amperes (minimum) and 120 volts.
Align Large Prongs/Slots
Insure Proper Grounding and Firm
Connection Exists Before Use

5
Installation
Stainless Steel Refrigerator
Step
1
Remove
Packaging
To remove the freezer door:
Open the freezer door and remove the base
grille.
E. Plastic tubing enters the freezer door
through the bottom hinge. Remove the
tubing clamp and loosen the coupling nut.
•Pull the tubing away from the coupling
and close the door.
F. Loosen the screw at the top of the door
hinge. Disconnect the wiring harness
connector.
•Hold the door closed and remove the
bottom hinge screws.
•Remove the door together with both
hinges to avoid damage to the wiring
harness or water tubing.
To move the refrigerator indoors:
•Place a piece of the carton against the side
panel of the refrigerator as a pad to protect
the stainless steel finish.
•Place the refrigerator on the hand-truck with
a side panel against the truck.
•Replace the refrigerator doors and top cap
following the same procedures in reverse
order. Be sure to replace the screws on the
back side under the top cap.
CAUTION
To remove top cap:
A. On the back side of the refrigerator,
remove 1 screw located under the top cap
on each side. IMPORTANT: These screws
must be re-installed when top cap is re-
placed.
B. Push the top cap forward, slipping the cap
through key hole slots, lift off cap.
C. Remove 2 screws on the top of the refrig-
erator case and lift off cap filler strip.
To Remove the Fresh Food Door:
D.On the fresh food side, loosen the screw at
the top of the door hinge. Carefully lift off
door.
Use a hand-truck to move this refrigerator.
•To remove the skid, lay the refrigerator on its
back and remove the shipping bolts.
Before moving the refrigerator indoors:
• Cut the banding with tin snips.
• Remove outer carton.
• Slide out 4 corner posts.
• Remove plastic wrapping.
Door and passageways
into the installation location require a 36"
min. opening.
If the opening is less than 36", the top cap
and doors must be removed.
Loosen
This Nut
Spring
Clamp
Coupling
B
F
E
Wiring
Connector
A
C
D

6
Installation
Stainless Steel Refrigerator
2
Install
Water Line
Step
Washer
Inlet End
Vertical Cold
Water Pipe
Saddle Type
Shutoff
Valve
Pipe Clamp
Saddle Type
Shutoff Valve
Compression Nut
Ferrule
(Sleeve)
Outlet Valve
Packing Nut
•A cold water supply is required for automatic
icemaker operation. The water pressure must
be between 20 and 120 p.s.i.
•Route 1/4" OD copper tubing between house
cold water line and the water connection
location.
•Measure the distance from the water valve on
the back of the refrigerator to the water
supply line. Add 8 foot length to allow the
refrigerator to be moved away from the wall
after installation. Bend the tubing into 3 coils
of about 10".
Shut off the main water supply.
Turn on the nearest faucet long enough to
clear the line of water.
Install a shut-off valve between the icemaker
water valve and cold water pipe in a basement
or cabinet. The shut-off valve should be
located where it will be easily accessible.
NOTE: If you must install the valve into a
horizontal water pipe, make the connection at
the top or side, rather than at the bottom, to
avoid drawing off any sediment from the water
pipe.
•Drill a 1/4" hole in the water pipe.
•Fasten the shut-off valve to the pipe with pipe
clamp.
•Tighten the clamp screws until the sealing
washer begins to swell. Do not over tighten.
•Place a compression nut and ferrule (sleeve)
onto the end of the tubing and connect it to
the shut-off valve. Make sure the tubing is
fully inserted into the valve and ferrule is
tightened.
•Turn on the main water supply and flush
debris from the line. Run about a quart of
water through the tubing into a bucket. Shut
off water supply at the shut-off valve.
NOTE: Saddle type shut-off valves are
included in many water supply kits. Before
purchasing, make sure a saddle type valve
complies with your local plumbing codes.
•Install optional water filter in the water line
near the refrigerator. A water filter is
recommended in areas where water supply
contains sand or particles. Installation
instructions are packed with the filter.
3
Step
Connect
Water Supply
Check to be sure that refrigerator power cord
is not plugged into the wall outlet.
•Remove the plastic flexible cap from the
water valve.
•Place compression nut and ferrule (sleeve)
onto the end of the tubing as shown.
•Insert the end of the copper tubing into the
water valve connection a far as possible. Hold
the tubing in place and tighten the fitting.
•Fasten the copper tubing into the clamp
provided to hold it in a vertical position. You
may need to pry open the clamp.
•Turn on the water at the shut-off valve to
check for leaks.
1/4" Copper Tubing Tubing
Clamp
Ferrule
(Sleeve)
1/4" Compression Nut
Refrigerator Connection

7
Installation
Stainless Steel Refrigerators
4
Step
Connect
Power
The icemaker will not begin to operate until it
reaches its operating temperature of 15ºF.
(-9ºC.) or below.
•Lower the feeler arm to the ON position and
the icemaker will begin operation
automatically.
•Make sure the ice bin is pushed back all the
way to the stops on the shelf below the
icemaker.
•Discard the first few batches of ice cubes to
be sure that any remaining impurities in the
water line will be flushed out.
NOTE: The icemaker may double-cycle when
it first starts, causing some water spillage from
the icemaker into the ice bucket. This is
normal and should not happen again.
5
Step
Start
Icemaker
•Push the refrigerator into position being
careful not to entangle power cord. Arrange
the coil of copper tubing so that is does not
vibrate against the back of the refrigerator.
•Remove internal packing materials and set
shelves to desired positions.
Roll
Refrigerator
Into Position
Step
6
Level The
Refrigerator
7
Step
•Remove the base grille by gasping it at the
bottom and pulling outwards.
•Turn the roller adjusting screws clockwise to
raise the refrigerator, counterclockwise to
lower it. Use an adjustable wrench (3/8" hex
head bolt) or pliers.
NOTE: When leveling, you can improve door
closure by raising the front approximately
5/8" from the floor.
•Replace base grille by aligning prongs with
clamps on the cabinet and pushing forwards
until the grille snaps into place.
Clamp
Prong
•Connect the refrigerator power cord plug to
properly grounded receptacle.

Pub. No. 49-6894
Dwg. No. 162D9886P001
1996 GE Appliances
Printed in USA
(N.D. 523) 9/96
Note: While performing installations described in this book,
safety glasses or goggles should be worn.
To obtain specific information concerning any
Monogram product or service, call GE Answer Center®
consumer information service at 800.626.2000—any
time, day or night.
For Monogram local service in your area, call
1-800-444-1845.
NOTE: Product improvement is a continuing endeavor at General
Electric. Therefore, materials, appearance and specifications are subject
to change without notice.
Monogram.
®
General Electric Company
Louisville, KY 40225
Table of contents
Other GE Refrigerator manuals

GE
GE MONOGRAM ZISB480DM Manual

GE
GE ZISB420DH User manual

GE
GE GTU358BAMR User manual

GE
GE Side by Side 22 Dispenser User manual

GE
GE TFH22PRXAAA User manual

GE
GE GTH21KCXWW User manual

GE
GE Profile 24 CustomStyle Operating instructions

GE
GE Profile CustomStyle PSC25MGT Manual

GE
GE SidebySide2Q2224 Installation guide

GE
GE TBF-16V Owner's manual

GE
GE Profile PSB48L User guide

GE
GE Monogram ZISS480DRISS User manual

GE
GE MTE18 Operating instructions

GE
GE 22 Models Training manual

GE
GE GTZ18IBESS User manual

GE
GE Profile GSHS6KGZSS Manual

GE
GE Digital Energy LP 11 Operating instructions

GE
GE Profile Series Operating instructions

GE
GE GSHL6PHXLS Manual

GE
GE GTH18IBXWW - R 18.0 Cu. Ft. Top-Freezer... Manual