GE Monogram ZICP360NXARH User manual

Bottom-Freezer
Built-In Refrigerators

Consumer Information
Bottom Freezer Refrigerator
Introduction Your new Monogram refrigerator makes an eloquent statement of style, convenience and kitchen
planning flexibility. Whether you chose it for its purity of design, practical storage arrangements
or assiduous attention to detail-or for all of these reasons-you'll find that your Monogram
refrigerator's superior blend of form and function will delight you for gears to come.
The Monogram refrigerator was designed to provide the flexibility to blend in with your kitchen
cabinetry. Decorative door insert panels allow it to match your kitchen cabinets or blend with your
kitchen decon
Since the Monogram refrigerator is a built-in product, custom panels are required on the front of the
Monogram refrigerator. Consult your kitchen designer or cabinetmaker for your customized look.
The information on the following pageswill help you operate and maintain your refrigerator properly.
If you have any other questions, visit our Website at: monogram.cam
Contents Consumer Services
Important Phone Numbers .................... 19
Model and Serial Numbers ...................... 3
Performance Data Sheet ...................... 17
Problem Solver ............................. !5, !B
Product Registration ............................ 3
Safety Instructions ........................... 4-7
State of California
Water Treatment Device Certificate ........... 18
Warranty ............................. Back Cover
Care and Cleaning
Cleaning-Outside and Inside .................. 13
Light Bulb Replacement ....................... !4
Master LightSwitch ........................... 14
Vacation ...................................... !4
Operating Instructions
Automatic Icemaker ........................... 10
Sabbath Mode Product Kit, ZSAB! ............. !O
Shelves ........................................ 12
Storage Pans .................................. ii
Temperature Controls .......................... 8
Water Filter Cartridge ........................... 9
Before
using
your
refrigerator
Read this manual carefully. It isintended to
help you operate and maintain your new
refrigerator properly.
Keep it handy for answers to your questions.
If you don't understand something or need
more help,there is a list of toll-free consumer
service numbers included in the back section
of this manual.
OR
Visit our Website at: monogram.cam

Consumer Information
Bottom Freezer Refrigerator
Write
down the
model &
serial
numbers
You'll see them on a label inside the fresh food
compartment under the storage drawers on the
right side.
These numbers are also on the Consumer
Product Ownership Registration Card included
with this manual.
Before sending in this card, please write these
numbers here:
Model Number
Serial Number
Use these numbers in ang correspondence or
service calls concerning gour refrigerator.
Ifgou
received a
damaged
refrigerator
Immediatelg contact the dealer (or builder) that
sold gou the refrigeratoE
Save time
&moneg Before gou request service, check the Problem It lists causes of minor operating problems that
Solver in the back of this manual, gou can correct gourself.
If you need
service To obtain service, see the Consumer Services
page in the back of this manual.
We're proud of our service and want gou to be
pleased. If for some reason gou are not happg
with the service gou receive, here are steps to
follow for further help.
For customers in the USA:
FIRST,contact the people who serviced gour
appliance. Explain whg gou are not pleased.
In most cases, this will solve the problem.
NEXT,if gou are still not pleased, write all the
details-including gour phone number-to:
Manager, Customer Relations
GE Appliances
Appliance Park
Louisville, KY40225
For customers in Canada:
FIRST,contact the people who serviced gour
appliance. Explain whg gou are not pleased.
In most cases, this will solve the problem.
NEXT,if gou are still not pleased, write all the
details-including gour phone number to:
Manager, Consumer Relations
Mabe Canada Inc.
! FactorULane, Suite 3!0
Moncton, N.B.E1C9M3

IMPORTANT SAFETYINSTRUCTIONS
READ AND SAVE THESE INSTRUCTIONS
ILWARN ING: Whenusing
this appliance, always exercise basic safety
precautions, including the following:
• Use this appliance onlg for its intended
purpose as described in this Owner's Manual.
• This refrigerator must be properly
installed in accordance with the Installation o
Instructions before it is used.
• Do not allow children to climb, stand or hang
on the shelves in the refrigerator. They could
damage the refrigerator and seriously injure
themselves.
• Do not touch the cold surfaces in the freezer
compartment when hands are damp or wet.
Skin may adhere to these extremely cold
surfaces.
• Do not store or use gasoline or other
flammable vapors and liquids in the vicinitg
of this or any other appliance.
• In refrigerators with automatic icemakers,
avoid contact with moving parts of the ejector
mechanism, or with the heating element
located on the bottom of the icemaker. Do not
place fingers or hands on the automatic
icemaking mechanism while the refrigerator
is plugged in.
Keep fingers out of the "pinch point" areas:
clearances between the doors and between
the doors and cabinet are necessarily small.
Be careful closing doors when children are
in the area.
Unplug your refrigerator before cleaning
and making repairs.
NOTE:We strongly recommend that any
servicing be performed by a qualified
individual.
• Before replacing a burned-out light bulb,
set the Master Light switch in the OFF position
to turn off the lights in order to avoid contact
with a live wire filament. (A burned-out light
bulb may break when being replaced.)
NOTE: Setting the refrigerator temperature
controls to OFF does not remove power to the
light circuit.
Do not refreeze frozen foods which have
thawed completelg.
DANGER: RISK OF CHILD ENTRAPMENT
Child entrapment and suffocation are not
problems of the past. Junked or abandoned
refrigerators are still dangerous...even if they
will sit for '_justa few days/' If you are getting
rid of your old refrigerator, please follow the
instructions below to help prevent accidents.
Before You Throw Away Your Old
Refrigerator or Freezer:
• Take off the doors.
• Leave the shelves in place so that children
may not easily climb inside.
REFRIGERANTS
All refrigeration products contain refrigerants,
which under federal law must be removed prior
to product disposal, If you are getting rid of
an old refrigeration product, check with the
company handling the disposal about what
to do.

J J
INSTRUCTIONS IMPORTANTES DESECURITE
LIRE ET CONSERVER CESINSTRUCTIONS
,AVERTISSEMENT : Lorsque
vous utilisez le r@frig@ateur,observez toujours
certaines pr@cautionsde base, notamment :
• N'utilisez le r_frig_rateur que pour son usage
pr_vu, comme d_crit dans le present manuel.
•Installez le r_frJg_rateur conform_ment aux
directives d'JnstallatJon avant de l'utJlJser.
•Ne laissez pas les enfants grimper, s'asseoir,
se tenir debout ni se pendre aux clagettes
du r_frig_rateur. IIs pourraient endommager
le r_frig@ateur et se blesser gravement.
•Une fois le r_frig_rateur en marche, ne
touchez pas les surfaces froides du
cong_lateur, surtout si vous avez les mains
humides ou mouill_es : la peau risque
d'adh@er 5 ces surfaces tr_s froides.
•N'entreposez et n'utilisez pas d'essence ou
autres vapeurs et liquides inflammables 6
proximit_ de cet appareil ou de tout autre
appareil _lectrom_nager.
•Pour les r_frJg_rateurs dot_s d'une machine
6 gla_ons automatique, &vitez le contact avec
les pi@cesmobiles du m@canisme6jecteur,
ou avec I'@l@mentchauffant situ@6 la partie
inf@ieure de la machine 6 glaqons. Neposez
pas lesdoigts ou les mains sur le m@canisme
de la machine 6 glaqons pendant que
le r@frig@ateur est branch@.
• l_loignez les doigts des parties du
r@frig@rateur o5 l'on peut fadlement se
pincer: les espaces entre les portes et entre
les portes etles placards sont toujours @traits.
Sogez prudent Iorsque vous fermez les portes
de I'appareil en presence des enfants.
•D_branchez votre r_frig_rateur avant
de le nettoyer et de le r_parer.
REMARQUE : Nous vous recommandons
vivement de confier toute r_paration 6
un technicien qualifi&.
•Avant de remplacer one ampoule grJll_e,
mettez le commutateur de lumi_re principale
en position OFF (arr_t) pour _teindre la lumi_re
afin d'_viter tout contact avec un fil sous
tension. (Une ampoule grill_e peut se briser
pendant I'op@ation).
REMARQUE : Lorsque vous placez les
commandes de temp@rature du r@frig@ateur
sur OFF (arr@t),I'alimentation @lectrique
de I'ampoule n'est pas coup@e.
• Ne faites PAS recongeler des aliments
surgel@s quJ ant compl@tement d@gel@.
DANGER : RISQUES POUR LES ENFANT5
Lesenfants pris au pi@geou marts d'asphgxie
sont toujours d'actualit@.Lesappareils de
rdrig@ration abandon@ssont toujours aussi
dangereux, m@mesi on n'attend que "quelque
jours" pour s'en d@barasser.Si vous ne gardez
pas votre ancien appareil, veuillez suivre les
directives ci-dessous afin de pr@enir les
accidents.
Avant de vous d_barrasser de votre vieux
appareil de r_frig_ration :
*D_montez les portes.
,Laissez les clagettes en place afin d'emp@cher
les enfants de grimper 6 I'int@ieur.
RdLFRIGE-RANTS
Tousles appareils de r@frig@ationcontiennent
des r@frig@antsqui, conform@ment aux lois
f@d@ales,doivent @treenlev@savant toute
@liminationde I'appareil. Sivous vous
d@barrassezde vieux appareils de r@frig@ation,
v@ifiez,aupr@sde la soci@@qui s'occupe de leur
@limination,ce que vous devez faire.

IMPORTANT SAFETY INSTRUCTIONS
HOW TOCONNECT ELECTRICITY
Do not, under ang circumstances, cut or
remove the third {ground) prong from the
power cord. For personal safetg, this appliance
must be properlg grounded.
The power cord of this appliance is equipped
with a 3-prong (grounding) plug which motes
with a standard 3-prong (grounding) wall outlet
to minimize the possibilitg of electric shock
hazard from this appliance.
Have the wall outlet and circuit checked by
a qualified electrician to make sure the outlet
is properly grounded.
Where a standard 2-prong wall outlet is
encountered, it is your personal responsibility
and obligation to have it replaced with a
properly grounded 3-prong wall outlet.
Use of a GFI(Ground Fault Interruptor)is not
recommended for the refrigerator outlet.
The refrigerator should always be plugged into
its own individual electrical outlet which has a
voltage rating that matches the rating plate.
This provides the best performance and also
prevents overloading house wiring circuits which
could cause a fire hazard from overheated wires.
DO NOT USE AN ADAPTER PLUG TO CONNECT
THE REFRIGERATOR TO A 2-PRONG OUTLET.
DO NOT USE AN EXTENSION CORD
WITH THIS APPLIANCE.
Never unplug your refrigerator by pulling on
the power cord. Always grip plug firmly and pull
straight out from the outlet.
Repair or replace immediately all power cords
that have become frayed or otherwise
damaged. Do not usea cord that shows cracks
or abrasion damage along its length or at
either end.
When moving the refrigerator awag from the
wall, be careful not to roll over or damage the
power cord.
Refer to the Installation Instructions for
particular electrical system specifications
for this refrigerator.
SAVETHESE
INSTRUCTIONS

J J
INSTRUCTIONS IMPORTANTES DE SECURITE
RACCORDEMENT dLLECTRIQUE
Ne coupez ni retirez en aucun cas la troisi_me
broche {raise 6lu terre) de lu fiche du cordon
d'alimentotion. Pour votre s_curit_, cet
opporeil doit 6tre correctement mis 6 Io terre.
Le cordon d'alimentotion de cet opporeil est
muni d'une fiche a 3 broches(mise a la terre)
qui se branche dons une prise mural ordinoire
3 olv_oles (mise _ la terre) pour r_duire au
minimum les risques du chocs &lectriques.
Faites examiner lu prise de courant et le circuit
par un &lectricien qualifi_ pour vous assurer que
Io prise est correctement mise _ Io terre.
Si la prise murole est du tgpe standard a
2 alv_oles, il vous incombe de Io faire remplacer
par une prise _ 3 alv_oles correctement mise
la terre.
L'utilisation d'un interrupteur de d_faut _ Io
terre (GFI-Ground Fault Interruptor) n'est pas
recommond_ pour Ioprise de courant du
r_frig_roteuE
Le r_frig_roteur dolt toujours _tre branch6
dons so propre prise de courant, dont Iotension
nominale est identique 5 celle indiqu_e sur
la plaque signol_tique.
Cette pr&coution est recommund_e pour
gorantir un rendement optimum et _viter
une surcharge des circuits _lectriques de Io
r&sidence, ce qui pourrait cr&er un risque
d'incendie par surschauffe des fils.
N'UTILISEZ PAS UNE FICHE D'ADAPTATION
POUR RACCORDER LE RI_FRIGERATEUR DANS
UNE PRISE MURALE A 2 ALVI_OLES.
N'UTILISEZ PAS DE CORDONS PROLONGATEURS
AVEC CET APPAREIL.
Ne d_branchezjamois I'oppareil en tiront le
cordon d'olimentation. Soisissezfermement
la fiche du cordon et tirez droit pour Ioretirer
de la prise.
R&parez ou remplocez imm_diatement tout
cordon effiloch_ ou endommag_. N'utilisez
pos un cordon fendill_ ou pr_sentont des signes
d'usure.
Lorsque vous d_plucez I'opporeil du mur, foites
attention de ne pas la faire rouler sur lecordon
d'alimentotion ofin de ne pas I'endommageE
Vogez les Instructions d'lnstollation pour
les specifications porticuliers du sust#me
d'_l_ctrique de cet appareil.
CONSERVEZ CES
DIRECTIVES

Operating Instructions
Bottom Freezer Refrigerator
Temperature
controls -®
((,i,
F,,,z,, r F,E,.,ooo WA_R FIIYER
Preset Settings
Allow 24 hours to reach these preset temperatures.
The temperature display shows the actual
temperature of the freezer and fresh food
compartments. The actual temperature will
vary from the set temperature based on factors
such as frequency of door opening, amount of
food, defrost cycling and room temperature.
NOTE:Frequent door openings or door left open
for periods of time may mcrease the internal
temperature of the freezer and fresh food
compartments temporarily.
To turn off the cooling system in both the
freezer and fresh food compartments, press
either + pad until both displays show OFF.
To turn the cooling system on, press either
- pad.The preset temperatures of 0°F and 37°F
will appear in the display.
To check the current temperature setting for
the fresh food or freezer compartment, press
the + or - pad once. After 5 seconds, the display
will return to the actual temperature.
To change the temperature settings, press
the + or - pads to desired temperature set point
for fresh food and freezer separately. Allow
24 hours for the refrigerator to reach the
temperature you have set.
Temperature Ranges
Low High
34°F 45OF
1oc 7oc
Fresh Food
Freezer -6°F +6°F
-21°C -14°C
NOTE: Setting the controls to OFF stops cooling,
but does not shut off electrical power to the
refrigeratoE
Changing
display
temperatures
from °F to °C
To change the temperature display between
Fahrenheit and Celsius, press the Temp
Displag °C/°F.
Door
alarm To turn the Door Alarm feature on, press
the pad once. The ACTIVE light will come on.
To turn it off, press the pad again.
When the DOORALARM
is active, the alarm will flash
and beep if you keep the
door open for more than
2 minutes. (01,

Automatic Icemaker (on some models)
Bottom Freezer Refrigerator
Water
filter
cartridge
Thewater filter cartridge islocated behind the
grille panel atthe top of the refrigeratoc Lift up
the panelto access the cartridge.
When to Replacethe Filter:
Thefilter cartridge isdesigned
to filter 300 gallons of water
(lasting approximatelg 12 months).
It should be replacedwhen the status
lightturns red or if gou notice the
icecubes getting hollowor small.
WATER RLI1ER
Installing the Filter Cartridge:
1 Raisethe grille panel at the top of the
refrigeraton
2 Removethe old cartridge bg slowlg turning
it to the left. A small amount ofwater mag drip
down. Do not pull down on the cartridge.
3 Fillthe new cartridge with water from the
tap to allow for better flow immediatelg after
installation.
4 Line up the arrow on the cartridge with the
center of the holdec Donot push it up into
the holden
5 Slowlgturn it to the right untilthe cartridge stops.
It will rotate about 1/4 turn. DO NOT
OVERTIGHTEN.
_Cartrld e
der g
cWaattrl_jFgileter
Slowlg turn it to
the right. Do not
overtighten.
To Reset the Filter Status Light
Press and hold the RESETpad for 3 seconds.
Filter Bgpass Plug:
Youmust usethefilter bgpass plug:
a) if gou havea household reverseosmosiswater
sgstem and/or another form of homewater
filtration sgstem
b} ifa replacement filter is not available.
Theicemakerwill not operate without the filter
or filter bgpass plug installed.
O
Replacement filters:
Toorder additional filter cartridges in the
United States, visit our Website at ge.com,
or call GEParts and Accessories,800.626.2002.
iVlWF
Suggested Retail $38.95-47.95
Customers in Canada should consult the gellow
pages for the nearest Mabe Service Cente[

Automatic Icemaker (onsome models)and Sabbath Mode Product Kit
Bottom Freezer Refrigerator
Automatic
icemaker
A newly-installed refrigerator may take
12-24 hours to begin making ice.
The icemaker will produce sevencubes per
cycle-approximately 15 cycles in a 24-hour
period.
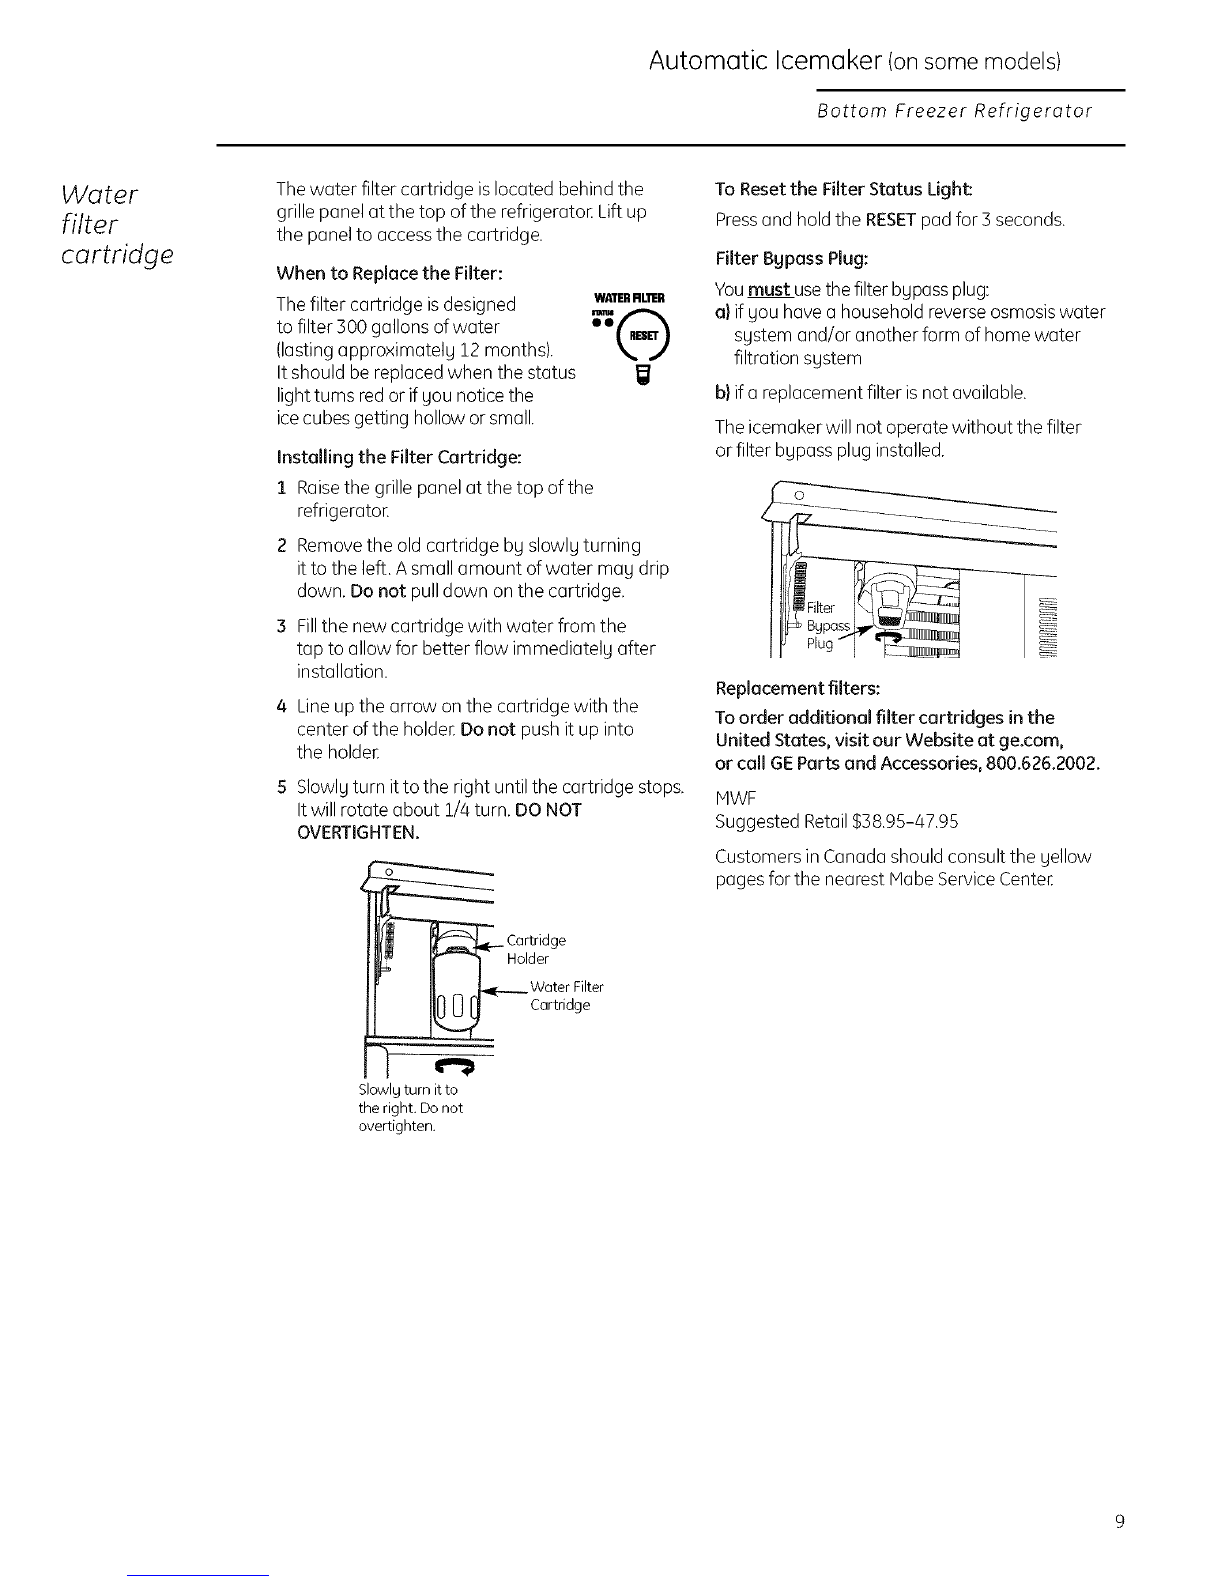
If the refrigerator isoperated before the water
connection is madeto the icemaker,set the power
switch to O {off).
When the refrigerator has been connected to
the water supply,set the power switch to I{on}.
Throw away the first full bucket of iceto allow
the water lineto cleaE
Besure nothing interferes with the sweep of
the feeler arm.
When the bin fillsto the levelof the feeler arm, the
icemaker will stop producing ice.
It isnormal for severalcubesto bejoined togetheE
If ice isnot usedfrequently, old ice cubes will
become cloudy, taste stole and shrink.
Power Switch
Feeler Arm
If icecubes get stuck in the icemaker,set the power
switch to O(off} and remove the cubes.Setthe
power switch to I (on}to restart the icemakeE
After the icemaker has been turned on again, there
will be o delay of about 45 minutes before the
icemaker resumesoperations.
The icebucket isconveniently located inthe upper
freezer basket. Occasionally icecubes may spill
out ofthe bucket. Shouldthe icecubes fall to the
bottom of the freezer,they are of no concern;they
will sublimate away harmlessly.
NOTE:Inhomes with low water pressure,you may
hear the icemaker water valve cycle on several
times when making one botch of ice.
Sabbath
lode
Product Kit
(available at
extra cost)
The Sabbath Mode Product Kitwas designed for
use on the Jewish Sabbath and Holidays. The
Sabbath Mode feature makes it possible for
observant Jews to refrigerate and freezer food
during the duration of the holiday.
The Sabbath Mode feature can be set to override
typical reactions to actions in your refrigerator.
While in the Sabbath Mode, your refrigerator will
still operate normally. However, the refrigerator
will not respond to your actions.
While in the Sabbath Mode, you may notice
the fan running when the door is opened;
however, this is not a result of your actions. The
fan will operate at random times. The defrost
heater will continue to defrost the refrigerator
and freezer and will be activated on a timer. The
defrost heater will not defrost as a result of door
openings or any consumer actions.
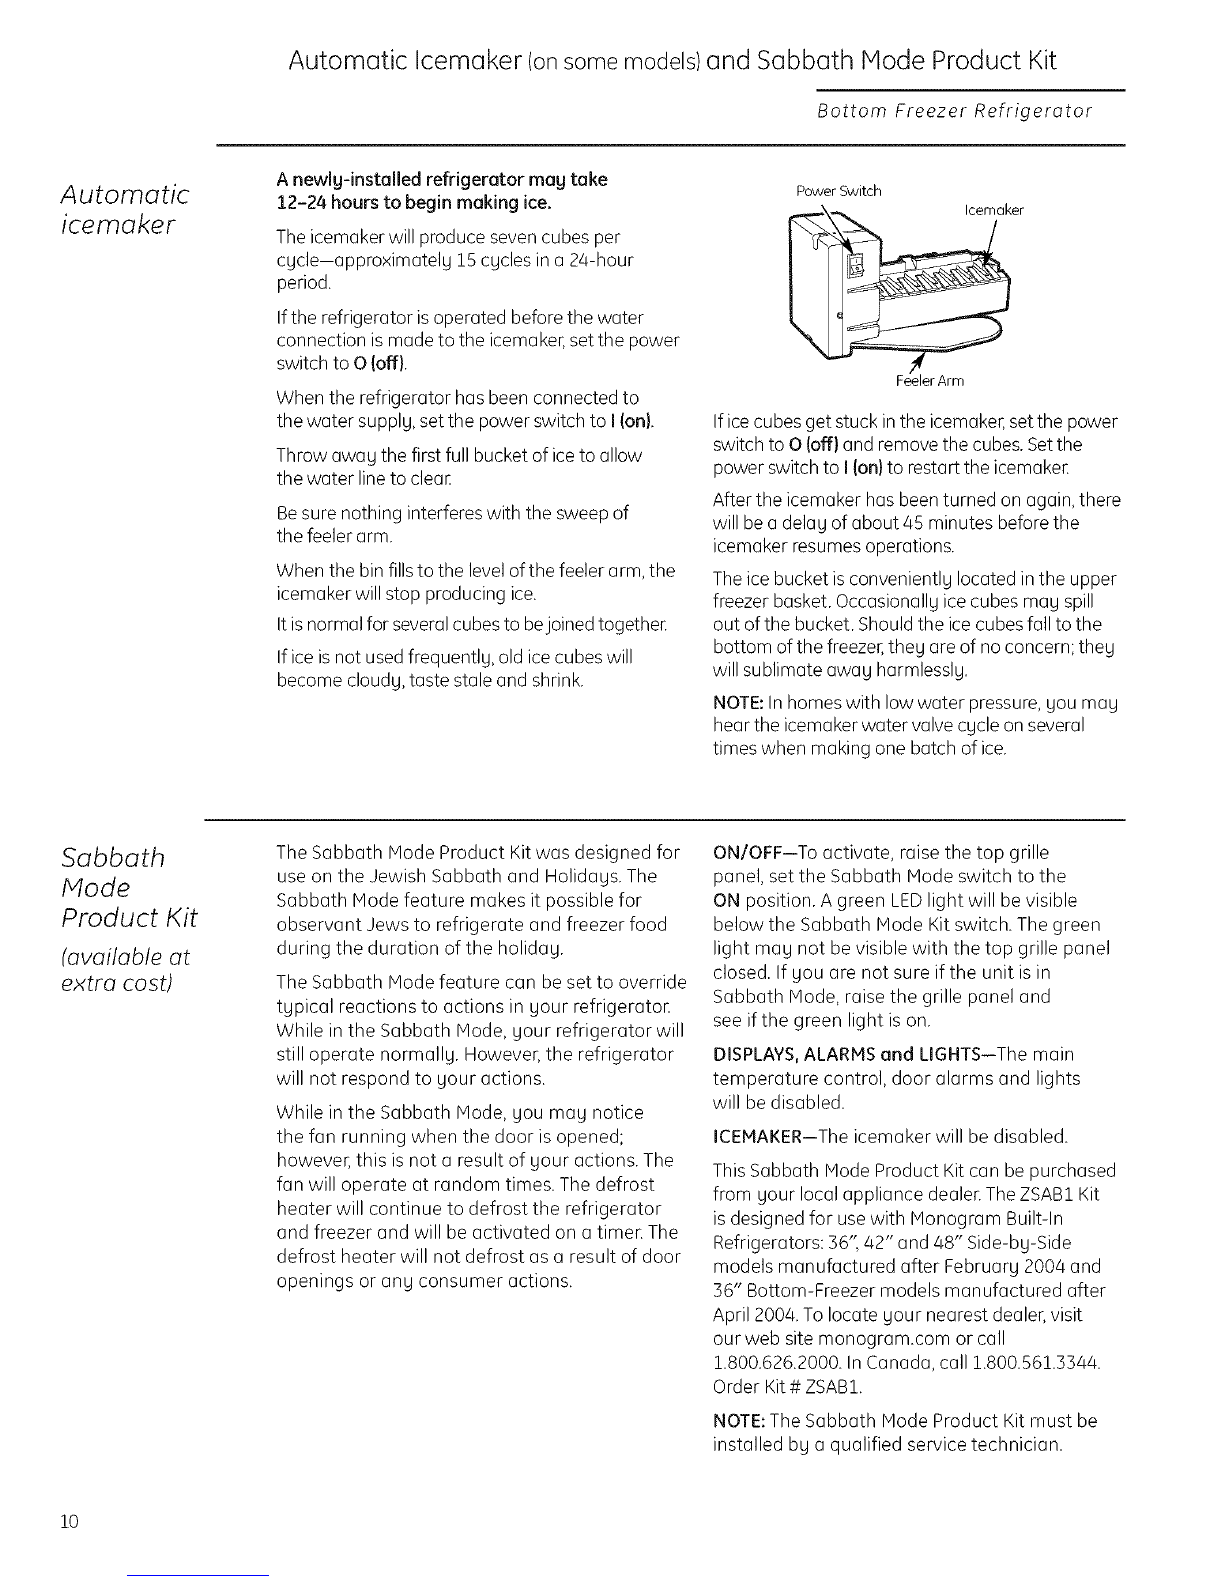
ON/OFF--To activate, raise the top grille
panel, set the Sabbath Mode switch to the
ON position. A green LEDlight will be visible
below the Sabbath Mode Kit switch. The green
light may not be visible with the top grille panel
closed. If you are not sure if the unit isin
Sabbath Mode, raise the grille panel and
see if the green light is on.
DISPLAYS,ALARMS end LIGHTS--The main
temperature control, door alarms and lights
will be disabled.
ICEMAKER--The icemaker will be disabled.
This Sabbath Mode Product Kit can be purchased
from your local appliance dealer.TheZSAB1Kit
is designed for usewith Monogram Built-In
Refrigerators: 36" 42" and 48" Side-by-Side
models manufactured after February 2004and
36" Bottom-Freezer models manufactured after
April 2004.To locate your nearest dealer,visit
our web site monogram.cam or call
1.800.626.2000.In Canada, call 1.800.561.3344.
Order Kit# ZSAB1.
NOTE:The Sabbath Mode Product Kit must be
installed by a qualified service technician.
10

Storage Pans
Bottom Freezer Refrigerator
Sealed snack
pans
The sealed snack pans retain high humidity
for the convenient storage of lunch meats and
cheese, hors d'oeuvres, spreads and snacks.
Hake sure the pans are closed completely
to maintain the correct humidity level. These pans must be fully closed before
closing the fresh food compartment dooE
Adjustable
humidity
pans
These drawers have individual, adjustable
humidity controls that let you control the
amount of cold air entering the drawers.
Hake sure the drawers are closed completely
to maintain the correct humidity level.
Slide the control all the way to the High setting
and the drawer provides higher humidity levels
recommended for most leafy vegetables.
Slide the control all the wag to the Low setting
and the drawer provides lower humidity levels
recommended for most fruits.
Excess water that may accumulate on the
bottom of the drawers should be emptied
and the drawers wiped dry.
These pans must be fully closed before
closing the fresh food compartment door.
Pan
removal To remove a pan, pull it out and lift the front
up and out of the wire holder. Lift the back
up and out.
To replace a pan, place the back of the pan in
the wire holder, making sure the indentations at
the back of the pan fit into the back of the wire
holder. Then lower the front of the pan into the
wire holder. Pressfirmly on the top of the pan
until it snaps into place.
High
humidity
storage
Storing unwrapped foods in a high humidity
environment keeps foods fresh by retaining
the natural moisture content of foods such as:
• Artichokes • Cherries • Parsley
• Asparagus • Corn • Peas,green
• Beets,topped • Cucumbers • Radishes
• Blueberries • Currants • Rhubarb
• Carrots • Greens,leafy • Spinach
• Celery • Lettuce • Tomatoes,ripe
As in any refrigerated storage area, it is
recommended that foods with strong odors
be stored wrapped-foods such as:
• Broccoli • Cabbage • Parsnips
• Brusselssprouts • Cauliflower • Turnips
• Greenonions
Low
humidity
storage
Lower humidity storage should be used for items
such as: • Apples
• Apricots
• Grapes
• Mushrooms
• Nectarines
• Oranges
• Papayas • Squash,
• Peaches summer
• Pears • Strawberries
• Pomegranates • Tangerines
•Mangoes
°Raspberries 11

Shelves and Bins
Bottom Freezer Refrigerator
Adjustable
shelves in the
fresh food
compartment
Tempered glass shelves in the fresh food
compartment enable gou to make efficient
shelf arrangements to fit your familg's food
storage needs.
To remove shelves: Tilt shelf up at front,
then lift it up and out of tracks on rear wall
of refrigeraton
To replace shelves: Select desired shelf height.
With shelf front raised slightl U,engage top lugs
in tracks at rear of cabinet. Then lower front
of shelf until it locks into position.
Removable
wine rack The wine rack isdesigned to hold a bottle on its
side and will fit on any shelf.
To relocate the wine rack: Pullthe wine rack
straight out, position its lip over the right edge
of the shelf gou want to suspend it from and
push it all the wag in.
....LL
Door
bins Some door bins are adjustable and can be
moved up and down to meet gour storage needs.
NOTE;The deeper door bins must be placed
at the bottom of the door onlg.
To remove: Lift the bin up and slide it toward you.
Freezer
drawer
with
basket
12
Inside the freezer drawer is a wire slide-out
freezer basket.
This basket can be pushed back so items on the
bottom of the freezer drawer can be reached.
To remove the basket:
1 Open the freezer drawer.
2 Lift up the back of the basket, then slide the
basket back until it clears the front hooks.
Ensure that the freezer drawer isfullg closed
after each opening to maintain normal
operating performance.
To remove basket

Careand Cleaning
Bottom Freezer Refrigerator
Cleaning
outside The door handles and trim. Cleanwith a cloth
dampened with soapg water: Drgwith a soft cloth.
Keep the outside clean. Wipe with a clean
cloth lightlg dampened with mild liquid dish
detergent. Drg with a clean, soft cloth.
Do not wipe the refrigerator with a soiled dish
cloth or wet towel. These maUleave a residue
that can erode the paint. Do not use scouring
pads, powdered cleaners, bleach or cleaners
containing bleach because these products
can scratch and weaken the paint finish.
The stainless steel panels and door handles
(on some models) should be regularlg cleaned
with a commerciallg available stainless steel
cleaner such as Stainless Steel Magie7M
Stainless SteelMagic and the Monogram
polishing cloth are available to preserve
and protect the fine finish, through
GEParts and Accessories, 800.626.2002,
or ge.com.
For Stainless SteelMagic, order part number
WX10X!5. ForMonogram polishing cloth, order
part number WX72X10001.
Do not use appliance wax or polish on the
stainless steel.
Cleaning
inside To help prevent odors, leave an open box
of baking soda in the refrigerator and freezer
cam partments.
Turn off power at the circuit breaker or fuse
box before cleaning. If this is not practical, wring
excess moisture out of sponge or cloth when
cleaning around switches, lights or controls.
Use warm water and baking soda solution-
about a tablespoon (15 ml) of baking soda
to a quart (1 liter) of water. This both cleans
and neutralizes odors. Thoroughlg rinse
and wipe drg.
Other parts of the refrigerator-including
door gaskets, meat and vegetable drawers,
ice storage bin and all plastic parts-can be
cleaned the same wag. After cleaning the door
gaskets, applg a thin lager of petroleum jells
to the door gaskets at the hinge side.This helps
keep the gaskets from sticking and bending
out of shape.
Avoid cleaning cold glass shelves with hot
water because the extreme temperature
difference may cause them to break. Handle
glass shelves carefullg. Rough handling of
tempered glass can cause it to shatter.
Do not wash ang plastic refrigerator parts
in the dishwasher.
13

Careand Cleaning
Bottom Freezer Refrigerator
Preparing
for
vacation
For long vacations or absences, remove food
and shut off power to the refrigerator at the fuse
box or circuit breaker. Clean the interior with a
baking soda solution of one tablespoon (!5 ml)
of baking soda to one quart (! liter) of water.
Leave the doors open.
For shorter vacations, remove perishable foods
and leave controls at regular settings. However,
if the room temperature is expected to drop
below 60°F (!6°C), follow the same instructions
as for long vacations.
Set the icemaker power switch to the 0 (off}
position and shut off the water suppl U to
the refrigeraton
Using the
Plaster Light
switch
This feature turns off the lights in the fresh food
and freezer compartments.
The switch is located behind the grille panel
at the top of the refrigerator. Lift up the panel
to access the switch.
Light bulb
replacement
in the
fresh food
compartment
Important: Turningthe temperature control to
OFFdoes not remove power to the light circuit.
There are four light bulbs in the top of the
fresh food compartment
To replace the bulbs:
1 Setthe Master Light switch inthe OFFposition
to turn off the lights. See Using the Master
Light switch.
2 Remove the light shield by placing your
fingers in the openings at the back of the
shield. Then, pull the shield toward gou
and swing the back of the shield down.
3 Replacewith the same sizebulb (40watt max.).
4 Reinstall the shield and reset the Master Light
switch to the ONposition.
Replacement 40-watt bulbs can be purchased
at uour local general retail store, through
GEParts and Accessories, 800.626.2002,
or at monogram.com. Order part # 40A15.
Light bulb
replacement
in the freezer
compartment
14
To replace a bulb:
1 Setthe Master Light switch inthe OFFposition
to turn off the lights. See Using the Master
Light switch.
2 Remove the freezer light shield bg removing
the two screws with a Phillips screwdriver.
3 Replacewith the same sizebulb (40watt max.).
4 Reinstall the shield and reset the Master Light
switch to the ONposition.
Replacement 40-watt bulbs can be purchased
at your local general retail store, through
GEParts and Accessories, 800.626.2002,
or at monogram.com. Order part # 40A15.

The Problem Solver
Bottom Freezer Refrigerator
Questions?
Use this
problem
solver!
PROBLEM POSSIBLE CAUSE
REFRIGERATOR
DOES NOT OPERATE , May be in defrost cycle when compressor does not operate for about
30 minutes.
Temperature control in the OFF position.
If interior light is not on, refrigerator may not be plugged in at wall outlet.
The fuse is blown/circuit breaker is tripped. Replace fuse or reset
the breaker.
MOTOR OPERATES
FOR LONG PERIODS
OR CYCLES ON AND
OFF FREQUENTLY
{Modern refrigerators
with more storage
space and a larger
freezer require
more operating time.
They start and stop
often to maintain
even tern peratu res J
OPERATING
SOUNDS
, Normal when refrigerator isfirst plugged in.Wait 24 hours for the
refrigerator to completely cool down.
The new variable speed compressor is designed to run for longer
periods of time to optimize efficiency and noise. You may notice the
compressor and/or fan speeds accelerate based upon door openings
and/or increased food loads.
You may hear the fans spinning at high speeds. This happens when
the refrigerator isfirst plugged in,when the doors are opened
frequently or when a large amount of food isadded to the
refrigerator or freezer compartments. The fans are helping to
maintain the correct temperatures.
Door left open or package holding door open.
If either door is open for over 3 minutes, you may hear the fans
come on in orderto cool the light.
Hot weather or frequent door openings. This is normal.
Temperature controls set at the coldest setting. See TemperatureControls.
, Refrigerator isso quiet, that most of the time you will hear low or no
operating noise.
Normal fan air flow-one fan blows cold air through the fresh food
and freezer compartments-another fan cools the compressor motor.
Thefans change speeds in order to provide optimal cooling and
energy savings.
These NORMALsounds will also be heard from time to time:
- You may hear a whooshing or gurgling sound when the doors close.
This isdue to pressure equalizing within the refrigerator.
- A water dripping noise may occur during the defrost cycle as ice
melts from the evaporator and flows into the drain pan.
- The flow of refrigerant through the freezer cooling coils may make
a gurgling noise like boiling wate_
- Water dropping on the defrost heater can cause a sizzling, popping
or buzzing sound during the defrost cycle.
-You may hear cracking or popping sounds when the refrigerator is
first plugged in or during/after the defrost cycle. This happens as the
refrigerator cools to the correct temperature.
- Electronic dampers click open and closed to provide optimal cooling
and energy savings.
- The compressor may cause a clicking or chirping sound when
attempting to restart (this could take up to 5 minutes).
- The electronic control board may cause a clicking sound when
relays activate to control refrigerator components.
- Ice cubes dropping into the bin and water running in pipes
as icemaker refills.
- The icemaker water valve will buzz when the icemaker fills
with water.
DOOR NOT CLOSING , Package holding door open.
PROPERLY , Check the door gasket; it may be out of position.
, Refrigerator not level. See Installation Instructions.
15

The Problem Solver
Bottom Freezer Refrigerator
Questions?
Use this
problem
solver!
16
PROBLEM POSSIBLE CAUSE
VIBRATION OR
RATTLING
{Slight vibration
is normal.)
FRESH FOOD
OR FREEZER
COMPARTMENT
TOO WARM
FROST OR ICE
CRYSTALS ON
FROZEN FOOD
{Frost within package
is normal.}
SLOW ICE CUBE
FREEZING
ICE CUBES HAVE
ODOR/TASTE
AUTOMATIC
ICEMAKER
DOES NOT WORK
MOISTURE FORMS
ON OUTSIDE OF
REFRIGERATOR
MOISTURE
COLLECTS INSIDE
REFRIGERATOR
HAS ODOR
INTERIOR LIGHT
DOES NOT WORK
SMALL OR
HOLLOW CUBES
, Refrigerator may not be properly installed.
, Temperature controls not set cold enough. SeeTemperature Controls.
Warm weather or frequent door openings.
Door left open for long time or freezer door left aja_
Package may be holding door open.
Door left open or package holding door open.
Frequent or long door openings.
, Freezer door left ajar.
, Door may have been left open or freezer door left ajar.
Temperature of freezer compartment too warm.
Old cubes need to be discarded.
Ice storage bin needs to be emptied and washed.
Unsealed packages in freezer compartment may be transmitting
odor/taste to ice cubes.
Keep open box of baking soda in refrigerator; replace every 3 months.
Interior of refrigerator needs cleaning. See Careand Cleaning.
Poor-tasting incoming water. Replace water filter.
Icemaker power switch is in the O {off} position.
Water supply turned off, restricted or not connected. Call your
installer for proper water supply line connection.
Water filter clogged. Replace the filter or usethe filter bypass plug.
, Freezer compartment too warm.
Piled up cubes in storage bin may cause icemaker to shut off too
soon. Level cubes in bin.
Ice cubes stuck in icemake_ Turn off the icemaker, remove cubes
and turn the icemaker back on.
Not unusual during periods of high humidity. Wipe surface dry.
Door left open or package holding door open.
Controlling humidity and temperature in the kitchen with air
conditioning will eliminate this condition.
In humid weather, air carries moisture into refrigerator when doors
are opened.
Controlling humidity and temperature in the kitchen with air
conditioning will eliminate this condition.
Foods with strong odors should be tightly covered.
Check for spoiled food.
Interior needs cleaning. SeeCare and Cleaning.
Keep open box of baking soda in refrigerator; replace every 3 months.
No power at outlet.
Light bulb needs replacing. See Coreand Cleaning.
Master Light switch is in the OFFposition.
Water filter clogged. Replace the filter or usethe filter bypass plug.
Check for a connection to a Reverse Osmosis water system.
If an ROisconnected, remove the water filter and install the
original bypass plug that came with the unit.

Performance Data Sheet
SmartWater Filtration System
H WF Cartridge
This system has been tested according to NSF/ANSI 42/53 for reduction of the substances listed below.
The concentration of the indicated substances in water entering the system was reduced to a concentration
less than or equal to the permissible limit for water leaving the system, as specified in NSF/ANSI42/53.*
100% safety factors built in for unmetered usage)
Parameter USEPA
MCL
Chlorine
T&O
Particulate**
Parameter
Turbiditg
Cgsts
Asbestos
Leadat pH 6.5
Leadat pH 8.5
Hercurg at pH 6.5
Hercurg at pH 8.5
Alachlor
Lindane
2,4-D
Toxaphene
Benzene
Carbofuran
1,4dichlorobenzene
Atrazine
Influent
Challenge Concentration
2.0rag/L± 10%
> 10,000 particles/mL
USEPA
MCL
0.5NTU
_>99.95% Reduction
_>99% Reduction
0.015 mg/L
0.015 mg/L
0.002 mg/L
0.002 mg/L
0.002 mg/L
0.0002 mg/L
0.070 mg/L
0.003 mg/L
0.005 mg/L
0.040 mg/L
0.075 mg/L
0.003 mg/L
Standard No. 42: Aesthetic Effects
Influent Effluent
Average Average Maximum
1.96mg/L 0.06mg/L 0.11 mg/L
6,400,000#/mL 58,833#/mL 150,000#/mL
Standard No. 53: Health Effects
Influent
Challenge Concentration
11+ 1 NTU***
Hinimum 50,000 L
107to 108fibers/L;> 101]m
0.15rag/L+ 10%
0.15rag/L+ 10%
0.006 mg/L+ !0%
0.006 mg/L+ !0%
0.04rag/L+ 10%
0.002 mg/L + 10%
0.210 rag/L+ 10%
0.015 rag/L+ 10%
0.015 rag/L+ 10%
0.080 mg/L + 10%
0.225 mg/L+ 10%
0.009 mg/L + 10%
Influent
Average
10.5NTU
118,750#/L
57 HF/L
0.1567 mg/L
0.1433 mg/L
0.0059 mg/L
0.0057 mg/L
0.0367 mg/L
0.0020 mg/L
0.2033 mg/L
0.0160 mg/L
0.0145 mg/L
0.0830 mg/L
0.2283 mg/L
0.0087 mg/L
Effluent
Average Maximum
0.!4 NTU 0.28 NTU
< !#/L 4#/L
0.996 HF/L < 1 HF/L
< 0.001 mg/L < 0.001 mg/L
0.000350 mg/L 0.0007 mg/L
0.000325 mg/L 0.0006 mg/L
0.00023 mg/L 0.0004 mg/L
<0.00002 mg/L <0.00002mg/L
0.00337mg/L 0.011000mg/L
0.00100 mg/L 0.001000 mg/L
0.000500 mg/L 0.000500 mg/L
0.001000 mg/L 0.001000 mg/L
0.000500 mg/L 0.000500 mg/L
< 0.0005 mg/L < 0.0005 mg/L
% Reduction
Average Minimum
96.77% 94.74%
99.14% 97.97%
% Reduction
Average Minimum
98.54% 97.20%
> 99.99% > 99.99%
99.60% 99.39%
99.36% 99.29%
99.30% 99.29%
94.70% 87.50%
93.20% 89.29%
99.34% 98.67%
99.00% 98.95%
98.32% 94.50%
93.44% 91.67%
96.51% 95.83%
98.78% 98.65%
99.78% 99.77%
94.22% 93.33%
Min. Required
Reduction
> 50%
>85%
Min. Required
Reduction
0.5 NTU
> 99.95%
_>99%
0.010 mg/L
0.010 mg/L
0.002 mg/L
0.002 mg/L
0.002 mg/L
0.0002 mg/L
0.070 mg/L
0.003 mg/L
0.005 mg/L
0.04mg/L
0.075 mg/L
0.003 mg/L
*Tested using a flow rate of 0.50 gpm; pressure of 60 psig; pH of 7.5 +_0.5; temp. of 68 ° +_5°F (20 ° +_3°C)
** Measurement in Particles/ml. Particles used were 0.5-1 microns
*** NTU=Nephelometric Turbiditg units
Operating Specifications
[] Capacitg: certified for up to 300 gallons (1135 I);up to six months for models without a replacement filter indicator light;
up to one gear for models with a replacement filter indicator light
[] Pressure requirement: 40-120 psi (2.8-8.2 bar), non-shock
[] Temperature: 33-100°F (0.6-38°C)
[] Flow rate: 0.5 gpm (1.9Ipm)
General Installation/Operation/Maintenance Requirements
[] Flush new cartridge at full flow for 3 minutes to purge out trapped air.
[] Replace cartridge when the indicator light flashes or water flow rate is reduced on non-indicator units.
Special Notices
[] Installation instructions, parts and service availabilitg, and standard warrantg are included with the product when shipped.
[] This drinking water sgstem must be maintained according to manufacturer's instructions, including replacement of filter cartridges.
[] Do not use with water that is microbiologicallg unsafe or of unknown qualitg without adequate disinfection before or
after the sgstem. Sgstems certified for cgst reduction mag be used on disinfected water that mag contain filterable cgsts.
[] The contaminants or other substances removed or reduced bg this water treatment sgstem are not necessarilg in gout wateE
[] Check for compliance with the state and local laws and regulations.
[] Note that while the testing was performed under standard laboratorg conditions, actual performance mag varg. Sgstems must
be installed and operated in accordance with manufacturer's recommended procedures and guidelines.
Standard No. 42: Aesthetic Effects
Chemical Unit
Chlorine Taste and Odor
Mechanical Filtration Unit
Particulate Reduction, Class I
Sgstem Tested and Certified bg NSFInternational against ANSI/NSF Standard 42 & 53 for the reduction of:
Standard No. 53: Health Effects
Chemical Reduction Unit
Alachlor and Atrazine Reduction
Benzene and Carbofuran Reduction
1,4dichlorobenzene and 2,4-D Reduction
Leadand Lindane Reduction
Mercurg and Toxaphene Reduction
Mechanical Filtration Unit
Turbiditg Reduction
Cgst and Asbestos Reduction
Manufactured for: General Electric Compang, Louisville, KY40225 17
EPAEST.No.070S9S-MN-O01

State of California
Department of Health Services
Water Treatment Device
Certificate Number
05-1698
Date Issued: February 2, 2005
Trademark/Model Designation
MWF Replacement Elements
MWF
Manufacturer: General Electric Company
The water treatment device(g) ,listed on this certificate have met the testing requirements pursuant to Section
116830 of the Health and Safety Code for the following health 'related contaminants:
Microbiological Contaminants and Tm-biditv
Cysts
Turbidity
Organic Contaminants
Alachlor
Atrazine
Benzene
Carb0furali
Lindane
Mercury
Toxaphene
1.4-dichlorobenzene
2,4-D
Rated Service CapaciD_: 300 gal Rated Serxice Flow: 0.5 gpm
Conditions of Certification:
Do not use where water is microbiologically unsafe or with water of unknown quality, except that systems certified for
cyst reduction may be used oll disinfected waters that may contain filterable cysts.
!8

Consumer Services
Bottom Freezer Refrigerotor
With the purchase of your new Monogram appliance, receive
the assurance that if you ever need information or assistance
from GE, we'll be there. All you have to do is call-toll-free!
GE Answer
Center ®
In the USA:
800.626.2000
Whatever gour question about ang Monogram major appliance, GEAnswer Center®information
service is available to help. Your call-and gour question-will be answered promptlg and
courteouslg. And gou can call ang time. GEAnswer Center®service is open 24 hours a dog,
Mondag through Saturdag.
OR
Visit our Website at: monogram.com
In Canada, call 1.800.561.3344.
In-Home Repair
Service
In the USA:
800.444.1845
In Canada:
1.800.561.3344
A GE consumer service professional will provide expert repair service, scheduled at a time
that's convenient for gou. Mang GE Consumer Service compang-operated locations offer
gou service todag or tomorrow, or at gour convenience (7:00 a.m. to 10:00 p.m. weekdags,
8:00 a.m. to 6:00 p.m. Saturdag and Sundog). Our factorg-trained technicians know gour
appliance inside and out-so most repairs can be handled in just one visit.
In Canada: Monday through Friday, 7:00 a.m. to 8:00 p.m. and Saturday, 8:00 a.m. to 5:00 p.m. EDST
For Customers
With Special
Needs...
In the USA:
800.626.2000
S_CTION
GEoffers Braille controls for a varietg of GEappliances, and
a brochure to assist in planning a barrier-free kitchen for persons
with limited mobilitg.
Consumers with impaired hearing or speech who have access to
a TDDor a conventional teletgpewriter mag call 800.TDD.GEAC
(800.833.4322) to request information or service.
Service Contracts
In the USA:
800.626.2224
In Canada:
1.800.561.3384
You can have the secure feeling that GEConsumer Service will still be there after gour
warrantg expires. Purchase a GE contract while gour warrantg is still in effect and gou'll receive
a substantial discount. With a multiple-gear contract, gou're assured of future service at
todag's prices.
Parts and
Accessories
Inthe USA:
800.626.2002
In Canada:
1.800.561.3344
Individuals qualified to service their own appliances can have parts or accessories sent directly
to their home. The GE parts system provides access to over 47,000 parts_.and all GE Genuine
Renewal Parts are fully warranted. VISA, MasterCard and Discover cards are accepted.
User maintenance instructions contained in this manual cover procedures intended to be
performed bg any user. Other servicing generally should be referred to qualified service
personnel. Caution must be exercised, since improper servicing mag cause unsafe operation.
19

Warrantg
Bottom Freezer Refrigerator
WHAT IS
COVERED
From the Date
of the Original
Purchase
WHAT IS NOT
COVERED
!62D9632P007
49-60423-!
05-07 JR
Printed in the United States
YOUR MONOGRAM REFRIGERATOR WARRANTY
Staple sales slip or cancelled check here. Proof of original
purchase date is needed to obtain service under warranty.
LIMITED TWO-YEAR WARRANTY
For two gears from date of original purchase, we will provide, free of charge, parts and service labor in gour home
to repair or replace ang part of the refrigerator that fails because of a manufacturing defect.
LIMITED FIVE-YEAR WARRANTY
For five gears from date of original purchase, we will provide, free of charge, parts and service labor
in gour home to repair or replace ang part of the sealed refrigerating sgstem (the compressor, condenser,
evaporator and all connecting tubing) that fails because of a manufacturing defect.
LIMITED ADDITIONAL SEVEN-YEAR WARRANTY ON THE SEALED SYSTEM
For the sixth through twelfth gear from the date of the original purchase, we will provide, free of charge,
replacement parts for any part of the sealed refrigerating sgstem (the compressor, condenser, evaporator and
all connecting tubing) that foils because of u manufacturing defect. You pug for the service trip to gour home
and for service labor charges.
LIMITED THIRTY-DAY WARRANTY ON WATER FILTER CARTRIDGE (Water filter, if included}
From the date of the original purchase we will provide, free of charge, replacement parts for ang port of the
water filter cartridge that foils because of a manufacturing defect. During this limited thirtg-dag warruntg,
we will also provide, free of charge, a replacement water filter cartridge.
ollJ _ol II ooQ oo®Q ooell ooQ o_oQ ooQ_ _ol _ool 9oQ_ ool _ oollooo _ol _ o®1 oo®1 ooe_ ool oo ®
This wurruntg is extended to the original purchaser and ang succeeding owner for products purchased for
ordinurg home use in the 48 mainland states, Hawaii, Washington, D.C. or Canada. If the product is located in an
urea where service bg u GE Authorized Servicer is not available, gou mug be responsible for u trip charge or gou
mug be required to bring the product to an Authorized GE Service location for service. In Alaska the warrantg is
the same except that it is LIMITED because gou must pag to ship the product to the service shop or for the
service technician's travel costs to gour home.
All wurrantg service will be provided bg our Factorg Service Centers or bg our authorized Customer Cure ®
servicers during normal working hours.
Should gour appliance need service, during wurrantg period or begond, in the USA call 800.444.1845.
In Canada: 800.56:[.3344. Please hove gour serial number and model number available when calling for service.
Service trips to gour home to teach gou how
to use the product.
• Replacement of house fuses or resetting of circuit
breakers.
Damage to the product caused bg accident, fire,
floods or acts of God.
• Failure of the product if it is used for other than
its intended purpose or used commerciallg.
Damage caused after deliverg.
• Improper installation, deliverg or maintenance.
If gou have an installation problem, contact
gour dealer or installer. You are responsible
for providing adequate electrical, plumbing
and other connecting facilities.
Replacement of the light bulbs, if included, or
water filter cartridge, if included, other than as
noted above.
Replacement of the water filter cartridge, if
included, due to water pressure that is outside
the specified operating range or due to excessive
sediment in the water supplg.
Loss of food due to spoilage (in the USA onlg).
Incidental or consequential damage caused
bg possible defects with this appliance.
Product not accessible to provide required
service.
I
EXCLUSION OF IMPLIED WARRANTIES--Your sole and exclusive remedy is product repair us provided in I
this Limited Warranty. Any implied warranties, including the implied warranties of merchanta6ility or I
fitness for a particular purpose, ere limited to one year or the shortest period allowed by low.
Some states/provinces do not allow the exclusion or limitation of incidental or consequential damages,
so the above limitation or exclusion mag not applg to gou. This warrantg gives gou specific legal rights, and gou
mag also have other rights which varg from state to state/province to province. To know what gour legal rights
are in gour state/province, consult gour local or state/provincial consumer affairs office or gour state's Attorneg
General.
Warrantor in USA: General Electric Compang,
Louisville, KY 40225
Warrantor in Canada: Mabe Canada Inc.
GE Consumer &Industrial
Appliances
General Electric Compang
Louisville, KY 40225
ge.com
This manual suits for next models
10
Other GE Refrigerator manuals

GE
GE Profile PSS26PSTSS Manual

GE
GE GFE28HSK Manual

GE
GE TBX20 User manual

GE
GE GE Profile Arctica PSS26MGP User instructions

GE
GE PDSF0MFXARCC and Operating instructions

GE
GE Profile CustomStyle PSC23SHTSS User instructions

GE
GE Hotpoint CTF14C Owner's manual

GE
GE GSHS6PGYSS Manual

GE
GE GE Profile Energy Star PDS20SCR User manual

GE
GE RHM 15 Operating instructions

GE
GE GTH18DCDBRBB Operating instructions

GE
GE GTQ080PANR User manual

GE
GE SIDE-BY-SIDE REFRIRATOR 22 Service manual

GE
GE GSS20GEW User manual

GE
GE TFX27EM User manual

GE
GE Monogram ZISS420NXSS Manual

GE
GE GE Profile Energy Star PSSC6KGX Manual

GE
GE TBH22RP User manual

GE
GE TFX27RM User manual

GE
GE GSH25GGC Manual