GE Profile PSB42LSRBV How to use

PUB # 31-9125 11/04
MODEL SERIES:
PSB42LSRBV
PSB42LGRWV
PSB42LGRBV
PSB48LSRBV
PSB48LGRWV
PSB48LGRBV
Profile 42" and 48" Built-In Side by
Side Refrigerators
GE Consumer & Industrial
TECHNICAL SERVICE GUIDE

– 2 –
IMPORTANT SAFETY NOTICE
The information in this service guide is intended for use by
individuals possessing adequate backgrounds of electrical,
electronic, and mechanical experience. Any attempt to repair a
major appliance may result in personal injury and property
damage. The manufacturer or seller cannot be responsible for the
interpretation of this information, nor can it assume any liability in
connection with its use.
WARNING
To avoid personal injury, disconnect power before servicing
this product. If electrical power is required for diagnosis or test
purposes, disconnect the power immediately after performing the
necessary checks.
RECONNECT ALL GROUNDING DEVICES
If grounding wires, screws, straps, clips, nuts, or washers used to
complete a path to ground are removed for service, they must be
returned to their original position and properly fastened.
GE Consumer & Industrial
Technical Service Guide
Copyright © 2004
All rights reserved. This service guide may not be reproduced in whole or in part
in any form without written permission from the General Electric Company.

– 3 –
Table of Contents
3-Way Valve...................................................................................................................................36
Auger Motor ...................................................................................................................................27
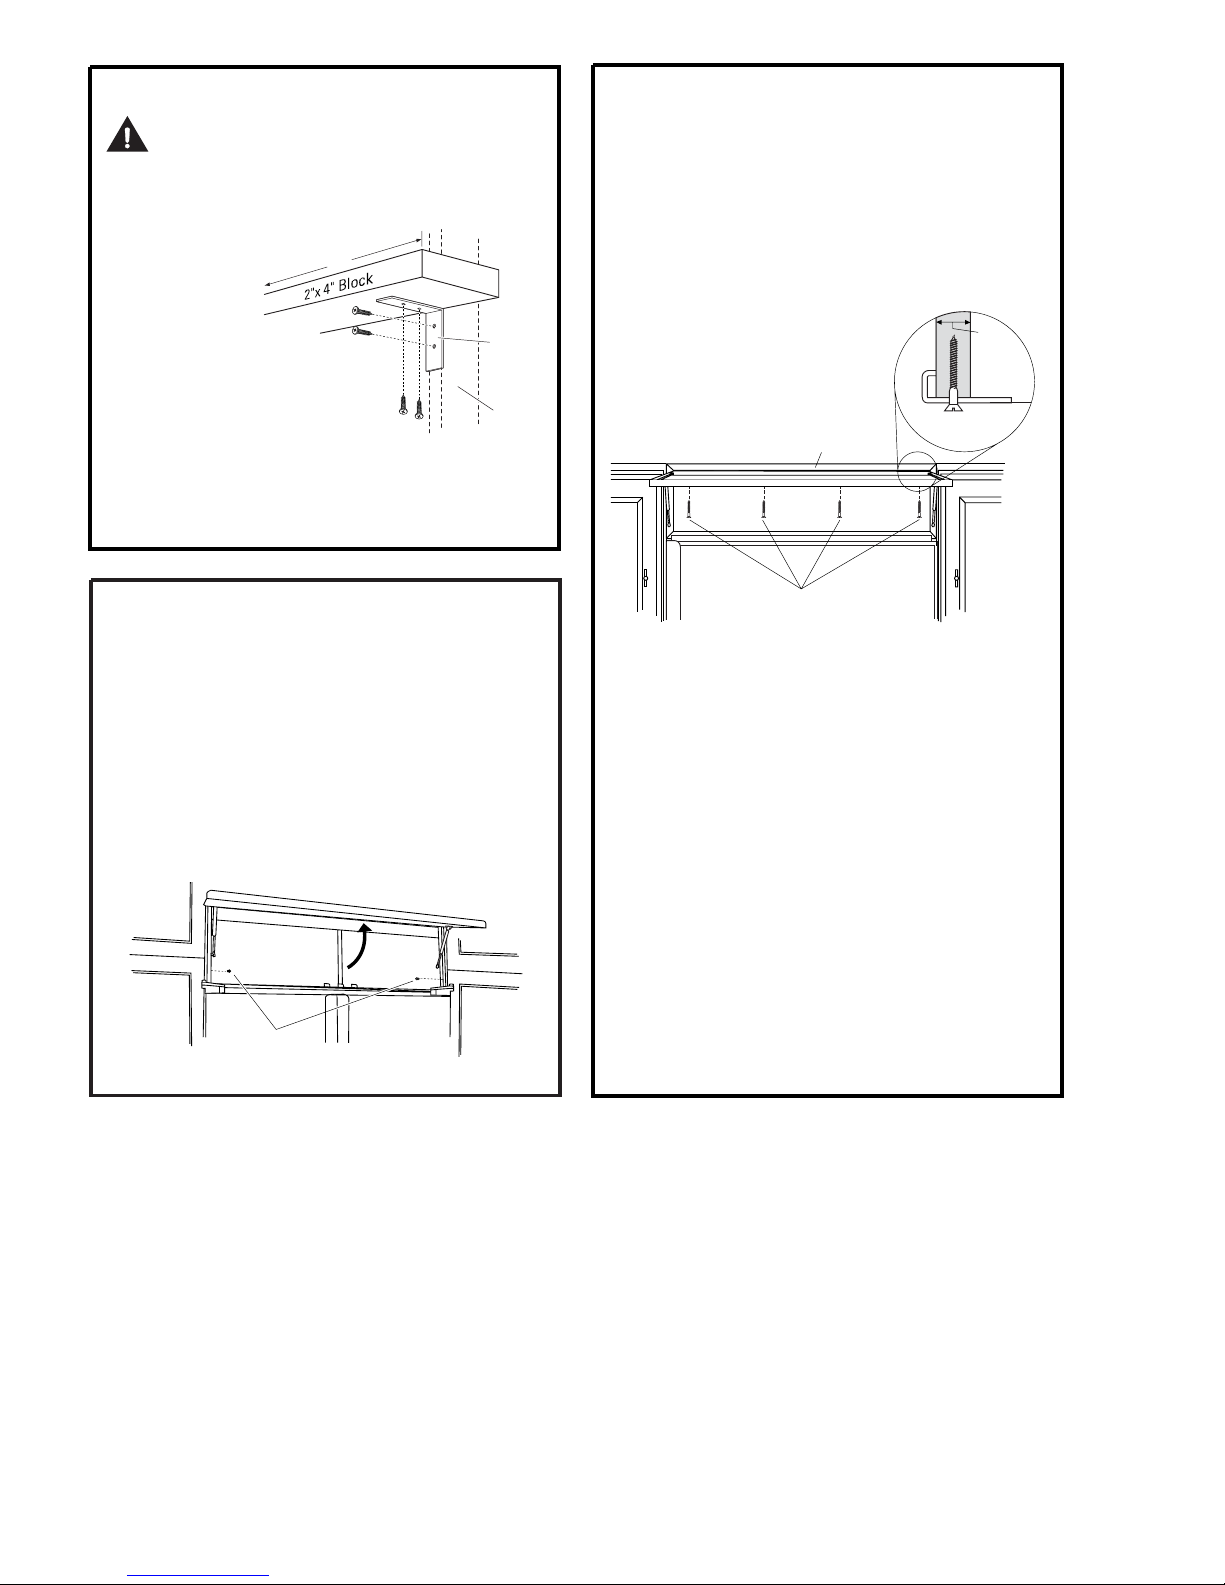
Casters and Leveling .....................................................................................................................21
Components ..................................................................................................................................18
Component Locator Views.............................................................................................................12
Component Resistance Values......................................................................................................8
Compressor ...................................................................................................................................35
Control Features ............................................................................................................................10
Cube Motor and Cube Reed Switch ..............................................................................................28
Defrost Cycles ...............................................................................................................................40
Diagnostic Mode ............................................................................................................................52
Dispenser Control Panel................................................................................................................29
Dispenser Heater...........................................................................................................................34
Dispenser Switch ...........................................................................................................................33
Doors .............................................................................................................................................18
Door Closer Assembly ...................................................................................................................20
Door Switches................................................................................................................................38
Door Water Line Replacement.......................................................................................................34
Drain Pan.......................................................................................................................................21
Drier ...............................................................................................................................................36
Duct Door Assembly ......................................................................................................................32
Evacuation and Charging Procedure.............................................................................................16
Fans...............................................................................................................................................41
Freezer Evaporator Assembly .......................................................................................................44
Freezer Evaporator Components ..................................................................................................47
Freezer Heater Testing ..................................................................................................................43
Fresh Food Evaporator Assembly .................................................................................................48
Fresh Food Evaporator Components ............................................................................................50
Fresh Food Heater Testing ............................................................................................................43
Heat Exchanger .............................................................................................................................35
Icemaker Controls..........................................................................................................................11
Icemaker Fill Tube and Heater.......................................................................................................26
Ice Bin and Icemaker .....................................................................................................................26
Ice Dispenser.................................................................................................................................30
Illustrated Parts..............................................................................................................................58
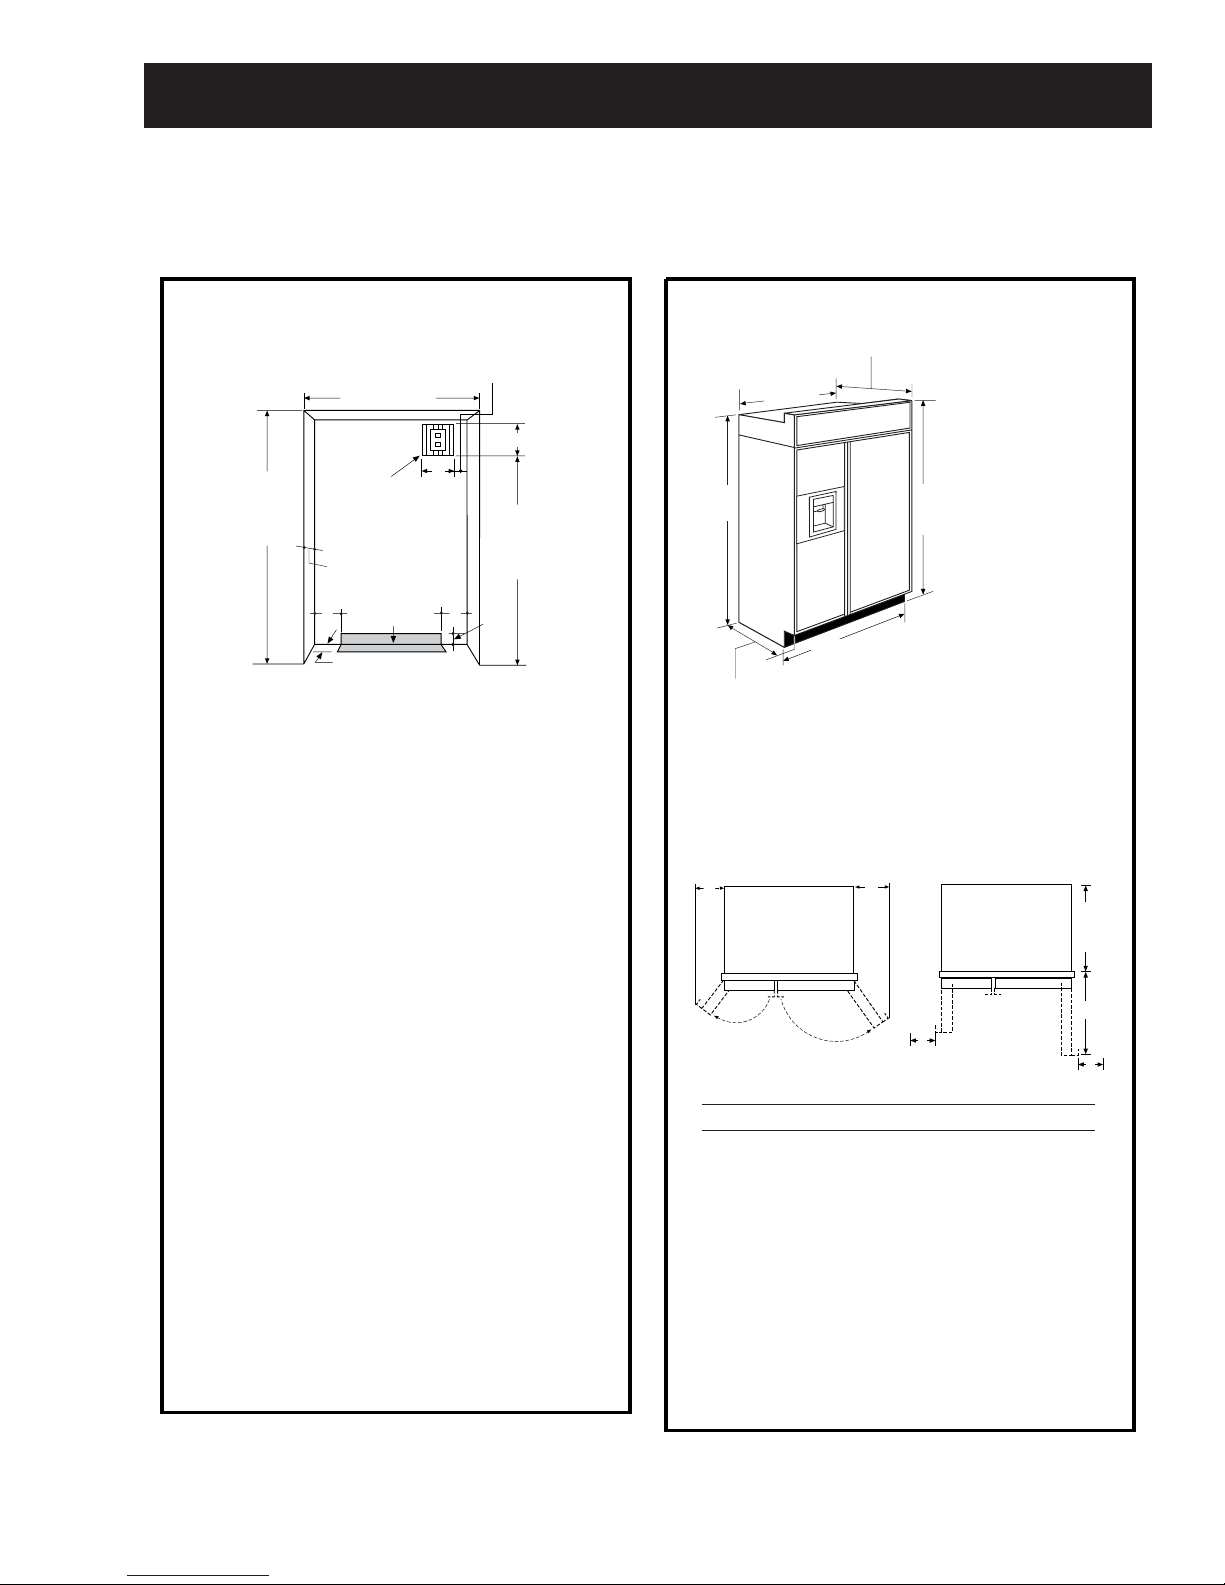
Installation Example 42" Model......................................................................................................5
Interior Airflow ................................................................................................................................17
Interior Lights .................................................................................................................................38
Introduction ....................................................................................................................................4
Machine Compartment Access Door .............................................................................................18
Main Switch ...................................................................................................................................34
Mufflers ..........................................................................................................................................36
Nomenclature ................................................................................................................................9
Power Control Board (PCB)...........................................................................................................22
Refrigerant Flow ............................................................................................................................14
Refrigeration Components.............................................................................................................13
Refrigeration System .....................................................................................................................13
Replacing the Freezer or Fresh Food Evaporator ........................................................................51
Schematics ....................................................................................................................................56
Service Diagnostics ......................................................................................................................52
Technical Data ...............................................................................................................................8
Terminal Block Panel .....................................................................................................................24
Thermistors....................................................................................................................................39
Troubleshooting Notes..................................................................................................................55
Warranty ........................................................................................................................................72
Water Valve and Water Tank .........................................................................................................30

– 4 –
Introduction
The new Profile Built-In Side by Side refrigerator has the following features:
Separate freezer and fresh food evaporators are recessed into the machine compartment for
increased efficiency and interior space savings.
3-Way valve directs refrigerant flow where needed.
High-and low-side sealed system mufflers quiet the operation.
Inverter is built into the power control board (PCB).
Combined dispenser and temperature control board provides customer control and test mode
operations.
Dispenser cube motor and cam replaces solenoid-operated cube mechanism.
Room ambient thermistor aids power control board (PCB) operation.
Component electrical testing is performed at the machine compartment-mounted terminal block.
Rear leveling mechanism is front-adjustable.
•
•
•
•
•
•
•
•
•

– 5 –
Installation Example 42" Model
Water and Electrical Locations
The opening must be prepared with the
electrical and water supply located as shown.
The cutout depth must be 24"
The refrigerator will project forward, slightly
beyond adjacent cabinets, depending on
your installation.
Additional Specifications
•A 120 volt, 60Hz, 15 or 20 amp power
supply is required. An individual properly
grounded branch circuit or circuit breaker
is recommended. Install a properly
grounded 3-prong electrical receptacle
recessed into the back wall. Electrical must
be located on rear wall as shown.
Note: GFI (ground fault interrupter) is not
recommended.
•Water line can enter the opening through
the floor or rear wall. The water line
or GE SmartConnect™tubing between the
cold water line and water connection
location. The line should be long enough
to extend to the front of the refrigerator.
Installation of an easily accessible shutoff
valve in the water line is required.
DIMENSIONS AND CLEARANCES
Allow minimum clearances for Freezer
door (Dimension A) and Fresh Food door
(Dimension B) for a full 130° door swing
and to allow for drawer removal.
when door swing is adjusted to 90°. If the 90°
door stop position is used, drawer access is
maintained, but drawer removal is restricted.
*Shipping height
The front height
may be adjusted
from 83-1/2" to 84-1/2"
by adjusting front and
rear leveling legs a
maximum of 1".
*The finished cutout width must be:
42" Frame-to-Frame
Depth Including
Handles 26-7/8"
41"
Case Width
25-3/8" Case Depth
*81-3/4"
at Rear
*84" From
Floor to
Top Frame
*Finished Width
Electrical
Area
84 1/2" max
83 1/2" min
Finished
Opening
74"
From Floor
to Bottom
of Electrical
24"
5" 5" 3 1/2"
Water Supply
3 1/2"
3"
7"
5"
Product Clearances
These refrigerators are equipped with a 2
position door stop. The factory set 130° door
swing can be adjusted to 90° if clearance to
adjacent cabinets or walls is restricted.
130° Door Swing 90° Door Swing
B
A
23-7/8"
Behind
Frame
C
D
D
Models A B C D
42" 12-3/16" 16" 24" 4"
THE INSTALLATION SPACE
installed should be 1/4" O.D. copper tubing
41-1/2" for 42" models
Four inch (4") minimum clearance is required

– 6 –
SKIP THIS STEP WHEN USING ANTI-TIP
BRACKETS
All Profile built-in refrigerators are Top-Heavy.
They must be secured to prevent the possibility
of tipping forward. Use this alternative method
to secure the refrigerator whenever steel wall
studs are encountered.
•Adjust height of refrigerator to match
84-1/2". The refrigerator must be level and
plumb with cabinets. The top case trim at
will overlap upper cabinets or cabinet trim.
•Open grille panel to access the top case trim.
•
clearance holes through the metal top
case trim.
•
the metal clearance holes and into wood
soffit. The holes should be centered in the
brace spanning the enclosure must be
securely fastened to cabinets on both sides.
•
pilot holes.
•
and secure the block to
the mounting
brackets
provided,
using #12 or
#14 wood screws.
•
Secure the
brackets with
wood block to the
back wall so that it is
finished floor. Use #12 or #14 wood screws.
•
wall studs.
Install (4) 1-1/2" Drywall Screws
Through Trim and Into Soffit
or 3/4" Min. Wood Brace
Top Case Trim
Side View
Top Case Trim
3/4"
Min.
ANTI-TIP
PRECAUTIONS
Positioned
Anti-Tip
Bracket
Wall Stud
(Behind
Drywall)
Wood Screws
Mounted into
Vertical
Wood Studs
36"
INSTALL ANTI-TIP BRACKETS
WARNING:
The refrigerator is Top-Heavy and must be secured
to prevent the possibility of tipping forward.
Cut a 2" x 4" wood block 36" long,
ALTERNATE ANTI-TIP
PRECAUTIONS
Whenever possible, perform this step for
anti-tip security.
The refrigerator must be secured to prevent
tipping.
•Raise the grille panel to access case trim.
•Drive a screw through the trim and into the
adjacent cabinet using holes provided.
•Follow the same procedure on the opposite
side.
Drive Screws
Through Case Trim Into
Adjacent Cabinets
Raise Grille Panel
to Stop Position
SECURE REFRIGERATOR
TO CABINETS
82" (or the rear installation height) from the
Screws must penetrate at least 1" into vertical
installation cutout opening 83-1/2" to
the front is 2-1/8" higher than the rear and
Use a 3/16" bit to drill 4 evenly spaced
Use a 1/16" bit to drill pilot holes through
soffit or a 3/4" minimum wood brace. The
Install four 1-1/2" drywall screws into the

– 7 –
Framed Or Custom Panels
Stainless Steel Wrapped Models
42" wide model - PSB42LSRBV
42" wide models - PSB42LGRWV, PSB42LGRBV
Stainless Steel Wrapped Refrigerators
Stainless Steel wrapped refrigerators have
wrapped doors and grille panels, and beveled
edges. These models are shipped ready for
installation.
Door Handles
The handles can be used to accommodate
both framed or custom panels.
Trimmed Refrigerators
Trimmed refrigerators are designed to be
customized with decorative panels. Field
installed custom door and grille panels are
panels from your cabinet manufacturer. The
decorative panel slides into the factory
installed trim. Or, order black and white
accessory panels from your Profile dealer.
Side Panels
Side panels (not supplied) must be used
whenever the sides of the refrigerator will
be exposed.
Accessory Panels
White and black accessory panels are
available from your Profile dealer. Panels are
cut to size and ready to install.
Door Handles
3/4" Custom Panel
24"
*84"
*3" to 4"
1-1/2"
Framed Panel
Door Handles
*Depending on
installation height.
Models White Black
Acrylic Acrylic
PSB42LGRWV PSPK42DWW
PSB42LGRBV PSPK42DBB
CUSTOMIZATION BASICS:
Trimmed Models
required. You may install 1/4" thick custom

– 8 –
ELECTRICAL SPECIFICATIONS
Max Defrost Control
w/No Door Openings........................16 hrs
Evap Defrost Thermistor........68°F (FZ)..63°F (FF)
Electrical Rating: 115V AC 60 HZ.............5.4 amp
Maximum Current Leakage......................0.75 mA
Maximum Ground Path Resistance...............0.1 Ω
Energy Consumption Model 42........50.5 KWh/mo
Energy Consumption Model 48......53.75 KWh/mo
DISCONNECT POWER CORD BEFORE SERVICING
IMPORTANT - RECONNECT ALL GROUNDING DEVICES
All parts of this appliance capable of conducting
electrical current are grounded. If grounding
wires, screws, straps, clips, nuts or washers
used to complete a path to ground are removed
for service, they must be returned to their
original position and properly fastened.
IMPORTANT SAFETY NOTICE
This information is intended for use by individuals
possessing adequate backgrounds of electrical,
electronic and mechanical experience. Any
attempt to repair a major appliance may result
in personal injury and property damage. The
manufacturer or seller cannot be responsible for
the interpretation of this information, nor can it
assume any liability in connection with its use.
REFRIGERATION SYSTEM
Refrigerant Charge (R134a).......................8.11 ounces
Compressor........................................738-1270 BTU/hr
Minimum Compressor Capacity
Vacuum...........................................................26 inches
Minimum Equalized Pressure
@70°F...............................................................66 PSIG
@90°F...............................................................74 PSIG
NO LOAD PERFORMANCE
Control Position 37-0°F and
Ambient Temperature of: 70°F 90°F
Fresh Food °F 37-42 36-43
Frozen Food °F (-2)-2 (-2)-5
Percent Running Time, %..........35-45 65-75
COMPONENT RESISTANCE VALUES
FF fan motor ……………………..............1600 Ω ± 20%
FZ fan motor ………………………….......1600 Ω ± 20%
Condenser fan motor ………………........1600 Ω ± 20%
Auger motor ………………………..............3.7 Ω ± 15%
Cube motor …………………………….....2091 Ω ± 10%
Cover motor ……………………………....2091 Ω ± 10%
Defrost heater FZ ……..................................44 Ω ± 7%
Drain heater FZ ..........................................377 Ω ± 7%
Sub-heater FZ ………...............................1322 Ω ± 7%
Defrost heater FF .......................................120 Ω ± 7%
Drain heater FF …......................................440 Ω ± 7%
Fill-tube heater .……….............................2645 Ω ± 7%
Dispenser heater (Recess)………………..1889 Ω ± 7%
Compressor (between the different
phase) …………….....................11. 7 Ω ± 7% / 1 phase
3- way valve …………………………..40 ± 4 Ω/ 1 phase
Water valve (Ice maker) …………...............180 Ω ± 7%
Water valve (Dispenser) ..………................325 Ω ± 7%
Technical Data
CAUTION
To avoid personal injury when servicing the
condensing unit, stand on a ladder which will
give enough support to allow removal of the top
panel and safely allow access to service the unit.
REFRIGERATION DIAGNOSIS
To access the low pressure side of the system,
install a WJ56X61 valve only on the process tube
extending from the compressor case.
Compressor
Suction Tube
Dryer Condenser
Fan
Condenser
Loop
Freezer
Evaporator Fresh Food
Evaporator
Compressor
Suction Tube
Muffler
Dryer
Condenser
Fan
Condenser
Loop
Freezer
Evaporator Fresh Food
Evaporator
PSB42LGRBV, PSB42LGRWV, PSB42LSRBV PSB48LGRBV, PSB48LGRWV, PSB48LSRBV

– 9 –
Nomenclature
Serial Number
The first two numbers of the serial number
identify the month and year of manufacture.
Example: AG123456S = January, 2004
A- JAN 2005 - H
D - FEB 2004 - G
F - MAR 2003 - F
G - APR 2002 - D
H - MAY 2001 - A
L - JUN 2000 - Z
M - JUL 1999 - V
R - AUG 1998 - T
S - SEP 1997 - S
T - OCT 1996 - R
V - NOV 1995 - M
Z - DEC 1994 - L
The letter designating
the year repeats every
12 years.
Example:
T - 1974
T - 1986
T - 1998
The
nomenclature
plate is located
at the top of
the fresh food
section on the
right-side wall.
It contains
the model and
serial numbers
and specifies
the minimum
installation clearances, electrical voltage,
frequency, maximum amperage rating, and
refrigerant charge.
Brand/Product
P - P r o fi l e
Style
S - Side by Side
Configuration
B - Built-In
Size
42 - 42 Inches Wide
48 - 48 Inches Wide
Feature Pack
Engineering
A - Initial Design
B - 1st Revision
C - 2nd Revision
D - 3rd Revision
Etc.
Door Type
V - Visor Handle
Icemaker/Exterior
G - 1 Year Filter
S - Stainless Steel
Model Year
R - 2004
P S
B42 LG R A V
Trim
W - White Disp Trim
B - Black Disp Trim
W
Mini-Manual
The mini-manual is located behind the
grille panel at the top of the refrigerator.
When service is completed, return the
mini-manual to its original location for
future use.
Nomenclature

– 10 –
Control Features
ICE DISPENSER
HOLD 3 SECS
LIGHT
QUICK ICECUBEDCRUSHEDWATERDOOR ALARM
LOCK
RESET FILTER
HOLD FOR
3 SECS
TO ACTIVATE
COLDER WARMER
DISPLAY
TEMP
COLDER WARMER
0 º F IS RECOMMENDED
ADJUST TEMPERATURE
37 º F IS RECOMMENDED
REFRIGERATOR
FREEZER
The temperature controls are preset in the factory at 37°F for the
refrigerator compartment and 0°F for the freezer compartment. Allow
24 hours for the temperature to stabilize to the preset recommended
settings.
The temperature controls can display both the SET temperature
as well as the actual temperature in the refrigerator and freezer.
The actual temperature may vary slightly from the SET temperature
based on usage and operating environment.
NOTE: The refrigerator is shipped with protective film covering the
temperature controls. If this film was not removed during installation,
remove it now.
To change the temperature, press and release the
WARMER or COLDER button. SET will illuminate in
the display, as well as the set temperature. To
change the temperature, tap either the WARMER or
COLDER button (while SET is illuminated) until the
desired temperature is displayed. Refrigerator
temperatures can be adjusted between 34°F and
47°F and the freezer temperatures can be adjusted
between –6°F and +8°F.
Once the desired temperature has been set,
the temperature display will clear after 10 seconds.
To display the temperature, the DISPLAY TEMP
button may be tapped.
Several adjustments may be required. Each time you
adjust controls, allow 24 hours for the refrigerator to
reach the temperature you have set.

– 11 –
To Use the Dispenser
Select CUBED , CRUSHED
or WATER .
Press the glass gently against the middle
of the dispenser pad.
The spill shelf is not self-draining.
To reduce water spotting, the shelf and
its grille should be cleaned regularly.
If no water is dispensed when the
refrigerator is first installed, there may be
air in the water line system. Press the
dispenser arm for at least two minutes to
remove trapped air from the water line
and to fill the water system. To flush out
impurities in the water line, throw away
the first six glassfuls of water.
CAUTION: Never put fingers
or any other objects into the ice crusher
discharge opening.
Locking the Dispenser
Press the LOCK/LIGHT
button for 3 seconds
to lock the dispenser
and control panel. To
unlock, press and hold
the button again for
3 seconds.
Dispenser Light
This button turns
the night light on the
dispenser on and off.
The light also comes
on when the dispenser
pad is pressed. If this
light burns out, it should
be replaced with a 6 watt
12V maximum bulb.
Quick Ice
When you need ice
in a hurry, press this
button to speed up ice
production. This will
increase ice production
for the following
48 hours or until you
press the button again.
Door Alarm
To turn the Door Alarm
on, press the DOOR
ALARM button once.
The ACTIVE light will
come on. To turn it off,
press it again. When the
DOOR ALARM is active,
the ACTIVE light will
flash if you open the
door and beep if you
keep the door open for
more than 2 minutes.
The light goes out and
the beeping stops when
you close the door.
Spill Shelf
LIGHT
LOCK
HOLD FOR
3 SECS
TO ACTIVATE
LIGHT
LOCK
HOLD FOR
3 SECS
TO ACTIVATE
QUICK ICE
DOOR ALARM
Icemaker Controls
Note: When QUICK ICE is selected,
the freezer temperature operates
at -9°F for 48 hours or until QUICK
ICE is pressed again. There is no
change of temperature on the
display panel.
In the event of a power loss, if the
freezer temperature is above 40°F,
Quick Ice will not restart. Below
40°F, the refrigerator will return to
the Quick Ice mode.
Display after power failure:
After a power failure, the
display will reset based
on freezer temperature.
If the freezer temperature
is below 40°F, the display
will retain the settings
prior to power loss. The
chart at the right describes
the possible settings.
Control Function Freezer<40°F Freezer>40°F
Refrigerator Set
Temperature Previous Setting Default 37°F
Freezer Set Temperature Previous Setting Default (0°F)
Door Alarm Previous Setting Previous Setting
Dispenser Option Previous Setting Default (Crushed Ice)
Quick Ice Previous Setting OFF
Reset Filter Previous Setting Previous Setting
Lock Previous Setting Previous Setting
Dispenser Light Previous Setting OFF

– 12 –
Component Locator Views
Door Closer
Water Lines
Condenser
Water Valve
Drier
Terminal Block
Power Control Board
Main Power Switch
Refrigerator (Bottom View, Drain Pan Removed)
Machine Compartment
Drain Pan Loop
Door Closer
Rear Leveler
Rear Leveler
Freezer Defrost Drain Tube
Fresh Food Defrost Drain Tube
3-Way Valve*
*The 3-way valve is located behind the condenser front plate.

– 13 –
Compressor
Drier
Condenser Loop
Freezer Evaporator
and Fan Fresh Food Evaporato
r
and Fan
Condenser
Drain Pan
Heater
3-Way Valve
Refrigeration System
Refrigeration Components

– 14 –
Refrigerant Flow
The compressor compresses R134a refrigerant,
raising its pressure and temperature. Refrigerant
vapor is pumped out the compressor discharge,
down through the drain pan loop, up through
the condenser coil, around the condenser loop,
through the drier, and into the 3-way valve. By
the time the refrigerant has reached the 3-way
valve, it has completely condensed into a liquid.
Depending upon whether the main control board
opens the 3-way valve to the freezer evaporator
or the fresh food and freezer evaporators,
refrigerant flows through the appropriate capillary
tube and into the evaporator. As the high pressure
liquid passes through the capillary and enters the
low pressure evaporator, it quickly expands and
evaporates. During evaporation, the refrigerant
absorbs heat, becoming cold. At the outlet of the
freezer evaporator, an accumulator captures any
remaining liquid, allowing only low pressure vapor
to return to the compressor through the suction
line.
Freezer
Evaporator
Fresh Food
Evaporator
FRESH FOOD AND FREEZER SECTION COOLING
Condenser
Drier
Capillary
3-Way
Valve
Jumper
Tube
Accumulator
Muffler
Muffler
Compressor
Fresh Food Fan
Condenser Fan
Freezer Fan
Low Pressure Vapor
Mix of Liquid and Vapor
Low Pressure Liquid
High Pressure Liquid
Mix of Liquid and Vapor
High Pressure Vapor

– 15 –
Freezer
Evaporator
Fresh Food
Evaporator
FREEZER SECTION COOLING
Condenser
Drier
Capillary
3-Way
Valve
Jumper
Tube
Accumulator
Muffler
Muffler
Compressor
Fresh Food Fan
Condenser Fan
Freezer Fan
Low Pressure Vapor
Mix of Liquid and Vapor
Low Pressure Liquid
High Pressure Liquid
Mix of Liquid and Vapor
High Pressure Vapor
Note: The refrigerator will operate with the 3-way valve set for freezer only or set for fresh food and
freezer. There is no 3-way valve setting for fresh food only. If the fresh food thermistor is not satisfied,
but the freezer thermistor is satisfied, the refrigerator will still operate with the 3-way valve set in the
fresh food and freezer mode.

– 16 –
Evacuation and Charging Procedure
WARNING:
• Before cutting or using a torch on refrigerant
tubes, recover the refrigerant from the system
using approved recovery equipment.
• Never charge new refrigerant through the
purge valve. This valve is always located on
the high pressure side of the system.
• Never apply heat from any source to a
container of refrigerant. Such action will cause
excessive pressure in the container.
• Always wear goggles when working with
refrigerants and nitrogen holding a charge in
some replacement parts. Contact with these
gases may cause injury.
1. Attach the hose from the R-134a charging
cylinder to the process tube port on the
compressor.
2. Evacuate the system to a minimum 20-in.
vacuum using the refrigerator compressor and
recovery pump, which is attached to the new
drier assembly.
3. Turn off the recovery pump. Close the ball
valve on the hose connected to the high-side
port connection. Add 3 ounces of R-134a
refrigerant to the system. Let the refrigerator
operate and circulate the refrigerant for 5
minutes.
4. Open the ball valve. Recover the purge/
sweep charge using the recovery pump and
the refrigerator compressor until a 20-in.
vacuum is attained. Close the ball valve and
remove the recovery hose.
5. Charge the system with the exact amount of
R-134a refrigerant specified.
6. Disconnect the power cord to the refrigerator.
This allows the pressure to equalize. After 3
to 5 minutes, the low-side pressure will be
positive and then the hose-to-charging port
can be disconnected.
7. Using an electronic leak detector, check
all brazed joints and both schrader ports.
Reinstall caps to schrader ports.

– 17 –
Interior Airflow
Fresh Cold Air
Warm Circulated Air
Fresh Food Air Flow
Freezer Air Flow
Note: The fans are extremely quiet. Check for airflow at the icemaker air duct in the freezer and the top
tower vent in the fresh food section. Fans turn off when the doors are opened (DC door switches control
operation) and delay 10 seconds before restarting when the doors are closed again. The freezer door
switch controls only the freezer fan. The fresh food door switch controls both the fresh food and freezer
fan operation.

– 18 –
Components
Machine Compartment Access Door
The machine compartment access door is held in
place by 2 hinges and 2 gas shocks.
To remove the machine compartment access
door:
1. Remove the grille panel.
2. Remove the gas shocks from the cabinet:
a. Insert a small screwdriver under the
retainer clip.
b. Pull the retainer inward to dislodge the gas
shock from the pivot ball.
3. Remove the 2 screws from both hinges, then
remove the machine compartment access
door.
Door Alignment
The freezer door is nonadjustable. The fresh
food door has an adjustment screw at the bottom
hinge. Use a 7/32-in. socket or open-end wrench
to turn the adjusting screw clockwise to raise the
door, or counterclockwise to lower the door. A
nylon plug, imbedded in the threads of the pin,
prevents the pin from turning, unless a tool is
used.
Note: Raising the fresh food door too high will
cause the upper hinge to bind on the machine
compartment access door.
Gas Shock
Clip
Adjusting Screw
Door Stop
The refrigerator has a 2-position door stop. When
space does not allow the door to swing open fully
to 130°, the stop can be adjusted to a 90° door
swing. The pin is factory installed in the 130°
location. To change the stop location, use a flat-
head screwdriver to move the stop pin.
90
130
Hinge
Door
Interior
Doors
The doors are of one-piece construction with
foamed-in insulation.
The inner and outer door panels cannot be
separated and must be replaced as an assembly.
Note: On trimmed models, the maximum weight
for the fresh food door panel is 70 pounds. The
maximum weight for the freezer door panel is 30
pounds.

– 19 –
Door Gaskets
The fresh food and freezer doors have magnetic
gaskets that create a positive seal to the front
of the steel cabinet. The cabinet has magnets
around the perimeter and center mullion under
the front edge.
3. Remove the upper hinge.
4. Lift the door up and out.
2. If removing the freezer door, shut off the
water supply and disconnect the water line
and electrical connectors. If removing the
refrigerator door, disconnect the static ground
wire from the grounding screw.
Screw
Mounting Screw
Ground Wire
Door Removal
WARNING: Use the appropriate safety equipment
and lifting techniques. Two persons may be
required for door removal.
Caution: Use wood or a heavy plastic sheet to
protect the floor where the door will be placed.
1. Remove the 8-mm mounting screw from the
hinge arm link using a 5/16-in. or 8-mm socket.
The magnetic door gaskets are secured to the
doors by a barbed edge that locks into a retainer
channel.
To remove and replace the door gasket:
1. Starting at any corner, pull the old gasket out
of the retaining channel.
2. Soak the new gasket in warm water to make it
pliable.
3. Push the barbed edge of the gasket into the
retainer channel.
Cabinet Edge
Condenser Loop
Cabinet Magnet
Shown With Plastic Liner Removed

– 20 –
Door Closer Assembly
Each door is equipped with a door closer
assembly that provides a smooth closing action
and prevents the door from being slammed shut.
The assembly is connected to the bottom hinge.
When the door is open to a 90° position, it will
automatically close. Beyond this position, the
door will stay open.
To remove the door closer assembly:
1. Remove the toe plate.
2. Remove the 8-mm mounting screw.
3. Insert a small screwdriver into the retaining
clip at the bottom of the shock absorber and
lift up (see photo).
4. Using a large screwdriver, lever the shock
absorber off the pivot ball as shown.
5. Remove the door closer assembly by pulling it
forward. Make certain to retain the white nylon
shock absorber support.
To install the door closer:
1. To make installation of the shock absorber
easier, secure the white nylon support to the
cylinder body with electrical tape .
2. Ensure the opening on the white nylon
support faces towards the inside of the
cabinet.
Tape
3. Make sure the door closer assembly support
is fully seated in the bracket to ensure
alignment of ball and socket.
Retaining Clip
Shown from Installation Viewpoint
White Nylon Support
Other manuals for Profile PSB42LSRBV
2
This manual suits for next models
5
Table of contents
Other GE Refrigerator manuals

GE
GE Profile CustomStyle PSC23SHTSS User instructions

GE
GE GSHF5KGX Manual

GE
GE TPG21PRDAWW User manual

GE
GE PGCS1R User manual

GE
GE Appliances 19 Training manual

GE
GE TFM20JRB AA User manual

GE
GE GFSF6KKY Manual

GE
GE Side-by-Side 36" User manual

GE
GE Appliances 28 User manual

GE
GE Monogram ZIS42N User manual
Popular Refrigerator manuals by other brands

MVP
MVP ikon ICBR50 Service, installation and care manual

Samsung
Samsung SRG-V57 Service manual

KitchenAid
KitchenAid KSSO42FMX01 parts list

Fisher & Paykel
Fisher & Paykel ACTIVESMART RS80 installation guide

Linea 2000
Linea 2000 Domo DO992BFK Instruction booklet

Whirlpool
Whirlpool EJT181XKWR2 Use and care guide