GE TFH22PRSMWW Training manual

I Use and Care&Installation Guide I
Refrigerator
EnglishVersion.................................. 2
Versionfranchise.......................... 23
Version en espa_ol ............ 45
Safety instructions ................ 3
Problem Solver .......... 17-19
Normal Operating Sound s ........... 17
More questions ?...In the United States call
GEAnswer Center®800.626.2000
In Canadaconsult your local telephone
directoryfor the Cameo Service Center
Operating Instructions, Tips
Automatic Icemaker &Dispenser ..5-7
Energy-Saving Tips ............................... 2
Food Storage Suggestions ......................... 8
Shelves ................................................. 10
Storage Drawers ................................ 9
Temperature Controls ............................ 4
Preparation
Clearances .......................... 13
Leveling .......................................... 13
Location ............................................. 13
Moving &Vacation ................. 13
Rollers ................................................. 13
Water Supply to Icemaker .......... 13
Careand Cleaning
Behind the Refrigerator ....................... 11
Cleaning-Inside and Outsid e.................. 11
Drawer and Cover Remova I............ 12
Light Bulb Replacement .............. 12
Under Refrigerator ................. 11
Water Filter Accessory ................................ 7
Installation
Installation ............................................. 14-16
Adapter Plug ............................... 14
Electrical Requirements ............. 14
Extension Cord .................. 14
Grounding ................................. 14
Water Line installation ........ 15, 16
Consumer Services ........... 20
Appliance Registration ................ 2
Modeland Serial Numbers ......................... 2
Warranty forCanadian Customers ........ 21
WarrantyforU, S.Customers ......Back Cover
Profile.SidebySide22,24 and27 Models
GE Appliances

Write down the model
and serial numbers.
You'll see them cm a label on the wallbcsidc
the top drawer or at the bottom, just insidethe
fresh |'cod compartment door.
These numbers are also on the Coosmnor
Product Ownership Registration Card that
came with your refrigerator.
Before sending in this card, please write these
numbers here:
Model Number
Serial Number
Use these numbers in any correspondence or
service calls concerning your refrigerator.
HELP US HELP YOU...
Read this book carefully.
It is intended to help you operate and
maintain your new refrigerator properly.
Keep it handy for answers to your questions.
If yoLI don-t understand something or need
more help. write (include your phone number):
In the United States:
Cormu v'nc_rAffail s
GE Appliance
Appliance Park
Louisville. KY 40225
In Canada:
Mmmger, Consumer Relations
-&$5 Skx mark .4 e.,
Mississauga, Ontario
Canada lAW 4142
If you received adamaged
refrigerator...
hnmediately contact the dealer (or builder)
that sold you the refrigerator.
Save time and money.
Before you request service...
Check the Problem Solver section in this
book. It lists minor operating problems that
you can correct yourself
ENERGY-SAVING TIPS
.Location of your refrigerator is important. A'_old locating it next to
your range, a heating vent or where the stm will shine direclly ca it
.Close the doors as soon as possible, particularly i n hot, humid weather.
.Be sure the doors are closed tightly. Before leaving the house or
retiring for the night, check to be sure the doors haven't been left
open accidentally.
.Keep foods covered to reduce moisture buildup inside the refrigerator.
IF YOU NEED SERVICE
To obtain service, see the Consumer Ser_ices
page in the back of this book,
We' re proud of our service and want }ou to
be pleased. If for some reasol', you are nut
happy with the service yoLI receive, here are
3 steps to lkJlow for further help.
For- Customers in the United States:
FIRST, contacl [he people who serviced your
appl brace. Explain why you are not pleased.
In mo_tcases{hiswilIsolve the problem.
NEXT, if' you are still not pleased, wri{e
all the detail> -including your phone
mmtber io:
Mailager. Consumer Relalions
(JE Appliance\
Appliance park
t,ouiv_ tile, KY 40225
FINALLY. il"your problem is stilt not
resol vcol.x_rite:
Major Appliance Consutner
Action Panel
20 North Wacker Dri '_e
(hicago. IL 60606"
For Customers in Canada:
FIRST. contact the people who serviced yol.u"
appliance. Explain why you are not pleased.
In most cases this will solve the problem.
NEXT, ii you are still not pleased, write all
the details including your phone number to:
Manager, Consumer Relations
2645 Skymark Ave.,
Mississauga, Ontario
(aimda L4W 4H2

IMPORTANT SAFETY INSTRUCTIONS
Read all instructions before using this appliance.
A WA1LNING--When using this appliance,
always exercise basic sat_ty precautions,
including the following:
.Use this appliance only for its intended purpose
as described in this Use and Care Guide.
This refrigerator must be properly
installed and located in accordance
with the Installation Instructions
before it is used.
Never unplug your refrigerator by
pulling on the power cord. Always
grip plug firmly and pull straight out
from the outlet.
•Repair or replace immediately all electric
service cords that have become frayed or
otherwise damaged. Do not use a cord that
shows cracks or abrasion damage along its length
or at either the plug or connector end.
.When moving your refrigerator away from the
wall, be careful not to roll over or damage the
power cord.
.Do not allow children to climb, stand or
hang on the shelves in the refrigerator. They
could damage the refrigerator and seriously
injure themselves.
.If your old refrigerator is still around
the house but not in use, be sure to
remove the doors. This will reduce the
possibility of danger to children.
•After your refrigerator is in operation, do
not touch the cold surfaces in the freezer
compartment? particularly when hands are
damp or wet. Skin may adhere to these extremely
cold surfaces.
.If your refrigerator has an automatic icemaker,
avoid contact with the moving parts of the ejector
mechanism, or with the heating element that
releases the cubes. Do not place fingers or hands
on the automatic icemaking mechanism while the
refrigerator is plugged in.
.Don't refreeze frozen foods which have thawed
completely. The United States Departlnent of
Agriculture in Home and Garden Bulletin
No. 69 says:
%..You may safely refreeze frozen foods that
have thawed if they still contain ice crystals or if
oo
they are still cold--below 40 F. (4 C.).
%..Thawed ground meats, poultry or fish that
have aW off-odor or off-color should not be
refrozen and should not be eaten. Thawed ice
cream should be discarded. If the odor or color of
any lbod is poor or questionable, get rid of it. The
food may be dangerous to eat.
"Even partial thawing and refreezing reduces the
eating quality of foods, particularly fruits,
vegetables and prepared foods. The eating quality
of red meats is affected less than that of many
other lbods. Use refrozen foods as soon as
possible to save as much of their eating quality as
you Call."
.nplug your refrigerator before
cleaning and making repairs.
NOTE: We strongly recommend that
any servicing be performed by a
qualified individual.
.Before replacing a burned-out light bulb, the
refrigerator should be unplugged in order to avoid
contact with a live wire filament. (A burned-out
light bulb may break when being replaced.)
NOTE: Turning control to OFF position does
not remove power to the light circuit.
° Do not store or use gasoline or other flammable
vapors and liquids in the vicinity of this or any
other appliance.
SAVE THESE
INSTRUCTIONS

OPERATING YOUR REFRIGERATOR
Set the Temperature Controls (appearance mavary)
The temperature controls let you regulate the temperature in the fresh
food and freezer compartments.
At first, set the Fresh Food control at "5" and the Freezer control at "C".
Allow 24 hours for the temperature to stabilize, whether you are
setting the controls for the first time or adjusting them later. Then, if
you want colder or warmer temperatures in either compartment, adjust
the controls one step at a time.
NOTE: Moving the Fresh Food control to OFF turns off cooling in
both compartments-fresh food and freezer but does not shut off
power to the refrigerator•
FreezerControl
CisInitial Setting
EisColdest
0_ i "_ "_ " _ "
FreshFoodControl
5is Initial Setting
9 is Coldest
How to Test Temperatures
Use the milk test for the fresh food compartment. Place a container
of milk on the top shelf in the fresh food compartment. Check it a day
later• If the milk is too warm or too cold, adjust the temperature controls•
[se the ice cream test for the freezer compartment. Place a
container of ice cream in the center of the freezer compartment. Check
it after a day. If it's too hard or too soft, adjust the temperature controls.
Ahvays allow 24 hours for the refrigerator to reach the
temperature you set.
Automatic Energy Saver System
You won't find an "energy saver" switch on this refi'igerator.
Warm liquid from the refrigerator's condenser is automatically
circulated around the front edge of the fi'eezer compartment to help
keep moisture fi'om forming on the outside of the refrigerator during
humid weather.
Many refrigerators use special electric heaters, This refrigerator needs
none. That's why there is no "energy saver" switch., there's no need
for it.
No Defrosting
It is not necessary to defrost the fi'eezer o1"fresh food compartments.
Your refrigerator is designed and equipped to defi'ost itself automatically.
If you turn your household thermostat below 60°F. (16°C.) at night...
•.. you may want to move the fi'eezer control one
step colder. Cooler temperatures in the house may
cause the compressor to operate less
thus allowing the fi'eezer compartment to warm
somewhat. To protect your frozen food supply,
leave the freezer setting at this colder setting for
the entire winter or for as long as you keep your
thernmstat turned down.
Moving the freezer control to colder setting should have no effect on
your fresh food compartment. However, if freezing occurs, move the
fi'esh food control one step warmer.
When you stop turning the thermostat down, mm the refrigerator's
controls back to their regular settings•

AUTOMATIC ICEMAKER & DISPENSER
(on some models)
How They Work
The automatic icemaker makes ice continual y. The dispenser
dispenses water, ice cubes or crushed ice tln'ough the fi'eezer
compartment door. Here' how they work.
Water flows t'rom the household supply through a
(l) dual solenoid valve
to the
(2) water tubing and
to the
(3) autonmtlc icemaker
as needed.
Water is frozen in the
(4) cube mokland
<jeered imo the
(5) storage bin where
a motor-powered
_l[igel ll/o _, es
cubes forward.
Cubes fall through the chute in the door when the dispenser
pad is pressed.
When CRUSHED is selected (on some models), a balTlechalmels
cubes through the crusher and crushed ice rid Is through a chute into
the glass.
When WATER is selected, (on some models) water flows through th_
{6) tubing in the door and is dispensed when the dispenser
pad is pressed.
(7) A light switch (on some models) turns the night light in the
dispenser on or off
The light also comes on when the dispenser pad is pressed.
The light in the dispenser should be replaced with a 7 watt nmximum
bulb when it burns out.
Important Facts about Your Ice & Water Dispenser
.If this is your first icemaker you'll hear occasional sounds that
nmy be unfamiliar. These are nomml icemaking _ounds and are not
cause for concern.
•Your icemaker will produce 8 cubes per cycle approx imateh
120 cubesin a 24-hour period-depending ola freezer compartm_ent
temperature, room temperature, number of door openings and other
use conditions.
.Intermittent dispensing of ice is normal. If ice flow inten'uption i s
more than brief, ice clump(S) may be the cause and shoukl be
removed l'ot Iowl ng instl uctions in this section.
•Avoid overfilling glasses with ice and using narrow or extra-tall
glasses. This can jam the chute or cause the door in the chute to
freeze _hul. Periodically open the freezer compartment door and look
dew. into the chute. If ice is blocking the chute, poke it through with
a wooden spoon.
.To help keep bits of ice from being sprayed beyond the glass,
place the glass close to the ice chute-but not soclose that it blocks
outceming ice.
.Fill glasses with ice before adding soda or other beverage mixes.
.Beverages and foods should not be quick-chilled in the ice
storage bin. Cans. bottles or tbod packages i n the storage bin may
canse the icemaker or auger to jam.
.Do not add ice from trays or bags to the storage bin. It ma)not
crush or dispense well.
Before Using Your Icemaker and Dispenser
II'vou the your refi'igerator befl_re the water _ ....... _
connection is nmde. raise the _ce access door and [.
make st re the lcemaker leeler ama is m t _e _._/---_'
STOP (up) posml,n. When the _ater suppl','has _" 9f i I_L-_--_I/
been connected to the icemaker move the l:eeler _7 i_-- _
arm to ON (down) position. _ ___=_:!
Feeler arm in Feeler arm in
STOP (up) ON (down)
position position
At first there will be a delay befbre water is dispensed and ice b, nmde.
On models with a water dispenser, it"no
water is dispensed when the refrigerator is
first installed, there may be air in the water line
system. Press the dispenser pad for al least two
minutes to remove trapped air from the water
line and to fill the water system.
Push the dispenser pad
until the water line is filled.
The ice cube mold will automatically fill with water AFFER cooling
to freezer temperature. The first cubes nornmlly freeze after
several hours.
NOTE: With a ne_ ly-insmlled refi'igerator, allow about 24 hours
for the freezer compartment to get cold enough to make ice.

AUTOMATIC ICEMAKER & DISPENSER
(continued,)
Once Your Icemaker and Dispenser are in Operation
Throw away the first few batches of ice cubes ( 16 or 24 c/Jbes). I'his
will flush away any impurities in the water line. Do the same thing
after _acations or extended periods when ice isn't used.
Onmodels with a water dispenser, pour the first 6ghlssfu/sof water in
the kitchen sir_k. The firstwmer through thes}slempicksupaslight
-plastic" taste from the water tubing.
To make sure the bin fills with ice, level the cubes occasionally.
When cubes _all into the bin they may pile up close to the icemaker
and push the l'eeler arm :o the STOP (up) position befure the biI_ gets
full. Keeping the cubes level allows the icemaker to fill the bin.
To Dispense Ice and Water
,Select CI BES. CR liSH[ D lob',
on some models) or W_iI'EI<
Dispenser
pad
.Grit? the _lass or other container
near the rim a.d press the rim
against the center of the
dispenser pad.
Dispenser
pad
When Dispensing Ice...
Some crushed ice may be dispensed even though you selected
CUBES. Thishappensoccasiomllly when a fewcubesg_'_channekxt
to the crusher+
Sometimes anmund of snow will form on the door in the ice chute.
This condition isl_orlnal, andtlsuallyoccurs_hen\ouha_edispensed
crushed ice repeatedly. The sno\_ will e_ entua/13 e_ aporate,
Sometinles crushed ice x_ill spra 3 beyond the glass, To ;l_oid this,
hold the glass Up close to lhe chute.
CAt TION: Never put fingers or other objects into the
dispenser opening.
When Dispensing Water...
The first glass of water dispensed may be warmer than the
following ones. <lhisis normal.
Dispensed water is cool, not iced. For colder water, simpl 3 add
crashed ice or cubes before di spensiilg water.
To Stop Dispensing
Releasepr0sstllo flora lhc
dispenser pad and v, ait a le\_
secollt/s[o ca{ch the hlst bits of ice
01" drops of _,_aler.
There may be some &ipping after
dispensing crushed ice oi'u ate_. If
there is alotof &ipping. lhespill
shoukl be wiped dr> i'i{J:t ai',_;l',.
Do not pour _,:,a{erin the spilI shell because it is llot self draining--
pour it in the kitchen slnk.'l'he shell' and ilsgrille shou Idbe cleaned
reglihtrly accord in: to CarealidCleaning Press here to remove grille
in structions. The gri lie is easily remox ed
b3pressing on the back right comer.
If Ice Clumps Form in the Storage Bin...
The k'emaker ejecls cubes in group_; of 8, and it i_ normal for se_ eral
cubes to be ioined together. How c er, if } ou don" t use the
ice _ ery often, ice chimps ma 3 form in the slo_'agebin and can clog
file dispen*er.
It' this happens:
.Remo_ e the slorage bin fi'om the freezer.
•Break up ice c Iu raps _ _[h _our hand s. Tl'lrm_ a_ a3 an> c 1 uraps {hat
) ou can't break Lip.
• Repl ace the bin before the re mai n i ng cubes meh alld fuse logelher,

To Remove Ice Storage Bin
Lift the bft corner to free the bin from
theshclf, Pull the bin straight out _ hilt
supporting it al front and back. r_ Ji
=!ll
I *' J', 4*f*l'!,i/
-w< fL:'"I
To Replace Ice Storage Bin
Slidedle bin hack until the tab on the bin loeb',
into the_lot in the ,dmlf.
I1'llw bill does not goall the \_a'< back, retool o
it alld ll.lrll the dri ve illecllall i <41111/4turn. l'hen
push tile bin back again until the tab on the
bin loeb', hm, the slot in the shelf.
Drive
Mechanism
If Ice Is Not Used Often...
"'Old" ice cubes will become ch)ud_,and taste slale. Empty ice
storage bm periodically and x_ash i t in 1 ukcx_l.li'l'll\'vaten Be sure to
allowsloragebin to cool" befon'iephicingit olher_iseice cube'.
wi I1stickto the metalauge I'.
Move Feeler Arm to STOP (up) Position when...
•ltOllle 31¢1"suppl } i s to I_e1tlll/ed tll>l t;,)r ,;e'_ol'a l llotlrs
• Ice Morage bin i ,,b_bei'emo'_ed foF aperi od of t i me.
.Go ing d\. a> on t Heat ion. at '. h I ch I i me you shou Id illso Iui'l/off the
ab<em the_>,atcr SuplH}l i _lelo \ our F¢I rigeralolz
ICE SERVICE
Ice Trays onsonicmodelsl
1_>release ice cubes, in,.clt tin}, hold it
eve{"stoia_e bin 01" bo\_ l. amt l_ i st ai
both end \.
Foronl} one or tw_iceeubes.leav¢
tla'_ righl side Lip. t_ i st boH_ end'.
sli1_'hll} and {'Oll)O\ e dc<,h'ed numbe_
of cube\.
\Vasb ice tra> s and storage bin in
lukewarm water only. D<_uol put
them in an HtltOlll_ltic dishxv ;.tshei+.
ACCESSORIES
Water Supply Kit
AkitconiainingcoF.per tubing, shut-off al,,efittingsandinstructions
needed io connect the iccmaker tc,yOtll-coldV_alter ti ne iSa\ ai! abh" at
CXlla COSLSee Preparation sectinn.
Automatic lcemaker Accessory Kit
If .vour reI rigerator did not come alread} quipped \\ ith an automatic
icenmkcr, al'_Iccnmkcr Acce<sor 3 Kit ix at ai lable at extra cost. Check the
back of the refrigerator for the specific icemaker kit needed fill- 3ore" model.
Water Filter Accessory
Your ice cubes can only be as fresh tasting as the x\ater that pn)duces them.
That's wily it's a good idea to ptlrif,, yotlr water v, iih a water filler.
REMOVES SHIIMENT
Rigid. porous graded density depth cellulose
fiber cartridge catches dirt. i'tis{ particles, sand a!ld silt
REMOVES el)ORS
Activated charcoal granules relllOve
IllLIMy. qalc odors.
IMPROVES TASTE
Aclh'ated charcoal granules remove oily.
medicinal, plastic and metallic tastes.
REI)[ CES SCALE
Special crystals reduce hard scale deposit formation.
The water fiher is an option at exlra cost alld is a_ailable from your dealer.
Specify WR97X(!214. It has complete inslallation inMrtlctions and installs
in minutes o_l I/4" {6 mm} ().D. copper water line.
7

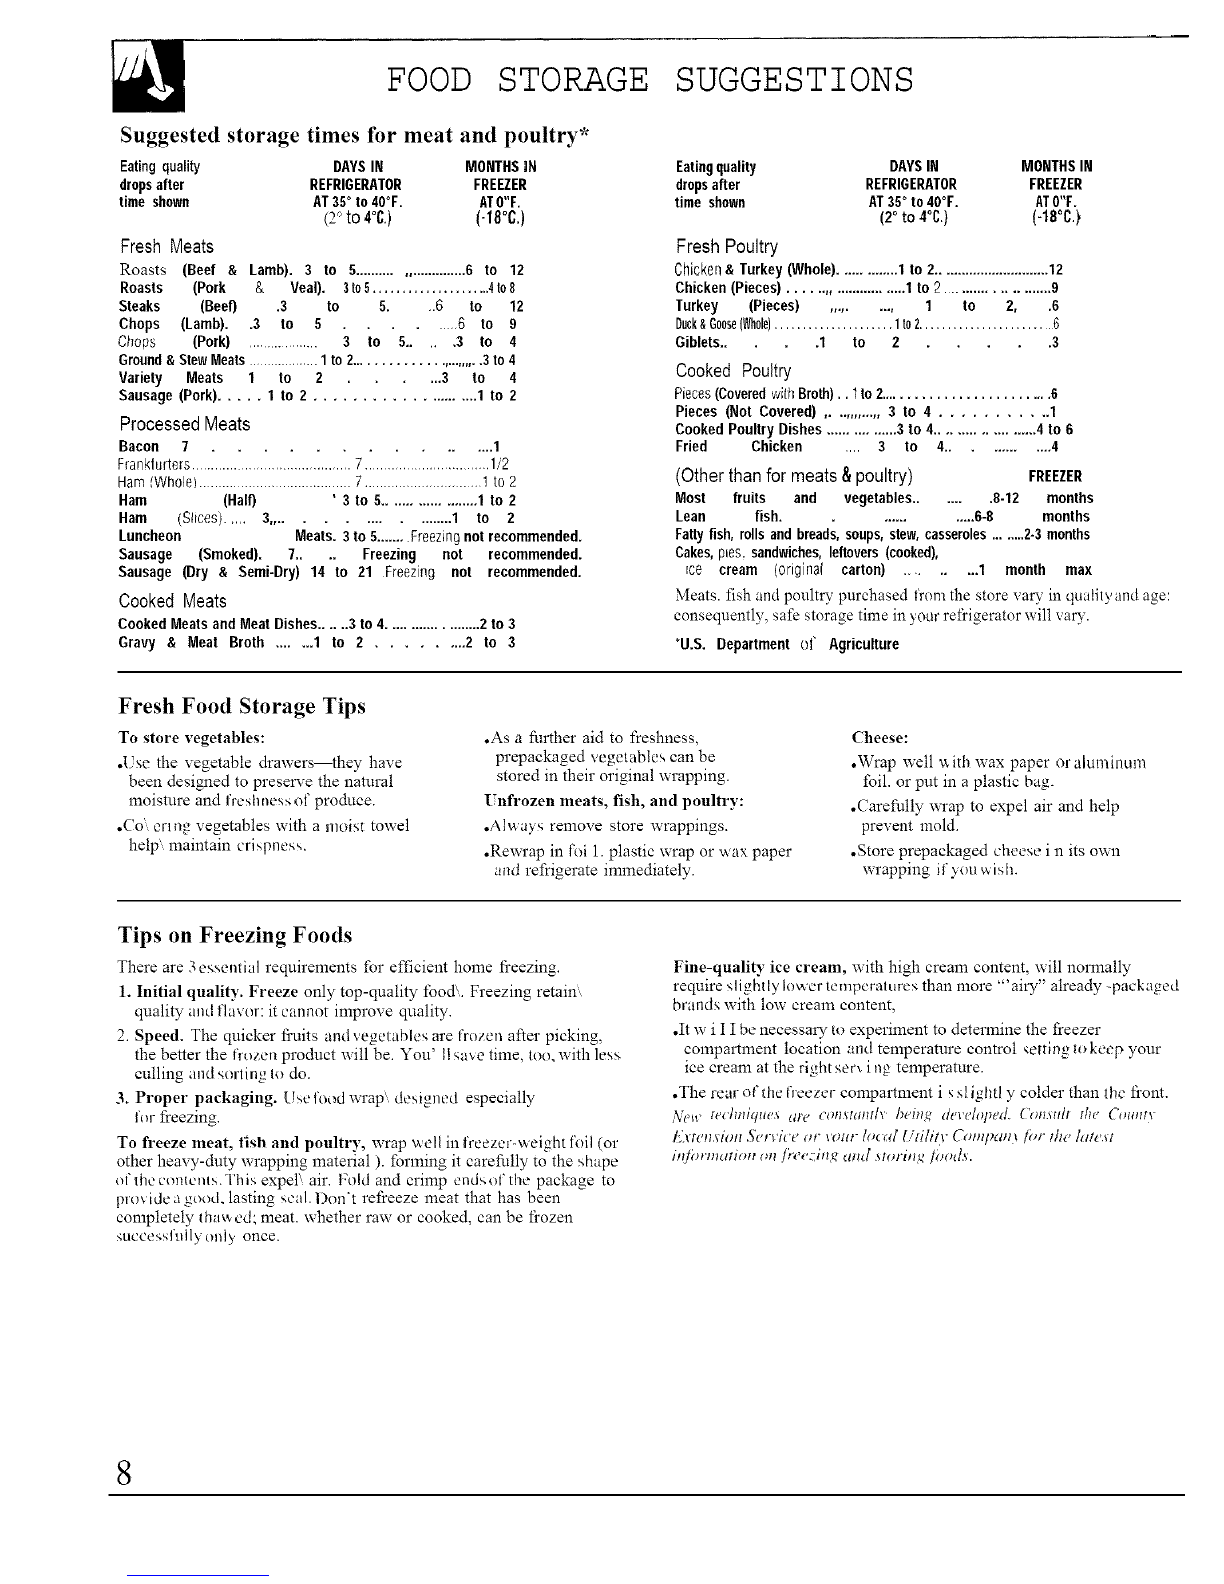
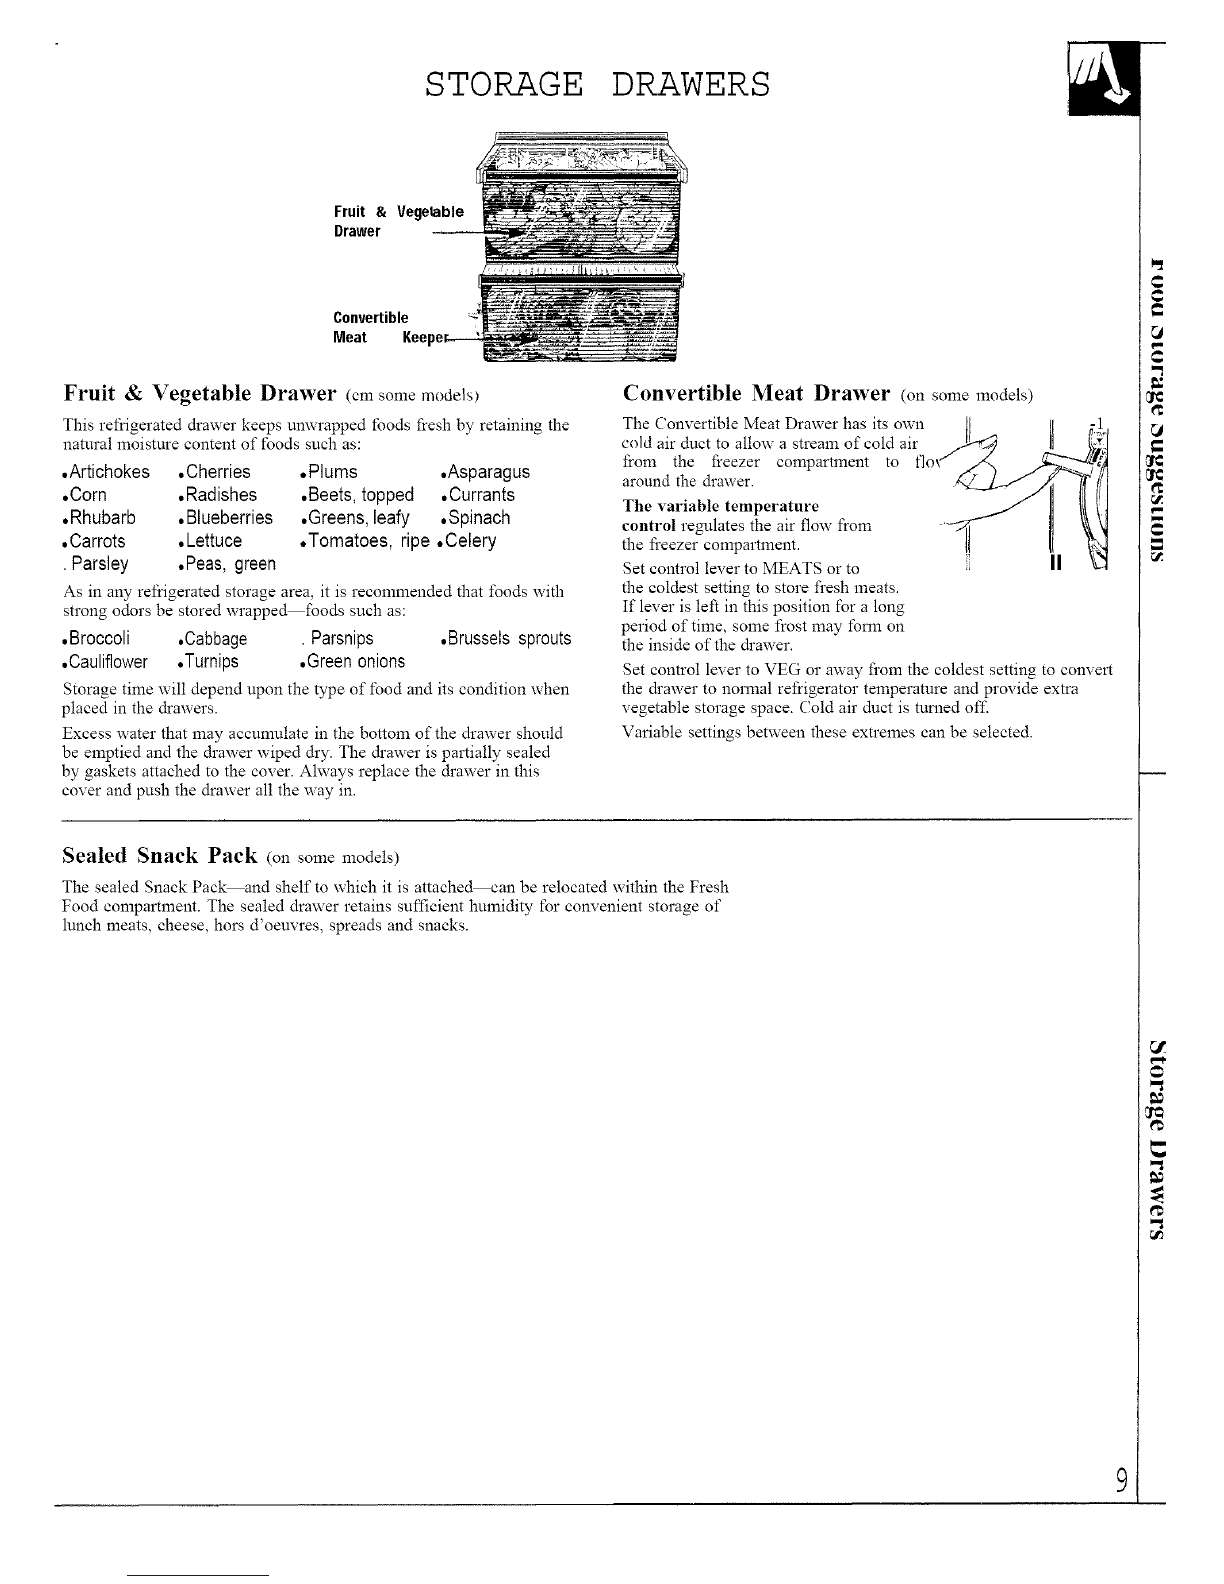
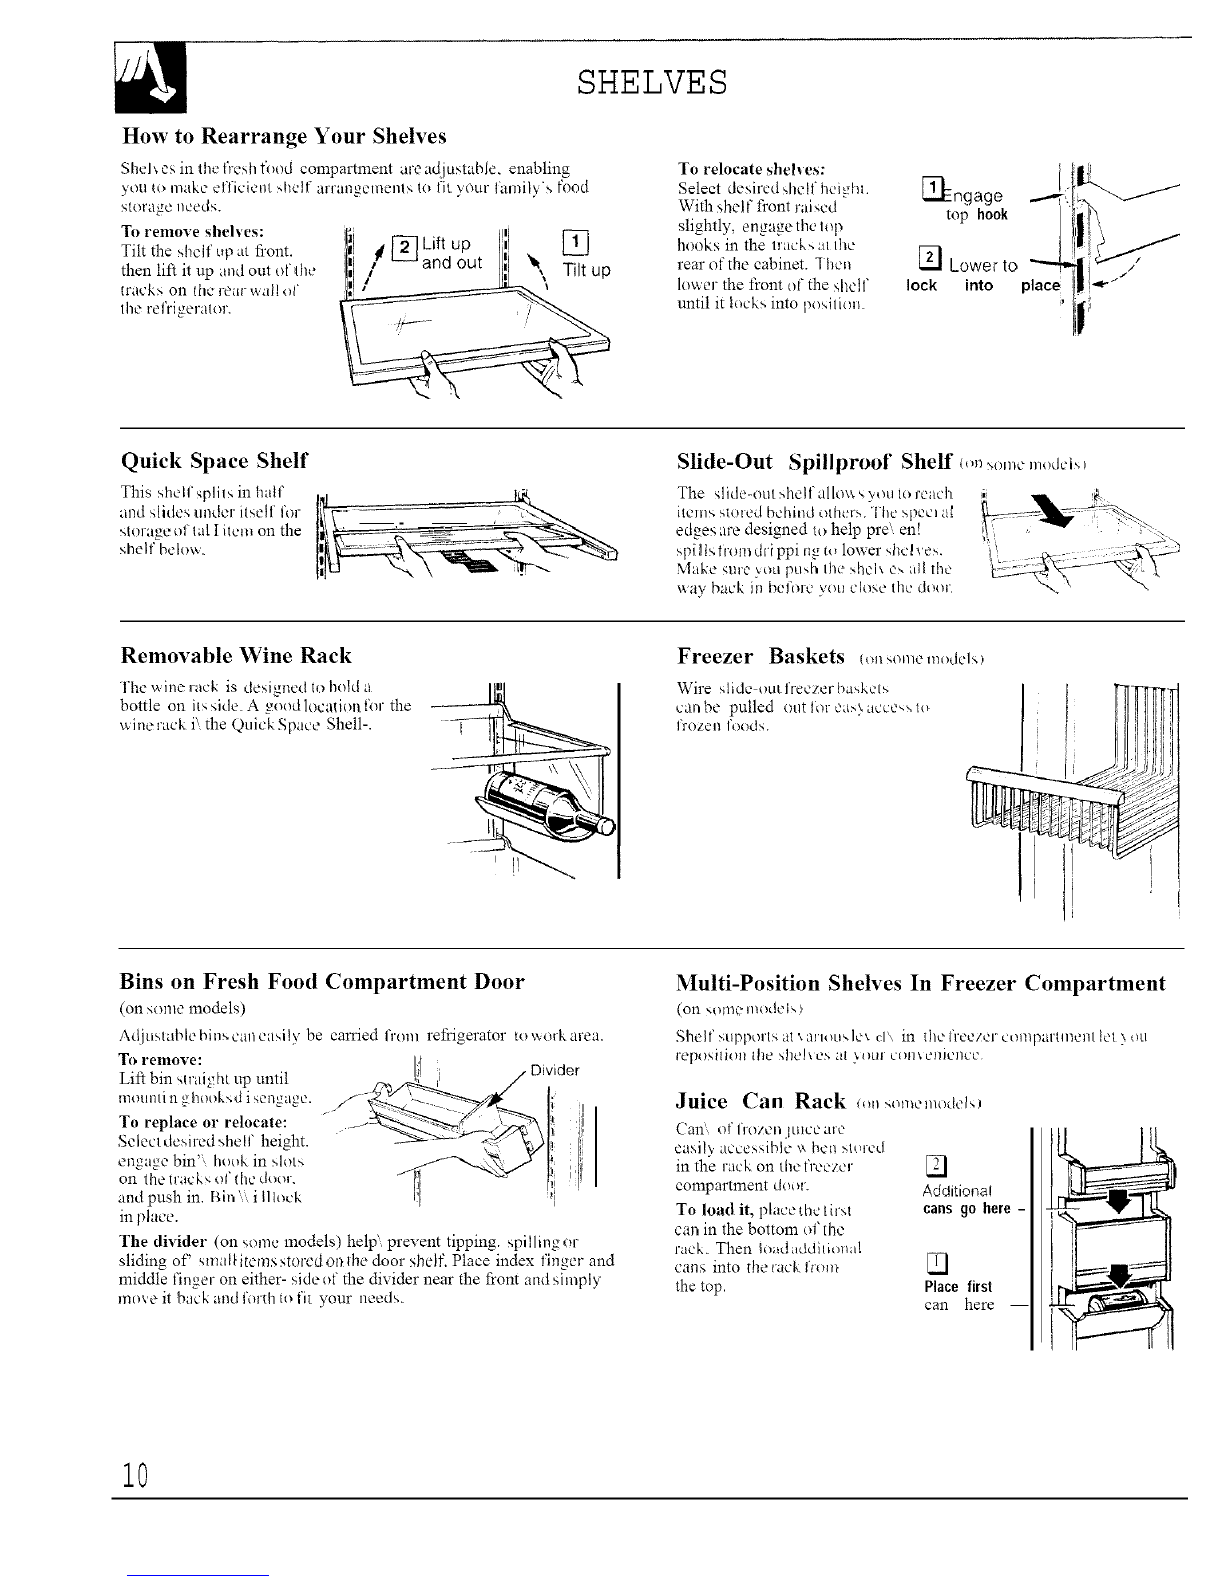
FOOD STORAGE SUGGESTIONS
Suggested storage times for meat and poultry*
Eatingquality DAYSIN MONTHSiN
dropsafter REFRIGERATOR FREEZER
time shown AT35°to 40°F. ATO"F.
(2°to4°c.) Heoc,)
Fresh Meats
Roasts (Beef & Lamb). 3 to 5.......................... 6 to 12
Roasts (Pork &Veal). 3t05..................... 4to8
Steaks (Beef) .3 to 5. _6 to 12
Chops (Lamb). .3 to 5......... 6 to 9
Chops (Pork) .................. 3 to 5..... 3to 4
Ground& StewMeats.................1to 2.............. ,.........3to 4
Variety Meats 1 to 2 ._3 to 4
Sausage (Pork)..... 1 to 2 .... ".. _.. i ............ 1 to 2
Processed Meats
Bacon 7 ............... 1
Frankfurters......................................... 7................................1/2
Ham(Whole)....................................... 7........................... 1 to 2
Ham (Half) ' 3 to 5..................... 1 to 2
Ham (SJices)..... 3.................... 1 to 2
Luncheon Meats. 3to 5....... Freezingnot recommended.
Sausage (Smoked). 7.... Freezing not recommended.
Sausage (Dry &Semi-Dry) 14 to 21 Freezing not recommended.
Cooked Meats
Cooked Meatsand Meat Dishes...... 3 to 4..................... 2 to 3
Gravy & Meat Broth ....... 1 to 2 ......... 2 to 3
Eatingquality DAYSIN MONTHSIN
dropsafter REFRIGERATOR FREEZER
time shown AT35°to 40°F. ATO"F.
(2°to 4°C.} (-18_C.}
Fresh Poultry
Chicken& Turkey(Whole).............. 1to 2.............................12
Chicken (Pieces) ......................... 1 to 2....................... 9
Turkey (Pieces) ......... 1 to 2, .6
Duck&Goose(Whole)..................... 1to2......................... 6
Giblets.. .1 to 2..... 3
Cooked Poultry
Pieces(CoveredwithBroth).. 1to 2.......................... 6
Pieces (Not Covered) ............. 3 to 4 ........... 1
Cooked Poultry Dishes................ 3 to 4..................... 4 to 6
Fried Chicken .... 3 to 4............ 4
(Otherthanfor meats&poultry) FREEZER
Most fruits and vegetables....... 8-12 months
Lean fish...... ....... 6-8 months
Fattyfish, rollsand breads,soups,stew,casseroles........2-3months
Cakes,p=es,sandwiches,leftovers (cooked),
ice cream (original carton) ...... 1 month max
Meats. fish and poultry purchased from the store va Uin quali b, and age:
consequently, safe storage time in your ret}igerator will valT
*U.S. Department o[ Agriculture
Fresh Food Storage Tips
To store vegetables:
.Use the vegetable drawers_hey have
been designed to preserve the natural
moisture and fi-eshnessof prodnce.
.Co enng vegetables with a moist towel
help maintain crispness.
.As a fnrther aid to freshness,
prepackaged vegetables can be
stored in their original wrapping.
Unfrozen meats, fish, and poultry:
.Always remove store wrappings.
.Rewrap in fi_i1. plastic wrap or wax paper
and refrigerate immediately.
Cheese:
.Wrap well _ ith wax paper or alumimm_
foil. or put in a plastic bag.
.Carefully wrap to expel air and help
prevent mold.
.Store prepackaged cheese i n its own
wrapping if you ,a ish.
Tips on Freezing Foods
There are :_essential requirements for efficient home fi'eezing.
1. Initial quality. Freeze only top-quality ibod\. Freezing retain
quality and fhlvor: it cannot improve quality.
2. Speed. The quicker fi'uits and vegetables are frozen after picking,
the better the frozen product will be. You' I! _ave time, too, with less
culling and sorting lo do.
3. Proper packaging. Use food wrap designed especially
for freezing.
To freeze meat, lists and poultry, wrap wel! in freezer-weight foil (or
other heavy-duty wrapping material ). forming it carefnlly to the shape
o1'1he conicnls. Th is expel\ air. Fold and crimp ends of the package to
pro_ idea good. lasting seaL I)on't refreeze meat that has been
completely lha_ ed; meat. whether raw or cooked, can be fi'ozen
successfnlly onl,,, once.
Fine-quality ice cream, with high cream content, will nornmlly
require slightly lower temperatures than more "'airy" already packaged
brands with low cream content,
.It w i I I be necessary to experiment to determine the freezer
compartment location and temperature control _ettbg to keep your
ice cream at the right ser_ i ng temperature.
.The rear or"die freezer compartment i s s] ightl y colder than the fi'ont.
,,\),w techniques are cnn_tamh' hein,_ developed, ('_m_ulr die Colmtv
Ih'te!;don .%rvice or vo,r /o( ag UdliS" Com!_am /or flu" ].tevt
.!fi)rmuti(m im /?,'ezin,_, am[ _tori_t_ fi:ods.
8

STORAGE DRAWERS
Fruit & Vegetable
Drawer
Convertible
Meat Kee
Fruit & Vegetable Drawer (cm some models)
This refrigerated drawer keeps unwrapped foods fresh by retaining the
natural moisture content of foods such as:
.Artichokes ,Cherries .Plums .Asparagus
.Corn ,Radishes .Beets topped .Currants
.Rhubarb ,Blueberries .Greens, leafy .Spinach
.Carrots ,Lettuce .Tomatoes, ripe .Celery
• Parsley .Peas, green
As in any refiqgerated storage area, it is recommended that foods with
strong odors be stored wrapped foods such as:
.Broccoli .Cabbage Parsnips .Brussels sprouts
.Cauliflower ,Turnips .Green onions
Storage time will depend upon the type of food and its condition when
placed in the drawers.
Excess water that may accunmlate in the bottom of the drawer should
be emptied and the drawer wiped dry. The drawer is partially sealed
by gaskets attached to the cover. Ahvays replace the drawer in this
cover and push the drawer all the way in.
Convertible Meat Drawer (on some models)
The Convertible Meat Drawer has its own [[
cold air duct to allow a stream of cold air II
from the freezer compartment to
around the drawer.
The variable temperature
control regulates the air flow from
the freezer compartment.
Set control lever to MEATS or to ', II
the coldest setting to store fresh meats.
If lever is left in this position for a long
period of time, some frost may tbml on
the inside of the drawer.
Set control lever to VEG or away from the coldest setting to convert
the drawer to normal refrigerator temperature and provide extra
vegetable storage space. (?old air duct is turned off
Variable settings between these extremes can be selected.
Sealed Snack Pack (on some models)
The sealed Snack Pack and shelf to which it is attache_can be relocated within the Fresh
Food compartment. The sealed drawer retains sufficient humidity for convenient storage of
lunch meats, cheese, hors d'oeuvres, spreads and snacks.

SHELVES
How to Rearrange Your Shelves
Sheh es in the l'rcsh fbod compartment are adjustable, enabling
you Io make el'ficiem ,,helf arrangemenls to fit your family's food
storage needs.
To remove sheh'es: _ Lift up []
Tilt the shelf up at fi'ont. #
then lift it up and out oI'lhe i _ and out _,, Till u0
tracks on flit rear walt of
lhe refrigeralor.
To relocate shehes:
Select desired shelf heighl. _,__=ngage _
With shelf front raised
slightly, engagetheiop top hook
hooks in the lracks at the vT1
rear of the cabinet, lhcn [zl Lower to
lower the front of the shelf lock into place
until it locks into 1)osilion.
Quick Space Shelf
This shelf spills in half
and slides under itself for
slol age of lal I item on the
shelf belox_.
Slide-Out Spillproof Shelf/<,, _omc m<)dei_)
The slide-out qaelf allmv _you to reach
items stoled behind others, "1he spccl a{
edges are designed to help pre', en!
spills h'oIn ctrf ppi n_ I_, lower slid yes.
Make qtre yoa push the shelx es :ill the
v, ay back ill before you close the door.
Removable Wine Rack
The uine rack is designed to hold a
bottle on ss e. A goodlocati{ n 'o" the
wine rack ix the Quick Space Shell-.
Freezer Baskets {o, somemodel,,)
Wire qidc ot!l fl-cczer haske[s
can be pulled ()tit tot" eli:,} ac_:e_,s 1o
frozen foods,
Bins on Fresh Food Compartment Door
(on some models)
Adjustablebiascaneasity be carried flora refrigerator lo\_ot-kai+ea.
T_) remove:
Lift bin slraip.ht up until Divider
moumi n e lu)oks d i sengage.
To replace or relocate:
Selecl desiredshelf height.
engage bin'. hook in _lots
on tile tracks of {he door.
and push in. Bill\ i iilock
in place.
The divider (on some models) help', prevent tipping, spilling or
sliding of' _mal_itenlsst{}rc'd ol}lhe door shelf. Place index finger and
middle finger on either- side of the divider near the front and simply
move it back and forth to fit your needs.
Multi-Position Shelves In Freezer Compartment
(on sollle inodc'I _,}
Shelf supports [it \ a]tous Ic,. cl\ in the ffcczcr compartil]unt let }otl
i-eposi[ioll the sheh cs at 3{}t_ con;ena'ncc
Juice Can Rack {.n,,omemodel_
Can ,af h'ozeu iulcc zue
easib accessible ,_ hen _t,_red
in the rack on ti_e fl-cezer []
compartment door. Additional
To load it, placethc first cans go here -
cal_ in the bottom of the
rack. Then h}adaddltiomd
cans into the rack from []
the top. Place first
can here
10

CARE AND CLEANING
Cleaning--Outside
The water and ice dispenser spill shelf (on some models)should
be wiped dry immediately to prevent spotting. Water left on the shelf
may leave deposits that you cam'emo_ eby soaking with undiluted
vinegar. You can also use a paste of non-precipitating water softener
(such a", Calgon brand) and water, or 1 leaspoon (5 ml) of citric acid
powder per pint (500 ml) of hot tap water. Soak until Ihe deposit
disappears or become', loose enough to rinse av, ax. Usually 30
minutessoaking time i adequate. A'. old usingwax on the spill
shelf alld trim.
The dispenser pad can be cleaned b_ using a \Val'ln water and baking
soda solution-about a tablespoon ( !5 nil)of baking soda to a quart ( l L)
of water. Rinse thoroughly with water and wipe dD.
The door handles and trim (on some model',) can be cleaned with a
cloth dampened with asolulionof mild liquid dishwashing detergent and
t<_ter.l)l y with a sob cloth. Don't use wax on the door handles and trim.
The soft door handles (on some models ) are easy to keep clea!l
if they are waxed eve D fc\,_ momhs Use a househoM \_.ax _.uch as,
Pledge brand or Jubilee brand to coat ltle handle',. Soil will thef_
easi I3__vash off with a dish detergent and water or a _ml_abras i\ e
al] purpose cleaner.
Keep the finish clean. Wipe with a clean cloth lightly dampened with
kitchen appliance wax or mild liquid dishwashing detergent. Dry and
polish with a clean, soft cloth. Do not wipe the refi'igerator with a
soiled dishwashing cloth or wet toweh These may lea e a residue that
can erode the paint. Do not use scouring pads, powdered cleaners,
bleach or cleaners containing bleach because these products can
scratch and weaken the paint finish.
Protect the paint finish. The finish on the outside of the refi'igerator
is a high quality, baked-on paint finish. With proper care, it will stay
new-looking and rust-free for years. Apply a coat of kitchen/appliance
wax when the refi'igerator is new and then at least twice a year.
Appliance Polish Wax & (?leaner is available from Service and
Part Centers.
Cleaning--Inside
Inside the fresh food and freezer compartments should be cleaned
at least once a year. Unplug the refi'igerator before cleaning. If this is
not practical, wring excess moisture out of sponge or clod1 when
cleaning around sw itches, lights or controls.
Usewarm water and baking soda solutio_ aboltt a tablespoon
( 15 ml) of baking soda to a quart !1 L) of water. Thi both clealm and
neutralizes odors. Riase thoroughly with water and _;ipo dry.
Other parts of the refrigeralor--irleludi ,1_!door gaskcls, meat al_d
vegetable &awer\, icesloragebi n and a] [plaslicparls canbe
cleaned the same way. a llerclean i ng door gaskets, apply a thin layer
of petroleum jelly todae door gaskels at the hinge,,ide. This helps
heep the gaskels lwm sticking and hendmg out ol shape. Do not use
cleansing powder\ or olhcl abrasi', e cleaner'..
A old cIeanhlgcoMglasssheh e'. idlhot _v iterbecause01e extreme
temperature dit't)reoco ma3 cause them {o break.
To help prevent odors, leave an open box of baking soda in the
rear of the refrigerator, on the top shelf. Change the box exery 3
months. An open box of baking soda in the freezer will absorb stale
freezer odors.
Do not wash any plastic parts from your refrigerator in
your automatic dishwasher.
Drain opening in freezer compartment. [
During yearly cleaning, remove bottom ffeez_
t,asket and flush a solution of baking soda
1teaspoon (5 ml) and 2 cups (500 ml) of hot
(not boiling) water through the &ain lilre w
the help of a meat baster. This will help eliminate
odor and reduce the 1 ikelihoodof a clogged drain
line. If drain become clogged, use a meat baster
and baking-soda-and-water solutkm to force the
clog through the drain line.
Behind Refrigerator
Caw should be taken in mo_ ing yi'mr refrigerator a\va_ from the wall
Alllypesof fh_oreovedng_canbedamaged, particularly cushioned
co\ eri ngs and those _ hh embossed surQtces.Pul_ the tel dgm ator
stud gh t out and return it Io pos ition b} pushing i t straight in. Moving
?,our rel rigerator in a side direction may rest*It in damage to }our floor
co'*eriug or refiigerator.
Whcu pushing the reh'igerator back. makesureyou don't rollover the
power cord or icenlaker bupply lille {ou some model\).
Under Refrigerator
For most efficient operation,
you need to keep the area under the
refrigerator clean. Remove the base
gri tie arid either sweep away or
_,acuum up dust that is readily
accessib]e. For best resu Its. use a
brush specially designed lbr this
purpose. It is a_,affable at most
app! i ante parts stores. This easy
cleaning operation should be done
at least once a year. Clean the condenser coils
at least once a year.
(<o;uimt_'d _l#xl pugs9
11

CARE AND CLEANING
(continued)
Drawer Removal
Drawers will stop bel'(ire coming all the \_ aNout of the refi'igerator to
help prevent content', fromspilling onto the floor. Drawers caneasily
bcle moved by tilting up slightly and pulling past the-stop" location.
T{} remove drawers when the refrigerator door cannot be opened
all the way:
1. R¢IIIO\ 0food flora the dr;lwer alld itN COVk_I ", II" _Otll' l'eI'l'ige[atoF ha",
adillstable sheh es, lemove food fi'om the holtoll/shelf and
temporarily relocate it higher up in cabinet.
2. Remove the flexible gasket at the
rear of Ihe top drawer. Lifl each
clld slraigb Ul', until the slots on
the gasket are free of the drawer
support tabs.
3. Pull the drawer parh_ a}out. Reach
in. push the rear of the gl ass Lip: at
the salne time,push it back until it <
clears t'rent-corner retainer, i
4. "tilt amt remove tile cover,
7, Tilt and remo', e the ceven
A', old clealfing the cold glass cover
with hot water because the extreme
lenq)erature difference maycauseit
to break.
8. Tilt andremove the drawer.
After cleaning, replace in reverse
order. When replacing the dl-awer
make sure you slide it through both
drawer guide on the lefl side.
Drawer gulOes
5. Pull the drawer I'or\_ ard. lift the
front to clear slops, and remm e the
drawer. I [ the re frigeralor door
doesn't open completely, pull the
draw ¢rouHinli I it hit', the door.
Then lift the drawer up until it is
higher than the dl'z!\_,e[ supports,tilt
it and lake it ouL
6. 11' tape hold theCo_ertibleMeat
Drawer {Oll some models)coverto
the drawer- supports, remove the
lape. Pull drawer partway out. Reach
in. push the real'of the ghlss up and.
at the _ame t i me, back, unti lh e ]ear,;
frollt COlq]el relail/ers
When drawer- and covers are back in
place, reinstal/gasket at the rear el' the
top draw el. Fit the er!! of the plastic
drawer _upport into the slot on the
gasket, with the rubber gasket flap
facing you. Make sure the gasket
snaps mtc,place.
Light Bulb Replacement
Fresh Food Compartment-l)pper Light
1. I, npJug refrigerator.
2. Pullofl the lemperaturecuntrol
knobs,
3.1}ulibotlom 01' thclightshiehl
down and forw -d. then rotale
(tic top up md off.
After replacing with samesize
bulb. reinstal/the light shield+
Fresh Food Compartment-Low er Light (on some models)
l'hJ',light is located behind a shield at the rear of" the fiesh food
CoHtpaFt meilt
1. [ Jnplug the rel'rigemmr.
2. Grasp the top edge of' the shield and lift it up and forward io fiee it'
top edge.
3. After replacing with the same size bulb. hooh the top ol' the shield
back in place.
Freezer Compartment
1. [ hi'Jug the refrigerator.
2. Remove the shell" just below light sMeld, (['he shell"
v_ill be easier to remo\ e it' it is emptied first. )
3, Pull the light shield toward you to reach the bulb.
After replacing with same size bulb. remstallshelf and plug the
refi'igerator blck in.
12

PREPARATION
Preparing for Vacation
For shorter vacations, remove perishable foods and leaxe controls
atregu I ar _ett i ngsHow ever. it' room temperature i sex peeled to
drop below 60°t. ( 1 (',_'C.),li_llowsml_dnstructiol> in Temperature
Control seclion.
For long vacations or absences, relllove food and shut oll power {o
refrigerator. MoxetheFrcshFood control Io()FF position andcIean
interiorx_ithbaking soda solution of I tablespoon ( 15 m 1)of"soda to
i quart ( tL) of watch Wipe dry. To prevent odors, lea_e open box el
soda in _efrigeralor.I.ea\ e doors open.
Move the icemaker (on some modcls)l\,eler am1 t{_STOP (up)
posil[on and be sure to shtlt off waler suppl) to fl_erefrigeratttr.
Preparing to Move
Disconnect power cord from wall outlet, remove all I\_od.and clezm
and dry the interior.
Secure all loose items such a_grille.shelv es and sloragepam, by
lapi figthem securely in place to prevent damage.
Be sure refrigerator slays in llpt'i_hl position during actuallno',ingaild
in xan. Refrigerator must be secured in *,anto prevent lno,.elnent.
Protect _utslde of refrigerator wilh blanket.
Refrigerator Location
Do not install refrigerator where temperature will be below
60°F: ( 16'C° ) because it _ill not run of'tea enough to maintain
proper lemperalures.
Do install it on afloor strong enough to support a fully loaded
refrigerator.
Alsc,seel'inergy-SaxingTips regarding location.
Clearances
AIh_wthefollox_ingclearancesforeaseofinstallation. proper air
clrcu 1 ation, plumbing and electrical connect ¢,ns.
Side'...................................................................... /8 t l:, mm)
Top .................................................................... 1" (25 ram)
ILtbuilt in.al/,m" 7/8" [22 mml tor/_i, vec<_vers'.)
Bach................................................................ Ii25lmn)
ll'the refi'igerator i againstawal! on either side. allow the
i_t[]ot_,ing door" clearances:
for22'and24'models....................................... 3/4"(1%rm_)
tbr27'm0&li.................................................. /"i 38mini
Rollers
._.diustablcrollel<, behind the base I
griile enable you to mo_e the I " "i" _7S7........refrieeralor a,.vax l'rolll Ihe \x, al] I'Ol
cleaning. "1hese rollers should be set i,
so the reh-i_erator resls firmly on the
,leer,,,asso,."tha,
c!ose autolnalicall'_ from i.lhalf-'aax-
open position, there is a built-in till
fnm_ the front Io the back el' the
cannel. Side-by-side refrigerators also
have specially designed door hinges that lift both doo]', slighll 3 x_hen
opened, allowing the folce of gravity to help close them securely
Leveling
To adjust rollers, remove the base
grille by granting it at the bottom and
pulling it out.
Turn the roller adjusting screws
clockwise toraise the refi'igerator.
countcrc ]_ckv, i seIo Io,aer it. t ' se an
adjustable wrench (3/8" [9 mm] hex
held bolt) or pliers.
When le,.cling. ),ou k:altilllpl'o\ e door closure b) rat sing the front
appro ximalely 5/8" (I 5m m ) fi*omthe floor.
To replace base grille, align llrtsngs on back of grille whh clamp,, in
cabi _leIaad push l'or_ ard mm Igrt lie ,malt. into pl ace
Water Supply to ]cemaker.ms nelnodels_
If your refT'igeralol'tlasall Jc01tKtkcr.or it'}Ou p[all to add anicemaker later, the i¢cmaker xtil{ha_e
Io be conuectcd to a cold '. 'aier ]iRe. A water supply hit containing copper lul-_mg,shill _>ILl"_g{)__2.
fittings and instructions I_a'_allable at exlra co,,t from }our dealer, lhere should be '.,ufficiem tubing
tor the icelllakerl:rolt_,!.hecoldv,, alter stlppl}ti',all,.l:_.}OLltOll/o',.el}te ret'rigeralor out frolll the v, all
se_eral I)et ( approxilll;llct} gJt2e/[ 244 cm!of] /4" [6 mm Ic_>PlX'rrobing in lhree i ()-inch [25 cm]
diameter cot 1\/.
13

INSTALLATION REQUIREMENTS
IMPORTANT... PLEASE READ CAREFULLY
How to Connect Electricity
For persona_ salety, this
appliance must be
properly grounded.
The m,w er cord of tiff s
appli ante is equipped _ i ib a
3 F,rong (grounding) plug
which mate _ ith a smndatd
B-prong ( grounding tx_ail
outletlo ml n imizelhe
possibilily of electric shock
hazard l}om this appliance.
Preferred method
Insure proper
grounding exists
before using.
Have the wall outlet and circuit checked by a qualified electrician to
nmke sure the outlet is properly grounded.
Where a standard 2-prong wall outlet is encountered, it is your
personal responsibility and obligation to have it replaced with a
properly grounded 3-prong wall outlet.
DO NOT. UNDER ANY CIRCUMSTAN(ES, CUT OR REMOVE
THE THIRD (GROUND) PRONG FROM THE POWER CORD.
Use of Adapter Plug
l"Iccatl_,e 01' potential
hazards ttllder certain
condition\," _ e strongly
recoil/mend agatn stuse
of at] adapter plug.
Hov_ c\ er. it' you still dect
rouse an adapter, \\ here
Iocalcodes permit, a
TEMPO P()RAR'_
(XINNECI'ION ma5 be
made to a properly
grounded 2-prong
\% ill {oIIt ICE b} tlSC I)l
a IJI Jistcd adaI)ter
avai htble at llIO_t lOt[I[
hardware q{ol'e >..
Temporary Method
(Adapter plugs not
}ermitted in Canada.)
Align large prongs/slots.
Insure propergroundin9 and firm
connection exists before use.
The larger _h)t in the adapter must be aligned with the larger slot in
the',_ all out!ct tOprtw ide proper polarity in the connection of the
po_ er cord.
[]se {}1"an adapter pt ug _vilI increase the clearance needed fl)r the back
of the _e fri_erator.
CAUTION: Attaching the adapter ground terminal to a wall outlet
cover screw does not ground the appliance unless the cover sc_ex_ is
recta< and not insulated, and the wall outlet is grounded through the
house wiring. You should have the circuit checked by a qualified
electrician to make sure the outlet is properly grounded.
When disconnecting the power cord from the adapter, alwayshok/
the adapter in place with one hand while pulling the power cord phlg
with the other hand. If this is not done, the adapter ground temlinal is
very likely to break with repeated use.
Should the adapter ground terminal break, DO NOT USE the
appliance until aproper ground has again been established.
Electrical Requirements
The refrigerator should always be plugged into its own individual
electricaloutlet which has a oha_.,.erating that matches the rating plate.
'!-his pro\ides the best performance and also prevents overloading house
wiring circuils hichcould cause a firehazard fi'om overheated wires.
Use of Extension Cords
Because of potential safety hazards under certain condition, we
strongly recommend against the use of an extension cord. Howe'. er. it'
you still elect to use an extension cord, it is absolutely necessar,,, that it
be a UI.-listed 3-wire grounding type appliance extension cord ha_ing
a grounding type plug and outlet and that the electrical rating of the
cord be 15 amperes (mininmm) and 120 volts.
14

I WATER LINE INSTALLATION INSTRUCTIONS
I
[CAUTION:
.If you use your refrigerator before connecting
the water line, make sure the icemaker feeler arm
is kept in the STOP (up) position.
* Do not install the icelnaker robing in areas
where temperatures tall below freezing.
• When using any electrical device (such as a
power drill) during installation, be sure the device
is insulated or wired in a manner to prevent the
hazard of electric shock.
.All installations must be in accordance with
local plumbing code requirements.
WHAT YOU WILL NEED
.A cold water supply is required for automatic
icelnaker operation. The water pressure must be
between 20 and 120 p.s.i.
.Power drill, unless you have a self piercing valve.
•Copper tubing, 1/4" (6 mm) outer diameter to
connect the refrigerator to the water supply. Be
sure both ends of the tubing are cut square.
To determine how much copper tubing you need:
measure the distance from the water valve on the
back of the refrigerator to the water supply pipe.
Then add 8 feet (244 cm). Be sure there is
sufficient extra tubing (about 8 feet [244 cm]
coiled into 3 turns of about 10 inches [25 cm]
diameter) to allow the refrigerator to move out
from the wall after installation. Do not use plastic
tubing orplastic fittings because the water supply
line is under pressure at all times. Also, certain
types of plastic tubing may become brittle with
age and crack, resulting in water leakage.
•Shutoff valve to connect to the cold water line.
The shut-off valve should have a water inlet with a
minimum inside diameter of 5/32" (4 rain) at the
point of connection to the COLD WATER LINE.
Saddle-type shut-off valves are included in many
water supply kits. Before purchasing, make sure a
saddle-type valve complies with your local
plumbing codes.
•Two 1/4" (6 ram) outer diameter compression
nuts and 2 ferrules (sleeves) to connect the
copper tubing to the shutoff valve and the
refrigerator water valve.
•If your existing water line has a flared fitting at
the end, you will need an adapter (available at
plumbing supply stores) to connect the water line
to the refrigerator OR--you can cut off the flared
fitting with a tube cutter and then use a
compression fitting•
WARRANTY INFORMATION
This water line installation is not warranted by
the refrigerator or icemaker manufacturer.
Follow these instructions carefully to minimize
the risk of expensive water damage.
[] SHUT OFF THE MAIN WATER SUPPLY.
Turn on the nearest faucet long enough to clear
the line of water.
inl
L_JINSTALL THE SHUTOFF VALVE ON THE
NEAREST FREQUENTLY USED DRINKING
WATER LINE.
Typical ways to connect to water supply
Through floor Under sink Through wall to In crawl
to basement to co_d utility room cold space under
cold water pipe water pipe water pipe house
a. Choose a location for the valve that is easily
accessible. It is best to connect into the side of
a vertical water pipe. When it is necessary to
connect into a horizontal water pipe, make the
connection to the top or side, rather than at the
bottom, to avoid drawing off any sediment from
the water pipe.
b. Drill a 1/4" (6 ram) hole in the water pipe,
using a sharp bit. Remove any burrs resulting
from drilling the hole in the pipe. (Do not drill a
hole if the valve is a sell-piercing type.)
c. Fasten the Pipe -- Washer
shutoff valve to cLarnp\
the cold water pipe SaddletW,"Xcg
with the pipe clamp, shutoff" _}_'_
valve
d. Tighten the ,_
clamp screws until the (,_#
sealing washer begins to
swell. Do not overtighten
or you may crush the
copper tubing.
hflet
/end
Vertical
-- cold water
i pipe
!{ IHIIHt!e'J Ht_Xl /}gik*¢ ')
15

WATER LINE INSTALLATION INSTRUCTIONS
(continued)
L...I ROUTE THE COPPER TUBING BETWEEN THE
COLD WATER LINE AND THE REFRIGERATOR.
Route the tubing through a hole drilled in the
floor or wall (behind the refrigerator or adjacent
base cabinet) as close to the wall as possible. Be
sure there is sufficient extra tubing (about 8 feet
[244 cm] coiled imo 3 turns of about 10" [25 cm]
diameter) to allow the refrigerator to move out
from tile wall alter installation.
[] CONNECT THE COPPER TUBING TO THE
SHUTOFF VALVE.
Place the compression
nut and ferrule (sleeve)
onto the encl of the
tubing and connect it to
the shutoff valve. Make
sure the tubing is fully
inserted into the valve.
Tighten the
nut securely.
Compression nut
Saddle type _tu_l
shutoff valve I
Packing nut
Ferrule
Outlet valve (sleeve)
compression
5L_TURN ON THE WATER AND FLUSH OUT
THE TUBING.
a. Turn the main water supply on and flush out
the tubing until the water is clear.
b. Shut the water off at the water valve after
about one quart of water has been flushed
through the tubing.
r-z] CONNECT THE COPPER TUBING TO
THE REFRIGERATOR.
Before making the connection to the
refrigerator, be sure the refrigerator power
cord is not plugged into the wall outlet.
Vv_ recommend installing a water filter
(available at Service and Parts Centers) if your
water supply has sand or particles that could clog
the screen of the refrigerator's water valve. Install
it in the water line near the refrigerator.
a. Remove the plastic flexible cap from the
water valve.
b. Place the 1/4" (6 mm) Tubing
Copper tubing clamp
compression nut
and ferrule
(sleeve) onto the
end of the tubing Ferrule
as shown. , (sleeve)
c. Insert the end
of the copper
tubing into the ti4" (6 mm)
water valve Compression nut
connection as far
as possible. While holding Refrigerator connection
the tubing, tighten the fitting.
d. Fasten the copper tubing into the clamp
provided to hold it in a vertical position. You may
need to pry open the clamp.
[] TURN THE WATER ON AT THE
SHUTOFF VALVE.
Tighten any connections that leak.
[] PLUG THE REFRIGERATOR POWER CORD
INTO A GROUNDED ELECTRICAL OUTLET.
[_ SET THE ICEMAKER FEELER ARM TO THE ON
(DOWN) POSITION.
The icelnaker will not begin to operate until it
reaches its operating temperature of 15" E (-9" C.)
or below. It will then begin operation automatically
if the icemaker is in the ON (down) position.
NOTE: The icemaker may double-cycle when it
first starts, causing some water spillage t_om the
icemaker into the ice bucket. This is normal and
should not happen again. The first few batches of
cubes should be thrown away, so that remaining
impurities in the water line will be flushed out.
[] MOVE THE REFRIGERATOR BACK TO
THE WALL.
Arrange the coil of copper tubing so that it does
not wbrate against the back of the refrigerator or
against the wall.
16

QUESTIONS?
USE THIS PROBLEM SOLVER
PROBLEM POSSIBLE CAUSE
REFRIGERATOR
DOES NOT OPERATE
MOTOR OPERATES
FOR LONG PERIODS
MOTOR STARTS &
STOPS FREQUENTLY
VIBRATION OR
RATTLING
• May be in defrost cycle when motor does not operate for about 30 minutes.
• Temperature control in OFF position.
.If interior light is not on, refligerator may not be plugged in at wall outlet.
.If plug is secure and the refrigerator still fails to operate, plug a lamp or a small
appliance into the same outlet to determine if there is a tripped circuit breaker or
burned out fuse.
.Modern refrigerators with more storage space and a larger freezer
compartment reqmre more operating time.
• Normal when refligerator is first delivered to your home--usually requires 24
hours to completely cool down.
• Large amounts of food placed in refrigerator to be cooled or frozen.
• Hot weather frequent door openings.
• Door left open.
• Temperature controls are set too cold. Refer to instructions for use
of Temperature Controls.
• Grille and condenser need cleaning• Refer to Care and Cleaning page.
• Check Energy-Saving Tips.
• Temperature control starts and stops motor to maintain even temperatures.
• If refrigerator vibrates, more than likely it is not resting solidly on the floor and
flont roller screws or flont leveling legs need adjusting, or floor is weak or uneven.
Refer to Rollers section on Installation Requirements page.
• If dishes vibrate on shelves, try moving them. Slight vibration is normal.
NORMAL OPERATING SOUNDS
These sounds are normal and do not indicate a need for service.
The new high efficiency compressor runs thster and will have a higher
pitch hum or pulsating sound while operating.
Defiost timer and refligerator control clicks on and off.
The fan circ}_lating air inside the fieezer which keeps the
temperatures throughout \
Water dropping on the defrost heater causing a
sizzling, hissing or popping sound during the defrost cycle.
The flow of refrigerant through the freezer cooling __
coil sounds like boiling water or a gurgling noise. _-----j
Cracking or popping of cooling coils caused by expansion
m_d contraction during defrost and refrigeration following defrost.
Water dripping as it melts from the evaporator
and flows to the drain pan during the defrost cycle.
lcemaker (on some models)
"i_e icemaker water valve will buzz when the icemaker fills
wilh water. If the feeler arm is in the ON (down) position it will buzz even if it has
not yet been hooked up to water. Keeping the feeler arm in the ON (down) position
before it is hooked uj_ to water can damage the icemaker. To prevent lhis, raise the
feeler arm to the STOP (up) position• This will stop the buzzing.
The sound of cubes dropping into the bin and water running in pipes as icemaker refills•
J
co. inuedJ ,rt I) k'_>)
i7
t_
"I
_q
_w
[

PROBLEM SOLVER
(cominued)
PROBLEM POSSIBLE CAUSE
HOT AIR FROM
BOTTOM OF
REFRIGERATOR
DOOR NOT CLOSING
PROPERLY
FRESH FOOD OR
FREEZER COMPARTMENT
TEMPERATURE
TOO WARM
FOODS DRY OUT
FROST OR ICE
CRYSTALS ON
FROZEN FOOD
SLOW ICE CUBE
FREEZING
ICE CUBES HAVE
ODOR!TASTE
(on some models)
AUTOMATIC
ICEMAKER
DOES NOT WORK
(on some models)
CUBE DISPENSER
DOES NOT WORK
(on some models)
• Normal air flow cooling motor• In the refrigeration process, it is normal that heat
be expelled in the area under the refrigerator. Some floor coverings will discolor
at these normal and safe operating temperatures• Your floor covering supplier
should be consulted if you object to this discoloration•
•Door gasket on hinge side sticking or folding over. To correct, put a small
amount of petroleum jelly on face of gasket•
.Temperature control not set cold enough. Refer _o Temperature Control section.
• Warm weather frequent door openings•
•Door left open for long time.
•Package may be holding door open.
• Foods not covered, wrapped or sealed properly•
• Door may have been left ajar or package holding door open.
• Too frequent or too long door openings•
•Frost within package is normal•
•Door may have been left open.
• Turn temperature of freezer compartment colder.
•Old cubes need to be discarded.
•Ice storage bin needs to be emptied and washed,
.Unsealed packages in refrigerator and/or freezer compartments may be
transmitting odor/taste to ice cubes.
• Interior of refrigerator needs clean ing--refer to Care and Cleaning section
• Poor-tasting incoming water. Install a water filter see Water Filter
Accesso_ T section.
• ON-STOP control in STOP (up) position.
•Water supply turned off or not connected.
• Freezer compartmenttoo warm.
• Cubes too small--water shutoff valve connecting retiigerator to home
water line may be clogged.
• Sometimes cubes fuse to the side of the ice mold and hold the feeler arm in the
STOP (up)position. Remove this ice to restart the icemaker.
• When reaching for cubes by hand, you may have pushed the feeler arm into the
STOP (up) position by mistake.
• Piled up cubes in storage bin may cause icemaker to shut off too soon. With
icemaker feeler arm in-STOP (up) position, level cubes in bin.
• No ice cubes. Remove storage container. If cubes are frozen to wire arm,
remove cubes.
• No ice cubes• Icemaker turned off or water supply turned off.
• Irregular ice clumps in storage container• Break up as many as you can with
fingertip pressure and discard the remaining clumps•
18

PROBLEM POSSIBLE CAUSE
WATER HAS POOR • If the water dispenser has not been used for a long time, dispense water
TASTE/ODOR in regular manner until all water in the system is replenished with fresh water•
(on some models) •Poor-tasting incoming water• Install a water filter see Water Filter section•
WATER IN FIRST
GLASS IS WARM
(on some models)
WATER DISPENSER
DOES NOT WORK
(on some models)
DIVIDER BETWEEN
FRESH FOOD AND
FREEZER COMPART-
MENTS FEELS WARM
•Allow about 24 hours for water to cool to proper temperature after
refrigerator is first installed.
•If water dispenser has not been used for a long time, water in first
glass will not be as cool as in succeeding glasses•
• If the water system has been drained, allow several hours for replenished
supply to chill.
•Water supply line turned off or not connected•
•Supply line may be clogged with sediment•
•If no water is dispensed when the refrigerator is first installed, there may be air
in the water system• Press the dispenser pad for at least two minutes to remove
trapped air from the water line and to fill the water system.
•Normal warmth is created by automatic energy saver system circulating warm
liquid around front edge of freezer compartment to help prevent condensation
on outside of refrigerator in hot, humid weather•
MOISTURE FORMS .Not unusual during periods of high humidity•
ON OUTSIDE OF
REFRIGERATOR
MOISTURE
COLLECTS INSIDE
WATER ON IzdTCHEN
FLOOR OR ON
BOTTOM OF FREEZER
REFRIGERATOR
HAS ODOR
INTERIOR LIGHT
DOES NOT WORK
•Too frequent or too long door openings•
•In humid weather, air carries moisture into refrigerator when doors are opened•
•The drain in the bottom of the refrigerator may be clogged• Remove any ice on
the freezer bottom and clean the drain• Refer to Care and Cleaning section•
• When using the dispenser use a glass no taller than six inches (15 cm) tall. A taller
glass may be jamming cubes in the funnel chute• They can fuse inside the chute
and drop out later, leaving water or ice on the floor•
•Foods with strong odors should be tightly covered•
•Check for spoiled food.
•Interior needs cleaning. Refer to Care and Cleaning section•
•Defrost water system needs cleaning.
•Keep open box of baking soda in refrigerator; replace every 3 months•
•No power at outlet•
•Light bulb needs replacing. See Care and Cleaning section•
If you need more help••• In the United States call, toll free:
GE Answer Center", 800•626•2000 consumer information selwice
In Canada: Manager, Consumer Relations
_645 Skymark Ave., Mississauga, Ontario, Canada L4W 4H2
19

We'll Be There
With the ][)ttr('|laSe..... ()f_our_ new (;F. [pa") liance,• receive, the assurance that i['vou c_er need inforntat iol
or assistance from (,E, w_:ll )ed_cle. All you have iodo is call-0r write!
In-Home Repah"Service IntheUnitedStates:800-GE-CARES(800-4324737)
_.(;E(o is nc sc v(,,'])o i'ssi() tl*_Jll I)ro'd(lcexpcrllcpairst, lxicc, schcdlflc,:tal a tinlclhat'scom, cl_icl_l [i>rvou..M;ll/v(;t" ( o)lstnllcl
S(q \i{'c COtl/l);lll}-oper;tlc(t lo(zlliolls ot_k_l' }()tl S(?l'X ic(? [()d_lv of [o1111 )IIO_A, OY _ll _,()111 { Oll\('lli(_ll( C ( 7:0(1 _t,l/l. Io 711111 l).Ill. _cckdax s, 9:011
;t.1//. ll) 21t10 l).l//. N;tlIII'(1;I}S), (){11" [_t( IoI \-llained [ec]mki_itls know v()tn-appii:mcc inside and oul- so illos[ i ci);lil?. (311 })c h_mdlcd inilN
one xisit.
InCanadaconsultyourlocaltelephonedirectoryfortheCameoServiceorAuthorizedServiceCenter
nearestyou.
GEAnswerCenter®intheUnitedStates:800.626.2000
\Vhmcx< r your qucsti(m ab()ul may G|' m:!i()r aI)plim1( e, ( ;1" .Mls_el C< ntvr inh)rmalion soy\ice is axni!;ible I() h('lp, x*_)ur {all--aiM x()m
queslio)l--will b(' ansx_eled pl(mq)ll} and (<mrteousl}. And you can call am time. (;E .\)iswc)(;cmc) se)x ice is ()p('n 21 h< )ms ada_. 7 (1;I_s
In CanadacontactManager,ConsumerRelations,Cameo,Inc., 2645SkymarkAvenue,Mississauga,
Ontario, CanadaL4W4H2
For CustomersWithSpecialNeeds... IntheUnitedStates:800.626.2000
['})Oil I'_.'(_! I(*Sl, (;|", _dll pro\ idc l')r_tillc ('onI)()Is fi)r a val ict?. ()f (;K applialwcs, and a 1)r()(hurc I<)assist ill plmming a Ba)Tiev fi'cc kit( hen ILl
p(:* soils wilh limited nlol)ilitx. F() ()btai)) tiles(' itclns, ['rec ()1chaise, cal! N00.(_21"}.201)0.
(;()llS[lll/ClS \\'iltl impailcd |)caring ot speech x_ll<)have access Io a ll)l) or ac<)nx cntiol_a[ lclclx pcx_ritcr max {all 8011 II )114 ;t'.\( : (,S0(b82,3-
13221 Io rcqu('sI il)li))'mali(m o)sc)_ ice.
InCanadacontactMona#or,ConsumerRelations,Camco,Inc.,2845SkymarkAvenue,Mississauga,
Ontario,CanadaL4W4tt2
ServiceContracts IntheUnitedStates:800-628-2224
")'()u (;tll ha\(' the s('( lll'c lcclill_ IhaI (@ (_OI]SI.1111CI,_UI'V]('(_' will still Be thc)'(' afler yotlr \_,AI'laIHV {'X])ilt?S. Pl)I ('h_ls(' _l( ;11 ('()It{! _1( { %hil(" \( )tll
WmT:mtx is Still m e[[_.:('l and \'()_l'[[ rcccb, e a s\lbstantial (lisc()unl. \\'ith a nnfltiplc-y(':u ('onll;t(!, }()11 "112 ;ISMI1 ('d O| ttltUl't" SOl'\ i( C AI )Od;t\ "_
p, ices.
800-461-3638In Canada
PartsandAccessoriesIntheUnitedStates:800-628-2002
Individuals qualified to service flmwown appliances m halt c(d(d )_ is ta'(cs_om:s s('t_t db _cl}_ I_ ) lheh h_)mc, t he ( _1-_pm > s_ "<cm
pr( )xi(l('_ a,. tess t0(n(r47,000 palls...a md all ( ;i'i ( ;cnuim' Renewal P:trls are lull_ x\_t1"1dl)I(_(t, f-IS.-., Xlasa r( :ard a)*d Dis( ()_t t<m (is a) e
ac,, (:[)l('(l
[ser maintenance instructions contained in this booldet cover procedures intended to be performed I)y an), user• Other ser_dcing generally
should be referred to qualified service personnel. Caution must be exercised, since improper servicing may cause unsafe operation.
InCanadaconsultyour local telephone directory for the CameoService orAuthorizedServiceCenter
nearestyou.
2O
This manual suits for next models
5
Table of contents
Other GE Refrigerator manuals

GE
GE GTH18ISXSS User manual

GE
GE Profile ENERGY STAR PFCS1NJW Manual

GE
GE Profile PSCS5VGX User manual

GE
GE ZISW/B480DX User manual

GE
GE GTH18JBR User manual

GE
GE 197D3351P020 Operating instructions

GE
GE GPE12 Original instructions

GE
GE GSH25JSXSS Manual

GE
GE GTS18KCPWW Assembly instructions

GE
GE HTS16BBRL Operating instructions

GE
GE GML03GAEBS Service manual

GE
GE Profile PSW26RSWSS User manual

GE
GE GSHS5PGXSS Manual

GE
GE GSS25QSWSS Manual

GE
GE Monogram ZISS480NRSS User instructions

GE
GE GE Profile Arctica CustomStyle PSH23SGN User instructions

GE
GE PSE26KGEGEWW Safety guide

GE
GE 21 User manual

GE
GE Cafe CFSP5RKBSS Assembly instructions

GE
GE Profile PSH25PSWSS Manual