GE 28128 Series User manual


: This product meets the applicable Industry Canada technical specications.
Operation is subject to the following two conditions: (1) This device may not cause interference,
and () This device must accept any interference, including interference that may cause
undesired operation of the device.
The equipment must be installed using an acceptable method of connection. The customer
should be aware that compliance with the above conditions may not prevent degradation of
service in some situations.
Repairs to certied equipment should be made by an authorized Canadian maintenance
facility designated by the supplier. Any repairs or alterations made by the user to this
equipment, or equipment malfunctions, may give the telecommunications company cause to
request the user to disconnect the equipment.
Users should ensure for their own protection that the electrical ground connections of
the power utility, telephone lines and internal metallic water pipe systems, if present, are
connected together. This precaution may be particularly important in rural areas.
: Users should not attempt to make such connections themselves, but should contact
the appropriate electric inspection authority, or electrician, as appropriate.
: This equipment may not be used on coin service provided by the telephone company.
This equipment generates and uses radio frequency energy which may interfere with
residential radio and television reception if not properly installed and used in accordance with
instructions contained in this manual. Reasonable protection against such interference is
ensured, although there is no guarantee this will not occur in a given installation. If interference
is suspected and veried by switching this equipment on and off, the user is encouraged
to try to correct the interference by one or more of the following measures: Reorient the
radio/television receiver’s antenna, relocate the equipment with respect to the receiver, plug
the equipment and receiver into separate circuit outlets. The user may also wish to consult a
qualied radio/television technician for additional suggestions. This equipment has been fully
tested and complies with all limits for Class B computing devices pursuant to part 15 FCC Rules
and Regulations.

Should your equipment cause trouble on your line which may harm the telephone network,
the telephone company, where practicable, may notify you that temporary discontinuance of
service may be required. Where prior notice is not practicable and the circumstances warrant
such action, the telephone company may temporarily discontinue service immediately.
The telephone company may make changes in its communications facilities, equipment,
operations or procedures where such action is required in the operation of its business. If these
changes are expected to affect the use or performance of your telephone equipment, the
telephone company will likely give you adequate notice to allow you to maintain uninterrupted
service.
Notice must be given to the telephone company upon termination of your telephone from your
line.
On the bottom of this equipment is a label indicating, among other information, the Ringer
Equivalence Number (REN) for the equipment.
The REN is useful in determining the number of devices you may connect to your telephone line
and still have all of these devices ring when your telephone number is called. In most (but not
all) areas, the sum of the RENs of all devices connected to one line should not exceed 5.
To be certain of the number of devices you may connect to your line as determined by the REN,
you should contact your local telephone company.
This telephone system meets FCC standards for Hearing Aid Compatibility.
Licensed under US Patent 6,47,009.
This equipment complies with FCC RF radiation exposure limits set forth for an uncontrolled
environment. This equipment should be installed and operated with a minimum distance of 0
centimeters between the radiator and your body. This transmitter must not be co-located or
operated in conjunction with any other antenna or transmitter.”
For body worn operation, this phone has been tested and meets the FCC RF exposure
guidelines when used with the belt clip supplied with this product. Use of other accessories
may not ensure compliance with FCC RF exposure guidelines.

4
This telephone is compliant with the DECT 6.0 standard which operates in the
1.9GHz to 1.9GHz frequency range.
SEE MARKING ON BOTTOM / BACK OF PRODUCT
RISK OFELECTRIC SHOCK
DONOTOPEN
WARNING: TO
PREVENT FIRE OR
ELECTRICAL SHOCK
HAZARD, DO NOT
EXPOSETHIS
PRODUCT TO RAIN
OR MOISTURE.
THE LIGHTNING
FLASH AND ARROW
HEAD WITHIN THE
TRIANGLE IS A
WARNING SIGN
ALERTING YOU OF
“DANGEROUS
VOLTAGE” INSIDE
THE PRODUCT.
CAUTION: TO REDUCE THE
RISK OF ELECTRIC SHOCK, DO
NOT REMOVE COVER (OR
BACK). NO USER
SERVICEABLE PARTS INSIDE.
REFER SERVICING TO
QUALIFIED SERVICE
PERSONNEL.
THE EXCLAMATION
POINT WITHIN THE
TRIANGLE IS A
WARNING SIGN
ALERTING YOU OF
IMPORTANT
INSTRUCTIONS
ACCOMPANYING
THE PRODUCT.
CAUTION:

5
Important InformatIon .................................2
Interference InformatIon .............................2
telephone network InformatIon .................3
ren number ...............................................3
hearIng aId compatIbIlIty (hac) .................3
lIcensIng .....................................................3
fcc rf radIatIon exposure statement ........3
InformatIon for dect product ..................4
IntroductIon ...............................................8
Before You Begin .............................................8
Parts CheCklist ............................................8
telePhone JaCk requirements.........................9
InstallatIon .................................................9
Digital seCuritY sYstem ...................................9
imPortant installation guiDelines ..............10
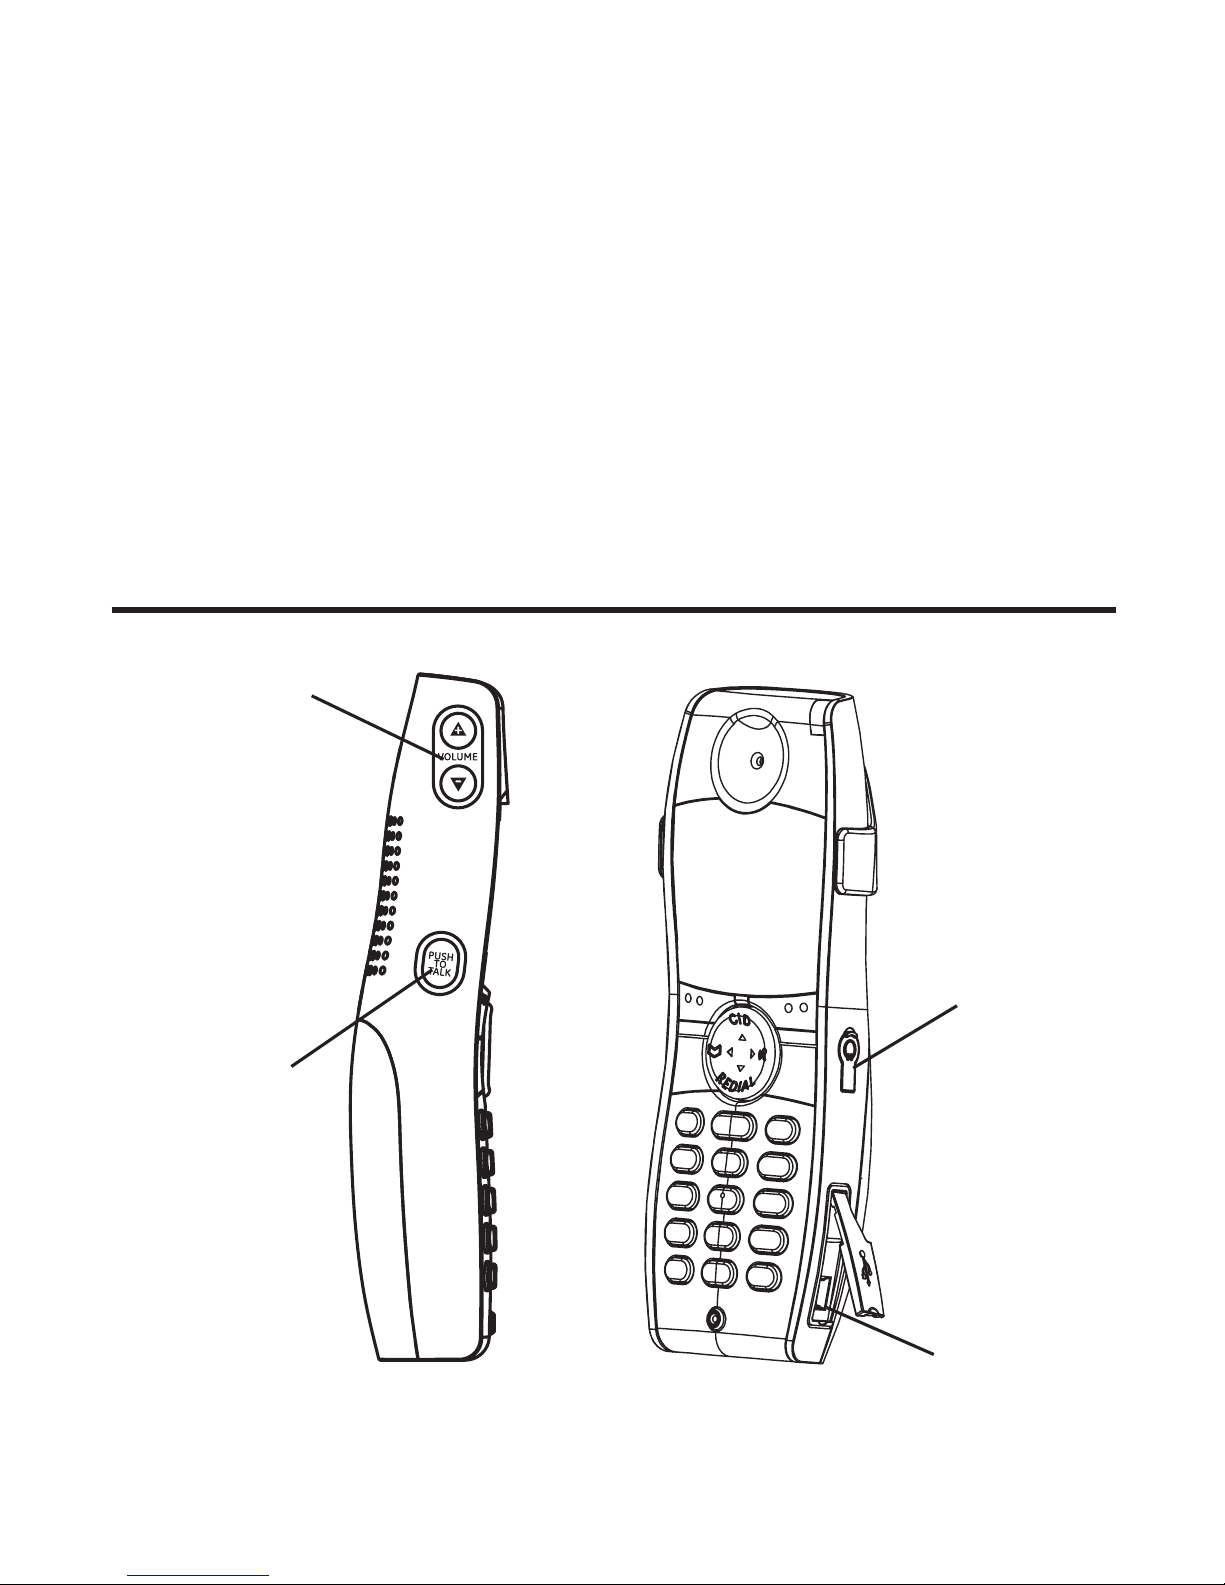
handset layout .........................................10
handset layout .........................................11
base layout ...............................................12
InstallIng the phone ..................................13
installing the hanDset BatterY ...................13
usB CaBle installation ................................13
Base station ....................................................14
Wall mounting ..............................................15
answerIng system setup ............................15
setting the VoiCe PromPt language ..........15
language ....................................................16
reCorDing the outgoing announCement ..16
reVieWing the announCement ......................16
auDiBle quiCk setuP guiDe ..........................16
programmIng InformatIon .........................17
text entrY .............................................17
programmIng the base ...............................17
ansWerer .........................................................17
ansWerer on/off ....................................17
seCuritY CoDe ............................................18
message alert ...........................................18
rings to ansWer .......................................18
message length ........................................19
alarm ...............................................................19
set alarm time ..........................................19
snooze ........................................................20
set CYCle time ...........................................20
set alarm meloDY ....................................20
Phone settings ...............................................20
language ....................................................21
Date/time ...................................................21
set area CoDe ...........................................21
tone/Pulse .................................................22
Default setting .........................................22
sounD settings ..............................................22
equalizer ....................................................22
ringer tone ...............................................23
ringer Volume ...........................................23
keY tone .....................................................23
Bluetooth® setuP .........................................24
ConneCt (anD Pair) ...................................24
mY DeViCes .................................................24
mY Base ......................................................25
programmIng the handset .........................25
alarm ...............................................................25
set alarm time ..........................................26
snooze ........................................................26
set CYCle time ...........................................26
set alarm meloDY ....................................26
Phone setting ................................................27
language ....................................................27
set time ......................................................27
set area CoDe ...........................................28
hanDset name ...........................................28
registration ...............................................29
Deregistration ...........................................29
gloBal De-registration .....................29
Default setting .........................................30
sounD setting ................................................30
equalizer ....................................................30
ringer tone ...............................................31
ringer Volume ...........................................31
keY tone .....................................................31
answerIng system operatIon .....................32
ansWerer on/off .........................................32

6
mailBox inDiCator ..........................................32
leaVing a message .........................................32
sCreening Calls from the Base ...................32
memorY full ...................................................33
message PlaYBaCk ..........................................33
leaVing a memo ..............................................34
answerIng system remote access ..............34
remote aCCess from CorDless hanDset ....34
memorY full ...................................................35
telephone operatIon .................................35
Visual inDiCators ...........................................35
Charge/in use inDiCator on the
Base .............................................................35
talk inDiCator anD sPkr inDiCator on
the hanDset ...............................................35
VmWi inDiCator on hanDset anD the
Base .............................................................35
sPeakerPhone oPeration ...............................36
Volume settings .............................................36
making a Call.................................................36
lanDline Calls ...........................................36
Cellular Calls ..........................................37
Chain Dialing from memorY ...................37
ansWering a Call ..........................................37
lanDline Calls ...........................................37
Cellular Calls ..........................................38
reCeiVing a lanDline Call During a
Cellular Call ............................................38
reCeiVing a Cellular Call During a
lanDline Call ............................................38
reCeiVing lanD line Call anD Cell
Call simultaneouslY .................................38
aVailaBle oPtions During a lanDline
Call ..................................................................38
more............................................................38
interCom ................................................39
aVailaBle oPtions During a Cell Call ......39
more............................................................39
interCom ................................................39
transfer to Cell ..................................39
making a lanDline Call When talking
to Cell Call .........................................39
making a Cell Call When talking to
lanD line Call ......................................39
ConferenCe .....................................................40
Call timer .......................................................40
auto stanDBY ..................................................40
flash/Call Waiting ......................................40
last numBer reDial .......................................40
Page ..................................................................41
Paging from the Base/grouP Page .......41
mute .................................................................41
ringer Volume (shortCut) ............................41
Do not DisturB (DnD) ...............................42
caller Id (cId) .........................................42
Call Waiting Caller iD ................................43
CiD error CoDes ...........................................43
reCeiVing CiD reCorDs .................................43
storing CiD reCorDs (in CiD memorY) .....43
reVieWing CiD reCorDs ................................43
Dialing a CiD numBer ..................................44
formatting a CiD numBer Before
Dialing .............................................................44
storing CiD reCorDs into Phone Book ....45
Deleting a CiD reCorD .................................45
call records .............................................46
reCeiVeD Calls ...........................................46
DialeD Calls ..............................................46
phone book ...............................................47
for Base ..........................................................47
aDDing Phone Book entries ...................47
storing the last numBer DialeD ................48
inserting a Pause in the Dialing
sequenCe ..........................................................49
reVieWing Phone Book reCorDs .................49
eDiting a Phone Book reCorD .....................49
Deleting a Phone Book reCorD ..................50
managing the reCorD grouPing in Phone
Book .................................................................50

7
aDDing the Phone Book entries in DesireD
grouP ..........................................................50
Deleting the Phone Book entries in
DesireD grouP ...........................................50
set grouP ring .........................................50
Changing the grouP name .....................51
managing sPeeD Dialing reCorD ................51
aDDing the sPeeD Dialing numBer.........51
eDiting the sPeeD Dialing numBer .........51
Deleting the sPeeD Dialing numBer ......52
transferring the Phone Book reCorD
BetWeen hanDset(s) anD Base ........................52
extra features ..........................................52
room monitoring ..........................................52
interCom oPeration .......................................53
hanDset to hanDset interCom Call ......53
reCeiVing an interCom Call ....................54
Push to talk .........................................54
scheduler ..................................................54
aDDing a reminDer ....................................55
set snooze ............................................55
set CYCle time ......................................55
set alarm meloDY ...............................56
reVieWing anD eDiting the reminDer
reCorD ........................................................56
Deleting a reminDer reCorD ...................56
dect 6.0 handset management
software ..........................................57
connectIng the belt clIp ...........................57
connectIng optIonal headset ...................57
changIng the battery ................................58
battery safety precautIons .......................58
dIsplay messages .......................................59
handset sound sIgnals .............................60
troubleshootIng guIde ..............................61
telePhone solutions ................................61
Caller iD solutions .................................63
BatterY solutions .....................................63
hanDset management softWare
solutions ....................................................63
causes of poor receptIon ..........................64
general product care ..............................64
warranty ..................................................65
accessory InformatIon ..............................66
Index .........................................................67

before you begIn
Make sure your package includes the items shown here.

9
For there will be additional handset, charge cradle,
belt clip, battery pack and cover than shown.
For there will be additional handsets, charge cradle,
belt clips, battery packs and covers than shown.
For there will be additional handsets, charge cradle,
belt clips, battery packs and covers than shown.
For there will be additional handsets, charge cradle,
belt clips, battery packs and covers than shown.
For there will be additional handsets, charge cradle,
belt clips, battery packs and covers than shown.
telephone Jack requIrements
To use this phone, you need an RJ11C type modular telephone
jack, which might look like the one pictured here, installed in
your home. If you don’t have a modular jack, call your local
phone company to nd out how to get one installed.
dIgItal securIty system
Your cordless phone uses a digital security system to protect against false ringing,
unauthorized access, and charges to your phone line.

10
Important InstallatIon guIdelInes
• Avoid sources of noise and heat, such as motors, uorescent lighting, microwave
ovens, heating appliances and direct sunlight.
• Avoid areas of excessive dust, moisture and low temperature.
• Avoid other cordless telephones or personal computers.
• Never install telephone wiring during a lightning storm.
• Never install telephone jacks in wet locations unless the jack is specically
designed for wet locations.
• Never touch non-insulated telephone wires or terminals, unless the telephone line
has been disconnected at the network interface.
• Use caution when installing or modifying telephone lines.

11
3
6
5
5
4

1
3
4
5
6
3
4

1
InstallIng the handset battery
1. Locate battery and battery door which are packaged together inside a plastic bag
and are separate from the handset.
. Locate the battery compartment on the back of the handset.
. Plug the battery pack cord into the jack inside the compartment.
4. Insert the battery pack.
5. Close the battery compartment by pushing the door up until it snaps into place.
6. Place the handset in the charging cradle.
usb cable InstallatIon
For Ringtones, Calendar, and Phone Book download capabilities; make sure that the
provided USB cable is correctly installed into your computer (using the larger end of
the connector) and your handset (using the smaller end of the connector).

14
. Install 4 AAA-size alkaline batteries (not included) for back up power in the event
of a power failure.
• Press the tab to open the battery compartment door located on the back of
the phone.
• Insert the batteries as shown on the diagram inside the battery compartment.
• Insert the tabs into place and snap the battery compartment door closed.
LOW BATTERY
. Plug one end of the telephone line cord into the TEL LINE jack on the bottom of the
base and the other end into a modular jack.
base statIon
1. Choose an area near an electrical outlet and a telephone wall jack (RJ11C), and
place your cordless telephone on a level surface, such as a desktop or tabletop,
or you may mount it on the wall.

15
4. Plug the AC power converter into the electrical outlet and the DC connector into
the jack on the bottom of the base.
5. Place the handset in the base cradle. The CHARGE IN USE indicator turns on,
verifying the battery is charging.
6. Use the number keys to enter the year and the date.
7. Press the Next (SKL) button to move to Set Time menu.
. Use the number keys to enter the time and use the or button
to select AM or PM.
9. Press the Store (SKL) button to save the settings. You will hear a conrmation tone.
10.
wall mountIng
1. Turn the base over.
. Attach the wall mounting pedestal by rst inserting the tabs on the open edge of
the pedestal into the slots on the lower portion of the bottom of the base. Then
push down and snap the pedestal into place.
. Slip the mounting holes (on the back of the base) over the wall plate posts, and
slide the unit down into place. (Wall plate not included.)
This section shows you how to set up your answering system to receive incoming
calls.
settIng the VoIce prompt language
The voice prompt language on the base is the same as the display prompt language
on the base. If you select Spanish as your voice prompt language on the base, the
display prompt language will also be Spanish. The default prompt language is English

16
1. Make sure your base is (not in talk mode).
. Press the Menu (SKL) button to enter the main menu.
. Use the or button to scroll to Phone Settings.
4. Press the Select (SKL) button to enter the submenu.
5. Use the or button to scroll to Language.
6. Press the Select (SKL) button to enter the menu.
7. Use the or button to scroll to the desired language. The default is ENGLISH.
. Press the Select (SKL) button to save your selection. You will hear a conrmation
tone.
recordIng the outgoIng announcement
For best results when recording, you should be about nine inches from the
microphone, and eliminate as much background noise as possible.
1. Make sure your base is (not in talk mode).
. Press and hold the ANNOUNCE button until screen displays ANNOUNCEMENT
RECORDING.
. Begin speaking after you hear the beep.
4. Release the button when you nish your announcement.
Hi, this is (use your name here), We can’t answer the phone right now, so please
leave your name, number and a brief message after the tone, and we’ll get back to
you soon. Thanks.
reVIewIng the announcement
Press and release the ANNOUNCE button to review your outgoing announcement.
audIble quIck setup guIde
If you need additional assistance; while in standby mode, press the REPEAT button on
the base and follow the voice instructions.

17
The base and/or handset menus give you access to all of the built-in features.
ONLY
Press the Menu (SKL) button to display the menu options,
then press the or button to navigate to the desired option.
Press the Select (SKL) button to activate a menu option. For details on programming,
refer to the applicable section. During programming, you may press the Back (SKR)
button at any time to exit the menu and keep the previous setting.
Use the number keys to enter characters. More than one letter is stored in each of the
number keys. For example, press the key twice for the letter B. Press the 1 key to
insert a space. Press the *TONE button to toggle between upper and lower case.
There are ve programmable menus available: Answerer, Alarm, Phone Settings,
Sound Settings, and Bluetooth.
answerer
In the Answerer Menu, there are ve programmable submenus: Answerer On/Off,
Security Code, Message Alert, Rings to Answer and Message Length.
1. Make sure your base is (not in talk mode).
. Press the Menu (SKL) button and Answerer shows on the display.
. Press the Select (SKL) button to enter the submenu.
This menu allows you to activate/deactivate the answering system.
Answerer
1. Use the or button to scroll to Answerer On/Off.
. Press the Select (SKL) button to enter the submenu.

1
. Use the or button to select On or Off. The default setting is On.
4. Press the Select (SKL) button to save your selection. You will hear a voice
announcement of conrmation.
You can access the answering system from a tone-dial telephone in another
(remote) location. The security code is required for remote access, and it prevents
unauthorized access to your answering system.
Answerer
1. Use the or button to scroll to Security Code.
. Press the Select (SKL) button to enter the menu. The current security code shows
on the display.
. Use the number keys to enter your new -digit security code. The default setting is
1 2 3.
4.
Press the Select (SKL) button to save your selection. You will hear a conrmation tone.
This feature sets your answering system to sound an alert tone from the base every
10 seconds when there are new messages.
Answerer
1. Use the or button to scroll to Message Alert.
. Press the Select (SKL) button to enter the submenu.
. Use the or button to select On or Off. The default setting is On.
4.
Press the Select (SKL) button to save your selection. You will hear a conrmation tone
.
This feature lets you select the number of times you want the phone to ring before
the answering system answers the call.
Answerer
1. Use the or button to scroll to Rings to Answer.
. Press the Select (SKL) button to enter the submenu.
. Use the or button to scroll and select from 3 Rings to 6 Rings or Toll Save
(TS). The default setting is 5 Rings.
4. Press the Select (SKL) button to save your selection. You will hear a conrmation
tone.

19
This option allows you to set the duration for the memo or incoming message
recording.
Answerer
1. Use the or button to scroll to Message Length.
. Press the Select (SKL) button to enter the submenu.
. Use the or button to scroll and select from 1 minute to 3 minutes or No
Limit. The default setting is 3 minutes.
4. Press the Select (SKL) button to save your selection. You will hear a conrmation
tone.
alarm
Set an alarm, then program the snooze time, occurance, and melody preferences.
1. Make sure your base is (not in talk mode).
. Press the Menu (SKL) button to enter the main menu.
. Use the or button to scroll to Alarm.
4. Press the Select (SKL) button to enter the submenu, Alarm On/Off shows on the
display.
5. Use the or button to scroll to On or Off.
6. Press the Select (SKL) button to save your selection. You will hear a conrmation
tone.
Alarm On
1. Press the Select (SKL) button to enter the menu. Set Alarm shows on the display.
. Use the number keys to enter the time, then use the or button to select
AM or PM. The default setting is 12:00AM.
.
Press the Select (SKL) button to save your setting. You will hear a conrmation tone.

0
Alarm On
1. Use the or button to scroll to Snooze: Off.
. Press the Select (SKL) button to enter the menu. Snooze On/Off shows on the
display.
. Use the or button to select from Off, Every 5 minutes, Every 10 minutes,
Every 15 mintues, or Every 30 minutes. Off is the default setting.
4. Press the Store (SKL) button to save your selection. You will hear a conrmation
tone.
Alarm On
1. Use the or button to scroll to Cycle: Once.
. Press the Select (SKL) button to enter the menu. Alarm shows on the display.
. Use the or button to select Once or Daily. The default setting is Once.
4. Press the Select (SKL) button to save your selection. You will hear a conrmation
tone.
Alarm On
1. Use the or button to scroll to Alarm Melody.
. Press the Select (SKL) button to enter the menu.
. Use the or button to select desired melody.
4. Press the Select (SKL) button to save your selection. You will hear a conrmation
tone.
phone settIngs
In the Phone Settings Menu, there are six programmable menus available: Language,
Date/Time, Set Area Code, Tone/Pulse, and Default Setting.
1. Make sure your base is (not in talk mode).
. Press the Menu (SKL) button to enter the menu.
. Use the or button to scroll to Phone Settings.
4. Press the Select (SKL) button to enter the submenu.
Other manuals for 28128 Series
1
This manual suits for next models
2
Table of contents
Languages:
Other GE Telephone manuals