GE 30385EE1 User manual

Model number:
30385
BLUETOOTH CORDED 2-LINE TELEPHONE

Thank you for choosing GE!
Register your product
Please take a moment to register your product online. Just go to
www.gephones.com and click “register here” from the home page. Provide
your email address and receive product updates, special oers, or discounts
on future purchases.
* It will not diminish your warranty rights if you choose not to register.
Assistance and more information
Retain your sales receipt as proof of purchase in the event warranty service is
necessary.
For product assistance or for more information about accessories, visit our
website at www.gephones.com or call our customer service center at
1-877-394-9775.
Attach your sales receipt here.
Table of contents
Getting started
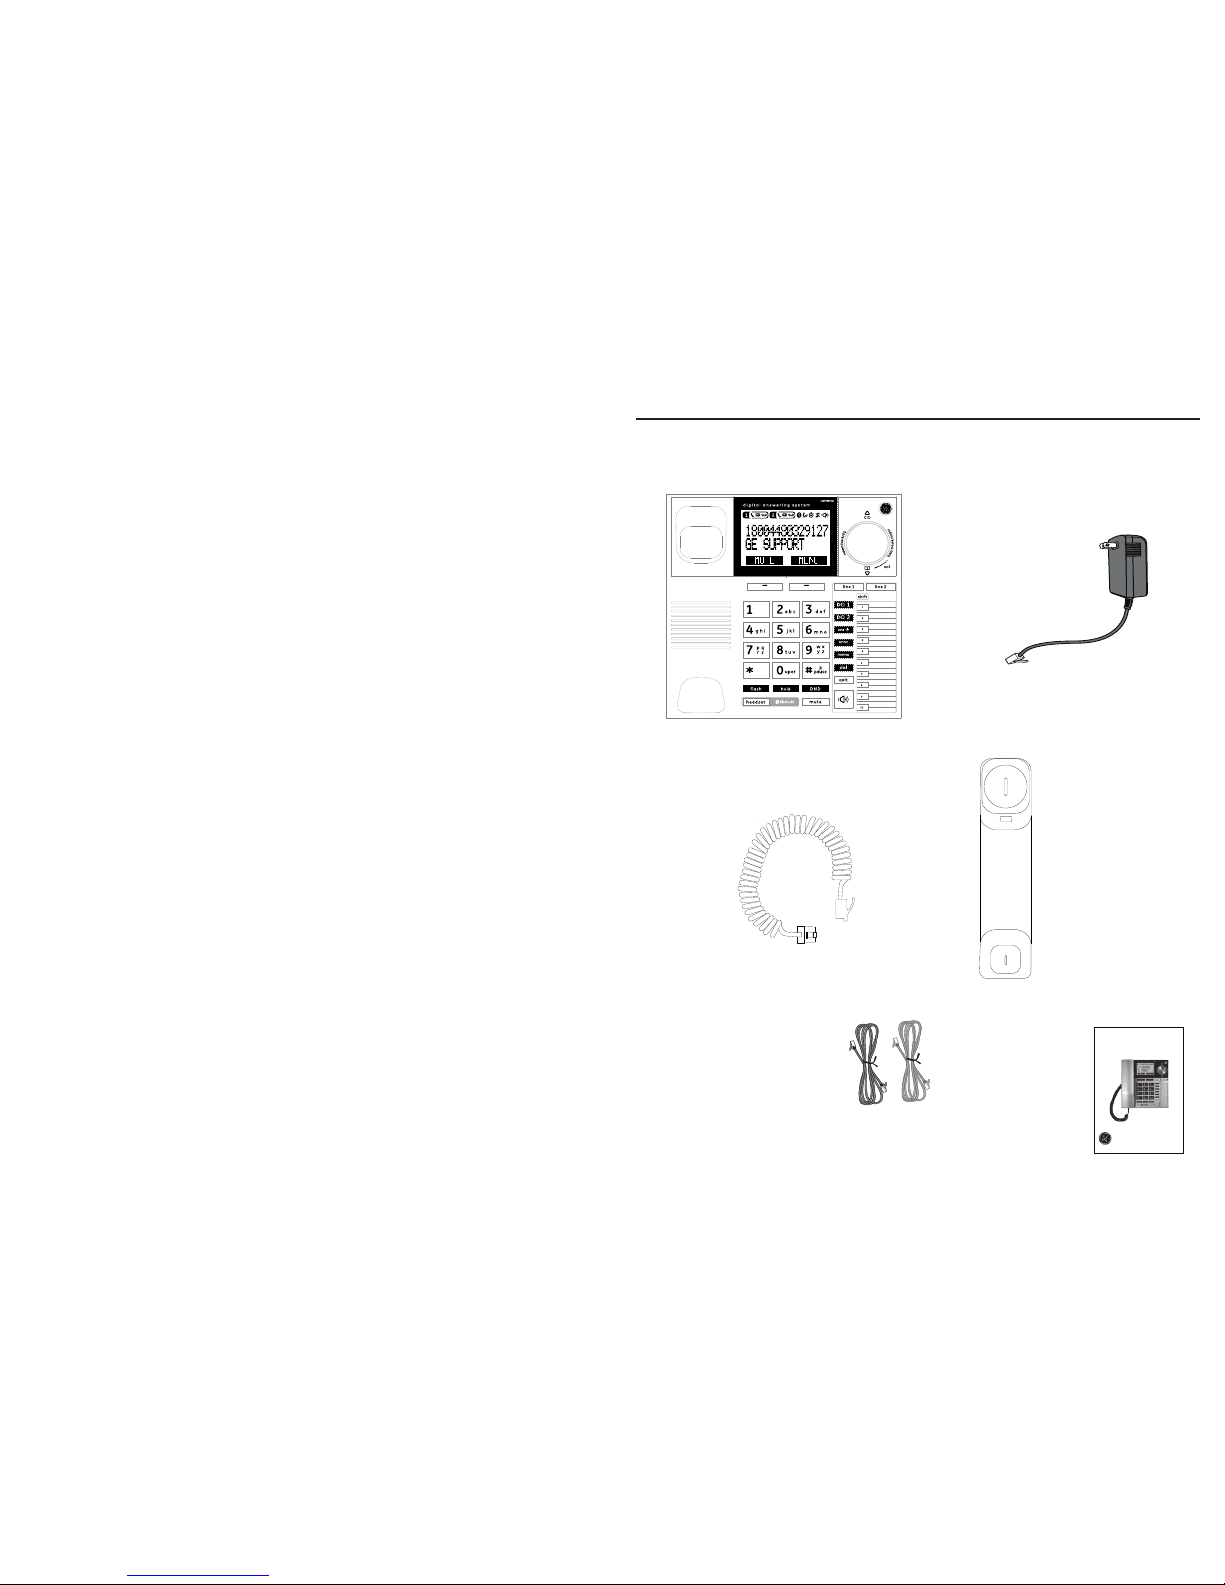
Parts checklist..................................................................1
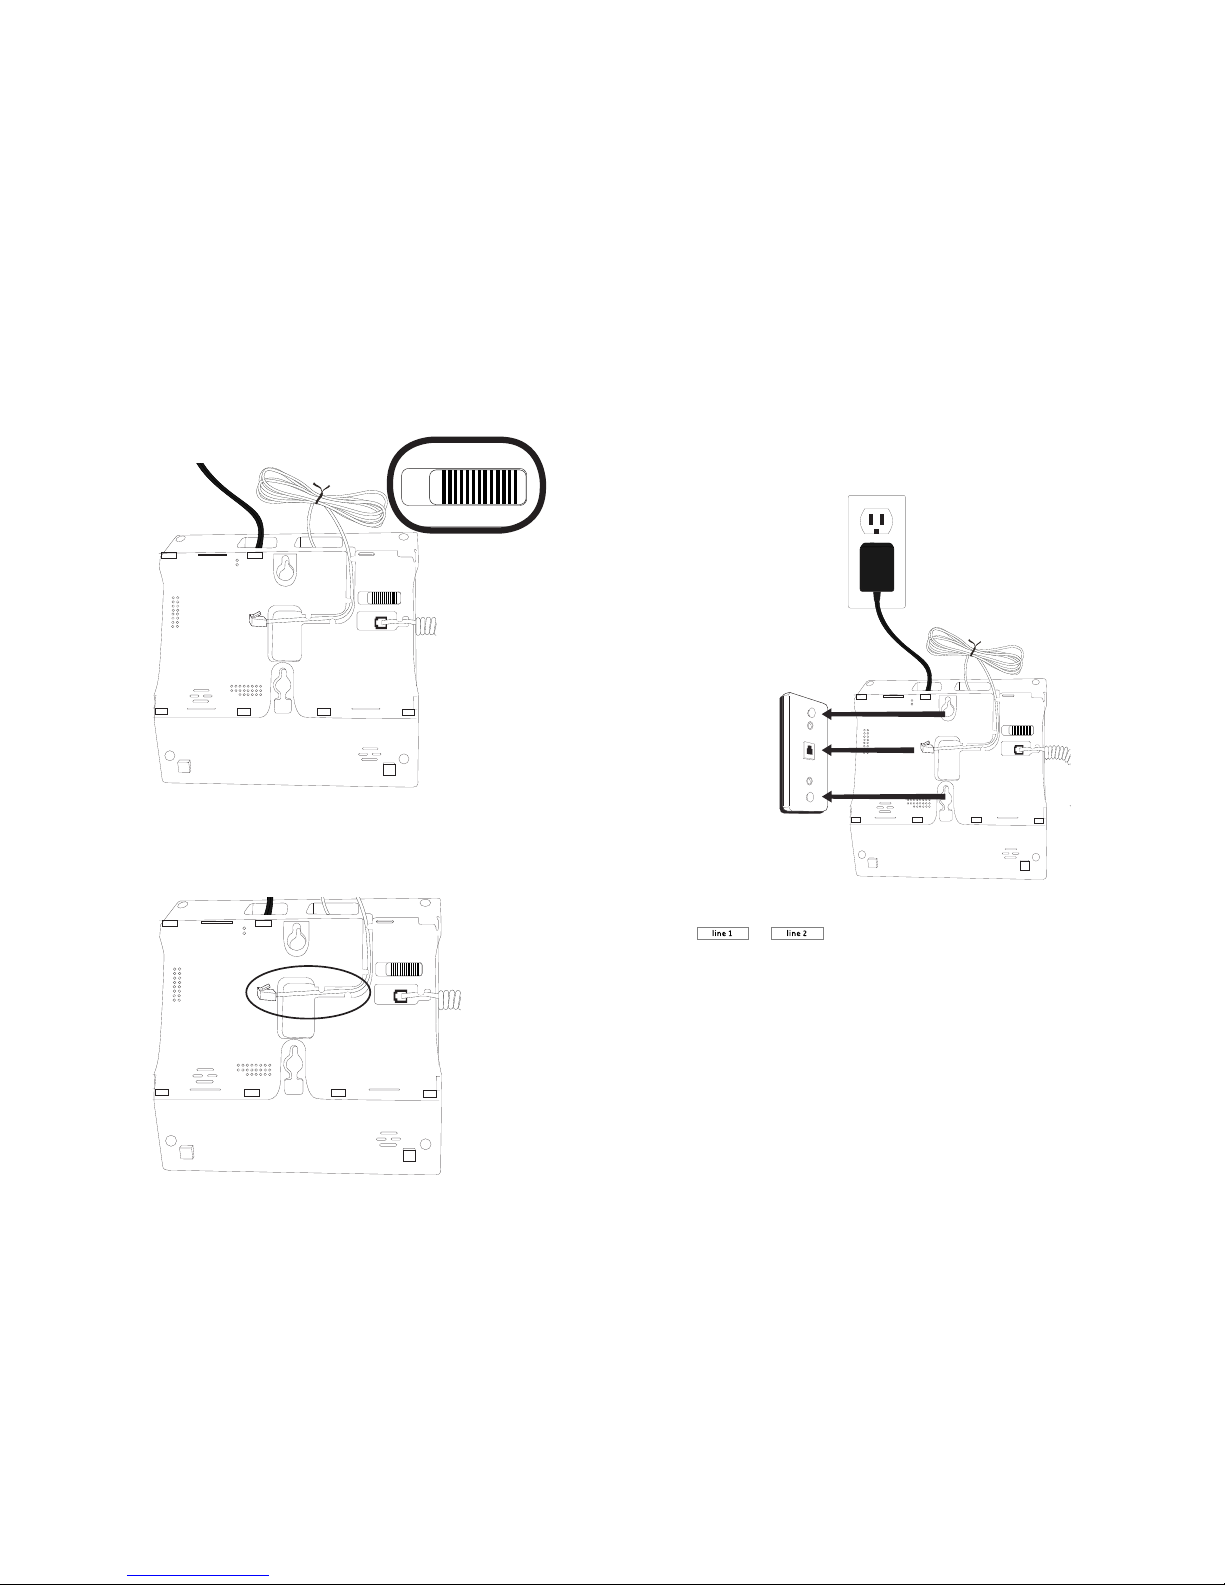
Installing on a desk........................................................2
Telephone jack requirements ...................................5
Wall mount installation................................................5
Telephone base layout..............................................10
Telephone base layout..............................................11
Side view layout ...........................................................12
Scroll wheel ....................................................................12
Telephone base screen display icon...................13
Paired devices...............................................................14
To pair a cell phone....................................................14
To pair a headset.........................................................14
o remove a paired device........................................15
Active Devices...............................................................15
To activate a paired device.....................................15
To connect/disconnect an active device..........16
To remove an active device....................................16
To add a device on the active devices list .......17
Information about an active device ...................17
Directory Download ...................................................18
Bluetooth Base name................................................18
Base PIN...........................................................................19
Auto Connect.................................................................19
Telephone base settings
Display language.........................................................20
Ring tones .......................................................................20
Ring volume ...................................................................20
Key beeps........................................................................20
Equalizer ..........................................................................21
Priority Line.....................................................................21
Local area code............................................................21
Date and time ...............................................................22
Date Format...................................................................22
Time Format...................................................................22
Alarm.................................................................................23
Alarm tone......................................................................23
Clear voicemail indicator.........................................24
Reset setting..................................................................24
Telephone operation
To make, answer or end a call...............................25
To make a Line 2 call while on Line 1 call........25
To make a Line 1 call while on Line 2 Call........25
Call Waiting....................................................................26
3-way conference call...............................................26
Muting a call ..................................................................26
Speakerphone...............................................................26
Volume control .............................................................26
Equalizer ..........................................................................27
Silencing the ringer.....................................................27
To put a call on hold...................................................27
To make a call using the redial memory ..........27
To save a number from the redial list to the
phonebook..................................................................27
To delete a number from the redial list.............28
Voice message indicator..........................................28
Answering system message indicator ..............28
Line-in-use indicator..................................................29
Phonebook
Add a local phonebook record..............................30
To view/call a phonebook entry...........................30
To search a phonebook entry alphabetically.31
Edit a phonebook entry ............................................31
Delete a phonebook entry.......................................31
Delete all phonebook entries.................................32
Phonebook capacity ..................................................32
Direct memory..............................................................32
Character table ............................................................33
Caller ID
Using Caller ID service ..............................................34
Phonebook Caller-ID matching.............................34
Review/call from the call log..................................34
Save a number to the Local Phonebook ..........34
Delete a caller ID record...........................................35
Delete all caller ID records ......................................35
Call log display screen messages........................35
Answering system
Answering system and voice mail.......................36
Turning the answering system on or o...........36
Message capacity .......................................................36
New message indicators for Line 1 and
Line 2 .............................................................................36
Recording memos.......................................................36
Listening to Outgoing Announcement (OGA) .37
Recording Outgoing Announcement (OGA).....38
Deleting your recorded Outgoing
Announcement (OGA).............................................38
Number of rings before the system answers.39
Message length............................................................39
Turning the message alert on or o...................40
Turning the call screening on or o....................40
Call intercept..................................................................40

1
Message playback using the telephone
base................................................................................41
Options during playback:.........................................41
Delete all old messages............................................41
Changing the security code for remote
access ...........................................................................42
Access the answering system remotely...........42
Remote access commands....................................42
Appendix
Troubleshooting guide..............................................43
General Product Care................................................45
Important Safety Instructions ...............................46
FCC Parts 15, 68 and ACTA......................................49
One Year Limited Warranty....................................53
Technical specication .............................................55
Index..................................................................................56
Remote access operation card.............................57
Getting started
Parts checklist
Your telephone contains the following items. Save your sales receipt and original
packaging in the event warranty service is necessary.
User’s guide
Corded handset
Handset coiled cord
DECT 6.0 BLUETOOTH CORDED TELEPHONE
Model number:
30385
Gray color telephone line cord for Line 1 + Line 2 (4-pin)
Black color telephone line cord for Line 2 (2-pin)
Telephone base
Power adapter for
telephone base

Getting started Getting started
2 3
Installing on a desk
1. Remove the base bracket by lifting it up from both sides of the bracket as shown in
Figure 1 below.
Figure 1
2. Plug one end of the coiled handset cord into the jack at the bottom of the
telephone base as shown in gure 2. Plug the other end of the coiled cord into the
bottom of the handset making sure that the plug is snapped into place and ush
with the bottom of the handset. Then route the coiled cord through the tabbed slot
as shown.
3. Slide the desk/wall switch to the desk position.
Figure 4
desk wall
4. Replace the bracket to the telephone base.
5. Plug the smaller end of the power adapter into the power jack at the back of the
telephone base.
6. Plug the larger end of the power adapter into an electrical outlet not controlled by
a wall switch.
Note that there is 1 power jack and 2 phone jacks at the back of the telephone
base as shown in Figure 3.
If both of your telephone lines are located in one wall jack, go to step 7. If your
telephone lines are in two separate jacks, go to step 9.
7. Plug one end of the 4-pin gray-color telephone line cord into the Line 1 + Line 2
jack at the back of the telephone base as shown in Figure 4.
8. Plug the other end of the telephone line into a telephone wall jack.
Power Jack Line 2 phone jackLine 1 + Line 2 phone jack
Figure 2
desk wall
Route
the cord
through the
tabbed slot.
Figure 3
DSL lter (not
included) is required
if you have DSL
high speed Internet
service.

Getting started Getting started
4 5
Wall plate
Modular
telephone
line jack
CAUTION:
1. Use only the power adaptor that came with this unit. Using other power adaptors may damage the unit.
2. To prevent re or electrical shock hazard, do not expose this product to rain or moisture.
If you have separate wall jacks for each line, install the telephone base as
described below.
9. Plug one end of the 4-pin gray-color telephone line cord into the Line 1 + Line 2
jack at the back of the telephone base as shown in Figure 5.
10.Plug the other end of the 4-pin gray-color telephone line cord into the telephone
wall jack you will use as your “line 1”.
11.Plug one end of the 2-pin black-color telephone line cord into the Line 2 jack at the
back of the telephone base.
12.Plug the other end of the 2-pin black-color telephone line cord into the telephone
wall jack you will use as your “line 2”.
13.Press or as desired. The speakerphone is activated automatically.
14.If you hear a dial tone, the installation is complete.
Wall mount installation
1. Make sure the telephone line cord is unplugged from the modular jack and the
power adapter cord is unplugged from the electrical outlet before installation.
2. Remove the base bracket by lifting it up from both sides of the bracket as shown in
Figure 6.
Figure 6
Figure 5
desk wall
Telephone jack requirements
To use this phone, you need a RJ11C type modular telephone jack,
which might look like the one pictured here, installed in your home.
If you do not have a modular jack, call your telephone service
provider to nd out how to have one installed.
If you have DSL high speed Internet service, a DSL lter is required
(not included). Contact your DSL service provider for more
information about DSL lter.
DSL lters (not included)
are required if you have
DSL high speed Internet
service.

Getting started Getting started
6 7
If both of your telephone lines are located in one wall jack, go to step 4. If your
telephone lines are in two separate jacks, go to step 8.
4. Route the 4-pin telephone line cord from the Line 1 + Line 2 jack through the
channel as shown in Figure 8, leaving about 2 inches from the end of the channel
for plugging into the wall jack.
desk wall
desk wall
Figure 7
3. Slide the wall mounting switch to the wall position as shown in Figure 7. This
prevents the handset from falling out of the telephone base.
desk wall
Figure 8
5. Plug the telephone line cord into the 2-line wall jack on the wall plate as shown
in Figure 9. Align the holes on the telephone with the mounting studs of the wall
plate and slide the telephone base down until it locks securely. Tie the excess cords
neatly with a twist tie. Plug the power adapter into an electrical outlet. Be sure to
avoid using an electrical outlet that is controlled by a wall switch.
desk wall
Figure 9
6. Press or as desired. The speakerphone is activated automatically.
7. If you hear a dial tone, the installation is complete.

Overview
9
Getting started
8
If you have separate wall jacks for each line, mount the telephone base on the wall
as described below.
8. Route the 4-pin gray-color telephone line cord from the Line 1 + Line 2 jack
through the channel as shown in Figure 8, leaving about 2 inches from the end of
the channel for plugging into the wall jack.
9. Plug the 4-pin gray-color telephone line cord into the wall jack on the wall plate as
shown in Figure 9. Align the holes on the telephone with the mounting studs of the
wall plate and slide the telephone base down until it locks securely. Plug the power
adapter into an electrical outlet as shown in Figure 10. Be sure to avoid using an
electrical outlet that is controlled by a wall switch.
10. Plug one end of the 2-pin black-color telephone line cord into the Line 2 jack and
the other end into a dierent wall jack as shown in Figure 10.
11.Neatly tie both the excess telephone line cords with a twist tie so it is held on the
top of the base unit.
12.Press or as desired. The speakerphone is activated automatically.
13.If you hear a dial tone, the installation is complete.
CAUTION:
1. Use only the power adaptor that came with this unit. Using other power adaptors may damage the unit.
2. To prevent re or electrical shock hazard, do not expose this product to rain or moisture.
Figure 10
desk wall
Your 30385 telephone system allows you to communicate with built-in Bluetooth
wireless technology.
This product is compatible with many current Bluetooth-enabled headsets and cell
phones. Refer to your headset or cell phone user’s guide for information about using
Bluetooth.
The telephone system allows you to:
• Pair up to 6 Bluetooth devices (cellular phone or bluetooth headset) with the
telephone base.
• Connect a maximum of two devices (cellular phone or bluetooth headset) at a time.
• Connect a Bluetooth headset to make or receive calls on or .
• Download phonebook from celluar phone to the telephone base. Note that it is
NOT possible to make or receive calls on the Cell line by using the telephone base.
• Establish a 3-way conference call between the corded handset, and
.

Overview Overview
10 11
Telephone base layout
• Press to review the
phonebook(s) when the
telephone is in idle mode.
• While in menu, press to
scroll down.
headset
Press to make or
receive call using
a Bluetooth
headset.
ash
During a call,
press to answer a
second incoming
call if you receive
a call waiting
alert (available
only if you have
subscribed to
the call waiting
feature from your
telephone service
provider).
mute
Press to mute a
call, press again
to resume
conversation.
redial/select/skip
• Press to review redial list.
• Press to select in menu.
• Press to skip to the
next message during
playback.
• Press to review the call
log when the telephone is
in idle mode.
• While in menu, press to
scroll up.
Quick dialing buttons
Press to call quick dialing
memory location.
repeat/back/EQ
• Press to repeat current message or press twice to
play previous message during message playback.
• Press to return to previous level when in menu.
• Press to adjust the equalizer when in idle mode or
during a call.
softkey
Press to select menu item
displayed above the key.
Telephone base layout
1 play/stop
Press to play messages or
stop playback on Line 1.
line 1
Press to make or answer call
on Line 1.
line 2
Press to make or answer call
on Line 2.
annc
Press to play, record
or delete outgoing
announcement.
memo
Press to record memo.
speaker
• Press to make or
answer a call using the
speakerphone.
• During a call, press
to switch between
speakerphone and
normal handset use.
exit
Press to exit a setting or
operation and return to idle
mode.
Do not disturb
Press to turn
Do Not Disturb
mode on of o.
hold
Press to put a
call on hold.
• Press and hold to add a dialing pause when
dialing or entering numbers into phonebook.
• Press to switch between upper case and lower
case when entering names into phonebook.
• Press to change the telephone number format
(7 digits, 1+, or 1+ area code) for appropriate
dialing.
del
Press to delete the entered
number or character.
2 play/stop
Press to play messages or
stop playback on Line 2.
Press to turn answering
system on or o.

Overview Overview
12 13
Side view layout
You can charge your
Bluetooth cellular phone
or headset by plugging the
USB cable (not included)
into the port on the right
side of the telephone base.
USB charging port
Scroll wheel
The scroll wheel on the telephone base can be used to navigate the menu or perform
telephone operations.
On the telephone base
redial/select/skip
volume up/down
EQ/back/repeat
CID/up
Phonebook/down
Telephone base screen display icon
Item Meaning
• Displays when there is a new voice mail message.
(Available only if you have subscribed to voice mail service from
your telephone service provider.)
• Displays when speakerphone is in use.
• Displays when a paired device is connected.
• Flashes when a call on the Cell line is on hold
• Flashes when the telephone is pairing or connecting with a
Bluetooth enabled device.
• Displays when the alarm is set.
• Flashes during alarm ringing.
• Displays when there are new unreviewed calls.
• Displays when the ringer is turned o.
• Displays when Do Not Disturb (DND) mode is activated.
• Displays when answering system is on.
• Flashes when there are new messages.
• Line 1 icons will display in this area.
• Line 2 icons will display in this area.
• Displays when the line is in use.

Bluetooth settingsBluetooth settings
1514
To use a Bluetooth enabled cell phone with your telephone system, you must rst pair
and connect the device with the telephone base.
Bluetooth connection operates within 30 feet (10 meters) from the telephone base.
Keep your Bluetooth-enabled devices close to the telephone base before starting the
pairing procedures.
Paired devices
The paired devices list stores all devices paired to the telephone base. Once a device is
paired, you do not need to repeat the pairing procedure unless you remove the device
from the paired device list. The system can store a maximum of 6 devices (cell phone
or headset).
To pair a cell phone
1. With the cell phone near the corded base of the 30385, press the Menu softkey.
2. Press /or use the scroll wheel to select Bluetooth, and then press the Select
softkey.
3. Press /or use the scroll wheel to select My Devices, and then press the Select
softkey.
4. Press /or use the scroll wheel to select Add Cell Phone, and then press the
Select softkey.
5. The screen displays Place the cell phone near the base. Move your Bluetooth cell
phone near the telephone base, then press the Ok softkey.
6. The screen displays Please use your cell phone to search the base, and then
press the Ok softkey.
7. Turn the Bluetooth feature on your cell phone on and then search for the
telephone base.
8. When your cell phone nds the telephone base, select GE30385 on your cell phone
to continue the pairing process (enter the pairing code if prompted).
9. The telephone base displays XX Paired and XX Connected where XX indicates your
cell phone’s name, and the telephone base displays the icon when the pairing is
successful.
To pair a headset
1. Press the Menu softkey.
2. Press /or use the scroll wheel to select Bluetooth, and then press the Select
softkey.
3. Press /or use the scroll wheel to select My Devices, and then press the Select
softkey.
4. Press /or use the scroll wheel to select Add Headset, and then press the
Select softkey.
5. The screen displays Place the headset near the base. Move your Bluetooth
headset near the telephone base, and then press the OK softkey.
6. The screen displays Please set your headset in discoverable mode. Turn your
Bluetooth headset to discoverable mode, and then press the OK softkey.
7. When the telephone base nds your headset, press the Select softkey.
8. The screen displays XX Paired when the pairing is successful.
9. The telephone base then asks if you want to connect your headset with the
telephone base now. Press the Yes softkey to connect.
When the connection is successfully established, the screen displays XX Connected
where XX indicates the name of your headset.
To remove a paired device
You can remove a paired device from the Paired Devices list.
1. Press the Menu softkey.
2. Press /or use the scroll wheel to scroll to Bluetooth, and then press the Select
softkey.
3. Press /or use the scroll wheel to select My Devices, and then press the Select
softkey.
4. Press /or use the scroll wheel to select Paired Devices, and then press the
Select softkey.
5. Press /or use the scroll wheel to select the desired device, and then press the
Select softkey.
6. Press /or use the scroll wheel to select Remove Paired, and then press the
Select softkey.
7. The screen displays Remove? Press the Yes softkey to conrm.
Active Devices
Only devices on the Active Devices list can establish a Bluetooth connection with the
telephone base. The Active Device list can store a maximum of two devices. Both
devices can be connected to the telephone base, but only one of them can be used at
a time.
To activate a paired device
To allow a paired device to establish a Bluetooth connection to the telephone base, it
must be activated.
1. Press the Menu softkey.
2. Press /or use the scroll wheel to select Bluetooth, and then press the Select
softkey.
3. Press /or use the scroll wheel to select My Devices, and then press the Select
softkey.

Bluetooth settingsBluetooth settings
1716
4. Press /or use the scroll wheel to select Paired Devices, and then press the
Select softkey.
5. Press /or use the scroll wheel to select the desired device, and then press the
Select softkey.
6. Press /or use the scroll wheel to select Set Active, and then press the Select
softkey.
7. Press /or use the scroll wheel to select an empty location or replace an
existing device, then press the Select softkey to conrm.
To connect/disconnect an active device
You can connect or disconnect a device on the Active Devices list.
1. Press the Menu softkey.
2. Press /or use the scroll wheel to select Bluetooth, and then press the Select
softkey.
3. Press /or use the scroll wheel to select My Devices, and then press the Select
softkey.
4. Press /or use the scroll wheel to select Active Devices, and then press the
Select softkey.
5. Press /or use the scroll wheel to select the desired device, and then press the
Select softkey.
6. Press /or use the scroll wheel to select Connect or Disconnect, and then
press the Select softkey.
To remove an active device
You can remove a device on the Active Devices list.
1. Press the Menu softkey.
2. Press /or use the scroll wheel to scroll to Bluetooth, and then press the Select
softkey.
3. Press /or use the scroll wheel to select My Devices, and then press the Select
softkey.
4. Press /or use the scroll wheel to select Active Devices, and then press the
Select softkey.
5. Press /or use the scroll wheel to select the desired device, and then press the
Select softkey.
6. Press /or use the scroll wheel to select Remove, and then press the Select
softkey to conrm.
To add a device on the active devices list
You can add a paired device to the Active Devices list.
1. Press the Menu softkey.
2. Press /or use the scroll wheel to scroll to Bluetooth, and then press the Select
softkey.
3. Press /or use the scroll wheel to select My Devices, and then press the Select
softkey.
4. Press /or use the scroll wheel to select Active Devices, and then press the
Select softkey.
5. Press /or use the scroll wheel to select an empty location, and then press the
Add softkey.
6. Press /or use the scroll wheel to select the desired paired device, and then
press the Select softkey.
7. Press /or use the scroll wheel to select Set Active, and then press the Select
softkey.
NOTE: If two devices are on the Active Devices List, you will need to remove one before adding another device.
Information about an active device
1. Press the Menu softkey.
2. Press /or use the scroll wheel to scroll to Bluetooth, and then press the Select
softkey.
3. Press /or use the scroll wheel to select My Devices, and then press the Select
softkey.
4. Press /or use the scroll wheel to select Active Devices, and then press the
Select softkey.
5. Press /or use the scroll wheel to select the desired device, and then press the
Select softkey.
6. Press /or use the scroll wheel to select Bluetooth ID, and then press the
Select softkey. The screen displays the information about the device.

Bluetooth settingsBluetooth settings
1918
Directory Download
You can download up to 4 Cell Phonebooks from the paired cell devices to your
telephone system via Bluetooth connection. Each cell phone directory can hold up to
1500 entries with up to 24 digits for each phone number and 15 characters for each
name.
Make sure your cell phone is paired and is on the Active Devices list before
downloading the phonebook.
1. Press the Menu softkey.
2. Press /or use the scroll wheel to scroll to Bluetooth, and then press the Select
softkey.
3. Press /or use the scroll wheel to select Dir. Download, and then press the
Select softkey.
4. Press /or use the scroll wheel to select the desired device, and then press the
Select softkey.
5. Press /or use the scroll wheel to select the desired option, then press the
Select softkey.
(Cell Memory - download directory entries from cell phone memory.
SIM Memory - download directory entries from SIM card memory.
Both - download directory entries from both cell phone and SIM card memories.)
If the selected device’s directory has already been downloaded to the
telephone system, the screen displays Dir. Existed Overwrite? press the Yes
softkey to overwrite the existing entries.
6. The number of entries downloaded displays and a beep sounds when the
phonebook download is complete.
NOTES:
1. If the selected device is on the active devices list but is not connected, the screen displays Not Connected.
Refer to the To connect/disconnect an active device section to connect the device to the
telephone base.
2. If the selected device is not on the Active Devices list, the screen displays No Device. Refer to the To add a
device on the active devices list section to add a device rst.
3. You can only add phonebook entries to the Local Phonebook. You cannot add any new entries to the Cell
Phonebooks.
4. The system can only store the name and phone number(s) of an entry. It does not store additional
information such as company name, address, email, etc. In the case where one name has more than one
phone numbers associated with it, the system automatically separates them into dierent entries in the
phonebook.
5. The name of the Cell Phonebook being downloaded is the Base Name of your bluetooth device. For more
information on how to use the bluetooth functionality on your cell phone, please refer to your individual cell
phone’s user manual.
Bluetooth Base name
You can change the name of the base to personalize your system. The default name
is GE30385.
1. Press the Menu softkey.
2. Press /or use the scroll wheel to scroll to Bluetooth, and then press the Select
softkey.
3. Press /or use the scroll wheel to select My Base, and then press the Select
softkey.
4. Press /or use the scroll wheel to select Base Name, and then press the Select
softkey.
5. Edit the base name by using the dial pad keys. Refer to the Characters Table
section for information on how to use the dial pad keys.
6. Press the Ok softkey to conrm.
Base PIN
To change the Base PIN:
1. Press the Menu softkey.
2. Press /or use the scroll wheel to scroll to Bluetooth, and then press the Select
softkey.
3. Press /or use the scroll wheel to select My Base, and then press the Select
softkey.
4. Press /or use the scroll wheel to select Base PIN, and then press the Select
softkey.
5. Press del to delete the current PIN and then enter a new PIN by using the dial pad
keys.
6. Press the Save softkey to conrm.
Auto Connect
When this feature is set to on, the telephone base automatically searches and
connects with your Bluetooth active device when it is within range.
1. Press the Menu softkey.
2. Press /or use the scroll wheel to scroll to Bluetooth, and then press the Select
softkey.
3. Press /or use the scroll wheel to select Auto Connect, and then press the
Select softkey.
4. Press /or use the scroll wheel to select On or O, and then press the Select
softkey.

Telephone base settings
20 21
Telephone base settings
Display language
You can select ENGLISH, ESPAÑOL or FRANCIS as the display language. The default
setting is ENGLISH.
1. Press the Menu softkey when the handset is in idle mode.
2. Press /or use the scroll wheel to select Settings and then press the Select
softkey.
3. Press /or use the scroll wheel to select Language and then press the Select
softkey.
4. Press /or use the scroll wheel to select the desired language and then press
the Select softkey to conrm.
Ring tones
You can select from 10 ringer melodies for the telephone base.
1. Press the Menu softkey when the handset is in idle mode.
2. Press /or use the scroll wheel to select Settings and then press the Select
softkey.
3. Press /or use the scroll wheel to select Ring Tones and then press the Select
softkey.
4. Press /or use the scroll wheel to select Line 1 or Line 2 and then press the
Select softkey.
5. Press /or use the scroll wheel to select the desired ring tone and then press
the Select softkey to conrm.
Ring volume
You can set the telephone base ringer volume from level 1 to level 5 or turn the ringer
o.
1. Press the Menu softkey when the handset is in idle mode.
2. Press /or use the scroll wheel to select Settings and then press the Select
softkey.
3. Press /or use the scroll wheel to select Ring Volume and then press the Select
softkey.
4. Press /or use the scroll wheel to select the desired volume level and then
press the Select softkey to conrm. You can also adjust the ring volume when the
base is in the idle mode by using the scroll wheel.
Key beeps
The telephone base can be programmed to emit a tone with each key press. You can
choose to turn this feature on or o. The default setting is ON.
To change the key tone setting:
1. Press the Menu softkey when the handset is in idle mode.
2. Press /or use the scroll wheel to select Settings and then press the Select
softkey.
3. Press /or use the scroll wheel to select Key Beeps and then press the Select
softkey.
4. Press /or use the scroll wheel to select On or O and then press the Select
softkey to conrm.
Equalizer
This feature allows you to change the balance of the audio of the handset to best suit
your hearing.
1. Press repeat/back/EQ on the left of the scroll wheel when the telephone base is in
idle mode.
2. Press /or use the scroll wheel to select Natural, Bass or Treble and then press
the Select softkey to conrm.
Priority Line
Priority line setting determines the default line the telephone uses when making an
outgoing call. You can select either Line 1 or Line 2.
1. Press the Menu softkey when the handset is in idle mode.
2. Press /or use the scroll wheel to select Adv. Settings and then press the
Select softkey.
3. Press /or use the scroll wheel to select Priority Line and then press the Select
softkey.
4. Press /or use the scroll wheel to select Line 1 or Line 2 and then press the
Select softkey to conrm.
Local area code
If you program your area code, the caller ID history displays only seven digits of the
telephone numbers from your area code.
1. Press the Menu softkey when the handset is in idle mode.
2. Press /or use the scroll wheel to select Adv. Settings and then press the
Select softkey.
3. Press /or use the scroll wheel to select Local Area Code and then press the
Select softkey.
4. Enter a 3-digit area code and then press the Save softkey to conrm.

Telephone base settings Telephone base settings
22 23
Date and time
In order for your answering system to accurately mark your messages you must set
the date and time.
1. Press the Menu softkey when the handset is in idle mode.
2. Press /or use the scroll wheel to select Clock & Alarm and then press the
Select softkey.
3. Press /or use the scroll wheel to select Set Date/Time and then press the
Select softkey.
4. Enter the current month, day and year. For example, May 16, 2010 should be
entered as [0], [5], [1], [6], [1], [0], and then press the Next softkey to conrm.
5. Enter the current hour and minute. For example, 9:30 should be entered as [0], [9],
[3], [0]. Press /or use the scroll wheel to select AM or PM.
6. Press the Save softkey to conrm.
Date Format
1. Press the Menu softkey when the handset is in idle mode.
2. Press /or use the scroll wheel to select Clock & Alarm and then press the
Select softkey.
3. Press /or use the scroll wheel to select Set Format and then press the Select
softkey.
4. Press /or use the scroll wheel to select Date Format and then press the Select
softkey.
5. Press /or use the scroll wheel to select MM/DD/YYYY or YYYY/DD/MM, and
then press the Select softkey to conrm.
Time Format
1. Press the Menu softkey when the handset is in idle mode.
2. Press /or use the scroll wheel to select Clock & Alarm and then press the
Select softkey.
3. Press /or use the scroll wheel to select Set Format and then press the Select
softkey.
4. Press /or use the scroll wheel to select Time Format and then press the
Select softkey.
5. Press /or use the scroll wheel to select 12 Hours or 24 Hours, and then press
the Select softkey to conrm.
Alarm
The alarm can be programmed to sound once or daily for one minute. The alarm
setting is independent of each handset.
1. Press the Menu softkey when the handset is in idle mode.
2. Press /or use the scroll wheel to select Clock & Alarm and then press the
Select softkey.
3. Press /or use the scroll wheel to select Set Alarm and then press the Select
softkey.
4. Press /or use the scroll wheel to select On, and then press the Select softkey.
5. Enter the desired hour and minute, and then press /or use the scroll wheel to
select AM or PM.
6. Press the Ok softkey.
7. Press /or use the scroll wheel to select Once or Daily.
(Once: The alarm sounds once at the set time.
Daily: The alarm sounds daily at the set time.)
8. Press the Select softkey to conrm.
Alarm tone
You can select from 10 ringers for the alarm.
1. Press the Menu softkey when the handset is in idle mode.
2. Press /or use the scroll wheel to select Clock & Alarm and then press the
Select softkey.
3. Press /or use the scroll wheel to select Set Alarm and then press the Select
softkey.
4. Press /or use the scroll wheel to select Alarm Tone and then press the Select
softkey.
5. Press /or use the scroll wheel to select the desired ringer and then press the
Select softkey to conrm.
6. You can select Stop or Snooze when the alarm sounds. The snooze will activate the
alarm sound again in 5 minutes.

25
Telephone base settings
24
Clear voicemail indicator
You can reset the VMWI (voice message waiting indicator) when the phone indicates
new messages waiting but there are none (for example, if you have previously
accessed voice mail from a dierent telephone line while away from home). When
new voice mails do exist, your telephone service provider will continue to send the
signal to activate the feature.
1. Press the Menu softkey when the handset is in idle mode.
2. Press /or use the scroll wheel to select Adv. Settings and then press the
Select softkey.
3. Press /or use the scroll wheel to select Clear VoiceMail and then press the
Select softkey.
4. Press the Yes softkey to conrm.
Reset setting
This feature allows you to restore all system settings, except the answering system
messages and phonebook, to default settings. This feature could be useful, if you have
forgotten the security code to access the answering system remotely.
1. Press the Menu softkey when the handset is in idle mode.
2. Press /or use the scroll wheel to select Adv. Settings and then press the
Select softkey.
3. Press /or use the scroll wheel to select Reset setting and then press the
Select softkey.
4. Press the Yes softkey to conrm.
NOTE: All settings under the Ans. Sys Setup, Direct Memories, Clock & Alarm,Settings,Adv. Settings and
Bluetooth menus will be restored to default settings, the redial list and call log will also be cleared.
Telephone operation
To make, answer or end a call
Using the telephone base:
To make a call
1. Lift the corded handset, or press or or .
2. Dial the phone number.
To predial a call
1. Dial the phone number using the dial pad keys. If you make an error when dialing,
press to erase the digit entered.
2. Lift the corded handset, or press or or to call.
To answer a call
Lift the corded handset, or press or to answer an incoming Line 1 call.
Lift the corded handset, or press or to answer an incoming Line 2 call.
To end a call
Return the corded handset to the telephone base or press .
Using a Bluetooth headset:
To make a call
Press on the telephone base, then dial the phone number.
-OR-
Dial the phone number, then press on the telephone base to call.
To answer a call
Press on the telephone base or press the call button on your headset to
answer an incoming call.
To end a call
Press on the telephone base or press the call button on your headset to end
a call.
To make a Line 2 call while on Line 1 call
When you are on a Line 1 call, you can initiate a Line 2 call without disconnecting the
Line 1 call.
Using the telephone base:
1. Press on the telephone base when on a Line 1 call.
2. Dial the phone number using the dial pad keys.
3. Press to call from the Line 2 line.
Press or to switch between the Line 1 call and Line 2 call.
To make a Line 1 call while on Line 2 Call
When you are on a Line 2 call, you can initiate a Line 1 call without disconnecting the
Line 2 call.

Telephone operationTelephone operation
26 27
Using the telephone base:
1. Press on the telephone base when on a Line 2 call.
2. Dial the phone number using the dial pad keys.
3. Press to call from the Line 1 line.
Press or to switch between the Line 1 call and Line 2 call.
Call Waiting
If you subscribe to call waiting service from your telephone service provider, a call
waiting alert tone sounds when there is a second incoming call. If you subscribe to
both caller ID and call waiting with caller ID services, the second caller’s information is
displayed after you hear the call waiting alert tone.
Using the telephone base:
• Press to answer the second incoming call.
• Press to switch between calls.
3-way conference call
When you have calls on both Line 1 line and Line 2 line, you can establish a 3-way
conference.
1. With calls on both lines, press the Options softkey.
2. Press / or use the scroll wheel to select Conference, then press the Select
softkey. A 3-way conference call is established.
Muting a call
The mute function allows you to turn o the microphone while on a call. You can hear
the other party but the other party cannot hear you.
Using the telephone base:
1. Press during a call. The telephone base screen displays Mute.
2. Press again to resume conversation. The telephone base screen displays
Talk.
Speakerphone
Anytime during a call, press on the telephone base to switch between
speakerphone and normal handset use.
Volume control
You can adjust the volume of the handset or speakerphone anytime during a call.
• Use the scroll wheel on the telephone base to increase or decrease the volume.
NOTE: Only the listening volume can be adjusted.
Equalizer
This feature allows you to change the tone of the audio of the handset to best suit
your hearing. You can select Natural, Bass or Treble.
Using the telephone base:
1. During a call, press repeat/back/EQ on the left of the scroll wheel.
2. Press / or use the scroll wheel to select Natural, Bass or Treble.
3. Press the Select softkey to conrm.
Silencing the ringer
You can temporarily silence the ringer for an incoming call on a telephone base
without disconnecting the call.
• Press the Silence softkey, or use the scroll wheel to scroll the volume level to silent.
To put a call on hold
To put a Line 1 call on hold:
Press on the telephone base to put a Line 1 call on hold. The button
ashes. Press on the telephone base to resume the call.
To put a Line 2 call on hold:
Press on a the telephone base to put a Line 2 call on hold. The
button ashes. Press on the telephone base to resume the call.
NOTE: If a call that is placed on hold is not picked up within 5 minutes, the call will be automatically
disconnected.
To make a call using the redial memory
The last ten telephone numbers previously dialed are stored in the redial list (up to 24
digits each).
Using the telephone base:
1. Press redial/select/skip on the right of the scroll wheel when in idle mode.
2. Press /or use the scroll wheel to scroll to the desired entry.
3. Lift the corded handset, or press or to call from Line 1 line.
-OR-
Press to call from Line 2 line.
4. The number is dialed automatically.
To save a number from the redial list to the phonebook
Using the telephone base:
1. Press redial/select/skip located on the blue ring surrounding the scroll wheel.
2. Press /or use the scroll wheel to select the desired entry, then press the
Options softkey.

Telephone operationTelephone operation
28 29
3. Press /or use the scroll wheel to select Save Number, then press the Select
softkey.
4. Enter the name using the dial pad keys, then press the Next softkey.
5. Edit the number using the dial pad keys if necessary, then press the Next softkey.
6. Press /or use the scroll wheel to select the desired category (Home, Cell,
Oce, Other) of the number.
7. Press Save softkey to conrm.
To delete a number from the redial list
Using the telephone base:
1. Press redial/select/skip locaed on the blue ring surrounding the scroll wheel when
in idle mode.
2. Press /or use the scroll wheel to select the desired entry, then press the
Options softkey.
3. Press /or use the scroll wheel to select Delete, then press the Select softkey to
delete the selected entry.
-OR-
Press /or use the scroll wheel to select Delete All, then press the Select
softkey to delete all entries.
4. Press the Yes softkey to conrm.
Voice message indicator
The telephone base displays voice message indicators for Line 1 and Line 2
separately.
• The icon appears inside denotes that Line 1 has received a new voice
message from your service provider.
• The icon appears inside denotes that Line 2 has received a new voice
message from your service provider.
IMPORTANT: Voice mail service is dierent from the answering system. In order to use the voice mail service,
you must subscribe to it from your telephone service provider.
Answering system message indicator
The telephone base displays answering system message indicators for Line 1 and
Line 2 separately.
• The icon appears inside denotes that Line 1 has received a new
answering system message.
• The icon appears inside denotes that Line 2 has received new
answering system message.
Line-in-use indicator
Line 1 and Line 2 each has its own line-in-user indicator.
• The icon appears inside denotes that Line 1 is in active use.
• The icon appears inside denotes that Line 2 is in active use.
NOTE: The line-in-use indicator is dierent from the new calls indicator .

Phonebook
30 31
Phonebook
The telephone system has a Local Phonebook that can store up to 100 entries. The
phone number in each entry can be up to 24 digits long; the contact names can be up
to 15 characters long. The telephone system can also download and store up to 4 Cell
Phonebooks with each phonebook storing up to 1500 entries. For more information
on Cell Phonebooks, refer to page 18 Directory Download section.
Add a local phonebook record
1. Press when in idle mode.
2. Press /or use the scroll wheel to select the Local Phonebook, then press the
Select softkey.
3. Press the Options softkey.
4. Press /or use the scroll wheel to select Add Entries, then press the Select
softkey.
5. Enter the name (max. 15 characters). Press the key to the corresponding character
to display the correct letter. See the character table on page 33 for more
information.
6. Press the Next softkey.
7. Enter the number (max. 24 digits). If you need a pause between digits, press and
hold the until a Pappears in the display. This will insert a 3-second pause in
the dialing sequence.
8. Press the Next softkey.
9. Press /or use the scroll wheel to select the desired category (Home, Cell,
Oce, Other) of the number.
10.Press the Save softkey to conrm.
To view/call a phonebook entry
1. Press when in idle mode.
2. Press /or use the scroll wheel to select the desired phonebook, then press the
Select softkey.
3. Press /or use the scroll wheel to scroll through the phonebook to select the
desired entry.
4. Lift the corded handset or press to call from Line 1 line, or press
to call from Line 2 line.
To search a phonebook entry alphabetically
1. Press when in idle mode.
2. Press /or use the scroll wheel to select the desired phonebook, then press the
Select softkey.
3. Use the dial pad key (0-9) to enter up to the rst three letters of the entry you are
looking for. The closest match will appear.
4. Lift the handset or press to call from Line 1 line, or press to call
from Line 2 line.
Edit a phonebook entry
1. Press when in idle mode.
2. Press /or use the scroll wheel to select the desired phonebook, then press the
Select softkey.
3. Press /or use the scroll wheel to select the desired entry, then press the
Options softkey.
4. Press /or use the scroll wheel to select Edit Entries, then press the Select
softkey.
5. Edit the name (max. 15 characters). Press the key to the corresponding character
to display the correct letter. See the character table on page 33 for more
information.
6. Press the Next softkey.
7. Edit the number (max. 24 digits). If you need a pause between digits, press and
hold the until a Pappears in the display. This will insert a 3-second pause in
the dialing sequence.
8. Press the Next softkey.
9. Press /or use the scroll wheel to select the desired category (Home, Cell,
Oce, Other) of the number.
10.Press the Save softkey to conrm.
Delete a phonebook entry
1. Press when in idle mode.
2. Press /or use the scroll wheel to select the desired phonebook, then press the
Select softkey.
3. Press /or use the scroll wheel to select the desired entry, then press the
Options softkey.
4. Press /or use the scroll wheel to select Delete An Entry, then press the Select
softkey.
5. Press the Yes softkey to conrm.

Phonebook Phonebook
32 33
Delete all phonebook entries
1. Press when in idle mode.
2. Press /or use the scroll wheel to select the desired phonebook, then press the
Select softkey.
3. Press the Options softkey.
4. Press /or use the scroll wheel to select Delete All, then press the Select
softkey.
5. Press the Yes softkey to conrm.
Phonebook capacity
This feature allows you to check the remaining capacity of the phonebook.
1. Press when in idle mode.
2. Press /or use the scroll wheel to select the desired phonebook, then press the
Select softkey.
3. Press /or use the scroll wheel to select entry, then press the Options softkey.
4. Press /or use the scroll wheel to select PB Capacity, then press the Select
softkey. The screen then displays X/Y, where Xindicates the number of entries
stored while Yindicates the capacity of the selected phonebook.
For example, 241/1500 means that there are 241 entries in a phonebook, which
has a maximum capacity of 1500 entries.
Direct memory
You can program 20 phone numbers into the memory location buttons 1-10 and
shift 1-10 in the telephone base for quick dialing.
To program a memory location:
1. Press the Menu softkey when the telephone base is in idle mode.
2. Press / or use the scroll wheel to select Direct Memory, then press the Select
softkey.
3. Press buttons 1-10 for locations 1-10, or press button shift followed by 1-10 for
locations 11-20.
4. Enter the number (max. 24 digits). If you need a pause between digits, press and
hold the until a Pappears in the display. This will insert a 3-second pause in
the dialing sequence.
5. Press the Save softkey to conrm.
To dial from a memory location:
Press the desired memory location button on the telephone base, the number will be
dialed automatically using the speakerphone.
-OR-
1. Lift the corded handset, or press or or .
2. Press the desired memory location button on the telephone base.
To edit/delete a memory location number:
1. Press the Menu softkey when the telephone base is in idle mode.
2. Press /or use the scroll wheel to select Direct Memory, then press the Select
softkey.
3. Press the desired memory location button (1-10 for locations 1-10, or shift
following by 1-10 for locations 11-20).
4. To edit the number, press to delete the existing numbers. Then use the dial
pad keys to enter the new number (max. 24 digits). If you need a pause between
digits, press and hold the until a Pappears in the display. This will insert a
3-second pause in the dialing sequence.
-OR-
To delete the number, press and hold until all numbers erased on the
screen.
5. Press the Save softkey to conrm.
Character table
Use the dial pad and the chart below to enter a name (up to 15 characters). Each
press of a particular key displays the character in the following order:
Dial pad
key
Character by number of key presses
12345678
[1] space 1 # ‘ , - . &
[2] Aa Bb Cc 2
[3] Dd Ee Ff 3
[4] Gg Hh Ii 4
[5] Jj Kk Ll 5
[6] Mm Nn Oo 6
[7] Pp Qq Rr S 7
[8] Tt Uu Vv 8
[9] Ww Xx Yy Zz 9
[0] 0
NOTE: Press # to alternate between upper and lower case. Press * for special characters, *, ?, !, /, (, ), @.

Caller ID
34 35
Caller ID
Using Caller ID service
IMPORTANT: You must subscribe to Caller-ID services from your telephone service
provider(s) to receive Caller ID information.
Caller ID records from Line 1 line and Line 2 line are stored separately and in the order
that they are received.
Your telephone stores caller ID memory for the 100 most recent calls. When the 101st
call is received, the oldest Caller ID record (rst call) is automatically deleted.
Phonebook Caller-ID matching
If the last seven digits of an incoming telephone number match a telephone number
in your phonebook, the name from this entry will display on the screen.
For example, if Michael Jones calls, and his number is saved in the phonebook under
the name MIKE, the screen displays the name MIKE.
NOTE: The number you see on your caller ID is in the format sent by the telephone service provider. It usually
delivers 10-digit telephone numbers (area code plus telephone number). If the last seven digits of the incoming
telephone number do not match with a number in your phonebook, the name appears as it is delivered by the
telephone service provider.
Review/call from the call log
As calls are received and stored, the display is updated to let you know new calls have
been received. To scroll through the caller ID records:
1. Press when the handset is in idle mode.
2. Press /or use the scroll wheel to select Line 1 or Line 2, then press the Select
softkey.
3. Press /or use the scroll wheel to scroll through the phonebook. When the
desired record is displayed, press or to call from Line 1 line, or press
to call from Line 2 line.
-OR-
Press repeatedly until the phone number is shown in the desired format (for
example, when 555-5555 is displayed, press to change the format of the
phone number to 555-555-5555, 1-555-555-5555, and back to 555-5555), then
press or to call from Line 1 line, or press to call from Line 2
line.
Save a number from CID to the local phonebook
You can save a number from the caller id log to your local phonebook.
1. Press when the handset is in idle mode.
2. Press /or use the scroll wheel to select Line 2 or Line 2, then press the Select
softkey.
3. Press /or use the scroll wheel to select the desired entry, then press the
Options softkey.
4. Press /or use the scroll wheel to select Save Number, then press the Select
softkey.
5. Edit the name using the dial pad keys if necessary, then press the Next softkey.
6. Edit the number by using the dial pad keys if necessary, then press the Next
softkey.
7. Press /or use the scroll wheel to select the desired category (Home, Cell,
Oce, Other) for the entry, then press the Save softkey.
IMPORTANT: You can only save a caller ID record to the Local Phonebook.
Delete a caller ID record
1. Press when the handset is in idle mode.
2. Press /or use the scroll wheel to select Line 1 or Line 2, then press the Select
softkey.
3. Press /or use the scroll wheel to select the desired entry, then press the
Options softkey.
4. Press /or use the scroll wheel to select Delete, then press the Select softkey.
5. Press the Yes softkey to conrm.
Delete all caller ID records
1. Press when the handset is in idle mode.
2. Press /or use the scroll wheel to select the desired entry, then press the
Options softkey.
3. Press /or use the scroll wheel to select Delete All, then press the Select
softkey.
4. Press the Yes softkey to conrm.
Call log display screen messages
Display When
Out of area The caller’s name and number are not available.
Private The caller is blocking the name and/or number.
This manual suits for next models
1
Table of contents
Other GE Telephone manuals