GE 28871 User manual

Model 28871
DECT 6.0 Telephone/
Answering System with
Cordless Handset
User's Guide

Equipment Approval Information
Yourtelephone equipment is (]pproved for connection to the Public Switched Telephone Network (]nd
is in complionce with ports 15(]nd 68,FCCRules(]nd Regul(]tions (]nd the Technic(]l Requirements
for Telephone Termin(]l Equipment published by ACTA.
1 Notification to the Local Telephone Company
On the bottom ofthis equipment is(] I(]bel indic(]ting, (]mong other inform(]tion, the USnumber
(]nd Ringer Equiv(]lence Number (REN)for the equipment. You must, upon request, provide this
inform(]tion to your telephone comp(]ny.
The RENis useful in determining the number of devices you m(]yconnect to your telephone line
(]nd still hove (]11of these devices ring when your telephone number is c(]lled. Inmost (but not (]11)
(Ire(Is,the sum of the RENsof (]11devices connected to one line should not exceed 5.To be cert(]in
of the number of devicesyou m(]y connect to your line (Isdetermined by the REN,you should
cont(]ct your Ioc(]ltelephone comp(]ny.
Aplug (]ndjock used to connect this equipment to the premises wiring (]nd telephone network
must comply with the opplic(]ble FCCPort 68 rules (]nd requirements (]dopted by the ACTA.A
compli(]nt telephone cord (]nd modul(]r plug is provided with this product. It is designed to be
connected to (] comp(]tible modul(]rjock th(]t is(]lso compliont. Seeinst(]ll(]tion instructions for
det(]ils.
Notes
• This equipment m(]y not be used on coin service provided bythe telephone comp(]ny.
• Potty lines (]re subject to st(]te t(]riffs, (]nd therefore, you m(]y not be (]ble to useyour own
telephone equipment if you (]re on (] p(]rty line.Check with your Ioc(]ltelephone comp(]ny.
• Notice must be given to the telephone comp(]ny upon perm(]nent disconnection of your
telephone from your line.
• Ifyour home h(]sspeci(]lly wired (]l(]rm equipment connected to the telephone line,ensure
the inst(]ll(]tion of this product does not dis(]ble your (]l(]rm equipment. Ifyou h(]ve questions
(]bout wh(]t will dis(]ble(]l(]rm equipment, consult your telephone comp(]ny or (] qu(]lified
inst(]ller. USNumber is located on the cabinet bottom
RENnumber is located on the cabinet bottom
2 Rights of the Telephone Company
Shouldyour equipment c(]use trouble on your linewhich m(]y h(]rm the telephone network,
the telephone comp(]ny sh(]ll,where pr(]ctic(]ble, notify you th(]t tempor(]ry discontinu(]nce of
service m(]y be required.Where prior notice is not pr(]ctic(]ble (]nd the circumst(]nces w(]rr(]nt
such (]ction, the telephone comp(]ny m(]y temporarily discontinue service immedi(]tely. Inc(]se
of such temporary discontinu(]nce, the telephone comp(]ny must: (1)promptly notify you of such
tempor(]ry discontinu(]nce; (2)(]fiord you the opportunity to correct the situ(]tion; (]nd (3)inform
you of your right to bring (] compl(]int to the Commission pursu(]nt to procedures set forth in
Subp(]rt Eof P(]rt68, FCCRules(]nd Regul(]tions.
Thetelephone comp(]ny m(]y m(]ke ch(]nges in its communic(]tions f(]cilities, equipment,
oper(]tions or procedures where such (]ction is required in the oper(]tion of its business (]nd not
inconsistent with FCCRules(]nd Regul(]tions. If these ch(]nges (]re expected to (]fleet the use or
perform(]nce ofyour telephone equipment, the telephone comp(]ny must give you (]dequ(]te
notice, in writing, to (]llow you to m(]int(]in uninterrupted service.

Interference Information
Thisdevice complies with Part 15of the FCCRules.Operation issubject to the following two
conditions: (1)This device may not cause harmful interference; and (2)This device must accept any
interference received, including interference that may cause undesired operation.
Thisequipment has beentested and found to comply with the limits for a Class Bdigital device,
pursuant to Part 15of the FCCRules.Theselimits are designed to provide reasonable protection
against harmful interference in a residential installation.
Thisequipment generates, uses,and can radiate radio frequency energy and, if not installed and
used in accordance with the instructions, may cause harmful interference to radio communications.
However, there is noguarantee that interference will not occur in a particular installation.
Privacy of Communications may not be ensured when usingthis product.
If this equipment does cause harmful interference to radio or television reception, which can be
determined by turning the equipment off and on,the user isencouraged to try to correct the
interference by one or more of the following measures:
• Reorient or relocate the receiving antenna (that is,the antenna for radio or television that is
"receiving" the interference}.
• Reorient or relocate and increase the separation between the telecommunications
equipment and receiving antenna.
• Connect the telecommunications equipment into an outlet on a circuit different from that to
which the receiving antenna isconnected.
If these measures do not eliminate the interference, please consult your dealer or an experienced
radio/television technician for additional suggestions. Also,the Federal Communications Commission
has prepared a helpful booklet, "How To Identify and Resolve Radio/TV Interference Problems."This
booklet isavailable from the U.S.Government Printing Office, Washington, D.C.20402. Pleasespecify
stock number 004-000-00345-4 when ordering copies.
Notice: Thechanges or modifications not expressly approved by the party responsible for
compliance could void the user's authority to operate the equipment.
Hearin,q Aid Compatibility (HAC)
Thistelephone system meets FCCstandards for Hearing Aid Compatibility.
Licensing
Licensed under USPatent 6,427,009.
FCC RF Radiation Exposure Statement
Thisequipment complies with FCCRFradiation exposure limits set forth for an uncontrolled
environment. This equipment should be installed and operated with a minimum distance of 20
centimeters between the radiator and your body. This transmitter must not beco-located or
operated in conjunction with any other antenna or transmitter.
Information for DECT Product
k_6:0 Thistelephone iscompliant with the DECT6.0standard which operates in the 1.92GHz
to 1.93GHzfrequency range. Installation of this equipment issubject to notification
............... and coordination with UTAM.Any relocation of this equipment must be coordinated
through and approved by UTAM.UTAMmay becontacted at 1-800-429-8826.

Table of Contents
EQUIPMENT APPROVAL INFORMATION .......................... 2
INTERFERENCE INFORMATION ...................................... :3
HEARINGAID COMPATIBILITY(HAC} .......................... 3
LICENSING .............................................................. 3
FCC RF RADIATION EXPOSURE STATEMENT ................. 3
INFORMATION FOR DECT PRODUCT ........................... 3
INTRODUCTION ........................................................ 6
BEFORE YOU BEGIN ................................................. 6
PARTS CHECKLIST) ......................................................... 6
TELEPHONE JACK REQUIREMENTS ................................. 7
INSTALLATION .......................................................... 7
DIGITAL SECURITY SYSTEM ............................................ 7
IMPORTANT INSTALLATION GUIDELINES .......................... 7
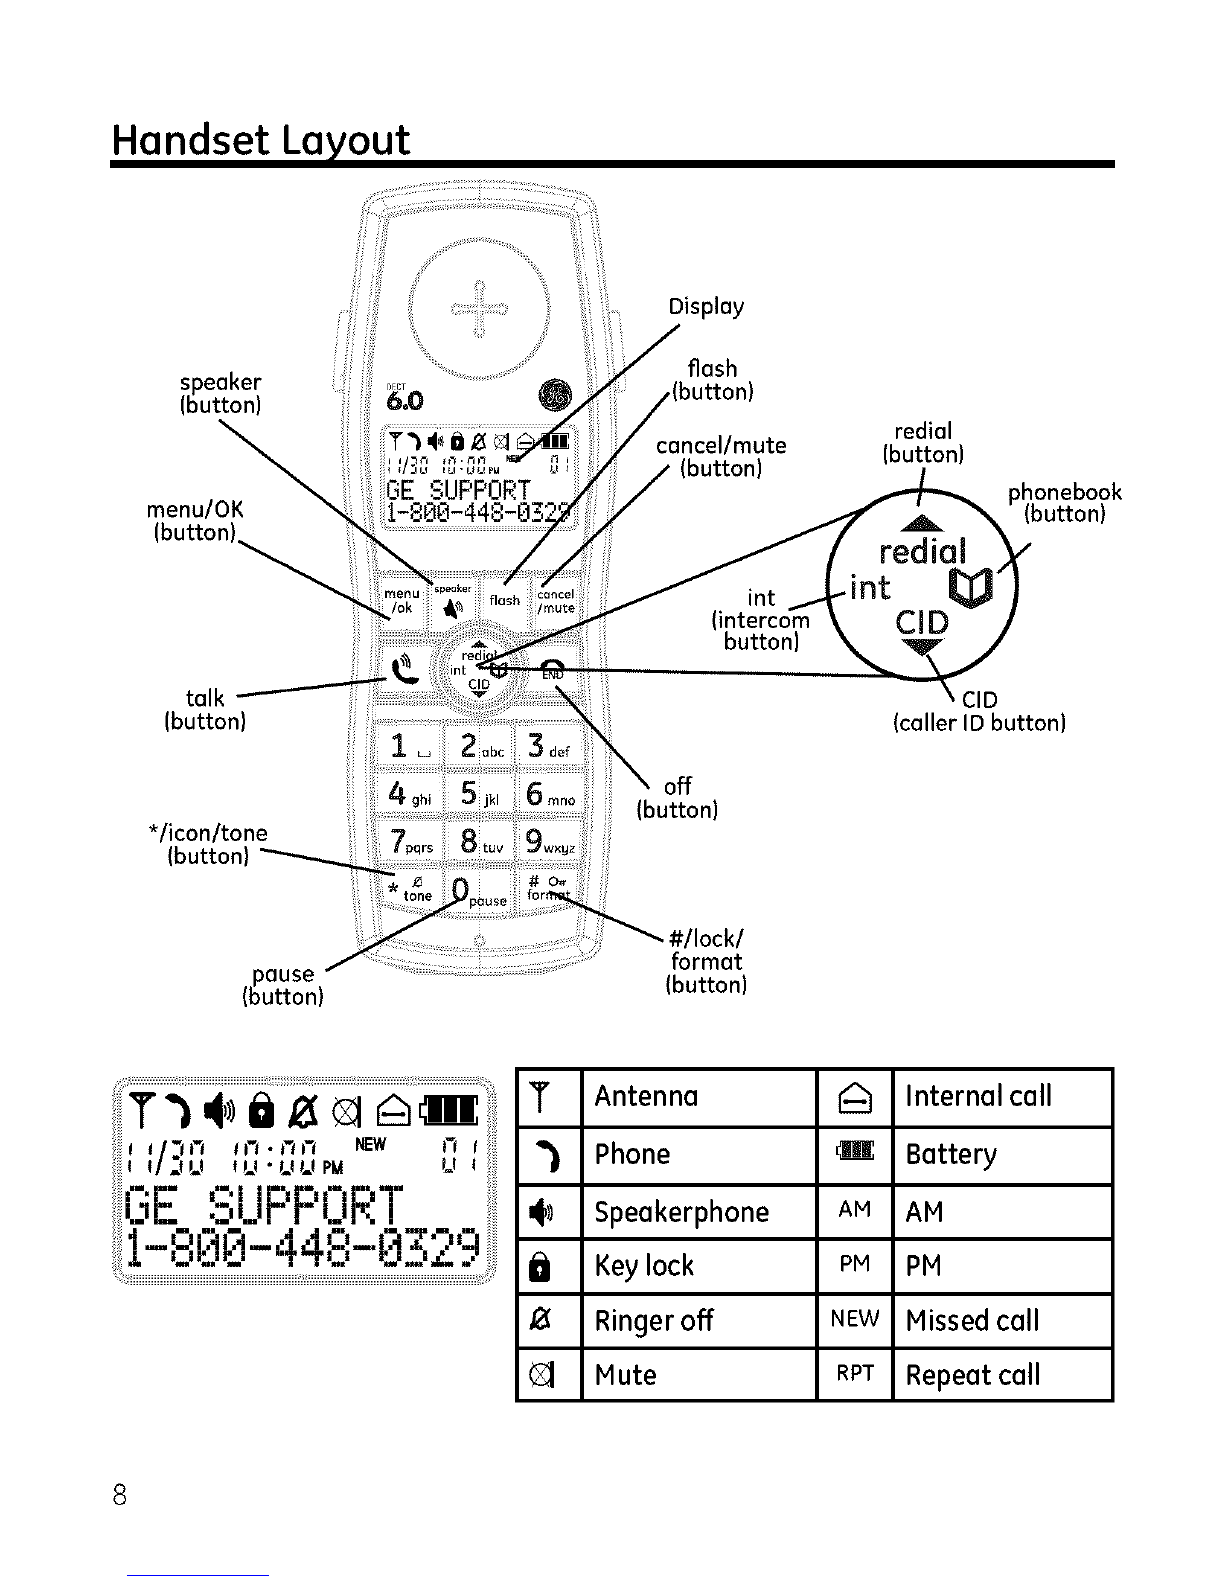
HANDSET LAYOUT ....................................................8
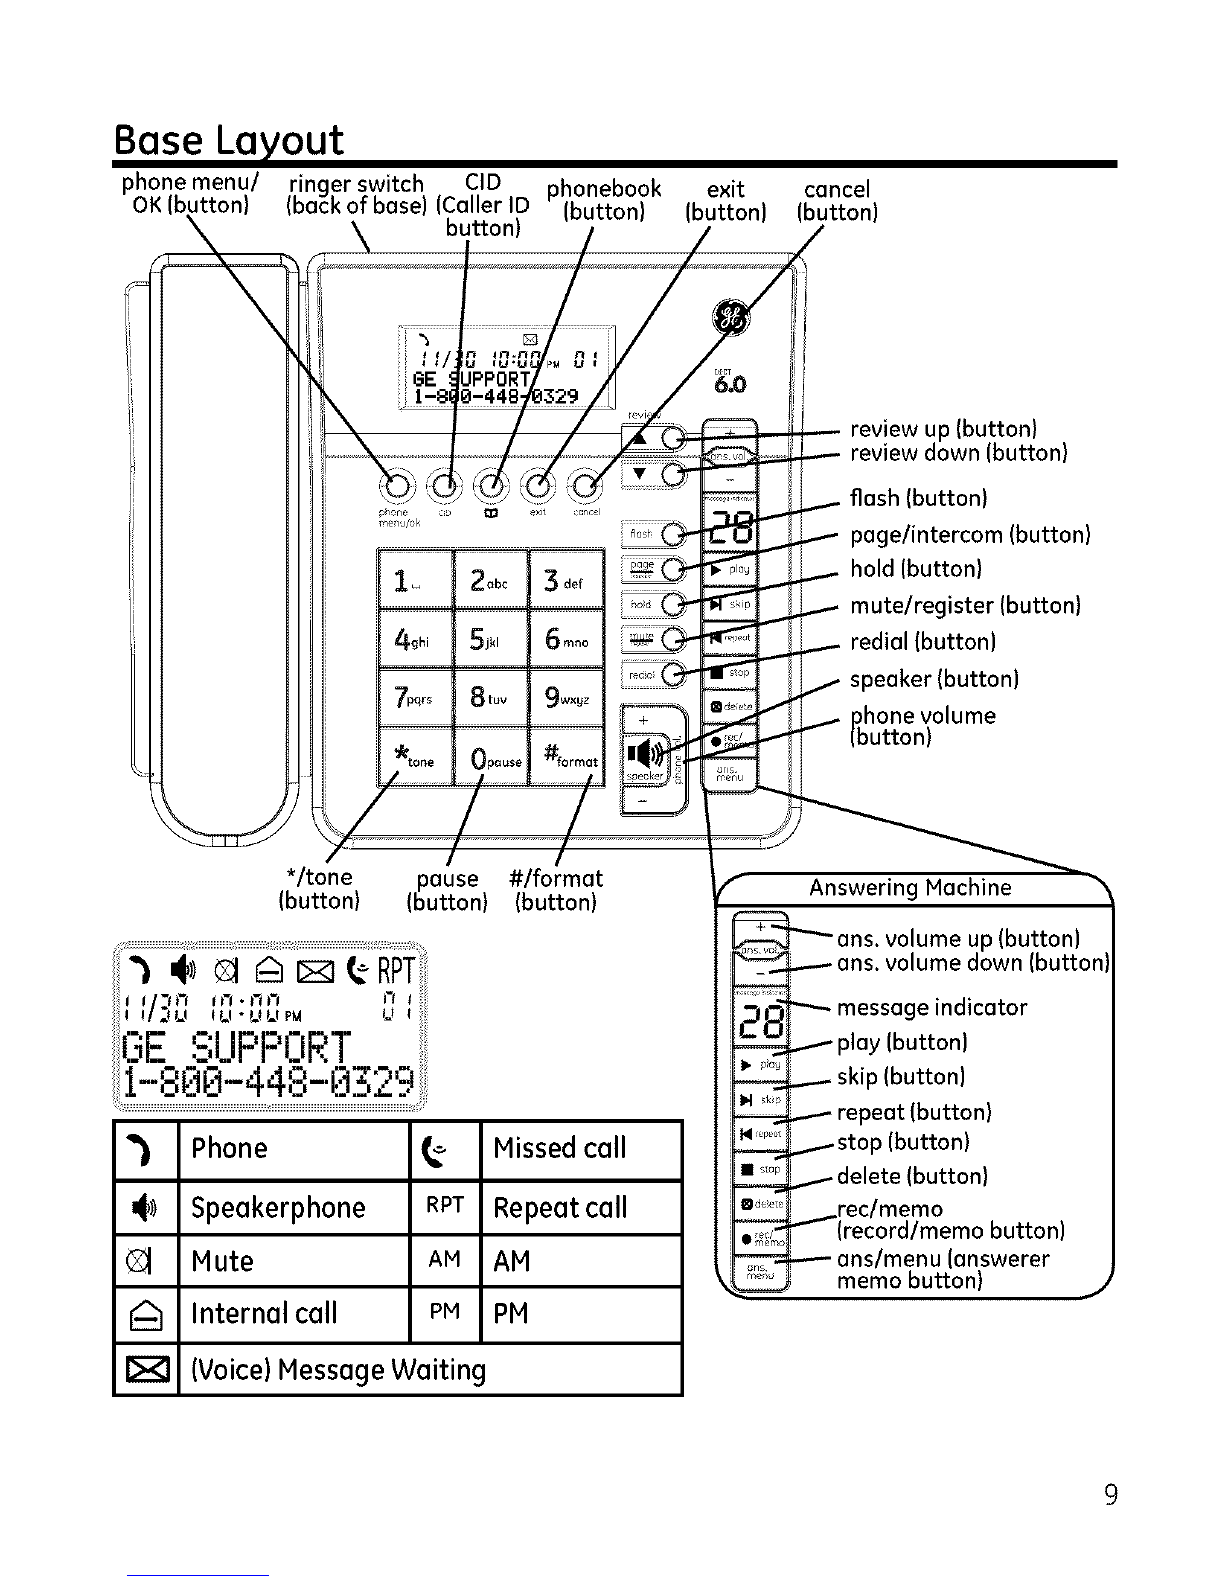
BASELAYOUT..........................................................9
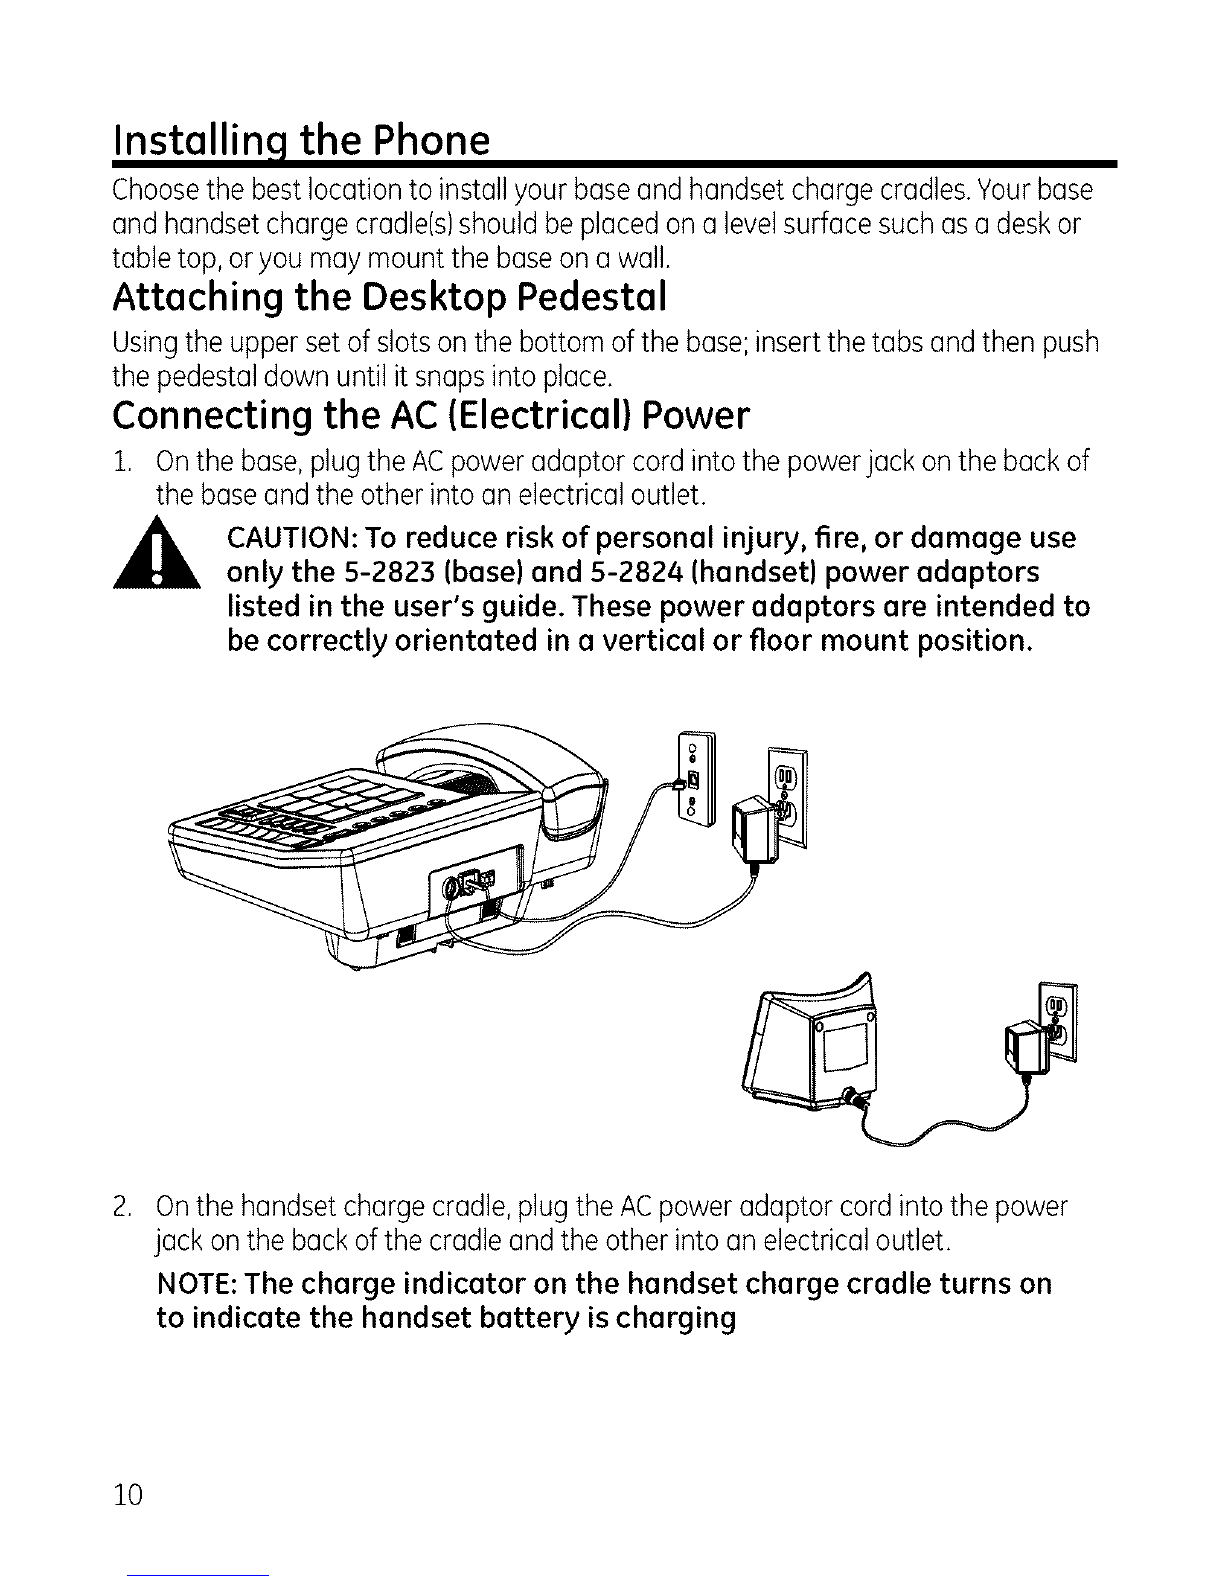
INSTALLING THE PHONE ...........................................10
ATTACHING THE DESKTOP PEDESTAL ..........................]0
CONNECTING THE AC (ELECTRICAL) POWER .............. 10
CONNECTING THE TELEPHONE LINE ................... 11
CONNECTING THE CORDED HANDSET ............... 11
SETTING THE RINGER VOLUME ................................... 11
WALL MOUNTING THE BASE ...................................... 11
INSTALLING THE HANDSET BATTERY ........................... 12
MENU OPERATION ................................................. 13
BASE MENU ............................................................... 13
SELECTING THE LANGUAGE ................................ 13
AREA CODE ....................................................... 13
LCD CONTRAST ................................................ ].3
KEY TONE .......................................................... 13
DIAL MODE.......................................................14
DATE /TIME ...................................................... 14
MESSAGE WAITING ........................................... 15
RESET ................................................................. 15
HANDSET MENU .................................................... 16
HANDSETSETTING ...................................................... 16
RING MELODY ................................................... 16
RING VOLUME ................................................... 16
Low BATTERY .................................................... 16
NoCOVERAGE ................................................... 17
KEY TONE .......................................................... 17
AUTO TALK ........................................................ 17
(DAILY) ALARM ................................................... 18
HANDSET NAME ................................................ 18
LANGUAGE ......................................................... 18
SCREEN CONTRAST ............................................ 19
RESET HANDSET ................................................ 19
BASE SETTING ............................................................ 19
CHANGEPIN ....................................................19
DIAL MODE ....................................................... 20
MESSAGEWAITING(VMWI) ............................20
RESET BASE ....................................................... 21
DATE /TIME ..................................................... 21
REGISTRATION ............................................................. 22
REGISTER ............................................................ 22
REMOVE HANDSET (DE-REGISTRATION) ............. 22
BASIC OPERATION .................................................. 23
MAKING A CALL ......................................................... 23
CORDLESS HANDSET ......................................... 23
CORDED HANDSET ............................................ 23
RECEIVING ACALL ...................................................... 23
CORDLESS HANDSET ......................................... 23
CORDED HANDSET ............................................ 23
ADJUSTING THE RECEIVER OR SPEAKER VOLUME ....... 23
SPEAKERPHONE OPERATION ....................................... 24
SWITCH BETWEEN SPEAKERPHONE _ RECEIVER ON
THE BASE ........................................................... 24
SWITCH BETWEEN SPEAKERPHONE _ RECEIVER ON
THE CORDLESS HANDSET ................................... 24
SPECIAL FEATURES ...................................................... 24
PAGE ALL CORDLESS HANDSETS FROM BASE,,, 24
TEMPORARY TONE (FOR PULSE OR ROTARY SERVICE
USE)....................................................................24
MUTE.................................................................24
PAUSE ................................................................ 25
FLASH ................................................................ 25
KEYPAD LOCK (ONLY FOR CORDLESS HANDSET), 25
HOLD(ONLYFORBASE)...................................... 25
REDIAL FUNCTION ...................................................... 26
DIAL A NUMBER FROM THE REDIAL MEMORY - 26
SAVE REDIAL MEMORY ...................................... 26
DELETE A SINGLE REDIAL MEMORY .................. 26
DELETE ALL REDIAL MEMORY ........................... 26
INTERCOM OPERATION ................................................ 27
BASE TO CORDLESS HANDSET ........................... 27
CORDLESS HANDSET TO BASE ........................... 27
CORDLESS HANDSET TO CORDLESS HANDSET,, 27
RECEIVING AN INCOMING CALL DURING AN
4

Table of Contents
INTERCOM CALL ................................................. 27
Two-WAY CALLING .......................................... 28
THREE WAY CONFERENCE CALL ....................... 28
CALL TRANSFER ................................................. 28
CALLERID (CID} .................................................. 29
CALL WAITING CALLER ID.........................................29
RECEIVINGCID RECORDS..........................................29
CID MEMORY RECORD STORAGE .............................. 29
REVIEWINGCID RECORDS ......................................... 30
DIALING ACID NUMBER ........................................... 30
DELETINGCID RECORDS ........................................... 31
DELETE A SINGLE CID RECORD ........................ 31
DELETE ALL CID RECORDS .............................. 31
PHONEBOOK ......................................................... 31
REVIEW PHONEBOOK .................................................. 31
STORING NAME AND NUMBER INTO PHONEBOOK,,,,,, 32
STORINGCID RECORDS IN PHONEBOOK ................... 32
EDiT PHONEBOOK ENTRY ........................................... 33
DELETE PHONEBOOK ENTRY ....................................... 33
DIAL RECORD FROM PHONEBOOK .............................. 33
ANSWERING SYSTEM SETUP _ PROGRAMMING ............ 34
AUDIBLE QUICK SETUP GUIDE ................................... 34
SET ANSWERING MACHINE ON/OFF .....................34
DAY/TIME ................................................................... 34
OUTGOING ANNOUNCEMENT ..................................... 35
ANNOUNCEONLYON/OFF ....................................35
RECORDING AN ANNOUNCEMENT ............................... 3S
RECORDING AN ANSWER ONLY ANNOUNCEMENT ...... 36
REVIEWING/DELETINGA1/A2 ANNOUNCEMENTS,,,,36
REMOTE ACCESS CODE .............................................. 36
REMOTE ACCESS ......................................................... 37
SET AUDIBLE MESSAGE ALERT ON/OFF .................37
SETNUMBEROFRINGSTOANSWER.........................38
RECORDINGAMEMO..................................................38
MESSAGE PLAYBACK ................................................... 39
DELETING MESSAGES ................................................. 39
IMPORTANT INFORMATION .................................. 39
CHANGING THE BATTERY ......................................... 40
BATTERY SAFETY PRECAUTIONS .................................. 40
DISPLAY MESSAGES ................................................41
HANDSET SOUND SIGNALS ...................................... 41
TROUBLESHOOTING GUIDE ....................................... 41
CALLERIO SOLUTIONS ...................................... 43
BATTERY SOLUTIONS .......................................... 43
CAUSES OF POOR RECEPTION ................................... 44
GENERAL PRODUCT CARE ....................................... 44
WARRANTY ASSISTANCE .......................................... 4S
ACCESSORY INFORMATION ....................................... 4S
LIMITED WARRANTY ............................................... 46
INDEX ........................................................... 48, 49
WARNING: TO
PREVENT FIRE OR
ELECTRICAL SHOCK
HAZARD, DO NOT
EXPOSETHIS
PRODUCT TO RAIN
OR MOISTURE.
THE LIGHTNING
FLASHAND ARROW
HEADWITHIN THE
TRIANGLE IS A
WARNING SIGN
ALERTINGYOU OF
"DANGEROUS
VOLTAGE" INSIDE
THE PRODUCT.
CAUTION: TO REDUCE THE
RISK OF ELECTRIC SHOCK, DO
NOT REMOVE COVER (OR
BACK). NO USER
SERVICEABLE PARTS INSIDE.
REFER SERVICING TO
QUALIFIED SERVICE
PERSONNEL.
THE EXCLAMATION
POINT WITHIN THE
TRIANGLE IS A
WARNING SIGN
ALERTING YOU OF
IMPORTANT
INSTRUCTIONS
ACCOMPANYING
THE PRODUCT.
SEE MARKING ON BOTTOM /BACK OF PRODUCT

Introduction
CAUTION: When using telephone equipment, there are basic
safety instructions that should always be followed. Refer to the
IMPORTANT SAFETY INSTRUCTIONS provided with this product
and save them for future reference.
IMPORTANT: Because cordless phones operate on electricity, you
should have at least one phone in your home that isn't cordless, in
case the power in your home goes out.
Before You Be in
Parts Checklist (for Model 28871xx2}
Make sure your package includes the items shown here.
Coiled
handsetcord
2 AC power
adaptors
Base Base Handset
Telephone
linecord
Handset
battery
Cordless handset Cordless Handset battery Desk pedestal/
charger handset compartment Wallmount
door bracket
ForModel28871xx3therewill beONEadditional handset,battery pack,cover,
chargecradleand poweradaptorthan shown.

Telephone Jack Requirements
Tousethis phone,youneedan RJllC type modulartelephone
jack,which might looklikethe one picturedhere,installedinyour
home.Ifyoudon't havea modularjack,callyourlocalphone
companyto find out howto getone installed.
Installation
Wall plate
Modular
telel:
line
Digital Security System
Yourcordlessphoneusesa digitalsecuritysystemto protectagainst falseringing,
unauthorizedaccess,and chargesto your phoneline.
INSTALLATIONNOTE:Somecordless telephones operate at
frequencies that may cause or receive interference with nearby TVs,
microwave ovens, and VCRs.To minimize or prevent such interference,
the base of the cordless telephone should not be placed near or on
top of a TV, microwave ovens, or VCR.If such interference continues,
move the cordless telephone farther away from these appliances.
Certain other communications devices may also use the 1.9 GHz
frequency for communication, and, if not properly set, these
devices may interfere with each other and/or your new telephone.
If you are concerned with interference, please refer to the owner's
manual for these devices on how to properly set channels to avoid
interference. Typical devices that may usethe 1.9GHzfrequency
for communication include wireless audio/video senders, wireless
computer networks, multi-handset cordless telephone systems, and
some long-range cordless telephone systems.
Important Installation Guidelines
• Avoidsourcesof noiseand heat,such asmotors,fluorescentlighting,
microwaveovens,heatingappliancesand directsunlight.
• Avoidareasof excessivedust, moistureand lowtemperature.
• Avoidothercordlesstelephonesor personalcomputers.
• Neverinstalltelephonewiring during a lightningstorm.
• Neverinstalltelephonejacksin wet locationsunlessthejack isspecifically
designedfor wet locations.
• Nevertouch non-insulatedtelephonewiresor terminals,unlessthe telephone
linehasbeendisconnectedatthe networkinterface.
• Usecaution wheninstallingor modifyingtelephonelines.

Handset Layout
speaker
(button)
menu/OK
(button)
talk
(button)
*/icon/tone
(button)
pause "
(button)
Display
flash
cancel/mute
int
button)
off
(button)
format
(button)
redial
(button)
phonebook
(button)
CID
(caller ID button)
TAntenna
_} Phone
4_ Speakerphone
iJ Keylock
Ringer off
Hute
1_ Internal call
m Battery
AM AH
PM PH
NEW Hissedcall
RPT Repeatcall

Base Layout
phonemenu/ ringer switch CID phonebook exit cancel
OK atton) (back of base) (Caller ID (button) (button) (button)
/
"_ Phone _ Missedcall
4_) Speakerphone RPT Repeatcall
Mute AM AM
Internal call PM PM
I_ (Voice)MessageWaiting
-- review up (button)
review down (button)
....- flash (button)
.---- page/intercom (button)
.._ hold (button)
..--- mute/register (button)
redial (button)
/speaker (button)
phone volume
(button)
Answering Machine
_'_"- ans. volume up (button)
_ans. volume down (button]
_ essage indicator
play (button)
skip (button)
repeat (button)
stop (button)
_delete (button)
e_l _rec/memo
_(record/memo button)
ans/menu (answerer
memo button) j

Installin 9 the Phone
Choosethe bestlocationto installyour baseand handsetchargecradles.Yourbase
and handsetchargecradle(s)shouldbe placedon a levelsurfacesuchasa deskor
tabletop,or you maymount the baseon a wall.
Attaching the Desktop Pedestal
Usingthe upperset ofslotsonthe bottom ofthe base;insertthe tabs andthen push
thepedestaldownuntil itsnapsinto place.
Connecting the AC (Electrical) Power
1. Onthe base,plugtheACpoweradaptor cordintothe powerjack onthe backof
the baseandthe otherinto an electricaloutlet.
CAUTION:To reduce risk of personal injury, fire, or damage use
only the 5-2823 (base} and 5-2824 (handset} power adaptors
listed in the user's guide. These power adaptors are intended to
be correctly orientated in a vertical or floor mount position.
On the handset charge cradle, plug the ACpower adaptor cord into the power
jack on the back of the cradle and the other into an electrical outlet.
NOTE: The charge indicator on the handset charge cradle turns on
to indicate the handset battery is charging
10

ConnectingtheTelephoneLine
Onthebase,plugoneendofthestraighttelephonelinecordintothejackontheback
ofthebaseandtheotherendintoamodularwalltelephonejack.
ConnectingtheCordedHandset
1. Connectoneendofthecoiledhandsetcordtothejackonthesideofthebase.
2. Connecttheotherendofthecoiledcordtothejackonthehandset,thenplace
thehandsetinthebasecradle.
Setting the Ringer Volume
Youmay controlthe ringervolumelevelwith theswitch locatedon the backofthe
base.
ll_ =ringertonewill be loud
=ringertonewill be low
=telephonewillnot ring
Wall Mounting the Base
Thebaseispackagedwith the pedestalattachedin desktopmode.Tomount the
baseon thewall:
1. Turnthe baseoverand removethe pedestal.
2. Rotatethe pedestala halfturn, andalign itwith the bottom ofthe base.
B. Attachthe pedestalbyfirst insertingthetabs on the pedestalintothe slotson the
bottom ofthe base,and thenpushthe pedestaldownuntil it snapsinto place.
/4. Plugthe telephonelinecord intothejack markedPHONELINEon the backofthe
baseand the otherendinto a modularphonejack.
5. Feedthe telephonelinecordand ACpoweradaptorcordthroughthe grooveson
the pedestalto allowthe unitto restflat againstthewall.
6. Slipthe mounting holesonthe pedestaloverthe wallplate postsandfirmly slide
the unitinto place.(Wallplatenot included.)
7. Removethehandsethook,turn it upsidedown,and put it backinthe slot.You
needto dothis sothecordedhandsetdoesn'tfall out ofthe base.
8. Placethe cordedhandsetinthe basecradle.
11

Installing the Handset Battery
NOTE:You must connect the handset battery before using the
cordless handsets.
CAUTION:To reduce the risk of fire or personal injury, only use
the Thomson Inc. approved Nickel-Metal Hydride battery model
5-2826, which is compatible with this unit.
1. Locatebatteryand battery doorwhich are packagedtogether insidea plasticbag
and areseparatefrom the handset.
2. Locatethebattery compartmenton the backofthe handset.
B. Plugthe battery packcordintothejack insidethe compartment.
NOTE:To ensure proper battery installation, the connector iskeyed
and can beinserted only one way.
battery PRESSDOWN
black wire FIRMLY
i!
iJ
red wire ........................................................................................................................................................_.ii
4. Insertthe battery pack.
S. Closethe battery compartment by pushingthe door up until it snapsinto place.
6. Placethe handset(s)inthe chargingcradle(s)
Allow handsetsto chargefor 16 hours prior to first use. Ifyou don't properly
chargethe handsets,battery performance iscompromised.
12

Menu Operation
Base Menu
Selecting the Language
Choose the screen display language.
1. Pressthe phone menu/ok button. The screen displays LANGUAGE.
2. Pressthe phone menu/ok button again.
3. Pressthe A or ,, button to select the desired language.
8. Pressthe phone menu/ok button to confirm the setting.
5. Pressthe exit button to return to idle mode.
Area Code
1. Pressthe phone menu/ok button.
2. Pressthe ,, or ,, button to select AREA CODEand press the phone menu/ok
button again.
3. Enter the area code.
4. Pressthe phone menu/ok button to confirm the setting.
5. Pressthe exit button to return to idle mode.
LCD Contrast
There are 8 levels available for selection. The default setting is level 7.
1. Pressthe phone menu/ok button.
2. Pressthe ,, or ,, button to select CONTRASTand press the phone menu/ok
button again.
3. Pressthe A or ,, button to select the desired contrast level.
4. Pressthe phone menu/ok button to confirm the setting.
5. Pressthe exit button to return to idle mode.
Key Tone
Turn the button tone for the base ON or OFF.The default setting is ON.
1. Pressthe phone menu/ok button.
2. Pressthe ,, or ,, button to select KEY TONEand press the phone menu/ok
button again.
3. Pressthe -, or ,, button to select ON or OFF.
4. Pressthe phone menu/ok button to confirm the setting.
5. Pressthe exit button to return to idle mode.
13

DialMode
SetthedialmodetoTONEorPULSE.ThedefaultsettingisTONE.
1. Pressthephonemenu/okbutton.
2. PresstheAor- buttontoselectDIALMODEand pressthe phonemenu/ok
button again.
3. Pressthe A or - button to selectTONEor PULSE.
/4. Pressthe phone menu/ok button to confirmthe setting.
5. Pressthe exit button to returnto idle mode.
Date /Time
Setthe Date/Timedisplayedin idlemode.Thedefault settingis"2008,01/01 12:01
pm".
1. Pressthe phone menu/ok button.
2. Pressthe A or - button to selectDATE/TIMEand pressthe phone menu/ok
button again,the screendisplaysYear2008.
3. Usethe numberkeypadto input thelast two digits ofyear(range:00-99),press
the phone menu/ok button to confirmthesetting andthen entermonth and date
settings.
/4. Input thecorrectdate andmonth,theformat is:date/month (daterange:01-
30/31,month range:01-12,pressthe phone menu/ok button to confirmthe
settingand entertime setting.
5. Input thecorrecttime,theformat is:hour/minute (hourrange:01-12and 00-23,
minute range:00-59),and selectam, pm,or 2/4-hourusingthe A or - button.
6. Pressthe phone menu/ok button to confirmthe setting.
7. Pressthe exit button to returnto idle mode.
NOTE:If the value you input is over the range, you cannot enter the
next setting. Please re-enter the correct setting.
14

MessogeWoiting
Ifyouhavesubscribedtoavoicemessagingservice,the_ icondisplaysonthe
baseandMESSAGEWAITINGdisplayson handsetto alert youthat you havereceived
newmessages.
Toturnthe VisualMessageWaiting Indication(VMWI)off;
1. Pressthe phone menu/ok button.
2. Pressthe -, or ,, button to scrollto VMWIand pressthephonemenu/okbutton
again.ThescreendisplaysVPIWIOFF?'.
8. Pressthe phone menu/ok button to confirmthe setting.
5. Pressthe exit button to returnto idle mode.
NOTE:This service requires o subscription through your local
service provider.
Reset
Resetsthe telephonebaseto the original(default)settings.
NOTE:All caller ID records stored in base ond cordless hondset,
and all the phonebook and redial records stored in base will be
cleared upon reset. You may wish to write down this information
before resetting the base.
i. Pressthe phone menu/ok button.
2. Pressthe -, or -- button to selectRESETandpressthe phone menu/ok button,
thescreendisplaysENTERPIN.(Thedefault settingis0000)
3. Usethe numberkeypadto input thecorrect PINcode,pressthe phone menu/ok
button to confirm,and thescreendisplaysRESET?.
4. Pressthe phone menu/ok button to confirmthe setting.
5. Pressthe exit button to returnto idle mode.
15

Handset Menu
Handset Setting
Ring Melody
5 ringertonesare availablefor selection.Thedefault settingisMelody1.
1. Pressthemenu/ok button.
2. Pressthe A or ,, button to selectSETUPHSand pressthe menu/ok button.
3. Pressthe A or ,, button to selectRINGMELODYandpressthe menu/okbutton.
4. Pressthe A or ,, button to hear and selectthedesiredring melody.
S. Pressthe menu/ok button to confirmthe setting.
6. Pressthe_ button to returnto idlemode.
Ring Volume
Sring volumesare availablefor selection.Thedefault settingisVolume5.Theringer
canbe disabledbypressingthe* button for 1.5secondswhilephone isin idle mode.
thescreendisplaysthe _ icon.Pressand hold* button again to enablethe ringer.
1. Pressthemenu/ok button.
2. Pressthe A or ,, button to selectSETUPHSand pressthe menu/okbutton.
3. Pressthe A or ,, button to selectRINGVOLUMEand pressthe menu/ok button.
4. Pressthe A or ,, button to hearand selectthe desiredringvolume..
5. Pressthe menu/ok button to confirmthe setting.
6. Pressthe_ button to returnto idlemode.
Note: For the cordless handset, the intercom ring volume cannot
be adjusted, but it can be deactivated.
Low Battery
Settingthe warningbeepto ONwillalert youwhenthecordlesshandsetbattery is
low.Thedefault settingisON.
1. Pressthe menu/ok button.
2. Pressthe A or ,, button button to select SETUPHS and press menu/ok button.
3. Pressthe ,, or ,, button button to select TONESand press menu/ok button.
4. Pressthe ,, or ,, button button to select LOW BATTERYand press menu/ok
button.
5. Pressthe A or ,, button to select ON or OFF.
16

2. Pressthe
3. Pressthe
4. Pressthe
S. Pressthe
6. Pressthe
7. Pressthe
Key Tone
6. Pressthe menu/ok button to confirm the setting.
7. Pressthe _ button to return to idle mode.
No Coverage
Setting the warning beep to ON will alert you when the cordless handset is out of
range. The default setting is OFF.
1. Pressthe menu/ok button.
,, or ,, button to select SETUPHS and press menu/ok button.
,, or ,, button to select TONESand press menu/ok button.
A or _- button to select NO COVERAGEand press menu/ok button.
A or ,, button to select ON or OFF.
menu/ok button to confirm the setting.
button to return to idle mode.
2. Pressthe
]. Pressthe
4. Pressthe
5. Pressthe
6. Pressthe
7. Pressthe
Auto Talk
Turnthe buttontone to ONor OFF.Thedefaultsetting isON.
1. Pressthe menu/ok button.
,, or ,, button to selectSETUPHSand pressmenu/ok button.
,, or ,, button to selectTONESand pressmenu/ok button.
-, or ,, button to selectKEYTONEand pressmenu/ok button.
A or ,, button to selectONor OFF.
menu/ok button to confirmthe setting.
button to returnto idlemode.
Allowsfor instantcommunicationwhenthe phoneisliftedfrom the cradlewith no
needto press_, or '_' button.Thedefault settingisON.
1. Pressthe menu/ok button.
2. Pressthe A or ,, button to select SETUPHS and pressthe menu/ok button.
3. Press the -, or ,, button to select AUTO TALl{ and press the menu/ok button.
4. Pressthe A or ,, button to select ON or OFF.
5. Pressthe menu/ok button to confirm the setting.
6. Pressthe _ button to return to idle mode.
17

(Daily) Alarm
1. Pressthemenu/ok button.
2. Pressthe ,, or ,, button to selectSETUPHSand pressthe menu/okbutton.
3. Pressthe ,, or ,, button to selectALARMand pressthe menu/ok button.
4. Pressthe -, or ,, button to selectONor OFF.
S. If youselectON. pressthe menu/ok buttonto enterHH:MM.Pressthe ,, or ,,
button to selectam or pm.
6. Pressthe menu/ok button to confirmthe setting.
NOTE:When alarm is set, an Ais shown on display. When the
Alarm time is reached, the alarm sounds and ALARM ON blinks for
1 minute.
Handset Name
Seta preferrednameto thecordlesshandset.Thedefault nameisHANDSET.
1. Pressthe menu/ok button.
2. Pressthe ,, or ,, button to selectSETUPHSand pressthe menu/ok button.
3. Pressthe A or ,, button to selectHANDSETNAMEand pressthe menu/ok
button.
4. Enterthedesirednameusingthe numberkeypad.(Deleteincorrectentriesby
pressingthecancel/mute button).
S. Pressthe -, or ,, button to movecursor left or right.
6. Pressthe menu/ok button to confirm.
Language
Choosethe screendisplaylanguage.
1. Pressthe menu/ok button.
2. Pressthe
3. Pressthe
4. Pressthe
S. Pressthe
6. Pressthe
,, or ,, button to selectSETUPHSand pressthe menu/ok button.
A or ,, button to selectLANGUAGEand pressthe menu/ok button.
-, or ,, button to selectthe desiredlanguage.
menu/ok button to confirmthe setting.
button to returnto idlemode.
18

Screen Contrast
There are 5 levels available for selection. The default setting is Level 5.
1. Pressthe menu/okbutton.
2. Pressthe ,, or ,, button to select SETUPHS and pressthe menu/ok button.
B. Pressthe -, or ,, button to select CONTRASTand press the menu/ok button.
4. Pressthe -, or ,, button to select the desired contrast level.
5. Pressthe menu/ok button to confirm the setting.
6. Pressthe ENi_Dbutton to return to idle mode.
Reset Handset
You can reset your cordless handset to its original (default)settings.
1. Pressthe menu/ok button.
2. Pressthe A or ,, button to select SETUPHS and pressthe menu/ok button.
B. Pressthe -, or ,, button to select RESETand press the menu/ok button.
8. Press the menu/ok button to confirm the setting.
5. Pressthe _ button to return to idle mode.
NOTE: All phonebook and redial records stored in the handset will
be cleared upon reset. You may wish to write down the information
before resetting the handset.
Base Setting
Change PIN
The PINis a security feature to prevent others from changing the stored settings. The
default PIN is0000. Ifyou change the PIN.please record the new PINcode for your
record.
NOTE: The PIN code must be 4 digits.
i. Pressthe menu/ok button.
2. Pressthe ,, or ,, button to select SETUPBSand press the menu/ok button.
B. Press A or ,, button to select CHANGE PIN and press menu/ok button, the
screen displays ENTERPIN (default setting = 0000).
4 Input the current PIN code and press the menu/ok button, the screen displays
NEW PIN.and prompts you to input a new PINcode.
NOTE: WRONG PIN displays if the current PIN code you input was
incorrect. Re-enter PIN code.
19

5. InputthedesirednewPINcodeandpressmenu/okbutton,thescreendisplays
REPEATPINand promptsyouto inputthe newPINcodeagain for verification.
NOTE:If the verification PIN code is different from the new PIN
code, the change will fail. You will be prompted to input a new PIN
code.
6. Input thenew PINcodeagain and pressmenu/ok button to confirmthe setting.
7. Pressthe_ button to returnto idlemode.
DialMode
Setthedial modetoTONEor PULSE.Thedefault settingisTONE.
1. Pressthe menu/ok button.
2. Pressthe A or ,, button to selectSETUPBSand pressthe menu/ok button.
3. Pressthe A or ,, button to selectDIALMODEand pressthe menu/ok button.
3. Pressthe A or ,, button to selectTONEor PULSE.
/4. Pressthe menu/ok button to confirmthe setting.
5. Pressthe_ button to returnto idlemode.
Message Waiting (VMWI)
Ifyou havesubscribedtoa voicemessagewaiting service.MESSAGEWAITING
displayson handsetand theI_ icondisplayson the baseto alert youthat you have
receivednewmessages.
Toturnthe VisualMessageWaiting Indication(VMWI)off viathehandset;
1. Pressthe menu/ok button.
2. Pressthe * or ,, button to selectSETUPBSand pressthe menu/ok button.
3. Pressthe * or ,, button to selectVMWIand pressthe menu/ok button.
ThescreendisplaysVPIWIOFF?'.
/4. Pressthe menu/ok button to confirmthe setting.
S. Pressthe_ button to returnto idlemode.
NOTE:This service requires a subscription through your local
service provider.
20
Other manuals for 28871
2
Table of contents
Other GE Telephone manuals

GE
GE 29870 Series User manual

GE
GE 55927860 User manual

GE
GE 16043750 User manual

GE
GE 28527 Series User manual

GE
GE 25831 User manual

GE
GE 15-Feb User manual

GE
GE BedroomPhone 16224640 User manual

GE
GE BedroomPhone 00004548 User manual

GE
GE 29578 User manual

GE
GE -295861 - Corded Desktop CID Itad User manual