GE UVW7241SNSS Original instructions

Write the model and serial
numbers here:
Model #_________________
Serial # _________________
You can find them on a label
on the inside of the hood.
ESPAÑOL
Para consultar una version en
español de este manual de
instrucciones, visite nuestro sitio de
internet GEAppliances.com.
RANGE HOOD
49-2000720 Rev. 0 04-20 GEA
GE is a trademark of the General Electric Company. Manufactured under trademark license.
UVW7241SNSS
OWNER’S MANUAL &
INSTALLATION
INSTRUCTIONS
Wall-Mount
SAFETY INFORMATION .............3
USING THE HOOD
Features ..................................5
Controls ..................................5
CARE AND CLEANING
Exterior Surfaces ......................... 6
Metal Grease Filter........................ 6
Charcoal Filter ........................... 6
Replacing a Lamp......................... 6
INSTALLATION INSTRUCTIONS ....7
TROUBLESHOOTING TIPS..........13
LIMITED WARRANTY ...............14
CONSUMER SUPPORT ..............16

249-2000742 Rev. 0
THANK YOU FOR MAKING GE APPLIANCES A PART OF YOUR HOME.
Whether you grew up with GE Appliances, or this is your first, we’re happy to have you in the family.
We take pride in the craftsmanship, innovation and design that goes into every GE Appliances
product, and we think you will too. Among other things, registration of your appliance ensures that we
can deliver important product information and warranty details when you need them.
Register your GE appliance now online. Helpful websites and phone numbers are available in the
Consumer Support section of this Owner’s Manual. You may also mail in the pre-printed registration
card included in the packing material.

49-2000742 Rev. 0 3
SAFETY INFORMATION
IMPORTANT SAFETY INFORMATION
READ ALL INSTRUCTIONS BEFORE USING
READ AND SAVE THESE INSTRUCTIONS
WARNING TO REDUCE THE RISK OF FIRE,
ELECTRIC SHOCK OR INJURY TO PERSONS,
OBSERVE THE FOLLOWING:
A. Use this unit only in the manner intended by the
manufacturer. If you have questions, contact the
manufacturer.
B. Before servicing or cleaning unit, switch power off
at service panel and lock the service disconnecting
means to prevent power from being switched
on accidentally. When the service disconnecting
means cannot be locked, securely fasten a
prominent warning device, such as a tag, to the
service panel.
C. Do not use this unit with any solid-state speed
control device.
D. This unit must be grounded.
CAUTION FOR GENERAL VENTILATING USE
ONLY. DO NOT USE TO EXHAUST HAZARDOUS
OR EXPLOSIVE MATERIALS AND VAPORS.
CAUTION TO REDUCE RISK OF FIRE AND
TO PROPERLY EXHAUST AIR, BE SURE TO DUCT
AIR OUTSIDE. DO NOT VENT EXHAUST AIR INTO
SPACES WITHIN WALLS OR CEILINGS OR INTO
ATTICS, CRAWL SPACES OR GARAGES.
WARNING TO REDUCE THE RISK OF INJURY
TO PERSONS IN THE EVENT OF A RANGE TOP
GREASE FIRE, OBSERVE THE FOLLOWING*:
A. SMOTHER FLAMES with a close-fitting lid, cookie
sheet or metal tray, then turn off the burner. BE
CAREFUL TO PREVENT BURNS. If the flames do
not go out immediately, EVACUATE AND CALL
THE FIRE DEPARTMENT.
B. NEVER PICK UP A FLAMING PAN—You may be
burned.
C. DO NOT USE WATER, including wet dishcloths or
towels—a violent steam explosion will result.
D. Use an extinguisher ONLY if:
1. You know you have a Class ABC extinguisher,
and you already know how to operate it.
2. The fire is small and contained in the area where
it started.
3. The fire department is being called.
4. You can fight the fire with your back to an exit.
*Based on “Kitchen Fire Safety” published by NFPA.

449-2000742 Rev. 0
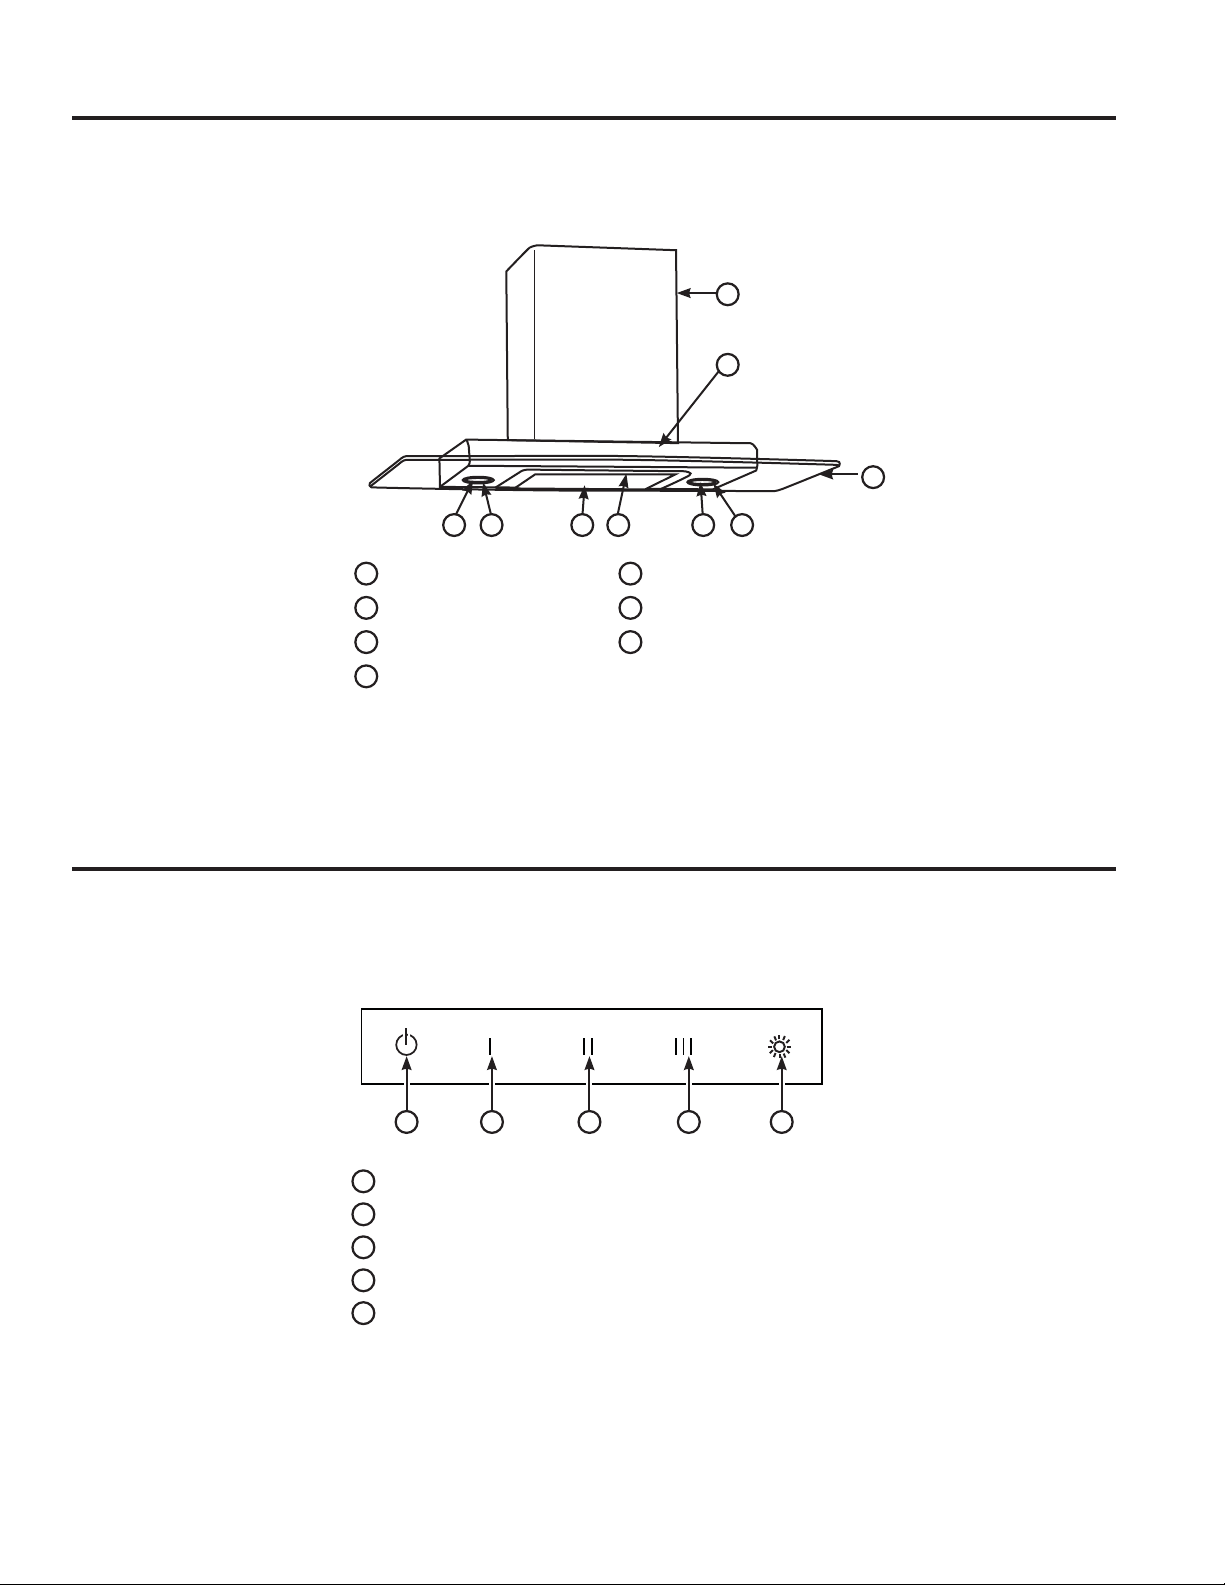
How to Remove Protective Shipping Film and Packaging Tape
Carefully grasp a corner of the protective shipping film
with your fingers and slowly peel it from the appliance
surface. Do not use any sharp items to remove the film.
Remove all of the film before using the appliance for the
first time.
To assure no damage is done to the finish of the
product, the safest way to remove the adhesive from
packaging tape on new appliances is an application of
a household liquid dishwashing detergent. Apply with a
soft cloth and allow to soak.
NOTE: The adhesive must be removed from all parts.
NOTE: For further cleaning instructions/suggestions,
please refer to the Care And Cleaning section.
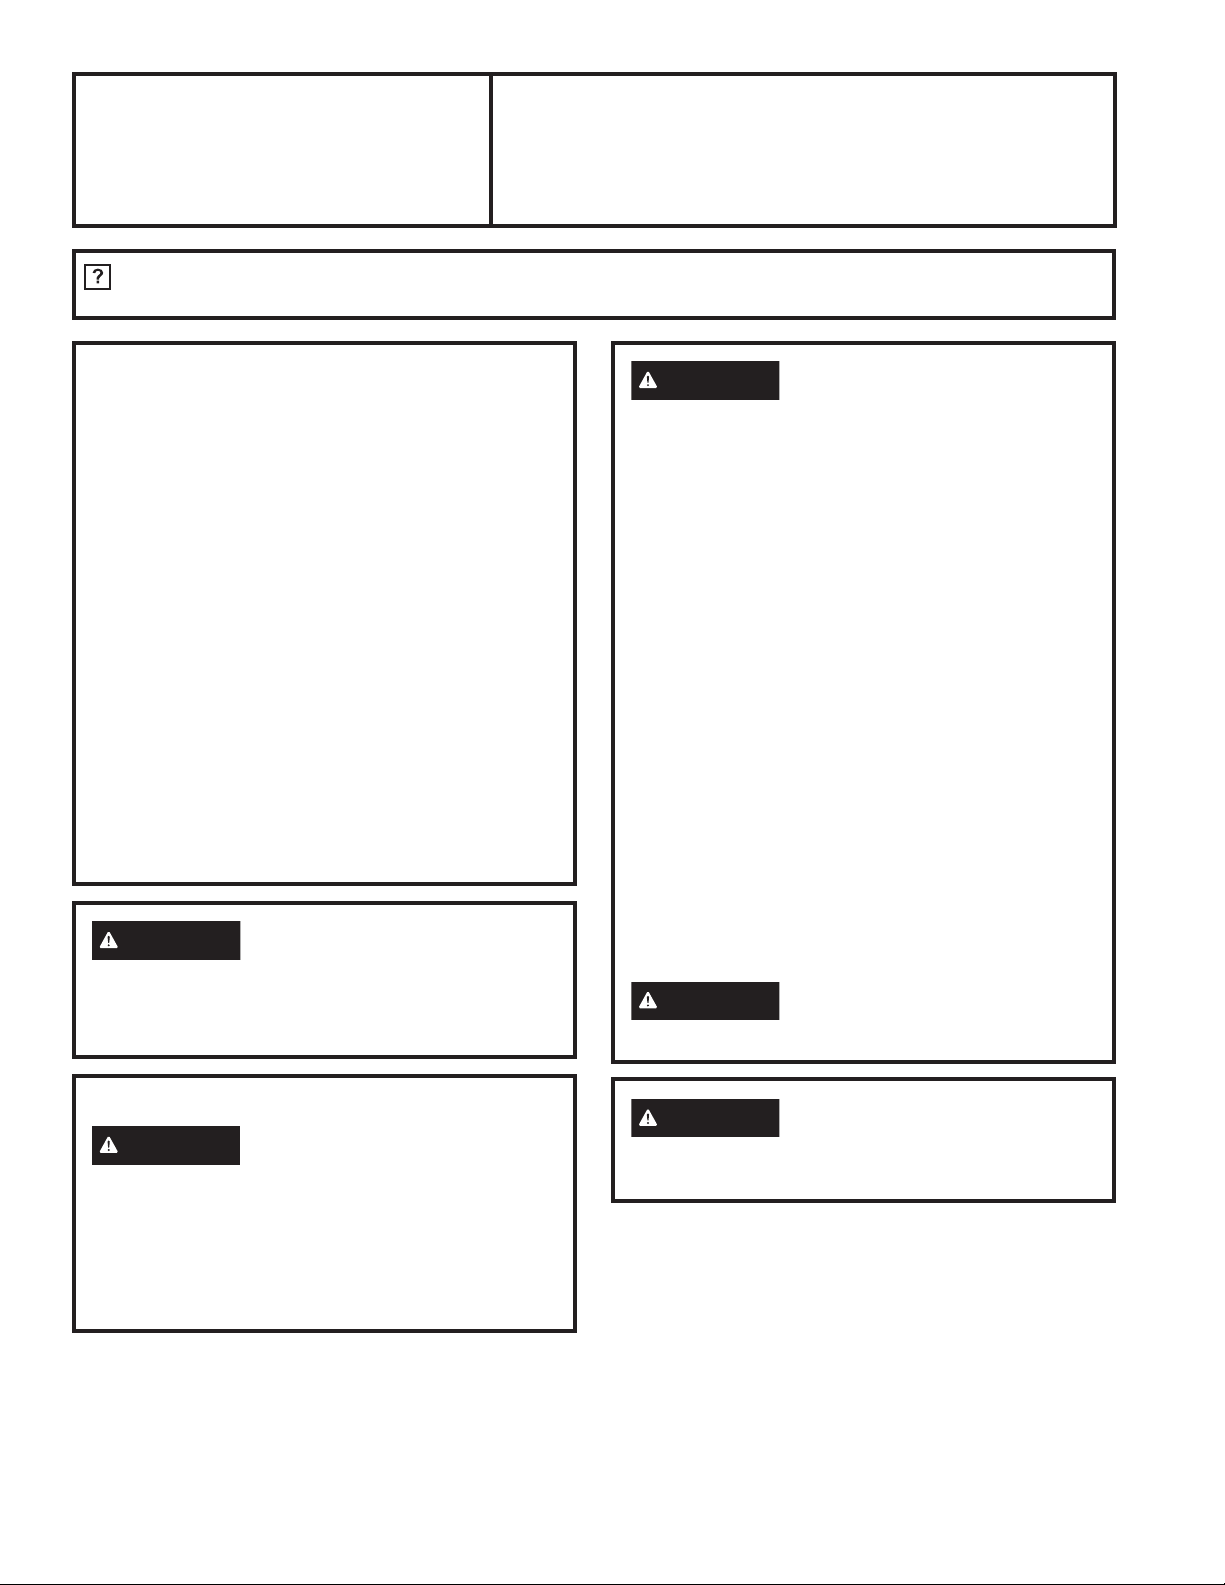
SAFETY INFORMATION
IMPORTANT SAFETY INFORMATION
READ ALL INSTRUCTIONS BEFORE USING
READ AND SAVE THESE INSTRUCTIONS
WARNING TO REDUCE THE RISK OF A
RANGE TOP GREASE FIRE:
A. Never leave surface units unattended at high
settings. Boilovers cause smoking and greasy
spillovers that may ignite. Heat oils slowly on
medium settings.
B. Always turn hood ON when cooking at high heat or
when flambéing food (i.e. Crepes Suzette, Cherries
Jubilee, Peppercorn Beef Flambé).
C. Clean ventilating fans frequently. Grease should not
be allowed to accumulate on fan or filter.
D. Use proper pan size. Always use cookware
appropriate for the size of the surface element.
WARNING TO REDUCE THE RISK OF FIRE,
ELECTRIC SHOCK OR INJURY TO PERSONS,
OBSERVE THE FOLLOWING:
A. Installation work and electrical wiring must be
done by qualified person(s) in accordance with all
applicable codes and standards, including fire-rated
construction.
B. Sufficient air is needed for proper combustion and
exhausting of gases through the flue (chimney) of
fuel burning equipment to prevent back drafting.
Follow the heating equipment manufacturer’s
guidelines and safety standards such as those
published by the National Fire Protection
Association (NFPA), the American Society for
Heating, Refrigeration and Air Conditioning
Engineers (ASHRAE) and the local code authorities.
C. When cutting or drilling into wall or ceiling, do not
damage electrical wiring and other hidden utilities.
D. Ducted fans must always be vented to the outdoors.
E. When applicable, install any makeup (replacement)
air system in accordance with local building
code requirements. Visit GEAppliances.com for
available makeup air solutions.
F. Turn off breaker to adjacent rooms while working.
WARNING TO REDUCE THE RISK OF FIRE,
USE ONLY METAL DUCTWORK.
Ŷ'RQRWDWWHPSWWRUHSDLURUUHSODFHDQ\SDUWRI\RXU
hood unless it is specifically recommended in this
manual. All other servicing should be referred to a
qualified technician.

49-2000742 Rev. 0 5
Features
Controls
USING THE HOOD: Features / Controls
The range hood is designed to remove smoke, cooking vapors and odors from the cooktop area. For best results,
start the hood before cooking and allow it to operate 15 minutes after the cooking is complete to clear all smoke and
odors from the kitchen.
ADuct cover
BControl panel
CGlass canopy
DLamp cover
EHalogen Bulb
FGrease filter release
GGrease filter
A
B
C
DD EE F
G
A B C D E
APower/Off - Turns the blower on and off.
BSpeed 1 - Blower speed HI
CSpeed 2 - Blower speed Medium
DSpeed 3 - Blower speed Lo
ELight - The light button controls both lights. Press once
for On and again for Off.

649-2000742 Rev. 0
Care and Cleaning
CARE AND CLEANING
IMPORTANT: Clean the hood and grease filters
frequently according to the following instructions. Replace
grease filters before operating hood.
EXTERIOR SURFACES:
To avoid damage to the exterior surface, do not use steel
wool or soap-filled scouring pads.
Always wipe dry to avoid water marks.
Cleaning Method:
• Liquid detergent soap and water, or all-purpose
cleanser
• Wipe with damp soft cloth or nonabrasive sponge, then
rinse with clean water and wipe dry.
METAL GREASE FILTER
1. Push up on the middle, right side of the decorative
glass to open the door.
2. Remove the metal filter.
3. Wash metal filters as needed in dishwasher or hot
detergent solution.
4. Replace metal grease filters.
CHARCOAL FILTER
The charcoal filter is not washable. It should last up to 6
months with normal use.
To replace charcoal filter:
1. Remove metal grease filter from range hood. See
“Metal Grease Filter” in this section.
2. Bend spring clips away from metal grease filter.
3. Place charcoal filter into top side of metal filter.
4. Bend spring clips back into place to secure the
charcoal filter to the metal filter.
5. Replace metal grease filter. See “Metal Grease Filter”
in this section.
REPLACING A LAMP
Turn off the range hood and allow the lamp to cool. To
avoid damage or decreasing the life of the new bulb, do
not touch bulb with bare fingers. Replace bulb, using
tissue or wearing cotton gloves to handle bulb.
If new lamps do not operate, make sure the lamps are
inserted correctly before calling service.
1. Disconnect power.
2. Use a flat-blade screwdriver to pry open the light cover.
3. Avoiding contact with skin, replace the used bulb with
a new halogen bulb, of the same size, shape and
wattage.
4. Replace the light shield and snap closed.
5. Reconnect power.

49-2000742 Rev. 0 7
Installation
Instructions
“If you have questions, call GE Appliances at 800.GE.CARES (800.432.2737)
or visit our website at: GEAppliances.com”
BEFORE YOU BEGIN
Read these instructions completely and carefully.
ŶIMPORTANT— Save these
instructions for local inspector’s use.
ŶIMPORTANT— Observe all governing
codes and ordinances.
ŶNote to Installer – Be sure to leave these
instructions with the Consumer.
ŶNote to Consumer – Keep these instructions for
future reference.
ŶSkill level – Installation of this vent hood requires
basic mechanical and electrical skills.
ŶCompletion time – Approximately 1 to 3 hours
ŶProper installation is the responsibility of the
installer.
ŶProduct failure due to improper installation is not
covered under the Warranty.
FOR YOUR SAFETY
WARNING Before beginning the installation,
switch power off at service panel and lock the
service disconnecting means to prevent power from
being switched on accidentally. When the service
disconnecting means cannot be locked, securely
fasten a prominent warning device, such as a tag,
to the service panel.
CAUTION Due to the weight and size of
these vent hoods and to reduce the risk of personal
injury or damage to the product, TWO PEOPLE
ARE REQUIRED FOR PROPER INSTALLATION.
WARNING Disconnect all electrical power
at the main circuit breaker or fuse box before
installing.
WARNING TO REDUCE THE RISK OF FIRE,
ELECTRIC SHOCK OR INJURY TO PERSONS,
OBSERVE THE FOLLOWING:
A. Installation work and electrical wiring must be
done by qualified person(s) in accordance with
all applicable codes and standards, including
fire-rated construction.
B. Sufficient air is needed for proper combustion
and exhausting of gases through the flue
(chimney) of fuel burning equipment to prevent
back drafting. Follow the heating equipment
manufacturer’s guidelines and safety standards
such as those published by the National Fire
Protection Association (NFPA), the American
Society for Heating, Refrigeration and Air
Conditioning Engineers (ASHRAE) and the local
code authorities.
C. When cutting or drilling into wall or ceiling, do
not damage electrical wiring and other hidden
utilities.
D. Ducted fans must always be vented to the
outdoors.
E. Turn off breaker to adjacent rooms while
working.
WARNING TO REDUCE THE RISK OF FIRE,
USE ONLY METAL DUCT WORK.
24” Wall-Mount
Range Hood
UVW7241SNSS
INSTALLATION INSTRUCTIONS

849-2000742 Rev. 0
Installation Preparation
PRODUCT DIMENSIONS
24”610 mm
279 mm
19”
480 mm
2-3/8” 34”
18-3/8”
60 mm
466 mmm
866 mm (max)
11”
298 mm
11-3/4”
LOCATION REQUIREMENTS
IMPORTANT: Observe all governing codes and
ordinances.
Have a qualified technician install the range hood. It is
the installer’s responsibility to comply with installation
clearances specified on the model/serial rating plate.
The model/serial rating plate is located behind the left
filter on the rear wall of the vent hood.
Canopy hood location should be away from strong
draft areas, such as windows, doors and strong
heating vents.
Grounded electrical outlet is required. See “Electrical
Requirements” section.
The canopy hood is factory set for venting through the
roof or wall. For non-vented (recirculating) Installation
see “For non- vented (recirculating) installation only” in
the “Connect Vent System” section.
All openings in ceiling and wall where canopy hood will
be installed must be sealed.
FOR MOBILE HOME INSTALLATIONS
The installation of this range hood must conform to the
Manufactured Home Construction Safety Standards,
Title 24 CFR, Part 328 (formerly the Federal
Standard for Mobile Home Construction and Safety,
Title 24, HUD, Part 280) or when such standard
is not applicable, the standard for Manufactured
Home Installation 1982 (Manufactured Home Sites,
Communities and Setups) ANSI A225.1/NFPA 501A,
or latest edition, or with local codes.
INSTALLATION PREPARATION

49-2000742 Rev. 0 9
INSTALLATION INSTRUCTIONS
Installation Preparation
TOOLS AND MATERIALS REQUIRED
(NOT SUPPLIED)
Gather the required tools and parts before starting
installation. Read and follow the instructions
provided with any tools listed here.
Tools needed
• Level
• Drill with 1-1/4” (3.0 cm), 1/8” (3.2 mm), and 5/16”
(7.9 mm) drill bits
• Pencil
• Wire stripper or utility knife
• Tape measure or ruler
• Pliers
• Caulking gun and weatherproof caulking
compound
• Vent clamps
• Jigsaw or keyhole saw
• Flat-blade screwdriver
• Metal snips
• Phillips screwdriver
• Metric hex key set
For non-vented (recirculating) installations, you will
also need:
• 6” (15.2 cm) dia. round metal vent duct - length
required is determined by ceiling height.
PARTS SUPPLIED
Remove parts from packages. Check that all parts
are included.
• 120 V power cord with 3 prong plug
• Hood canopy assembly with blower, vent
transition, light bulb and canopy glass already
installed
• Metal grease filter
• Vent cover support bracket
• Mounting template
• 2-piece vent cover
• 4 - 4 x 8 screws
• 6 - 5 x 45 mm mounting screws
• 2 - 8 x 40 mm wall anchors
• 4 - 10 x 50 mm wall anchors

10 49-2000742 Rev. 0
Installation Preparation
ELECTRICAL REQUIREMENTS
Observe all governing codes and ordinances.
Ensure that the electrical installation is adequate
and in conformance with National Electrical Code,
ANSI/NFPA 70 (latest edition), or CSA Standards
C22.1-94, Canadian Electrical Code, Part 1 and
C22.2 No. 0-M91 (latest edition) and all local codes
and ordinances.
If codes permit and a separate ground wire is
used, it is recommended that a qualified electrician
determine that the ground path is adequate.
A copy of the above code standards can be
obtained from:
National Fire Protection Association
1 Batterymarch Park
Quincy, MA 02169-7471
CSA International
8501 East Pleasant Valley Road
Cleveland, OH 44131-5575
It is important to make sure you have the proper
electrical connection.
RECOMMENDED GROUNDING
METHOD
A 120 volt, 60 Hz, AC only, 15-amp fused,
grounded electrical supply is required. Use an outlet
that cannot be turned off by a switch. Do not use an
extension cord.
NOTE: Before cleaning, or removing a light bulb,
turn vent hood off, and then disconnect the vent
hood from the electrical source. When you are
finished, reconnect the vent hood to the electrical
source.
PREPARE LOCATION
• It is recommended that the vent system be
installed before hood is installed.
• Before making cutouts, make sure there is proper
clearance within the ceiling or wall for exhaust
vent.
• Check your ceiling height and the hood height
maximum before you select your hood.
1. Disconnect power.
2. Determine which venting method to use: roof,
wall, or nonvented.
3. Select a flat surface for assembling the range
hood. Place covering over that surface.
WARNING Excessive Weight Hazard
Use two or more people to move and install range
hood. Failure to do so can result in death or
personal injury.
4. Using 2 or more people, lift range hood onto
covered surface.
INSTALLATION PREPARATION

49-2000742 Rev. 0 11
INSTALLATION
MOUNT RANGE HOOD TO THE WALL
1. Determine and mark the centerline on the wall
where the canopy hood will be installed.
2. Select a mounting height between a minimum of
24” (61.0 cm) for an electric cooking surface, a
minimum of 27” (68.6 cm) for a gas cooking surface,
and a suggested maximum of 36” (91.4 cm)
above the range to the bottom of the hood. Mark a
reference line on the wall.
3. Place the vent hood on the wall, adjust to align and
fasten with screws and screw anchors suited to the
wall type (reinforced concrete, plasterboard etc.)
4. Mark centers of the fastener locations through the
template to the wall.
IMPORTANT: All screws must be installed into
wood. If there is no wood to screw into, additional
wall framing supports may be required.
Remove the template.
5. Drill 3/16" (4.8 mm) pilot holes at all locations where
screws are being installed into wood.
6. Install the 2 - 5 x 45 mm mounting screws. Leave a
1/4" (6.4 mm) gap between the wall and the back of
the screw head to slide range hood into place.
VENT COVER BRACKET
INSTALLATION
1. Attach vent cover bracket to wall flush to the ceiling
using 2 - 5 x 45 mm screws.
COMPLETE PREPARATION
1. Determine and make all necessary cuts in the wall
for the vent system. Install the vent system before
installing the hood. See “Venting Requirements”
section.
2. Determine the required height for the home power
supply cable and drill a 1-1/4” (3.2 cm) hole at this
location.
3. Run the home power supply cable according to the
National Electrical Code or CSA Standards and
local codes and ordinances. There must be enough
1/2” conduit and wires from the fused disconnect (or
circuit breaker) box to make the connection in the
hood’s electrical terminal box.
NOTE: Do not reconnect power until installation is
complete.
4. Use caulk to seal all openings.
INSTALL RANGE HOOD
1. Using 2 or more people, hang range hood on 2
mounting screws through the mounting slots on
back of hood.
2. Remove the grease filter. See Care and Cleaning
section.
3. Level the range hood and tighten upper mounting
screws.
4. Install 2 - 5 x 45 mm lower mounting screws and
tighten.
Installation
1/4"
(6.4 mm)
a
b
c

12 49-2000742 Rev. 0
Installation
CONNECT VENT SYSTEM
For non-vented (recirculating) installation only:
1. Assemble the air deflector with the duct cover
bracket with 4 - assembly screws provided with
the Recirculation Kit.
2. Measure from the bottom of the air deflector to
the bottom of the hood outlet.
3. Cut the duct to the measured size (X).
4. Remove the air deflector.
5. Slide the duct onto the bottom of the air deflector.
6. Place the assembled air deflector and duct over
the exhaust outlet from the hood.
7. Reassemble the air deflector to the duct cover
bracket with 4 assembly screws.
8. Seal connections with vent clamps.
COMPLETE INSTALLATION
1. For non-vented (recirculating) installations only,
install charcoal filters over metal grease filter. See
the Care and Cleaning section.
2. Install metal filters. See the Care and Cleaning
section.
3. Check the operation of the range hood blower
and light. See the Using the Hood section.
NOTE: To get the most efficient use from your new
range hood, read the Using the Hood section.
MAKE ELECTRICAL CONNECTION
Plug into a grounded 3-prong outlet.
Assembly Screws
Duct Cover Bracket
Air Deflector
Air Deflector
Vent
Clamp
Vent
Duct
Exhaust
Outlet
X = length to
cut vent duct
WARNING ELECTRICAL SHOCK
HAZARD
Plug into a grounded 3-prong outlet
Do not remove the ground prong
Do not use an adapter
Do not use an extension cord.
Failure to follow these instructions can result in
death, fire, or electrical shock.
INSTALLATION PREPARATION

49-2000742 Rev. 0 13
Save time and money! Review the charts on the following pages first and you may not need to call for service. For
more help, visit GEAppliances.com or call 800.GE.Cares (800-432-2737).
Problem Possible Cause What To Do
Hood doesn’t work Electric Supply Check that the hood is plugged into a receptacle.
Check that the power is turned on.
Poor Airflow Aluminum grease filters are
clogged Clean and dry the filters, and then reassemble
Charcoal filters are clogged Replace the charcoal filters.
Motor running, but no
airflow Butterfly valve jammed Call for service.
After running for
a while, the motor
stops.
The high temperature safety
device is activated. The kitchen is not sufficiently ventilated.
The hood is installed to close to
the stove The hood must be a minimum of 25 5/8” (65 cm)
above the stove.
Strong cooking smell Charcoal filters are not installed In re-circulating mode, charcoal filters must be
installed.
Oil dripping onto
stove Oil cup missing or not installed Replace aluminum filter and replace oil cup.
Aluminum grease filter saturated Wash the aluminum grease filters
Whirring sound Fan blade problem Call for service
Troubleshooting tips ... Before you call for service
TROUBLESHOOTING TIPS

14 49-2000742 Rev. 0
Staple your receipt here. Proof of the original purchase
date is needed to obtain service under the warranty.
GEAppliances.com
All warranty service is provided by our Factory Service Centers, or an authorized Customer Care®technician. To schedule
service online, visit us at www.geappliances.com/service_and_support/, or call GE Appliances at 800.GE.CARES
(800.432.2737). Please have your serial number and your model number available when calling for service.
Servicing your appliance may require the use of the onboard data port for diagnostics. This gives a GEAppliances factory
service technician the ability to quickly diagnose any issues with your appliance and helps GE Appliances improve its
products by providing GE Appliances with information on your appliance. If you do not want your appliance data to be
sent to GE Appliances, please advise your technician not to submit the data to GE Appliances at the time of service.
What GE Appliances will not cover:
ŶService trips to your home to teach you how to use
the product.
ŶImproper installation, delivery, or maintenance.
ŶFailure of the product if it is abused, misused,
modified, or used for other than the intended purpose
or used commercially.
ŶReplacement of house fuses or resetting of circuit
breakers.
ŶDamage to the product caused by accident, fire,
floods, or acts of God.
ŶDamage to finish, such as surface rust, tarnish, or small
blemishes not reported within 48 hours of delivery.
ŶIncidental or consequential damage caused by
possible defects with this appliance.
ŶDamage caused after delivery.
ŶProduct not accessible to provide required service.
WARRANTY
GE Appliances Vented Range Hood Warranty
EXCLUSION OF IMPLIED WARRANTIES
Your sole and exclusive remedy is product repair as provided in this Limited Warranty. Any implied warranties,
including the implied warranties of merchantability or fitness for a particular purpose, are limited to one year or
the shortest period allowed by law.
This warranty is extended to the original purchaser and any succeeding owner for products purchased for home use
within the USA. If the product is located in an area where service by a GE Appliances Authorized Servicer is not available,
you may be responsible for a trip charge or you may be required to bring the product to an Authorized GE Appliances
Service location for service. In Alaska, the warranty excludes the cost of shipping or service calls to your home.
Some states do not allow the exclusion or limitation of incidental or consequential damages. This warranty gives you
specific legal rights, and you may also have other rights which vary from state to state. To know what your legal rights
are, consult your local or state consumer affairs office or your state’sAttorney General.
Warrantor: GE Appliances, aHaier company
Louisville, KY 40225
Extended Warranties: Purchase a GE Appliances extended warranty and learn about special discounts that are
available while your warranty is still in effect. You can purchase it online anytime at
www.geappliances.com/service_and_support/shop-for-extended-service-plans.htm
or call 800.626.2224 during normal business hours. GE Appliances Service will still be there after your warranty expires.
For the period of GE Appliances will replace
One year
From the date
of the original
purchase
Any part of the cooking product which fails due to a defect in materials or workmanship.
During this limited one-year warranty, GE Appliances will provide, free of charge, all labor
and related service costs to replace the defective part.

49-2000742 Rev. 0 15
Notes

16 49-2000742 Rev. 0
Consumer Support
CONSUMER SUPPORT
Printed in China
GE Appliances Website
Have a question or need assistance with your appliance? Try the GE Appliances Website 24 hours a day, any day
of the year! You can also shop for more great GE Appliances products and take advantage of all our on-line support
services designed for your convenience. In the US: GEAppliances.com
Register Your Appliance
Register your new appliance on-line at your convenience! Timely product registration will allow for enhanced
communication and prompt service under the terms of your warranty, should the need arise. You may also mail in
the pre-printed registration card included in the packing material. In the US: GEAppliances.com/register
Schedule Service
Expert GE Appliances repair service is only one step away from your door. Get on-line and schedule your service at
your convenience any day of the year. In the US: GEAppliances.com/service
or call 800.432.2737 during normal business hours.
Extended Warranties
Purchase a GE Appliances extended warranty and learn about special discounts that are available while your
warranty is still in effect. You can purchase it on-line anytime. GE Appliances Services will still be there after your
warranty expires. In the US: GEAppliances.com/extended-warranty
or call 800.626.2224 during normal business hours.
Remote Connectivity
For assistance with wireless network connectivity (for models with remote enable),
visit our website at GEAppliances.com/connected-home-smart-appliances/ or call 800.220.6899 in the US.
Parts and Accessories
Individuals qualified to service their own appliances can have parts or accessories sent directly to their homes
(VISA, MasterCard and Discover cards are accepted). Order on-line today 24 hours every day.
In the US: GEApplianceparts.com or by phone at 877.959.8688 during normal business hours.
Instructions contained in this manual cover procedures to be performed by any user. Other servicing
generally should be referred to qualified service personnel. Caution must be exercised, since improper
servicing may cause unsafe operation.
Contact Us
If you are not satisfied with the service you receive from GE Appliances, contact us on our Website with all the
details including your phone number, or write to:
In the US: General Manager, Customer Relations | GE Appliances, Appliance Park | Louisville, KY 40225
GEAppliances.com/contact

Escriba los números de modelo y
de serie aquí:
Nº de Modelo ____________
Nº de Serie ______________
Los encontrará en una etiqueta
dentro de la campana.
ESPAÑOL
Para consultar una version en
español de este manual de
instrucciones, visite nuestro sitio de
internet GEAppliances.com.
CAMPANA DE COCINA
49-2000720 Rev. 0 04-20 GEA
GE es una marca registrada de General Electric Company. Fabricado bajo licencia de marca.
UVW7241SNSS
MANUAL DEL
PROPIETARIO E
INSTALACIÓN
con Montaje de Pared
INFORMACIÓN DE SEGURIDAD ....3
USO DE LA CAMPANA
Funciones ................................5
Controles .................................5
CUIDADO Y LIMPIEZA
Superficies Exteriores ..................... 6
Filtro de Grasa Metálico ................... 6
Filtro de Carbón .......................... 6
Reemplazo de una Lámpara................ 6
INSTRUCCIONES
DE INSTALACIÓN ....................7
CONSEJOS PARA LA SOLUCIÓN
DE PROBLEMAS .....................13
GARANTÍA LIMITADA ..............14
SOPORTE PARA
EL CONSUMIDOR....................16

249-2000742 Rev. 0
GRACIAS POR HACER QUE GE APPLIANCES SEA PARTE DE SU HOGAR.
Ya sea que haya crecido usando GE Appliances, o que ésta es su primera vez, nos complace
tenerlo en la familia.
Sentimos orgullo por el nivel de arte, innovación y diseño de cada uno de los electrodomésticos de
GE Appliances, y creemos que usted también. Entre otras cosas, el registro de su electrodoméstico
asegura que podamos entregarle información importante del producto y detalles de la garantía
cuando los necesite.
Registre su electrodoméstico GE ahora a través de Internet. Sitios Web y números telefónicos útiles
están disponibles en la sección de Soporte para el Consumidor de este Manual del Propietario.
También puede enviar una carta en la tarjeta de inscripción preimpresa que se incluye con
el material embalado.

49-2000742 Rev. 0 3
INFORMACIÓN DE SEGURIDAD
INFORMACIÓN IMPORTANTE DE SEGURIDAD
LEA TODAS LAS INSTRUCCIONES ANTES DE USAR
LEA Y GUARDE ESTAS INSTRUCCIONES
ADVERTENCIA PARA REDUCIR EL RIESGO
DE INCENDIO, DESCARGA ELÉCTRICA O LESIONES A
PERSONAS, CUMPLA CON LOS SIGUIENTES PUNTOS:
A. Utilice esta unidad sólo de la manera concebida por el
fabricante. Si tiene alguna pregunta, comuníquese con el
fabricante.
B. Antes de realizar reparaciones o limpiar la unidad,
desconecte la energía del panel de servicio y bloquee los
medios de desconexión para evitar el accionamiento de
la energía de manera accidental. Cuando los medios de
desconexión de servicio no pueden bloquearse, coloque
sobre el panel de servicio un dispositivo de advertencia
bien visible, como una etiqueta.
C. No utilice esta unidad con ningún dispositivo de control
de velocidad de estado sólido.
D. Esta unidad debe estar conectada a tierra.
PRECAUCIÓN SÓLO PARA USO DE
VENTILACIÓN GENERAL. NO LO UTILICE PARA
ELIMINAR MATERIALES Y VAPORES PELIGROSOS O
EXPLOSIVOS.
PRECAUCIÓN PARA REDUCIR EL RIESGO
DE INCENDIO Y PARA ELIMINAR EL AIRE DE ESCAPE
CORRECTAMENTE, ASEGÚRESE DE DIRIGIR EL AIRE
DEL CONDUCTO HACIA EL EXTERIOR. NO VENTILE EL
AIRE DE ESCAPE EN ESPACIOS DENTRO DE PAREDES
O CIELORRASOS O EN ÁTICOS, HUECOS SANITARIOS
O GARAJES.
ADVERTENCIA PARA REDUCIR EL RIESGO DE
LESIONES A PERSONAS EN CASO DE UN INCENDIO
DE GRASA SOBRE UNA ESTUFA, CUMPLA CON LOS
SIGUIENTES PUNTOS*:
A. APAGUE LAS LLAMAS con una tapa que ajuste bien,
una plancha para galletas o una bandeja de metal, y
luego apague el quemador. TENGA MUCHO CUIDADO
A FIN DE EVITAR QUEMADURAS. Si las llamas no
se apagan de inmediato, SALGA DE LA VIVIENDA Y
LLAME AL DEPARTAMENTO DE BOMBEROS.
B. NUNCA LEVANTE UNA SARTÉN EN LLAMAS—
Usted puede quemarse.
C. NO UTILICE AGUA, incluyendo repasadores o toallas
húmedos—se provocará una violenta explosión de vapor.
D. Utilice un extintor SÓLO si:
1. Usted sabe que cuenta con un extintor Clase ABC y
ya sabe cómo utilizarlo.
2. El incendio es pequeño y se contuvo en el área donde
comenzó.
3. Se está llamando al departamento de bomberos.
4. Usted puede combatir el incendio con su espalda
dirigida hacia una salida.
*Basado en “Kitchen Fire Safety” publicado por NFPA.

449-2000742 Rev. 0
ADVERTENCIA PARA REDUCIR EL RIESGO DE
UN INCENDIO DE GRASA SOBRE UNA ESTUFA:
A. Nunca deje unidades de superficie desatendidas en
configuraciones de calor elevadas. Los alimentos que
hierven y se derraman provocan humo y derrames
grasosos que pueden prenderse fuego. Caliente los
aceites lentamente en configuraciones bajas o medias.
B. Siempre encienda el sistema de ventilación cuando
cocine con configuraciones de calor elevadas o cuando
flambee alimentos (por ej., Crepes Suzette, cerezas
Jubilee, carne flambeada a la pimienta en grano).
C. Limpie los ventiladores con frecuencia. No debe
permitirse la acumulación de grasa en el ventilador o en
el filtro.
D. Utilice el tamaño de recipiente adecuado. Siempre utilice
recipientes de cocción apropiados para el tamaño del
elemento de superficie.
ADVERTENCIA A FIN DE REDUCIR EL
RIESGO DE INCENDIOS, DESCARGAS ELÉCTRICAS
O LESIONES PERSONALES, CUMPLA CON LO
SIGUIENTE:
A. El trabajo de instalación y el cableado eléctrico deben
ser realizados por una persona(s) calificada de acuerdo
con todos los códigos y estándares aplicables, incluyendo
construcciones resistentes al fuego.
B. Es necesario contar con suficiente cantidad de aire
para una combustión y salida de gases adecuadas a
través del conducto (chimenea) del equipo de consumo
de combustible, a fin de evitar ráfagas de aire. Siga las
pautas del fabricante del equipo de calefacción y los
estándares de seguridad, tales como aquellos publicados
por la Asociación Nacional de Protección contra
Incendios (National Fire Protection Association, NFPA), la
Sociedad Estadounidense para la Calefacción (American
Society for Heating), los Ingenieros de Refrigeración
y Acondicionadores de Aire (Refrigeration and Air
Conditioning Engineers, ASHRAE) y las autoridades de
los códigos locales.
C. Al cortar o perforar una pared o un cielorraso, no dañe el
cableado eléctrico y de otros servicios ocultos.
D. Los ventiladores con conducto siempre deben contar con
ventilación hacia el exterior.
E. Cuando corresponda, instale un sistema de reposición
(reemplazo) de aire de acuerdo con los requisitos
del código local de construcción. Para acceder a
soluciones relacionadas con la reposición de aire, visite
GEAppliances.com.
F. Desconecte el disyuntor de habitaciones adyacentes
mientras esté trabajando.
ADVERTENCIA A FIN DE REDUCIR EL RIESGO
DE INCENDIOS, USE SÓLO CONDUCTOS DE METAL.
Ŷ1RLQWHQWHUHSDUDURUHHPSOD]DUQLQJXQDSDUWHGHOD
cocina, a menos que esto se recomiende específicamente
en este manual. Cualquier otra reparación deberá ser
realizada por un técnico calificado.
Cómo Retirar la Película Protectora de Envío y la Cinta de Embalaje
Con cuidado tome un extremo de la película protectora
de envío con los dedos y lentamente retire la misma de la
superficie del electrodoméstico. No utilice ningún producto
filoso para retirar la película. Retire toda la película antes de
usar el electrodoméstico por primera vez.
Para asegurar que no haya daños sobre el acabado del
producto, la forma más segura de retirar el adhesivo de la cinta
de embalaje en electrodomésticos nuevos es aplicando un
detergente líquido hogareño para lavar platos. Aplique con una
tela suave y deje que se seque.
NOTA: El adhesivo deberá ser eliminado de todas las partes.
No se puede retirar si se hornea con éste dentro.
NOTA: Para más instrucciones/ sugerencias sobre la limpieza,
por favor consulte la sección de Cuidado y Limpieza.
INFORMACIÓN DE SEGURIDAD
INFORMACIÓN IMPORTANTE DE SEGURIDAD
LEA TODAS LAS INSTRUCCIONES ANTES DE USAR
LEA Y GUARDE ESTAS INSTRUCCIONES
Table of contents
Languages:
Other GE Ventilation Hood manuals

GE
GE Monogram ZV1050 User manual

GE
GE Monogram ZV950 User manual

GE
GE JV376 Training manual

GE
GE Monogram ZV30 User manual

GE
GE Monogram ZV900 User manual

GE
GE UVW9361BL Manual

GE
GE Monogram ZVC30LSS User manual

GE
GE Monogram ZV750 User manual

GE
GE Monogram ZV1050 User manual

GE
GE JVX5300 Original instructions

GE
GE GE Monogram ZV850SPSS Manual

GE
GE GE Monogram ZVC42LSS User manual

GE
GE JV930SCBR Training manual

GE
GE JV694SBB Training manual

GE
GE ZV900SL3SS User manual

GE
GE JV535 Operating instructions

GE
GE Monogram ZV42 User manual

GE
GE PVW7361 User manual

GE
GE JVX3240 Original instructions

GE
GE Monogram ZV750 User manual