GE Appliances GFWN1100 User manual

GEAppliances.com
49-90454-2 06-13 GE
Washers
Safety Instructions..............2,3
Operating Instructions
ControlPanels ...................... 4-7
Features............................8–9
Loading and Using the Washer ....10,11
CleaningtheWasher..............12–14
Installation Instructions......15–20
PreparingtoInstallYourWasher......15
Rough-In Dimensions.................16
Location of Your Washer .............16
Unpacking Your Washer..............17
DrainRequirements..................18
ElectricalRequirements ..............18
Water Supply Requirements ..........18
InstallingtheWasher..............19,20
ReplacementParts...................20
Troubleshooting Tips .........21–24
Consumer Support
Warranty ............................25
Service Telephone Numbers ..........26
Owner’s Manual &
Installation Instructions
Write the model and serial
numbers here:
Model # _________________
Serial # __________________
You can find them on a label on the
side of the washer.
As an ENERGY STAR®partner,
GE has determined that this
product meets the ENERGY STAR®
guidelines for energy efficiency.
GFWN1100
GFWN1200
GFWH1200
GMAN1200
GFWH1300
GFWN1300
GFWH1400
GFWH1405
GFWS1500
GFWS1505
Printed in China
English/Français/Español

IMPORTANT SAFETY INFORMATION.
READ ALL INSTRUCTIONS BEFORE USING.
2
Consumer Support Troubleshooting Tips Operating Instructions Safety Instructions
Installation
Instructions
This is the safety alert symbol. This symbol alerts you to potential hazards that can kill you or hurt you and others. All
safety messages will follow the safety alert symbol and the word “DANGER”, “WARNING”, or “CAUTION”. These words are
defined as:
Indicates a hazardous situation which, if not avoided, will result in death or serious injury.
Indicates a hazardous situation which, if not avoided, could result in death or serious injury.
Indicates a hazardous situation which, if not avoided, could result in minor or moderate injury.
DANGER
WARNING
CAUTION
IMPORTANT SAFETY INSTRUCTIONS
To reduce the risk of death, fire, explosion, electric shock, or injury to persons when using your
appliance, follow basic precautions, including the following:
Read all instructions before using the appliance.
DO NOT wash or dry articles that have been previously cleaned in, washed in, soaked in or spotted with gasoline,
dry-cleaning solvents, or other flammable or explosive substances, as they give off vapors that could ignite or
explode.
DO NOT add gasoline, dry-cleaning solvents, or other flammable or explosive substances to the wash water. These
substances give off vapors that could ignite or explode.
Under certain conditions, hydrogen gas may be produced in a hot-water system that has not been used for 2
weeks or more. HYDROGEN GAS IS EXPLOSIVE. If the hot water system has not been used for such a period, before
using a washing machine, turn on all hot-water faucets and let the water flow from each for several minutes. This
will release any accumulated hydrogen gas. As the gas is flammable, DO NOT smoke or use an open flame during
this time.
DO NOT allow children to play on or in this appliance. Close supervision of children is necessary when this appliance
is used near children. Before the washer is removed from service or discarded, remove the door or lid. Failure to
follow these instructions may result in death or injury to persons.
DO NOT reach into the appliance if the tub or agitator is moving to prevent accidental entanglement.
DO NOT install or store this appliance where it will be exposed to the weather.
DO NOT tamper with controls, repair or replace any part of this appliance or attempt any servicing unless
specifically recommended in the user maintenance instructions or in published user repair instructions that you
understand and have the skills to carry out.
Keep the area around your appliance clean and dry to reduce the possibility of slipping.
DO NOT operate this appliance if it is damaged, malfunctioning, partially disassembled, or has missing or broken parts
including a damaged cord or plug.
Unplug the appliance or turn off the circuit breaker before servicing. Pressing the Power button DOES NOT disconnect
power.
See “Electrical Requirements” located in the Installation Instructions for grounding instructions.
SAVE THESE INSTRUCTIONS
WARNING

3
Consumer SupportTroubleshooting TipsOperating InstructionsSafety Instructions Installation
Instructions
GEAppliances.com
WHEN NOT IN USE
Turn off water faucets to minimize leakage if a break
or rupture should occur. Check the condition of the fill
hoses; GE recommends changing the hoses every 5
years.
Ensure that the hot water hose is connected to the “H”
(internal red screened) valve and the cold water hose is
connected to the “C” (internal blue screened) valve.
Install or store where it will not be exposed to
temperatures below freezing or exposed to the weather,
which could cause permanent damage and invalidate
the warranty.
Properly ground washer to conform with all
governing codes and ordinances. Follow details
in Installation Instructions.
This washer does not include water supply hoses.
GE strongly recommends the use of factory specified
parts. A list of factory hoses available for purchase are
listed below. These hoses are manufactured and tested
to meet GE specifications.
GE strongly recommends the use of new water supply
hoses. Hoses degrade over time and need to be
replaced every 5 years to reduce the risk of hose failures
and water damage.
Parts and Accessories
Order on-line at GEApplianceparts.com today, 24 hours a
day or by phone at 800.626.2002 during normal business
hours.
Part Number Accessory
PM14X10002 4 ft Rubber Water Supply Hoses
Or
PM14X10005 4 ft Braided Metal Water Supply Hoses
WX10X10011 Tide®Washing Machine Cleaner*
WX7X1 Washer Floor Tray
PROPER INSTALLATION
This washer must be properly installed and located in accordance with the Installation Instructions before it is used.
If you did not receive an Installation Instructions, you can receive one by visiting GEAppliances.com or by calling
800.GE.CARES (800.432.2737).
* Tide®is a registered trademark of Procter & Gamble
SAVE THESE INSTRUCTIONS
- Electrical Shock Hazard
WARNING
Plug into a grounded 3 prong outlet.
DO NOT remove ground prong.
DO NOT use an adapter.
DO NOT use an extension cord.
Failure to do so can result in death, fire or electrical
shock.

About the washer control panel.
4
Find the illustration that closely matches your model and see the descriptions for details.
Consumer Support Troubleshooting Tips Operating Instructions Safety Instructions
Installation
Instructions
1
11
10
6
79
82
3 4
512
1314 15
1
11
6
79
2
3 4
5
13 15
1
11
6
79
2
3 4
5
13 15

5
Consumer SupportTroubleshooting TipsOperating InstructionsSafety Instructions Installation
Instructions
GEAppliances.com
2
Power
Press to “wake up” the display. If the display is active, press to put the washer into standby mode.
NOTE: Pressing Power does not disconnect the appliance from the power supply.
Wash Cycles
The wash cycles are optimized for specific types of wash loads. The chart below will help you match
the wash setting with the loads. The GentleClean™lifters lightly tumble the clothes into the water and
detergent solution to clean the load.
Whites For heavily to lightly soiled white laundry.
Colors/Normals For heavily to lightly soiled colorfast cottons, household linens, work and play
clothes.
Stain Wash For heavily soiled colorfast laundry.
Sanitize When selecting sanitize, the washer increases the water temperature to sanitize
(on some models) and remove 99.9% of bacteria found in home laundry. For best results, select the
heavy soil setting when using the sanitize cycle.
Bulky Bedding For large coats, bed spreads, mattress covers, sleeping bags and similar large and
(on some models) bulky items. Large items such as blankets, comforters, jackets and small rugs.
Delicates For lingerie and special-care fabrics with light to normal soil. Provides gentle
Hand Wash tumbling and soak during wash and rinse.
Speed Wash For lightly soiled items that are needed in a hurry. Cycle time is approximately
30 minutes, depending on selected options.
Drain & Spin Drain and spin at any time.
Basket Clean Use for cleaning the basket of residue and odor. Recommended use of once per month.
NOTE: Never load laundry while using Basket Clean. The laundry may become
damaged or contaminated. See the Care and Cleaning section.
1
Soil Level
Changing the Soil level increases or decreases the wash time to remove different amounts of soil.
To change the Soil level, press the Soil level pad until you have reached the desired setting.
Spin Speed
Changing the Spin speed changes the final spin speed of the cycles. Always follow the fabric
manufacturer’s care label when changing the spin speed.
To change the spin speed, press the Spin speed pad until you have reached the desired setting. Higher
spin speeds are not available on certain cycles, such as Delicates.
Higher spin speeds remove more water from the clothes and will help reduce dry time, but may also
increase the possibility of setting wrinkles on some fabrics.
Wash Temp
Adjust to select the proper water temperature for the wash cycle. The prewash and rinse water is
always cold to help reduce energy usage and reduce setting of stains and wrinkles.
Follow the fabric manufacturer’s care label when selecting the wash temperature.
To change the wash temperature, press the Wash Temp pad until you have reached the desired
setting.
NOTE: The first 10 seconds of the wash fill is always cold. This feature assists in conditioning the fabric
and preventing stains from setting on garments.
Start/Add a Garment
Press to start a wash cycle. If the washer is running, pressing it once will pause the washer and unlock
the door. Press again to restart the wash cycle.
NOTE: If the washer is paused and the cycle is not restarted within 2 hours, the current wash cycle will
be cancelled.
NOTE: The washer performs automatic system checks after pressing the Start pad. Water will flow
in 45 seconds or less. You may hear the door lock and unlock before water flows; this is normal.
3
4
5
6
NSF Protocol P172
Sanitization Performance of Residential and
Commercial, Family-Sized Clothes Washers

About the washer control panel.
6
Consumer Support Troubleshooting Tips Operating Instructions Safety Instructions
Installation
Instructions
Prewash (on some models)
Prewash is an extra wash before
the main wash. Use it for heavily soiled
clothes or for clothes with a care label
that recommends prewashing before
washing. Be sure to add high-efficiency
detergent, or the proper wash additive
to the prewash dispenser.
NOTE: When selecting prewash,
it is recommended to use powder
detergent in the main wash (detergent)
compartment.
Extra Rinse
Use an extra rinse when additional rinsing
is desired to remove excess dirt and
detergent from soiled loads.
Delay Wash (on some models)
You can delay the start of a wash cycle
for 10–18 hours, depending on the model.
Press the Delay Wash pad to choose the
number of hours you want to delay
the start of the cycle, then press the Start
pad. The machine will count down and
start automatically at the correct time.
NOTE: If you forget to fully close the door,
a reminder signal will beep reminding you
to do so.
NOTE: If you open the door when the delay
is counting down, the machine will enter
the pause state. You must close the door
and press Start again in order to restart
the countdown.
Lock
You can lock the controls to prevent any
selections from being made. Or you can
lock the controls after you have started
a cycle.
Children cannot accidentally start
the washer by touching pads with
this option selected.
To lock the washer controls, press and
hold the Lock pad for 3 seconds.
To unlock the washer controls, press
and hold the Lock pad for 3 seconds.
The control lock icon on the display will
light up when it is on.
NOTE: The Power pad can still be used
when the machine is locked.
Cycle Signal
Use the Signal pad to change
the volume of the end of cycle signal. Press the pad until you reach
the desired volume.
7
8
9
10
11
My Cycle (on some models)
To save a favorite cycle, set the desired
settings for wash cycle, soil level, spin speed
and wash temp settings and hold down
the My Cycle pad for 3 seconds. A beep will
sound to indicate the cycle has been saved.
To use your custom cycle, press the
My Cycle pad before washing a load.
To change the saved cycle, set the desired
settings and hold down the My Cycle pad
for 3 seconds.
NOTE: When using My Cycle, wash
options cannot be modified after the
cycle has been started.
NOTE: If you change wash options with
My Cycle before starting the cycle, the
My CycleOLJKWZLOOWXUQRȺDQG\RXZLOO
be returned to the base cycle.
12

7
GEAppliances.com
Consumer SupportTroubleshooting TipsOperating InstructionsSafety Instructions Installation
Instructions
13 eWash (Energy Saving Wash)
Use eWASH to save energy on specified
wash cycles. eWASH cannot be used
with Steam Refresh, Stain Wash or
Basket Clean.
14 Steam
(on some models)
Steam adds steam into the washer
during Whites, Colors/Normals, Stain
Wash, Sanitize or Bulky Bedding
cycles.
To use:
1. Turn Power on and select a wash
cycle.
The Steam option is only available
on Whites, Colors/Normals, Stain
Wash, Sanitize or Bulky Bedding
cycles.
2. Press Steam pad to activate.
3. Press the Start pad.
15 Display
The display shows the approximate time
remaining until the end of the cycle. NOTE: The cycle time is affected by how long
it takes the washer to fill. This depends on the
water pressure in your home.

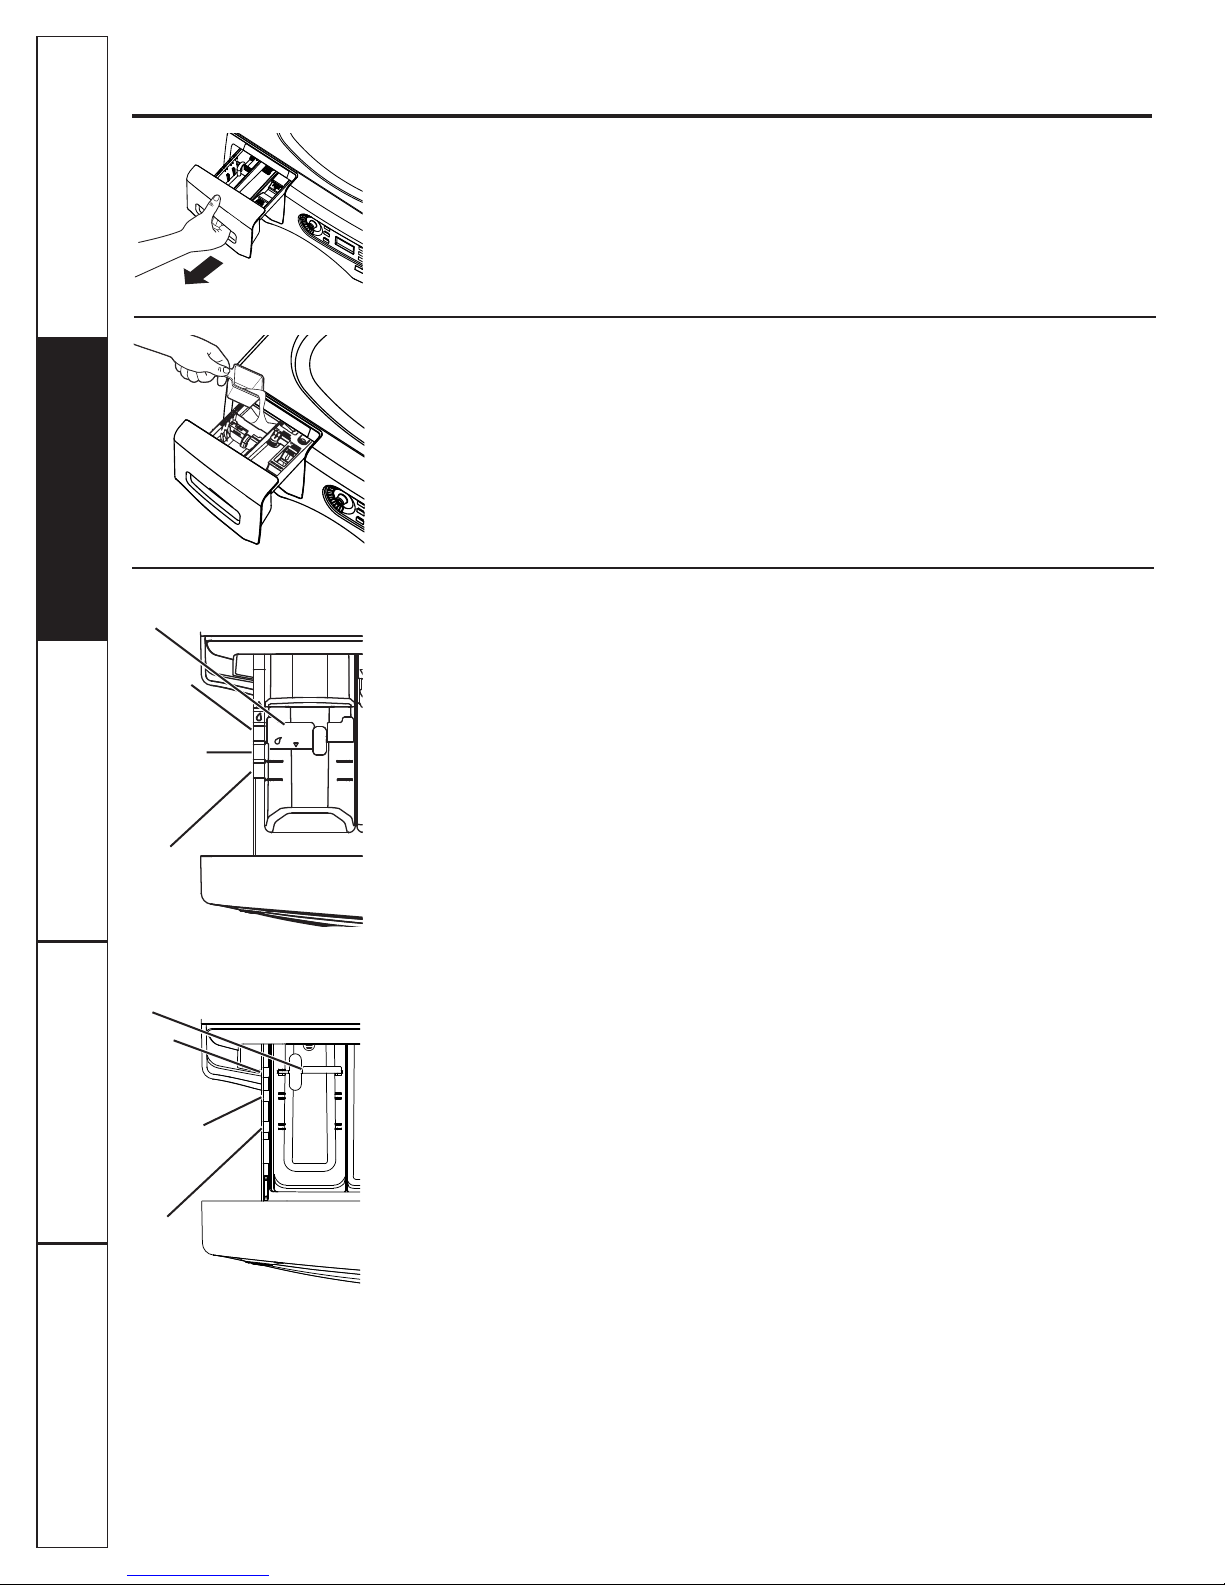
The Dispenser Drawer
Slowly open the dispenser drawer by pulling
it out until it stops.
After adding laundry products, slowly close
the dispenser drawer. Closing the drawer too
quickly could result in early dispensing of the
bleach, fabric softener or detergent.
You may see water in the bleach and fabric
softener compartments at the end of the cycle.
This is a result of the flushing/siphoning action
and is part of the normal operation of the
washer.
The Detergent Compartment
High-efficiency detergent is required for this
washer. Use the detergent manufacturer’s
recommended amount.
The detergent selection insert must be placed in
the detergent compartment in a specific position
according to what type of detergent you are
using.
Powder Detergent – Remove the detergent
selection insert.
Liquid Detergent – You will need to adjust
the insert according to the type of Liquid
Detergent you are using. The Icons on the side
of the detergent compartment must line up on
the center when the insert is in position.
NOTE: Not all models have the 2x and 3x
detergent settings. Some have only regular
HE detergent settings. You must reduce the
amount of detergent for 2x or 3x detergent
per bottle instructions.
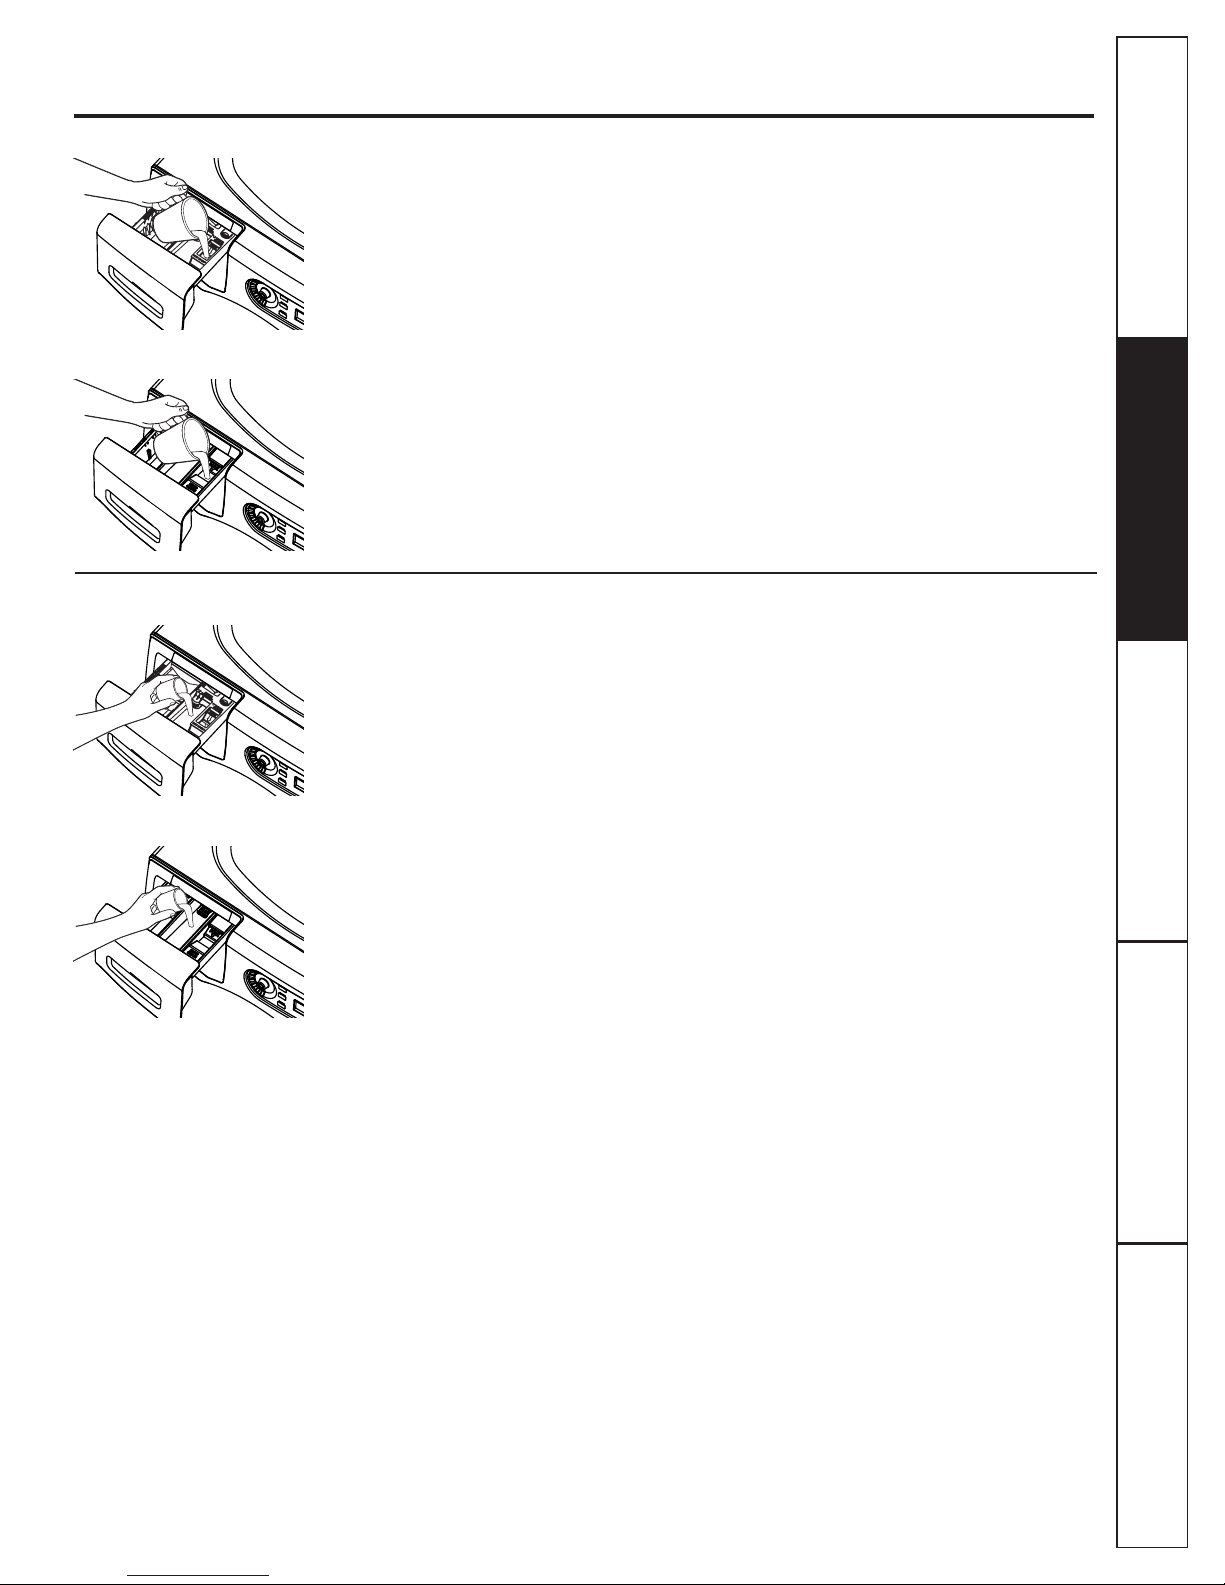
Move the insert by pulling it up and replace
it by sliding it down between either the rear
or front detergent compartment molded rails, as
desired, for liquid detergent. Remove for powder
detergent.
Add measured detergent to the front left
detergent compartment of the dispenser
drawer.
Detergent is flushed from the dispenser
at the beginning of the wash cycle. Either
powdered or liquid detergent can be used.
Detergent usage may need to be adjusted for
water temperature, water hardness,
size and soil level of the load. Avoid using too
much detergent in your washer as it can lead
to oversudsing and detergent residue being
left on the clothes.
Using more detergent than the recommended
quantity can cause residue buildup on your
washer.
The Prewash Compartment (on some models)
Only use the Prewash Compartment if you
are selecting the Prewash cycle for heavily
soiled clothes. Add measured detergent or
prewash additive to the back left prewash
compartment of the dispenser drawer.
Detergent or prewash additive is flushed
from the dispenser in the prewash cycle
(if selected).
NOTE: Liquid detergent will drain into the
washer drum as it is added.
Detergent usage may need to be adjusted for
water temperature, water hardness, size and
soil level of the load. Avoid using too much
detergent in your washer as it can lead to
over sudsing and detergent residue being left
on the clothes.
Consumer Support Troubleshooting Tips Operating Instructions Safety Instructions
Installation
Instructions
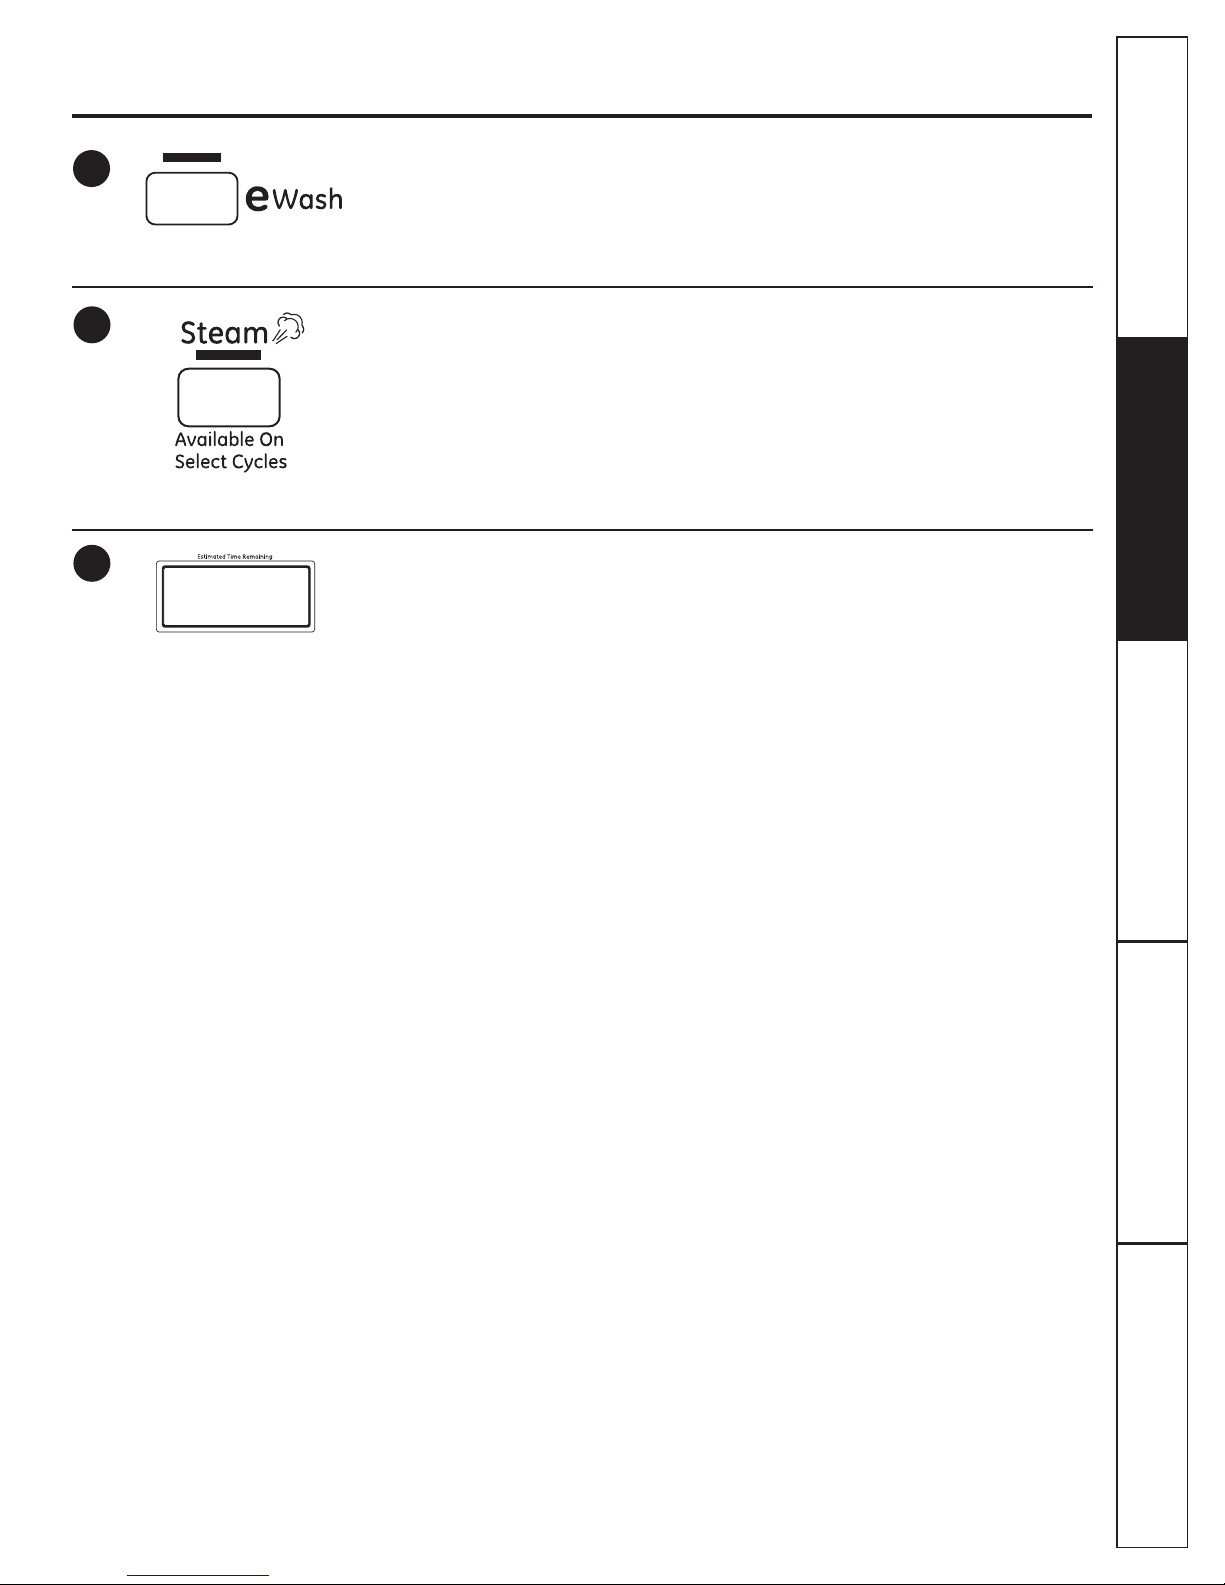
About the washer features.
NOTE: Features may not be available on all washer models.
8
Normal
HE Liquid
Detergent
Setting
2X HE Liquid
Detergent Setting
(most common
setting)
3X HE
Liquid
Detergent
Setting
remove for powder
PREWASH
LIQUID
3X 2X 1X
MAINWASH
Remove for powder detergent
Appearance may vary
On some models:
DETERGENTS
O
LIQUID 3X 2X 1X
remove for powder
Normal
HE Liquid
Detergent
Setting
2X HE Liquid
Detergent Setting
(most common
setting)
3X HE
Liquid
Detergent
Setting
Remove for powder detergent
On some models:
Appearance may vary

The Liquid Bleach Compartment
IMPORTANT: The bleach compartment
position varies by model. Be sure to identify
the correct compartment for bleach before
using.
If desired, measure out the recommended
amount of liquid bleach, not to exceed
1/3 cup (80 ml), and pour into the right
compartment labeled “LIQUID BLEACH”.
Do not exceed the maximum fill line. Overfilling
can cause early dispensing of the bleach which
could result in damaged clothes.
NOTE: Do not use powdered bleach in the
dispenser.
9
GEAppliances.com
Consumer SupportTroubleshooting TipsOperating InstructionsSafety Instructions Installation
Instructions
The Fabric Softener Compartment
IMPORTANT: The fabric softener compartment
position varies by model. Be sure to identify
the correct compartment for fabric softener
before using.
If desired, pour the recommended amount
of liquid fabric softener into the compartment
labeled “FABRIC SOFTENER.”
Use only liquid fabric softener in the dispenser.
Dilute with water to the maximum fill line.
Do not exceed the maximum fill line. Overfilling
can cause early dispensing of the fabric softener
which could stain clothes.
NOTE: Do not pour fabric softener directly
on the wash load.
On some models:
On some models:
On some models:
On some models:

Loading and using the washer.
Always follow fabric manufacturer’s care label when laundering.
Sorting Wash Loads
Preparing Clothes
Colors
Whites
Lights
Darks
Soil
Heavy
Normal
Light
Fabric
Delicates
Easy Care
Sturdy Cottons
Lint
Lint Producers
Lint Collectors
Combine large and small items in a load. Load large items first. Large items should not be more than half
the total wash load.
Washing single items is not recommended. This may cause an out-of-balance load. Add one or two
similar items.
Pillows and comforters should not be mixed with other items. This may cause an out-of-balance load.
To avoid snags during washing:
• Close garment zippers, snaps, buttons and hooks.
• Mend seams, hems, tears.
• Empty all items from pockets.
• Remove nonwashable garment accessories such as ornaments and nonwashable trim materials.
To avoid tangling, tie strings, draw ties and belt-like materials.
Brush away surface dirt and lint; treat spots and stains.
Promptly wash wet or stained garments to maximize results.
Mix garments using recommended maximum load sizes on page 11.
Use nylon mesh garment bags to wash small items.
Wash multiple garments at one time for best results.
Sort laundry into loads that can be washed together.
Follow these steps to maximize garment care.
Consumer Support Troubleshooting Tips Operating Instructions Safety Instructions
Installation
Instructions
10
- Fire Hazard
WARNING
Never place items in the washer that are dampened with gasoline or other flammable liquids.
No washer can completely remove oil.
Do not dry anything that has ever had any type of oil on it (including cooking oils).
Doing so so can result in death, explosion, or fire.

Loading the Washer
Wash drum may be fully loaded with loosely added
items. Do not wash fabrics containing flammable
materials (waxes, cleaning fluids, etc.).
To add items after washer has started, press Start
and wait until the door is unlatched. The washer
may take up to 30 seconds to unlock the door
after pressing Start depending on the machine
conditions. Do not try to force open the door when
it is locked. After the door unlocks, open gently. Add
items, close the door and press Start to restart.
11
GEAppliances.com
Consumer SupportTroubleshooting TipsOperating InstructionsSafety Instructions Installation
Instructions
WORKWEAR
4 Jeans
5 Workwear Shirts
5 Workwear Pants
LINENS
2 Bath Sheets
10 Bath Towels/
12 Washcloths
7 Hand Towels/
2 Terrycloth
Bath Mats
OR
2 Flat Queen-Sized
Sheets
2 Fitted
Queen-Sized
Sheets
4 Pillowcases
MIXED LOAD
4 Pillowcases
2 Hand Towels
2 Flat Sheets/
2 Fitted Sheets
2 Bath Towels/
4 Washcloths
OR
6 Shirts (Men’s
or Women’s)
4 Pair Pants
(Khakis
or Twills)
5 T-Shirts
7 Pairs of Boxers
4 Pairs of Shorts
OR
6 T-Shirts
4 Pairs of
Sweatpants
4 Sweatshirts
2 Hoodies
7 Pairs of Socks
DELICATES**
7 Bras
7 Panties
3 Slips
2 Camisoles
4 Nightgowns
SPEED WASH
(2–4 GARMENTS)
2 Casual Wear
Work Shirts
1 Pair Casual Wear
Work Pants
OR
3 Soccer Uniforms
Maximum Loading Sizes*
*Exceeding maximum recommended load sizes may affect cleaning performance and garment care.
**Using a nylon mesh bag for small items is recommended.

12
Consumer Support Troubleshooting Tips Operating Instructions Safety Instructions
Installation
Instructions
Cleaning the washer.
Cleaning the Interior
of the Washer
To clean the interior of the washer, select
the Basket Clean feature on the control
panel. The cycle will use more water,
in addition to bleach, to refresh your
washer.
NOTE: Read the instructions below
completely before starting the Basket
Clean cycle.
1. Remove any garments or objects from
the washer and ensure the washer
basket is empty.
2. Open the washer door and pour
one cup or 250 ml of liquid bleach
or other washing machine cleaner
into the basket.
3. Close the door and select the Basket
Clean cycle. Push the Start pad.
4. When the Basket Clean cycle is
working, you will see CLn on the
display. The cycle will complete in
about 90 minutes. Do not interrupt
the cycle.
5. After the cycle is complete, leave
the door open slightly for better
ventilation.
If for any reason the cycle needs to
be interrupted, the door will not open
immediately. Forcing open the door at
this stage may cause water to flood.
The door will open after the water is
drained to a level where it would not
flood the floor.
Basket Clean may be interrupted
by pressing the Start pad in between
cycles. A power outage in the house might
also interrupt the cycle. When the power
supply is back, the Basket Clean cycle
resumes where it had stopped. When
interrupted, be sure to run a complete
Basket Clean cycle before using the
washer. If the Power pad is pressed during
BasketClean, the cycle will be lost.
IMPORTANT:
Run Basket Clean with 1 Cup (250 ml) of
bleach once a month.
After the completion of a Basket Clean
cycle, the interior of your washer may
have a bleach smell.
It is recommended to run a light color
load after the Basket Clean cycle.
Care and Cleaning
Exterior: Immediately wipe off any spills. Wipe with damp cloth. Do not hit surface with sharp objects.
Moving and Storage: Ask the service technician to remove water from drain pump and hoses.
Do not store the washer where it will be exposed to the weather. When moving the washer,
the tub should be kept stationary by using the shipping bolts removed during installation.
See Installation Instructions in this book. If these parts are not available, they can be ordered
by visiting our Website at GEAppliances.com or by calling 800.GE.CARES. In Canada, call 800.561.3344.
Long Vacations: Be sure the water supply is shut off at the faucets. Drain all water from the hoses if the
weather will be below freezing.

Cleaning the Pump Filter
Due to the nature of the front-load washer,
it is sometimes possible for small articles
to pass to the pump. The washer has a
filter to capture lost items so they are not
dumped to the drain. To retrieve lost items,
clean out the pump filter.
1. Using a coin or flat screwdriver
in the notch on the door, open
the access door.
2. Place a shallow pan or dish under
the pump access door and towels
on the floor in front of the washer to
protect the floor. It is normal to catch
about a cup of water when the filter
is removed.
3. Pull down the pour spout.
4. Turn the pump filter counterclockwise
and remove the filter. Open slowly to
allow the water to drain.
5. Clean the debris from the filter.
6. Replace the filter and turn clockwise.
Tighten securely.
7. Flip up the pour spout.
8. Close the access door.
Pour
spout
Pour
spout
Cleaning the Door Gasket
Open the washer door. Using both hands,
press down the door gasket. Remove any
foreign objects if found trapped inside
the gasket. Make sure there is nothing
blocking the holes behind the gasket.
While holding down the door gasket,
inspect the interior gasket by pulling it
down with your fingers. Remove any
foreign objects if found trapped inside
this gasket. Make sure there is nothing
blocking the holes behind the gasket.
When you are finished cleaning
the door gasket, remove your
hands and the gasket will return
to the operating position.
Consumer SupportTroubleshooting TipsOperating InstructionsSafety Instructions Installation
Instructions
13
GEAppliances.com
Pump filter

Dispenser Drawer Area: Detergent and fabric softener may build up
in the dispenser drawer. Residue should be removed once or twice a month.
Remove the drawer by first pulling it out until it stops. Then reach back into
the left or right rear corner (depending on model) of the drawer cavity and
press down firmly on the lock tab, pulling out the drawer.
Remove the inserts from the bleach and fabric softener compartments and
the detergent insert. Rinse the inserts and the drawer with hot water to
remove traces of accumulated laundry products.
To clean the drawer opening, use a small brush to clean the recess. Remove
all residue from the upper and lower parts of the recess.
Return inserts to the proper compartments. Replace the dispenser drawer.
Lock tab is visible only after drawer
has been pulled open
14
Consumer Support Troubleshooting Tips Operating Instructions Safety Instructions
Installation
Instructions
Cleaning the washer.
Tab on back right or left depending on model

Installation
Washer
Instructions
BEFORE YOU BEGIN
Read these instructions completely and carefully.
•IMPORTANT – Save these instructions
for local inspector’s use.
•IMPORTANT – Observe all governing
codes and ordinances.
• Note to Installer – Be sure to leave these
instructions with the Consumer.
• Note to Consumer – Keep these instructions
for future reference.
• Skill level – Installation of this appliance requires
basic mechanical and electrical skills.
• Completion time – 1-3 hours
• Proper installation is the responsibility of the installer.
• Product failure due to improper installation is not
covered under the Warranty.
WARNING
• This appliance must be properly grounded and
installed as described in these Installation Instructions.
• Do not install or store the appliance in an area where
it will be exposed to water/weather. See the Location
of Your Washer section.
• NOTE: This appliance must be properly
grounded, and electrical service to the washer
must conform with local codes and ordinances
and the latest edition of the National Electrical
Code, ANSI/NFPA 70.
FOR YOUR SAFETY:
15
TOOLS REQUIRED
Adjustable wrench or 1/2” socket with ratchet
Adjustable wrench or 9/16” open-end wrench
Channel-lock adjustable pliers
Carpenter’s level
Inlet Hose Screen
Washers (2)
PARTS SUPPLIED
Cable Tie
Hose Guide
STACK BRACKET KIT
OPTIONAL PEDESTAL ACCESSORY
A stack bracket kit is available at additional cost.
It can be ordered in the United States by visiting
our Web site at GEAppliances.com or calling 800.
GE.CARES. In Canada, call 800.661.1616 or visit your
local GE Appliances dealer. Order kit # WE25X10018 or
GEFLSTACK.
A pedestal is available at additional cost. It can be
ordered in the United States by visiting our Web site at
GEAppliances.com or calling 800.GE.CARES. In Canada,
visit your local GE Appliances dealer. This product
should be used with the pedestal # SBSD137HXX
and SBSD227FXX. Follow the pedestal Installation
Instructions.
Water Hoses (2)
PARTS REQUIRED (Obtain locally)
If you have any questions, call 800.GE.CARES (800.432.2737) or visit our Website at: GEAppliances.com
In Canada, call 800.561.3344 or visit GEAppliances.ca

16
Installation Instructions
LOCATION OF YOUR WASHER
Do Not Install the Washer:
1. In an area exposed to dripping water or outside
weather conditions. The ambient temperature should
never be below 60°F (15.6°C) for proper washer
operation.
2. In an area where it will come in contact with curtains
or drapes.
3. On carpet. The floor MUST be a hard surface with
a maximum slope of 1/2” per foot (1.27 cm per
30 cm). To make sure the washer does not vibrate
or move, you may have to reinforce the floor.
NOTE: If floor is in poor condition, use 3/4” impregnated
plywood sheet solidly attached to the existing floor
covering.
IMPORTANT:
Minimum Installation Clearances
• When installed in alcove: Sides, Rear,
Top = 0” (0 cm)
• When installed in closet: Sides, Rear,
Top = 0” (0 cm), Front = 1” (2.54 cm)
• Closet door ventilation openings required:
2 louvers each 60 square in. (387 cm), located 3”
(7.6 cm) from top and bottom of door
ROUGH-IN DIMENSIONS
SIDE
FRONT
27.0”
(68.6 cm)
*NOTE: With pedestal, 52.6”
Stacked, 84”
39.8”
(101.09 cm)
33.6”
(85.3 cm)
39.8”
(101.09 cm)

UNPACKING THE WASHER
WARNING: Recycle or destroy the carton
and plastic bags after the washer is unpacked. Make
materials inaccessible to children. Children might use
them for play. Cartons covered with rugs, bedspreads
or plastic sheets can become airtight chambers causing
suffocation.
1. Cut and remove the top and bottom packaging straps.
2. While it is in the carton, carefully lay the washer on its
side. DO NOT lay the washer on its front or back.
3. 7XUQGRZQWKHERWWRPIODSV³UHPRYHDOOEDVHSDFNDJLQJ
including the cardboard, styrofoam base and styrofoam
tub support (inserted in center of base).
NOTE: If you are installing a pedestal, proceed to
the installation instructions that come with the pedestal.
4. Carefully return the washer to an upright position and
remove the carton.
5. Carefully move the washer to within 4 feet (122 cm)
of the final location.
6. Remove the following from the back side of the washer:
4 bolts
4 plastic spacers (including rubber grommets)
4 power cord retainers
NOTE: Failure to remove the shipping braces can cause
the washer to become severely unbalanced.
Save all bolts for future use.
NOTE: If you must transport the washer at a later date,
you must reinstall the shipping support hardware to prevent
shipping damage. Keep the hardware in the plastic bag
provided.
In case you misplace your shipping bolts, replacements
are available at additional cost. They can be ordered in the
United States by visiting our website at GEAppliances.com
or calling 800.GE.CARES. In Canada, call 800.661.1616. Order
kit #WH49X10039.
Installation Instructions
17

1. Drain capable of eliminating 17 gals (64.3 L)
per minute.
2. A standpipe diameter of 1–1/4” (3.18 cm) minimum.
3. The standpipe height above the floor should be:
Minimum height: 24” (61 cm)
Maximum height: 96” (244 cm)
NOTE: The drain hose attached to the washer can reach
a 58” (147 cm) high standpipe. For a higher standpipe,
contact an authorized parts distributor.
18
Installation Instructions
ELECTRICAL REQUIREMENTS
CIRCUIT – Individual, properly polarized and grounded
15-amp branch circuit fused with 15-amp time-delay fuse
or circuit breaker.
POWER SUPPLY – 2-wire, with ground, 120-volt,
single-phase, 60-Hz, alternating current.
OUTLET RECEPTACLE – Properly
grounded 3-prong receptacle to be
located so the power supply cord
is accessible when the washer is
in an installed position.
WARNING:
Improper connection of the equipment grounding conductor
can result in a risk of electrical shock. Check with a licensed
electrician if you are in doubt as to whether the appliance is
properly grounded.
1. The washer MUST be grounded. In the event of
malfunction or breakdown, grounding will reduce
the risk of electrical shock by providing a path of least
resistance for electrical current.
2. Since your washer is equipped with a power supply
cord having an equipment-grounding conductor and
a grounding plug, the plug MUST be plugged into an
appropriate, copper-wired receptacle that is properly
installed and grounded in accordance with all local
codes and ordinances or in the absence of local codes,
with the National Electrical Codes, ANSI/NFPA 70 (latest
edition). If in doubt, call a licensed electrician. DO NOT
cut off or alter the grounding prong on the power
supply cord. In situations where a two-slot receptacle is
present, it is the owner’s responsibility to have a licensed
electrician replace it with a properly grounded
three-prong grounding-type receptacle.
Read these instructions completely and carefully.
GROUNDING REQUIREMENTS
WATER SUPPLY REQUIREMENTS
Hot and cold water faucets MUST be installed within
42 inches (107 cm) of your washer’s water inlet. The faucets
MUST be 3/4” (1.9 cm) garden hose-type so inlet hoses can
be connected. Water pressure MUST be between 10 and 120
pounds per square inch. Your water department can advise
you of your water pressure. The hot water temperature
should be set to deliver water at 120° to 140°F (48°–60°C).
DRAIN REQUIREMENTS
WARNING:
TO REDUCE THE RISK OF FIRE, ELECTRICAL SHOCK AND
PERSONAL INJURY:
• DO NOT USE AN EXTENSION CORD OR AN ADAPTER
PLUG WITH THIS APPLIANCE.
Washer must be electrically grounded in accordance
with local codes and ordinances, or in the absence
of local codes, in accordance with the NATIONAL
ELECTRICAL CODE, ANSI/NFPA NO. 70.
BACK
96”
(244 cm)
Max.
24”
(61 cm)
Min.

INSTALLING THE WASHER
1. Run some water from the hot and cold faucets to flush
the water lines and remove particles that might clog up
the inlet hoses and water valve screens.
2. Obtain inlet hoses locally.
3. Ensure there is a rubber
washer in the hoses. Reinstall
the rubber washer into the
hose fitting if it has fallen out
during shipment. Carefully
connect an inlet hose to
the outside “H” outlet of the
water valve. Tighten by hand,
then tighten another 2/3 turn
with pliers. Carefully connect
the other inlet hose to the inside “C” outlet of the water
valve. Tighten by hand; then tighten another 2/3 turn
with pliers. Do not crossthread or over-tighten these
connections.
4. Install the screen washers by inserting them into the free
ends of the inlet hoses with protruded side facing the
faucet.
5. Connect the inlet hose ends to the HOT and COLD water
faucets tightly by hand, then tighten another 2/3 turn
with pliers. Turn the water on and check for leaks.
6. Carefully move the washer to its final location. Gently
rock the washer into position ensuring inlet hoses do
not become kinked. It is important not to damage the
rubber leveling legs when moving your washer to its final
location. Damaged legs can increase washer vibration. It
may be helpful to spray window cleaner on the floor to
help move your washer into its final position. NOTE: To
reduce vibration, ensure that all four rubber leveling legs
are firmly touching the floor. Push and pull on the back
right and then back left of your washer.
NOTE: Do not use the dispenser drawer or door to lift
the washer.
NOTE: If you are installing into a drain pan, you can use
a 24-inch long 2x4 to lever the washer into place.
7. With the washer in its
final position, place
a level on top of the
washer (if the washer
is installed under a
counter, the washer
should not be able to
rock). Adjust the front
leveling legs up or down
to ensure the washer is resting solid. Turn the lock
nuts on each leg up towards the base of the washer
and snug with a wrench.
NOTE: Keep the leg extension at a minimum to prevent
excessive vibration. The farther out the legs are extended,
the more the washer will vibrate.
If the floor is not level or is damaged, you may have
to extend the rear leveling legs.
19
Installation Instructions
C
H
Inlet Hose
Screen
Washers

20
Installation Instructions
INSTALLING THE WASHER (cont.)
8. Attach the U-shaped hose guide to the end of
the drain hose. Place the hose in a laundry tub or
standpipe and secure it with the cable tie provided in
the enclosure package.
NOTE: Placing the drain hose too far down the drain pipe
can cause a siphoning action. No more than 7 inches of
hose should be in the drain pipe. There must be an air
gap around the drain hose. A snug fit can also cause a
siphoning action.
9. Plug the power cord into a grounded outlet.
NOTE: Check to be sure the power is off at the circuit
breaker/fuse box before plugging the power cord into
an outlet.
10. Turn on the power at the circuit breaker/fuse box.
11. Read the rest of this Owner’s Manual. It contains
valuable and helpful information that will save you
time and money.
12. Before starting the washer, check to make sure:
Main power is turned on.
The washer is plugged in.
The water faucets are turned on.
The unit is level and all four leveling legs are firmly
on the floor.
The shipping support hardware is removed
and saved.
The drain hose is properly tied up.
There are no leaks at the faucet, drain line
or washer.
13. Run the washer through a complete cycle.
Check for water leaks and proper operation.
14. If your washer does not operate, please review
the Before You Call For Service section before
calling for service.
15. Place these instructions in a location near the washer
for future reference.
Cable Tie Cable Tie
If replacement parts are needed for your washer, they
can be ordered in the United States by visiting our Web
site at GEAppliances.com or by calling 800.GE.CARES. In
Canada, call 800.661.1616.
REPLACEMENT PARTS
Cable Tie
Other manuals for Appliances GFWN1100
2
This manual suits for next models
9
Table of contents
Languages:
Other GE Washer manuals

GE
GE WCCB1030YAC User manual

GE
GE GTW330 Original instructions

GE
GE WNRD2050GWC User manual

GE
GE GTWS8650DWS User manual

GE
GE Profile Harmony PTWN8050M Operating instructions

GE
GE Spacemaker WSSH300 Original instructions

GE
GE WCVH4800K How to use

GE
GE PTW605 Original instructions

GE
GE GTWN4950FWW Manual

GE
GE G152 User manual