manuals.online logo
Brands
  1. Home
  2. •
  3. Brands
  4. •
  5. GE
  6. •
  7. Washer
  8. •
  9. GE S21O0 User manual

GE S21O0 User manual

This manual suits for next models

22

Other GE Washer manuals

GE GFWH2405MV User manual

GE

GE GFWH2405MV User manual

GE WHRE5550K User manual

GE

GE WHRE5550K User manual

GE Appliances WASR3110 User manual

GE

GE Appliances WASR3110 User manual

GE Spacemaker WSXH208 Original instructions

GE

GE Spacemaker WSXH208 Original instructions

GE WWM657M User manual

GE

GE WWM657M User manual

GE WBXR1060T User manual

GE

GE WBXR1060T User manual

GE GTW680 series Original instructions

GE

GE GTW680 series Original instructions

GE WCVH6800JBB User manual

GE

GE WCVH6800JBB User manual

GE GTW525 Original instructions

GE

GE GTW525 Original instructions

GE G188 User manual

GE

GE G188 User manual

GE Appliances G153 User manual

GE

GE Appliances G153 User manual

GE WWA8324G User manual

GE

GE WWA8324G User manual

GE WWA8344B Installation instructions

GE

GE WWA8344B Installation instructions

GE Washers User manual

GE

GE Washers User manual

GE WWA8360G Installation instructions

GE

GE WWA8360G Installation instructions

GE Spacemaker WSLS1100H Original instructions

GE

GE Spacemaker WSLS1100H Original instructions

GE GTW485 Operating instructions

GE

GE GTW485 Operating instructions

GE WWA5710M User manual

GE

GE WWA5710M User manual

GE GTWP2005MCC Manual

GE

GE GTWP2005MCC Manual

GE GTWN7450DWW User manual

GE

GE GTWN7450DWW User manual

GE GE Profile WCCB1030J Manual

GE

GE GE Profile WCCB1030J Manual

GE WA8879R User manual

GE

GE WA8879R User manual

GE GFWH2400 Original instructions

GE

GE GFWH2400 Original instructions

GE Profile Harmony WPGT9360 How to use

GE

GE Profile Harmony WPGT9360 How to use

Popular Washer manuals by other brands

Haier HWM96-0623S null

Haier

Haier HWM96-0623S null

Haier B828TX null

Haier

Haier B828TX null

Haier HWM30-0701 null

Haier

Haier HWM30-0701 null

Samsung WF8508NMW8 null

Samsung

Samsung WF8508NMW8 null

Samsung WF-B105AV null

Samsung

Samsung WF-B105AV null

Haier HWM20-0701 null

Haier

Haier HWM20-0701 null

Akai AWM1050WF null

Akai

Akai AWM1050WF null

Haier HWM15-0501 null

Haier

Haier HWM15-0501 null

Tricity Bendix AW 1000 W Operating & installation instructions

Tricity Bendix

Tricity Bendix AW 1000 W Operating & installation instructions

Panasonic NA-F60L5WRB operating instructions

Panasonic

Panasonic NA-F60L5WRB operating instructions

Electrolux EWF1284EDW Service manual

Electrolux

Electrolux EWF1284EDW Service manual

LG TV2516DV3B owner's manual

LG

LG TV2516DV3B owner's manual

LG TH2517DSAV owner's manual

LG

LG TH2517DSAV owner's manual

VESTEL CMH-XL 7510 TE user manual

VESTEL

VESTEL CMH-XL 7510 TE user manual

AEG 74335 User information

AEG

AEG 74335 User information

Johnson JWF721A user manual

Johnson

Johnson JWF721A user manual

Beko WTE7604XLW0 owner's manual

Beko

Beko WTE7604XLW0 owner's manual

Danby DTT100A1WDB Owner's use and care guide

Danby

Danby DTT100A1WDB Owner's use and care guide

manuals.online logo
manuals.online logoBrands
  • About & Mission
  • Contact us
  • Privacy Policy
  • Terms and Conditions

Copyright 2025 Manuals.Online. All Rights Reserved.

ge.com
Safety Instructions .......... 2,s
Operating Instructions
Care and Cleaning
of the Washer .................... 9
Control Panels .................. 4, 6
Control Settings ................ 4-7
Features .......................... 8
Loading and Using
the Washer ....................... 9
Troubleshooting Tips ..... lo-12
Consumer Support
Consumer Support ............... 16
Warrantg ........................ 1S
$21 O0
$3700
WBB2090
WBSR3140
WCSR2090
WCSR4170
WDSR2080
WHDSR209
WHDSRS16
WJSR4160
WLSR2000
WLSR3000
WVSR1060
EWA4600
WBB4500
WCRE6270
WJRR4170
WLRR4500
WLRR5000
WSERR417
WWSE5240
Write the model and serial
number here:
Model #
Serial #
You can find them _ /-'7
on the left corner
of the washer
under the lid.
175D1807P563 49-90295 06-06 JR
IMPORTANT SAFETY INFORMATION.
READ ALL INSTRUCTIONS BEFORE USING.
_,WAR N!NG! Foryoursafety,the,n_ormat,on,nth,smanuafmustbe_offowedtom,n,m,zether,sk
of fire or explosion, electric shock, or to prevent property damage, personal injury,
or loss of tile.
WATERHEATERSAFETY
Under certain conditions, hydrogen gas may be produced in a water heater that has not been
used for two weeks or more. Hydrogen gas can be explosive under these circumstances.
If the hot water hasnot been usedfor two weeksor more, prevent the possibility of damage or injury by
turning on all hot water faucets and allowing them to run for several minutes. Dothis beforeusing any
electrical appliance which isconnected to the hot water system. Thissimple procedurewill allow any
built-up hydrogen gasto escape.Sincethe gas isflammable, do not smoke or usean open flame or
appliance during this process.
%PROPERINSTALLATION
This washer must be properly installed and located in accordance with the Installation
Instructions before it is used. If you did not receive on Installation Instructions sheet, you con
receive one by visiting ge.com or by coiling 800.GE.CARES (800.432.2737).
• Install or store where itwill not be exposed to • Properlu ground washer to conform with all
temperatures below freezing or exposed to the governing codes and ordinances. Followdetails
weather,which could cause permanent damage in Installation Instructions.
and invalidate the warrantu.
YOURLAUNDRYAREA
• Keepthe area underneath and around uour
appliances free of combustible materials such as
lint, paper,rags,chemicals,etc.
• Closesupervision isnecessarg ifthis appliance is
used bu or near children.Do not allow children to
plau on,with or insidethis or any other appliance.
ge.com
WHEN USING THE WASHER
• Never reach into washer while it ismoving. • Thelaundry processcan reducethe flame
Wait until the machine has completely stopped retardancg of fabrics.Toavoid such a result,
before opening the lid. carefully follow the garment manufacturer's
wash and care instructions.
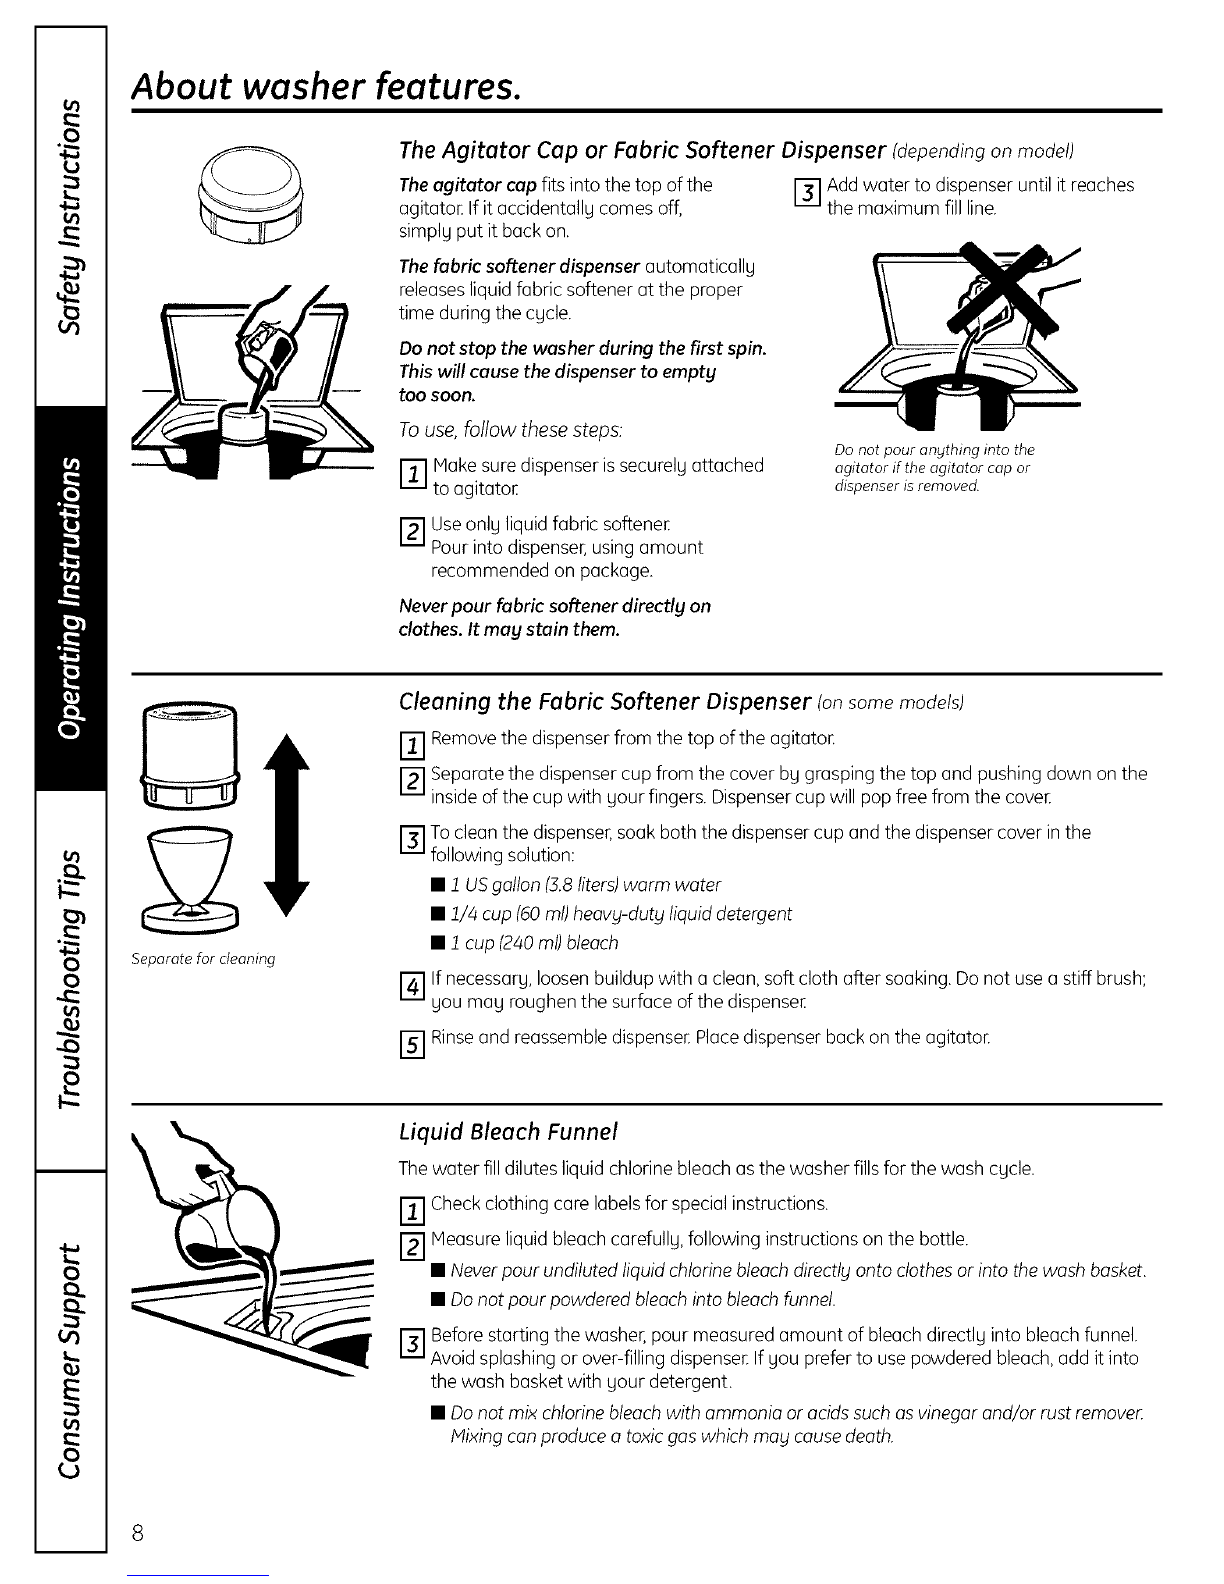
Donot mix chlorine bleach with ammonia or acids
Use this
appliance
only for its
intended
purpose as
described in
this Owner's
Manual.
such as vinegar and/or rust remover Mixing
different chemicals can produce a
toxic gaswhich may cause death.
Do notwash or dry articlesthat have been
cleaned in,washed in, soakedin or spotted with
combustible or explosivesubstances (suchas
wax,oil,paint, gasoline, degreasers,dry-cleaning
solvents,kerosene,etc.).Thesesubstances giveoff
vapors that may igniteor explode. Donot add
these substancesto the wash water Do not useor
place these substances around your washer or
dryer during operation.
• Tominimize the possibility of electricshock,
unplug this appliance from the power supply
or disconnect the washer at the building's
distribution panel by removing the fuse or
switching off the circuit breakerbefore attempting
any maintenance or cleaning.
NOTE:TurningtheCycleSelectorKnob to an off
position,or pressing PAUSEdoesNOTdisconnect
the appliance from thepower supply.
• Neverattempt to operate this appliance if it is
damaged, malfunctioning, partially disassembled,
or has missingor broken parts,including a
damaged cord or plug.
WHEN NOTIN USE
_-- • Turn off water faucets to relievepressureon hoses
and valves and to minimize leakage ifa break or
rupture shouldoccur Checkthe condition of the fill
hoses;GErecommends changing the hoses every
5 years.
• Beforediscarding a washer,or removing it
from service,remove the washer lidto prevent
childrenfrom hiding inside.
• Donot attempt to repair or replace any part of this
appliance unlessspecifically recommended in this
Owner's Manual, or in published user-repair
instructions that you understand and have the
skillsto carry out.
• Donot tamper with controls.
4' ,. READAND FOLLOWTHISSAFETYINFORMATION
",.__- CAREFULLY.
_, \ SAVE THESE INSTRUCTIONS
About the control panel-for models with "pull knob" start.
Step I
• Add detergent
• Add diluted fabric
softener (on models
with a fabric
softener dispenser)
Step 2
• Add clothes
p3
• Select load size and
other wash options
• Select wash cgcle
Step/4
• Close lid
•Pullknob
LOAD SIZE TEMPERATURE OPT|ONS
D.--.. m_.a
Controls
Load Size
Looselgload clothesno higher than the top row of holesin the washer basket Thewater levelshouldjust cover
the clothes. Adjustthe load sizeaccordinglg,
Temperature (onsome models)
Selectthe water temperature for the wash and rinsecgcles,Alwags follow fabric manufacturer's care labelor
instructions when laundering,
_Options (onsome models)
2nd Rinse Option
When gou use extra detergent or bleach to cleon heavilg soiled clothes, gou mag wont to use the 2nd Rinse
option. It provides a second deep cold rinse.
ge.com
Wash Cycle-Cycle Selector Knob
The chartbelow willhelpyou match thewash cyclesettingwithyour clothing.The chartisrankedfrom longestto
shortestcycletimeand wash intensity,
Your washer mag not have all these cgcles. (Cgcles varg bg model.)
PREWASH
CASUALS
COTTONS
or WHITES
EASYCARE
DELICATES
HAND WASH
SPEED WASH
SPIN
DARK COLORS
COLORS
RINSESPIN
15 MINI30 MIN
AUTO SOAK
2nd RINSE
Forremoving surface dirt from heavilg soiledclothes. Make sureto follow with a
regular wash cgcle.
Forwrinkle-free and permanent press items,and knits.
Forheavy to lightly soiledcottons, household linens,work and play clothes.
For wrinkle-free and permanent press items, and knits.
For lingerie and special-care fabrics with light to normal soil.
For items labeled handwashable with light soils. Provides periods of agitation and soak
during wash and rinse.
For lightlg soiled items that are needed in a hurrg.
For draining the tub and spinning water out of the clothes.
For non-colorfast cottons and blends and items that are labeled cold wash bg the fabric
manufactureE
For wrinkle-free and permanent press items, knits and cottons.
For quickly rinsing chlorine, perspiration, stains, etc., out of clothes.
For very soiled clothes. Begins with agitation, soaks for a specified period of time, then moves
through the rest of the cycle automaticallg.
Provides an automatic, second deep rinse to thoroughlg remove detergent or bleach from
gour clothes.
About the control panel-for models with STARTbutton.
Step I
• Add detergent
• Add diluted fabric
softener (on models
with a fabric
softener dispenser)
Step 2
• Add clothes
ep3
• Select load size and
other wash options
• Select wash cgcle
Step 4
• Close lid
• Push START
LOAD SIZE TEMPERATURE OPTIONS 00000
START
0
STOP/PAUSE
l.J=
Controls
Load Size
Looselgload clothesno higher than the top row of holesin the washer baskeL Thewater levelshouldjust cover
the clothes, Adjustthe load sizeaccordinglg,
Temperature
Selectthe water temperature for the wash and rinsecgcles,Alwags follow fabric manufacturer's care label or
instructions when laundering.
PerfecTemp sensesthe incoming water temperature and adjusts the fillwater to obtain a more precise
temperature range for allwash temperatures, Forexample,in a COLDwash selection, somewarm water
mag be added to reacha temperature needed to better dissolvedetergents, Often,detergents are not
completelg dissolvedin verg cold water,especiallgin cooler climates,
During winter months, when the water entering gout home iscolder,or for locationswith verg coldwater gear
round, usethe PerfecTemp plus COLDto help dissolvepowdered detergents and to improve the cleaning of
gour clothes,
TheTAPCOLDfeature turns the PerfecTemp feature on gout washer off, and uses gout householdtap water
temperature for a COLDwash,Thiscan provideenergg savingsbg reducing the amount of hot water usedin
gour wash,
Options
Autosoak Option (onsome models)
Thisoption beginswith a brief agitation, soaksfor a specified period of time, then moves through the rest of the
cgcle automaticallg, Onsome models,this option islocated on the Cgcle Selectorknob,
2nd Rinse Option (onsome models)
When gou useextra detergent or bleachto clean heavilg soiledclothes, gou mag want to usethe 2nd Rinse
option, It provides a second deep cold rinse,
Extended Spin Option (onsome models)
Usethis option to extract more water from gout clothes,Clotheswill be drier when this option isselected and will
drg more quicklg in gout drge_
ge.com
Status Indicator Lights
TheCycle Indicator Lights show what stage the washer isin.When the Selectorknob is set to a new cycle, the Indicator
Lightswill flash momentarily, showing what stages the cycle will go through. Onmodels without an AUTOSOAKoption,
the SOAKlight will not light up. I°°°°°1
FILL SOAK WASII RINS[ SPIN
r_ wash Cycle-Cycle Selector Knob
Thewash cycle controls the length and intensity of the washing process.The knob can be turned in either direction.
Turningthe CycleSelectorknob after starting a cycle will stop the washer and reset the cycle to the new selection.
PressSTARTtobegin the new cycle selection.
Thechart below will help you match the wash cycle setting with your clothing.Thechart isranked from longest to
shortest cycle time and wash intensity. (Cyclesvary by model.)
PREWASH Forremoving surface dirt from heavily soiledclothes. Hake sureto follow with a
regular wash cycle.
CASUALS Forwrinkle-free and permanent press items,and knits.
COTTONS Forheavy to lightly soiledcottons, household linens,work and play clothes.
EASYCARE Forwrinkle-free and permanent pressitems, and knits.
DELICATESFor lingerieand special-care fabrics with light to normal soil.
HANDWASH Foritems labeled handwashable with light soils.Providesperiodsof agitation and soak
during wash and rinse.
SPEEDWASH For lightly soileditems that are needed in a hurry.
DRAIN& SPIN Fordraining the tub and spinning water out of the clothes.
OR
SPINONLY
AUTOSOAK Forvery soiledclothes. Beginswith a brief agitation, soaksfor a specifiedperiod of time,
then movesthrough the rest of the cycle automatically.
START
PressSTARTtobegin the cycle. PressingSTARTagain or raisingthe lid will PAUSEthe cycle and the Cycleindicator light
will blink.
Tocontinue the cycle, pressSTARTagain or close the lid.If machine ispaused more than 24 hours,the cgcle will be
cancelled.Tostop the cycle, hold the button for ] seconds.If water remains in the machine,selectthe DRAIN&SPIN
ORSPINONLVcycleto drain tub and spinwater out ofthe washer tub.
Raisingthe lidwill stop agitation or spin action, but does not pause the cycle.
About washer features.
The Agitator Cap or Fabric Softener Dispenser (depending on model)
Theagitator cap fits into the top ofthe
agitatoE If it accidentallg comes off,
simplg put it back on,
Thefabric softener dispenser automaticallg
releasesliquid fabric softener at the proper
time during the cgcle.
Do not stop the washer during the first spin.
This will cause thedispenser to empty
tOO soon.
E_] Add water to dispenser until it reaches
the maximum fill line.
To use, follow these steps:
r]-i Make suredispenser issecurelg attached
to agitatoE
[_] Useonlg liquid fabric softener
Pour into dispenser,usingamount
recommended on package.
Never pour fabric softenerdirectly on
clothes. It mag stain them.
Do not pour ongthing into the
agitator if the agitator cop or
dispenser is removed.
o!
Separate for cleaning
Cleaning the Fabric Softener Dispenser (onsomemodels)
_-] Removethe dispenserfrom the top ofthe agitator,
I_] Separatethe dispensercup from the cover bg grasping the top and pushing down on the
insideof the cup with gour fingers. Dispensercup will pop free from the cover,
[_]To cleanthe dispenser,soak both the dispenser cup and the dispensercover in the
following solution:
•ffUSgallon (3.8liters)warm water
•1/4 cup (60ml)heovy-dutblliquid detergent
•1 cup (240ml)bleach
If necessarg,loosenbuildup with a clean, soft cloth after soaking.Do not usea stiff brush;
gou mag roughen the surface of the dispenser
[] Rinseand reassemble dispenser,Placedispenser back on the agitator,
Liquid Bleach Funnel
Thewater fill dilutes liquid chlorine bleach asthe washer fills for the wash cgcle.
_-] Checkclothing care labelsfor special instructions.
_] Heasure liquid bleach carefullg,following instructions on the bottle.
• Neverpour undiluted liquid chlorinebleachdirectlblonto clothesor into the wash basket.
• Donot pour powdered bleachinto bleach funnel.
[_] Beforestarting the washer,pour measured amount of bleachdirectlg into bleachfunnel.
Avoidsplashing or over-filling dispenser,If gou preferto usepowdered bleach, add it into
the wash basketwith gour detergent.
• Donot mix chlorinebleachwith ammonia or acids such asvinegar and/or rust removen
Mixing conproduce atoxicgas which ma_lcausedeath.
Loading and using the washer.
Alwags follow fabric manufacturer's care label when laundering, ge.com
SortingWashLoads
Sort bg color(whites,lights,colors),soillevel,
fabric tgpe (sturdgcottons, easg care,delicates)
and whether the fabric produces lint (terrg cloth,
chenille)or collects lint (velveteen,cordurog).
ProperUseofDetergent
Add detergent and start the washer before adding
clothes so that the detergent can work effectivelg.
Usingtoo little or too much detergent isa common
cause of laundrg problems.
Youcan uselessdetergent if gou have soft water,
a smaller load or a lightlg soiledload.
LoadingtheWasher
Load drg items Iooselg,no higher than the top row of
holesin the washer basket. When loading wet items,
make sure gou set the load/water levelhigh enough
to allow the items to move freelg.Water levelshould
just cover the clothes.Toadd items after washer has
started, lift the lid and submerge additional items next
to the agitatoE
•Donot wrap long items likesheetsor pants
around theagitaton
• Donot wash fabrics containing flammable
materials (waxes,deaning fluids,etc.).
• Agitation will not start with thelid up.
Care and cleaning of the washer.
Wash Basket:.Leavethe lid open after washing to
allow moisture to evaporate. If gou want to clean
the basket, usea clean soft cloth dampened with
liquid detergent;then rinse.(Donot useharsh or
grittg cleaners.)
FillHoses: GErecommends changing the hoses
everg 5 gears.
Exterior: Immediatelg wipe off ang spills.Wipe
with damp cloth.Trgnot to hit surface with
sharp objects.
Moving and Storage: Askthe servicetechnician to
remove water from drain pump and hoses.Seethe
Installation Instructions packed with product for
information on how to reinstall the shipping rod
to keepthe tub stationarg when moving the washeE
Formore information, visit ge.com or call
800.GE.CARES(800.432.2737).Donot store
the washer where it will be exposed to the weatheE
Long Vacations: Be surewater supplg is shut off at
faucets. Drainall water from hosesif weather will
be below freezing.
Before you call for service...
Troubleshooting Tips
Save time and money! Review the charts on the following pages,
or visit ge.com. You may not need to call for service.
WATER Possible Causes What To Do
Too many suds Too much detergent • Heasure gour detergent carefull U.Use less soap if gou have
soft water, a smaller load or a lightly soiled load.
Type of detergent • Switch to a lower sudsing detergent brand and follow
instructions on package.
Soft water • TrU less detergent.
Water leaks Using too much detergent • Use less detergent. Use less soap if you have soft water,
in washer a smaller load or a lightly soiled load.
Fill hoses or drain hose is • Hake sure hose connections are tight at faucets and
improperly connected rubber washers are installed. Hake sure end of drain hose
is correc% inserted in and secured to drain facility.
Household drain may • Check household plumbing. You mag need to call
be clogged a plumben
Constant water pressure • Tighten hoses at the faucets and turn the water off after
to the fill hoses at the each use.
water source • Check condition of the fill hoses; they should be replaced
ever U5 gears.
Water temperature Cooler water temperatures • New laundry detergents have been formulated to work
seems incorrect provide improved energy with cooler water temperatures without affecting wash
efficiency performance.
Water supply is turned off •Turn both hot and cold faucets fully on and make sure
or improperly connected hoses are connected to correct faucets.
Water valve screens are •Turn offthe water source and remove the water connection
stopped up hoses from the upper back of the washen Use a brush or
toothpick to clean the screens in the machine. Reconnect
the hoses and turn the water back on.
House water heater is • Hake sure house water heater is delivering water at
not set properly 120°F-140°F (48°C-60°C).
Water pumped out before Lid lifted or cycle was put in • Reset cycle.
cycle is complete pause for over 24 hours
Water won'tdrain Drain hose is kinked or • Straighten drain hose and make sure washer is not
improperly connected sitting on it.
• Top of drain outlet should be less than 8 ft (2.5 m)
above floon
Washer pauses during The PREWASH Cycle or • This is normal. The washer alternates between agitate and
wash cycle AUTO SOAK Option was soak during these cycles to get your clothes cleaner with
chosen less wean
Washer pauses during This is normal •The washer may pause during the spin cycle to remove
spin cycle soapg water more efficientlg.
10