Gecko Futura Operating instructions

Futura Spas!
1 Pump Spas equipped with!
in.k300 spa keypad!
"
in.k300TM
the essential spa keypad
Bright LCD screen
Spa function icons
Affordable
TechBook
Gecko Alliance
450 des Canetons, Quebec City (Qc), G2E 5W6 Canada, 1.800.78.GECKO
www.geckoalliance.com
9919-101218-C
Rev. 04-2015
© Groupe Gecko Alliance Inc., 2015
All trademarks or registered trademarks
are the property of their respective owners. Printed in Canada
Programming Guide
in.k300TM
the essential spa keypad
Bright LCD screen
Spa function icons
Affordable
TechBook
Gecko Alliance
450 des Canetons, Quebec City (Qc), G2E 5W6 Canada, 1.800.78.GECKO
www.geckoalliance.com
9919-101218-C
Rev. 04-2015
© Groupe Gecko Alliance Inc., 2015
All trademarks or registered trademarks
are the property of their respective owners. Printed in Canada

in.k300 Keypad Layout!
"
3
4
in.k300 TechBook
in.k300 keypad layout
6.30"
(160.02 mm)
in.k300 dimensions Installation of in.k300
To install the in.k300, use the drilling template provided
in this section.
Determine the mounting location and stick the template
on chosen location.
Cut out an opening according to the template.
Clean the installation surface and peel the adhesive
gasket from the back of the keypad.
Insert keypad and align it correctly, then ensure it
is properly glued by gently pressing evenly on the
entire surface.
Gasket with or without adhesive
Optional wing nuts
and spacers
2.25"
(57.15 mm)
1.87"
(47.45 mm)
Up
Down
Light
Pump 1
Indicator lights Up / Down
Indicator lights
Light
Pump 2
Pump 1
1 Pump Model 2 Pump Model
Set Point
Smart Winter
Mode
Heater
Filter

3
in.k300 TechBook
7
Start or stop accessories
To start or stop an accessory, press the associated button.
Indicators will light up when the associated accessory is on.
When an accessory has more than two states, press the
button until it reaches the desired state. Indicators will
flash when dual speed pumps are on at low speed, and
will be solid at high speed.
If you have a blower it will be controlled by the Pump 2
key. The order of actions is as follows: pump 2 on;
pump 2 high speed (if applicable); blower on;
pump 2 off; blower off.
Keypad functions
Water temperature
The temperature shown on screen is the current water
temperature. Use the Up and Down buttons to set
the desired temperature.
The set point icon will appear at the top of
the screen. After 3 seconds without any change to
the set temperature value, the keypad will resume
the normal display.
Off Mode
Pressing Pump 1 for 5 seconds will enable the Off mode.
This mode allows you to stop all outputs including
automatic functions such as filter cycle, heat request
and smart winter mode for 30 minutes to perform quick
spa maintenance. When Off mode is active, the display
will toggle between the “OFF” message, the clock and
the water temperature. The spa light will flash for a few
seconds before the end of the 30 minutes to warn you
that the system is about to resume its normal operation.
Press Pump 1 or Pump 2 (if available) to restart the system
before the expiration of the 30 minute delay. When the
system resumes its normal operation, the display shows
“On“ for 3 seconds.

3
8
in.k300 TechBook
Program menu
The program menu is accessible by holding down
the Light key for 5 seconds. In the program menu
the following parameters can be set: clock, filter
or purge cycles, economy mode and temperature units.
While in the program menu, use the Up or Down key to
adjust the parameters and use the Light key to jump to
the next parameter. The changes will be saved after the
confirmation of the last parameter only. If there is no action
taken for 10 seconds, the system will exit the program menu
without saving any changes.
Setting the clock
Enter the program menu by holding down the Light key
for 5seconds. The display will show the current clock
setting with the hour flashing.
Depending on factory settings your system may be set
to 24-hour time or 12-hour time.
Setting the hour: Use the arrow keys to adjust the hour.
Press the Light key to jump to the next parameter,
the minutes.
Setting the minutes: Use the arrow keys to adjust
the minutes. Press the Light key to jump to the next
parameter, the filter or purge start time (FS).
Programming steps
Programming the filter/ purge cycles
Depending on system configuration your spa will
perform either afilter or apurge cycle. The filter cycle
menu consists of the following parameters: the start time
(FS), the duration (Fd) and the frequency (FF). The purge
cycle menu consists of the following parameters: the start
time (FS) and the frequency (FF).
A filter cycle consists of starting all the pumps and
blower in high speed for 1 minute (purge step) then,
the pump associated with the filter will run in low speed
for the remaining duration of the filter cycle (clean step).
A purge cycle is used when the spa is equipped with a
24 hour circulation pump which provides a continuous
clean step. It consists of starting all the pumps and
blower in high speed for 1 minute.

3
in.k300 TechBook
9
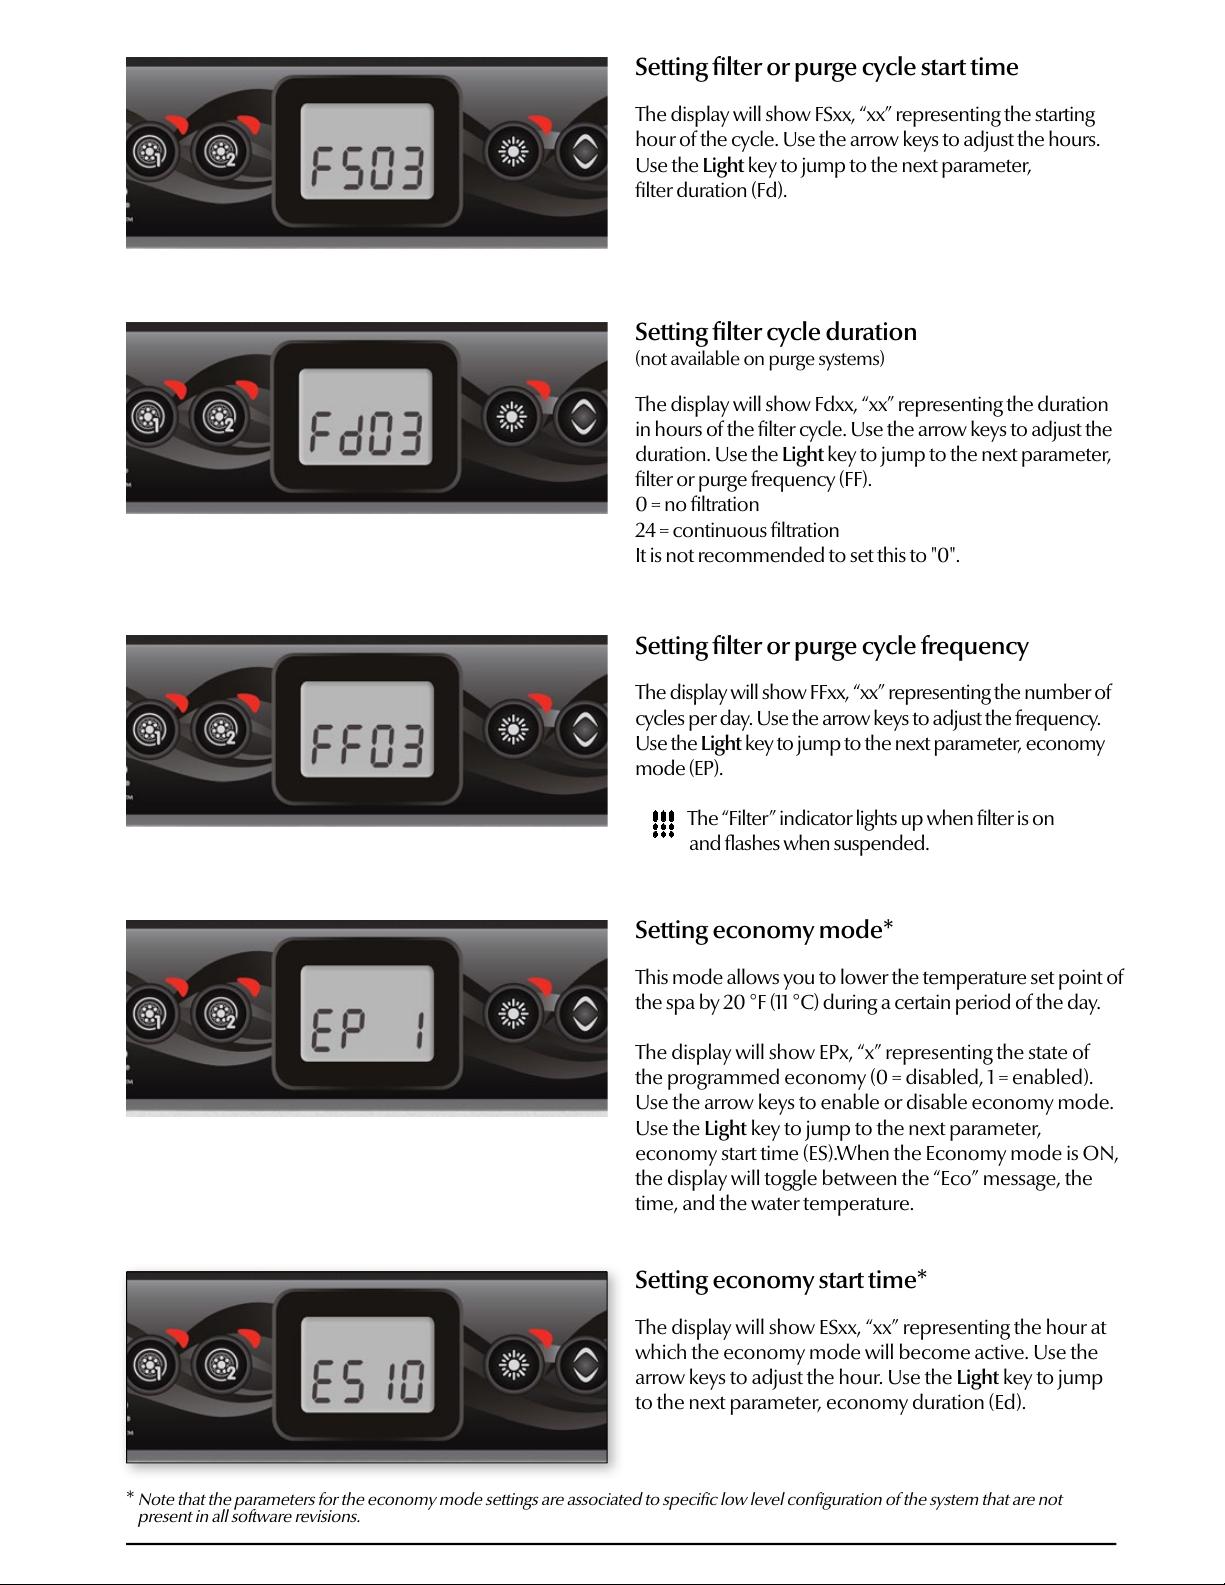
Setting filter or purge cycle start time
The display will show FSxx, “xx” representing the starting
hour of the cycle. Use the arrow keys to adjust the hours.
Use the Light key to jump to the next parameter,
filter duration (Fd).
Setting filter or purge cycle frequency
The display will show FFxx, “xx” representing the number of
cycles per day. Use the arrow keys to adjust the frequency.
Use the Light key to jump to the next parameter, economy
mode (EP).
The “Filter” indicator lights up when filter is on
and flashes when suspended.
Setting filter cycle duration
(not available on purge systems)
The display will show Fdxx, “xx” representing the duration
in hours of the filter cycle. Use the arrow keys to adjust the
duration. Use the Light key to jump to the next parameter,
filter or purge frequency (FF).
0 = no filtration
24 = continuous filtration
It is not recommended to set this to "0".
Setting economy mode*
This mode allows you to lower the temperature set point of
the spa by 20 °F (11 °C) during a certain period of the day.
The display will show EPx, “x” representing the state of
the programmed economy (0 = disabled, 1 = enabled).
Use the arrow keys to enable or disable economy mode.
Use the Light key to jump to the next parameter,
economy start time (ES).When the Economy mode is ON,
the display will toggle between the “Eco” message, the
time, and the water temperature.
Setting economy start time*
The display will show ESxx, “xx” representing the hour at
which the economy mode will become active. Use the
arrow keys to adjust the hour. Use the Light key to jump
to the next parameter, economy duration (Ed).
*
Note that the parameters for the economy mode settings are associated to specific low level configuration of the system that are not
present in all software revisions.

3
10
in.k300 TechBook
Setting economy duration*
The display will show Edxx, “xx” representing the duration in
hours of the economy mode. Use the arrow keys to adjust
the hour. Use the Light key to jump to the next parameter,
temperature unit.
24 =continuous economy
Setting temperature unit
Water temperature can be displayed in either Fahrenheit (°F)
or Celsius (°C). The display will show °F or °C.
Use the arrow keys to change the setting.
Use the Program or Light key to save all the parameters.
Smart Winter Mode
Our Smart Winter Mode protects your system from
the cold by turning pumps on several times a day
to prevent water from freezing in pipes.
The “SWM” indicator lights up when freezing is
detected and flashes when the purge is active.
Water temperature regulation
Every 15 to 90 minutes the pump will run to ensure
accurate water temperature readings as well as avoid
heater activation in dry conditions. After verifying pump
activation and taking a water temperature reading if
required, the system automatically turns the heater on to
reach and maintain water temperature at Set Point.
Indicator flashes when taking water
temperature reading.
Cooldown
After heating the spa water to the desired Set Point,
the heater is turned off, but its associated pump
(Pump 1 low-speed or CP) remains on for
a predetermined period of time to ensure adequate
cooling of the heating element, prolonging its useful life.
*
Note that the parameters for the economy mode settings are associated to specific low level configuration of the system that are not
present in all software revisions.

3
in.k300 TechBook
11
Error messages
Code Message
HL Warning! HL Error
FLO No flow for more than 2 hours
FLO No flow condition
HR Danger! Relay stuck
OH Warning! Spa temp. high
Prr Warning! Temp. probes defective
AOH Internal pack temp. high
FLC Flow switch closed
SP in Input voltage issue
FrEr The input frequency is out of range
RH NCComm. error in.xm2 - in.therm
RH ID in.xm2 - in.therm incompatible
SC ER Learning mode error
F1 in.xm2 Fuse # 1 is blown
F2 in.xm2 Fuse # 2 is blown
F3 in.xm2 Fuse # 3 is blown
Hr Danger! Thermal fuse error
UPL The spa pack does not have valid software. Please insert valid in.stick to reprogram spa pack.
BL The spa pack does not have valid software. Please insert valid in.stick to reprogram spa pack.
The list below shows the different error messages that can appear on the home screen.
Refer to the troubleshooting and error codes section of the TechBook for your spa pack for more details.
Other manuals for Futura
1
Table of contents
Other Gecko Hot Tub manuals
Popular Hot Tub manuals by other brands

Jacuzzi
Jacuzzi Experience ALIMIA Instructions for preinstallation

Adirondack Spas
Adirondack Spas KEENE owner's manual

CalderaSpas
CalderaSpas CalderaSpas Utopia Series owner's manual

Four Winds
Four Winds UltraXStream owner's manual

Sunbeam
Sunbeam FB3500 Instruction booklet

Intex
Intex PureSpa SJB-HS-11 manual