Gecko Futura User manual

Futura Spas!
2 Pump Spas equipped with!
in.k300 spa keypad"
in.k300TM
the essential spa keypad
Bright LCD screen
Spa function icons
Affordable
TechBook
Gecko Alliance
450 des Canetons, Quebec City (Qc), G2E 5W6 Canada, 1.800.78.GECKO
www.geckoalliance.com
9919-101218-C
Rev. 04-2015
© Groupe Gecko Alliance Inc., 2015
All trademarks or registered trademarks
are the property of their respective owners. Printed in Canada
Owners Manual

SAVE THESE INSTRUCTIONS
Important User Safety Instructions
Your physiological response to hot water is subjective and depends on your age, health, and
medical history. If you don’t know your tolerance to hot water, or if you get a headache, or be-
come dizzy or nauseous when using your hot tub, get out and cool o!immediately.
READ AND FOLLOW ALL INSTRUCTIONS CAREFULLY
1. DANGER: Risk of Injury. The suction fittings in this hot tub are sized to match the specific
water flow created by the pump. Should the need arise to replace the suction fittings or the
pump, be sure that the flow rates are compatible. Never operate the hot tub if the suction
fittings are broken or missing. Never replace a suction fitting with one rated less than the
flow rate marked on the original suction fitting.
2. ELECTRICAL SUPPLY: The electrical supply for this product must include a suitably rated
switch or circuit breaker to open all ungrounded supply conductors to comply with section
422-20 of the National Electrical Code, ANSI/NFPA 70. The disconnect must be readily ac-
cessible and visible to the hot tub occupant but installed at least 5 feet (1.5m) from the hot
tub water.
• A green colored terminal or a terminal marked G, Gr, Ground, Grounding or the symbol* is
located inside the supply terminal box or compartment. To reduce the risk of electric
shock, this terminal must be connected to the grounding means provided in the electric
supply service panel with a continuous copper wire equivalent in size to the circuit conduc-
tors that supply this equipment.
• At least two lugs marked “Bonding Lugs” are provided on the external surface or on the in-
side of the supply terminal box/compartment. To reduce the risk of electric shock, connect
the local common bonding grid in the area of the hot tub to these terminals with an insu-
lated or bare copper conductor not smaller than No. 6 AWG. This bonding wire must also
be run between the pumps and the spa pack.
• All field-installed metal components such as rails, ladders, drains or other similar hardware
within 5 feet (1.5m) of the hot tub shall be bonded to the equipment grounding buss with
copper conductors not smaller than No. 6 AWG.
3. WARNING: To Reduce the Risk of Injury:
• The water in a hot tub should never exceed 104 °F (40 °C). Water temperatures between
100 °F (38 °C) and 104 °F (40 °C) are considered safe for a healthy adult. Lower water tem-
peratures are recommended for young children and when hot tub use exceeds 10 minutes.
• Since excessive water temperatures have a high potential for causing fetal damage during
the early months of pregnancy, pregnant or possibly pregnant women should limit hot tub
water temperatures to100 °F (38 °C). If pregnant, please consult your physician before us-
ing a hot tub.
• Before entering the hot tub, the user should measure the water temperature with an accu-
rate thermometer since the tolerance of water temperature-regulating devices may vary as
much as +/- 5 °F (2 °C).

• Persons su!ering from obesity or a medical history of heart disease, low or high blood
pressure, circulatory system problems or diabetes should consult a physician before using
a hot tub.
4. SAFETY INFORMATION: When using this electrical equipment, basic safety precautions
should always be followed, including the following:
WARNING: Children should not use hot tubs without adult supervision.
WARNING: Do not allow children to submerge their head under water.
WARNING: Do not use hot tubs unless all suction guards are installed to prevent body
and hair entrapment.
WARNING: People with infectious diseases should not use a hot tub.
WARNING: To avoid injury, exercise care when entering or exiting the hot tub. Where
practical, install a safety grab bar or handrail. Turn o!the jets before entering the hot
tub to improve visibility of the steps or flat entry area.
WARNING: Do not use drugs or alcohol before or during the use of a hot tub to avoid
unconsciousness and possible drowning.
WARNING: Pregnant or possibly pregnant women should consult a physician before
using a hot tub.
WARNING: Water temperature in excess of 38 °C (100 °F) may be injurious to your
health.
WARNING: Before entering the hot tub, measure the water temperature with an accu-
rate thermometer.
WARNING: Do not use a hot tub immediately following strenuous exercise.
WARNING: Prolonged immersion in a hot tub may be injurious to your health.
WARNING: Do not permit electric appliances (such as lights, telephone, radio, televi-
sion, etc.) within 5 feet (1.5m) of this hot tub unless such appliances are built-in by
the manufacturer.
WARNING: The use of alcohol or drugs can greatly increase the risk of fatal hyper-
thermia in hot tubs.
WARNING: People using medication and/or having an adverse medical history should
consult a physician before using a spa or hot tub.
WARNING: Test the GFCI (Ground Fault Circuit Interrupter) monthly.
Hyperthermia
Since your hot tub can be set to reach temperatures of 104°F (40° C), users should be aware
that extended submersion in water that exceeds normal body temperature can lead to hyper-
thermia.
Hyperthermia occurs when the internal temperature of the body reaches several degrees
above the normal body temperature of 98.6° F (37° C). The symptoms of hyperthermia drowsi-
ness, lethargy, and an increase in the internal temperature of the body. The e!ects of hyper-
thermia include:
•Unawareness of impending hazard.
• Failure to perceive heat.
• Failure to recognize the need to exit the hot tub.
• Physical inability to exit the hot tub.
• Fetal damage in pregnant woman.
• Unconsciousness resulting in the danger of drowning.

If you sense any of the symptoms of hyperthermia, safely exit the hot tub immediately.
Cautions
• Observe a reasonable time limit when using the hot tub. Long exposures at higher temper-
atures can cause high body temperature. Symptoms may include dizziness, nausea, faint-
ing, drowsiness, and reduced awareness. These e!ects could possibly result in drowning.
• Always test the hot tub water temperature before entering the hot tub. Enter and exit the
hot tub slowly. Wet surfaces can be very slippery.
• Proper chemical maintenance of hot tub water is necessary to maintain safe water and pre-
vent possible damage to hot tub components.
• Use the straps and clip tie downs to secure the cover when not in use. This will help to dis-
courage unsupervised children from entering the hot tub and keep the hot tub cover secure
in high-wind conditions. There is no representation that the cover, clip tie-downs, or actual
locks will prevent access to the hot tub.
• For exercise, the water should not exceed 90 °F (32 °C).
• Maintain water chemistry in accordance with manufacturer’s instructions.
Set-Up And Delivery Guidelines
Location
Some Points to Consider:
• How close is the spa from the exit or entrance to your house? (Consider the cold
weather)
• Is the path to the spa clean of debris, sand, grass clippings? (So as not to track into
spa)
• Is there any protection from wind, inclement weather?
• Can neighbors or passersby see the spa?
• If your spa is to be placed near where sprinklers may hit the cabinet, shell or equip-
ment, please adjust or cap them to prevent prolonged water exposure.
• Generally, spas belong outdoors. Locating a spa indoors increases your risk of indoor
flooding.
Outdoor Installations:
• Local electrical and plumbing codes.
• Consider local codes pertaining to fencing, enclosures, walls, electrical and plumbing. You
will need to ensure that your spa is an adequate distance from power lines, both above
ground and underground. Your spa will also need to be childproofed (covered and of ade-
quate height).
• View from house for aesthetics and supervisory needs.
• Distance from house for wintertime soaking.
• Nighttime lighting.
• Locate the spa with an awareness to sunlight exposure, views, access, lot lines, lighting,
wind direction, shielding, septic tanks, plants, trees. (Chemicals in the spa water splashed
from within your spa may damage plant life.)
• Consider the location of the nearest bathroom.
• If your spa is to be located on a second story, be positive support is adequate."
• Area for placement of support equipment where adequate space will be needed for periodic
removing and cleansing of the cartridge filter and general servicing.

• Provide adequate drainage away from the equipment and adequate elevation to allow
draining by syphon.
• Location of electrical supply. Both 120 volt and 240 volt systems require hard wire installed
from the electrical source to the spa support pack terminal.
• Locations at least 5 feet (1.52 m) from all metal surfaces. (A spa may be installed within 5
feet of metals surfaces, if, in accordance with Article 680 of the National Electrical Code,
ANSI/NFPA 70-1984, each metal surface is permanently connected by a No. 8AWG (8.4
mm2) copper conductor attached to the wire connector on the terminal box provided for
this purpose.)
Indoor Installations:
• Local electrical and plumbing codes.
• Ventilation fans and/or dehumidifiers should be provided to handle the high humidity de-
veloped by your spa. Walls, ceiling and wood trim should be resistant to high humidity.
• Chemicals will vaporize from the water and may cause an odor and possibly corrosion to
certain home hardware. Never store chemicals inside the spa cabinet.
• During the normal use of the spa, water will escape the spa vessel. Never place the spa on
or over any material which may be damaged by this water or the chemicals within the wa-
ter. Keep damageable materials far enough away from the spa to avoid water damage, even
if the spa should lose all its water.
• Consider and prepare for the unlikely event of rapid spa drainage. If placement of the spa
is permanent, you may wish to provide floor drains to accommodate draining, etc. Always
leave room all around the spa for easy access in case repairs are necessary.
• Consider and prepare for the unlikely event of spa removal.
• Do not set spa on finished floor without a waterproof barrier protection underneath.
Surface and Pad Requirements:
• Your new portable spa must be placed on a firm, flat and level surface, so the spa weight is
supported uniformly. We recommend a 3-1/2”(93mm) thick concrete slab. Alternate deck-
ing methods may void warranty of spa shell.
• Please contact your Futura Spas dealer if you have any questions regarding location or
placement of your new spa.
Requirements for Wood Decking, Gates and Balconies:
• Wood decking or balconies must be constructed to support 150 pounds per square foot
(730 kg/m2). Refer to local and current building codes in your area.
• Consult an engineer for live loads in your area.
Leveling your spa:
After the hot tub is properly positioned on the support base, the entire unit should be
checked with a level and shimmed as necessary. Should you find that the support base is sloped
or otherwise uneven, level your hot tub using TAPERED wood shims where necessary, ensuring
that the tapered end extends at least 36 inches under the unit. This will insure contact with the
support substructure to appropriately distribute the weight of the unit. Do not just shim under
the cabinet base outside edge, as this will cause structural stress on the unit, potentially caus-
ing unwarrantable damage to the hot tub structure and /or shell.

ELECTRICAL REQUIREMENTS:
All Self Contained Volt Electric Spa Packs
• Extension cords are not to be used in conjunction with the operation of the spa. Low volt-
age damage could result, which is not covered by warranty.
• Your 240 volt spa will require a 50 amp dedicated circuit breaker, GFCI, with proper wire
size for length of run. The circuit must have 4 wires, 2 hots, a neutral and a ground.
• If you have any doubts, have your electrical system checked by a certified electrician.
Important Electrical Safety Instructions
SAFETY COMES FIRST. WHEN INSTALLING & USING THIS ELECTRICAL EQUIPMENT, BASIC
SAFETY PRECAUTIONS MUST ALWAYS BE FOLLOWED!
1. READ AND FOLLOW ALL INSTRUCTIONS
2. Electrical installation must be completed by a qualified electrician in accordance with all
National, Regional and Local Codes and Regulations in e!ect at the time of installation.
3. Connect only to a dedicated circuit protected by a class ‘A’ two-pole ground fault cir-
cuit interrupter (GFCI)
4. Use copper conductors only! 5 The hot tub equipment and all electrical plugs, outlets
5. and lights within 1.5m (5ft) of the unit must be G.F.C.I protected. Consult your electri-
cian or local electrical authority for further details.
6. A green colored terminal or a terminal marked “G”, “GR”, “Ground”, or “Grounding” is
located inside the supply terminal box or compartment. To reduce the risk of electric
shock, this terminal must be connected to the grounding means provided in the electric
supply service panel with a continuous copper wire equivalent in size to the circuit
conductors supplying the equipment.
7. At least two lugs marked “BONDING LUGS” are provided on the external surface or on
the inside of the supply terminal box or compartment. To reduce the risk of electric
shock, connect the local common bonding grid in the area of the hot tub to these ter-
minals with an insulated or bare copper conductor not smaller than No.6 AWG (Canada/
Europe) / No.8 AWG (USA).
8. All field installed metal components such as rails, ladders, drains or other similar hard-
ware within 3 m (10 ft) of the hot tub shall be bonded to the equipment grounding bus
with copper conductors not smaller than No.6 AWG.
Wire Size
• North America - The minimum wire size for systems that require a 50A or 60A GFCI is
#6/3 c/w ground (also referred to as #6 gauge / 4 conductor).
• Europe - The minimum wire size for European system is 2.5 mm2 copper wire.
• Important Note - This guide is for standard installations where the wire run is 15 m (50 ft.)
or less. For longer wire runs, consult a qualified electrician.

North America - GFCI Installation
Important Note: Installation of the GFCI - Circuit Breaker, including ampere sizing and selec-
tion of conductor size and type, must be performed by a qualified electrician in accordance with
the National Electrical Code, or the Canadian Electrical Code, and all Federal, State/Provincial
and local codes and regulations in e!ect at the time of installation.

Europe - R.C.D. Installation - Typical
Important Note: Installation of the R.C.D. - Circuit Breaker, including ampere sizing and se-
lection of conductor size and type, must be performed by a qualified electrician in accordance
with National, Regional and Local Codes and Regulations in e!ect at the time of installation.

Electrical Connection To Spa
WARNING - Secure wires as defined by the NEC and in compliance with any local codes in
e!ect at the time of installation. ALL SPAS ARE FACTORY CONFIGURED FOR 240 VOLT IN-
STALLATIONS. DO NOT CHANGE ANY WIRING INSIDE OF THE SPA PACK.
•Connect Line 2 to Blue Wire
•Connect input Neutral to White Wire
•Connect Line 1 to Black Wire
•Connect Ground to Ground Lug provided inside control box
•Connect Bonding wires to bonding lugs inside the spa

Start-Up Instructions
Filling Your Spa
• Your new spa has left the factory cleaned and polished. You may have to clean out any dirt
that has accumulated during shipping. Use warm water and sponge or cloth.
• Be sure all fittings are connected, secure and hand tightened in the equipment enclosure.
In cold weather months your Futura Spa is shipped with fittings disconnected to ensure no
damage or freezing occurs during the spa’s route from our factory to your home.
• Fill your Futura Spa with your garden hose. Place the hose inside spa and secure the hose
in place. Filling through the filter helps to allow most of the trapped air in the pumps and
heater to be eliminated.
• No not attempt to fill the spa for the first time when the outside temperature is below
freezing. In cold temperatures the water in the pumps may start to form ice crystals before
the filling process is complete preventing the pumps from turning.
•Note: Futura Spas recommends you do not fill your spa with hot water. Excessively ho wa-
ter (over 107° F) may cause damage to components in the spa pack.
•Also: Do not fill your spa with water from a water softener. If your water is extremely hard
your spa dealer can help you to remedy this problem.
• Continue filling the spa to half (1/2) way up the skimmer opening. Remove the hose and
close the filter canister (see section on filter maintenance).
• Ensure that all jets are open. See section Jet & Feature Operation
Starting
• Before applying voltage to power-up your hot tub, it is very important that you understand
the sequence of events that occur when the system is activated in order that the pump can
be primed e$ciently and damage to the system can be avoided.
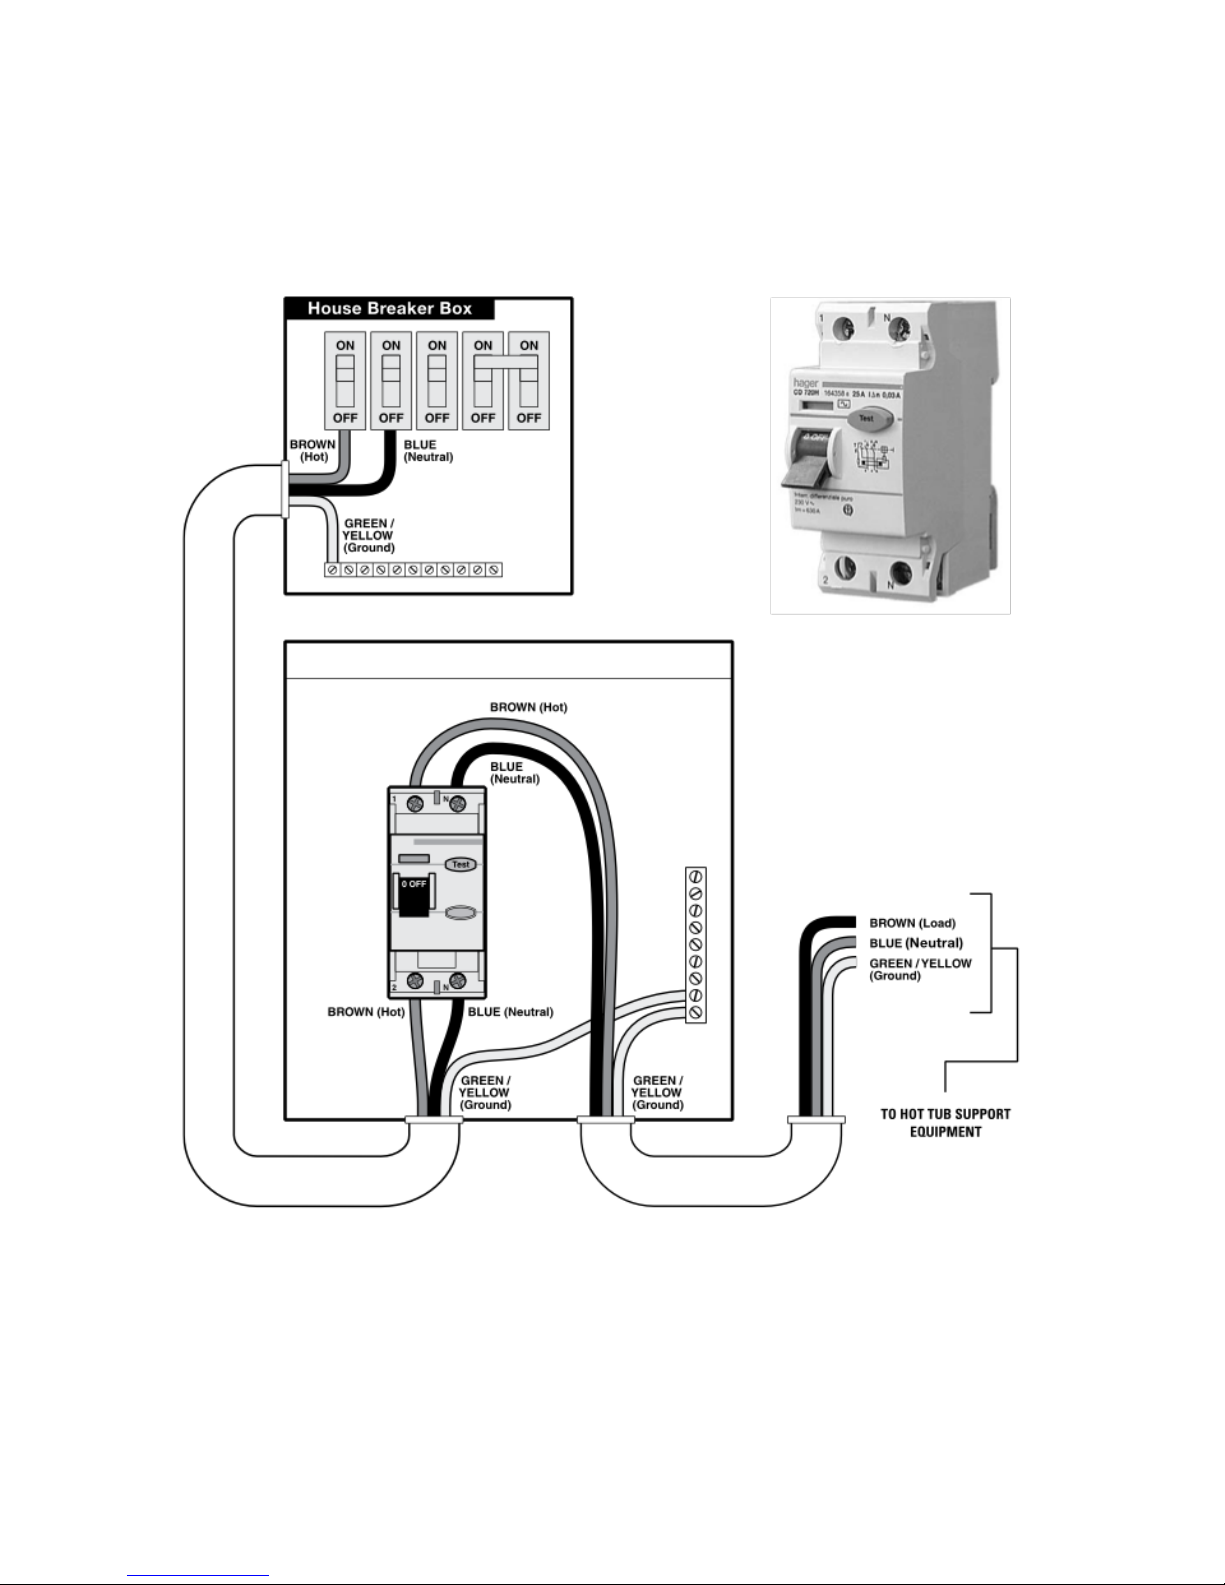
• Turn the main power “on” at your electrical panel
• When the hot tub turned on the water should start circulating immediately. If the motor
works but you do not notice water circulation within the first 15 seconds, the pump may
require priming due to trapped air (referred to as an ‘air lock’). To prime, turn power o!at
the main house panel (or GFCI) and try releasing the air by loosening the union on the dis-
charge side of the pump(s) while the motor is not running. Turn the power back on. If the
pump(s) does not prime after 15 seconds, sometimes momentarily turning the pump(s) o!
and on will help the system to prime.
• Important: Under NO circumstances should the pump(s) be allowed to operate without
priming beyond 2 minutes, as this may not only cause unwarrantable damage to the pump,
it may also cause the control system to go into an overheat condition.
Definition: ‘Priming’ a pump is a term used to describe the process in which air trapped
in the plumbing and pump wet-end (referred to as an ‘air lock’) is released, allowing the
pump to move water e$ciently through the plumbing system and to the jets.
• When the pump starts circulating on low speed, it will be necessary to release trapped air in
the filter. Carefully loosen the vent valve counter-clockwise until there is the hissing sound
of air escaping. Once there is a steady stream of water, close the vent valve, ensuring that
the o-ring does not become pinched.
• Turn the pump onto high speed and check for leaks. The control system will automatically
return the pump to low speed after 15 minutes.
• Adjust the hot tub heat control at the topside panel to the desired water temperature.

• Adjust water balance (pH, TA, calcium hardness) to recommended levels and add sanitizer.
See section Hot Tub Water Maintenance
• The hot tub will require 8-10 hours to reach the desired temperature for 240 volt installa-
tions.
• Keep insulated safety hard cover on the hot tub, and the air controls closed during the en-
tire heat up process.
in.k300 2 Pump Solid State Control System
"
3
4
in.k300 TechBook
in.k300 keypad layout
6.30"
(160.02 mm)
in.k300 dimensions Installation of in.k300
To install the in.k300, use the drilling template provided
in this section.
Determine the mounting location and stick the template
on chosen location.
Cut out an opening according to the template.
Clean the installation surface and peel the adhesive
gasket from the back of the keypad.
Insert keypad and align it correctly, then ensure it
is properly glued by gently pressing evenly on the
entire surface.
Gasket with or without adhesive
Optional wing nuts
and spacers
2.25"
(57.15 mm)
1.87"
(47.45 mm)
Up
Down
Light
Pump 1
Indicator lights Up / Down
Indicator lights
Light
Pump 2
Pump 1
1 Pump Model 2 Pump Model
Set Point
Smart Winter
Mode
Heater
Filter

3
in.k300 TechBook
7
Start or stop accessories
To start or stop an accessory, press the associated button.
Indicators will light up when the associated accessory is on.
When an accessory has more than two states, press the
button until it reaches the desired state. Indicators will
flash when dual speed pumps are on at low speed, and
will be solid at high speed.
If you have a blower it will be controlled by the Pump 2
key. The order of actions is as follows: pump 2 on;
pump 2 high speed (if applicable); blower on;
pump 2 off; blower off.
Keypad functions
Water temperature
The temperature shown on screen is the current water
temperature. Use the Up and Down buttons to set
the desired temperature.
The set point icon will appear at the top of
the screen. After 3 seconds without any change to
the set temperature value, the keypad will resume
the normal display.
Off Mode
Pressing Pump 1 for 5 seconds will enable the Off mode.
This mode allows you to stop all outputs including
automatic functions such as filter cycle, heat request
and smart winter mode for 30 minutes to perform quick
spa maintenance. When Off mode is active, the display
will toggle between the “OFF” message, the clock and
the water temperature. The spa light will flash for a few
seconds before the end of the 30 minutes to warn you
that the system is about to resume its normal operation.
Press Pump 1 or Pump 2 (if available) to restart the system
before the expiration of the 30 minute delay. When the
system resumes its normal operation, the display shows
“On“ for 3 seconds.

Refer to the supplemental programming guide for programming directions.
Error Messages
Error Code
Message
HL
Warning! High Limit Error. The water has reached an unsafe
temperature.
FLO
Water Flow has not been detected. Heater will not activate.
HR
Danger! Relay stuck in on position.
OH
Warning! Over Heat Error. The water has reached an unsafe
temperature.
Prr
Temperature probe malfunction.
AOH
Internal pack temperature high.
FLC
Flow Switch Closed. Water flow has been detected when none
should be present.
SP in
Input voltage issue. The voltage running to the spa is wrong.
FrEr
Input voltage frequency is out of range.
RH NC
Communication error in in.therm xm2 module.
RH ID
in.xm2 in.therm incompatible.
SC ER
Learning mode error.
F1
Fuse 1 blown.
F2
Fuse 2 blown.
F3
Fuse 3 blown.
Hr
Danger! Thermal fuse error
UPL
The spa control does not have valid software. Firmware
upgrade required.
BL
The spa control does not have valid software. Firmware
upgrade required.

Cold Weather Conditions
In the case of a power failure or equipment breakdown the spa's freeze protection can not be
activated. If the spa will not be running for an extended period in freezing conditions steps
must be taken to prevent ice damage to the spa. Damage caused by freezing is not covered by
any warranties. Drain the spa and place a small 100 watt lamp or small heater inside the spa
cabinet. The heat will help prevent freezing for a short time.
Warm Weather Conditions
Since your spa will normally be expected to maintain warm to hot water to be ready for your
use, a great deal of attention has been directed to the energy conservation detail of insulation
so as to keep electrical costs down. This energy conservation e$ciency is achieved by extensive
insulation of the skirt, plumbing and spa shell.
This energy conservation feature may cause an inconvenience during warmer times of the
year. During warm periods of the year, the temperature within the equipment compartment can
elevate to a point that the pump will automatically turn o!for a short period of time (15- 30
minutes) to allow the pump to cool down before automatically restarting. This cool down fea-
ture will not harm your spa but serves only to protect the pump from damage and as an indica-
tor that it is too hot. To minimize this occurrence, refrain from using your Hydrotherapy Jets for
prolonged periods of time during extreme hot weather.
The jet pump chosen for your spa has been specifically sized for maximum performance and
your Hydrotherapy enjoyment.
Filter Maintenance
Filtration starts as soon as flow is steady through the filter. As the filter cartridge removes the
dirt from the spa water, the accumulated dirt causes flow resistance.
Cleaning And Replacing Filter Cartridge
Your spa filter has been designed for quick and easy maintenance. The filter cartridge should
be rinsed by hose once a week and cleaned with a cartridge cleaner once a month. A second
filter cartridge is recommended and will speed up the process. This can be purchased from your
Futura Spas dealer.
•Turn power OFF at the breaker.
• Remove filter cover. Loosen air relief valve before removing retaining ring. Do not remove
air relief valve.
• Pull filter lid straight up to remove.
• Do not twist or pull filter lid up at an angle. This could cause damage to the filter canister,
especially in freezing weather. Do not remove dome lid in icy conditions!
• Remove filter cartridge and clean with a garden hose and a high-pressure nozzle. Periodi-
cally you may need to soak your filter in a “cartridge filter cleaner” to remove excess min-
erals and/or oils. You can purchase this cleaner at your Futura Spas dealer.
• Rinse filter thoroughly before installing. Clean o-ring on dome lid and apply a light film of
silicone lubricant to o-ring. Do not use a petroleum-based lubricant as it could damage the
o-ring. Consult your Futura Spas dealer.

• Reinstall filter and lid and turn power ON to the spa. Tighten air relief valve once any
trapped air has been bleed o!.
Jets
Types of Jets
Your Futura Spa comes with di!erent types of jets and jet configurations. Each type of jet has
a specific purpose and operates di!erently than the others. All jets with the exception of the
fixed ozone jet in the footwell are adjustable and can be turned on or o!. They all combine to
create a luxurious and invigorating hydrotherapy environment. Most of the jets are removable
for easy cleaning. It is not uncommon for particulates to get caught in the jets causing them to
stop rotating, especially in environments where there are trees overhead or nearby.

Jet Water Flow Adjustment
Your Futura Spa features adjustable water flow on specific hydrotherapy jets.
To reduce the flow: grasp the outer flange of the jet, and turn clockwise approximately a 1/4
turn. When it hits the stop, the jet is considered closed, and flow will be restricted.
To increase the flow: from the closed position, turn the jet counter-clockwise approximately
1/4 turn. When it hits the stop, the jet is open, and there is maximum jet flow. Do not attempt
to turn the jet past the stop, as this will unclip the jet internal from the socket. All Futura Spas
are shipped from the factory with the jets in the open position.
Jet Air Flow Adjustment
Your Futura Spa features adjustable air flow on specific hydrotherapy jets.
To reduce the flow: turn the handle on the air control clockwise. When it hits the stop, the air
is closed, and air flow will be restricted.
To increase the flow: turn the handle on the air control counter-clockwise. When it hits the
stop, the air control is fully opened. For maximum operating e$ciency, the air controls must
remain closed when your hot tub is not in use.
Jet Insert Removal & Replacement
To Remove:
• Turn the jet counter-clockwise to unclip & pull out of socket.
To Reinstall:
• Push the jet into the socket until it snaps into place, ensuring the square pin on the back of
the jet lines-up with the groove in the socket flange.
Diverter Valve (If Equipped)
This valve, which is located along the top lip of the spa is used to divert the power from
the pump to one of the “Hot Seats” or the other. The valve has a 180° range from one side
to the other. By moving the valve to one side, the pump will deliver all of its power to one
seat. Moving the valve to the other side will shift the power to the other seat. If the valve is
moved to a position anywhere between both sides, the power will be shared between both
sides.
Always: return the valve handle to the middle position before exiting the hot tub to ensure
that there is air and water flow to the ozone jet
Waterfall Control (If Equipped)
If your hot tub has the optional waterfall feature, then you will have a waterfall flow control
valve. The waterfall feature was designed to provide a gentle cascade of water over the neck
and shoulder area. Simply turn the top of the control clockwise for less water flow, and coun-
terclockwise for more water flow.
For maximum operating e$ciency, turn the waterfall o!when the hot tub is not in use.

9-Bulb LED Underwater Light (If Equipped)
The 9-Bulb LED Underwater Light replaces the standard underwater light. Pressing the "Light"
button on the top side control will turn the light on. Each subsequent press will change the
mode of the light. After all the lighting modes are cycled through, the next press of the "Light"
button will turn the LED lighting o!.
Motion Glow Lighting (If Equipped)
Motion Glow Lighting is 16 - 20 individual LEDs placed around the top of the spa. They oper-
ate in conjunction with the 9-bulb LED Underwater Light. Pressing the "Light" button on the top
side control will turn the Motion Glow Lighting on. Each subsequent press will change the mode
of the Motion Glow Lighting. After all the lighting modes are cycled through the next press of
the "Light" button will turn the Motion Glow Lighting o!.
Water Maintenance
Water Conditions vary greatly from location to locations. Your dealer is familiar with local wa-
ter conditions and which chemicals are compatible with the water and are designed specifically
for your spa. This is the best person to advise you on proper water quality management. Proper
water chemistry will insure years of trouble free operation. A careless attitude in regard to water
maintenance will result in poor and potentially harmful conditions for soaking and even damage
to your hot tub investment.
CAUTION: Never store hot tub chemicals inside the hot tub’s equipment enclosure.
Two basic goals of the chemical water treatment are sanitizing and balancing the water. Sani-
tizing simply means keeping the water free from living microorganisms including algae, bacte-
ria and viruses. The current most popular chemicals for sanitizing include chlorine, bromine
and ozone. Balancing water means establishing a balance among pH, total alkalinity and total
hardness. Water that is unbalanced can corrode the spa and it's support equipment or leave de-
posits of minerals. Properly balanced water is essential to allow the sanitizing chemical to work
e!ectively. There are numerous chemical additives to help you in controlling pH, total hardness
and total alkalinity. NEVER use softened water when filling your spa. Softened water is extreme-
ly corrosive to the metal parts of the spa equipment and may lead to an unforeseen failure.
Sanitizing
To destroy bacteria and organic compounds in the hot tub water, a sanitizer must be used
regularly, either chlorine or bromine. Bromine residual of 2 to 3 ppm is generally considered
desirable. A two-part bromine system or granular chlorine (Dichlor) can also be acceptable san-
itizers. Chlorine residual should be 1 to 3 ppm.
IMPORTANT: Do not use Hydrogen Peroxide based sanitizers in your spa. When using Tri-
chlor chlorine or Bromine tablets you must use a floating dispenser. These chemicals can have
an extremely corrosive e!ect on certain materials in the spa. Damage caused by use of these
chemicals, or improper use of any chemicals, is not covered under the spa’s warranty.
pH Control

pH is a measure of relative acidity or alkalinity of water and is measured on a scale of 0 to 14.
The midpoint of 7 is said to be neutral, below which is acidic and above which is alkaline. In hot
tub water, it is ideal to keep the water between 7.2 to 7.8. A low pH will be corrosive to metals
in the hot tub equipment. A high pH will cause minerals to deposit on the interior surface (scal-
ing). In addition, the ability of the sanitation agents to keep the hot tub clean is severely a!ect-
ed as the pH moves beyond the ideal range. That is why almost all hot tub water test kits con-
tain a measure for pH as well as sanitizer.
IMPORTANT: Heater and other component failure due to improperly maintained pH or Total
Alkalinity is not covered under warranty.
Other Additives
Their are many other additives are available for your spa. Some are necessary to compensate
for out-of-balance water, some aid in cosmetic water treatment and others simply alter the feel
or smell of the water. In many cases if the water chemistry gets to far o!, it is easier to drain
and refill the spa then add lots of expensive chemicals to try to fix it.
Ozonator (If Equipped)
All Futura spas are factory prepared to accommodate an ozonator. The Futura Spas Corona
Discharge Ozonator is regarded as the most advanced system on the market reducing chemical
consumption and maintaining clearer, cleaner water. The Corona Discharge Ozonator runs
when ever the spa is in the filtration cycle. Continuous use of an ozonator can dramatically re-
duce sanitizer consumption.
The ozonator will automatically activate when the spa enters its filtration mode or when the
spa is heating. When the ozonator is active you will be able to notice a very faint blue light
coming from the clear tube attached to the ozonator. The ozonator has a finite life and will
need to be replaced after several years.
Draining & Winterizing Your Spa
After a certain time, you may find that the addition of chemicals will not clarify or eliminate
odors in the spa. This is an indication that the water needs to be drained and replaced. Gener-
ally, depending upon bather load and water chemistry maintenance, this may need done every 3
months. With the use of ozone as the sanitizing agent, it is found that the water needs changed
less frequently. Draining of a Futura Spa requires creating a siphon with your garden hose.
1. Turn o!all power to the spa.
2. Hook-up garden hose to an exterior spigot on the house.
3. Place other end of garden hose into the bottom of the spa.
4. Turn on the garden hose allowing water to fill into the spa.
5. After several minutes, after all the air has been pushed out of the garden hose turn the
water o!and disconnect the hose from the house spigot.
6. Keep the garden hose below the spa and a siphon will start
Once the spa is empty, clean the interior surfaces with a product designed for cleaning the
acrylic su$ce and a soft towel. Do not use soaps or detergents as they will cause the fresh spa
water to foam. Refill and restart the spa.

If your spa is to be used during the winter months in cold climate where the danger of freez-
ing exists, certain precautions should be taken to avoid damage. An increased circulation cycle,
and use of a rigid foam cover are suggested. Contact your dealer for advice. Many spa owners
find that outdoor wintertime soaking is quite enjoyable, and we certainly suggest the use of a
spa year-round, although certain situations do require closing the unit for the winter months
(i.e., vacation homes). The only way to guarantee against freeze damage is to keep the spa
powered on and running. If you must drain the spa for the winter follow these steps:
1. Drain the hot tub entirely.
2. Remove and clean the cartridge filter element
3. Using a wet/dry utility vacuum, remove remaining water from the jet openings, filter car-
tridge housing, and footwell.
4. Either pour or use a turkey-baster where necessary to add potable biodegradable RV
antifreeze to areas such as pump wet end, jets and filter housing. DO NOT USE AUTO-
MOTIVE ANTIFREEZE.
5. Turn pump on for only a few seconds to circulate the antifreeze.
6. Unthread and disconnect all unions in the support equipment area. Remove lowest win-
ter drain plug on pump face plate. Repeat for all pumps, where applicable.
7. Cover exposed plumbing connections with plastic bags and duct tape.
8. Where practical, disconnect hot tub support equipment and store in a dry heated area.
9. Install the safety hardcover, and cover the entire hot tub with a tarp to prevent prema-
ture weathering of the cabinet and the safety hard cover.
10.Remove snow build up regularly to prevent damage to the safety hard cover.
IMPORTANT: mixing potable biodegradable RV antifreeze with water significantly reduces its
ability to protect against freezing. Therefore, it is very important ALL water is removed from the
hot tub plumbing before adding.
Headrest/ Pillow Care
Pillows are attached to the spa with a plastic pin. They are not designed to be removed regu-
larly. Pillows are inflatable with a standard sports ball inflation needle and a pump. If a pillow
comes o!of the spa reinsert the pillow into the receiver on the spa. If the pillow keeps coming
o!deflate it slightly. Pillows can be locked into place permanently by applying a small amount
of clear 100% silicon sealant to the back of the pillow.
• Do not sit on pillows.
• Do not pull on pillows.
• Proper water chemistry must be maintained. Excessive levels of chlorine, bromine or ozone
may damage your pillows.
• Pillows should be washed when you drain your spa with a mild soap and then wiped with
conditioner.
• When you shock your spa, prop up your cover for a minimum of thirty minutes so excess
gases may escape out of spa.
• Please be advised that pillows are not a warranty item.

Safety Hard Cover
When a hot tub is uncovered, over 90% of heat is lost from the water surface. Safety Hard
Covers are designed for maximum thermal e$ciency. They are hinged in the middle for easier
handling, and the zip fastener allows the tapered foam inserts to be changed if damaged. The
skirt of the safety hard cover hangs over lip of the spa to protect the acrylic. The locks, with one
part fastened to the cabinet, prevent small children or animals from entering the hot tub. Do
not drag the safety hard cover across the hot tub or decking. Fold the cover first, then lift by
the handles. Safety Hard Covers are not designed to be stood or sat on. Standing on the hard-
cover could cause the foam inserts to crack, which will lead to water absorption.
NEVER SIT, LEAN OR STAND ON YOUR HARDCOVER.
Clean the Safety Hard Cover as needed with a cover cleaning product or saddle soap. Never
use cleaning products designed for the automotive or boating industry on a spa cover.
Troubleshooting
A good general rule is to visually inspect your spa and equipment area frequently. If anything
looks broken, worn, or incorrect, contact your electrician or spa dealer. A simple repair may
prevent an injury or more serious problems requiring expensive repairs. If your spa is not oper-
ating, check the following:
All equipment does not operate
•Check power source G.F.C.I. breaker.
• Check to assure spa has dedicated circuit.
• Check the “test” and “reset” buttons on G.F.C.I.
• Check internal fuses.
Pump does not work
• Check all items above.
• Check filter; clean or replace cartridge.
• Check for blockages (restrictions) at suctions, skimmer and pump basket.
• Push “jet” button to check if high speed is functioning on a dual-speed pump.
• Check if pump is plugged into spa pack
•Check for air lock (pump needs prime)
Inadequate jet action
• Make sure jets are turned on.
• Make sure air controls are open.
• Check for restrictions (blockages) in jets and/or main skimmer and pump basket.
• Check water level.
• Push “jet” button to check if high speed is functioning on a dual-speed pump.
• Check to be sure the optional Turbo diverter jet is in proper position.
No heat
• Check all steps under part “1.”
• Check for clogged filter element and other restrictions..
• Check water level.
Other manuals for Futura
1
Table of contents
Other Gecko Hot Tub manuals