Geeky Faye Art GFA Ultimate Frame Manual

Page 1
GFA Ultimate Picture Frame
Instruction Guide: Consumer Ed.
http://geekyfaye.art
© 2020 Geeky Faye Art
All rights reserved.
GFA Ultimate Picture Frame
Instruction Guide: Consumer Edition
Thank you for buying the GFA Ultimate Picture
Frame! May you never need to buy
another picture frame ever again!
Within this guide you will nd instructions on
how to:
• Plan your frame
• Determine the right option for your printer
• Print your frame for an optimal t
• Assemble your frame
• Troubleshoot potential issues
If you have any questions that this guide cannot
answer, you can reach me at [email protected]
and I’ll do my best to assist!

Page 2
GFA Ultimate Picture Frame
Instruction Guide: Consumer Ed.
http://geekyfaye.art
© 2020 Geeky Faye Art
All rights reserved.
Contents
Step One: Planning Your Frame 3
Step Two: Printing Your Frame 5
• Figure 2.1 5
• Figure 2.2 6
• Figure 2.3 6
Step Three: Frame Assembly 7
• Figure 3.1 7
• Figures 3.2-3.6 8
• Figures 3.7-3.9 8
• Figure 3.10 8
• Figure 3.11 8
• Figure 3.12 9
• Figure 3.13 9
• Figure 3.14 9
• Figure 3.15 10
• Figure 3.16 10
• Figure 3.17 10
• Figure 3.18 11
• Figure 3.19 11
• Figure 3.20 11
• Figure 3.21 11
• Figure 3.22 12
• Figure 3.23 12
FAQ/Troubleshooting 13

Page 3
GFA Ultimate Picture Frame
Instruction Guide: Consumer Ed.
http://geekyfaye.art
© 2020 Geeky Faye Art
All rights reserved.
Step One: Planning Your Frame
Before you can get making your frame, you need to gure out what
size frame you’ll be making. The different versions of the frame will
determine the sizing options available. The GFA Ultimate Picture
Frame can accommodate the following:
Inches:
All standard
sizes above
8”x8”,
including Letter
Any
conguration
that can be
made from
the following
measurements:
4 inches, 3
inches, and 2
inches
A Sizes:
All standard
sizes between
A6 and 4A0
Larger sizes
can be
created
following the
same sizing
convention at
your own risk!
B Sizes:
All standard
sizes between
B6 and 4B0
Larger sizes
can be
created
following the
same sizing
convention at
your own risk!
Metric:
All standard
sizes above
20cm x 20cm
Any
conguration
that can be
made from
the following
measurements:
10 cm, 5 cm, 4
cm

Page 4
GFA Ultimate Picture Frame
Instruction Guide: Consumer Ed.
http://geekyfaye.art
© 2020 Geeky Faye Art
All rights reserved.
All of the les have the size of the piece listed in the name. If you are
not using the Frame Planning tool and doing your own maths, you
should be able to determine the pieces required according to the
lengths mentioned in the le names.
Please note that the sizes listed with the A and B sized pieces are
more precise to create the necessary sizes. The number you get
may be up to 1mm larger than ofcial sizes; this is normal.
If you are using the Frame Planning Tool, then choose your frame
type, put in your desired frame measurements (or choose from the
drop down) and the tool will tell you exactly how many of each piece
you will need to print. There are further instructions on the page.
The frame is designed to be able to t additional mounting, thicker
pieces of art, as well as a pane of glass or acrylic. The front slot
can accommodate up to 4mm, the back slot can take up to 7mm.
Please plan accordingly.
Along with your frame pieces,
you will also need either M3x10
screws to secure the backing
pieces, or some 3D print friendly
glue only if you want to make
the frame permanent.
Consider how you want to
display the frame as well! The
frames stand independently or
can be hung with either a bit of
1mm wire or 8 gauge/4.5mm
wall screws.

Page 5
GFA Ultimate Picture Frame
Instruction Guide: Consumer Ed.
http://geekyfaye.art
© 2020 Geeky Faye Art
All rights reserved.
Step Two: Printing Your Frame
For your frame to function as intended, it is very important
that the printed pieces have a good, tight t when slotted
together, which requires having the correct settings dialed
into your printer. To determine the best t for your printer,
it is highly recommended that you print out all of the Test
Pieces included rst. See Figure 2.1 for an example piece.
There are four sets of test pieces,
identied with Sizes 1-4. The size
of each piece is marked with a
number on the bottom of the print.
These can all be printed at
the same time with the same
settings (these settings are
for FDM only, see next page
for resin):
• Nozzle Size: .4mm
• Layer Height: .2mm
• Top Layers: 5
• Bottom Layers: 5
You are welcome to
add variation around
inll and wall thickness; I
recommend 10-15% grid and
2 perimeters. No supports
or rafts are required. These
settings can be applied to
all frame prints.
Figure 2.1

Page 6
GFA Ultimate Picture Frame
Instruction Guide: Consumer Ed.
http://geekyfaye.art
© 2020 Geeky Faye Art
All rights reserved.
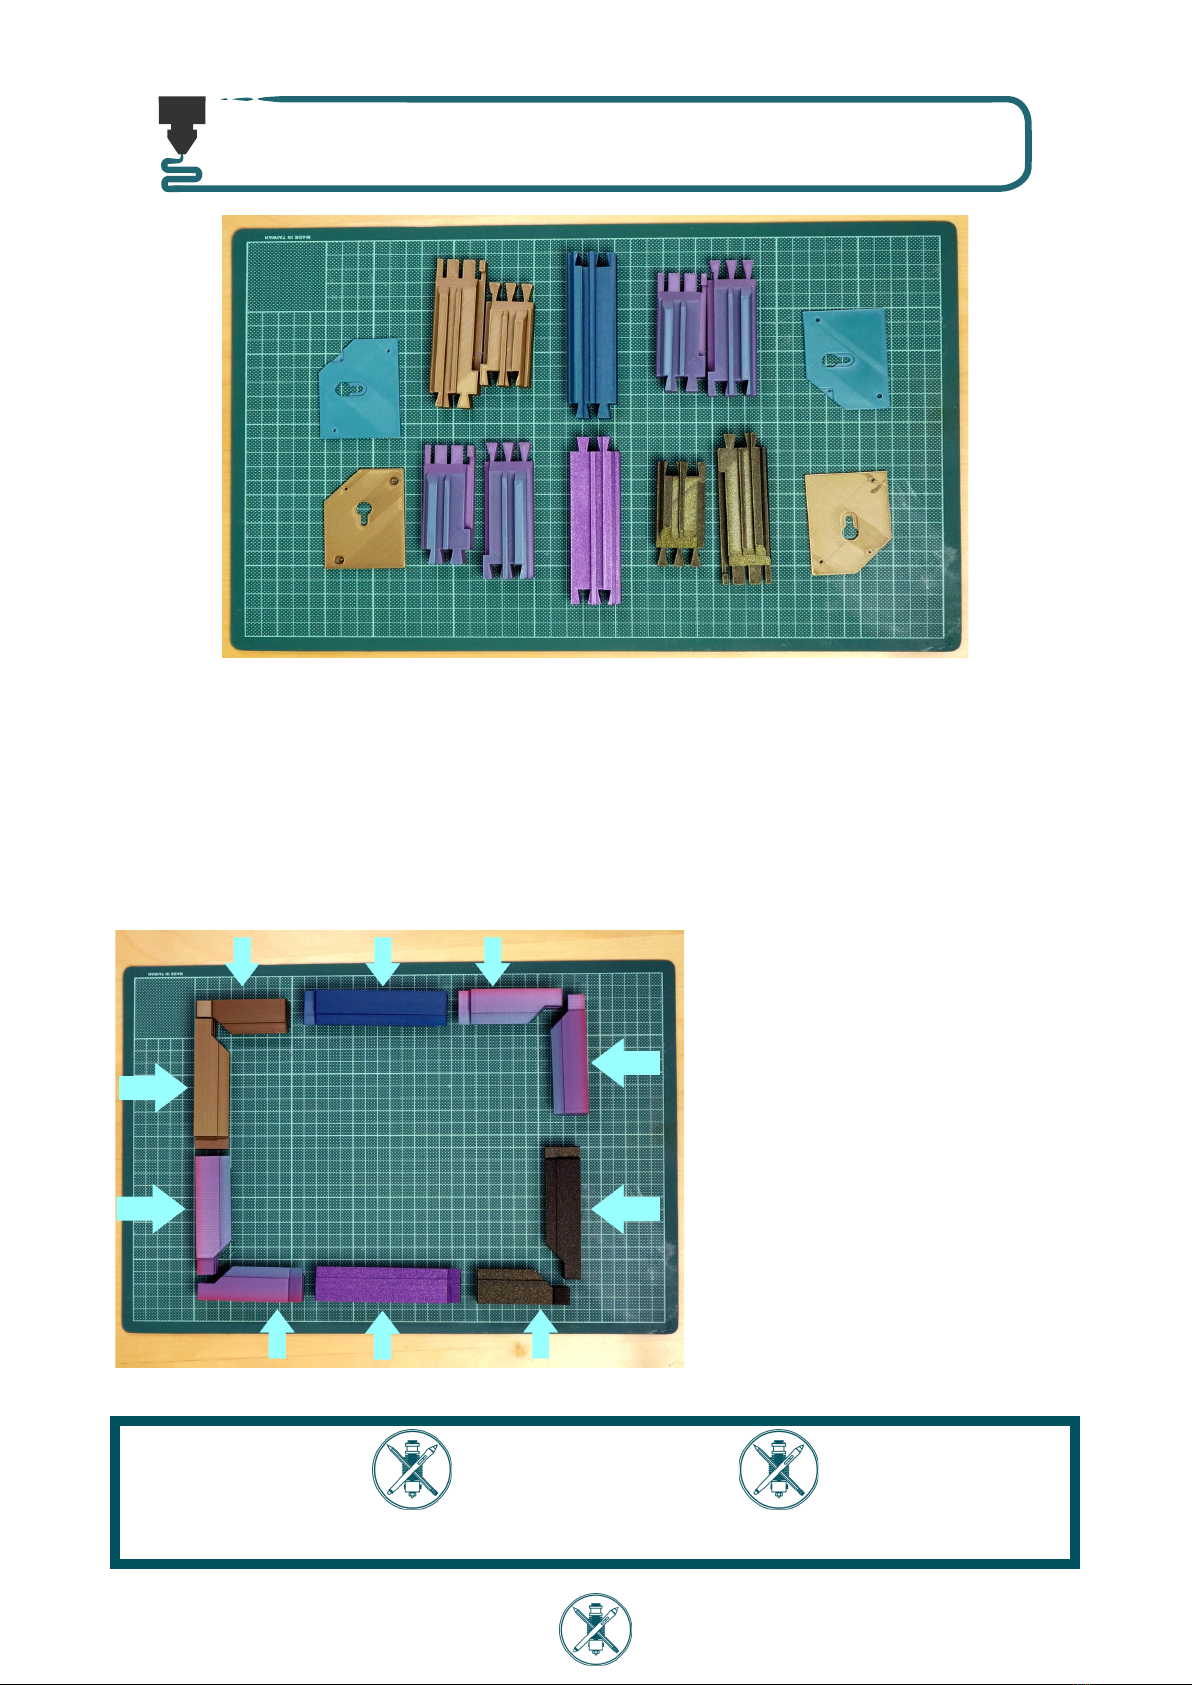
Once you’ve got the pieces
printed, slot them together as
seen in Figure 2.2. The pieces
should require a small amount
of force to get them to t, then sit
snuggly with little to no wobble.
In an ideal t you should be able
to pry them back apart with a
bit of force. If you require great
force to slide them together
and they become stuck, the size
is too small. If they wobble or
slide apart, the size is too big.
Choose the size that is closest to
described above, erring on the
side of too tight.
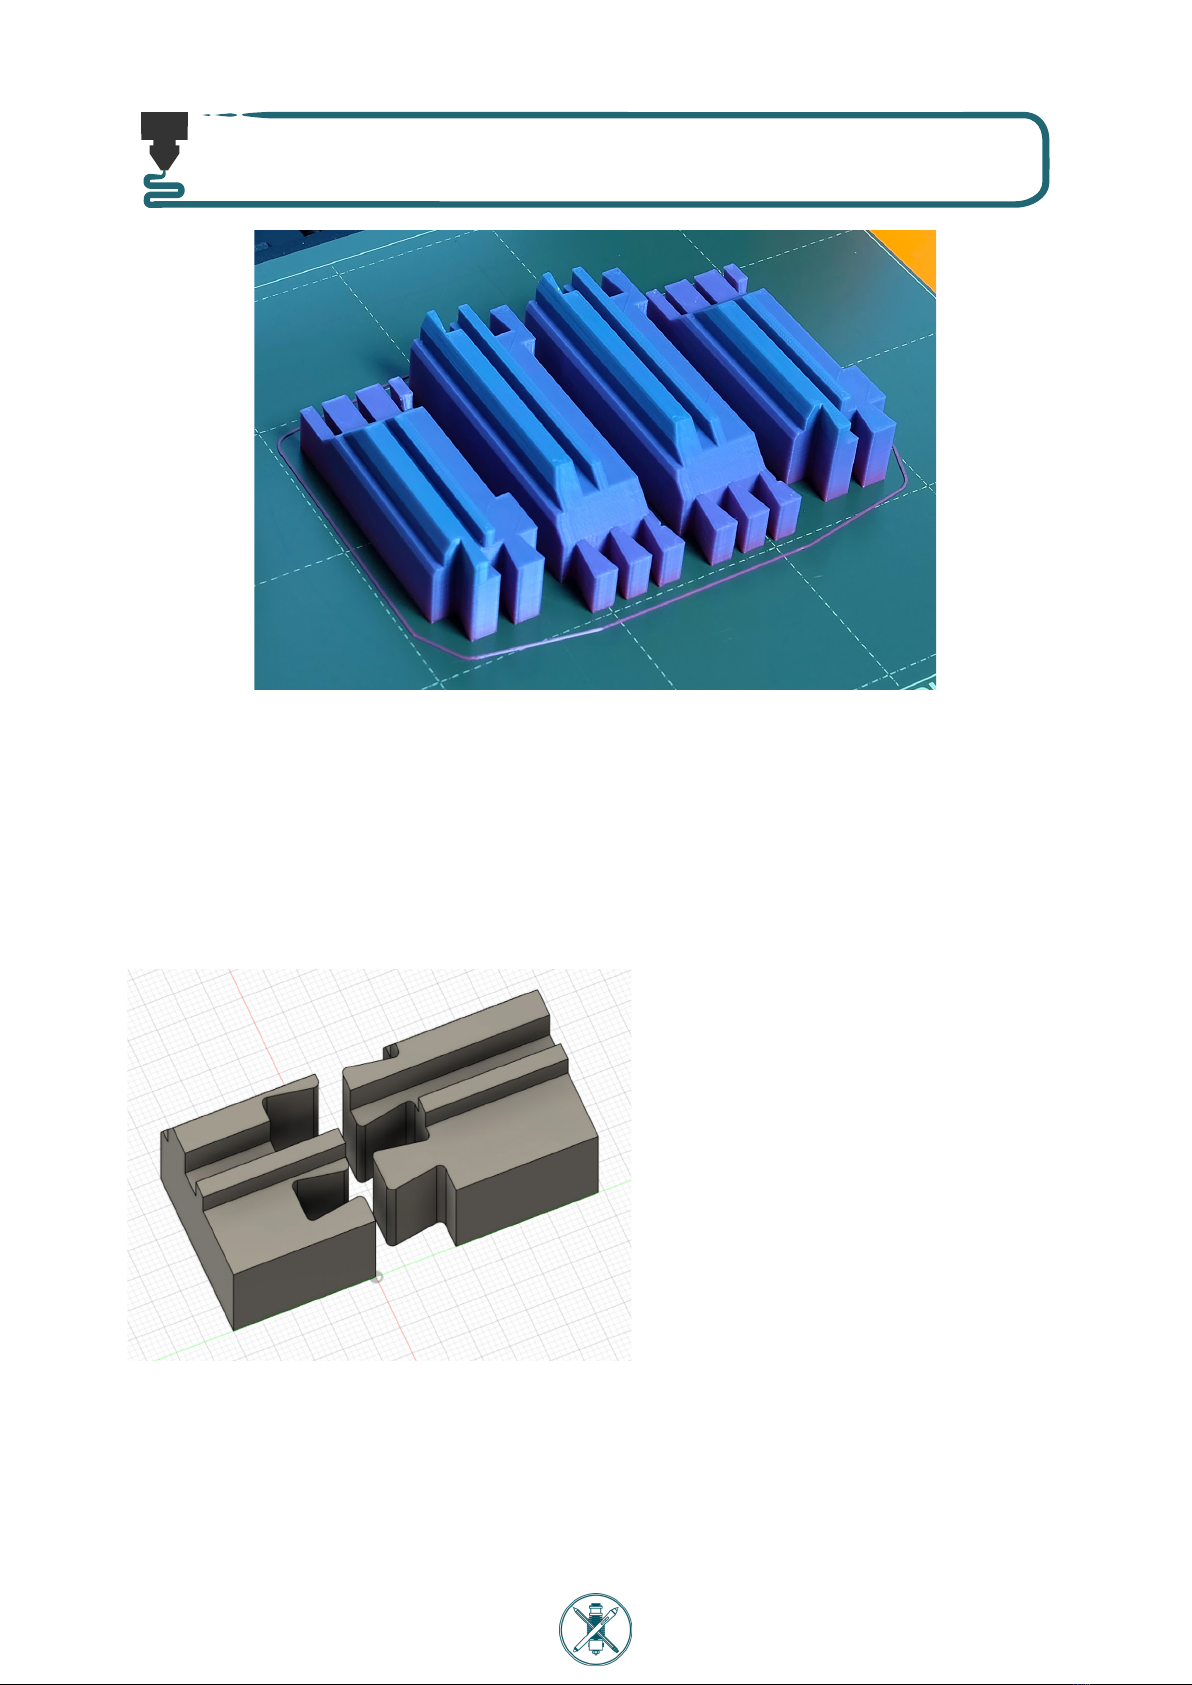
If you nd yourself struggling to t the
pieces together, check the print for
elephant foot, as seen in Figure 2.3.
Elephant foot can be removed after
the fact with a blade or deburring
tool, however it is better to factor for it
before you print your nal pieces. Many
slicers include a setting that allows you
to compensate for elephant footing, or
you can adjust your nozzle height until
the rst layer is less squished.
Faye’s Tips!
Once you are happy with the t, you’re ready to print your pieces!
Important Notes!
There are only two sizes for the backing pieces as they require a less
precise t. Use Backing Size 1 for frame sizes 1 and 2, & Backing Size 2 for
frame sizes 3 and 4.
These settings are for FDM style printing ONLY. If you are printing
in resin, default settings should be ne, but some post processing
(sanding) may be required.
Figure 2.2
Figure 2.3

Page 7
GFA Ultimate Picture Frame
Instruction Guide: Consumer Ed.
http://geekyfaye.art
© 2020 Geeky Faye Art
All rights reserved.
Step Three: Frame Assembly
To prepare for assembly, gather up all of your printed pieces, as well
as your chosen method of attaching the backing (screws or glue).
If you are using a piece of glass or perspex in the frame, you’ll also
need that to hand, as well as what you are framing.
If at any point something doesn’t appear to be working as stated,
please check the Troubleshooting Section at the end of this guide
for help.
To get started, arrange
your pieces in the general
shape of the nal frame
to make sure you have all
the pieces you need, with
the backs on the table
and the front of the frame
facing up, as seen in
Figure 3.1. Become familiar
with the direction in
which the pieces will slide
together as the order in
which you connect them
will be important!
Be aware that corner pieces only slot together in one direction!
Figure 3.1
Faye’s Tips!

Page 8
GFA Ultimate Picture Frame
Instruction Guide: Consumer Ed.
http://geekyfaye.art
© 2020 Geeky Faye Art
All rights reserved.
Start the assembly with the corners at one end of the frame,
putting each corner together as seen above before adding
any length pieces or attaching the corners to each other. The
corner and lengths come together the same way as the test
pieces (see Figure 2.2). You’ll nish with one side complete.
From there, add length pieces (as seen in Figures 3.10 and
3.11) until you have three sides of the frame assembled. Leave
off the remaining corners and fourth side for now.
Check and make sure everything is tting together nicely so
far. You should be able to give the assembled pieces a bit
of a tug and not have it wiggle or rattle about much. If any
pieces are not tting together well, a bit of clean up with a
knife/deburring tool should help.
1 2 3 4 5
6 7 8
9 10
Figures 3.2-3.6
Figures 3.7-3.9
Figure 3.10 Figure 3.11

Page 9
GFA Ultimate Picture Frame
Instruction Guide: Consumer Ed.
http://geekyfaye.art
© 2020 Geeky Faye Art
All rights reserved.
Instead of tting the remaining corner pieces together (as seen in
Figures 3.2-3.6), slot onto the main body of the frame the side of the
corner that is the ‘receiving’ piece, or the piece that will be slid into.
(See Figure 3.12) It should look like the corner piece with slots, instead
of the piece with triangular extensions (see Figure 3.13). Prepare the
last side of the frame, but do not attach it. There should also be one
last corner piece, completely unattached (Figure 3.14).
Your frame will look a bit different due to the sheer variation
of size possibilities, but your frame should be looking
somewhat like the photo above. Time to grab your glass/art!
11 12
13
Figure 3.12
Figure 3.14
Figure 3.13

Page 10
GFA Ultimate Picture Frame
Instruction Guide: Consumer Ed.
http://geekyfaye.art
© 2020 Geeky Faye Art
All rights reserved.
Before you start inserting anything
into the frame, make sure to properly
identify the front slot in the frame. It
sits right behind the front facade of
the frame, with a small lip separating
it from the back slot. See Figure 3.15 if
you are unsure!
Carefully insert the art into the front slot if you are not using any clear
front piece, or insert your glass/acrylic if you are. There is space in the
back of the frame for the art if you are using the front slot for glass/
acrylic, or simply prefer to place the art in the back. Make sure that the
edges of whatever you are inserting are straight and square, or you
may nd the frame bending a bit to accommodate it! If you are having
trouble with this, please refer to the Troubleshooting section at the end
of this guide for more help.
Once you’ve got the art
or glass slid fully into the
front slot of the frame, or if
you are only placing art in
the back, attach the fourth
side of the frame at the
corner where you already
have the rst corner half.
Faye’s Tips!
Figure 3.15
Figure 3.16
Figure 3.17
14
15

Page 11
GFA Ultimate Picture Frame
Instruction Guide: Consumer Ed.
http://geekyfaye.art
© 2020 Geeky Faye Art
All rights reserved.
Once you’ve got the fourth side on, it’s time for the nal
piece. This will likely be the most stubborn to attach, but if
you put it together in the right order, both the length and
corner t should go in the same direction, allowing you to
slide the nal piece on. Don’t be afraid to use a little force to
squeeze together any remaining gaps!
If you’re placing art or anything
in the back slot of the frame,
ip the frame over and gently
place it in after giving your glass/
perspex a wipe to clean it of any
debris. If your art is thin, a piece
of cardboard should be placed
behind for support, as seen in
Figure 3.20. From there you are
ready to attach the back plates.
Keeping your hanging
orientation and direction of
the art in mind, place your
back plate pieces in the slots
on the back of the frame.
Make sure you place them
with the slots for the screw
heads facing out, and the
indentations for the hanging
screws facing in. You may
need to clear loose plastic
from the screw holes to get a
clear path.
Figure 3.19Figure 3.18
Figure 3.20
Figure 3.21
16 17
17b
18

Page 12
GFA Ultimate Picture Frame
Instruction Guide: Consumer Ed.
http://geekyfaye.art
© 2020 Geeky Faye Art
All rights reserved.
Secure the back plates to the frame with the M3x10 screws,
or with a bit of glue if you prefer. Check that they are secure.
Flip it back over and admire your new frame,
because it’s complete! Find a good place to
display it, then get started on the next one!
Please be sure to share photos of your frame on social media and
tag me in the results so I can see and share it! #GFAUltimateFrame
@GeekyFayeArt
Figure 3.22 Figure 3.23
Even if you aren’t placing anything in the back, or choosing to hang
the frame, you should still secure at least two back plates for stability.
Also, your back plates may look different as some sizes come with an
L-shaped screw mounting hole.
Faye’s Tips!
19

Page 13
GFA Ultimate Picture Frame
Instruction Guide: Consumer Ed.
http://geekyfaye.art
© 2020 Geeky Faye Art
All rights reserved.
FAQ/Troubleshooting
I’ve printed the test pieces and none of them t together right;
help!
• First of all, double check that you are testing the correct
pieces together; a Test Piece 1 and a Test Piece 2 won’t t
together correctly! If they still won’t t, check that there isn’t
any elephant foot on the prints (see Figure 2.3) preventing
them from coming together. If they still won’t t (or are all
too loose), then please email me for further assistance.
How do I get a multi-coloured frame like in the photos?
• If you just want different pieces in different colours (like the
frame in Part 3) you simply need to print each set of pieces
separately to make them different. If you want more than
one colour in a single piece (as seen in the cover photo)
then you can add a pause in the print where you want the
change and swap laments then. Your individual slicer
should have more information on how to do this online.

Page 14
GFA Ultimate Picture Frame
Instruction Guide: Consumer Ed.
http://geekyfaye.art
© 2020 Geeky Faye Art
All rights reserved.
What if I want a frame that’s smaller than the options here?
• If you want a custom frame size that is not possible with the
pieces provided, then you can get in touch to swap to the
Pro CAD version to customise the design in the CAD software
of your choice, at the price difference between versions.
Only do this if you have CAD experience. Otherwise, I’m
afraid there is no other way to change the size of the pieces;
it is recommended to not scale them in your slicer to
change the size. Doing this can result in the pieces not tting
together.
The straight length pieces t together well but the corner pieces
are a bit wobbly, how do I x this?
• If there is just a bit of wobble at the corners, this will
be stabilised when the frame is fully assembled and is
completely normal. If the pieces are sliding apart (but the
lengths are stable) then double check and make sure that
you haven’t printed pieces from two different size sets.
I’m struggling with the assembly of the frame; are there more
visuals of the process I can see?
• Yes! There is a video showing the entire build process on my
website. You can nd it through the shop, or navigate there
directly via the QR code below.

Page 15
GFA Ultimate Picture Frame
Instruction Guide: Consumer Ed.
http://geekyfaye.art
© 2020 Geeky Faye Art
All rights reserved.
Can I glue the frame pieces together to improve the stability of
the frame?
• You can glue it if you really want to, but it is not
recommended as it will make the frame permanent and
potentially make it impossible to get your art back out. If the
frame is unstable without it then a smaller size of tolerance
should be used until the frame is stable on its own.
My screws aren’t tightening all the way when I attach the
backing?
• The holes for the screws may not print completely perfectly
due to being on their side, so the screws may not stop
rotating or grip at the end. This is okay so long as the
backing plate is secure, so just give it a little tug to double
check!
My glass/perspex is exing the frame a bit and not tting quite
right?
• Double check that the piece is completely square! Acrylic
and Perspex are often cut quite imprecisely and may not
have completely straight
edges. A bit of sanding
may help even it up,
otherwise building the
frame ‘around’ it a bit
more instead of sliding it
into a mostly complete
frame may help. Don’t
be afraid to get a bit
forceful screwing in the
backing; it will help the
frame hold its shape. The
black frame to the left
had imperfect Perspex
but a little elbow grease
got it to work!

Page 16
GFA Ultimate Picture Frame
Instruction Guide: Consumer Ed.
http://geekyfaye.art
© 2020 Geeky Faye Art
All rights reserved.
Is there a limit to how many frames I can make with one
purchase?
• Nope! The joy of this design is that you aren’t limited in the
kinds of frames you can make, and you are encouraged to
ll your house with GFA Ultimate Picture Frames! You are also
welcome to make and give them as gifts!
Can I print and sell frames to other people?
• No, as the les were purchased with a personal use license
only. If you are interested in selling prints of the frame to
others then you must contact me directly to reach an
arrangement and be granted a commercial license. The
reselling of digital les is strictly prohibited. Evidence of
either without written permission will result in legal action.
How do I make an Inches/Metric/etc. sized frame if I purchased
a different size?
• Each unique Size Group can only make frames in that unit
of measurement, meaning trying to make a Metric frame
with an Inches set of les isn’t going to yield the results you
want. If you want to make frames in other sizes then the one
you purchased you will have to go back and purchase the
additional size you need.
Thank you so much for purchasing
the GFA Ultimate Picture Frame!
Like it? Love it? Wanna shout about
it? Please share your thoughts and
reviews online and tag them with
#GFAUltimateFrame.
Table of contents
Popular Indoor Furnishing manuals by other brands

tikamoon
tikamoon Edos SID0079 Assembly, Use, Maintenance Manual

Southern Enterprises
Southern Enterprises HZ348600TX Assembly instructions

Graff
Graff EXPO 41312 Instructions for assembly and use

MASCOT
MASCOT NL2111191 user manual

New Classic Furniture
New Classic Furniture RYLAND U5985-13P1 Assembly instructions

CB2
CB2 HACIENDA Assembly instructions

for Living
for Living H19-0281 Assembly instructions

Core Products
Core Products Augusta AG514 Assembly instructions

Kozyard
Kozyard Corona Assembly manual

Baumax
Baumax BALTICA 2901 Assembling Instruction

Leigh Country
Leigh Country Char-Log TX 93605 manual

Posture Depot
Posture Depot HW Pro Assembly instructions