Geemarc AMPLICALL 140 User manual

0
Wireless Sound Sensor Alerter (Baby monitor)
Alerteur : Capteur Sonore (Bébé alarme)
Drahtloser Geräuschsensor-Alarmgeber
(Baby-Monitor)
EnglishP1
FrançaisP8
DeutschP16

1
Please refer to our website: www.geemarc.com for an up to date
user guide, as there may be important updates and changes you
need to be aware of.
Package Contents
The AC140(AMPLICALLTM140) box contains the following items:
z1 AC140 Base station
z1 AC/DC power adaptor
z1 UK and 1 VDE plug adaptors
z1 Micro sensor (50cm)
z1 double side adhesive sticker for Micro sensor mounting
z1 external cord with 3.5mm plug / jack for micro sensor (1.5m)
z1 user’s manual
z2 screws and 2 anchors
z1 Drill hole template
z2pcs of doorbell icons and 2pcs of baby icons
DESCRIPTION
Mic
Battery
cover
Bell
button Power On/Off Delay time Selector
Sensitivity
Selector
Ext mic
DC 5V in Battery compartment

2
Connection your device
Your AC140 is delivery with an power
adaptor, you must plug it in the socket
AC/DC situate on the bottom right.
When using the AC/DC power, you
must install the batteries too.
Otherwise you will get a battery
low information on AC140.
UK plug
VDE plug
AC/DC adaptor (with Type C
plug)
Micro sensor
Extension cord

3
You have the possibility to add 2 Alkaline batteries AA 1.5V
(not provided) if you want that your device works in power
failure mode or without power adaptor.
Please follow the below procedure to insert the batteries.
1.Unscrew the screw on the battery cover.
2.Open the battery cover.
3.Insert the 2 alkaline batteries AA1.5V in respecting the
polarity.
4.Replace the battery cover.
5.Replace the screw.

4
Pairing with the AMPLICALL receivers
AC140 works with the AMPLICALL receivers and must be
paired before using.
To pair a new device, please follow these steps:
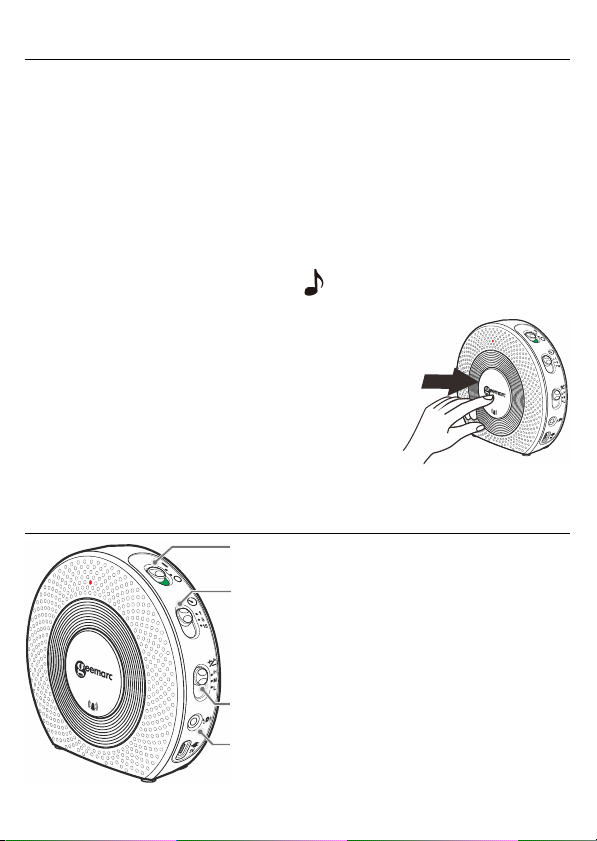
1. Enter pairing mode for the AMPLICALL receivers.
Press & hold the LEARNING button (●) for 3 seconds. The
LED in zone icon #1 will flash.
2.Press the LEARNING button (●) again to move to the zone
icon you wish to pair with.
Press the melody selection () button to scroll through the
melodies. Once you hear a melody you like, do not press
any button during the melody.
3.Once the zone icon and melody are
selected, press one time on device
AC140 button to pair. If successful,
the AMPLICALL receivers will
generate two short tones.
Press the LEARNING button (●) to exit
the pairing mode; the system is now ready to use
Settings
Power On/Off: Slide the switch to Off
(O )position when do not use.
Delay:You can select 5,10,or 15 seconds
delay time using this switch. When selected
5 seconds, it means that AMPLICALL
receivers will be trigger after 5 seconds
of sound detected in continuous.
Sensitivity: You can select Hi, Mid or
Low Mic sensitivity by this switch.
Ext.Mic: you can plug the external mic
to this jack. The internal mic will be cut
off when the external mic is installted.

5
Operation
Using the internal microphone:
Using the external microphone:
Adjust the distance (between the microphone and the Sound
source) and sensitivity according to the sound source type
and intensity.
Code Conflict
If the AC140 coding is the same as another transmitter, you
must change the code. Please follow the procedure as below.
When you have changed the code must re-pair the bell press.
Slide the power
switch to OFF
position.
Press and hold the
bell button. Slide the power switch
to ON position, do not
release the bell button,
until the LED indicator
blinks 6 times.

6
Wall mounting
The AC140 can either be placed on a flat surface or be
mounted on a wall.
Mark two holes on the wall using a pencil and drill hole
template.
Mount the unit to the wall using the provided anchors and
screws.
GUARANTEE
From the moment your Geemarc AMPLICALLTM140 is purchased,
Geemarc guarantee is for the period of two years. During this
time, all repairs or replacements (at our discretion) are free of
charge. Should you experience a problem then contact our help
line or visit our website at www.geemarc.com. The guarantee
does not cover accidents, negligence or breakages to any parts.
The product must not be tampered with or taken apart by anyone
who is not an authorized Geemarc representative. The Geemarc
guarantee in no way limits your legal rights.
IMPORTANT: YOUR RECEIPT IS PART OF YOUR GUARANTEE
AND MUST BE RETAINED AND PRODUCED IN THE EVENT
OF A WARRANTY CLAIM.
Please note: The guarantee applies to the United Kingdom
only.

7
DECLARATIONS:
UKCA Directives
Geemarc Telecom SA hereby declares that this AMPLICALLTM140
is in compliance with the essential requirements and other relevant
provisions of the Radio Equipment Directive 2014/53/UE.
The UKCA declaration of conformity may be consulted at
www.geemarc.com
RF power : < 250mW
Recycling Directives
The WEEE (Waste Electrical and Electronic Equipment) has been
put in place for the products at the end of their useful life are
recycled in the best way.
When this product is finished with, please do not put it in your
domestic waste bin. Please use one of the following disposal
options:
- Remove the batteries and deposit them in an appropriate WEEE
skip. Deposit the product in an appropriate WEEE skip.
- Or, hand the old product to the retailer. If you purchase a new
one, they should accept it. Thus if you respect these instructions
you ensure human health and environmental protection.
For product support and help visit our website at www.geemarc.com
telephone 01707 387602
lines are open 09h00 to 16h00 Mon to Fri
2 Rue Galilée, Parc de l’Etoile, 59791 GRANDE-SYNTHE Cedex,
FRANCE
This product is made in China To Geemarc Telecom

8
Veuillez consulter notre site Web: www.geemarc.com car il peut y
avoir des mises à jour importantes et changement dont vous devez
être conscient.
Contenu de la boite
La boite de l’AC140 contient les éléments suivants:
z1 station de base AC140
z1 adaptateur secteur CA/CC
z1 adaptateur de prise britannique et 1 adaptateur de prise VDE
(européen)
z1 micro-capteur (50cm)
z1 autocollant adhésif double face pour le montage du micro
capteur
z1 rallonge micro de 1,5 m et de 3,5 mm
z1 guide d’utilisation
z2 vis et 2 chevilles
z1 gabarit de perçage
zpièces d'icônes de sonnette et 2 pièces d'icônes de bébé
DESCRIPTION
Mic
Couvercle du
compartiment des
piles
Sonnette
Mise en marche/arrêt Sélecteur de
délai
Sensibilité
Mic EXT
Entrée 5V CC Compartiment de piles

9
Raccordement de votre appareil
Votre AC140 est livré avec un
adaptateur électrique, vous devez le
brancher dans la prise CA/CC située
en bas à droite.
Vous devez également installer des
piles avant d'utiliser l'alimentation
CA/CC. Sinon, vous obtiendrez une
information de batterie faible sur
l'AC140.
Fiche GB
Fiche VDE
Adaptateur CA/CC (avec prise de
type C)
Micro externe
Rallonge capteur

10
Vous avez la possibilité d'ajouter 2 piles alcalines AA 1,5V
(non fournies) si vous souhaitez que votre appareil puisse
fonctionner en cas de panne de courant ou sans adaptateur.
1.Retirez la vis.
2.Enlevez le couvercle du compartiment des piles.
3.Insérez les 2 piles alcalines AA 1,5V en respectant la
polarité.
4.Remettez le couvercle du compartiment des piles.
5.Remettez la vis.

11
Enregistremement
L'AC140 fonctionne avec les récepteurs AMPLICALL et doit
être appairé avant d'être utilisé.
Pour enregistrer votre nouvel appareil, veuillez suivre les
étapes décrites ci-dessous:
1. Entrez en mode enregistrement pour récepteur AMPLICALL.
Appuyez sur le bouton Programmation(●) et maintenez-le
enfoncé pendant 3 secondes. La LED de l'icône de zone n°1
se met à clignoter.
2.Appuyez à nouveau sur le bouton Programmation (●) pour
vous déplacer vers l'icône de la zone avec laquelle vous
souhaitez vous jumeler.
Appuyez sur le bouton de sélection de la mélodie ()
pour faire défiler les mélodies. Dès que vous entendez une
mélodie qui vous plaît, appuyez sur aucun bouton tant que
la mélodie est en cours de diffusion.
3.Une fois que l'icône de zone et la mélodie sont sélectionnées,
appuyez une fois sur le bouton de l'appareil AC140 pour
effectuer l'enregistrement. Si le résultat est positif, le
récepteur AMPLICALL produira deux courtes tonalités.
Appuyez sur le bouton Programmation (●) pour quitter le
mode enregistrement ; le système est maintenant prêt à être
utilisé.

12
Réglages
Fonctionnement
Utilisation du microphone interne:
Utilisation du microphone externe:
Réglez la distance (entre le microphone et la source sonore)
et la sensibilité en fonction du type et de l'intensité de la
source sonore.
Interrupteur Marche/Arrêt: Faites glisse
r
le commutateur sur la position « Arrêt »
lorsque vous n'utilisez pas l'appareil.
Délai: Vous pouvez sélectionner un délai
de 5,10 ou 15 secondes en utilisant cette
interrupteur. Si par exemple la durée
sélectionnée est de 5 secondes, cela
signifie que le récepteur AMPLICALL
émettra un son 5 secondes après le
captage des pleures du bébé.
Sensibilité: Ce bouton permet de
sélectionner la sensibilité du micro (Fort,
Moyen ou Faible).
Micro externe: Vous pouvez brancher le
capteur externe à ce jack. Le micro interne
est coupé lorsque le micro externe est
installé.

13
CONFLIT DE CODES
Si le code de l’AC140 est le même que celui d'un autre
émetteur, vous devez changer le code. Veuillez suivre la
procédure ci-dessous. Vous devrez enregistrer de nouveau
votre appareil à son récepteur AMPLICALL.
Mettez
l'interrupteur en
position
ARRÊT.
Appuyez sur le
bouton de sonnette
et maintenez-le
enfoncé.
Mettez l'interrupteur en
position marche. Ne
relâchez pas le bouton
de la sonnette, avant
que le voyant LED ait
clignoté 6 fois.
Montage
Le capteur peut être posé sur la table ou fixé au mur.
Dessinez deux trous sur le mur à l'aide d'un crayon.
Fixez l'appareil au mur ou au plafond.

14
GARANTIE
Votre produit Geemarc AMPLICALLTM140 est garanti 2 ans,
suivant la date d’achat. Au cours de cette période, toutes les
réparations ou tous les remplacements (à notre seule discrétion)
seront effectués sans frais. En cas de problème, contactez
notre service d'assistance ou rendez-vous sur notre site Web:
www.geemarc.com. La garantie ne couvre pas les accidents,
la négligence ou les ruptures de pièces. Le produit ne doit
pas être altéré ou démonté par quiconque n'étant pas un
représentant agréé de Geemarc. La garantie de Geemarc ne
limite en aucun cas vos droits légaux.
IMPORTANT : VOTRE FACTURE FAIT PARTIE DE VOTRE
GARANTIE ET DOIT ETRE CONSERVÉE ET PRODUITE
LORS D'UNE RÉCLAMATION SOUS GARANTIE.
Veuillez noter : la garantie est applicable en France
uniquement.
DÉCLARATION :
Directives CE
Geemarc Telecom SA déclare par la présente que son
AMPLICALLTM140 est conforme aux exigences essentielles
ainsi qu’à d’autres directives pertinentes de la norme 2014 /
53 / UE.
La déclaration de conformité peut être consultée sur le site
suivant www.geemarc.com
Puissance de la fréquence radio < 250mW
Directives de recyclage
La DEEE (Déchets d'équipements électriques et électroniques)
a été créée pour les produits en fin de vie afin de faciliter leur
recyclage. Lorsque ce produit est en fin de vie, veuillez ne pas
le jeter dans votre poubelle à ordures ménagères.
Veuillez utiliser l'une des options d'élimination suivantes :

15
- Retirez les piles et déposez-les dans une benne DEEE
appropriée. Déposez le produit dans une benne DEEE
appropriée.
- Ou alors, remettez l'ancien produit au détaillant. Si vous en
achetez un nouveau, ils devraient l'accepter. Ainsi, si vous
respectez ces instructions, vous assurez la protection de la
santé humaine et de l'environnement.
Consulter notre site Internet pour obtenir la notice détaillée ou des
informations et de l'aide sur nos produits: www.geemarc.com
Email: [email protected]
Téléphone: 03 28 58 75 99
2 Rue Galilée, Parc de l’Etoile, 59791 GRANDE-SYNTHE Cedex,
FRANCE
Produit fabriqué en Chine pour Geemarc Telecom

16
Bitte besuchen Sie unsere Website: www.geemarc.com für bis zu
Datum Benutzerführung, da es wichtige Updates geben kann und
Änderungen, auf die Sie achten müssen!
Paketinhalt
Das Paket enthält die folgenden Gegenstände:
z1x Basisstation
z1x AC/DC Stromadapter
z1x GB Steckeradapter und 1x VDE Steckeradapter
z1x Mikro-Sensor (50cm)
z1x doppelseitiger Klebeaufkleber für die Mikrosensormontage
z1x 1,5m externes Kabel 3,5mm für Mikro-Sensor
z1x Bedienungsanleitung
z2x Schrauben und 2x Dübel
z1x Bohrlochschablone
z2x Teile mit Klingelsymbolen und 2x Teile mit Babysymbolen
BESCHREIBUNG
Mikro
Batterieab-
deckung
Klingel
Strom an/aus Zeitverzögerung
Selektor
Empfind-
lichkeit
Ext mikro
DC 5V in Batteriefach

17
Verbindung mit Ihrem Gerät
Ihr AC140 wird mit einem Stromadapter
geliefert, den Sie an den AC/DC
Anschluss unten rechts anschließen
müssen.
Bei Nutzung des AC/DC Stromadapter
müssen Sie auch die Batterien
installieren, ansonsten erhalten
Sie auf dem AC140 den Hinweis,
dass der Akku niedrig ist.
UK Stecker
VDE Stecker
AC/DC Adapter (mit Stecker Typ
C)
Mikro sensor
Verlängerungskabel

18
Sie haben die Möglichkeit, 2 alkalische Batterien AA 1,5V
(nicht mitgeliefert) zu nutzen, wenn Sie sicher sein wollen,
dass Ihr Gerät auch bei Stromausfall oder ohne Stromadapter
funktioniert.
1.Entfernen Sie die Schraube.
2.Nehmen Sie die Batterieabdeckung ab.
3.Setzen Sie 2 alkalische Batterien AA 1,5V gemäß der
entsprechenden Polarität ein.
4.Setzen Sie die Batterieabdeckung wieder auf.
5.Setzen Sie die Schraube wieder ein.

19
Paarung
AC140 funktioniert mit dem AMPLICALL-Empfängern und muss
vor der Nutzung gepaart werden..
Um eine Paarung mit einem neuen Gerät vorzunehmen,
befolgen Sie bitte die folgenden Schritte:
1.Setzen Sie den AMPLICALL-Empfängern in den Paarungsmodus.
Halten Sie die LEARNING Taste (●) 3 Sekunden lang gedrückt.
Die LED-Anzeige in der Symbolzone #1 blinkt auf.
2.Drücken Sie erneut auf die LEARNING Taste(●) und gehen Sie
auf die Symbolzone, mit der Sie eine Paarung herstellen wollen.
Drücken Sie auf die Melody Selector ()Taste, um durch die
verschiedenen Melodien zu scrollen. Sobald Sie eine Melodie
hören, die Ihnen gefällt, drücken Sie während des Abspielens
der Melodie keine Taste.
3.Sobald die Symbolzone und die Melodie ausgewählt wurden,
drücken Sie einmal auf die AC140 Taste am Gerät, um dieses
zu paaren. Sobald dies erfolgreich abgeschlossen ist, erzeugt
der AMPLICALL-Empfängern zwei kurze Töne.
Drücken Sie auf die LEARNING Taste (●), um den
Paarungsmodus zu verlassen: jetzt ist das System
bereit zur Verwendung.
Einstellungen
Strom: Schieben Sie den Schalter auf die aus
Position, wenn das Gerät nicht verwendet wird.
Verzögerung: Sie können mit diesem Schalter
eine Zeitverzögerung von 5,10 oder 15 Sekunden
wählen. Bei 5 Sekunden bedeutet das, dass ein
kontinuierlicher Ton von 5 Sekunden ausgelöst
wird.
Empfindlichkeit:Sie können mit diesem Schalte
r
eine hohe, mittlere oder niedrige
Mikrofonempfindlichkeit auswählen.
Ext.Mikro: Sie können das externe Mikro an
diesem Anschluss anschließen. Das interne Mikro
wird nicht genutzt, wenn das externe Mikro
installiert ist.
Table of contents
Languages:
Other Geemarc Baby Monitor manuals