Geister Iron Assistant User manual

INSTRUCTIONS FOR USE
IRON ASSISTANT™
PNEUMATIC ENDOSCOPE HOLDER

Dateiname mit Revisionsstand:
erstellt/geändert am:
erstellt von:
geprüft von:
freigegeben von:
Seite
29-5000 Pneumatik holder_EN C
04.06.12/03.12.2018
ssta
cgro
cgro
2 von 28
Geister Medizintechnik GmbH
Föhrenstraße 2
78532 Tuttlingen / Germany
Tel.: +49-7461-96624-0
FAX: +49-7461-96624-22
E-Mail: info@geister.com
Read Instruction
Non sterile
Medical device Class I
Article No. 29-5000

Dateiname mit Revisionsstand:
erstellt/geändert am:
erstellt von:
geprüft von:
freigegeben von:
Seite
29-5000 Pneumatik holder_EN C
04.06.12/03.12.2018
ssta
cgro
cgro
3 von 28
CONTENTS
I - INSPECTION OF THE DEVICE........................................................................S.3
II - GENERAL INFORMATION..............................................................................S.5
III –ASSEMBLY AND OPERATION......................................................................S.7
IV - CLEANING - DISINFECTION –STERILIZATION.........................................S.11
V –PREPARING BEFORE USE FOR A SURGERY ..........................................S.13
VI - TECHNICAL SPECIFICATIONS - CARE/MAINTENANCE...........................S.18
APPENDIX
A - Optional accessories description ...................................................................S.20
B - Part Descriptions and Codes –Accessories..................................................S.21
C - Assembling instrument holder with the pneumatic……………………..….S.22
D - Adapting the firmness of the proximal ball joint ..........................................S.25
E –Spare parts and ccessories………………………………………………….S.26

Dateiname mit Revisionsstand:
erstellt/geändert am:
erstellt von:
geprüft von:
freigegeben von:
Seite
29-5000 Pneumatik holder_EN C
04.06.12/03.12.2018
ssta
cgro
cgro
4 von 28
Note: All numbers in brackets refer to the appended appendix A
Pictogram in use
(On the device and labelling)
Attention, see instructions for
use
NON-sterile
Reference number
Reusable
Lot number, serial number
Operating pressure
Latex free
I - INSPECTION OF THE DEVICE AND ACCESSORIES
I-1 Inspection on receipt
As you receive the parcel containing your Pneumatic Endoscope Holder by the
forwarding agent, check that packing is in good condition. In case of
damages, note the damage on the forwarding agent’s receipt before you sign.
Open the parcel containing the device and check it immediately after receipt. Check if
it is complete and in good working order.
Any damage, faulty working order, or missing parts have to be notifying to the dealer
or the forwarding company immediately (within 48 hours).
Keep the original packaging, in order to send the device back for any service.
Please use the form on our website for:
http://www.geister.com/Seiten/DE/Service/Wartung.php

Dateiname mit Revisionsstand:
erstellt/geändert am:
erstellt von:
geprüft von:
freigegeben von:
Seite
29-5000 Pneumatik holder_EN C
04.06.12/03.12.2018
ssta
cgro
cgro
5 von 28
The Pneumatic Endoscope Holder and its accessories are delivered non-sterile.
Before use, they have to be cleaned and sterilized according to the instructions in
section IV of this manual.
I-2 Accessories checklist:
Unless otherwise specified, your Pneumatic Endoscope Holder 29-5000 must be
delivered with the following accessories:
1 Pneumatic Endoscope Holder: (Central stand & Instrument holder). (20/ 21)
1 A one meter Silicone Hose with quick Stäubli connector. (30)
1 Tightening Ball with inlay for the Instrument. (18)
1 Instruction for use.

Dateiname mit Revisionsstand:
erstellt/geändert am:
erstellt von:
geprüft von:
freigegeben von:
Seite
29-5000 Pneumatik holder_EN C
04.06.12/03.12.2018
ssta
cgro
cgro
6 von 28
Please refer to the list of accessories at the end of this manual, (see Appendix E).
II - GENERAL INFORMATION –HOW IT WORKS
The Pneumatic Endoscope Holder is a holding and manipulating arm for surgery. It
allows the operating team to hold an endoscope in a given position and to change
this position immediately with only one hand.
The pressure fixation provides for an easy handling of the Pneumatic Endoscope
Holder and a maximal holding power of 5 kg in case of 7,5 bar. The holding power is
related to the gas pressure.
II-1 Description of parts
The Pneumatic Endoscope Holder consists of:
•The pneumatic central stand, (fixed to the OR table rail) which can either be
used below a sterile drape or can be sterilized by autoclaving.
•The instrument holder, which can be completely dismantled and sterilized,
may also undergo liquid or ultrasonic cleaning.
• Autoclavable pneumatic tube with quick connector.
II-2 Installation
The central holder has to be mounted with the rail clamp on the OR-table rail. (III-1).
The rail clamp is adaptable to all common sizes of rails found on OR-tables.
The construction allows a 180° turn. The central holder is movable trough the lever
(40)

Dateiname mit Revisionsstand:
erstellt/geändert am:
erstellt von:
geprüft von:
freigegeben von:
Seite
29-5000 Pneumatik holder_EN C
04.06.12/03.12.2018
ssta
cgro
cgro
7 von 28
The Pneumatic Endoscope Holder is operated by use of pneumatic pressure:
either from the central compressed air supply
or from a compressed air cylinder with a pressure regulator
(CO2;AIR;NITROGEN)
The required pressure is 5 to 8 bar (optimal performance 7-8 bar).
II-3 Operation
Pressing the control lever at the distal end with on finger releases all the 3 ball joints
simultaneously. Now it is possible to place the endoscope in the desired position -
only with one hand. The Pneumatic Endoscope Holder will become tightened as
soon as the control lever is released.
III –ASSEMBLY AND OPERATION
The assembling, the fixation on the table, the operation with pressure as well
as the functional handling should first be practiced outside of an active
surgery.
Recommendations about the positioning on the OR-table and maintaining the
sterility during the procedure can be found in part (V).
III-1 Mounting the Pneumatic Endoscope Holder on the OR-table:
Angular
adjustment and
tightening lever

Dateiname mit Revisionsstand:
erstellt/geändert am:
erstellt von:
geprüft von:
freigegeben von:
Seite
29-5000 Pneumatik holder_EN C
04.06.12/03.12.2018
ssta
cgro
cgro
8 von 28
Attach the arm on the OR-table rail; tighten the screw manually (39).
Adjust the swivelling rail clamp to the desired gradient and firmly tighten with the
locking handle (40).
IMPORTANT :
Check the tightness of the attachment before holding an instrument (grip on
the rail, fixation of the angular adjustment, and the overall stability and
rigidity of the rail itself).
Connect the supply hose (30) made from silicone with textile mesh to the “Stäubli”-
connector on the base below the central stand. The connector has a check valve
(31) and can be swivelled, however do not remove the connector from the
central stand !
HOW TO FIX the swivelling rail clamp on the OR-table
III-2 Assemly of the instrument holder to the pneumatic central stand
First: Assembling the instrument holder:
Select the proper inlay for the tightening ball and insert it with the threaded end. Fix
it with the black ring on the opposite side. Turn the ring four times clockwise to fix
the inlay in the thread. Do not overtorque or tighten too much, so it will later allow
an easy insertion of the endoscope.
NOTE:
The tightening ball can be inserted or removed anytime once the lever is
pressed and the ball spanner (19) is disconnected.
UNCLAMPING
CLAM
PING

Dateiname mit Revisionsstand:
erstellt/geändert am:
erstellt von:
geprüft von:
freigegeben von:
Seite
29-5000 Pneumatik holder_EN C
04.06.12/03.12.2018
ssta
cgro
cgro
9 von 28
Insert the inner tube (24) into the Instrument Holder; insert the lever into the slot on
the closed side. Before doing that, make sure that the spiral spring (23) is placed on
its right position inside the Instrument holder.
Insert the scope holder (red plastic ball with inlay) into the mount of the inner tube
(24). Place the ball spanner with the pins into the slot. Push it to the end, and turn the
spanner 90° until the pins are adapted to the slots.
III-3 Connecting the Instrument Holder with the pneumatic central stand
IMPORTANT: The system must be without pneumatic pressure
The Instrument Holder is prepared according to part III-2.
The pneumatic central stands housing ends in a lock nut distally (16). This nut is
marked with a dot-point, the housing is marked with an arrow. Turn the nut counter-
clockwise until both are in one line. Also the Instrument holder is marked with a dot-
point. If this dot-point is in one line with the dot-point of the nut and the arrow, the
Instrument holder can be inserted into the housing. Fix the Instrument Holder by
turning the nut clockwise 45°.
A
B

Dateiname mit Revisionsstand:
erstellt/geändert am:
erstellt von:
geprüft von:
freigegeben von:
Seite
29-5000 Pneumatik holder_EN C
04.06.12/03.12.2018
ssta
cgro
cgro
10 von 28
NOTE: For dismantling follow the reverse order.
Please read also attachment “ C” carefully.
III-3 Connection to the central pressure supply
The Pneumatic Endoscope Holder can be connected through the extension tube line
(33); directly to the central pressure supply of the OR; different adapters (36) are
available. A pressure between 7 –8 bar is considered optimal.
III-4 Connection to pressure cylinders
Make sure that the seal of pressure reducer (3) is in good condition. Visually inspect
the hose for wear or damage. Do not use the device if any damage is visible. Then
connect the pressure reducer by tightening the screw (2) firmly by hand.
Connect the end of the hose (32) directly to the connector of the pressure reducer if
the bottle is placed under the OR-table, or use an extension hose with quick
connectors (34/33).
Always keep the pressure cylinder in an upright position with the tap facing up.
IMPORTANT:
Never use pressure cylinders in horizontal position, or with tap facing
down.
•Never lubricate the joints or pressure reducer rings
•Never try to unscrew the reducer (2) while the tap (1) is open, or while
the circuit is under pressure. Frist, turn off the tap, bring the pressure in
the circuit down (by pressing on the Pneumatic Endoscope Holder
control lever). Then unscrew the connection (2) by hand.
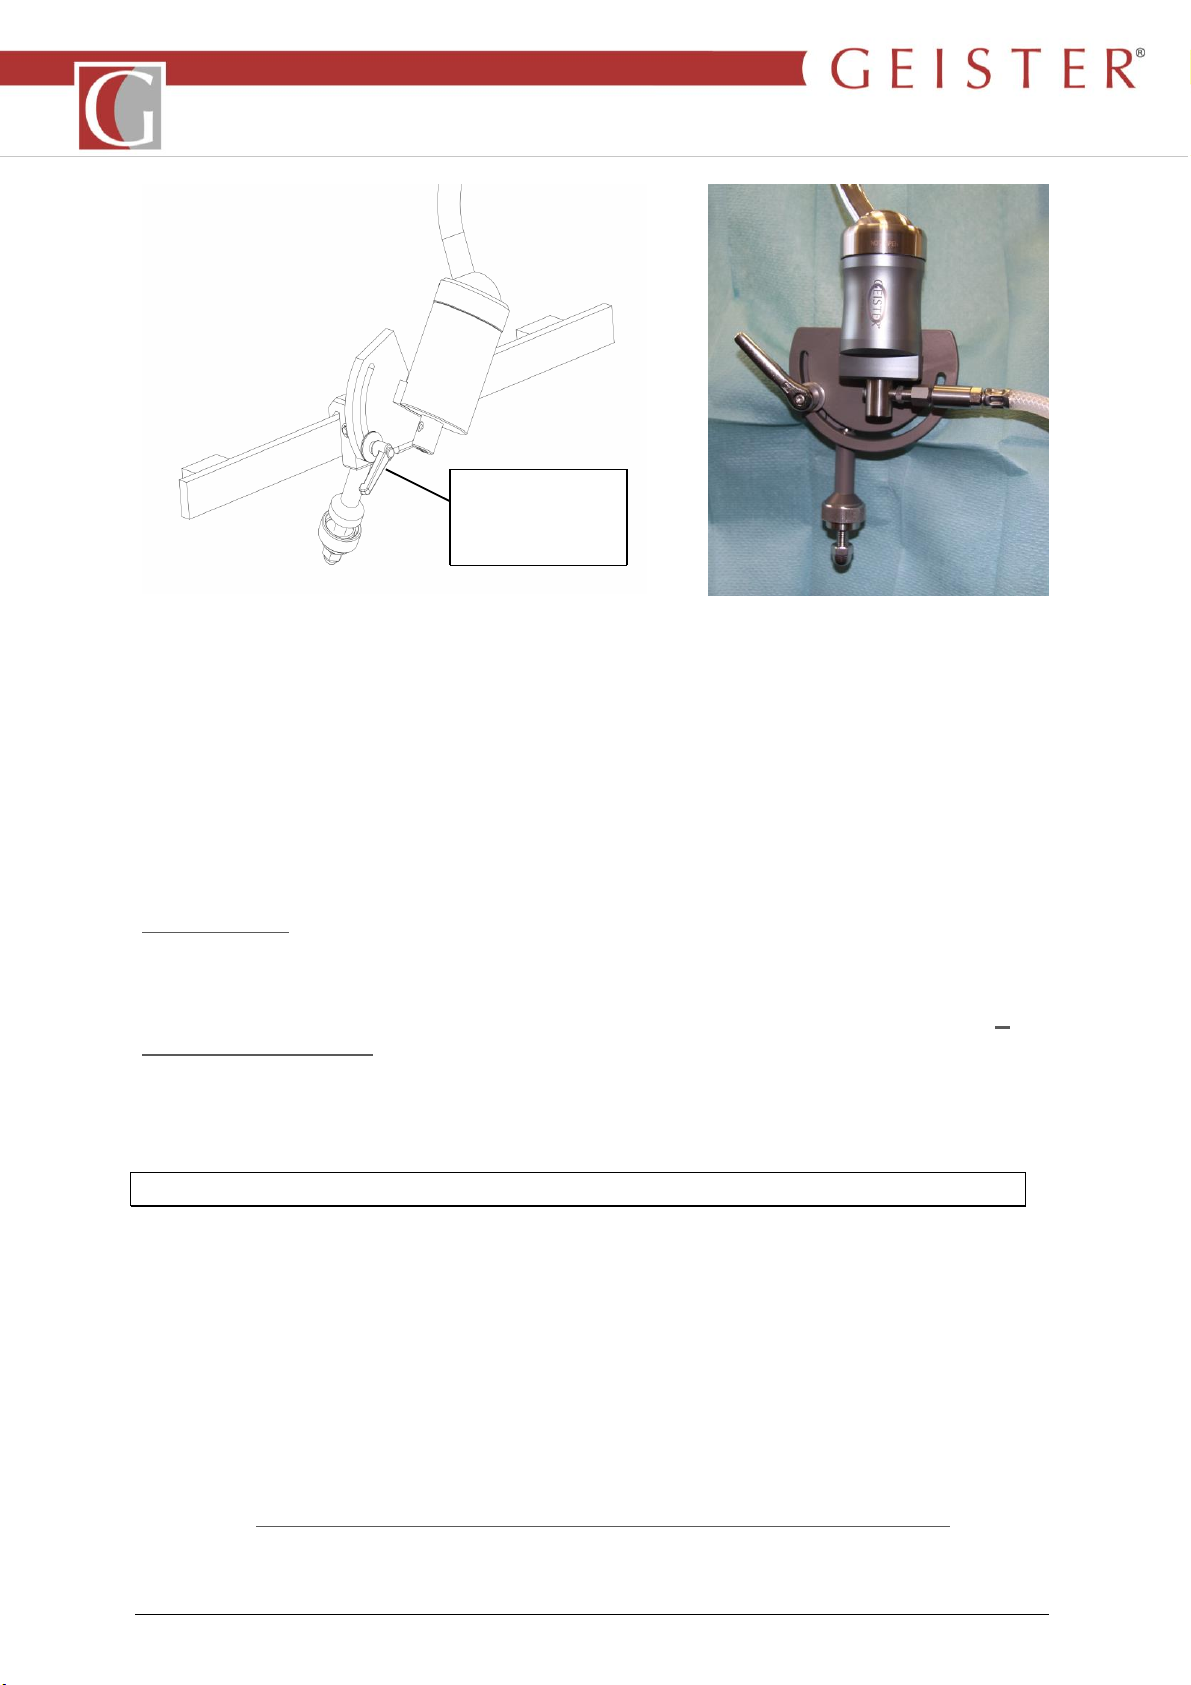
III-5 Putting the unit under pressure and testing
Caution:
Avoid putting the Pneumatic Endoscope Holder under pressure when it is not
attached properly on the stand.
Bottle supply: turn on the tap (1) and make sure that there is no leakage. For CO2
the manometer must display a pressure of 50 bar (700psi). If it is under 30 bar (
435psi), change or refill the bottle.

Dateiname mit Revisionsstand:
erstellt/geändert am:
erstellt von:
geprüft von:
freigegeben von:
Seite
29-5000 Pneumatik holder_EN C
04.06.12/03.12.2018
ssta
cgro
cgro
11 von 28
Compressed air supply: connect the supply hose to the operating room wall socket.
The Pneumatic Endoscope Holder remains rigid in the selected position. To move the
instrument, press the control lever (17) and release it once the desired position is
reached.
Insert an instrument or endoscope with a diameter corresponding to the inlay. Press
the control lever (17) continuously while introducing the instrument. The control lever
(17) should also be pressed while moving the instrument inside the ball, or while
taking it out.
Caution:
Repeated manipulation of the Pneumatic Endoscope Holder without an
instrument or Endoscope reduces the life expectancy of the ball joint.
III-6 End of test
Deflate the gas:
•turn off the tap, or disconnect the hose from the central compressed air supply
and disconnect the quick connector (32, 33).
•press the remote lever to deflate the gas circuit.
•remove the instrument holder from the stand, and remove the stand from the
OR- table (Chapter II)
Warning: Avoid removing the instrument holder from the stand while the unit is
still under pressure
IV - CLEANING - DESINFECTION –STERILIZATION
After use the device must be properly cleaned as soon as possible.
IV- 1 Cleaning/disinfecting:
•Dismantle the instrument holder as follows:
Separate the instrument holder from the central stand (turn the nut
counter- clockwise),
Turn the tightening ball (19) a quarter of a turn and remove it.
Remove the inner tube (24 and its spring (23) ) from the instrument
holder.
(chapter III)
Remove the inlay from the tightening ball.
IMPORTANT: Take care of the dismantled components –don’t lose them!

Dateiname mit Revisionsstand:
erstellt/geändert am:
erstellt von:
geprüft von:
freigegeben von:
Seite
29-5000 Pneumatik holder_EN C
04.06.12/03.12.2018
ssta
cgro
cgro
12 von 28
•Soak the contaminated instrument holder immediately after use in a cleaning
solution (neutral pH detergent), following the manufacturer’s instructions
concerning concentration and duration. Do not allow contaminated
instrument to dry after use.
•Use a soft brush to clean incrusted stains.
•Rinse thoroughly with distilled water.
•Dry with compressed air.
•After cleaning, reassemble in reverse order; be sure to include the spring.
•Before sterilizing, verify the condition and functioning of the different parts,
particularly the more sensitive parts such as the joints, extension tubing, etc.;
lubricate the moving parts such as the control lever (17) with a special
lubricant for surgical instruments; do not lubricate the ball joints (13 & 14)
•In case of decontamination with a liquid, first dismantle and soak, and then
thoroughly rinse in distilled sterile water.
Pneumatic Central Stand.
•Wipe off any liquid on the device with a gauze pad dipped in alcohol or water.
•Dry with a dry cloth.
•Do not use solvents.
ATTENTION !
Never expose the central stand to liquids that might penetrate the ball
joints, never put it in a washing machine or ultra sound cleaning
systems as DAMAGE MAY OCCUR. The ball joints (13/14) may not be
oiled, greased or lubricated with other substances.
IV - 2 Sterilisation
Do not sterilize the Pneumatic Endoscope Holder and accessories over 135°C.
Per AAMI TIR 12 1994 “Designing, testing, and Labelling Reusable Medical
Device for reprocessing in Health Care Facilities” the following parameter have
been chosen for achieving effective sterilization:
Steam sterilization by Autoclave for instrument holder and pneumatic central stand
max: 134°C –18 min –2 bar
Follow manufacturer’s recommendations for implementation of Asepsis
•If the pneumatic stand is not sterile, see section V-3 Sterile drapes.
•If the pneumatic stand is sterilized, see section V-4.
ATTENTION !

Dateiname mit Revisionsstand:
erstellt/geändert am:
erstellt von:
geprüft von:
freigegeben von:
Seite
29-5000 Pneumatik holder_EN C
04.06.12/03.12.2018
ssta
cgro
cgro
13 von 28
In case of sterilizing the pneumatic central stand with instrument holder, only
the part of the hose joined to the stand can be sterilized by autoclave (white
translucent woven silicone hose) (30). The rubber extension hose (connection
supply hose) is not autoclavable.
The pressure reducer cannot be sterilized or soaked.
DO NOT STERILIZE THE PRESSURE REDUCER OR THE BLACK RUBBER
EXTENSION HOSE

Dateiname mit Revisionsstand:
erstellt/geändert am:
erstellt von:
geprüft von:
freigegeben von:
Seite
29-5000 Pneumatik holder_EN C
04.06.12/03.12.2018
ssta
cgro
cgro
14 von 28
V –FITTING FOR SURGERY
The operating and handling of the Pneumatic Endoscope Holder and its
accessories should be performed only by trained healthcare professionals
familiar with its use, assembly / disassembly and care.
V –1 Interaction with the instrument being held
The Pneumatic Endoscope Holder is designed to hold endoscopes of various sizes
and instruments with a rigid cylindrical shaft that fits with the manual tightening ball
joint. Accordingly it has been classified as a class I medical device according to the
EEC/93/42 Directive on Medical Devices. Used for holding an endoscope, the
Pneumatic Endoscope Holder should be classified class II according to U.S. FDA.
Consequently, the choices of the type of instrument held by the Pneumatic
Endoscope Holder as well as its applications are the sole responsibility of the
surgeon. This is of primary importance when it is used with instruments that are likely
to entail particular risks.
The specifications described below could help in evaluating possible device
compatibilities.
The compression resistance of instruments held by the Pneumatic Instrument Holder:
Supplied with 8 bars, the linear force which can be applied to the articulated DISTAL
joint can reach 1000 N (10kg).
This strength could cause the elastic ball joint to break if the Pneumatic Endoscope
Holder is put under pressure without an instrument or endoscope installed.
With normal usage and if the appropriate ball joints are used, all force is evenly
distributed by the ball joints and there is no risk of damage to the instruments,
particularly standard endoscopes.
In case there is a doubt upon instrument resistance, use a lower pressure (5/6 bar).
Electrical risk
In certain conditions, especially when all the articulations of the arm are in a
locked/stopped position, there could be electrical conduction between the instrument
holder (distal part) and the operating table rail. In this case, the instrument holder ball
joints in Plastic continue to assure electric insulation of the instrument being held.
ATTENTON!
However, if using electrical or electromagnetic active instruments or
devices sensitive to electrostatic discharges, the user should make sure

Dateiname mit Revisionsstand:
erstellt/geändert am:
erstellt von:
geprüft von:
freigegeben von:
Seite
29-5000 Pneumatik holder_EN C
04.06.12/03.12.2018
ssta
cgro
cgro
15 von 28
there are no conductive part of the instrument to come into contact with a
metal part of the arm (e.g., handle, part of an endoscope, etc.).
Unintended emission of substances or energy:
The Pneumatic Endoscope Holder is operated by pressurized gas. If the system
is not deflated by pushing the lever no gas is emitted.
Only in case the ball joints are released by pressure deflation, gas will be
emitting. The volume in case of simple repositioning under normal
atmospheric pressure is between 2 to 3 litres per minute.
When using a sterile cover the emitted gas will float to the rail clamp.
Energy emission:
No emission at all from electromagnetic energy (no power supply, consumption or
emission.
V - 2 Postioning of the Pneumatic Endoscope Holder
The easiest way to manipulating and using it is achieved by placing the Pneumatic
Central Stand on the rail opposite or lateral to the surgeon.
IMPORTANT: Avoid reducing or entirely obstructing the working space of the
surgical team.
V –3 sterile positioning with pneumatic central stand are unsterile
Not sterile pneumatic central stand –sterile instrument holder

Dateiname mit Revisionsstand:
erstellt/geändert am:
erstellt von:
geprüft von:
freigegeben von:
Seite
29-5000 Pneumatik holder_EN C
04.06.12/03.12.2018
ssta
cgro
cgro
16 von 28
Pressure reducer on CO2bottle (quick connector)
(3)
Supply hose, autoclavable part (length –1m) (non-
sterile) (30)
Wall gas supply (6-8 bar) CO2or air
A Sterile field
B Sterile instrument holder
C Non-sterile stand, use of a single
use sterile tube or camera cover.
D Operating drapes
ATTENTION
surgeon are sterile –assistant are non-sterile !
After positioning of patient and anaesthesia, the assistant fixing the rail clamp on the
table in position described in V-2. The arm of the pneumatic central stand has to be
move in the farthermost position from the patient. This is limited by the working space
of the distal ball point (13).
The surgeon is placing the sterile covers in a common way. On the side, where the
Pneumatic Endoscope Holder is mounted, the cover has to be placed on the base
over the distal ballpoint.
The Assistant now moves the pneumatic central stand to a vertical position, the
proximal ball point should be directed towards the surgeon.
The surgeon puts the instrument holder into a suitable sterile tube cover. Now he
is able to connect the instrument holder with the pneumatic central stand. The nut
will be turned by the assistant to fix the connection (III-3) and appendix C.
The surgeon put the sterile tube cover over the Pneumatic Endoscope Holder to
cover the pneumatic central stand completely. The distal end of the sterile tube
cover has to be properly connected with sterile covering of the table. The proximal

Dateiname mit Revisionsstand:
erstellt/geändert am:
erstellt von:
geprüft von:
freigegeben von:
Seite
29-5000 Pneumatik holder_EN C
04.06.12/03.12.2018
ssta
cgro
cgro
17 von 28
end has to be fixed on the instrument holder. The assistant starts the pressure
supply.
The Pneumatic Endoscope Holder is now ready for use.
The surgeon selects the lever (17) position, down or on top, before he places the
endoscope in the tightening ball. The positioning is to realize by a half turn.
IMPORTANT!
For laparoscopic procedures:
Before fixing the endoscope with the Pneumatic Endoscope Holder all
trocars should be on place, otherwise this activity can destroys the
endoscope.
V - 4 Pneumatik Endoskope Holderused as a sterile device: the whole arm is
autoclaved
Sterile pneumatic central stand and sterile instrument holder
Pressure reducer for medical CO2bottle (3)
Autoclavable gas supply hose ( 1 m) (30)
A Sterile field

Dateiname mit Revisionsstand:
erstellt/geändert am:
erstellt von:
geprüft von:
freigegeben von:
Seite
29-5000 Pneumatik holder_EN C
04.06.12/03.12.2018
ssta
cgro
cgro
18 von 28
30.1: Connection to pressured CO2bottle
30.2: Connection to a non-sterile extension hose
Extension hose for connection to CO2bottle (34)
Extension hose for connection to wall gas (35)
.CO2or air connectors (6-8 bar)
The pressure suppy of gas can be alternative
from wall connector or an medical pressure
cylinder with pressure regulator
B Sterile Instrument Holder
(autoclaved)
D Sterile operating drapes
E Sterile stand (whole Endoboy
autoclaved) set up over operating
drapes
ATTENTION
surgeon are sterile –assistant are non-sterile !
After positioning of patient and anaesthesia; the surgeon drapes the table with sterile
covers in a common way.
The surgeon is mounting the sterile Pneumatic Endoscope Holder on the rail,
passing through the sterile cover. Now he can give out the sterile gas supply hose
(30) to the non-sterile assistant.
Surgeon is fixing the instrument holder (16) on the proximal ball point.
(15) (III-3) and appendix C.
The assistant starts the pressure supply. The Pneumatic Endoscope Holder is
now ready for use.
The surgeon select the lever (17) position, “down or on top”, before he places the
endoscope in the tightening ball. The positioning is to realize by a half turn.
The Pneumatic Endoscope Holder is now ready for use.

Dateiname mit Revisionsstand:
erstellt/geändert am:
erstellt von:
geprüft von:
freigegeben von:
Seite
29-5000 Pneumatik holder_EN C
04.06.12/03.12.2018
ssta
cgro
cgro
19 von 28
The surgeon select the lever (17) position, “down or on top”, before he place the
endoscope in the tightening ball. The positioning is to realize by a half turn.
IMPORTANT!
For laparoscopic procedures:
Before fixing the endoscope with the Pneumatic Endoscope Holder all
trocars should be on place, otherwise this activity can destroys the
endoscope.
V - 5 On the end of the procedure
•Stop the pressure supply. Close the swivel valve on the pressure cylinder or
disconnect the wall connector. Press the lever (17).
•Open the tightening ball fixation and remove the endoscope.
•Disconnect the instrument holder from the pneumatic central stand.
•Disassemble the instrument holder and the tightening ball, clean it and prepare
it for sterilization. The pneumatic central stand then to be processes according
to chapter IV.
•Suitable preparation according to chapter IV.

Dateiname mit Revisionsstand:
erstellt/geändert am:
erstellt von:
geprüft von:
freigegeben von:
Seite
29-5000 Pneumatik holder_EN C
04.06.12/03.12.2018
ssta
cgro
cgro
20 von 28
VI - TECHNICAL SPECIFICATIONS - CARE/MAINTENANCE
VI-1 Specifications
Class I medical device classified according to the EEC/93/42 Directive on Medical
Devices
In compliances with FDA 510K, class II product.
CO2or compressed air pressure supply from 5 to 8 bar.
The resistance and torque depends on the pressure of the gas.
Main materials used:
•Mechanical parts: stainless steel 316L, aluminium 2017A + hard anodization
(rail clamp)
•Screws, pins, springs: stainless steel 302
•Seals, hoses: Viton, PTFE, and silicone
•Elastic ball joints: POM (Delrin) medical grade
No part or accessory is composed by latex
VI-2 Care - Maintenance
The essential care and maintenance of the Pneumatic Endoscope Holder consists of
following cleaning instructions (see section IV) and regular inspection of all sensitive
parts such as seals, mobile parts, and pneumatic hoses.
IMPORTANT:
An annual general inspection by the manufacturer is necessary to keep the
device in good working order. This maintenance procedure includes a complete
inspection of the device, replacement of worn parts, and the final factory inspection is
repeated.
Only by this, proper function is guaranteed for every 12 month past of general
inspection.
In the absence of this annual inspection, the manufacturer ceases to guarantee
that the Pneumatic Endoscope Holder’s operation conforms to specifications.
A service manual including technical information on the product is available on request.
All the maintenance and repair operations have to be performed by people trained and
qualified for repairing the Pneumatic Endoscope Holder, as well as using only
original spare parts.
The manufacturer declines responsibility in case of accident or if the device is used
without correct maintenance or if it has been modified.
Note:
Table of contents
Other Geister Medical Equipment manuals
Popular Medical Equipment manuals by other brands

brewer
brewer Flex 5700 Installation & operation manual

FujiFilm
FujiFilm SonoSite M-Turbo user guide

Bio Compression Systems
Bio Compression Systems SC-2004-OC operating instructions

Metro DataVac
Metro DataVac LIONVILLE Series quick start guide

Braun
Braun Aesculap ELAN 4 manual

Fluke
Fluke BP Pump 2 Operators Operator's manual

Otto Bock
Otto Bock 50P12 Instructions for use

Watermark Medical
Watermark Medical ARES 610 Product guide

DENTSPLY
DENTSPLY Cavitron Prophy-Jet Directions for use

Maquet
Maquet Servo-i V3.0 user manual

HILLENBRAND INDUSTRY
HILLENBRAND INDUSTRY Hill-Rom AvantGuard LI158Bx/1200 manual

HealthSmart
HealthSmart 522-9821-1900 instructions