Starck Sefam S.Box User manual


2 SEFAM S.Box
Download the FREE application
on your Smartphone or on your tablet
and
With SEFAM ACCESS, you can:
Easily adjust your S.Box,
Easily monitor the evolution of the effectiveness of your treatment and other
parameters of your health and well-being,
Share this data with your healthcare professionals,
Get access to information about your S. Box.
With SEFAM ACCESS, engage in your treatment !
www.SEFAM-medical.com

SEFAM S.Box Contents 3
CONTENTS
Before you start...................................................................................................................................... 4
Safety guidelines ...........................................................................................................................................4
When traveling ...............................................................................................................................................5
Recommended use .......................................................................................................................................5
Contra-indications .........................................................................................................................................6
Side effects.....................................................................................................................................................6
Components of the system .........................................................................................................................6
Description ............................................................................................................................................. 7
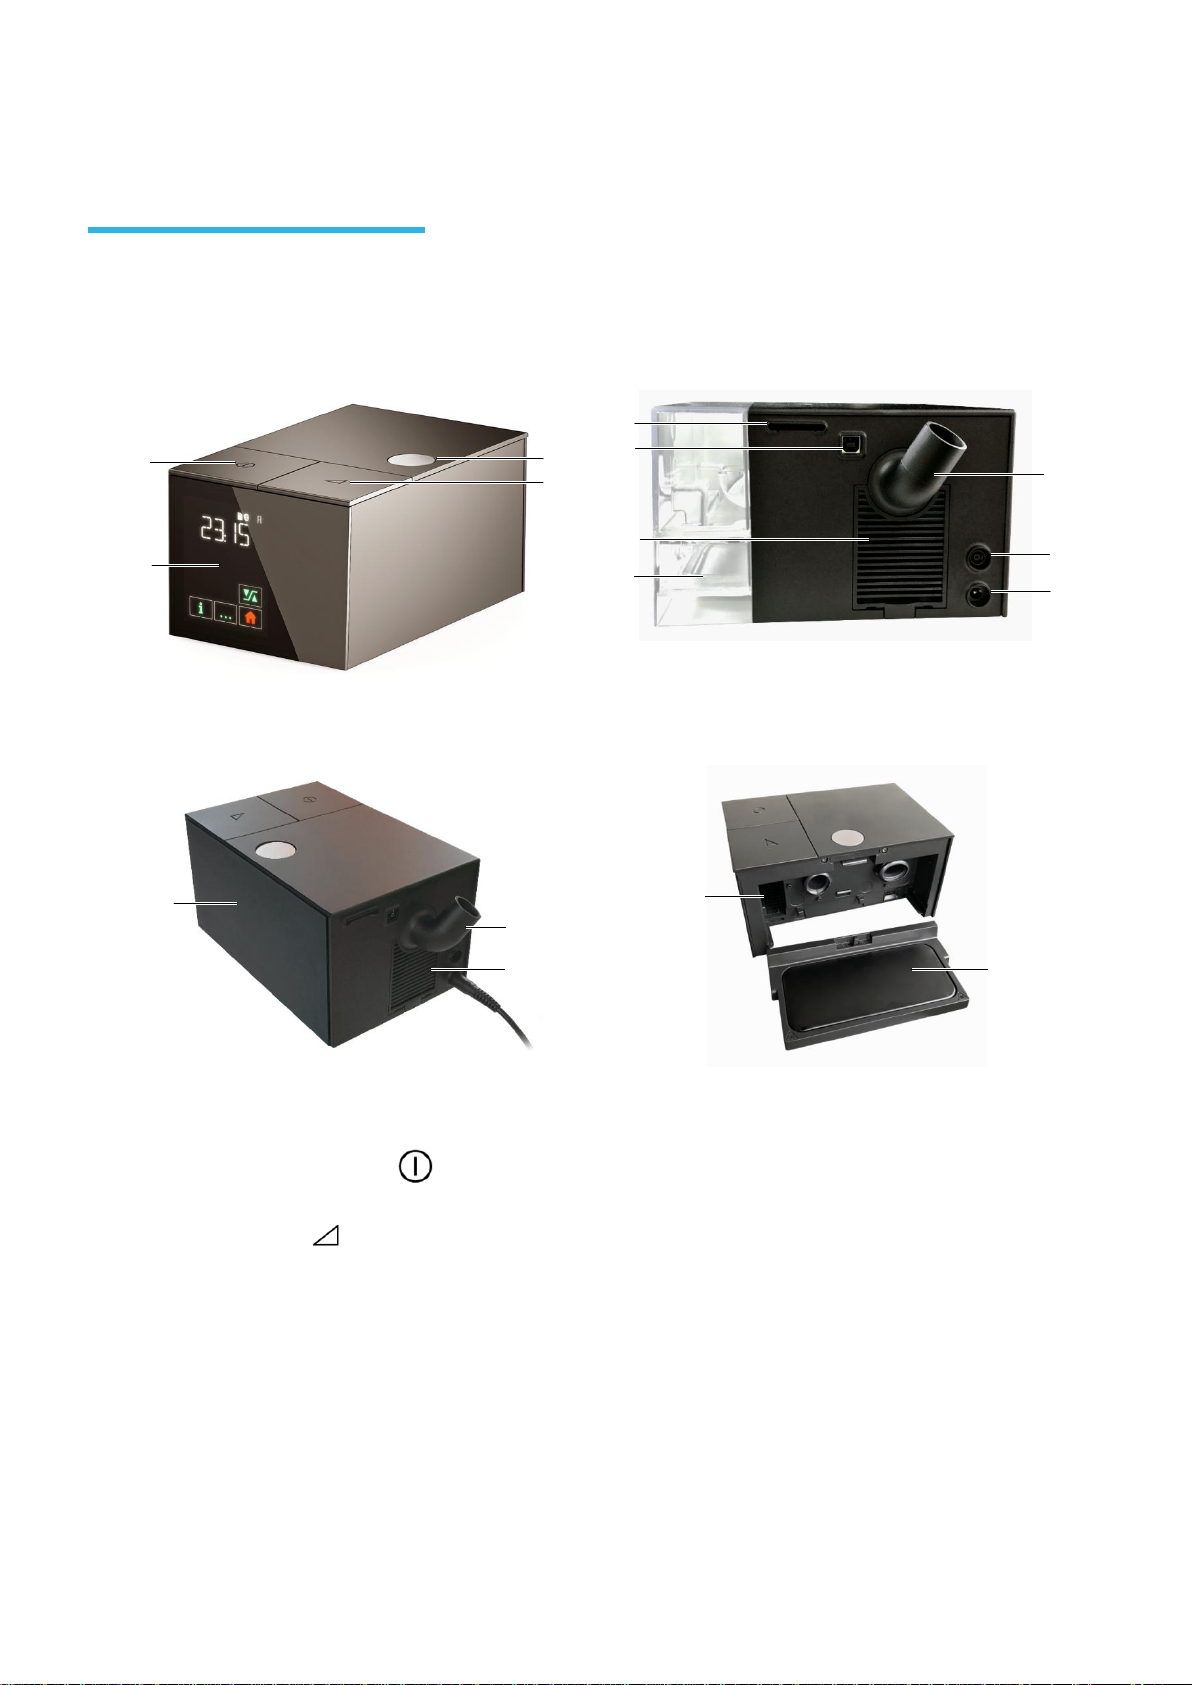
Views of the device .......................................................................................................................................7
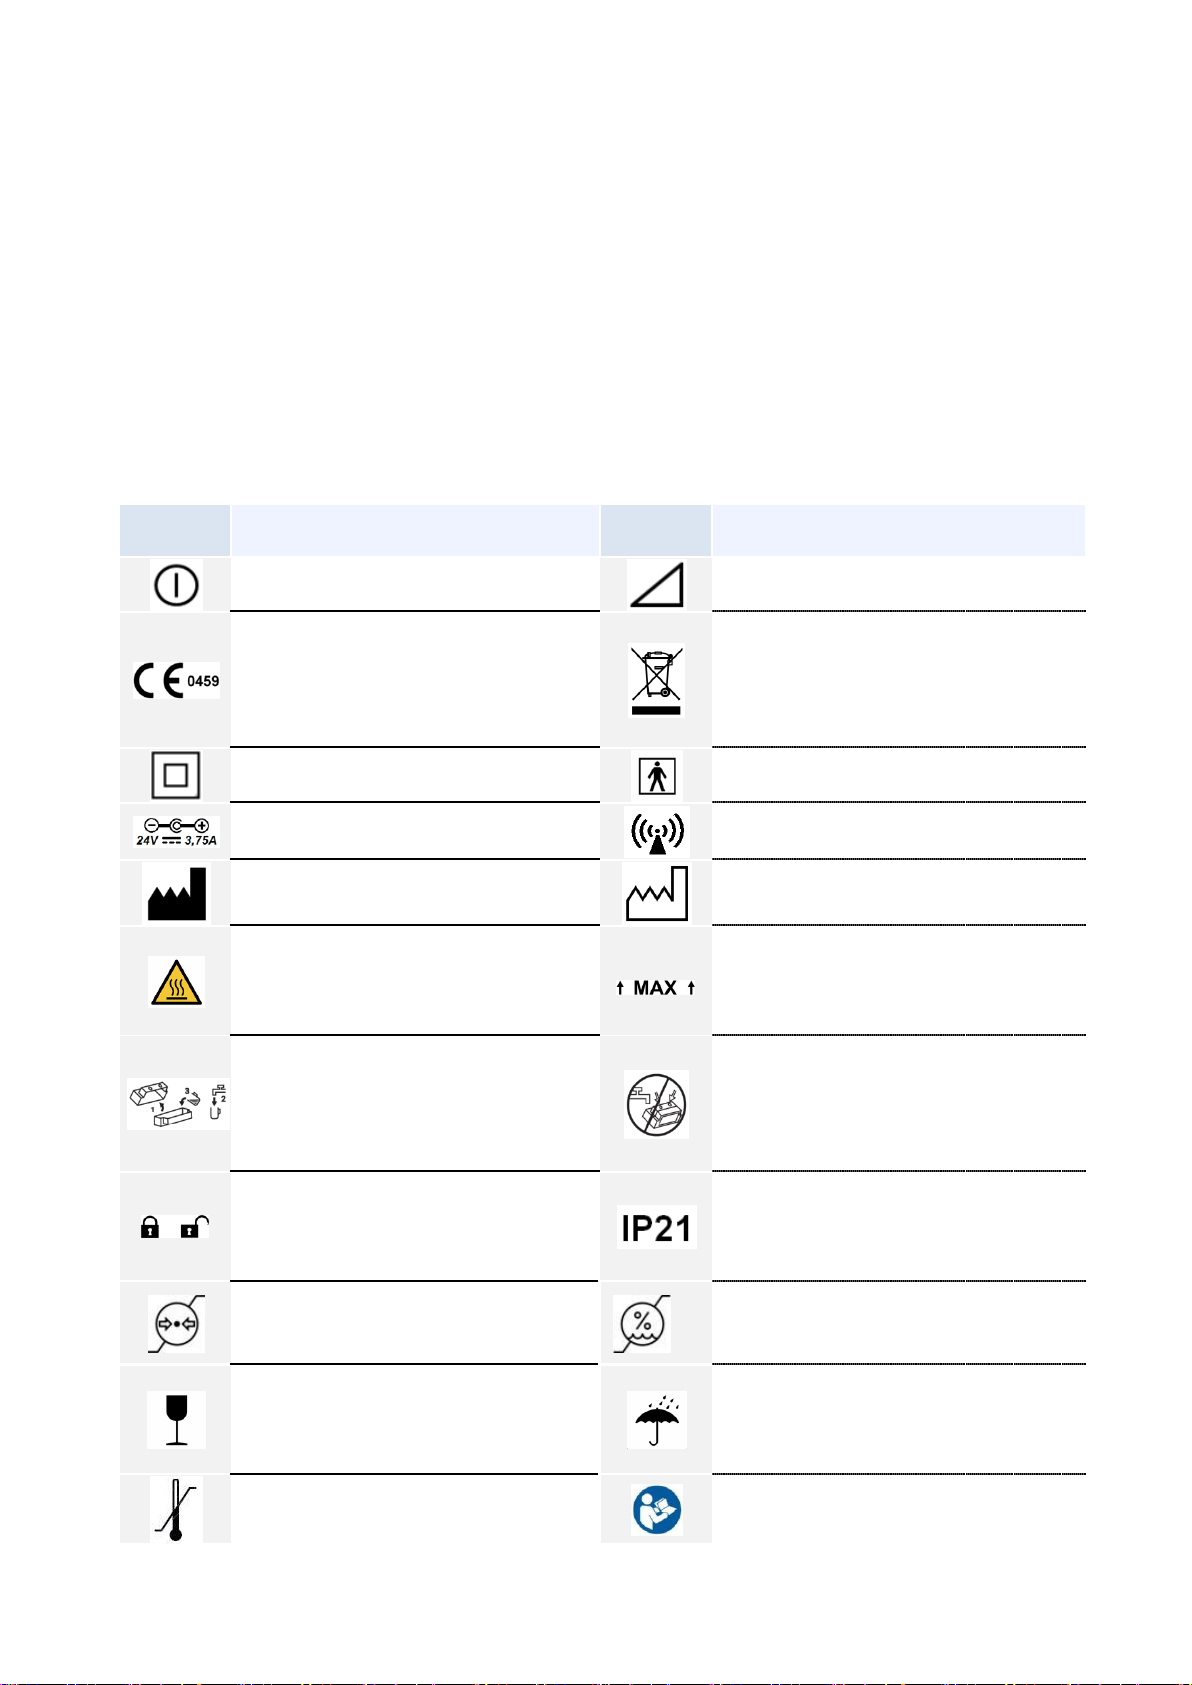
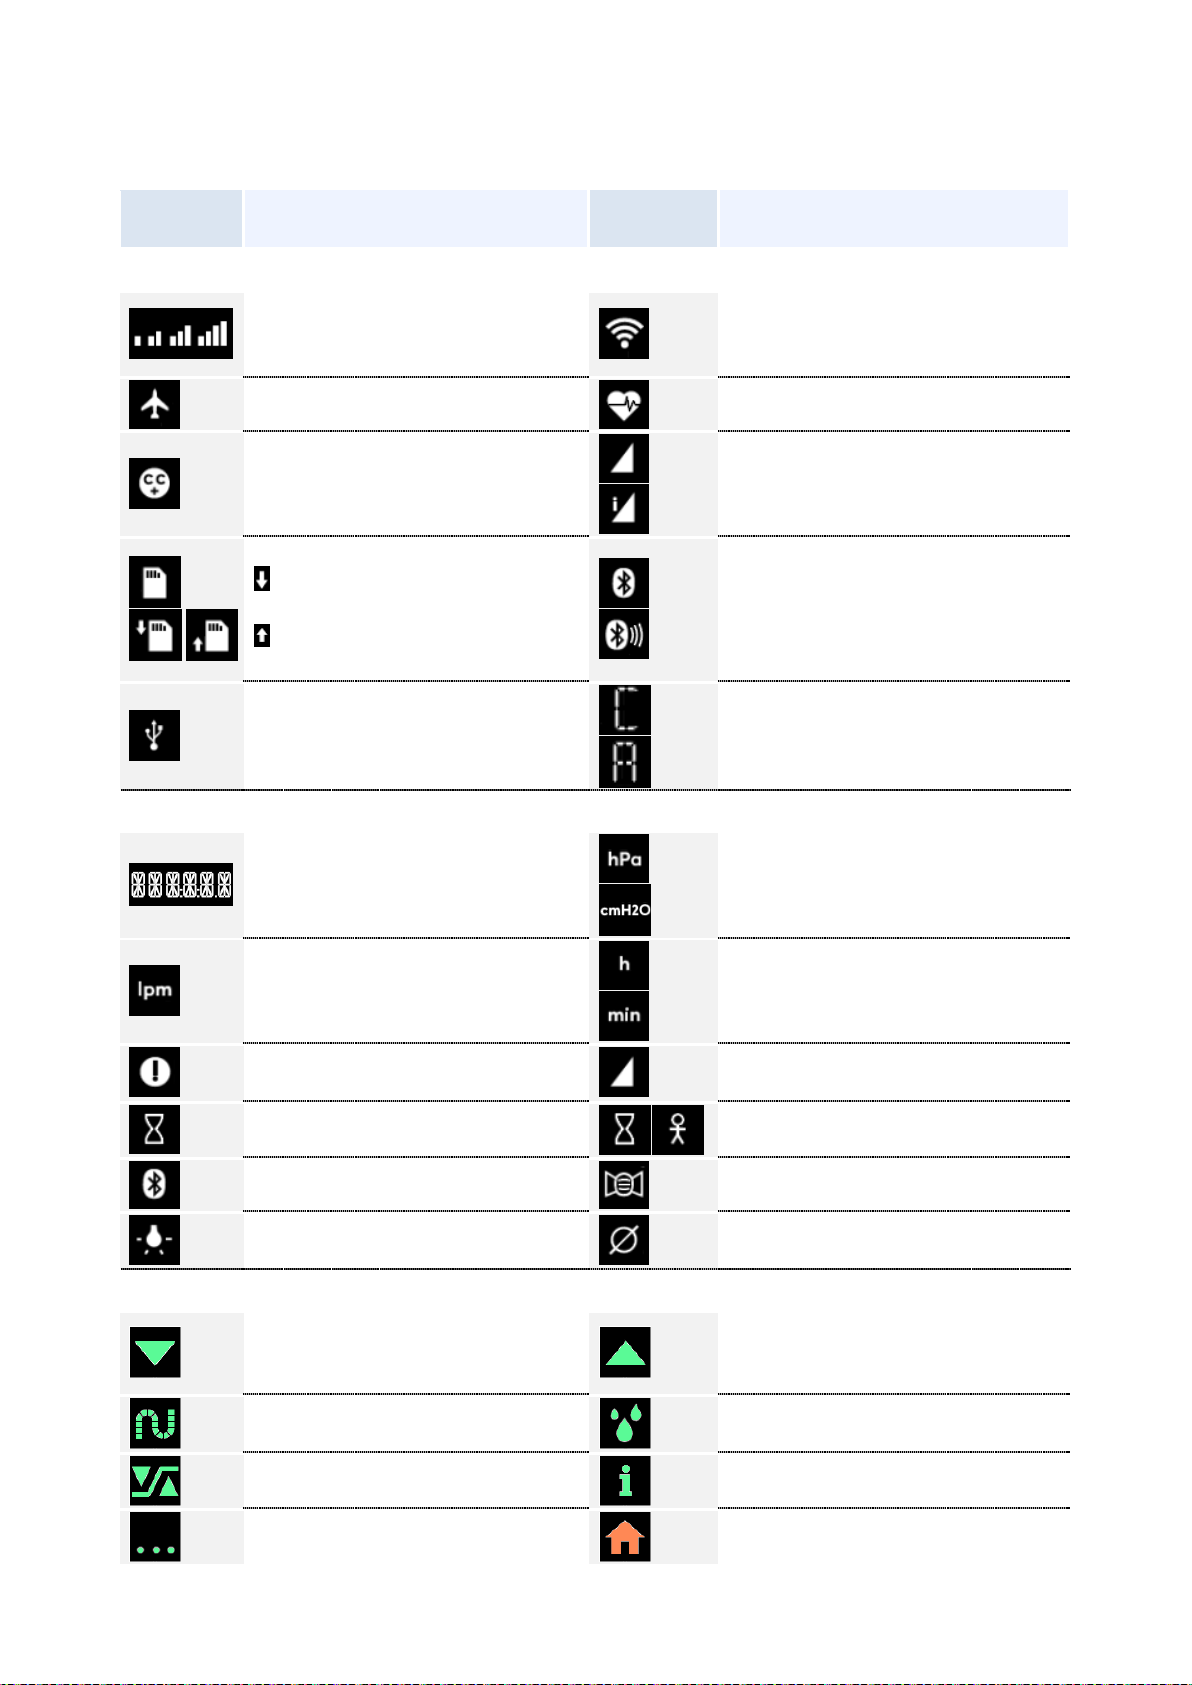
Definition of symbols....................................................................................................................................8
Installation.............................................................................................................................................. 9
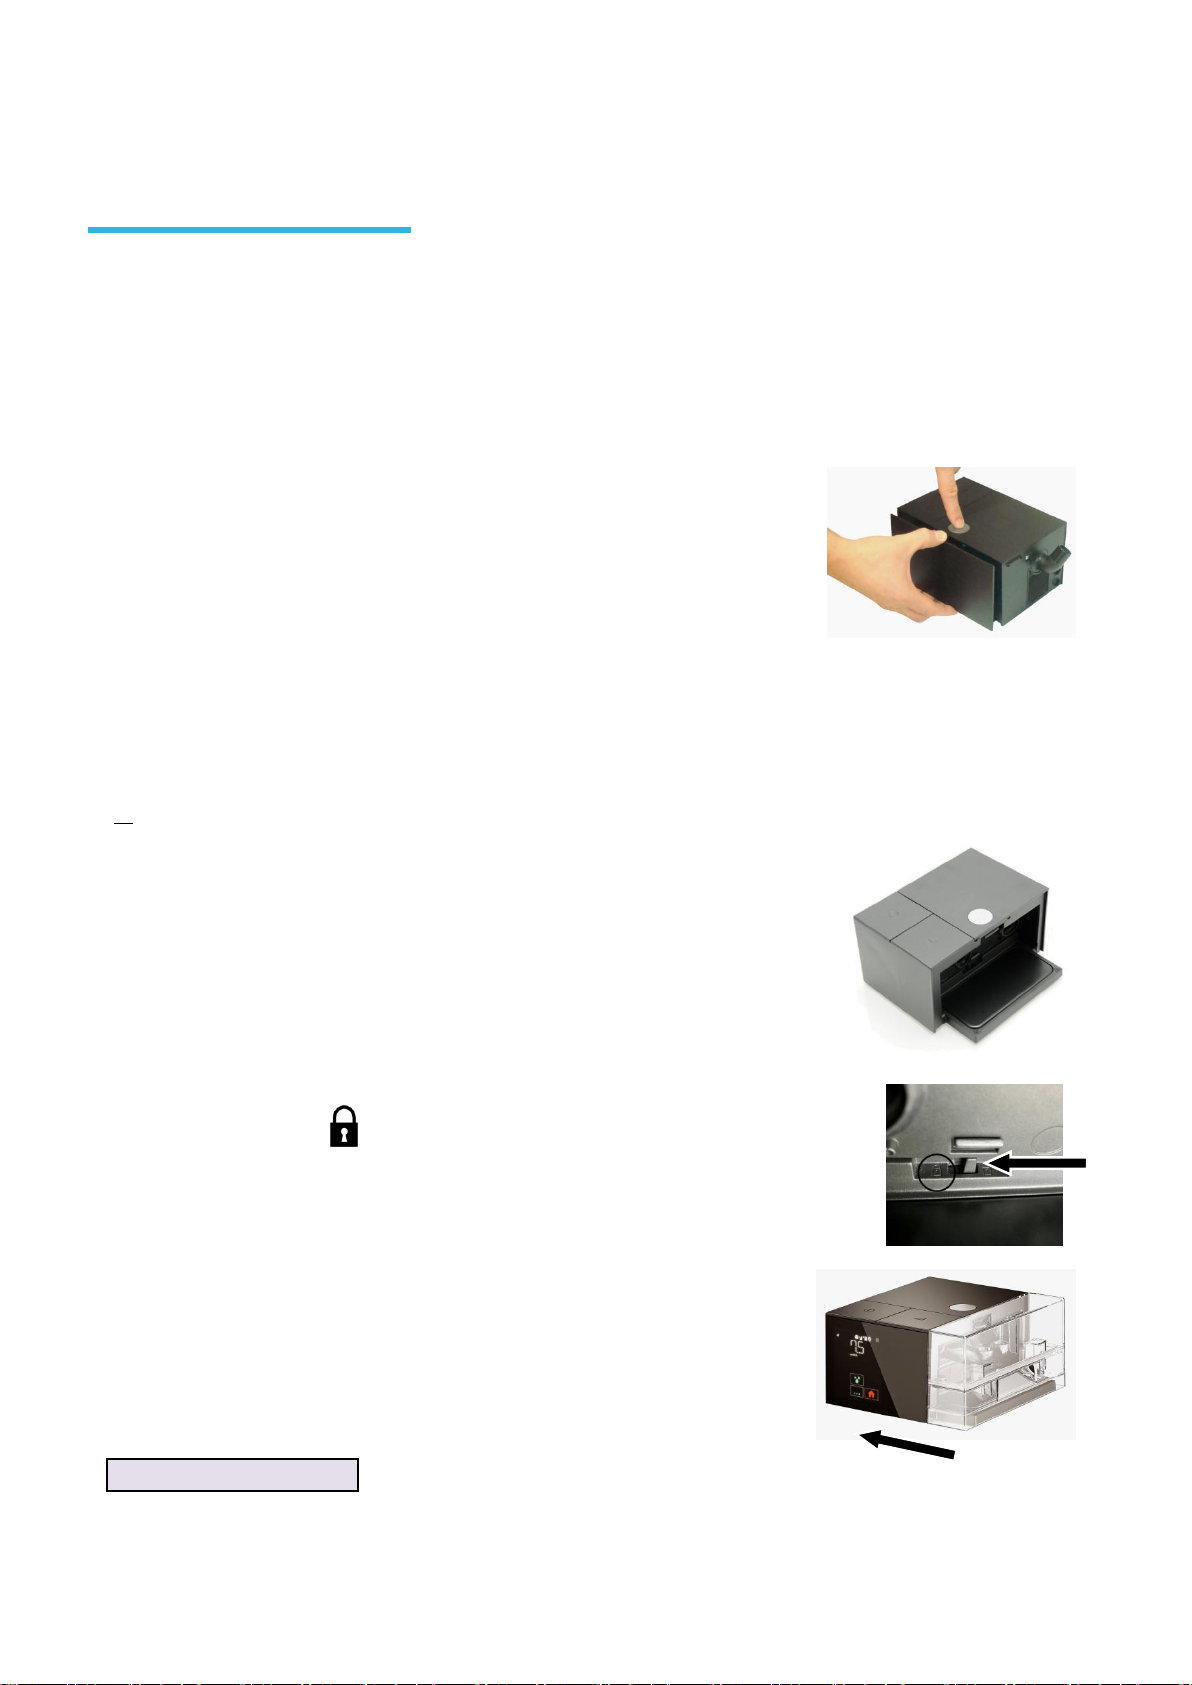
Standard installation of the device.............................................................................................................9
Installation for power via the cigarette lighter........................................................................................10
Use ........................................................................................................................................................ 11
Filling the humidifier chamber (if installed) ............................................................................................11
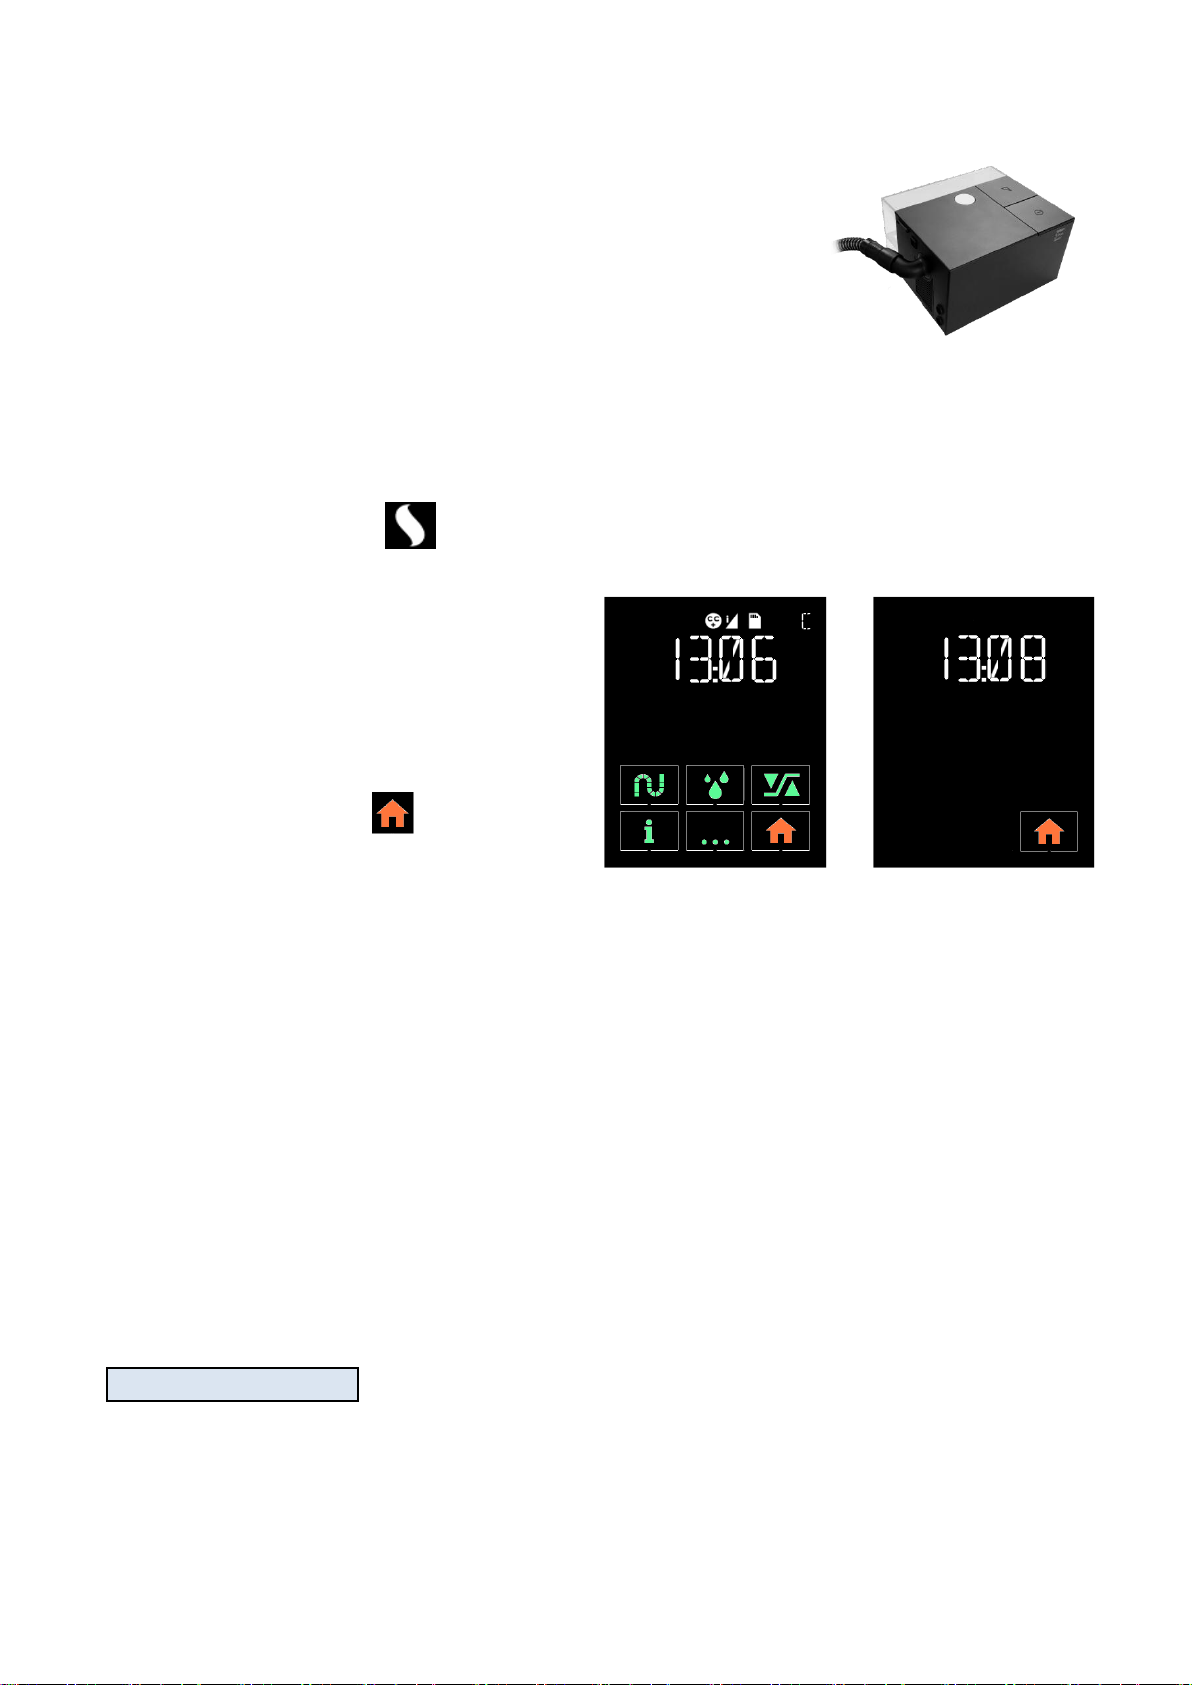
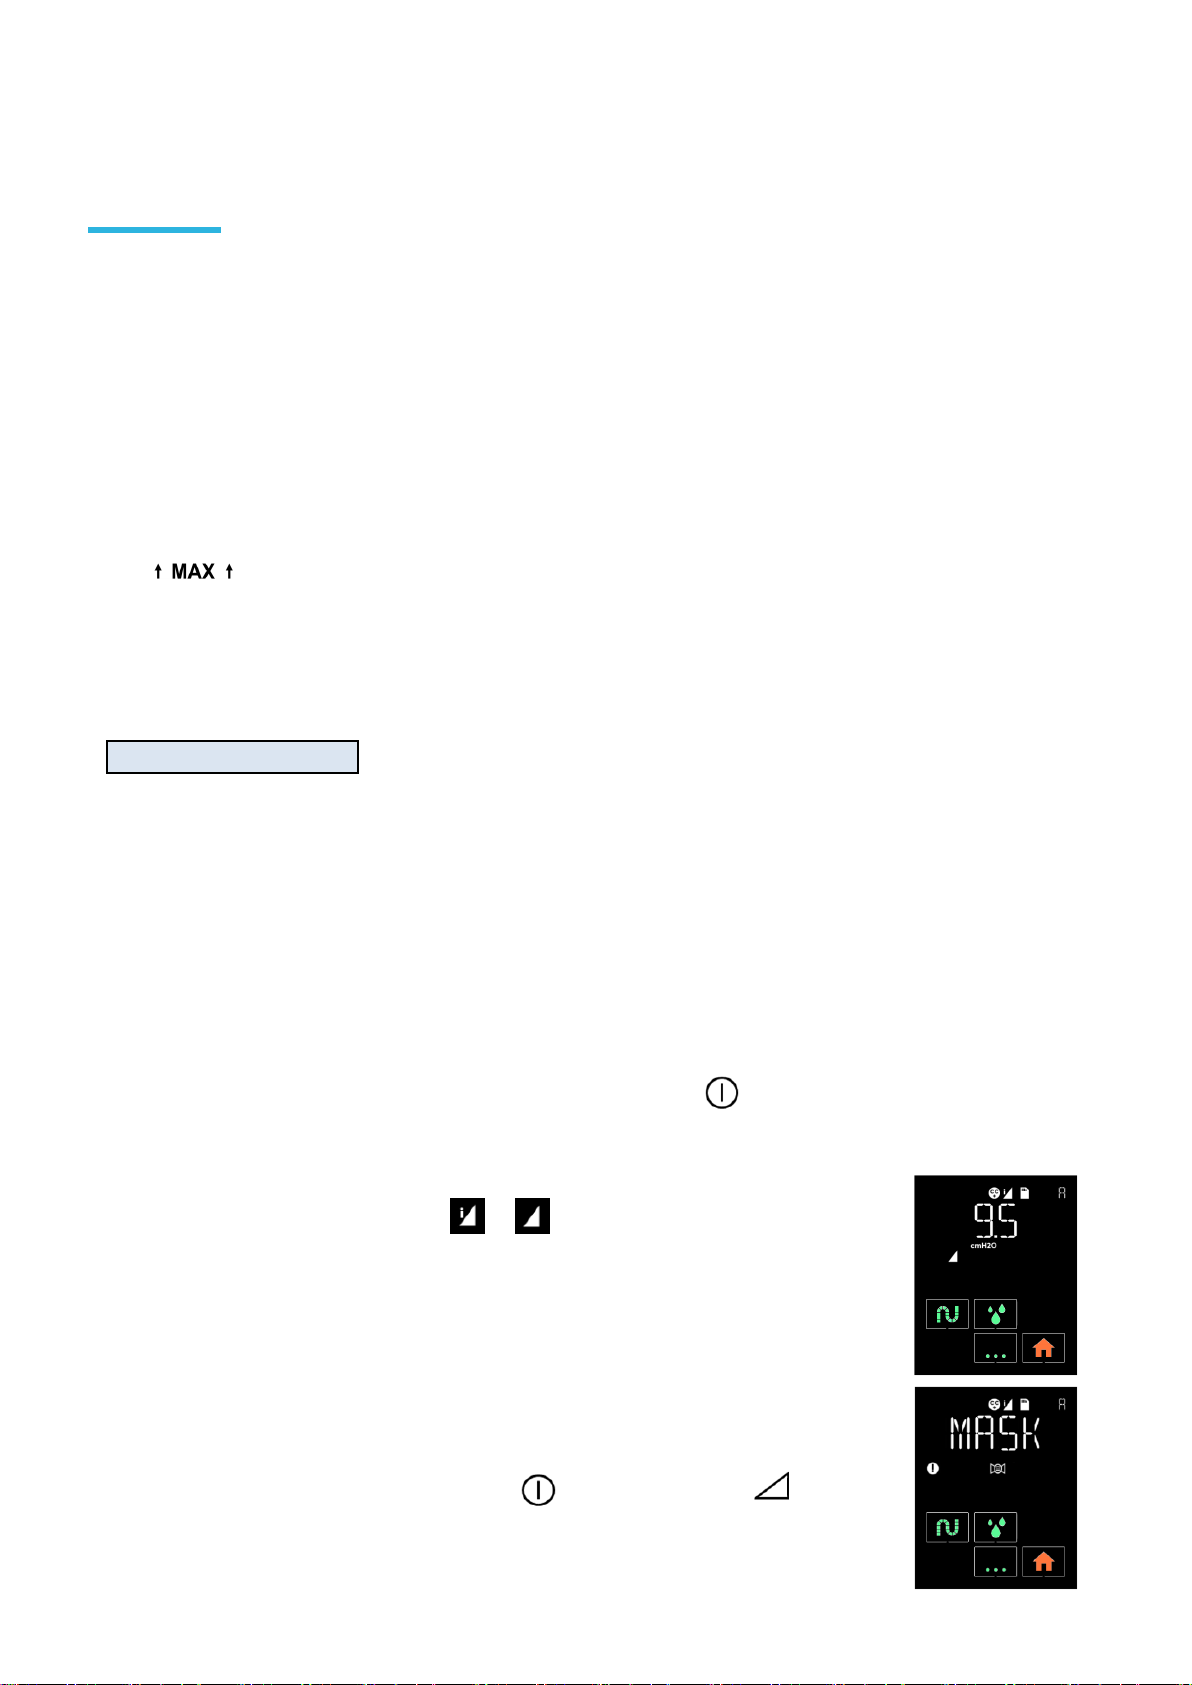
Starting treatment .......................................................................................................................................11
Stopping treatment .....................................................................................................................................12
Available features ........................................................................................................................................12
Using an SD card .........................................................................................................................................13
Transporting the device..............................................................................................................................13
Information and settings..................................................................................................................... 14
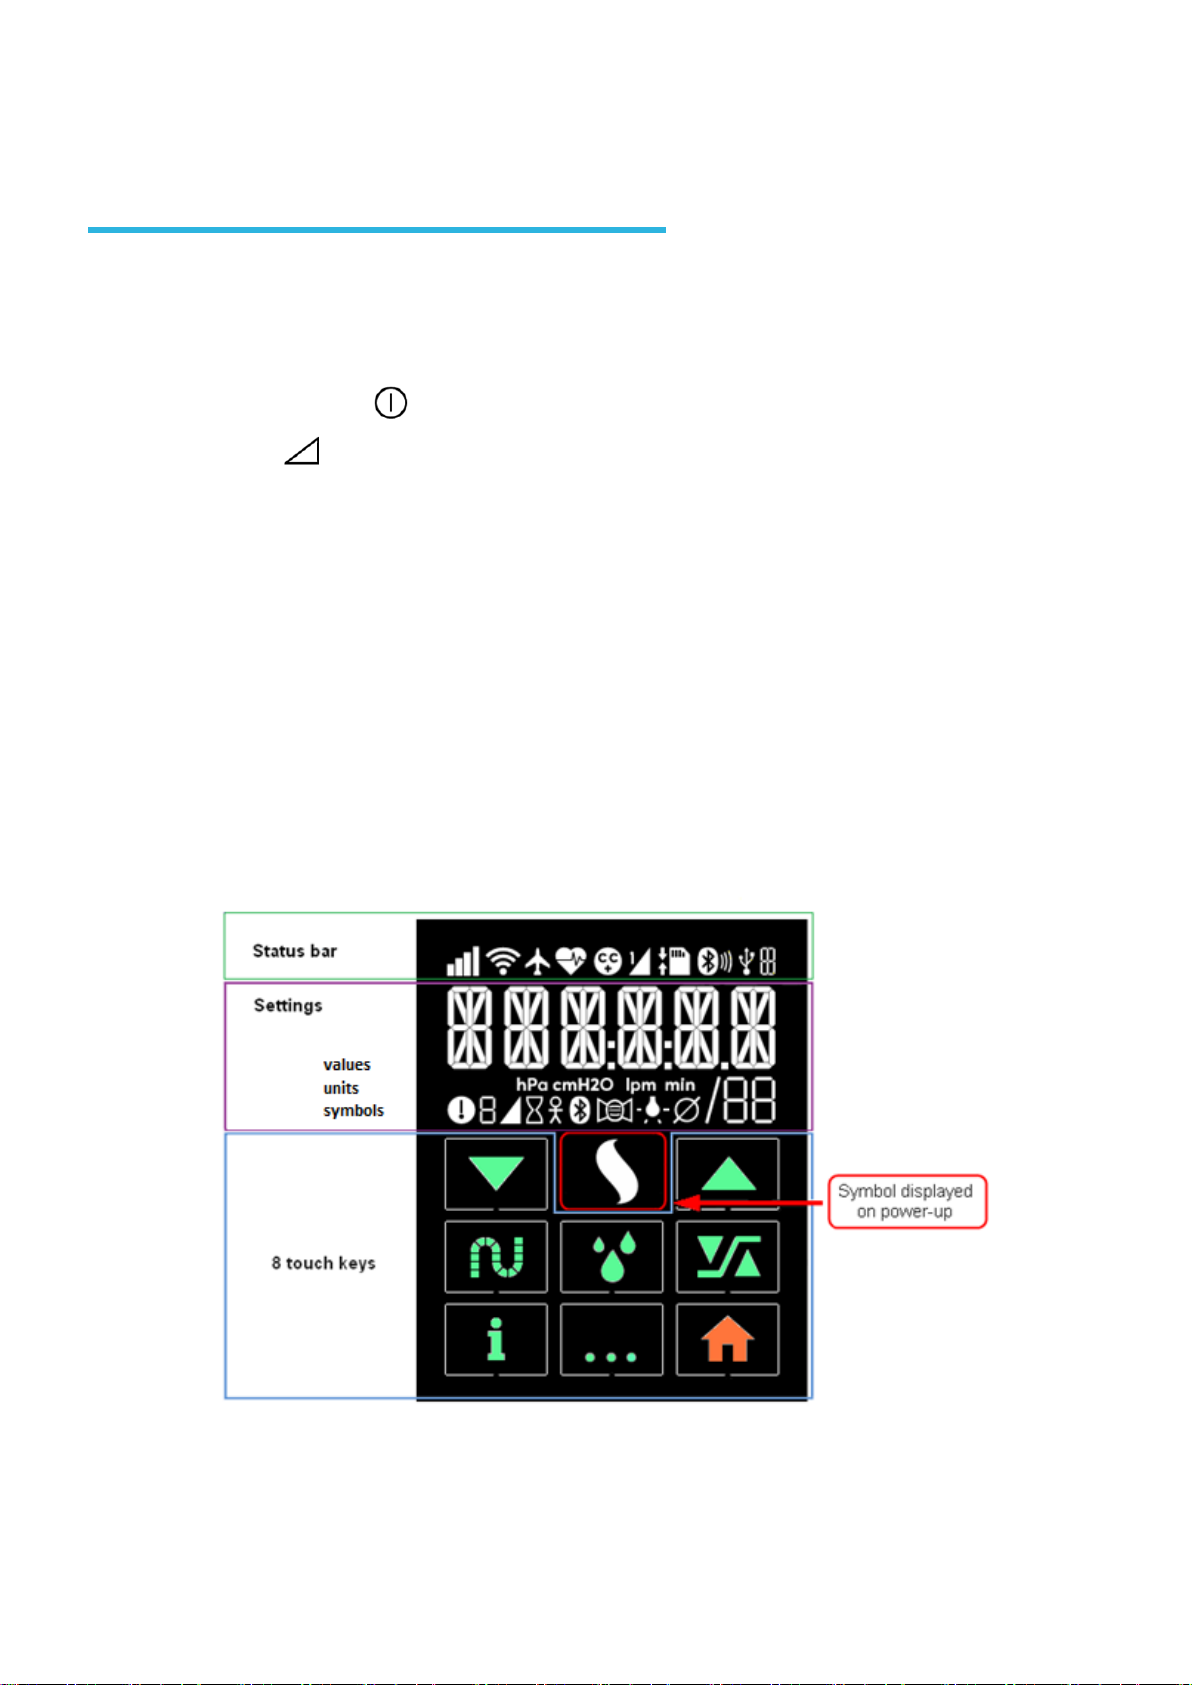
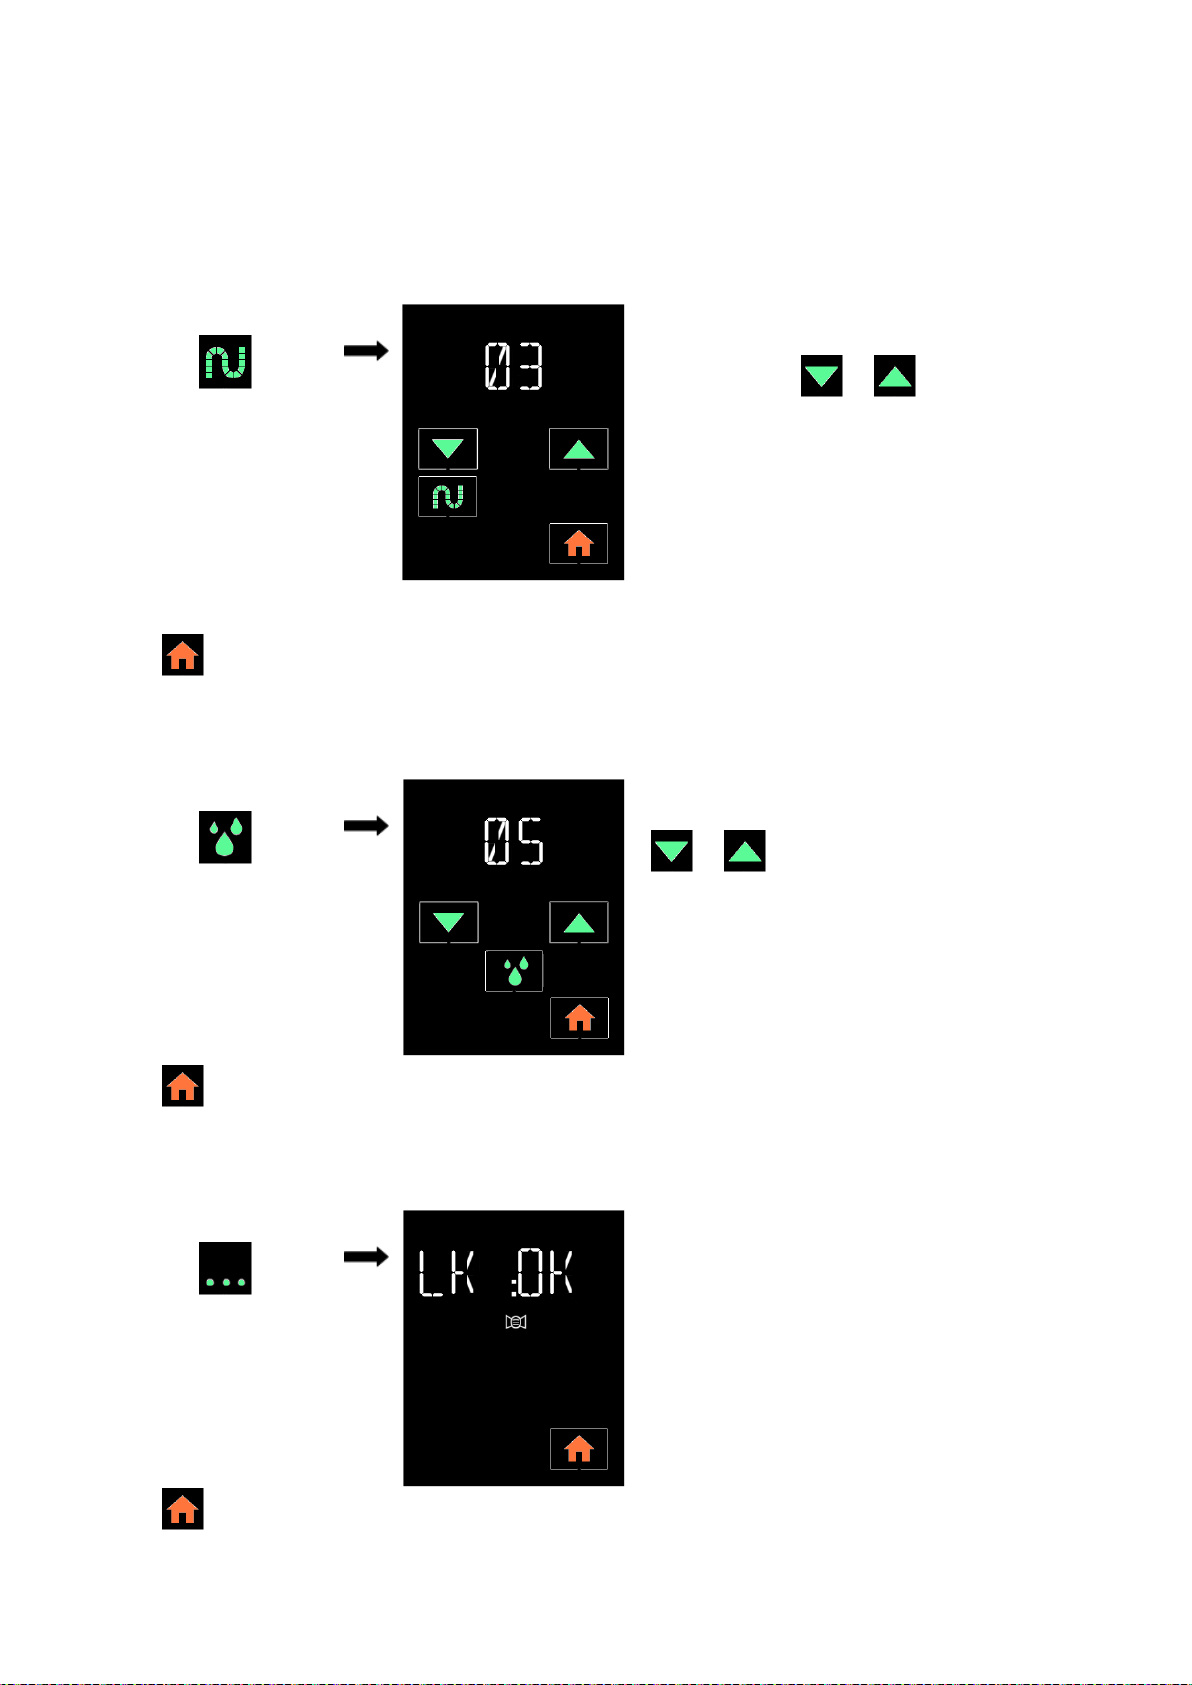
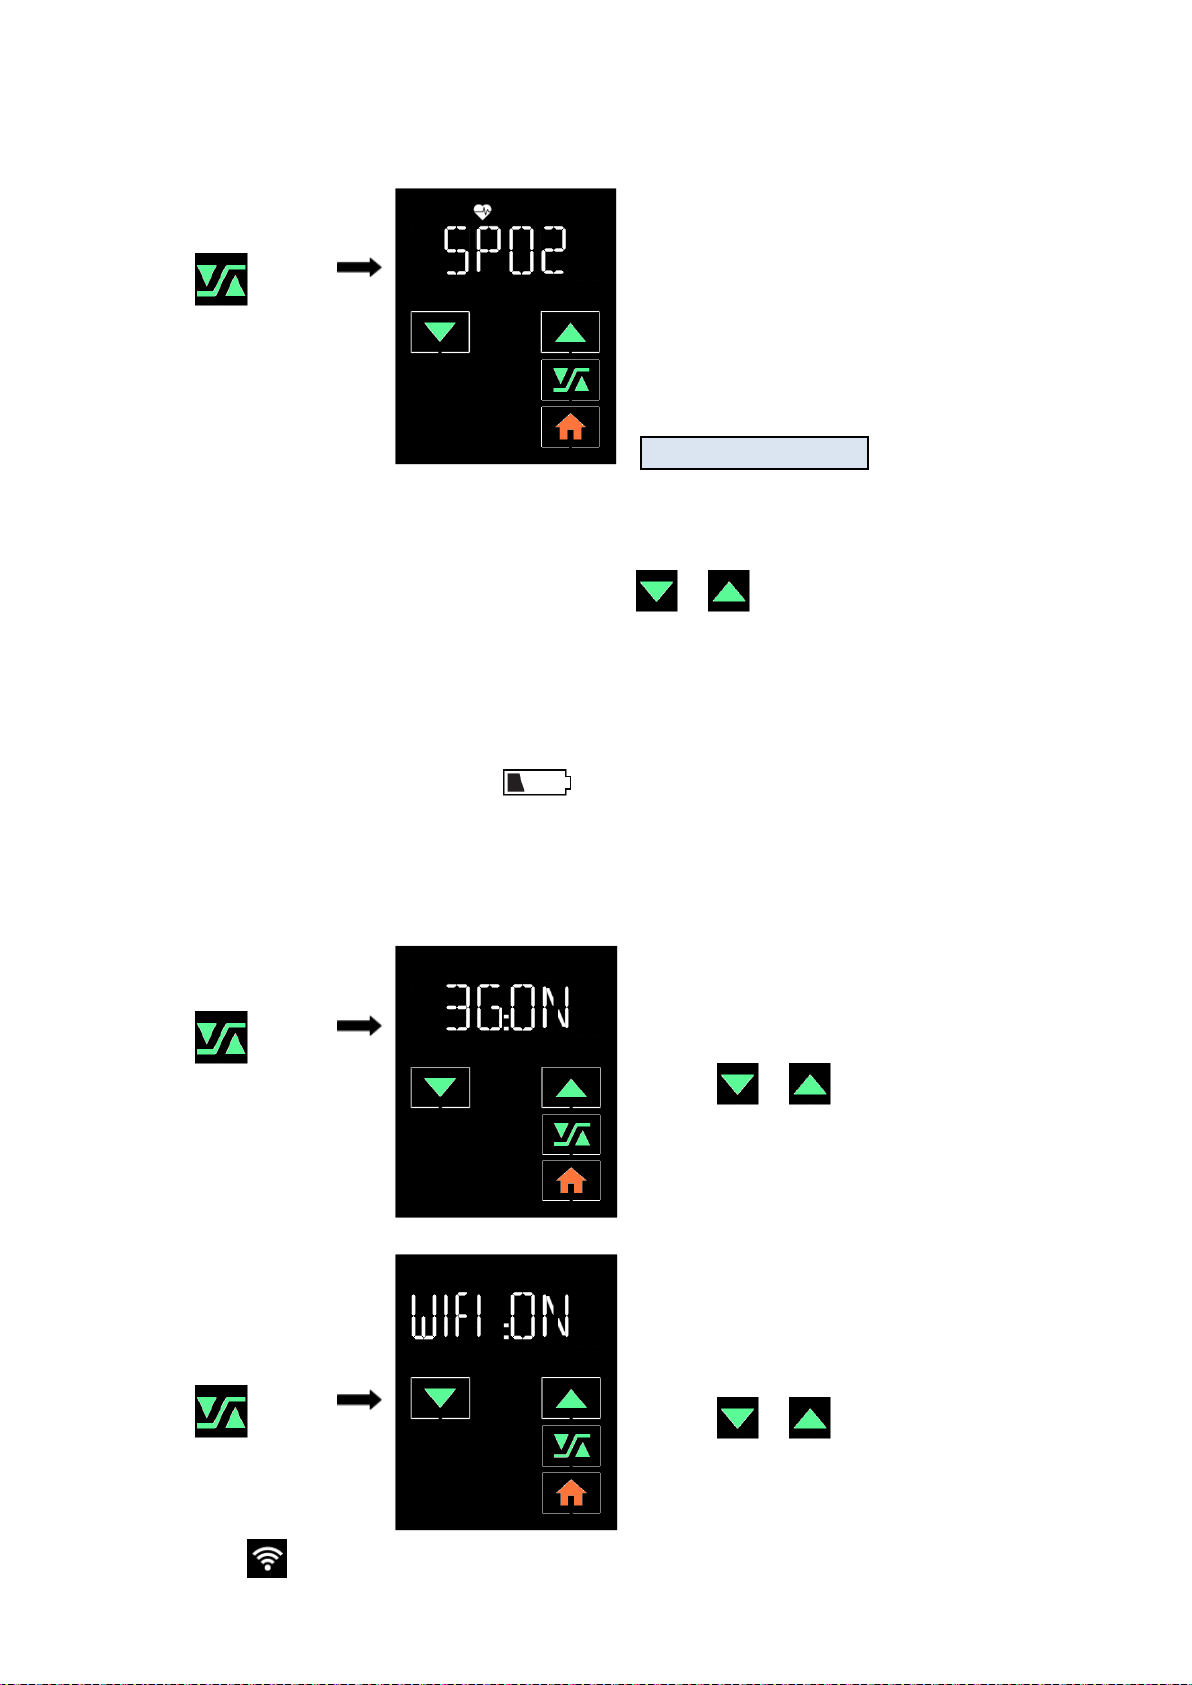
User interface description..........................................................................................................................14
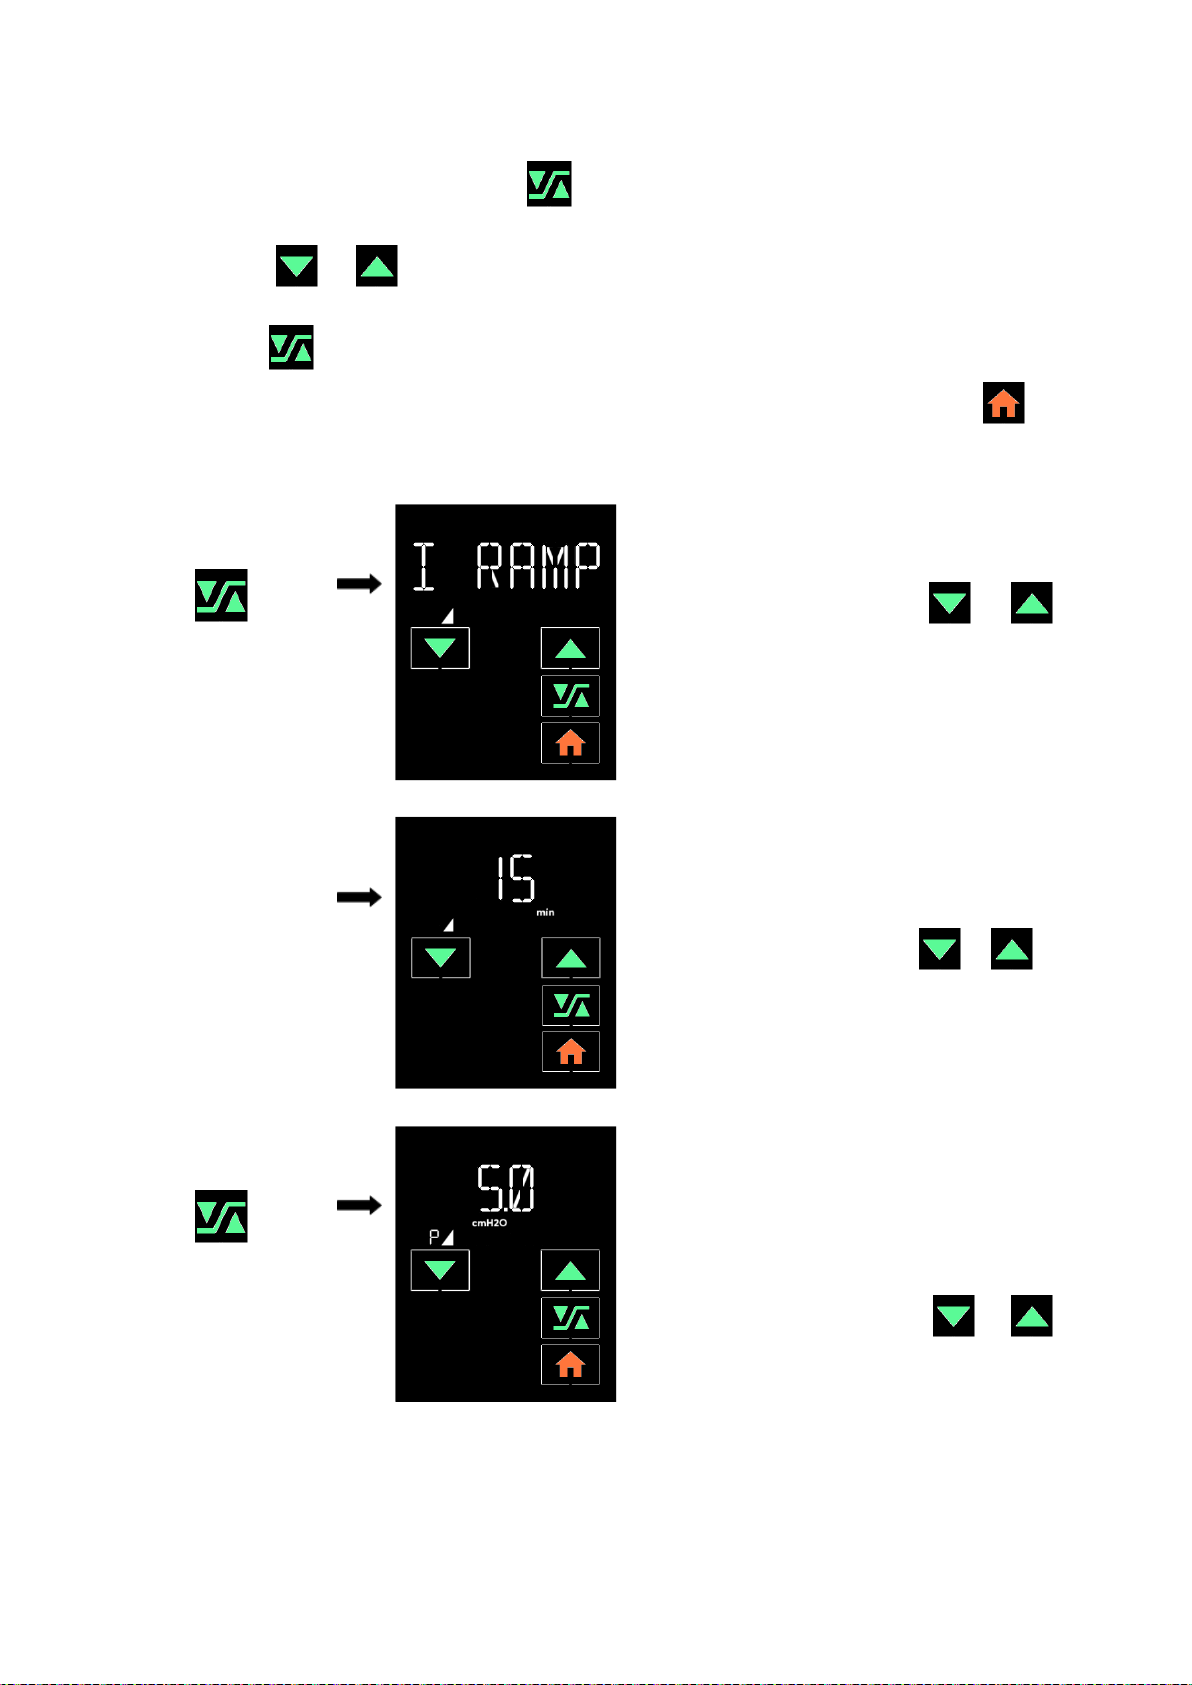
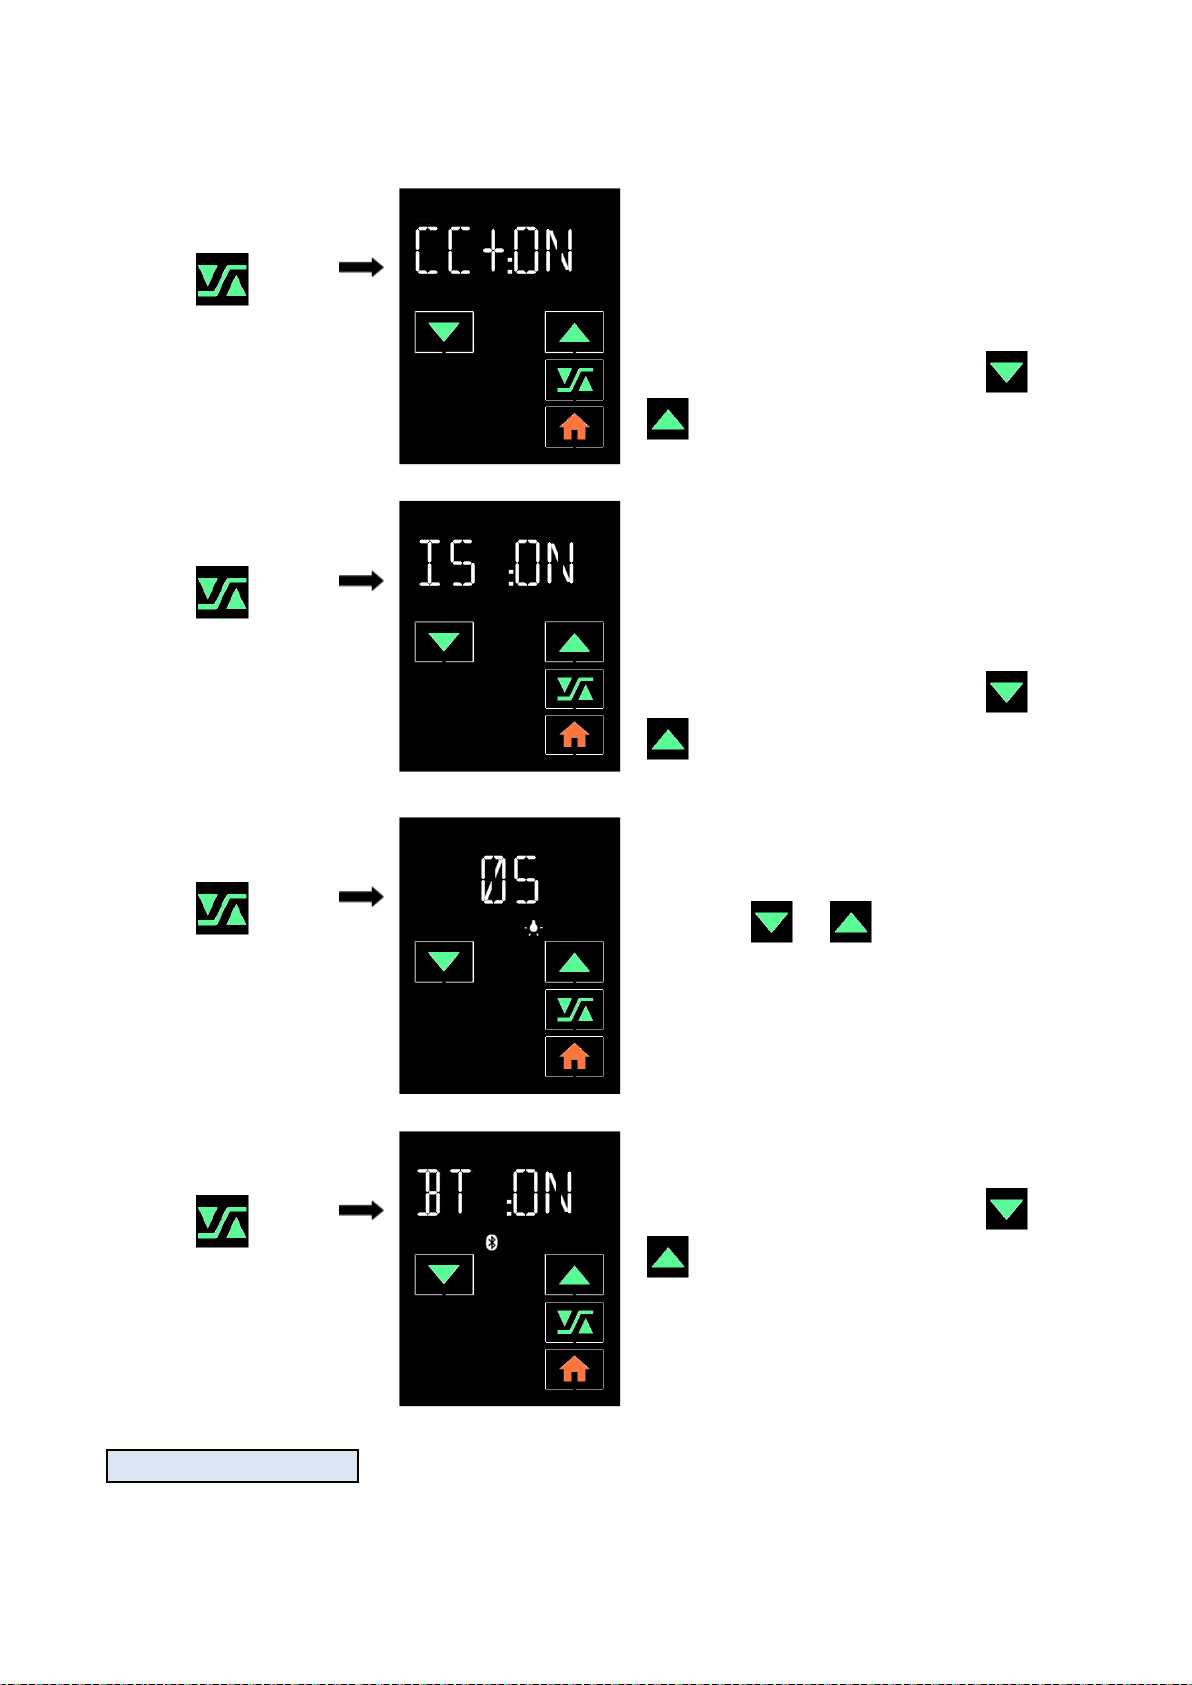
How to set the device .................................................................................................................................16
Using the device when adding oxygen (optional) ............................................................................. 27
Installation with an oxygen adapter (optional).......................................................................................27
Starting and stopping treatment ..............................................................................................................27
Cleaning and Maintenance ................................................................................................................. 28
Daily................................................................................................................................................................28
Weekly ...........................................................................................................................................................28
Monthly..........................................................................................................................................................29
In case of problems............................................................................................................................. 30
Helpful tips....................................................................................................................................................30
Device messages ........................................................................................................................................32
Technical characteristics.................................................................................................................... 33
Performance of the device ........................................................................................................................33
Humidifier performance .............................................................................................................................33
Conditions of use.........................................................................................................................................34
Transporting and storage conditions ......................................................................................................34
Electrical characteristics ............................................................................................................................34
Physical characteristics .............................................................................................................................35
CE marking ...................................................................................................................................................35
Regulatory Requirements ..........................................................................................................................35
End-of-life disposal of the device .............................................................................................................36

4 Before you start SEFAM S.Box
Before you start
Please read this manual carefully before using your SEFAM S.Box to understand the usage constraints
of the device.
Safety guidelines
WARNING:
Means in this manual that there is a risk of danger of injury or accident
to yourself or others.
The SEFAM S.Box can only be used on prescription. Under no circumstances should you change the
prescribed settings without the agreement of your healthcare professional.
Use the device only for the prescribed use as indicated in this manual. The advice given in this manual does
not replace the instructions of your healthcare professional.
This device is not intended to provide assistance to vital functions.
The device should be used only with the circuits, masks, fittings and accessories recommended by a
physician or provided by your Home Care Provider. Make sure that you have the user guide for each
accessory and read them carefully.
Contact your Home Care Provider if you think that the device or any of its accessories is damaged,
malfunctioning or has a defect.
Do not attempt to open or modify the device (risk of electric shock). The maintenance of this device is
entirely the responsibility of qualified personnel. Please contact your Home Care Provider.
Use only the power supply provided with the device.
If necessary, the device can be disconnected from the power supply by unplugging the power cord. Make
sure the power cord is easily accessible.
If the device is connected to a multi-socket outlet, do not connect the system to any other multi-socket
outlet or extension cable.
Place the device on a stable horizontal surface and in a clean and dry environment. Do not use the device if
it is adjacent or on another appliance.
Be careful not to accidentally or intentionally block the air outlet or any opening of the device or the
breathing circuit. Do not cover the device or place it too close to a wall. Do not put any liquid nor objects
into the air outlet as they may be propelled into the tube.
Keep the device and its power supply away from all sources of water. Use the device and its accessories
only if they are dry and in good working condition.
Keep the power cord away from hot surfaces.
If additional oxygen must be used, follow and respect carefully the safety instructions concerning the use
of oxygen.
Do not use the device, particularly the heated humidifier, in the presence of flammable vapors, flammable
anesthetic agents, independently or mixed with other gases (risk of explosion).
Once the machine is in operation and the mask is in place, make sure the unit produces an air flow. If not,
remove the mask immediately and contact your Home Care Provider.
Never block the leak vent of the mask which allows the continuous evacuation of the air and minimizes the
re-inhalation of carbon dioxide. If the device is in operation, the generated air flow pushes out the exhaled
air through the mask's vent hole. On the other hand, if the device is not in operation, there will not be
enough fresh air produced in the mask, and the exhaled air may be re-inhaled, which under certain
circumstances could lead to a phenomenon of suffocation in a few minutes.
If the device has a malfunction and the patient is equipped with a nasal mask, the resistance of the device
is low enough to allow the patient to exhale through the machine otherwise the patient can simply open
his/her mouth. If the patient is equipped with a face mask, the mask should have an anti-asphyxia valve.
Remove the mask in the event of a power outage or malfunction of the device.
Do not leave unnecessary lengths of tube on the bed. They could wrap around your head or neck when you
are asleep.
Keep the device away from children and pets.

SEFAM S.Box Before you start 5
The Health Industry Manufacturers Association (HIMA) recommends maintaining a minimum separation of
15 cm between a wireless phone and a pacemaker in order to avoid possible interference with the
pacemaker. The Bluetooth communication in the SEFAM S.Box device must be considered as a wireless
phone.
In case your device is equipped with a heated humidifier:
Precautions should be taken when using the heated humidifier to prevent the risk of water entering the
machine causing irreversible damage. Place the device on a horizontal and stable surface and be careful
not to tilt it.
The heated humidifier as well as the bottom of the humidifier chamber has a plate that can be hot in
normal operation. Avoid touching these parts.
The humidifier chamber must be cleaned before its first use or after any technical intervention, then
regularly following the procedure described in the paragraph "Cleaning and Maintenance " on page 28.
Always empty the humidifier chamber before moving or transporting the device.
Fill the humidifier chamber away from the device to prevent water from spilling over it.
Do not use the device if there is a leak in the humidifier chamber due to, for example, the deterioration of
the gasket.
The heated humidifier should not be used at room temperature above 35°C as the air temperature
delivered to the patient may exceed 43°C. There is a risk of irritation or burning of the upper airways.
The performance of the device may change if a heated humidifier is added.
There is a risk of air leakage when the humidifier chamber or side cover is improperly reassembled, which
may cause a variation in the applied pressure versus the prescribed pressure.
CAUTION:
In this manual it means that there is the possibility of material damage
to this device or any other.
Place the device in a way that nobody can bump into it or trips over the power cord
If the apparatus is placed on the floor, ensure that it is in a place free from dust, bedding, clothing or other
objects that may obstruct the air intake.
Like any medical electrical device, the device is likely to be disturbed by mobile or portable radio frequency
communication devices (mobile phones, Wi-Fi…).
When traveling
When traveling with your device, refer to the instructions of "Transporting the device" page 13 and in
case of airline travel, contact your Home Care Provider to prepare the trip. It is advised to bring the
patient manual along with you to facilitate the formalities of registration and security in airports.
You can take with you, as hand luggage, the device and its accessories packed in their travel bag, but
it is recommended to protect them inside a rigid suitcase if they are in the checked luggage
compartment.
If you travel to a country where the voltage is different from the voltage usually used, it may be
necessary to take another power cord or an adapter to connect your device to the electrical outlets in
this country.
Recommended use
The SEFAM S.Box is designed for the treatment of Obstructive Sleep Apnea–Hypopnea Syndrome
(OSAHS) in patients over 30 kg, who breathe spontaneously. It can be used at home or in healthcare
centers (hospital or clinics). It is designed for hassle free travelling and can be used in an airplane.
The S.Box heated humidifier is an accessory designed to warm and add moisture to the air flow
delivered to the patient by the SEFAM S.Box device, for the treatment of Obstructive Sleep Apnea–
Hypopnoea Syndrome (OSAHS). It is intended for use by adult patients in either the homecare or the
hospital environment.

6 Before you start SEFAM S.Box
Contra-indications
Studies have shown that using positive pressure can be contraindicated in certain patients with one
of these pre-existing medical conditions:
Severe bullous emphysema
Pneumothorax
Pneumocephalus, trauma or recent surgery with sequela of cranio-nasopharyngeal fistula.
Decompensated cardiac insufficiency or hypotension, particularly in case of decreased blood
volume or cardiac arrhythmia
Dehydratation.
Tracheotomy.
Side effects
If any of the following symptoms appear, while using the device, which may in certain cases require
temporary cessation of treatment, please contact your healthcare professional: unusual chest pain,
severe headache, increased dyspnea, dryness of the airways or nose, skin sensitivity, running or
bleeding nose (Epistaxis), discomfort or pain in the ear or sinuses, bloating, daytime sleepiness,
mood changes, disorientation, irritability or loss of memory.
Components of the system
The SEFAM S.Box comes with the following components:
S.Box SD card
Side cover
Inlet air filter
Patient manual
S.Box power supply
S.Box carrying bag
Flexible tube
The device can also be used with the following optional accessories. Contact your Home Care
Provider for more information on the available accessories. When using them, follow the instructions
given with the accessories.
S.Box cigarette cable (24 VDC)
Fine filter (disposable)
S.Box heated humidifier
Oximeter 3150
S.Box modem
S.Box Wi-Fi module
SEFAM S.Box by Starck carrying case
PolyLink system
S.Box heated tube with ATC (Adaptive Thermo
Control) 15 mm in diameter
SEFAM ACCESS (tablet / smartphone
application)

SEFAM S.Box Description 7
Description
Views of the device
Figure 1 –Front view
Figure 2 –Rear view of a device
with a humidifier
Figure 3 –Rear view of a device
with a side cover
Figure 4 –View of the heater plate
and accessory location
1
Start / standby button :
To switch the device on and off.
2
Touch screen display:
To view the information and access the settings.
3
Ramp button :
Enables or disables the ramp function when the
unit is operating.
4
Button to unlock humidifier chamber
or side cover:
To unlock and remove the humidifier chamber or
the side cover from the machine.
5
SD card slot:
Slot for inserting the SD card.
6
USB connector:
Intended for use by your doctor or Home Care
Provider.
7
Air inlet filter and grid:
Prevent dust from entering the device and the air
flow path.
8
Power port:
To power the device by the power supply or by a
cigarette lighter.
2
1
3
4
10
2
11
2
13
2
7
2
14
2
9
8
14
5
7
6
12

8 Description SEFAM S.Box
9
Heated tube connection:
To connect a S.Box heated tube with ATC.
10
Accessory slot:
Slot for a communication accessory (PolyLink
system, S.Box modem or S.Box Wi-Fi module).
11
Heater plate (if humidifier is included):
Base of the heated humidifier used to heat the
water in the humidifier chamber.
12
Humidifier humidifier chamber (if
included):
Humidifier chamber in which the maximum
water level is indicated.
13
Side cover (if included):
14
Angled outlet connector:
Swivel connector for connecting the tube.
Definition of symbols
Symbol
Description
Symbol
Description
Start / standby button.
Ramp button.
Device is in accordance with the
requirements of the European
directive 93/42 /EC on medical
devices.
Device can no longer be used,
dispose separately from household
garbage.
See "End-of-life disposal of the
device" page 36.
Class II device.
Type BF device.
24 V Direct Current power supply
Device composes an RF transmitter,
non - ionizing radiation.
Manufacturer.
Manufacturing date.
Danger: hot surface.
On the humidifier chamber, this
symbol indicates the maximum
water level which should not be
exceeded in the chamber.
On the humidifier chamber, this
symbol indicates that it is
necessary to open the chamber and
remove its cover before pouring
water in from a recipient.
Do not pour water directly into the
openings of the humidifier chamber.
On the heater plate, this symbol
indicates in which direction to push
the latch to lock or unlock the
heater plate.
Device protected against solid
objects of more than 12 mm and
against drops of water falling
vertically.
On the packaging, this symbol
means "Atmospheric pressure
limit".
On the packaging, this symbol
means "Relative humidity limit".
On the packaging: this symbol
means "Fragile" because the
package must be handled with care.
On the packaging: this symbol
means "Keep dry" because the
package must be protected against
moisture and water.
On the packaging, this symbol
means "Temperature limit".
Refer to the user manual.

SEFAM S.Box Installation 9
Installation
Standard installation of the device
The apparatus must be positioned on a flat and stable surface. It comes with a pre-mounted side
cover and according to the chosen configuration, it can also be delivered with a heated humidifier
that replaces the pre-mounted side cover.
1. If you have a humidifier or/and a communicating
accessory, remove the side cover from the device:
Press the button to unlock the cover (mark 4 in Figure 1)
and at the same time, pull the cover with the integrated
handle located under the cover away from the machine.
2. Install the communicating accessory (S.Box modem, S.Box Wi-Fi module or PolyLink system)
into the accessory slot (mark 10 in Figure 4) –we herefor refer to the corresponding
instructions in the installation and usage procedure.
3. Then place the cover on the rails in the side part of the device and push it against the device
until you hear a "click".
or
Install the heated humidifier (if included):
A) Place the heater plate on the rails in the side part of the
device and push it towards the machine.
B) Lock the heater plate by pushing the latch to the left
as indicated by .
C) Place the base of the humidifier chamber on the heater
plate and push the humidifier chamber against the
device until you hear a "click".
WARNING:
If the heated humidifier is not properly installed, there is a risk of air loss which can cause a variation of the
applied pressure versus the prescribed pressure.

10 Installation SEFAM S.Box
4. Connect the breathing tube:
Connect the end of the flexible tube to the angled outlet
connector on the back of the device (Mark 14 in Figure 2).
If you have a S.Box heated tube with ATC, insert its power
cable lead into the corresponding socket on the device
(Mark 9 in Figure 2).
5. Prepare the mask by following the instructions in its operating instructions. Connect the mask to
the end of the breathing tube.
6. Plug the power supply cord into the power inlet on the back of the device (Mark 8 in Figure 2) and
connect the power supply plug to the electrical power grid.
7. When you turn on the power for the first time, the display light comes on and the
logo of the mobile apps appears.
Then, the standby mode screen appears
two seconds later, indicating the time.
The device is now ready for use.
After two minutes in standby mode,
without action on any touch key or any
button, the hibernation mode screen
appears.
The touch key "home" permits:
to return the screen from hibernation
to standby screen
to turn off the display from the
standby screen.
Standby screen
Hibernation screen
Notes:
The backlight of the display comes on when your hand approaches the display (Wave & Go feature) or
when you tap the touch area or push one of the two operating buttons on the device.
Displays illustrated in this manual are just used as examples.
Installation for power via the cigarette lighter
The device can be powered by a cigarette lighter socket using a 24 V cable (optional) designed for
this purpose. To do this, replace step 6 of the standard installation by the following step:
Connect the cigarette lighter cable to the power input of the device (Mark 8 in Figure 2) and the
other end of the cable directly to the cigarette lighter socket.
CAUTION:
Use only the 24 V cigarette lighter cable recommended with the device.
Assure the conformity of the voltage supplied by the cigarette lighter socket.
Do not use the device with a 12 V or 13 V battery of a light vehicle.

SEFAM S.Box Use 11
Use
Filling the humidifier chamber (if installed)
1. Unplug the SEFAM S.Box device from the power supply or the electrical power grid.
2. To separate the humidifier chamber from the device, press the button to unlock the humidifier
chamber (mark 4 in Figure 1) and at the same time, pull the humidifier chamber away from the
device using the integrated handle.
3. Put the humidifier chamber away from the device and pull the opening clip upwards to release
the upper part of the chamber, then put it aside.
4. Fill the bottom part of the chamber with water up to the maximum level mark indicated by
.
5. Put the upper part back on the base of the humidifier chamber by positioning the hinge properly,
then press down on the upper part to close the chamber and lock it.
6. Place the humidifier chamber back on the heater plate, with the hinge side towards the inside of
the machine, and push it against the device until you hear a "click".
7. Plug the SEFAM S.Box device into the power supply or electrical power grid.
CAUTION:
Be careful not to exceed the maximum level mark.
Fill the chamber only with water at room temperature, do not use hot or chilled water.
It is recommended to use distilled water.
Do not add any product to the water in the chamber (essential oils, etc).
Do not use alkaline solution (physiological saline).
Starting treatment
1. Put on your mask as described in the corresponding user instructions. If the Intelligent Start
feature has been activated by your Home Care Provider, the device will start during your first
breaths in the mask.
You can also hold down the start / standby button to begin treatment. Recording of
compliance data and of treatment effectiveness begins immediately in the device memory and
on the SD card when present.
2. Then, the display of the device indicates the delivered pressure and
if the ramp is enabled (symbol or in the status bar).
The displayed symbols indicate which features and accessories
are activated (see the table " Description of icons and symbols "
page 15).
3. If the message " MASK " appears on the screen, that means your
mask is not properly connected.
Reposition it properly to minimize the leak as much as possible ,
then press the start / standby button or the ramp button .
The apparatus will restore the set pressure and the message will
disappear.

12 Use SEFAM S.Box
4. Lie down and place the breathing tube so that it can follow your movements while you are
sleeping.
5. If your device is equipped with a heated humidifier, it starts automatically when the appliance is
switched on. You can increase or decrease the humidification level using the touch key , (see "
How to set the device " page 16).
WARNING:
After a power failure, the appliance will recover the same parameters and operating mode as the ones before
the power failure occured (start / standby).
Stopping treatment
1. Remove the mask.
2. Hold down the start / standby button to switch off the device. If it is installed, the heated
humidifier stops simultaneously.
Available features
Mask Fit & Go
You can check the air tightness of your mask before starting the treatment and when the device is in
standby mode. The residual mask leak information can be displayed by tapping the touch button .
Adjust your mask in case of undesired leak. Tap to return to the standby screen.
Mask unplugged feature
If you remove your mask, the device automatically reduces the flow. The machine will restore normal
flow and pressure when you reconnect you mask or if you press the Start / standby button or the
ramp button . Otherwise, the machine will stop after 30 minutes. The feature can be used at
night when you need to get up.
Comfort Control Plus
The Comfort Control Plus (CC+) is intended to slightly increase the treatment pressure when you
inhale and to decrease the pressure when you exhale to make your breathing more comfortable
during the treatment. It can be activated during the ramp or the entire treatment. In both cases, three
levels are available in order to get an optimal setting.
Ramp
When activated, the ramp function makes it possible to gradually increase the pressure to help you
fall asleep. The delivered pressure increases progressively from a lower initial pressure (ramp
pressure) up to the prescribed pressure for a duration called ‘ramp time’. There are two types of
ramp:
Time ramp (T RAMP): the ramp time is determined by your Home Care Provider. The symbol
is displayed in the status bar.
Intelligent ramp (I RAMP): the ramp time is automatically determined by the device. The pressure
rise (in CPAP mode) or the activation of the pressure up/down commands (in Auto CPAP mode)
occurs as soon as the device starts to detect obstructive breathing events indicating that you
have fallen asleep. The symbol is displayed in the status bar.
The ramp starts automatically when the apparatus is switched on (if the ramp time is not zero). It
can be deactivated by pressing the ramp button .

SEFAM S.Box Use 13
Using an SD card
An SD card is used to store the most recent compliance data memorized by the machine, or to
update the settings of your device. Follow the instructions given by the Home Care Provider before
using this card.
Inserting the card
When the device is operating, switch it off by holding down the start / standby button . Insert the
SD card in the corresponding slot: the symbol appears on the top of the screen. If it is blinking, it
means that the card is improperly inserted or non-functional. Reinsert it properly. If the problem
persists, contact your Home Care Provider.
Updating the settings
If the Home Care Provider configured the SD card to update the settings of the device, the machine
will start automatically once the card is inserted in the slot and the symbol blinks slowly on the top
of the screen. Leave the SD card in the slot after the update is finished. This operation can be
performed only once.
Saving data
If data are recorded in the device, the data backup starts automatically when you insert the SD card
in the machine. The symbol blinks slowly on the top of the screen. Do not remove the card. Each
time the treatment is stopped, the data is saved automatically and the corresponding symbol blinks
on the screen.
CAUTION:
Do not remove the SD card during the treatment as data are recorded in real time.
If the symbol or is blinking slowly on the top of the screen, it means that a settings update or a data
backup is in progress. Do not remove the SD card.
Removing the card
Once the recording is finished, switch off the apparatus by holding down the start / standby button
. Wait for the symbol to stop blinking on the screen (up to 2 minutes) and remove the card. You
can now send it to your Home Care Provider.
Transporting the device
Unplug the power supply and disconnect all accessories from the device. Pack the apparatus and the
accessories in the travel bag.
Device with heated humidifier
If your device is equipped with a humidifier, press the button to unlock the humidifier chamber and at
the same time, pull the chamber using the integrated handle. Then, away from the device, pull the
opening clip upwards to release the upper part of the chamber, then put it aside. Empty the water.
Then unlock the heater plate by pushing the latch to the right and remove it. Pack it, with the
humidifier chamber, in the designated compartment of the travel bag. Place the cover on the rails in
the side part of the device and push it against the device until you hear a "click". Pack the device in
the bag.
CAUTION:
It is absolutely necessary that you empty the humidifier chamber before moving or transporting the device, in
order to prevent any risk of water entering the machine, which can cause irreversible damage.

14 Information and settings SEFAM S.Box
Information and settings
User interface description
The two mechanical buttons on the top of the device are used to manage its operation:
Start / standby button : switches the device on or off.
Ramp button : deactivates or activates the ramp function when the device is in operation.
When the device is in operation, information appears on the touch screen in front and you may be
able to adjust certain settings.
The available parameters are:
settings for your treatment,
general settings such as time or brightness,
recorded compliance data.
The display may also indicate possible problems with the device or its accessories.
General organization of the display
From top to bottom, the display is organized in three parts:
a status bar
a setting area
a space with 8 touch keys and the symbol displayed on power-up.

SEFAM S.Box Information and settings 15
Description of icons and symbols
Symbol
Meaning
Symbol
Meaning
Status bar
GSM mobile phone network
status. Flashes quickly during the
transmission.
Wi-Fi Communication activated.
Flashes quickly during the
transmission.
Airplane mode
Oximeter connected
Comfort Control Plus CC+
function activated
Time ramp T RAMP activated
Intelligent ramp I RAMP activated
SD card inserted
Flashes slowly when data
storing is in progress.
Flashes slowly when settings
update is in progress.
Bluetooth connection activated
Bluetooth transmission in
progress
USB connection activated
Operation mode
C: CPAP
A: APAP (Auto-CPAP)
Settings: values, units and symbols displayed
Numbers or letters
Pressure unit: hecto Pascal or
cm H2O
Flow unit: liter per minute
Time unit: hour and minute
Caution: the device detected an
error or an incident
Setting of the ramp time
Machine hour counter
Usage hour counter
Bluetooth
Mask adjustment
Setting of the brightness of the
display
Diameter of tube
Touch keys
Scrolling-down touch key, allows
to decrease the value of the
displayed parameter
Scrolling-up touch key, allows to
increase the value of the
displayed parameter
Touch key to adjust the S.Box
heated tube with ATC setting
Touch key to adjust the heated
humidifier setting
Touch key to access the settings
Touch key to access information
Multifunctional touch key
Home touch key

16 Information and settings SEFAM S.Box
How to set the device
The setting can be done via the touch keys if the unit is in standby or in use (depending on settings).
1. Heating capacity of the S.Box heated tube with ATC (if installed)
Tap the touch key
in standby or
operation mode.
View of the display:
You can decrease or increase the
displayed value of the heating power by
tapping the key or .
Possible settings: OFF (no heating), 01 to
05 and AUTO (if a humidifier is also
present).
The AUTO mode makes the heating of the
heated tube progressive as a function of
the heating power level of the heated
humidifier.
This setting is only possible if your device is equipped with a S.Box heated tube with ATC.
Tap to return to the standby or operation screen.
2. Humidification level (if humidifier installed)
Tap the touch key
in standby or
operation mode.
View of the display:
You can decrease or increase the value of
the humidification level by tapping the key
or .
Possible settings: OFF (no humidification)
and 01 to 10.
This setting is only possible when your
device is equipped with a humidification
system.
Tap to return to the standby or operation screen.
3. Mask Fit & Go: control airtightness of the mask
Tap the touch key
in standby mode.
View of the display:
Residual mask leak information can be
viewed, but not changed.
Possible displays: LK:OK, LK:NOK.
In case of undesired leak (LK:NOK), re-
adjust your mask.
Tap to return to the standby screen. The display will turn off automatically after two minutes
without tapping a key.

SEFAM S.Box Information and settings 17
4. Settings menu
To access the settings, tap the touch key when the device is in standby mode. In the following
sequence of settings:
Tapping on or allows you to decrease or increase the value of the parameter or to
deactivate or activate the displayed function,
Tapping on allows you to access the next display,
The display turns off automatically after two minutes without pressing a key or by tapping .
❶
Tap the touch key
in standby mode.
Views of the display:
I Ramp (Intelligent Ramp) if it has been
selected by your Home Care Provider.
You can activate or deactivate this
function by tapping the key or
displayed.
Possible settings: I RAMP and OFF.
or
Ramp time if T Ramp (Time Ramp) has
been selected by your Home Care
Provider.
You can decrease or increase the value
displayed by tapping the key or .
Possible settings: OFF and from 5 min to
the maximum ramp time set by your
Home Care Provider.
❷
Tap the touch key
Ramp pressure (ramp start pressure).
This parameter is displayed if a ramp has
been selected by your Home Care Provider
and if he/she did not lock your access to
this setting.
You can decrease or increase the value
displayed by tapping the key or
repeatedly.
Possible settings:
from 4 cm H2O to the pressure set in
CPAP mode.
from 4 cm H2O to the maximum
pressure set in APAP (Auto-CPAP)
mode.

18 Information and settings SEFAM S.Box
❸
Tap the touch key
Views of the display:
CC+ (Comfort Control Plus)
This function is displayed if it has been
activated by your Home Care Provider and
if he did not lock your access to this
setting.
You can deactivate (OFF) or activate (ON)
this function by tapping the key or
.
Possible settings: CC+: ON and CC+: OFF.
❹
Tap the touch key
IS (Intelligent Start)
This function is displayed if it has been
activated by your Home Care Provider and
if he did not lock your access to this
setting.
You can deactivate (OFF) or activate (ON)
this function by tapping the key or
.
Possible settings: IS: ON and IS: OFF.
❺
Tap the touch key
Brightness
You can decrease or increase the
brightness of the display by tapping the
touch key or as many times as
needed.
Possible settings: 01 to 10.
❻
Tap the touch key
BT (Bluetooth wireless communication)
You can deactivate (OFF) or activate (ON)
this function by tapping the key or
.
Possible settings: BT: ON and BT: OFF.
CAUTION:
The Bluetooth wireless connection must be enabled:
for real-time acquisition of signals from the Nonin pulse oximeter on the SD card
to recover compliance data recorded in the device via a Bluetooth connection
to make adjustments via tablet / smartphone applications (refer to the corresponding instructions for use).

SEFAM S.Box Information and settings 19
❼
Tap the touch key
Views of the display:
SPO2 (Pulsed Oxygen Saturation of
Hemoglobin).
The device searches for an oximeter and
the display flashes alternately with six
dashes as long as no oximeter is
associated.
Once detected, the six digits of the PIN
code of the oximeter flash alternately with
SPO2.
CAUTION:
Make sure that the PIN code is the one of
the oximeter that you want to pair.
You can deactivate the communication by tapping on or .
Notes:
This display appears only if the Bluetooth communication has been enabled previously
Follow the instructions in the user guide to install the oximeter and oximetry sensor (if present), and
wait for the communication to take place (approximately one minute).
Replace the batteries if a low level ( ) is displayed on the oximeter.
If your device is equipped with a communicating accessory (PolyLink system, S.Box modem or S.Box
Wi-Fi module), the corresponding display appears at this level in the settings menu. Refer to the
installation of the relevant accessory described in the corresponding instructions for use.
❽
Tap the touch key
Connecting the S.Box modem (if installed)
You can deactivate (OFF) or activate (ON)
the S.Box modem connection by tapping
the key or .
Possible Settings: 3G: ON and 3G: OFF.
or
❽
Tap the touch key
Connecting the S.Box Wi-Fi module (if
installed)
You can deactivate (OFF) or activate (ON)
the Wi-Fi module connection by tapping
the key or .
Possible settings: WIFI: ON and WIFI: OFF.
The symbol blinks slowly at the top of the screen.

20 Information and settings SEFAM S.Box
Only when the Wi-Fi module is installed inside the SEFAM S.Box device and the Wi-Fi connection
activated, you can access the WPS automatic configuration which allows connecting to the local
network.
Tap the touch
key
Views of the display:
Tap the touch
key
View of the display:
Select YES on the screen by using the touch key or . You then have about two minutes to
press the WPS button on your Wi-Fi router and enable connecting to the network with the key . A
progress bar appears until the connection to the network is effective. The symbol
blinks quickly at the top of the screen, then becomes permanent.
Then you go back to the WPS screen and you can resume the settings menu.
or
❽
Tap the touch key
BLE communication (BLE = Bluetooth Low
Energy)
You can deactivate (OFF) or activate (ON)
the communication by tapping the key
or .
Possible Settings: BLE: ON and BLE: OFF.
CAUTION:
The Bluetooth Low Energy wireless connection must be enabled for acquisition of signals from the PolyLink
system.
Tap the touch key
Communication with the PolyLink BLE
module
The device searches for the BLE module
and the display blinks alternately with six
dashes as long as no module is
associated.
Once detected, the last six digits of the
Bluetooth address of the PolyLink system
flash alternately with BLE.
You can disable the communication by
tapping the key or .
Other manuals for Sefam S.Box
1
Table of contents