manuals.online logo
Brands
  1. Home
  2. •
  3. Brands
  4. •
  5. Gems
  6. •
  7. Switch
  8. •
  9. Gems LS-2050 Series Training manual

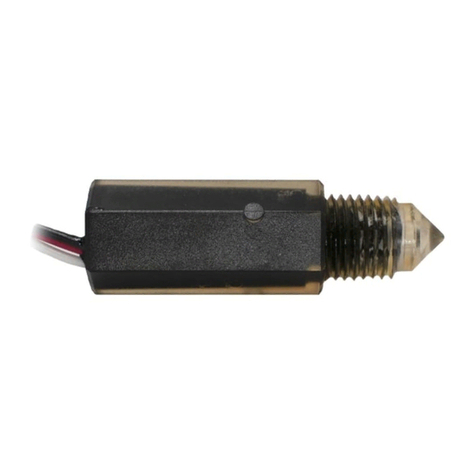
Gems LS-2050 Series Training manual

Horizontal: ±15°
1/2" Min.
.8 Min. #18 AWG, 24" L., Polymeric
900
Approx. 3/4"
.9 Min. .85 Min.
Maintenance . . .
An occasional cleaning when excessive contamination is present in the liquid is all that is
normally required. To clean unit: Compress split end of cam pivot pin, remove pin and
disassemble unit as shown below. Wipe parts clean with hydrocarbon solvent and
reassemble unit. Lock cam pivot pin by spreading split end slightly with screwdriver.
P/N 72950
Rev.P
Units are side-mounted in the tank at the point of high, low or intermediate
level sensing. Ideal for tanks with "hard-to-get-at" tops or bottoms. Float
and cam action is positive. Standard versions are U.L. Recognized - File
No. E45168. Explosion-proof units are approved for Class I, Division I,
Group D hazardous areas.
CSA Listed
Standard
Versions Switch*
Explosion-Proof Versions
30288
30290
48068
48069
FM Approved
----
55690
----
----
SPDT, 20 VA
SPDT, 20 VA
SPST, 100 VA, N.O.**
SPST, 100 VA, N.C.**
LS-2050's
52100
116971
116972
LS-52100's
----
55690
----
----
121753
----
----
121753
----
----
SPDT, 20 VA
SPST, 100 VA, N.O.**
SPST, 100 VA, N.C.**
*See "Electrical Data" on next page for more information
**100 VA switches are not UL recognized or CSA listed
Stem & Mtg Material
Float Material
LS-2050 LS-52100
Brass
Buna N
316 SS,
Beryllium Copper,
Teflon,
Ceramic
Other Wetted
Materials
316 SS
316 SS
SS,
Teflon,
Ceramic
316 SS
304 SS
Teflon,
Ceramic
150
Water: To +180°F
Oil: -40° to +250°F -40°F to +300°F
PSIG, Max. @ 70°F
Mounting Attitude
Switch Differential
(In Liquid)
Liquid Specific Gravity
Lead Wires
Operating Temp °F
500
Housing and
Stem Assembly
Permanent
Magnet
Spring Shuttle Float and Cam
Assembly
Cam Pivot Pin
Electrical Connection . . .
Electrical connection is provided by wire leads with 1/2" NPT or junction box with 1/2"
NPT.
Typical Wiring Diagrams . . .
Specifications . . .
1
1
1
LS-2050/LS-52100 Series
Side-Mounted Level Switches
Instruction Bulletin No. 72950
Product must be maintained and installed in strict accordance
with the National Electrical Code and GEMS technical brochure
and instruction bulletin. Failure to observe this warning could re-
sult in serious injuries or damages.
An appropriate explosion-proof enclosure or intrinsically
safe interface device must be used for hazardous area appli-
cations involving such things as (but not limited to) ignitable
mixtures, combustible dust and flammable materials.
*** Warning: To prevent ignition of flammable or combus-
tible atmospheres, disconnect power before servicing.
Pressure and temperature limitations shown on individual
catalog pages and drawings for the specified level switches
must not be exceeded. These pressures and temperatures
take into consideration possible system surge pressures/tem-
peratures and their frequencies.
Selection of materials for compatibility with the media is
critical to the life and operation of GEMS level switches. Take
care in the proper selection of materials of construction; par-
ticularly wetted materials.
Important Points!
Lifeexpectancyofswitch contactsvaries withapplications.
Contact GEMS if life cycle testing is required.
Ambient temperature changes do affect switch set
points, since the specific gravity of a liquid can vary
with temperature.
Level switches have been designed to resist shock
and vibration; however, shock and vibration should be
minimized.
Liquid media containing particulate and/or debris
should be filtered to ensure proper operation of GEMS
products.
Electrical entries and mounting points may require liq-
uid/vapor sealing if located in an enclosed tank.
Level switches must not be field repaired.
Physical damage sustained by the product may ren-
der it unserviceable.
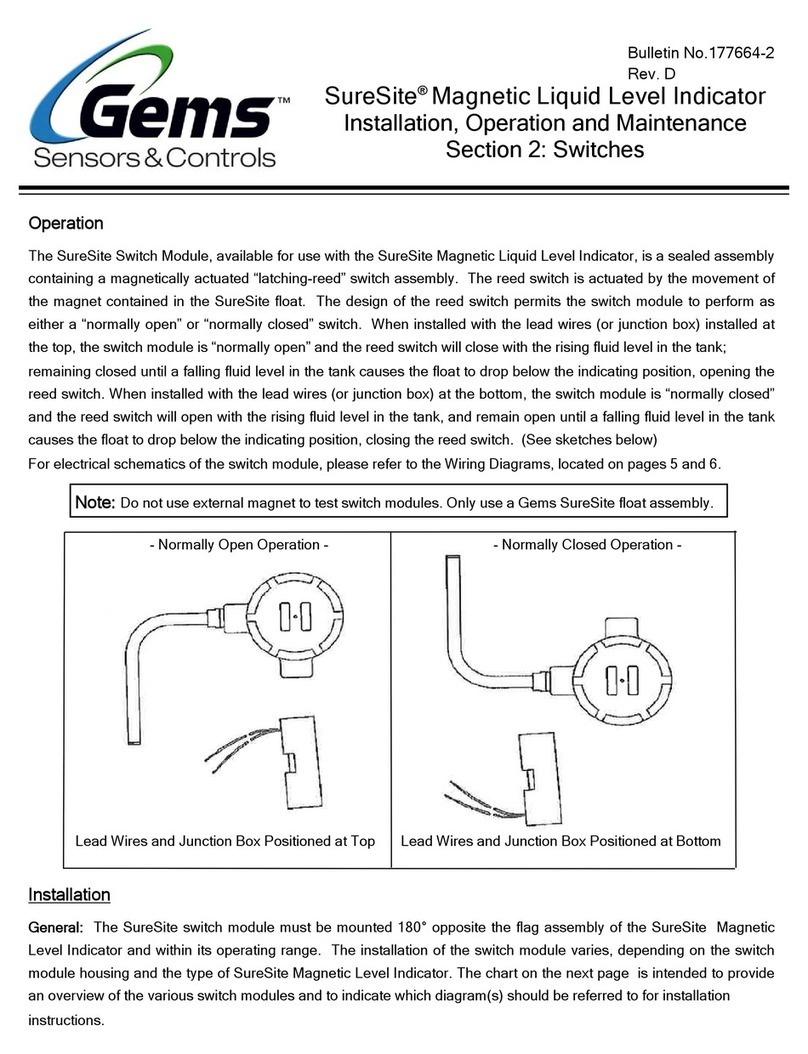
To Install LS-52100 Series or LS-2050
Series Units with Buna N Float . . .
Insert unit from the outside through 1" NPT boss in the
tank side and tighten so that the arrow on the unit housing
is pointing upward.
Important: Units shouldbeinstalledin environments free
from excessive contamination and high shock.
Method B: When inside of tank is
accessible. Unscrew and remove float
andlockwasher fromunitarm. Insert unitin
1" NPT boss in tank and tighten so that
arrow on housing points upward. Reas-
semble float and lockwasher on unit arm
from inside of tank.
To Install LS-2050 Series Units with Stainless Steel Float . . .
(Use either Method A or Method B shown below)
Method A: From outside of tank. Unscrew
and remove float and lockwasher from unit
arm. Thread a 2" to 1" NPT reducer (by
others) onto unit and reassemble float and
lockwasher. Insert unit and reducer in 2"
NPT boss in tank side and tighten so that
arrow on unit housing points upward.
Dimensional Data . . .
LS-52100 Series
Float In
Dry Position
Float In
Actuating
Position
Arrow Must
Point Upward
1" NPT
Boss
Inside
of Tank
Lockwasher
Float
Arm
Arrow
Must Point
Upward
LS-2050 Series
(Brass/Buna N
LS-2050 Series
(All Stainless Steel)
Arm
Lockwasher
Float
2" to 1" NPT
Reducer
Arrow Must
Point Upward
2" NPT
Boss
Electrical Data . . .
Switch Ratings - Max. Resistive Load
*100 VA switches are not U.L.
Recognized or CSA listed
**Limited to 50,000 operations.
Amps A.C.
.4
.17
.08
.8**
.4
VA AmpsDC
.3
.13
.06
N.A.
N.A.
20
100*
Volts
0-30
120
240
120
240
Thisproductis suitableforClass IandClassII applicationsonly,per therequirements
of standard EN60730 and any additional specific requirements for a particular
applicationormediumbeingsensed. ClassIcomplianceofmetalbodiedunitsrequires
a ground connection between the metal body and the earthing system of the
installation. Class I compliance of plastic bodied units in contact with a conductive
medium requires that the medium be effectively earthed so as to provide an earthed
barrier between the unit and accessible areas. For Class III compliance, a supply
at safety extra-low voltage (SELV) must be provided. Please consult the Factory
for compliance information on specific part numbers.
Approximate Actuation
Level - Contacts Transfer
on Ascending Level
1/2" NPT 1"
NPT
5/8"
7/8"
(22.2 mm) 2-3/8" ±1/8"
(60.3 mm)
1-3/8"
(34.8 mm)
3-7/16"
(87.3 mm)
←→
↓
←→
↑
1"
NPT
1"
(25.4 mm)
Approximate Actuation Level -
Contacts Transfer on Ascending Level
5-1/16"
(128.6 mm)
3-5/8"
Approx.
(92.0 mm)
4-1/8"
Approx.
(104.8 mm)
↑
↓
↑
↓
Approximate Actuation Level -
Contacts Transfer on Ascending Level
1"
NPT
1"
(25.4 mm)
5-1/16"
(128.6 mm)
5-9/32" Approx. (134.1 mm)
3-1/4"
Approx.
(82.5 mm)
↑
↓
↑
↓
European Pressure Directive
The product is designed and manufactured in accordance with Sound Engineering Practice as
defined by the Pressure Equipment Directive 97/23/EC. This product must not be used as a
“safety accessory” as defined by the Pressure Equipment Directive, Article 1, Paragraph 2.1.3.
The presence of a CE Mark on the unit does not relate to the Pressure Equipment Directive.

This manual suits for next models

1

Other Gems Switch manuals

Gems PS61P Series Training manual

Gems

Gems PS61P Series Training manual

Gems ULS-100 Training manual

Gems

Gems ULS-100 Training manual

Gems ELS-1100 Series Training manual

Gems

Gems ELS-1100 Series Training manual

Gems FS-600 Series User manual

Gems

Gems FS-600 Series User manual

Gems SureSite series Installation and operating instructions

Gems

Gems SureSite series Installation and operating instructions

Gems ELS-1100 Series Training manual

Gems

Gems ELS-1100 Series Training manual

Gems LS-700 Series Training manual

Gems

Gems LS-700 Series Training manual

Gems PS31 Training manual

Gems

Gems PS31 Training manual

Gems ELS-1100 HT Series Training manual

Gems

Gems ELS-1100 HT Series Training manual

Popular Switch manuals by other brands

Aruba 4100i Series Installation and getting started guide

Aruba

Aruba 4100i Series Installation and getting started guide

OEZ FSD Series Instructions for use

OEZ

OEZ FSD Series Instructions for use

V7 EGS16 user manual

V7

V7 EGS16 user manual

Cypress CHDD-41AR Operation manual

Cypress

Cypress CHDD-41AR Operation manual

MRD TNM4000-TP36FF4X16G24P user manual

MRD

MRD TNM4000-TP36FF4X16G24P user manual

LEGRAND Plexo 0 698 50L manual

LEGRAND

LEGRAND Plexo 0 698 50L manual

Heathkit Heathkit HD-1234 Assembly and operating instructions

Heathkit

Heathkit Heathkit HD-1234 Assembly and operating instructions

Philips 2G350A2H user guide

Philips

Philips 2G350A2H user guide

Jung FMAS816REG operating instructions

Jung

Jung FMAS816REG operating instructions

Trust 71263 user manual

Trust

Trust 71263 user manual

EUCHNER CET3-AR Series quick start guide

EUCHNER

EUCHNER CET3-AR Series quick start guide

EMP-Centauri S2/1PCNpos-W1 instruction manual

EMP-Centauri

EMP-Centauri S2/1PCNpos-W1 instruction manual

Eaton Series NRX Instruction leaflet

Eaton

Eaton Series NRX Instruction leaflet

D-Link DU-H4 user manual

D-Link

D-Link DU-H4 user manual

Topex multiSwitch user manual

Topex

Topex multiSwitch user manual

Smartwares SH5-RBD-01A instruction manual

Smartwares

Smartwares SH5-RBD-01A instruction manual

Kramer VS-21DTP quick start guide

Kramer

Kramer VS-21DTP quick start guide

Ubiquiti USW-48-POE quick start guide

Ubiquiti

Ubiquiti USW-48-POE quick start guide

manuals.online logo
manuals.online logoBrands
  • About & Mission
  • Contact us
  • Privacy Policy
  • Terms and Conditions

Copyright 2025 Manuals.Online. All Rights Reserved.