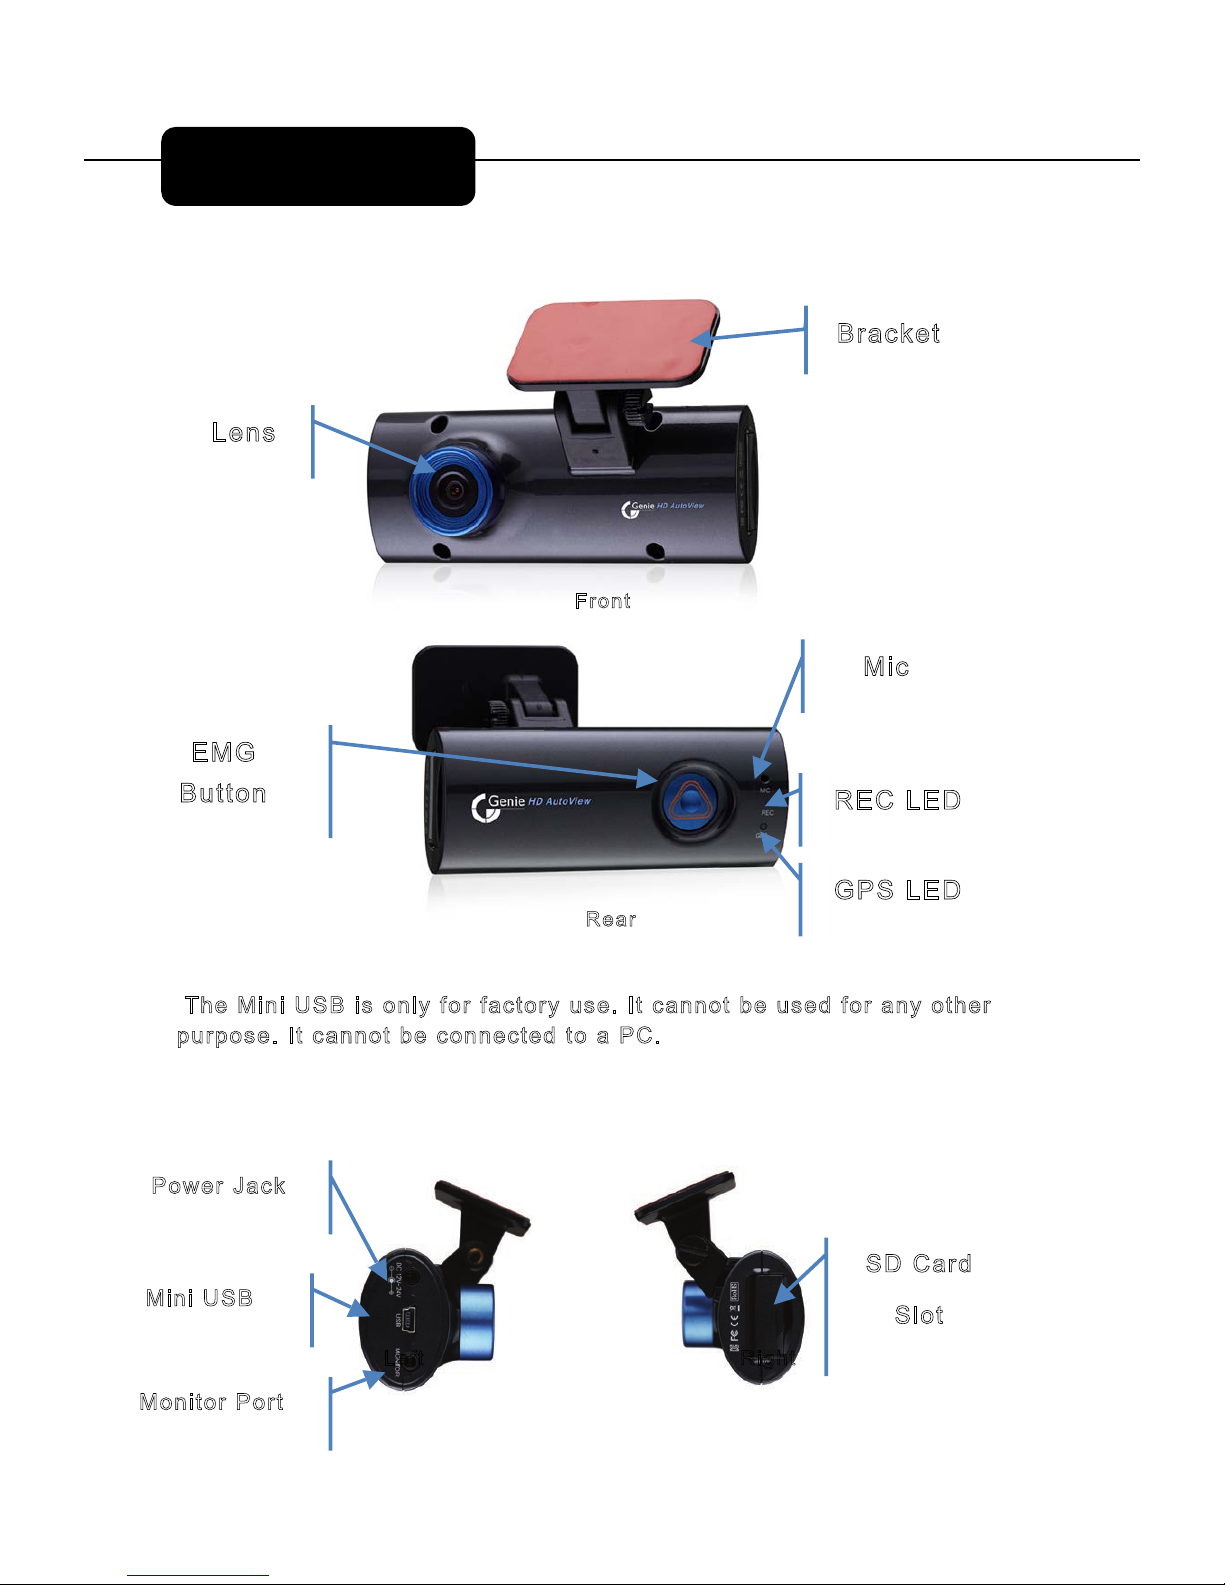
Genie CCTV HDAV100 Manual

Model: HDAV100
Genie HD AutoView
Vehicle Camera
Instruction Guide

!
Cautions
Do not use any chemical agents to clean your
Genie HD AutoView, as they may cause
damage to the product. If you do need to clean
any part of the product only use a damp cloth.
!
!
Do not insert anything into the product, or
subject it to unnecessary shocks. Failure to
follow this caution could result in a fire or
cause an electric shock.
!
Do not place anything on the windscreen
which may block the cameras angle of view.
The video quality could be compromised.
!
!
!
Make sure the Genie HD AutoView is turned
off before removing the SD Card, otherwise it
might result in damage to the Card.
!
Do not disassemble, repair or modify this
product. It will void the product warranty.

About the Product
Thank you for purchasing this Genie HD AutoView. Genie HD AutoView
features a built-in GPS antenna, H.264 video compression for ultra-clear
video, and intuitive playback software for you to view and archive your
recorded videos. Genie HD AutoView is designed to record daily driving
events from the driver’s perspective. To play back the events, please use the
included Genie HD AutoView software.
Continuous Recording
During driving, the product records the view of the road, audio and GPS
coordinates.
Record Speed – Maximum of 30 fps
Resolution – 1080p (1920 x 1080), 720p (1280 x 720)
Event Record
If certain events happen, while in continuous recording mode, the event
record settings (user defined) can automatically change frame rates etc.
Emergency (when pressing the emergency button)
Impact (if there is a physical impact on the vehicle)
Over speed (exceeding the speed the user has set as a limit)
Analyse the Data for Video, Audio, Speed and GPS Coordinates
Recorded data on the SDHC card can easily be played back and analysed in
the exclusive Genie AutoView viewer program. The recorded Video/Audio/GPS
Coordinates/Speed are shown in the viewer.

GenieHDAutoView&
Bracket
CableHolder
VideoOutCable
SDHCCard
CigaretteJackCable
CD

$1=5?6138&1BD
B?>D
'51B
"56D
'978D
"5>C
B13;5D
#
EDD?>
#93
'"
&("
&?G5B 13;
#9>9*(
#?>9D?B&?BD
(1B4
(<?D
)85#9>9*(9C?><I6?B613D?BIEC5D31>>?D25EC546?B1>I?D85B
@EB@?C5D31>>?D253?>>53D54D?1&

Genie AutoView
Image Sensor 2MP CMOS Sensor
Audio Input MIC Built In
Video Compression H.264
Audio Compression ADPCM
Record Resolution 1080P (1920 x 1080), 720P (1280 x 720)
Record Speed Max. 30fps
Emergency Button Event recording using the emergency button settings
G-Sensor Event recording by outside impact
GPS Sensor Event recording using the user’s over speed settings
Recording Media SDHC card (Max: 32GB, Default 8GB)
Recommended Type: Over Class 6
Lens Horizontal View 93°,Vertical View 70°
Viewer Windows 7 / VISTA / XP
Power DC12~24V
Operating
Temperature
-5°~50°C (Storage Temperature: -20° ~ 80°C)
Humidity 10~95% RH
Weight 100g (without SDHC card)
Size (W x D x H) 102.5 (W) x 42 (D) x 27 (H )mm
※ As our products are subject to continuous improvement we reserve the
right to modify product design, specifications and prices without notice
and without incurring any obligations.
Features

1. Insert the SDHC card.
2. Assemble the Genie HD AutoView main body and bracket.
3. Decide where best to position the product on the windscreen - ideally
behind the rear view mirror. Clean up humidity moisture and dirt from the
windscreen using a clean, dry lint free cloth.
4. Remove the protective film covering the adhesive tape of the bracket.
5. After attaching the bracket to the windscreen, tighten the bracket screw
using a coin or small screwdriver.
6. Connect the power cable and secure with cable ties.
7. Start driving and use the product (the REC LED light is ON during normal
operation).
8. Turn OFF HD AutoView and remove the SDHC. Check the recorded data
using the viewer software on a PC.
Easy Installation
Caution
Only install the product when the vehicle is stationary
First connect the product to the power outlet then turn it on..
Only use the supplied power cable (DC12~24V).
Clean the windscreen where the product is to be attached. Dirt and
moisture could make the product fall from the windscreen.

Installation
Insert the SDHC card into the SD
card slot, as shown in the image on
the left. In cases where the SDHC
card is forcefully inserted, the SDHC
card and the product will be
damaged and the warranty become
void.
Assemble the bracket with the main
body.
The bracket screw is located on the
left side – looking from above.
Assign the place on the windscreen,
where the product is to be installed.
Before installing, please clean off all
dirt and moisture from the
windscreen.
If possible, install the product behind
the middle position of the rear-view
mirror to stop it from interfering with
the driver’s view of the road.

Remove the protective film covering
the adhesive bracket, and slightly
loosen the mounting bracket screw to
adjust the mounting angle.
Firmly press the mounting bracket and
camera onto the chosen position on
the windscreen.
Hold for 3 seconds to secure.

Tighten the mounting bracket screw
with a coin to secure the mounting
position. The camera's view of the road
angle should be adjusted to allow
for the windscreen’s tilt.
Secure the power cable with the supplied tie wraps.

Plug in the car adapter to the product
and then into the cigarette lighter to
power up.
HD AutoView takes approximately 30 seconds to start up.
It indicates recording has started with a beep.
During normal operation, the REC LED is always ON.

InstalltheViewer
program
Run“GenieHDAutoView.exe”
filefromtheinstallationCD.If
theOSiswindowsVISTA/7,
clicktherightmousebuttonand
install‒onlywithuserʼs
authorisation.Foreignlanguage
supportisprovidedandthe
programwillbetranslated
accordingtothePCʼsOS
Select“GeneralInstallation”
thenclickthe“Next”button.
Afterclicking“FinishInstallation”,theviewerprogramautomaticallyruns
andtheICONiscreated.

ReversePlay,
Play
VolumeUp/Down
1FramePlayback
ExploreEvents
RepeataEvent
GPSSignalWindow
Pause
Print
NextEvent
BackUp
PlaybackSpeed
SetUp
Speed
OpenaFile
Panorama
DrawLane
E-GoogleMap(as
longasconnectedto
theinternet)
GPSSignalBar
HowtoPlayback

How to Playback
After turning off the
product, take out the
SDHC card. Insert the
SDHC card into a PC
and click the viewer
program Icon to
execute the program.
On the main menu,
select the time data you
want to play and click the
play button to watch
the recorded data.

Playback
Double click the left mouse button to convert to full screen from the main
menu screen. To return to the main screen, click the left mouse button again.
On the playback screen, clicking the right mouse button on a screen position
initiates the zoom feature. You can move the zoom around after pressing the
mouse button. Press the right mouse button to deactivate the zoom function.

Click the Draw a lane icon, as above pop up screen, adjust the line to match the
lane. Select Draw lane on the road and click Apply button to start.
To cancel Draw a lane, unselect Draw lane on the road and click Apply button.
Click Panorama icon as above to start Panorama playback.
A 16 division screen is displayed, with each screen showing individual frames in
sequence.
Double click on any one screen to display in full screen.
To cancel Panorama mode, click the Restore screen button - as shown in red.
Playback-II

Playback-III
Click Repeat event icon as above to setup a repeat section. Click the desired Start
and End points during playback. Playback repeats between the selected times.
Click Release to clear Start and End points.

Back-Up
There are several options for
back up - JPEG, BMP, AVI,
JDR and G-SENSOR data
back-up.
Back up for Image - AVI and JDR
Select the time of the recorded data to
be backed up and press the back-up
button.
To back up the audio with the video,
check the “Audio” box, nominate the
backup data path then press the “Next”
button. A progress bar of the back-up is
displayed.
1. AVI back-up files can be played
back in Windows Media Player or
other AV players.
2. JDR back-up files can only be played
back using the Genie HD Autoview
viewer program.
3. Image back-up files can be shown
in an image viewer or “Paint” for
Window OS.

System Set-Up
Resolution - Select either 1080P or 720P.
Camera - Adjust the frame/sec.
Brightness - Brightness can be set to one of three levels “Dark/Default/Bright”.
The above settings influence on the data size of recorded files and the SD card
storage space.
Audio - Record with audio or not.
Overwrite - If “Use” is checked and the SD memory card is full, it automatically
overwrites only the normal mode data saved on to the SD card starting from the
beginning.
If “Not Use” is checked it will not record if the SD card has insufficient storage.
Standard Time Zone - Set the appropriate time zone where the camera is being used.
Auto Reboot - Set the auto reboot daily to keep the operation stable.
Km/Miles- Choose between Kilometres or Miles on viewer.

Event - EMERGENCY / IMPACT / OVERSPEED / SUDDEN START / SUDDEN STOP /
PARKING / MOTION.
Frame -
Post-alarm - 2 ~30 seconds recording after an event occurs.
Over speed - Set up the over speed monitoring system. Once the speed limit has been
exceeded, the device will begin recording. Km or Miles will be shown according to
which is chosen on the system.
Impact - Applying G-Sensor’s sensitivity.
Event Set-Up
Table of contents