Kompernass CR 5 A2 User manual

IAN 275078
DashboarD Camera Cr 5 a2
DashCam
Bedienungsanleitung und Sicherheitshinweise
Caméra embarquée
Mode d'emploi et consignes de sécurité
DashCam
Betjeningsvejledning og sikkerhedsanvisninger
DashCam
Gebruiksaanwijzing en veiligheidsvoorschriften
DashboarD Camera
Operating instructions and safety instructions

GB/IE Operating instructions and safety instructions Page 1
DK Betjeningsvejledning og sikkerhedsanvisninger Side 27
FR/BE Mode d'emploi et consignes de sécurité Page 53
NL/BE Gebruiksaanwijzing en veiligheidsvoorschriften Pagina 79
DE/AT/CH Bedienungsanleitung und Sicherheitshinweise Seite 105
Before reading, unfold the page containing the illustrations and familiarise yourself with all
functions of the device.
Før du læser, vend siden med billeder frem og bliv bekendt med alle apparatets funktioner.
Avant de lire le mode d’emploi, ouvrez la page contenant les illustrations et familiarisez-vous ensuite
avec toutes les fonctions de l’appareil.
Vouw vóór het lezen de pagina met de afbeeldingen open en maak u vertrouwd met alle functies
van het apparaat.
Klappen Sie vor dem Lesen die Seite mit den Abbildungen aus und machen Sie sich anschließend
mit allen Funktionen des Gerätes vertraut.

a
e
b
C
d

CR 5 A2 GB│IE│1 ■
Contents
Introduction ...................................................2
Information concerning these operating instructions ...............................2
Copyright................................................................2
Notes on trademarks.......................................................2
Intended use .............................................................2
Warnings used............................................................3
Safety . . . . . . . . . . . . . . . . . . . . . . . . . . . . . . . . . . . . . . . . . . . . . . . . . . . . . . . . 4
Basic safety guidelines......................................................4
Possible infringements of the rights of third parties ................................6
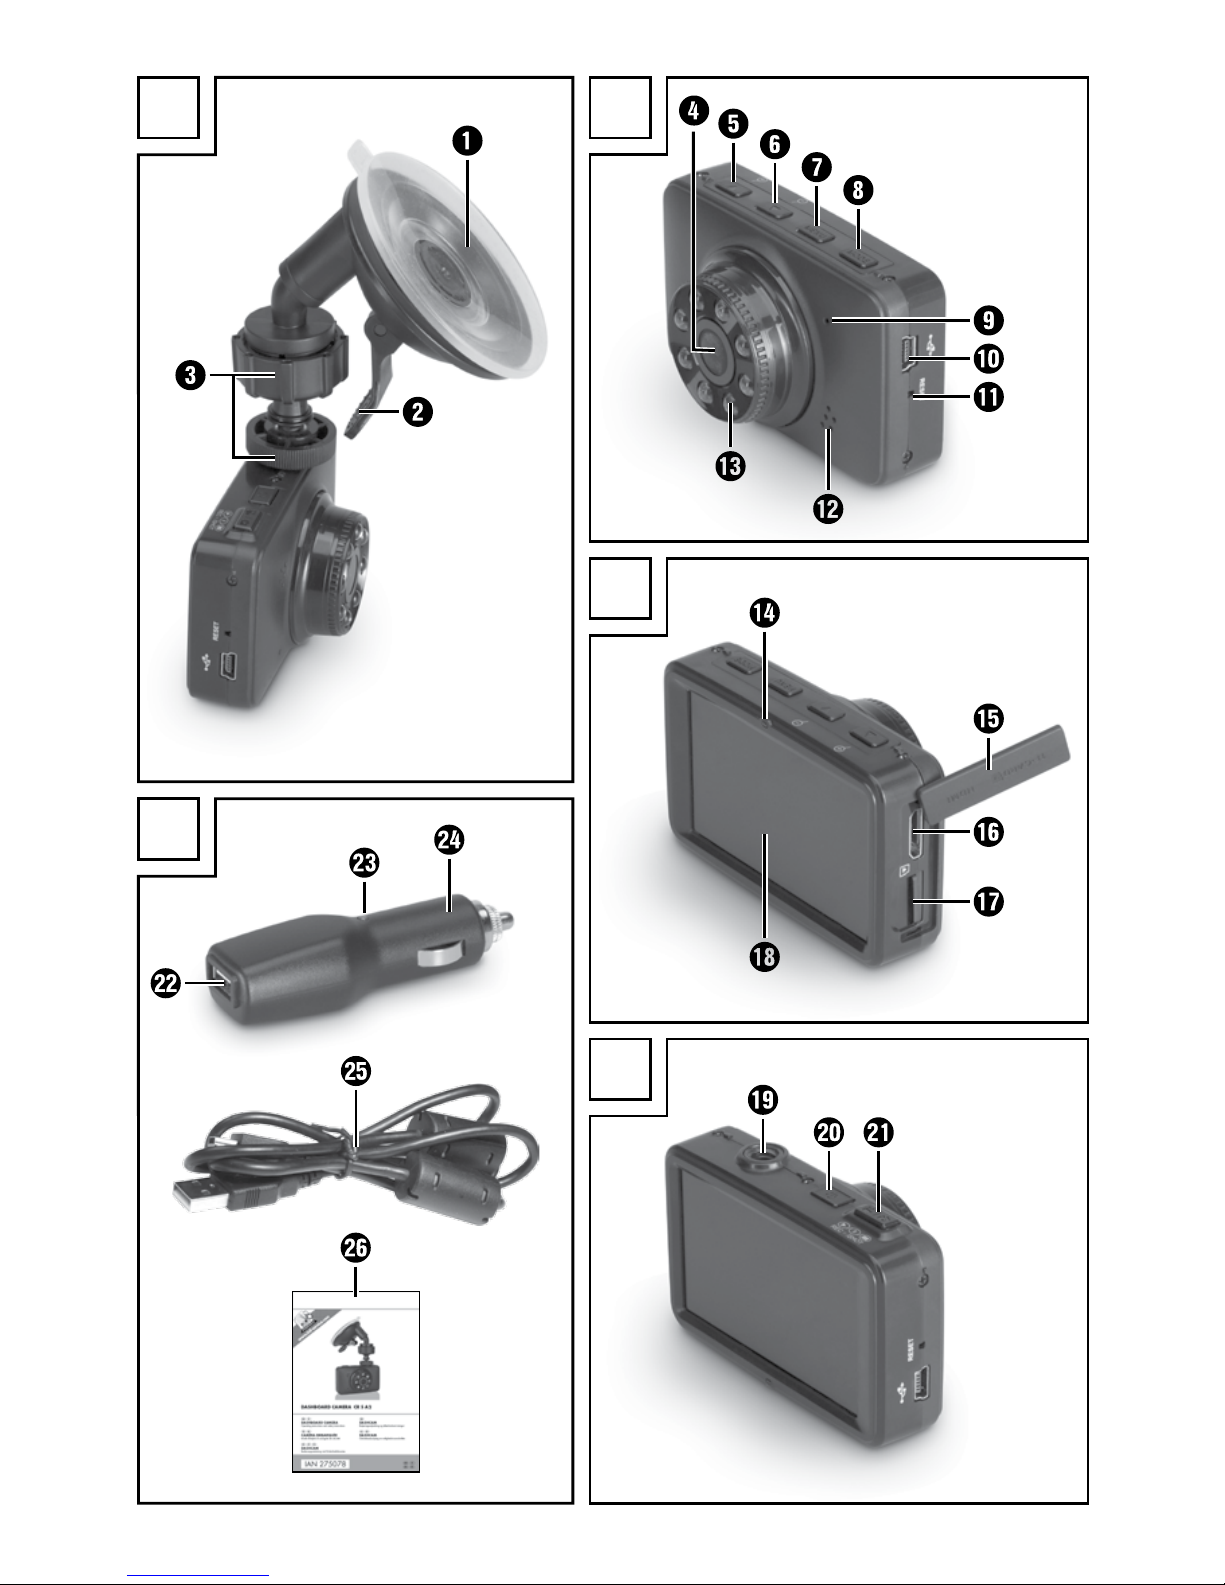
Controls.......................................................7
Contents of package and transport inspection ...................................8
Disposal of packaging materials ..............................................8
Initial operation ................................................9
Inserting/removing the microSD card ..........................................9
Mounting the camera on the windscreen ......................................10
Providing electric power ...................................................10
Handling and operation ........................................11
Switching on and off, making settings .........................................11
Basic settings ............................................................11
Setup menu...........................................................11
Video standby mode ...................................................14
Start/end recording....................................................14
Photo standby.........................................................17
Taking photos .........................................................17
Playback mode........................................................18
Showing recordings on an external monitor ....................................21
Transferring recordings to a computer.........................................22
Resetting the device .......................................................22
Changing the fuse ........................................................22
Cleaning .....................................................23
Troubleshooting ...............................................23
Fault causes and rectification................................................23
Storage/Disposal .............................................24
Storage when not in use ...................................................24
Disposal of the device .....................................................24
Appendix ....................................................24
Notes on the EU-Declaration of Conformity ....................................24
Technical data ...........................................................25
Warranty ...............................................................26
Service.................................................................26
Importer ................................................................26

CR 5 A2
■ 2│GB│IE
Introduction
Information concerning these operating instructions
Congratulations on the purchase of your new device.
You have selected a high-quality product. The operating instructions are part of this
product. They contain important information on safety, usage and disposal.
Before using the product, familiarise yourself with all handling and safety guidelines.
Use the product only as described and for the range of applications specified. Keep
these operating instructions as a reference and store them near the product. Please
pass on all documentation incl. these operating instructions on to any future owner(s)
if you sell this product or give it away.
Copyright
This documentation is subject to copyright protection.
Any copying or reproduction, including extracts thereof, and the reproduction of
images (even in a modified state), is permitted only with the written authorisation of
the manufacturer.
Notes on trademarks
USB®is a registered trademark of USB Implementers Forum, Inc.
All other names and products may be trademarks or registered trademarks of their
respective owners.
Intended use
This cockpit recorder is an information electronics device designed to record digital
photos and videos in motor vehicles, particularly while on the road. It is not intended
for any other use. This device is not intended for use in commercial or industrial
environments. The manufacturer accepts no responsibility for damage caused by
failure to observe these instructions, improper use, incompetent repairs, making
unauthorised modifications or for using unapproved replacement parts. The risk shall
be borne solely by the user.

CR 5 A2 GB│IE│3 ■
Warnings used
The following warnings are used in these operating instructions:
DANGER
A warning at this hazard level indicates an imminently hazardous
situation.
If the dangerous situation is not avoided, serious injuries or death may follow.
► Follow the instructions in this warning to avoid the risk of serious injury or death.
WARNING
A warning at this hazard level indicates a potentially hazardous
situation.
Failure to avoid this hazardous situation could result in physical injury.
► Follow the instructions in this warning to prevent physical injury.
CAUTION
A warning at this hazard level indicates potential material damage.
Failure to avoid this situation could result in material damage.
► Follow the instructions in this warning to prevent material damage.
NOTE
► A note indicates additional information that eases device handling.

CR 5 A2
■ 4│GB│IE
Safety
In this section, you will receive important safety advice relating to device handling.
The device complies with the statutory safety regulations. Improper use may result in
personal injury and material damage.
Basic safety guidelines
To ensure safe handling of the device, follow the safety guidelines set out below:
■ Prior to use, check the device for visible, external damage. Do not operate an
device that has been damaged or dropped.
■ If the cables or connections are damaged, have them replaced by an authorised
specialist or customer service.
■ All repairs must be carried out by authorised specialist companies or by the
Customer Service department. Failure to make proper repairs can put the user at
risk. Warranty entitlement will also lapse.
■ Defective components must always be replaced with original replacement parts.
Compliance with the safety requirements can only be guaranteed by using these
replacement parts.
■ Never open the device, and never carry out any repairs yourself.
■ Protect the device from moisture, spray and dripping water and penetration by
liquids.
■ Never subject the device to extreme heat or humidity. This applies especially to
storage in a car. If the car is stationary for long periods and the weather is
warm and sunny, temperatures of more than 40°C can arise in the car interior
and the glove compartment. Remove electrical and electronic devices from the
vehicle.
■ When fitting the camera and accessories, ensure that it does not interfere with
the steering, braking or the operation of other vehicle systems (such as airbags)
and does not restrict your field of view when driving, in accordance with the
Road Vehicles (Construction and Use) Regulations 1986.
■ Ensure that the suction cup does not extend further than 4 cm into the wiping ran-
ge of the windscreen wipers, and that not more than 1 cm of it is installed in the
area directly above the steering wheel (see also section Mounting the camera
on the windscreen).
■ Make sure the screen is switched off while you are driving.
To do this, select the setting „Auto display off“ in the setup menu and set the time
period to „1 min“. Wait until the screen has switched off before you start driving.
DANGER
► Do not place the car cradle in or near the expansion area of the airbag, since
the cradle could be flung through the vehicle interior in the event of airbag
deployment and cause serious injuries.

CR 5 A2 GB│IE│5 ■
WARNING
► The camera should not be mounted in such a way that you or other passengers
could be hit by the camera in the event of an accident. This could cause serious
injury.
■ Children and people who, due to their physical, intellectual, motor or sensory ca-
pabilities, are incapable of operating the device safely may only use the device
under the supervision or direction of a responsible person.
DANGER
► Packaging materials must be kept out of the reach of children and should not
be used as playthings. Risk of suffocation.
■ Do not allow children to use the device unless they are being supervised. Child-
ren are not always able to correctly recognise potential dangers. Children must
not play with the appliance.
■ Do not place any objects on the device.
■ Do not operate the device close to open flames (e.g. candles).
■ If you notice a burning smell or smoke coming from your device, disconnect
it from the power supply immediately.
WARNING
► Under no circumstances should the smoke be inhaled as this could be harmful
to your health.
■ Check regularly to ensure that the suction cup is securely attached to the wind-
screen. This is especially important in areas where extreme outside temperature
fluctuations occur.
■ All of the applicable laws in your location must be observed. The use of a cock-
pit camera is banned in some countries and may constitute a criminal offence.
The camera should not be operated while driving. Traffic safety must ALWAYS
take priority whilst driving. Use this device only if it is not like to lead to any
hazard during driving situations.
DANGER
► The device contains a lithium-ion battery. Therefore, the device must not be
thrown into the fire. There is a risk of explosion!
■ Do not exert any pressure on the display. If it should break, touching the sharp
edges could cause injury.

CR 5 A2
■ 6│GB│IE
Possible infringements of the rights of third parties
Please note the following when using the cockpit camera:
Copyright protection
In principle, everyone has the right to pictures of themselves. According to copyright
law, pictures of people may only be published without their permission if the affected
person appears merely as an incidental feature in a landscape or other location. The
question as to whether a person is merely an incidental feature must be ascertained
on a case by case basis.
Protection of privacy
The privacy of others may not be infringed by any recorded images. Do not set up the
camera pointing at the garden or an entrance of a neighbouring residence, even if
these locations are easily visible from your own vehicle or from public places. This
does not a constitute a right to publish these views.
Personal determinability
Personal determinability exists when it can be established that a certain person was
at a certain location at a certain time. This identification can be made by means of
an identifier related to a specific person, e.g. a car number plate. Personal determi-
nability of persons is to be avoided.
Surveillance cameras at the workplace
Surveillance at the workplace is subject to particularly strict legislation in Germany.
Employers should not use surveillance cameras in the workplace in any cases where
this could lead to a possible infringement of legal rights.
The respective legal requirements of the country in which the camera is being used
should always be observed to avoid possible infringements of the rights of third
parties. Due to the possible violation of third party rights, it is illegal to publish
recordings featuring strangers or vehicle license plates without authorisation,
e.g. on the Internet. The recordings may only be used for providing evidence in the
event of an accident.

CR 5 A2 GB│IE│7 ■
Controls
(For illustrations see the fold-out page)
Figure A:
Cradle with suction cups
Locking lever
Knurled screws for three-dimensional locking
Figure B:
Camera lens
/ ▲ button
/ ▼ button
MENU button
MODE button
Microphone
Mini-USB port
Reset opening
Loudspeaker
Infrared LEDs
Figure C:
Operating display
Cover
Mini-HDMI connection
microSD card slot
Screen
Figure D:
Thread for the tripod mount
On/Off button
/ button to start/stop the video recording, to trigger a photo or
call up menu items
Illustration E:
USB socket for power supply via the in-car adaptor
Operating light
12/24 V car adapter
USB to mini-USB cable
Operating instructions

CR 5 A2
■ 8│GB│IE
Contents of package and transport inspection
Please check the contents of the package (see fold-out page).
The following components are included in delivery:
● Cockpit recorder CR 5 A2
● Cradle with suction cups
● 12/24 V car adapter
● USB to mini-USB cable
● These operating instructions
♦ Remove all the parts of the device and the operating instructions from the
packaging and then check the contents for completeness and visible damage
(see fold out page).
♦ Remove all packing material and the protective film from the screen and
camera lens .
NOTE
► If the consignment is incomplete or damaged due to defective packaging or
carriage, contact the Service hotline (see the Service section).
Disposal of packaging materials
The packaging protects the device from damage during carriage. The packaging
materials have been selected in accordance with environmentally congruent and
disposal-specific parameters and are, therefore, recyclable.
Returning the packaging to the materials cycle conserves raw materials and reduces
the amount of waste that is generated. Dispose of packaging materials that are no
longer needed in accordance with applicable local regulations.
NOTE
► If possible, keep the original packaging of the device during the warranty
period, so that the device can be packed properly for returning in the event of
a warranty claim.

CR 5 A2 GB│IE│9 ■
Initial operation
Inserting/removing the microSD card
CAUTION
► Do not install or remove the microSD card (not supplied) while the device is
switched on. This can cause loss of data on the microSD card.
♦ Insert a microSD card into the microSD card slot so that the golden contacts
are facing toward the display. Press the microSD card in until it locks into place.
♦ To remove the microSD card, gently press the edge of the microSD card. The
microSD card is ejected slightly and can be removed from the device.
NOTE
► The camera does not have any internal memory. Therefore, recordings can only
be made with a memory card inserted.
You can find the maximum recording time depending on the storage capacity
of the microSD card and the selected resolution in the following table.
Resolution Storage capacity of the
microSD card Approximate recording time
1080p
4 GB approx. 0 hrs. 19 min.
8 GB approx. 0 hrs. 41 min.
16 GB approx. 1 hr. 21 min.
32 GB approx. 2 hrs. 41 min.
720p
4 GB approx. 0 hrs. 32 min.
8 GB approx. 1 hr. 06 min.
16 GB approx. 2 hr. 12 min.
32 GB approx. 4 hrs. 22 min.
480P
4 GB approx. 0 hrs. 47 min.
8 GB approx. 1 hr. 37 min.
16 GB approx. 3 hrs. 12 min.
32 GB approx. 6 hrs. 23 min.

CR 5 A2
■ 10│GB│IE
Mounting the camera on the windscreen
1) Screw the cradle into the thread of
the camera Position the suction cup on the
windscreen. Ensure that the suction cup is
pressed on flat.
2) Place the suction cup firmly against the wind-
screen and press the suction cup locking
lever downwards towards the windscreen.
This creates suction, and the suction cup is
pulled tightly against the windscreen. Pull the
locking lever in the opposite direction to
release the suction cup from the windscreen.
The suction cup has a tab at the side, which
makes it easier to remove.
3) After attaching the camera with the suction
cup on the windscreen, loosen the knurled
screws and adjust the camera as per your
wishes.
4) Once you have found the desired position and orientation, retighten the knurled
screws .
CAUTION
► The camera must be positioned so that the driver's field of vision is not
obscured.
► Ensure that the suction cup does not extend more than 4 cm into the wiping
range of the windscreen wipers (light grey area), and that not more than 1 cm
of it is installed in the area directly above the steering wheel (grey area) (see
diagram).
Providing electric power
CAUTION
► Use only the supplied car adapter to power your device.
1) Connect the car adapter to your vehicle's on-board power supply (cigarette
lighter). The operating light on the car adapter indicates operational
readiness when the socket is live.

CR 5 A2 GB│IE│11 ■
2) Connect the supplied mini-USB cable to the USB port on the car adapter
and the USB socket of the camera. As soon as the camera is powered by
the on-board power supply, the video recording starts and the operating display
lights up red. Once the internal backup battery is charging, the battery
charger symbol appears on the screen .
CAUTION
► In vehicles in which the cigarette lighter also works with the ignition switched off,
the device must be disconnected from the cigarette lighter socket after use.
Otherwise, the vehicle battery may be discharged over a long period of time,
since the device also uses power when it is idle. The vehicle's engine will no
longer start.
► In vehicles in which the cigarette lighter is not switched off, the recording is not
interrupted. In this case, you will need to switch off the camera manually.
Handling and operation
In this chapter you will receive important information for the handling and operation of
the device.
Switching on and off, making settings
Press the on/off button to switch on the device. The camera image is displayed on
the screen . The device is now in video standby mode.
To switch off the device, press and hold the on/off button for 3 seconds.
Basic settings
Setup menu
To make the basic settings for the device in the setup menu, press the MENU
button followed by the MODE button . The setup menu opens:
Default settings
NOTE
► When calling up the menu, you must first press the ▼ button to place the
selection bar on the first entry.
Then you can use the ▲▼ buttons / to move the selection bar to the desired
entry and then call up this menu item with the / button . To exit the activated
menu item without making a change, press the MODE button . Below right, the
current menu board as well as the total number of menu boards is shown. To close
the menu, press the MENU button .

CR 5 A2
■ 12│GB│IE
Time & date
If you access this menu option, you can then use the ▲▼ buttons / to select
whether the recordings are to be made with or without a date stamp. Select "Time &
date stamp on" to activate ths function or "Time & date stamp off" to deactivate it.
To set the current date, call up "Set time & date". Then use the ▲▼ buttons /to set
the current year. Press the MODE button to use the ▲▼ buttons / to set the
hours of the current time. Press the MODE button to use the ▲▼ buttons /
to set the minutes. Press the MODE button to use the ▲▼ buttons /to set the
seconds. Press the MODE button to use the ▲▼ buttons / to set the required
date format. The options are „YY/MM/DD“ for the two-digit date in the order „year/
month/day“, „MM/DD/YY“ for the two-digit date in the order „month/day/year“
and „DD/MM/YY“ for the two-digit date in the order „day/month/year“. Press
the MODE button to use the ▲▼ buttons / to set the day. Press the MODE
button to use the ▲▼ buttons / to set the month.
Confirm your selection by pressing the / button . Afterwards, the display will
return to the list of menu items.
Auto Power Off
If you access this menu option, you can the use the ▲▼ buttons / to choose
whether the device switches off automatically after "1 Min", "3 Min" or "5 Min" of
inactivity. If you select "Off", the device will not switch off automatically.
Confirm your selection by pressing the / button . Afterwards, the display will
return to the list of menu items.
Impact sensor
If you access this menu option, then you can use the ▲▼ buttons / to select the
sensitivity of the built-in impact sensor: "Very low", "Low", "Middle", "High" and "Very
high" are the available options. This feature automatically protects the current video re-
cording when it recognises an impact, which indicates an accident event, from being
overwritten during a loop recording. The symbol appears on the screen and
the current recording is protected from deletion. Confirm your selection by pressing the
/ button . Afterwards, the display will return to the list of menu items.
Beep sound
If you access this menu option, you can then use ▲▼ buttons / to select whether
the device emits an acoustic signal when pressing the device's buttons as well as the
on/off function ("On"), or not ("Off"). Confirm your selection by pressing the /
button . Afterwards, the display will return to the list of menu items.
NOTE
► The countdown and the shutter sound are played for a self-timer capture even if
the sounds are deactivated.

CR 5 A2 GB│IE│13 ■
Auto display off
If you access this menu option, you can then use the ▲▼ buttons / to select the
period after which the display automatically switches off: "1 Min", "3 Min" and "5
Min" are the available options. Select "Display always on" if the display is to remain
on permanently. To reactivate the display after it has been automatically switched off,
press one of the ▲▼ buttons / , the MODE button or the / button .
Language
If you access this menu option, you can then use the ▲▼ buttons / to select
"English" or "Deutsch" as the language for the on-screen menus. Confirm your selec-
tion by pressing the / button . Afterwards, the display will return to the list of
menu items.
Display icon rotation
If you access this menu option, you can then use the ▲▼ buttons / to select
whether the display icons and the menus are to be displayed in the normal mode
("Off") or rotated by 180° ("On"). The best selection depends on how you have
mounted the camera.
Format memory card
If you access this menu option, then you can use the ▲▼ buttons / to format the
inserted microSD card. This process will irretrievably delete all the data on the microSD
card, even data which is write protected. To format the card, use the ▲▼ buttons /
to select "OK" and then press the / button .
The formatting process will begin.
Default settings
If you access this menu option, you can then reset all the settings of the device to the
factory defaults. Use the ▲▼ buttons / to select "OK" and confirm your selec-
tion with the / button . Afterwards, the display will return to the list
of menu items. All of the previously made settings will be reset to the factory settings.
To close the setup menu, press the MENU button .

CR 5 A2
■ 14│GB│IE
Video standby mode
In video standby mode, the screen shows the following overview:
A –displays the remaining recording time depending on resolution and
available storage space
B –current video resolution
C –symbol to indicate an inserted microSD card
D –battery charge level of the internal battery
E –date display (only when the "Time & date stamp" is activated)
F –time display (only when the "Time & date stamp" is activated)
G –symbol for motion detection (only visible if the function is activated)
H –symbol for a loop recording as well as its length in minutes (here 3 minutes)
I –display for exposure correction
J –symbol for video standby
K –red dot flashes during recording
L –symbol for a write-protected file
Start/end recording
Press the / ▲ button repeatedly as required to zoom into the subject. Hold
down the button for fast zoom. You can use the / ▼ button in the same way to
zoom out. Press the / button to start the video recording. During the video
recording the operating display blinks green (battery operation only). Press the
button again to stop the recording.
If you press the MODE button during recording, the symbol is displayed and
the current recording will be write-protected.
NOTE
► As soon as the camera is connected to the vehicle's power supply, the recording
starts. To stop the recording, press the /button .

CR 5 A2 GB│IE│15 ■
If you now press the MENU button in video standby, the following menu opens:
Motion detection
Using the ▲▼ buttons / you can move the selection bar to the desired entry
and then call up this menu item with the / button . To exit the activated menu
item without making a change, press the MODE button . Below right, the
current menu board as well as the total number of menu boards is shown. If the
lowest menu item on a menu board is selected which leads to a further menu board,
press the ▼ button to jump to the first entry on the following menu board. To close
the menu, press the MENU button .
Resolution
If you access this menu option, you can then set the the video resolution:
"1920x1080P (HD)", "1280 x 720P" and "640 x 480P" are the options available.
Use the ▲▼ buttons / to select the desired resolution and confirm your selection
with the / button to return to the list of menu items.
Exposure
If you access this menu option, you can then adjust the video exposure in three steps
upwards (from +1 to +3, brighter), or downwards (from –1 to –3, darker). When the
setting is set to "0" there is no exposure compensation. Use the ▲▼ buttons /to
select the desired video exposure compensation and confirm your selection with the
/ button to return to the list of menu items.
Video length
If you access this menu option, you can then set the length of the loop for the video
recording: "3 Min", "5 Min", "10 Min" or "Loop recording off" are the available
options. Use the ▲▼ buttons / to select the desired value for the loop recording
and confirm your selection with the / button to return to the list of menu
items.
Remember that the microSD card used must have a sufficient capacity to record the
desired length of loop in the video resolution set. If you select "Loop recording off"
the recording ends when you reach the capacity of the microSD card. When the end
of the recording is reached, the device will start a new recording with the length set.
If the capacity of the memory card is not sufficient for the set duration, the recording
will be aborted. Reduce the length of the loop recording or use a memory card with
a greater capacity.

CR 5 A2
■ 16│GB│IE
Motion detection
If you access this menu option, you can then use the ▲▼ buttons /to activate or
deactivate this function. Confirm your selection with the / button to return to
the list of menu items.
When this function is activated, the device will automatically stop the video
recording when no moving images are detected. If the device again detects move-
ments, the device will automatically begin recording again. If the function
is deactivated, the device does not stop recording if no motion is detected.
NOTE
► You should only activate this function while the vehicle is parked if you want
to automatically film a break-in attempt or to record the other vehicle after a
collision.
► The initial recording with this function must be started manually.
Audio recording
If you access this menu option, you can then use the ▲▼ buttons /to activate or
deactivate audio recording via the built-in microphone. Confirm your selection with
the / button to return to the list of menu items.

CR 5 A2 GB│IE│17 ■
Photo standby
With the menu closed, press the MODE button during video standby to switch to
photo standby. The device then displays the following overview on the screen :
A –displays the remaining number of photos that can still be taken depending on
resolution and available storage space
B –current photo resolution
C –symbol to indicate an inserted microSD card
D –battery charge level of the internal battery
E –date display (only when the "Time & date stamp" is activated)
F –time display (only when the "Time & date stamp" is activated)
G –symbol for self-timer (here 5 seconds: only visible if the function is activated)
H –symbol for exposure correction
I –display for photo standby
J –display for continuous advance function (only visible if feature is enabled)
Taking photos
Press the / ▲ button repeatedly as required to zoom into the subject. Hold down
the button for fast zoom. You can use the / ▼ button in the same way to zoom
out. Press the / button to take a photo.
If you now press the MENU button in photo standby, the following menu opens:
Using the ▲▼ buttons / you can move the selection bar to the desired entry
and then call up this menu item with the / button . To exit the activated menu
item without making a change, press the MODE button . Below right, the current
menu board as well as the total number of menu boards is shown. If the
lowest menu item on a menu board is selected which leads to a further menu board,
press the ▼ button to jump to the first entry on the following menu board. To close
the menu, press the MENU button .
Other manuals for CR 5 A2
5
Table of contents
Languages:
Other Kompernass Dashcam manuals

Kompernass
Kompernass CR 5 A2 Product information sheet

Kompernass
Kompernass DASHCAM CR 5 A1 User manual

Kompernass
Kompernass CR 5 A2 Product information sheet

Kompernass
Kompernass CR 5 A1 User manual

Kompernass
Kompernass CR 5 A1 User manual

Kompernass
Kompernass CR 5 A2 Product information sheet

Kompernass
Kompernass CR 5 A2 Product information sheet

Kompernass
Kompernass CR 5 A1 User manual

Kompernass
Kompernass CR 5 A2 Product information sheet