George Home GHWD-22 User manual

IMPORTANT: RETAIN FOR FUTURE REFERENCE
GHWD-22
Hot water dispenser
User Guide 220-240V~50-60Hz 1850-2200W

2
THIS PRODUCT WAS DESIGNED AND MANUFACTURED TO MEET STRICT
QUALITY AND SAFETY STANDARDS. THERE ARE, HOWEVER, SOME
OPERATION PRECAUTIONS YOU SHOULD BE AWARE OF.
CAUTION. RISK OF SCALDING. DO NOT OPEN LID WHILST HOT WATER
DISPENSER IS HOT. BE CAREFUL WHEN HOT WATER IS DISPENSING
FROM YOUR HOT WATER DISPENSER AS THIS CAN RESULT IN INJURY.
1. Read all instructions before using.
2. Before connecting the hot water dispenser to the power supply, check and make
sure that the voltage indicated on the appliance corresponds with the voltage
in your home. If this is not the case, contact your dealer and do not use the hot
water dispenser.
3. If the supply cord is damaged, it must be replaced by the manufacturer or its
service agent or a similarly qualified person in order to avoid a hazard.
4. Do not let the cord hang over the edge of a table or counter or touch a hot
surface.
5. Do not place on or near a hot gas or electric burner or in a heated oven.
6. Do not operate the appliance without any water in it to avoid damaging the
heating elements.
7. Ensure that the hot water dispenser is used on a firm and flat surface, this will
prevent the hot water dispenser from overturning and avoid any damage or
injury.
8. To protect against a fire, electric shock or personal injury, do not immerse cord,
electric plugs or hot water dispenser in water or other liquids.
9. While water is boiling, or just after the water has been boiled, avoid contacting
with steam from the spout.
10. Do not open the lid when the water is being heated.
11. Appliances can be used by persons with reduced physical, sensory or mental
capabilities or lack of experience and knowledge if they have been given
supervision or instruction concerning use of the appliance in a safe way and
understand the hazards involved.
12. This appliance can be used by children aged from 8 years and above if they have
been given supervision or instruction concerning use of the appliance in a safe
way and if they understand the hazards involved. Cleaning and user maintenance
shall not be made by children unless they are older than 8 and supervised.
WARNINGS:
About this guide
We’ve written this manual to help you get the most from your hot water
dispenser. Please keep hold of it for future reference.

3
13. Keep the appliance and its cord out of reach of children aged less than 8 years.
14. Children shall not play with the appliance.
15. Do not touch the hot surface. Use the handle or the button.
16. The use of accessories, which are not recommended by the appliance
manufacturer, may result in fire, electric shock or personal injury.
17. Unplug the hot water dispenser from the outlet when not in use and before
cleaning. Allow the hot water dispenser to cool before putting on or taking off
parts, and before cleaning the appliance.
18. To disconnect, press the stop button, then remove plug from wall outlet.
19. Do not use the appliance for other than intended use.
20. This appliance is intended to be used in household and similar applications such
as:
– Staff kitchen areas in shops, offices and other working environments;
– Farm houses;
– By clients in hotels, motels and other residential type environments;
– Bed and breakfast type environments.
21. Save these instructions.
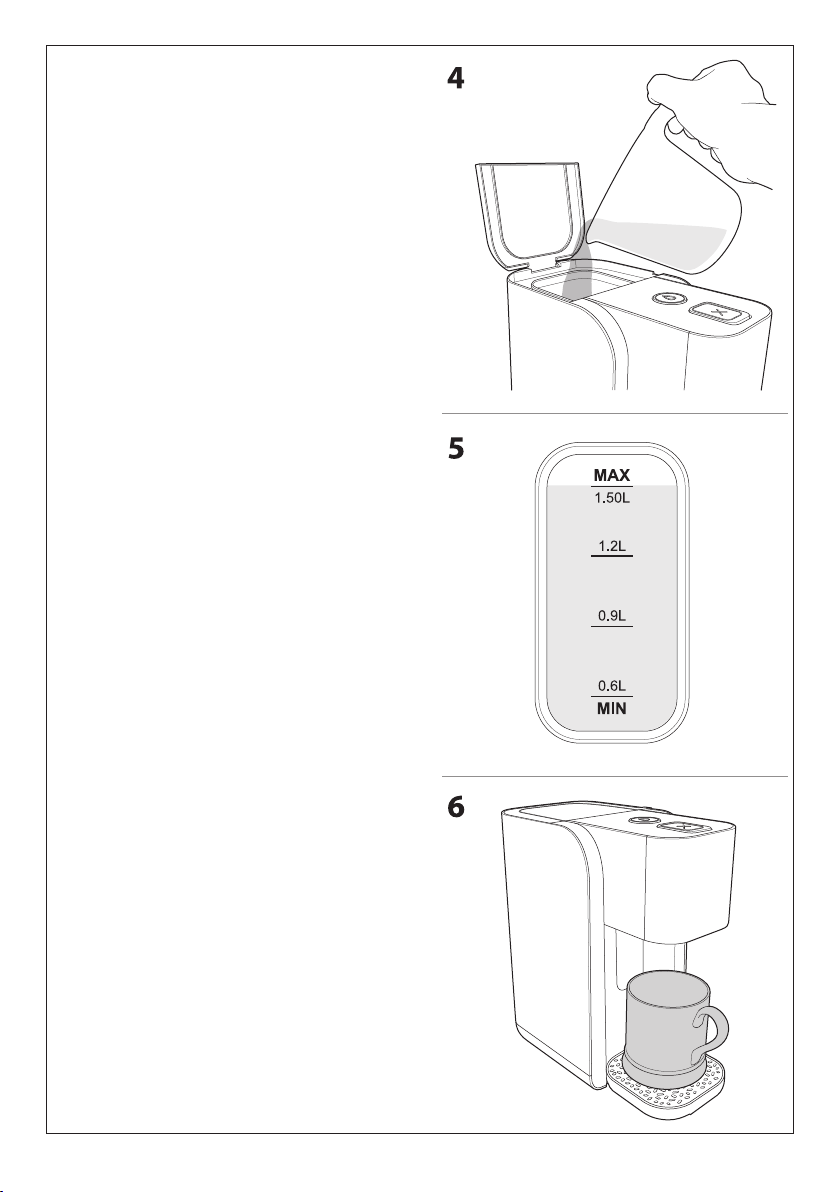
22. Never fill the hot water dispenser above the MAX marking. If the hot water
dispenser is overfilled, the water will leak from the dispensing spout and boiling
water may be ejected.
23. Always make sure that hands are dry before handling the plug or switching on the
hot water dispenser.
24. Do not use this hot water dispenser if it has been dropped or any visible signs of
damage or it is leaking.
25. Never leave the hot water dispenser unattended when in use.
26. Beware of steam coming from the dispensing spout or lid especially during
refilling. Never open the lid during the boiling cycle.
27. Never use the hot water dispenser without sufficient water and make sure the
water level is between the MIN and MAX markers for it to operate correctly.
28. Always make sure a cup or suitable container is placed below the dispensing
spout when operating the hot water dispenser.
29. Environmental information: If at anytime in the future you should need to dispose
of this product, please note that, in the UK, waste electrical products/batteries
should not be disposed of with household waste.
30. WARNING! Avoid spillage on the connector or the contact base.
31. Regarding the instructions for cleaning surfaces in contact with food, please refer
to chapter “Cleaning and maintenance”.
32. WARNING! Misuse may lead to injury.
33. WARNING! The heating element surface is subject to residual heat after use.
34. This appliance is not intended to heating liquid other than water.

4
Lid Power button
Body
Water level
gauge
Stop button
Body base
Power cord
Drip tray
cover
Drip tray
Plug
What’s in the box
Drip-tray
Hot water
dispenser
Features
User
Guide
Spout

5
Important:
If you’re using the hot water dispenser for the first time, we recommend
cleaning before use by boiling and discarding the full tank of water twice. Then
simply wipe the surface down with a damp cloth.
If you accidentally boil the hot water dispenser when it’s empty, the Hot water
dispenser will switch off automatically. This hot water dispenser is protected
from overheating. If this happens, remove the plug from the mains supply and
allow the hot water dispenser to cool for 40-60 minutes before filling it with
cold water and re-boiling.
You can shut off the power whilst the hot water dispenser is boiling by pressing
the stop button.
Using you hot water
dispenser
1. Place the hot water dispenser on
a flat, level, heat resistant surface,
within easy reach of a power socket.
2. Slot the drip tray onto the front of the
hot water dispenser.
Push the tab on the back of the drip
tray into the hole in the front of the
hot water dispenser body (a).
Push the drip tray down to lock in
place (b).
3. Lift the lid on the top of the hot water
dispenser upwards until it is fully
open.

4. Fill the water tank using a jug or cup
then close the lid.
IMPORTANT: Always ensure the lid is
correctly closed before using the hot
water dispenser.
5. IMPORTANT: The water level MUST
be within the MIN and the MAX level.
If there is not sufficient water in the
hot water dispenser, it may still work
and a small amount of water can
come out of the dispensing spout.
This is a reminder you should add the
water into the water tank.
If this hot water dispenser switches off
automatically before the water boils
due to insufficient water in the hot
water dispenser, this is quite normal
and it is a safety feature and not a
fault.
6
6. Place a cup on the drip tray so that it
is directly below the spout.
IMPORTANT: Never operate the hot
water dispenser without a cup placed
below the dispensing spout. The cup
must be able to hold 275ml of water
at least.

7. Plug the hot water dispenser into a
mains socket and turn the power on if
required.
IMPORTANT: Close the lid and press
the stop button before plugging in.
This can make sure the hot water
dispenser will not start a boil cycle
immediately when you plug the hot
water dispenser into the socket.
8. Press the POWER button on top of
the hot water dispenser to start the
boiling process.
When you press the POWER button
the water tank will be illuminate.
If you want to stop the boiling process
before the water has boiled, press the
STOP button.
7
9. After the water has boiled, the hot
water will be dispensed from the
spout into the cup.
WARNING: The water coming out of
the spout will be very hot, handle with
care and never touch the water to
prevent scalds.
IMPORTANT: Always leave the hot
water dispenser for 30 seconds
between two continuous water-
boiling cycles and leave for 5 minutes
between two full tanks of water
boiling.
Power button
Stop button

8
Cleaning and maintenance
Switch the hot water dispenser off and unplug from the mains socket. Always
allow the hot water dispenser to cool down before cleaning or performing any
maintenance.
1. NEVER immerse the body of the hot water dispenser in water or any other
liquid.
2. Wipe the exterior with a damp cloth and a mild detergent.
CAUTION: NEVER use abrasive cleaning agents such as steel wool,
scouring cleaning agents etc. to prevent damaging the surface of your hot
water dispenser.
3. Empty the drip tray if it is full of water. Remove the drip tray from the
bottom of the hot water dispenser and remove the drip tray cover.
4. Clean the drip tray and its cover using a mild detergent and a soft cloth.
Assemble the drip tray and attach it to the bottom of the hot water
dispenser as shown on page 5.
Emptying your hot water dispenser
Switch the hot water dispenser off and unplug from the mains socket, and
make sure the hot water dispenser is cooled down to the room temperature
completely before emptying your hot water dispenser.
1. Lift the lid on the top of the hot water dispenser upwards until it is fully
open.
2. Hold your hot water dispenser over a sink and pour the water out.
3. Keep holding your hot water dispenser over the sink and turn it the right
way up and allow any water to drain out of the dispensing spout.
4. Repeat steps 2 and 3 for several times until all the water has been emptied
from your hot water dispenser.
5. If your hot water dispenser will not be used for a long period, we
recommend emptying it first. Before using again boil and discard a full tank
of water twice.

9
Descaling your hot water dispenser
Your hot water dispenser should be periodically de-scaled as the mineral
deposits in tap water may form scale within this product and cause the hot
water dispenser to operate less efficiently.
You can use a commercially available de-scaling agent and follow the
instructions on the packaging. Alternatively, you can follow the instructions
below using white vinegar.
1. Fill the hot water dispenser with 300ml of white vinegar, then add water to
the MIN level.
2. Leave the solution in the hot water dispenser overnight.
3. Pour the contents of the hot water dispenser down the sink refer to
'Emptying your hot water dispenser' section, then fill the hot water
dispenser to the MAX mark with clean water.
4. Boil the hot water dispenser and discard the water.
5. Repeat the boil process several times until the odour of the vinegar has
been flushed away.
6. Any stains left inside the hot water dispenser can be removed by rubbing
with a damp cloth.
Boil-dry protection
If you accidently let the hot water dispenser operate without water, the boil dry
protection will switch off the power automatically. This hot water dispenser is
protected from overheating. If this happens, remove the plug from the mains
supply and allow the hot water dispenser to cool for 40-60 minutes before
filling it with cold water and re-boiling.

10
Notes

11
Customer services information
If you require further information, spare
parts or advice regarding your product,
or if you are experiencing any problems,
please contact customer services at the
telephone number or address shown
opposite. N.B. When calling or writing
please quote the product name.
Call
0800 952 0101
Write
ASDA, Leeds LS11 5AD
Product name: GHWD-22 Hot Water Dispenser
Product site code: 15A.09.22.225

Copyright
© 2022 ASDA Stores Limited.
All other trademarks appearing herein are
the property of their representative owners.
Specifications are subject to change
without notice.
Manufactured for:
ASDA, Leeds LS11 5AD/
ASDA, Antrim BT41 4GY.
Disposal
This symbol on the product or in the instructions means that
your electrical and electronic equipment should be disposed at
the end of its life separately from your household waste. There
are separate collection systems for recycling in the UK.
For more information, please contact
the local authority or your retailer
where you purchased the product.
Table of contents
Popular Water Dispenser manuals by other brands

WaterTech
WaterTech RC32-TM owner's manual

mysoda
mysoda Oasis Evo instruction manual

Blue Marine
Blue Marine Chiller 100 manual

pilotair
pilotair ACT 180T User’s Maintenance & Spare Parts Manual

OCEANAIRE
OCEANAIRE OWC1811QC Engineering, installation and service manual

WaterTech
WaterTech REIONATOR PRO ULTRA RXU13 Installation and service manual

WaterTech
WaterTech softmax owner's manual

Water Care
Water Care Evolve EV1-1044TW Installation instructions & owner's manual

GE
GE FXMLH use and care manual

Hellenbrand
Hellenbrand TS Series Brochure & specs

Sentencia
Sentencia Chrono plus Installation & operating instructions

Antunes
Antunes AQ-RO-400 owner's manual