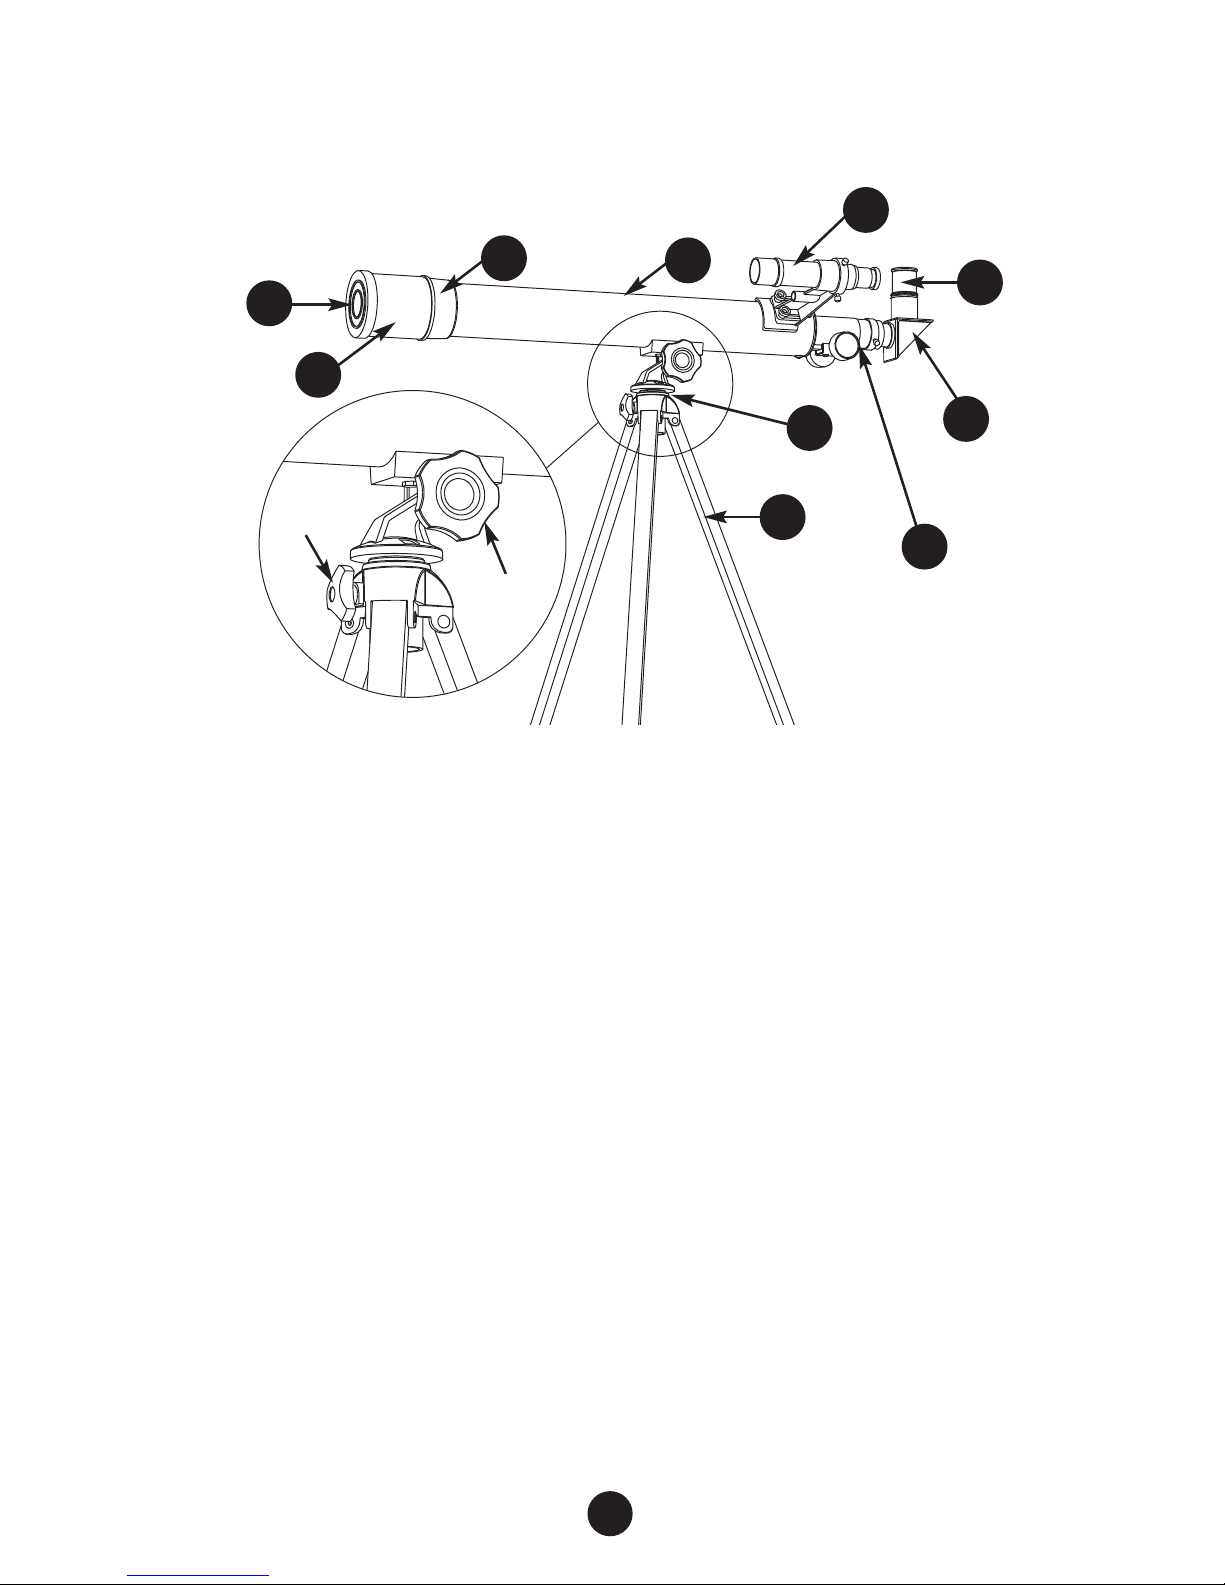
GeoSafari Vega 600 User manual

EI-5248
Ages 8+
Grades 3+
®

CAUTION:
Never look directly at the sun, with or without your telescope. Never
aim your telescope at the sun, or anywhere near the sun. Instant
and irreversible eye damage can occur, including blindness.
Do not let children use the telescope without adult supervision any
time the sun is above the horizon.

1
Introduction ........................................................................ 2
Getting Started.................................................................... 2
Let’s Look at Your Vega 600 .............................................. 3
Assembly Diagram .............................................................. 4
Assembling Your Telescope ................................................ 5
The Finder Scope ................................................................ 7
Installing Your Find r Scop .......................................... 7
Aligning Your Find r Scop ..........................................
Using Your Telescope ..........................................................
Choosing an Ey pi c for Vi wing................................ 9
Using Your T l scop for T rr strial Vi wing .............. 10
Tips for T l scop Us .................................................... 10
Frequently Asked Questions .............................................. 11
Observing the Night Sky .................................................... 12
Plan ts ............................................................................ 12
Stars ................................................................................ 12
Th Moon ........................................................................ 12
Learning More About Astronomy...................................... 14
Caring for Your Telescope .................................................. 14
Storag ............................................................................ 14
Optics .............................................................................. 15
Table of Contents

2
Introduction
Your V ga 600 is a r fractor t l scop . R fractors w r th first typ s
of t l scop s inv nt d. A r fractor t l scop coll cts light through a
larg obj ctiv l ns and dir cts it through th t l scop to th y pi c
for magnification. Your t l scop will nabl you to s many int r sting
obj cts in th night sky as w ll as giving you an up-clos vi w of
r markabl things h r on arth, from animals and landforms to
sporting v nts. Th information in this guid will h lp you g t th
most from your t l scop .
Getting Started
R mov all of th compon nts from th box. Using th list and pictur
b low, id ntify ach of th parts of your t l scop . It is r comm nd d
that you k p your t l scop box for long-t rm storag , or should you
v r n d to r turn th t l scop for s rvic .
Component parts:
A. Optical tub with rack and pinion focus r (pr -ass mbl d)
B. Tripod with altazimuth mount
C. Find r scop with brack t
D. Diagonal mirror
E. 20mm y pi c
F. 9mm y pi c
G. 2X r cting y pi c
A
B
CD
E
F
G

3
1. Optical tube: Holds and prot cts th t l scop ’s main, or
obj ctiv , l ns.
2. Objective lens: Gath rs light from a distant obj ct and brings that
light, or imag , to a point or focus.
3. Dust cap: Prot cts th obj ctiv l ns from scratch s and dirt.
4. Dew shield: Pr v nts d w from forming on th l ns at night and
acts as a sunshad to r duc r fl ctions during th day.
5. Finder scope: A low-pow r d t l scop that you align to th main
t l scop to mak it asi r to locat distant obj cts.
6. Eyepiece: Brings th imag from th t l scop ’s obj ctiv l ns to
your y . Your t l scop com s with a low-pow r y pi c and a
high-pow r on , too.
7. Diagonal mirror: Ori nts th imag from your t l scop so that it is
right-sid up. It also mak s it mor comfortabl to look at stars high
in th sky without b nding down low.
8. Focus knob: Turn th focus knob to mak imag s cl ar r.
9. Altazimuth mount: Holds th optical tub and allows you to adjust
your vi w up and down (altitud ) and sid -to-sid (azimuth).
10. Tripod: Supports th optical tub and mount. Latching adjust rs allow
you to chang th h ight of th tripod and lock it into plac for
comfortabl vi wing.
Let’s Look at Your Vega 600
Familiariz yours lf with th parts of your t l scop and th ir purpos .
10
1
3
4
5
6
7
9
2(inside)
Azimuth
control
Altitude
control

4
Asse bly Diagra
C
B
A
E
DF
G
I
J
K
L
H
A. Optical tub
B. Obj ctiv l ns (insid )
C. Dust cap
D. D w shi ld
E. Find r scop
F. Ey pi c
G. Diagonal mirror
H. Focus r/Focus knob
I. Altitud lock bolt
and nut
J. Azimuth lock scr w
K. Tripod h ight
adjust rs
L. Tripod l gs

5
Asse bling Your Telescope
Us th diagram on pag 4 and th dir ctions b low to ass mbl
your t l scop .
1. G ntly pull th aluminum tripod l gs (L) apart as far as th y will go
until th c nt r l g brac s sit flat, in a horizontal position. (S
Figur 1.)
2. Unlatch th tripod h ight adjust rs (K). Ext nd th l gs of your
t l scop until it is at a comfortabl h ight. Latch th tripod h ight
adjust rs to lock th l gs in plac .
3. R mov th altitud lock bolt and nut compon nt (I) from th plastic
“tongu ” locat d at th top of th tripod.
4. Th und rsid of th optical tub (A) has two prongs with a hol in
ach. Plac th s prongs ov r th tongu . Lin up th hol s on th
prongs with hol s in th tongu . (S Figur 2.)
Figur 1
Figur 2

6
5. On of th prongs has a cutout that is th xact siz and shap as th
altitud lock nut. Plac th nut in this cutout and hold it in plac . Ins rt
th altitud lock bolt from th oth r sid and turn it clockwis to scr w
it into th nut. Tight n it nough so that you can mov th optical
tub up or down and it will stay point d at th angl you want. (You
should b abl to aim th optical tub almost v rtically. If not, you
must r mov th optical tub and r v rs its position in th tongu .
(S Figur 2.)
6. Find th azimuth lock scr w (J) and tight n it, if n c ssary, by turning
it clockwis . Th scr w, wh n fully tight n d, will lock your t l scop ’s
horizontal mov m nt.
7. R mov th prot ctiv plastic cap ov r th t l scop ’s focus r (H) by
loos ning th two small scr ws. R mov th black plastic cap from
th diagonal mirror (G) and ins rt th mirror into th focusing tub .
S cur th mirror in plac by tight ning th two small scr ws. (S
Figur 3.)
8. Loos n th prot ctiv plastic cap from th diagonal mirror by
loos ning th singl scr w. Locat th 20mm y pi c , ins rt it into
th diagonal mirror, and tight n th scr w. (S Figur 3.)
9. Follow th dir ctions on pag 7 to install and align your
t l scop ’s find r scop (E) before using your t l scop .
Figur 3

7
The Finder Scope
Th find r scop is a small t l scop that sits on your optical tub . It
magnifi s obj cts fiv tim s and has a light coll cting obj ctiv l ns that
is 24mm in diam t r. Th vi wing fi ld of th find r scop is much wid r
than that of your t l scop so it is asi r to locat a particular obj ct
with th find r scop . Always use your finder scope to locate the object
you want to view first. The finder scope should be aligned with the
main optical tube before you begin using the telescope. By prop rly
aligning your find r scop with your t l scop , it will b asi r for you
to pr cis ly aim your t l scop at obj cts you want to study.
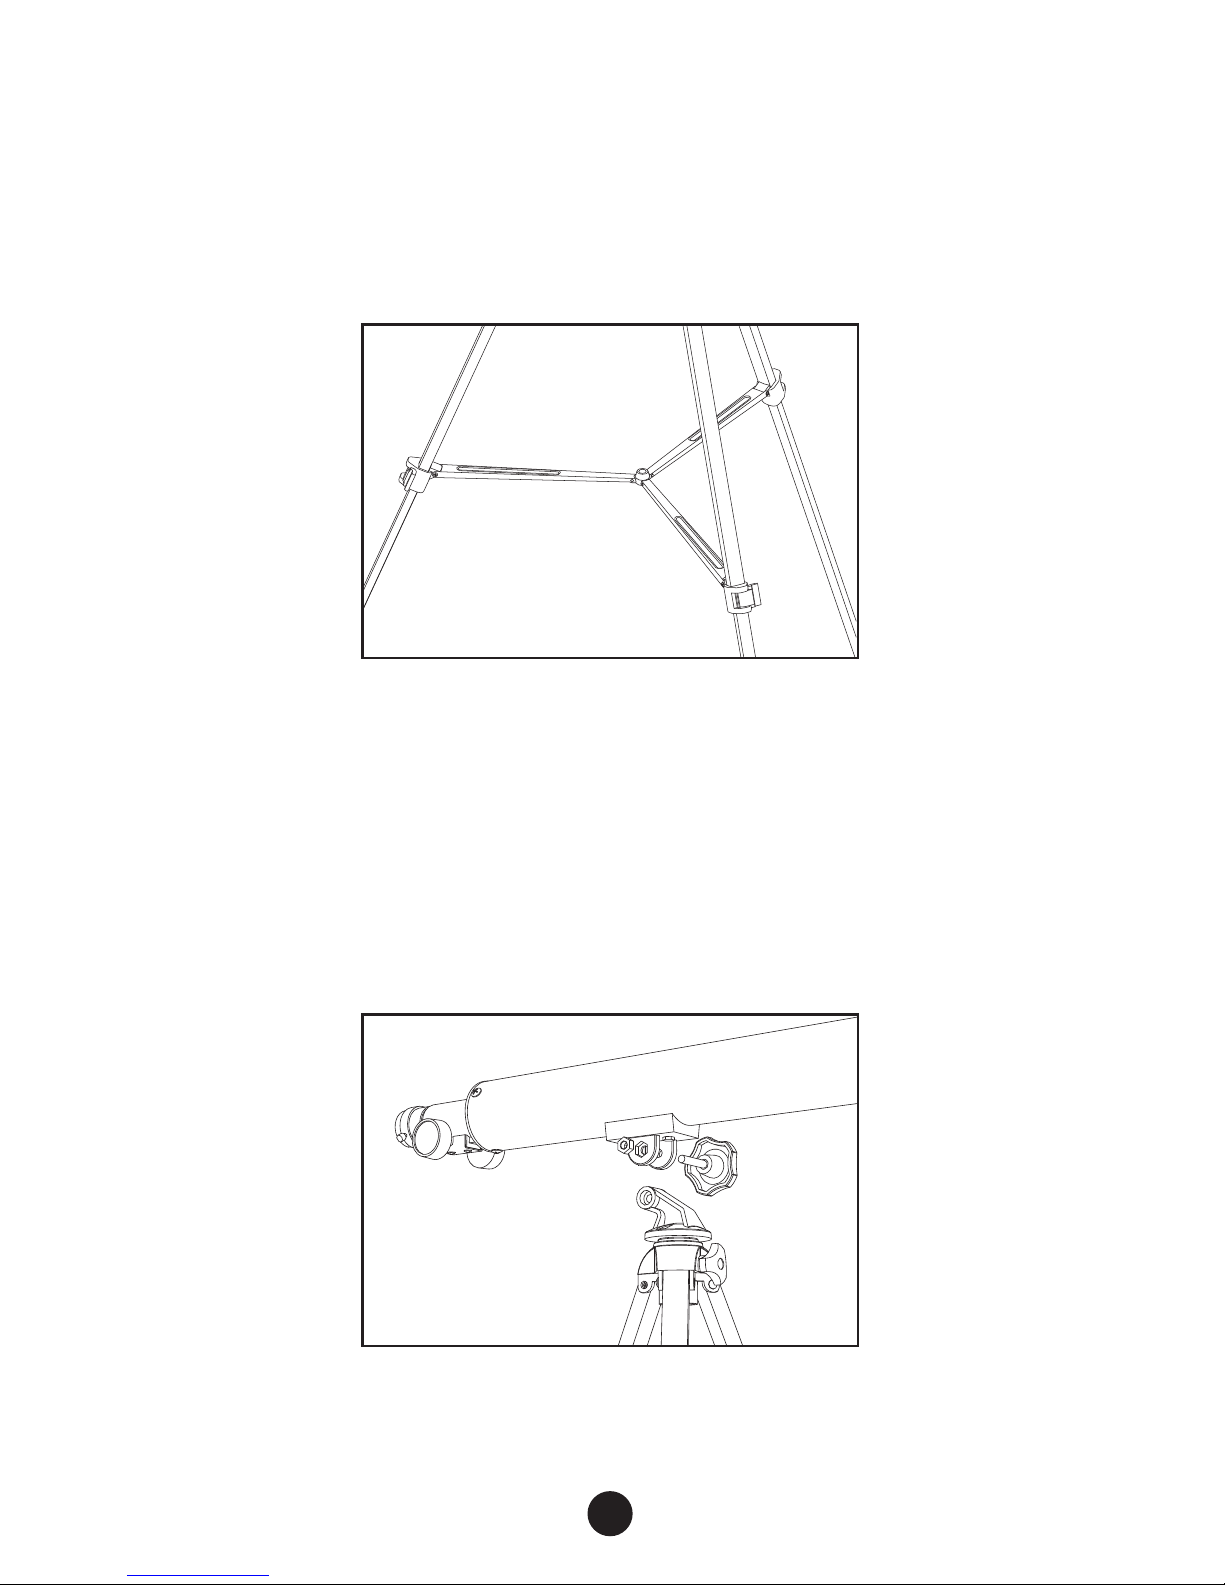
Installing Your Finder Scope
1. Your find r scop com s alr ady
install d in its mounting brack t. This
brack t attach s to your optical
tub with th two larg chrom d
bolts locat d n ar th t l scop ’s
focus r (H). (If th find r scop tub
is wrapp d in plastic, loos n th thr
positioning scr ws on th brack t
until you can slid th find r scop
out. R mov th plastic and r ins rt
th find r scop in th sam dir ction that it was position d b for .
Tight n th thr positioning scr ws. (S Figur 4.)
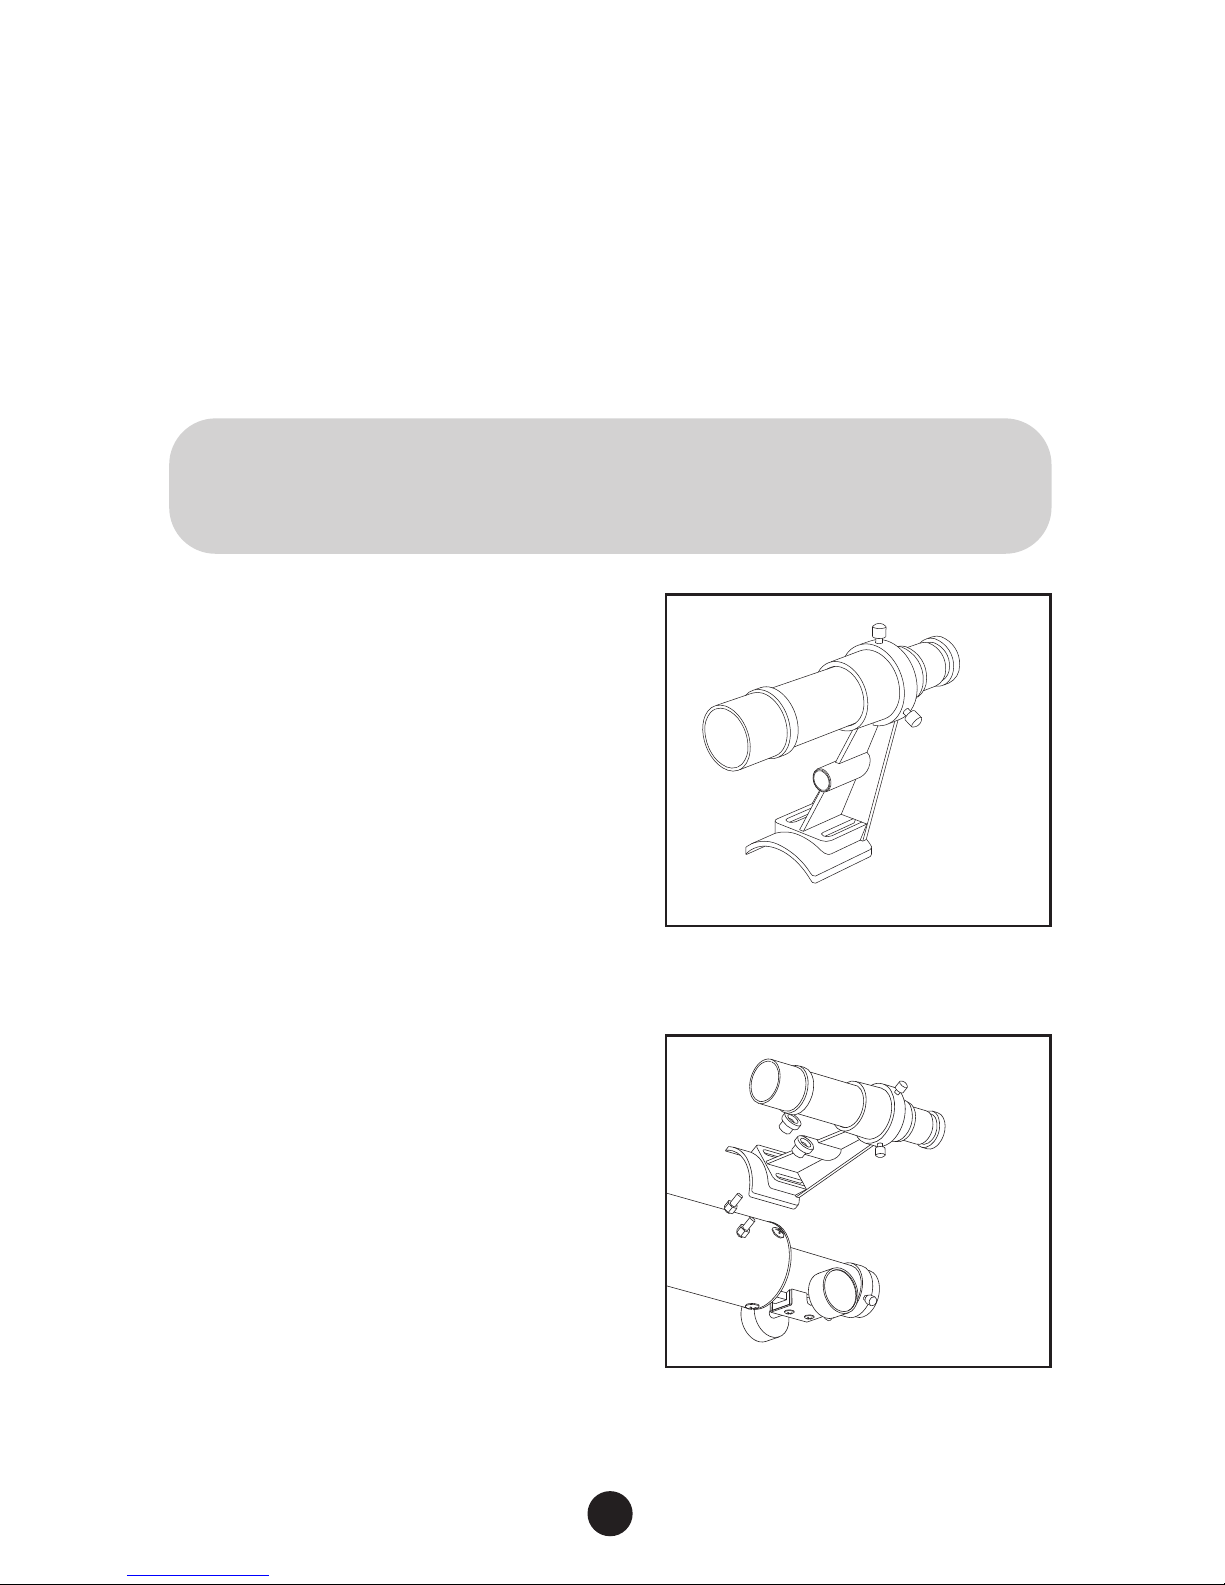
2. R mov only th top nut from ach
of th bolts and s t th m asid .
3. Position th find r scop and brack t
so that th two slots in th brack t
slip ov r th two upright bolts and
th larg r l ns of th find r scop
fac s in th dir ction of th larg
l ns at th front of your t l scop .
(S Figur 5.)
4. Thr ad th two nuts back ov r th
two bolts. Tight n th m firmly, but
do not ov r tight n th m as you may crack th brack t.
Note: Wh n you look through th find r scop , you will s an
upsid -down and backwards (l ft/right r v rs d) imag . This is
normal for all astronomical t l scop s.
Figur 4
Figur 5

Aligning Your Finder Scope
To work ff ctiv ly, your find r scop must b align d with your t l scop .
This is most asily don during th daytim with your low pow r (20mm)
y pi c in plac .
1. R mov th black plastic dust cap (C) from th obj ctiv l ns (B) at
th front of th t l scop and look through your t l scop to locat
an asily r cognizabl obj ct as far away as you can—at l ast 300 f t
away. Loos n th altitud and azimuth controls. Adjust th optical
tub until this obj ct is in th c nt r of th vi wing fi ld. Us th
focusing knob to mak th imag sharp.
2. Tight n th altitud lock bolt (I) and th azimuth lock scr w (J) so that
th t l scop is lock d in position.
3. Look through th find r scop . If th obj ct is not visibl or c nt r d
in th find r scop , r l as on of th thr positioning scr ws
holding th find r scop and car fully r position it until th obj ct
is c nt r d within th v rtical and horizontal lin s, call d “crosshairs.“
4. Occasionally ch ck th vi w through th t l scop to mak sur it
hasn’t mov d. Wh n th obj ct is c nt r d in both th find r scop
and th t l scop , tight n th positioning scr ws firmly holding th
find r scop in plac .
5. You may n d to r p at this proc dur to nsur a p rf ct alignm nt.
Wh n succ ssfully compl t d, th find r scop and th t l scop will
“s ” th sam vi w, nabling you to locat and study obj cts quickly
and asily.
Using Your Telescope
1. For b st r sults, tak your t l scop outsid . Do not aim it through a
window. If th window is clos d, th window glass will introduc
r fl ctions and distortions. If th window is op n, th moving air
curr nts of diff r nt t mp ratur s will caus distortions.
2. L t your t l scop adjust to th outsid t mp ratur . Your t l scop
will p rform much b tt r if th l ns s and th air insid th tub ar
all th sam t mp ratur as th outsid air. In xtr m t mp ratur s,
it may tak up to 30 minut s to acclimat your t l scop .

9
3. It is r comm nd d to start vi wing with your low pow r (20mm)
y pi c in plac b caus it giv s you th wid st angl and bright st,
sharp st vi ws.
4. Loos n th altitud and azimuth controls and mov th t l scop in
th dir ction of an obj ct you wish to vi w. Look through th find r
scop and pan th t l scop until th obj ct app ars c nt r d in th
find r scop ’s fi ld of vi w (th portion of th sky that you can vi w
through a t l scop ). Onc it is in your fi ld of vi w, tight n th
altitud and azimuth controls.
5. Look through th diagonal mirror. If you hav prop rly align d your
find r scop and your t l scop , th obj ct will app ar in th c nt r
of your t l scop . Turn th focusing knob until th imag is sharp.
Choosing an Eyepiece for Viewing
Your V ga 600 com s with two diff r nt y pi c s—a 20mm y pi c
and a 9mm y pi c . Th y pi c s off r you a rang of vi wing
pow rs or magnifications. Ey pi c s ar m asur d and lab l d in
“mm” (millim t rs). Th low pow r y pi c is th on with th
high r numb r in mm (20mm). Th high pow r y pi c is th on
with th low r numb r in mm (9mm).
As a rul , always start with th low pow r y pi c , gradually switching
to th high r pow r y pi c only aft r you hav locat d an obj ct.
CAUTION:
Never look directly at the sun, with or without your telescope. Never
aim your telescope at the sun, or anywhere near the sun. Instant and
irreversible eye damage can occur, including blindness.
Note: Wh n looking through th diagonal mirror, obj cts will app ar
right sid up, but r v rs d, lik a r fl ction in a mirror. This is normal
for all astronomical t l scop s. Your t l scop is suppli d with an
r cting y pi c , which prop rly ori nts imag s for t rr strial
vi wing. S pag 10 for dir ctions for using your r cting y pi c .

10
Using Your Telescope for Terrestrial Viewing
To vi w t rr strial (land) subj cts, your t l scop com s with an r cting
y pi c , or imag r ctor. This sp cial compon nt ori nts obj cts so that
you can vi w th m as you would with your nak d y . Follow th s
dir ctions to us th r cting y pi c :
1. R mov th diagonal mirror and y pi c from th focusing tub .
2. Loos n th small scr w in th focusing tub . Ins rt th r cting y pi c
dir ctly into th focusing tub . Tight n th scr w to k p it in plac .
(S Figur 6.)
3. Loos n th small scr w in th r cting y pi c and ins rt your chos n
y pi c into it. Tight n th scr w to k p this y pi c in plac .
(S Figur 6.)
Th r cting y pi c provid s a
2x magnification, which m ans
that th 20mm y pi c will
magnify obj cts 60x wh n us d
with th r cting y pi c .
Tips for Telescope Use
Exploring th night sky with a t l scop is xciting—and chall nging!
L arning to us a t l scop tak s practic and pati nc . H r ar som
tips to b tt r vi wing:
1. To locat obj cts, you must l arn how th sky is laid out. Ch ck books
about astronomy to l arn your way around th night sky. Consult on
of th w b sit s on pag 14 to ch ck th location of int r sting c l stial
sights. Local astronomy clubs ar a good sourc of information, too.
2. No matt r how much light surrounds you, mor is always wors . Turn
off any lights. Allow 15 minut s or mor for your y s to adjust to
th darkn ss.
3. Cool your t l scop to th outsid t mp ratur for about 30 minut s
b for obs rving. Cooling th t l scop r duc s air curr nts insid th
tub that could produc fuzzy, blurry imag s.
4. Plan tary vi wing r quir s good “s ing” conditions—st ady, dry
atmosph r with littl or no clouds. A good way to judg s ing
conditions is to ch ck th stars. If th stars app ar to b twinkling, a
ph nom non caus d by a turbul nt atmosph r , th n conditions ar
poor for plan t gazing.
5. Us slow, st ady hand mov m nts wh n using your t l scop . This
will minimiz vibrations and mak it asi r to g t a st ady vi w.
Figur 6

11
Frequently Asked Questions
1. Why is the image in my telescope eyepiece upside-down and/or
backwards?
If you hav ins rt d your y pi c dir ctly into th t l scop ’s focusing
tub , you will s an imag that is upsid -down and backwards. If you
hav ins rt d th diagonal mirror into th focusing tub and th n plac d
th y pi c into th diagonal mirror, your imag will b right-sid
up, but it will still app ar backwards or r v rs d. This is normal for an
astronomical t l scop . Aft r all, th r ’s no up or down in spac so it
do sn’t matt r how th fi ld is ori nt d. For t rr strial vi wing, wh n
you want imag s to b ori nt d prop rly (as s n with th nak d
y ), ins rt th r cting y pi c following th dir ctions on pag 10
of this guid .
2. Why can’t I see anything when I look through my telescope?
If you s only whit , gray, or black through th t l scop , th r ar
two lik ly caus s. Th first is that you hav ins rt d an y pi c that
is too pow rful. To solv this probl m switch to th low pow r y pi c .
As a rul , always start with th low st pow r y pi c , gradually
switching to high r pow r y pi c s only aft r you hav locat d an
obj ct. Th s cond caus is that th find r scop is not prop rly align d.
S pag 8 of this guid for th proc dur to prop rly align your
find r scop .
3. When I use my high power eyepiece, why does everything
look darker?
As t l scop magnification incr as s, brightn ss diminish s. Brightn ss
incr as s wh n magnification is r duc d. If an imag app ars dark or
uncl ar, try using your low pow r y pi c . It is asi r to study small,
bright vi ws of c l stial obj cts than larg , dark, or blurry on s. You
do not n d v ry high pow rs to study most c l stial obj cts.
4. Why do objects in the sky move out of view when I look through
my telescope?
Wh n you vi w a c l stial obj ct through a t l scop , th rotation of
th arth mak s it app ar as though obj cts ar moving across th
vi wing ar a. You can l ss n this ff ct and obs rv th larg st ar a
of th sky by using your low pow r l ns.

12
Observing the Night Sky
Your t l scop can bring you th moon and stars—and som plan ts, too.
Planets
Th plan ts ar our solar syst m companions. Th y rang in siz from
Pluto, a rocky plan t small r than our moon, to Jupit r, a giant gas ball
that could hold 1,000 Earths. Vi wing th plan ts pr s nts som chall ng s.
As th plan ts in our solar syst m orbit th sun, th ir position in our
night sky chang s. To find out wh r to look for plan ts at a particular
tim , ch ck an astronomy magazin , such as Sky and Telescope. You can
also visit th magazin ’s w b sit , list d on pag 14 in this guid .
Most p opl who hav look d up at th night sky hav probably s n
som plan ts but did not r aliz it. A plan t, wh n it is abov th
horizon, will not twinkl lik a star. Plan ts ar r solv d by th y as
tiny balls, as oppos d to stars, which ar infinit ly small points of light.
Th asi st plan ts to vi w, wh n th y ar visibl , ar th fiv “nak d-
y “ plan ts: Saturn, Jupit r, Mars, V nus, and M rcury. M rcury is th
most difficult to s sinc it is usually b low th horizon.
Each of th plan ts has its own s t of uniqu charact ristics, making th m
a wond r to b hold. Saturn’s rings and Jupit r’s cloud b lts ar just two
of th fascinating f atur s you can obs rv with your t l scop .
Stars
Th stars ar so far away that wh n you look at on with your t l scop ,
you won’t s a disk as you do wh n you look at a plan t. Ev n with a
larg , pow rful t l scop , a star is s n as a point of light. Som stars
look larg r than oth rs, but what you ar actually s ing is bright r
points of light compar d to dimm r points of light. Th bright r stars
ar n’t n c ssarily larg r, but th y app ar that way to us.
The Moon
Th silv ry moon is th b st subj ct to vi w with your t l scop . As
Earth’s n ar st n ighbor, it’s about a quart r million mil s (402,000 km)
away. That may sound lik a long distanc , but it’s clos nough that
your t l scop will r v al a fascinating lunar landscap of crat rs, plains,
and mountain p aks.

13
H r ar a f w int r sting lunar f atur s to look for:
Mare Crisium
Mar Crisium (“S a of Cris s“) is actually a hug plain form d wh n gr at
lava flows cool d and hard n d on th moon’s surfac .
Crater Copernicus
Crat r Cop rnicus is a bright crat r with a hug ncircling ring of d bris
that was thrown out of th crat r wh n it was form d by an impacting
m t or mor than 100 million y ars ago. It is 60 mil s (97 km) across and
mor than 2 mil s (12,600 f t, or 3,840 m) d p.
Crater Tycho
Bright str aks or rays, b st s n during a full moon, manat from this
crat r. Th rays indicat that this is a young crat r. Ov r tim , m t ors
constantly bombarding th crat r’s surfac will caus th rays to
disapp ar. Crat r Tycho is 56 mil s (90 km) across and almost 14,000 f t
(4,267 m) d p.
Crater Grimaldi
This larg crat r looks lliptical in shap , but it is actually circular. It
app ars to b lliptical b caus w s it on th w st rn horizon of th
moon, which is curving away from us. This ff ct is call d foreshortening.
Crat r Grimaldi is about 140 mil s (225 km) across and 10,500 f t
(3,200 m) d p.
E
N
S
W
Mare
Crisium Crater
Copernicus
Crater
Tycho
Crater
Grimaldi
© Copyright 1982 Th Royal Astronomical Soci ty of Canada
Not : This map,
lik your t l scop ,
shows a mirror imag
of th moon.

14
Learn More About Astrono y
Visit th s w b sit s to l arn mor about astronomy and th obj cts
you s in th night sky:
• http://www.nasa.gov
NASA’s official w b sit
• http://www.nasa.gov/audience/forkids/home/index.html
NASA’s link with information for stud nts
• http://www.nasm.si.edu
Th w b sit of th National Air and Spac Mus um at th
Smithsonian Institut
• http://www.space.com
Astronomy w b sit with int r sting links, including a sky cal ndar
listing what’s visibl in th sky ach night
• http://skyandtelescope.com
Astronomy w b sit with us ful information, including a customizabl
sky chart wh r you can typ in your zip cod for a map of th night sky
• http://cosmobrain.com
Astronomy w b sit with xc ll nt links, including an astronomical
cal ndar listing what’s visibl in th night sky and an “astrolinks“
s ction to many oth r outstanding sit s
Caring for Your Telescope
Tak good car of your V ga 600 and it will provid you with many
hours of vi wing xcit m nt.
Storage
Your t l scop should b stor d, fully ass mbl d, in a cl an, dry, and
dust-fr nvironm nt. It is unn c ssary to s parat th optical tub and
th mount for storing. If your t l scop has to b k pt in a bas m nt,
garag , or outdoors, cov r it with h avy plastic to prot ct it from moistur
and nsur that th dust cap and l ns cov rs ar on. Acc ssori s should
b stor d s parat ly in a box, with all th ir dust caps on.

15
Optics
Optical compon nts of a t l scop will g t dirty ov r tim . How v r, a
consid rabl amount of dirt or dust must b pr s nt on th optical surfac
b for you will notic th ff ct visually. Follow th s sugg stions to
maintain your t l scop ’s optics in th b st possibl condition:
1. K p th dust caps on during storag of th t l scop to r duc th
amount of dust coll ct d.
2. Aft r using th t l scop th r may b cond nsation on th optical
surfac s. Wh n th t l scop is brought insid , r mov th dust caps
and allow th moistur to vaporat naturally. Point th optical tub
downwards so as to minimiz th coll ction of airborn dust. Onc
th moistur has vaporat d, r plac th dust caps.
3. A small amount of dust on optical surfac s do s not n d to b
r mov d. A build-up of dirt and or dust coll ct d onto a l ns should
only b r mov d with th utmost car . If you wish to r mov a build-up
of dust from th l ns s, you should first try using a can of filt r d
compr ss d air. R mov th dust cap and th d w shi ld. Onc you
ar abl to fr ly blow across th surfac of th optics, b gin by first
pointing th can away from th pi c and g ntly xp l som air. This
will r mov any cond nsat in th air can lin s and cl ar off dust that
may hav accumulat d on th discharg tub . N xt, using short quick
bursts of air, car fully r mov th dust particl s. Do not hold the
trigger of the compressed air for too long as condensate might be
blown out across the optical surface.
Th optics of your t l scop should last a long tim b for th y g n rally
r quir major cl aning. By k ping th dust caps on and avoiding th
t mptation to handl th l ns s, you will find that v ry littl is n d d
in th way of optical maint nanc .

Developed in Southern California by Educational Insights.
© Educational Insights, Inc., Gardena, CA (U.S.A.). All rights reserved. Learning
Resources Ltd., King’s Lynn, Norfolk (U.K.). Please retain this information.
Made in China.
www.EducationalInsights.com
Fabriqué en Chine. Informations à conserver.
Made in China. Bitte bewahren Sie unsere
Adresse für spätere Nachfragen auf.
Hecho en China. Conservar estos datos.
Table of contents
Other GeoSafari Telescope manuals
Popular Telescope manuals by other brands

Vixen
Vixen BT81S-A instruction manual

Taurus
Taurus T300 instruction manual

Explore Scientific
Explore Scientific 20 Ultra Light Dobsonian Gen II instruction manual

iOptron
iOptron AstroBoy 9401 quick start guide

Celestron
Celestron PowerSeeker 60AZ Quick setup guide

Omegon
Omegon Dobson 76/300 DOB instruction manual

Celestron
Celestron AstroMaster 102AZ instruction manual

National Geographic
National Geographic NG65FS Instructions and owner's manual

Meade
Meade DS-2000 Series instruction manual

cassini
cassini C-872EFS operating instructions

Levenhuk
Levenhuk Ra 200RC F8 Carbon OTA user manual

Celestron
Celestron C65 user guide