GeoVision GV-IP User manual

GeoVision Inc. 1 10/12/2023
GV-IP Speaker User’s Guide
This document describes how to add and control GV-IP Speaker with GV-Control Center and
GV-VMS. And how to locate the speaker and update its firmware using GV-IP Speaker Setting
Kits.
1. Compatible Software...................................................................................................................... 1
2. Adding to GV-Control Center......................................................................................................... 2
2.1 Searching for a Speaker.......................................................................................................... 2
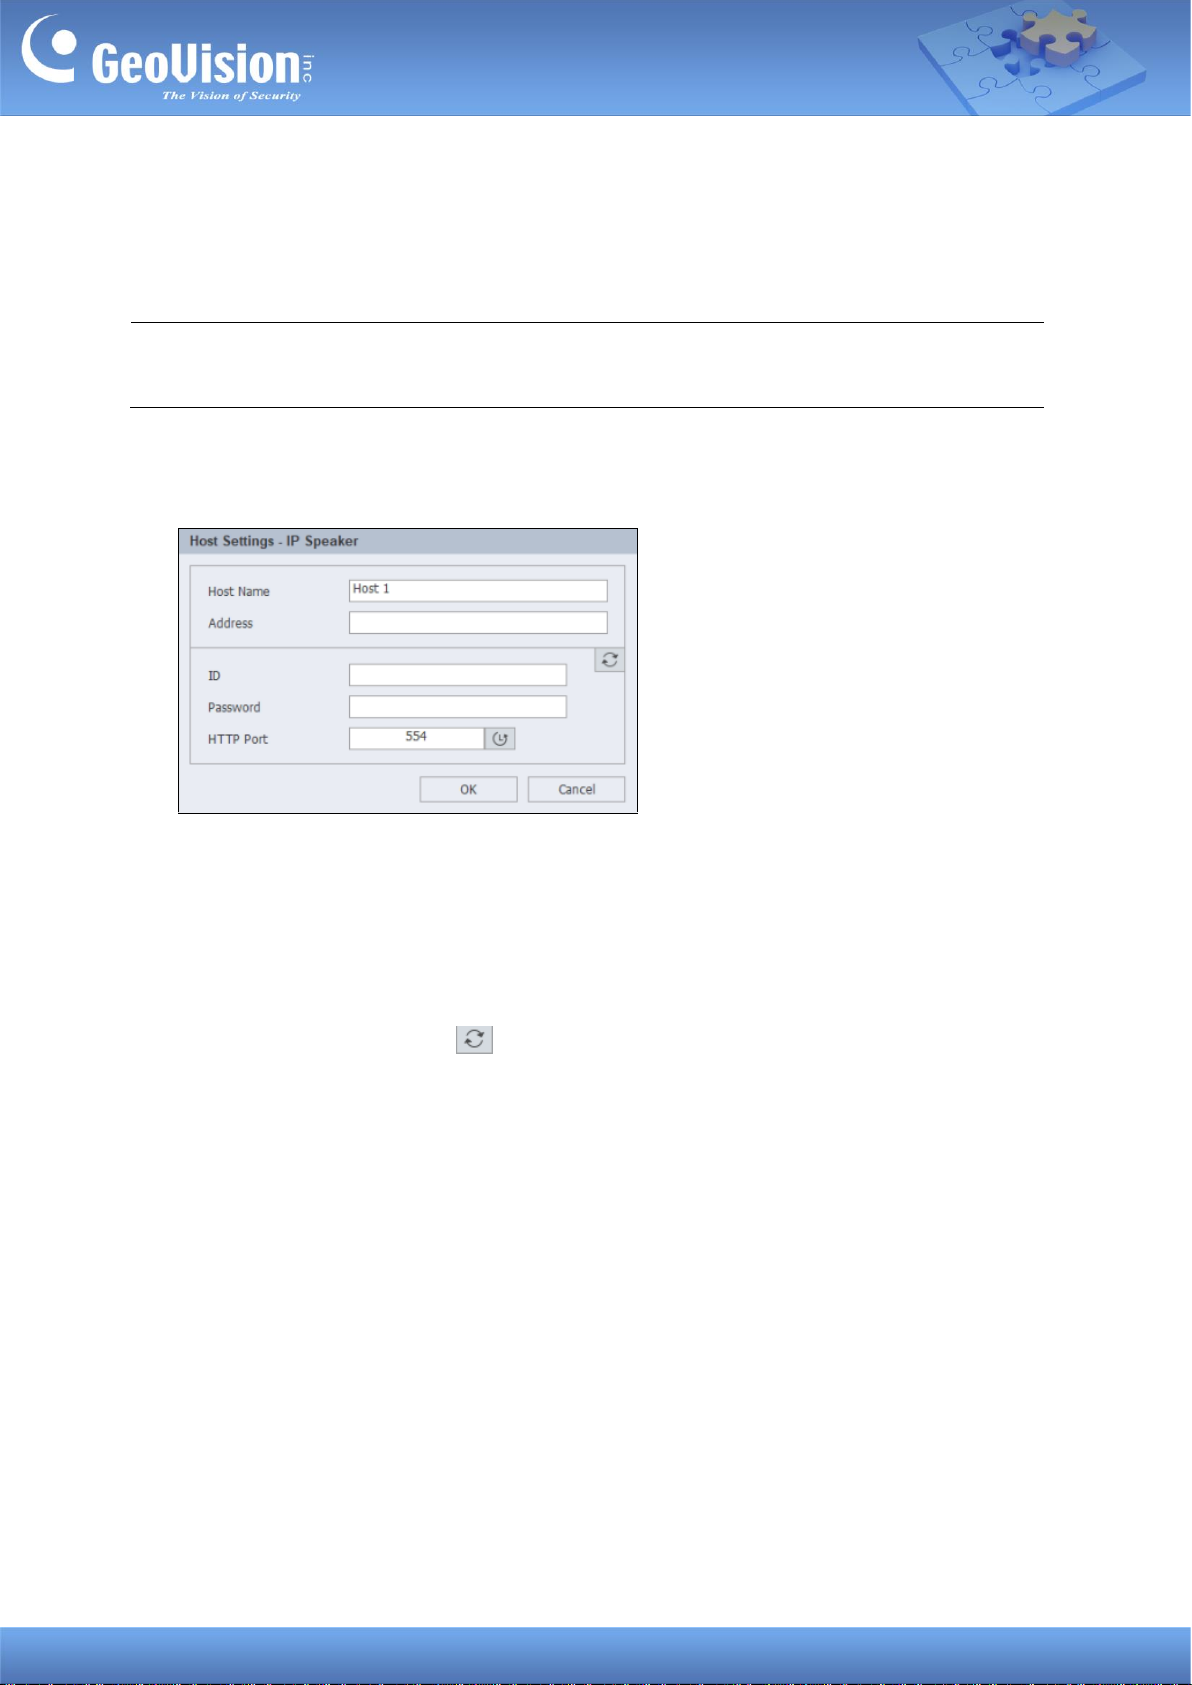
2.2 Manually Adding a Speaker..................................................................................................... 3
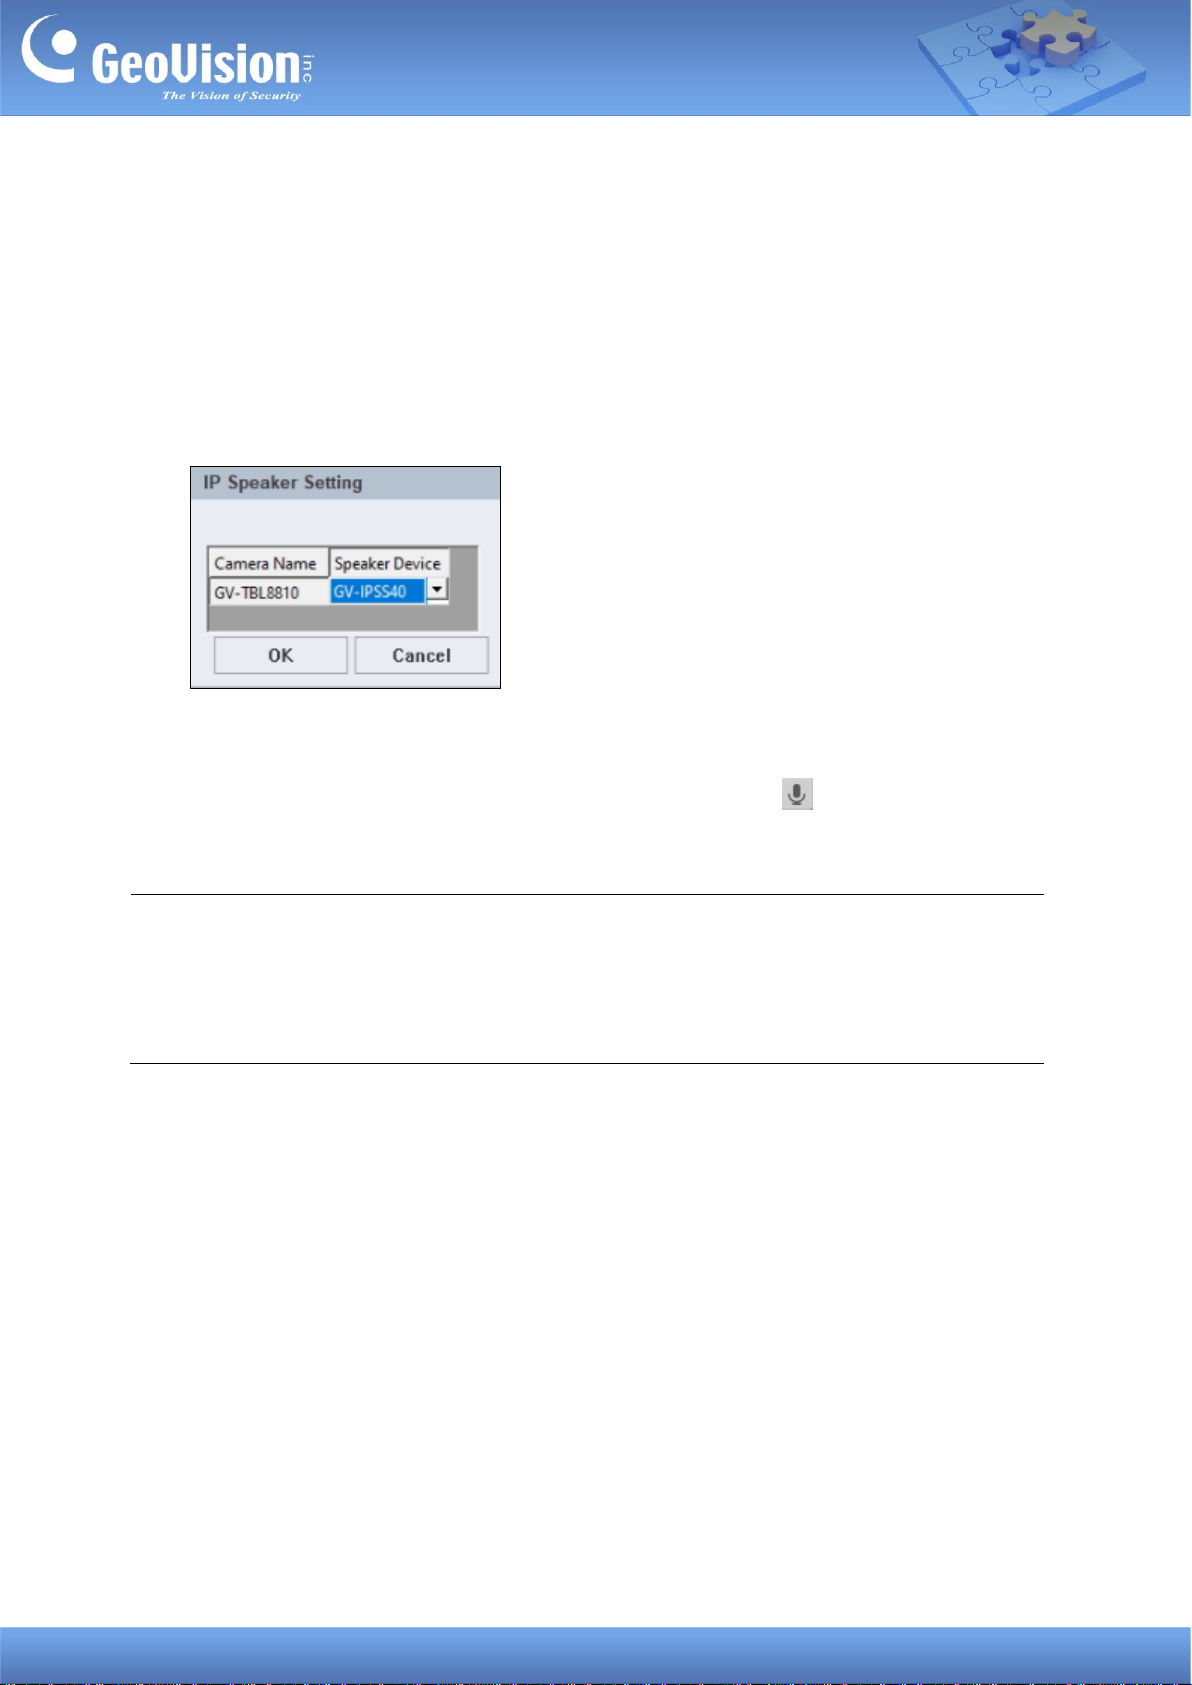
2.3 Associating a Speaker with a Camera .................................................................................... 4
2.4 Speaker Controls..................................................................................................................... 5
3. Adding to GV-VMS.......................................................................................................................... 7
3.1 Searching for a Speaker.......................................................................................................... 7
3.2 Manually Adding a Speaker..................................................................................................... 8
3.2 Associating a Speaker with a Camera .................................................................................... 9
3.3 Speaker Controls..................................................................................................................... 9
4. GV-IP Speaker Setting Kits ...........................................................................................................11
4.1 Changing the IP Address....................................................................................................... 14
4.2 Updating the Firmware .......................................................................................................... 15
1. Compatible Software
⚫GV-Control Center V4.2.0 or later
⚫GV-VMS V17.4.7 / V18.3.2, patch files required

GeoVision Inc. 2 10/12/2023
2. Adding to GV-Control Center
Add a speaker to GV-Control Center and assign the speaker to a channel.
2.1 Searching for a Speaker
To use the auto search function, the speaker must be installed on the same LAN as
GV-Control Center.
1. On the Host List, click the Add button > Add Host > Search Host.
2. In the Search Host dialog box, select the discovered speaker.
3. You are promoted to enter ID and Password. By default, the ID is admin and the
Password is admin123. Click OK.
4. You can add multiple IP speakers by entering their respective ID and Password.
5. Click Add Selected Hosts. The speaker is added to the Host List.
Note: To change the default ID and Password, you need to install the GV-IP Speaker
Setting Kits, and access Setting > ONVIFParam.See 4. GV-IP Speaker Setting Kits.

GeoVision Inc. 3 10/12/2023
2.2 Manually Adding a Speaker
To use this method, you must already know the IP address of the speaker in order to add it to
GV-Control Center.
Note: The speaker, by default, has a DHCP-enabled IP address, and no fixed IP address.
See 3. GV-IP Speaker Setting Kits for discovering its IP address.
1. On the Host List, click the Add button > Add Host > Add IP Speaker.
2. On this dialog box, configure the following settings:
◼Host Name: Name the speaker.
◼Address: Type the IP address of the speaker.
◼ID & Password: Type ID and Password. By default, the ID is admin and the
Password is admin123.
◼HTTP Port: It is port 554 by default.
3. Click Update Information to check if the speaker is connected successfully.
4. Click OK. The speaker is added to the Host List.

GeoVision Inc. 4 10/12/2023
2.3 Associating a Speaker with a Camera
You can associate a speaker with a camera of the following hosts: VMS/DVR/NVR, IP
Camera, Video Server, Recording Server, SNVR, FR Server, AI Guard, USAVision HD
DVR/NVR/SNVR, USAVision IP Camera.
1. On the Host List, right-click a supported host, and select IP Speaker Setting.
2. Select a speaker under Speaker Device, and click OK. The speaker is associated.
There are two ways to broadcast audio through the associated speaker:
1. Drop the camera to Live View and click the Microphone icon to broadcast.
2. Click the speaker on the Host List to broadcast. See 2.4 Speaker Controls below.
Note:
1. If you want to associate a camera with another speaker, remove the camera’s image
from the Live View window before enabling another speaker with the IP Speaker Setting.
2. You can associate a speaker with multiple cameras.

GeoVision Inc. 5 10/12/2023
2.4Speaker Controls
Make sure a microphone has been installed in the GV-Control Center system before
broadcasting.
⚫One-to-One Broadcast: To broadcast audio through a specific speaker, press and hold
the speaker icon. When the speaker is broadcasting, the icon turns orange.
⚫Volume: To change the volume, right-click the speaker icon and select Volume Setting.
⚫Play a WAV file:
1. Right-click the speaker icon, select Play Wave File and locate a .WAV file to play.
2. When the “Want to Repeat Wave File?”message appears, click Yesto play the
WAV file continuously.
3. To stop playing, double-click the speaker icon.

GeoVision Inc. 6 10/12/2023
⚫Group Broadcast: To broadcast audio through multiple speakers, select more than one
speaker on the Host List, right-click on one of them, and select Add to Broadcast
Service to display the control window shown below.
1
2
3
4
No.
Name
Description
1
Host
Select the desired hosts for audio broadcasting.
2
Setup
◼Select Audio File: Locate a .wav file to play
◼Opacity: Select the opacity level of the window from 20% (fully
transparent) to 100% (fully opaque).
◼Always on top: Always display the window on top of the screen.
3
Broadcast
Start / stop audio broadcasting.
4
Play File
After selecting an audio file, click the button to start/stop playing.

GeoVision Inc. 7 10/12/2023
3. Adding to GV-VMS
3.1 Searching for a Speaker
To use the auto search function, the speaker must be installed on the same LAN as GV-VMS.
1. Under the IP Speaker of the Content List, click the Add button > Scan Device.
2. In the Scan Device dialog box, select a discovered device.
3. You are promoted to enter ID and Password. By default, the ID is admin and the
Password is admin123. Click OK.
4. Click Add selected devices. The speaker is added to the Content List.
Note: To change the default ID and Password, you need to install the GV-IP Speaker
Setting Kits, and access Setting > ONVIFParam.See 4. GV-IP Speaker Setting Kits.

GeoVision Inc. 8 10/12/2023
3.2 Manually Adding a Speaker
To use this method, you must already know the IP address of the speaker in order to add it to
GV-VMS.
Note: The speaker, by default, has a DHCP-enabled IP address, and no fixed IP address.
See 3. GV-IP Speaker Setting Kits for discovering its IP address.
1. Under the IP Speaker of the Content List, click the Add button > Add IP Speaker.
2. On the Add IP Speaker dialog box, configure the following settings:
◼Name: Name the speaker.
◼IP:Type the IP address of the speaker.
◼Port: Chang it if necessary or keep the default value 554.
◼ID & Password: Type ID and Password. By default, the ID is admin and the
Password is admin123.
3. Click OK. The speaker is added to the Content List.

GeoVision Inc. 9 10/12/2023
3.2Associating a Speaker with a Camera
In the IP Device Setup dialog box, right-click a camera, select IP Speaker and select a
speaker. You can associate a speaker with multiple cameras
There are two ways to broadcast audio through the associated speaker:
1. Drop the camera to the live view grid and click the Microphone icon to broadcast.
2. Click the speaker on the Content List to broadcast. See 3.3 Speaker Controls below.
3.3 Speaker Controls
Make sure a microphone has been installed in the GV-VMS system before broadcasting.
Function
Description
Add
◼Scan Device: Detect speakers on the same LAN as GV-VMS.
◼Add Group: Create a group for speakers
Delete
Delete a listed speaker or a created group.
Configure
Select a speaker and click the icon to configure its name, IP address, port, login
ID and password.
Speaker
Press and hold the icon. The icon turns green . The operator can then
broadcast audio through a selected group of speakers.
Speaker
Press and hold the icon. The icon turns blue . The operator can then
broadcast audio through a selected speaker.

GeoVision Inc. 10 10/12/2023
When you right-click a speaker on the Content List, you will have the following options:
Function
Description
Play WAV File
Plays a selected WAV file. To stop playing, double-click the speaker
icon.
Volume Setting
Changes the volume of the speaker.
Configure
Changes the connection settings of the speaker.
Delete
Removes the speaker from the Content List.

GeoVision Inc. 11 10/12/2023
4. GV-IP Speaker Setting Kits
Download and install the GV-IP Speaker Setting Kits from our download page.
The controls in the window:
Function
Description
Query To
If you already know the IP address of the speaker, type its IP address in the left field
and click Query to to find it in the network.
Query
Find the IP address of the speaker, under the same LAN as the GV-IP Speaker
Setting Kits and GV-Control Center.

GeoVision Inc. 12 10/12/2023
Setting
When you click the Setting button, you will be prompted to enter Use and Password.
By default, the Use ID is admin and the Password is admin123.
[NormParam]
◼DevID: The Device ID.
◼Dev Network Param Setting: Configure a fixed IP address for the speaker. Or
select DHCP to have an IP address assigned by a DHCP server within the
network.
◼Update IP: The option is used to update the firmware of the speaker. Enter the IP
address of the PC used to update the firmware.
◼Confirm Verify: Enable to check any IP conflicts.
◼ReVal: Return factory default settings.
◼
[ONVIFParam]
By default, the Use ID is admin and the Password is admin123.You can change
both ID and Password.
[SipParam]
Connect a GV-IP Speaker to the SIP server. Use the SIP server to call the speaker
and speak into the microphone installed on the SIP server in order to broadcast via
the speaker.
◼RegIp: Type the IP address of the SIP server.
◼RegPort: The port of the SIP server is 5060 by default.
◼Use: Type the ID number of the speaker as assigned on the SIP server.
◼Password: Type the password of the speaker as assigned on the SIP server.
[Setting]
◼CompatProgram: Keep the compatible programs option turned OFF.
◼1/PlayPriorityH, 1/PlayPriorityM, 1/PlayPriorityL: Set High, Medium and Low
priorities to the protocols IP, SIP, ONVIF / RTSP. The default order of priority is
IP, SIP, and ONVIF / RTSP.
Pos
Click the button to play a sample video through the speaker.

GeoVision Inc. 13 10/12/2023
Update
To update the speaker firmware, see 4.2 Updating the Firmware.
Working
Change the Run Mode of the speaker from BOOT to RUN.
Reset
Restart the speaker.
Enable this option to use the broadcasting method to set up a speaker when the
speaker and the computer used for configure it are on different network segments.
Machine ID. Enable BCastSend and MachID for speaker configurations when two
speakers have the same IP address.

GeoVision Inc. 14 10/12/2023
4.1 Changing the IP Address
To change the IP address of a speaker, follow the steps below:
1. Run GV-IPS Setting.
2. Click Query to detect speakers on the same LAN.
3. Select a speaker in the list.
4. Click Setting. You are prompted to enter the ID and password of the speaker.
5. Change the speaker’s IP settings. Click OK.

GeoVision Inc. 15 10/12/2023
4.2 Updating the Firmware
To update the speaker’s firmware, follow the steps below:
1. Run GV-IPS Setting.
2. Click Query to detect speakers on the same LAN.
3. Select a speaker in the list.
4. To specify the IP address of the PC used to upgrade firmware, click and
type the IP in the Update IP field.

GeoVision Inc. 16 10/12/2023
5. To connect the speaker to the PC used to update the firmware, click Update, enter the
speaker’s ID and password, and then click Query. The Run Mode of the speaker in the
list changes from RUN to BOOT.
Note: If the speaker disappears from the list after you click Update. Wait a minute and then
click Query to detect it again.
6. Run GV-IP Speaker Update Kits.
A、Click Open File to locate a firmware file.
B、Click Start to search for speakers in BOOT mode.

GeoVision Inc. 17 10/12/2023
C、Select a speaker in the list
D、Click Start to start firmware upgrade.
On the GV-IP Speaker Update Kits user interface:
⚫filterUnmatchedType: When the option is enabled, only search for speakers with the
same firmware versions.
⚫markHighVer: When the option is enabled, it will detect new firmware version available,
and display the message “Higher version”.
IMPOPTANT:If a speaker's Run Mode is set to BOOT, the connection to the speaker is
terminated. To change the Run Mode from BOOT to RUN, select the speaker from the list and
click Working .
Other manuals for GV-IP
6
Table of contents
Other GeoVision Speakers manuals