Gerjak Annexe User manual

Gerjak Dear Customer,
We would like to wish you much pleasure with your new Gerjak product.
We very much appreciate that you have chosen our product! Following are some hints and tips to
give you pleasure for years to come with your Gerjak Annexe.
Please note that it is advisable to set up your new awning and check it before you go on vacation.
This will make for easier assembly at the site of your destination.
You will find below information that includes:
• Pre assembly checks and roof pole hook attachments.
• Trap Spanner, Robuusta hostelry, Corner Tie Downs.
• The use of zippers and unpacking the frame.
• Setting up the tent/annexe.
• Maintenance and cleaning tent material, windows & frame.
• Condensation, mildew and stains fight, wear zipper
Is the caravan rail in order?
To avoid damaging the tendon of the awning and to ensure best use of your awning, inspect the
caravan rail for unevenness and look for sharp protrusions.
Is everything in place?
Make sure all standard accessories are in the boxes delivered, such as: Tent, frame, pipe clamps,
hook pads, draft skirt and wheel arch cover, curtains.
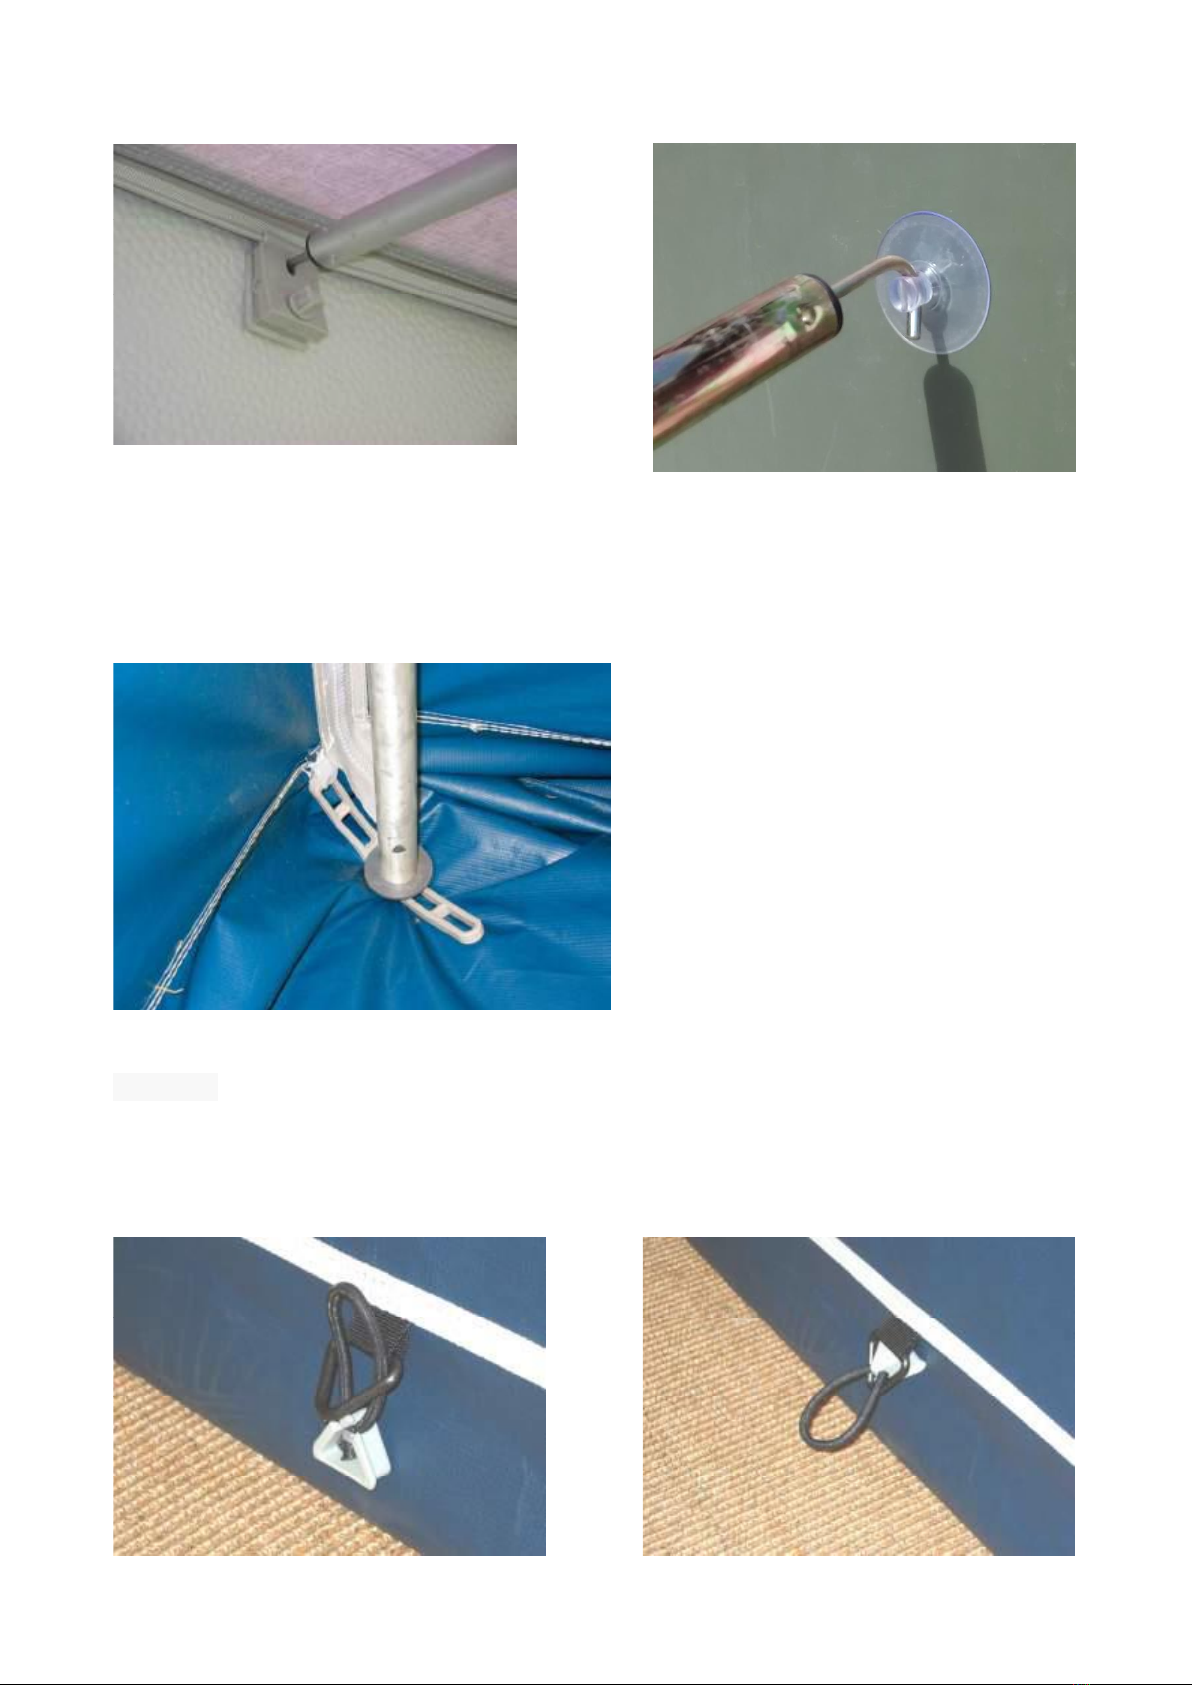
Clip-on System or Roof Pole Hook Pads
All tents are equipped with a double tendon. The thickest tendon should make to slide through the
skirting rail on the caravan. The extra tendon is used for the clip-on cubes which attach to the (3)
roof pole hooks. The cubes are supplied for used on selected models only.
Through the rail, you are free each time to choose where to place the rafters. This can be important
if, for example you are setting up on sloping terrain.
The clip-on cubes or suction hook pads are ideally situated right and left at about 200-210 cm from
the ground. Clip-on cubes need to be pinched to open (like a clothes pin) and attached to the thinner
tendon. Then you can lock the block by turning the screw.
See pictures on following page-

Trap Spanner
Gerjak tents have stairs tensioners which the frame uprights (legs) locate into.
Once in position the leg can be adjusted to achieve the correct roof height and tension.
Robuusta afspanning
Gerjak tents feature sturdy afspannig Robuusta. This allows you to tightly tension your tent. No
more fiddling with loose elastic. In your accessories bag, you will find the corresponding blocks
and elastics.

The use of the zippers
The Gerjak tents are equipped with zippers at both ends to make them universal.
As a result, the possibility exists to use the zippers as a door or as a zipper to attach a veranda.
Tie Down Straps
The Gerjak tents have on the outside edges a feature called Tie Down Straps. These allow added
tightening of the tent and for the corners to be properly secured. When setting, it is therefore
desirable to first tighten the corners so you get a square before then tightening down the
intermediate pegs.

Unpacking/identifying the frame
The easiest way is to take the frame components from the bag and sort through them piece by piece
to identify the different items. By doing this it soon becomes clear as to where many pieces need to
be positioned in order to fit together.
For example- Leg Portions can be recognised by the foot at the bottom of the tube/pole.
- The Roof Beams are identified by the hook that is on the rafter end for attachment to the
caravan. Put these separately.
- There are 3 Roof Pole assemblies consisting of 1 short & 1 long pole.
- You have 2 x Corner Brackets and a Centre (angle) Bracket. These come with poles attached. Also
set these aside.
- There are 3 extension pieces with locating/anchor sticks.
By reaching this point, more than half of the frame components have already been identified. Refer
to the Awning Frame diagram to identify any remaining parts.
*We recommend to first unpack the tent and attach it to the caravan, before fitting the roof beams
and uprights.
Awning Frame

Setting up the tent
1. Turn your caravan level.
2. Place frame according to drawing on the site.
3. Check your rail unevenness to prevent damage to your awning.
4. First remove the detachable walls of the tent. This helps to make it lighter and easier to manage.
5. Now pull the awning through the caravan rail. This is best be done by two people, one to pull the
tent through the rail, the other to guide the cord along the caravan rail.
6. Pull the tent out/away from the caravan rail and check that the left and right sides are at the same
height and length.
7. Now attach the blocks to the tent rail or suction hook pads to the side of the caravan (approx.
200-210 cm) in preparation for the attachment of the frame.
8. Insert the middle upright. Put this in the first instance at the bottom angled inward, so that it
stays. Then the middle rafter pole - Secure by hooking the hook in the clip-on cube or suction hook
pad at one end and sliding over the adjoining roof pole at the other (not yet tensioning).
9. Position the right-hand corner upright and assemble the tubes of the (angled) centre piece and the
corner bracket ensuring they slide together and lock (not yet tensioning). Place the upright leg on
the stairs tensioner (see Trapspanner).
10. Next, assemble and position the rafter poles as described in point 8. See also- Awning Frame
diagram. Repeat this assembly for the LH side.
Note: Once the frame is assembled, check that the adjustable poles are not applying tension in any
one direction.
*You can now Zipper all the walls into the tent and start tensioning.
11. Begin by first tensioning the two rear corners on the van side and then subsequently the two
front corners i.e. so that a square (as it were) arises. Pull the corners until there is firm resistance,
thus forming a straight line from corner to corner.
Note: It is best to tension the front wall by pulling diagonally, in order to prevent the door zippers
from coming loose or separating.

Table of contents
Popular Automobile Accessories manuals by other brands

Seizmik
Seizmik 23017 Installation & operation manual

Cequent Performance Products
Cequent Performance Products 76025 installation instructions

Peiying
Peiying PY0105P owner's manual

Westfalia
Westfalia 92 55 13 Original instructions

Mileage Ace
Mileage Ace Wifi 2 Setup manual

Thule
Thule 1318 Fitting instructions