German pool HTW-M20-SC User manual

P.1
360° Multi-Oscillation Fan RHS-126
Please read these instructions and warranty information carefully
before use and keep them handy for future reference.
Online Warranty Registration
USER MANUAL
HTW-M20-SCWiFi Smart Mirror Bathroom Heater

P.2
Please register your warranty information now !
For Warranty Terms & Conditions,
please refer to the last page of this user manual.
請即進行保用登記!
有關保用條款細則,請看說明書最後一頁。

P.3
Table of Contents
Warnings & Safety Precautions
Product Structure
Installation Instruction
Operation Instructions
Cleaning & Maintenance
Troubleshooting
Technical Specication
Warranty Terms & Conditions
04
06
07
10
16
17
17
31

P.4
Warnings & Safety Precautions
Note:
• IP24 protection rating only applies to wall-mounted installation.
• This product is a heater. Do not use this product as a fan.
WARNING!
Read all instructions carefully before using this product.
• This product is for domestic indoor use only. If this product is used for any commercial, industrial,
rental or other purposes, product warranty will be VOIDED.
• This product is not intended for use by children or persons with reduced physical, sensory
or mental capabilities, or lack of experience and knowledge, unless they have been given
supervision or instruction concerning use of this product by an adult responsible for their safety.
• Mind your children and DO NOT let children play with this product.
• Cleaning and user maintenance shall not be made by children without supervision.
• Check the voltage indicated on the rating label before using this product.
• If the supply cord is damaged, it must be replaced by the manufacturer, its service agent or
similarly qualied persons in order to avoid hazards.
• Unplug this product from the power source before cleaning and maintenance.
• Contact German Pool authorized service technician for repair or maintenance of this product.
1. Please read all instructions carefully before using this product.
2. Before use, please check whether the voltage used is consistent with the voltage on the rating
label of this product.
3. This product can be used by children aged from 8 years and above and persons with reduced
physical, sensory or mental capabilities or lack of experience and knowledge if they have been
given supervision or instruction concerning use of this product in a safe way and understand
the hazards involved. Cleaning and user maintenance shall not be made by children without
supervision.
4. Children of less than 3 years should be kept away from this product unless continuously
supervised.
5. Children aged from 3 years and less than 8 years shall only switch on/off this product provided
that it has been placed or installed in its intended normal operating position and they have been
given supervision, instruction, or assistance concerning use of this product in a safe way and
understand the hazards involved. Children aged 3-8 years old are only allowed to turn this product
on/off. Children aged from 3 years and less than 8 years shall not plug in, regulate and clean this
product or perform user maintenance.
6. WARNING! some parts of this product can become very hot and cause burns. Particular
attention must be given where children and vulnerable people are present.
7. This product is not intended for use by persons (including children) with reduced physical,
sensory or mental capabilities, or lack of experience and knowledge, unless they have been given
supervision or instruction concerning use of this product by a person responsible for their safety.

P.5
Warnings & Safety Precautions
8. Children should be supervised to ensure that they do not play with this product.
9. WARNING! In order to avoid overheating, DO NOT cover this product.
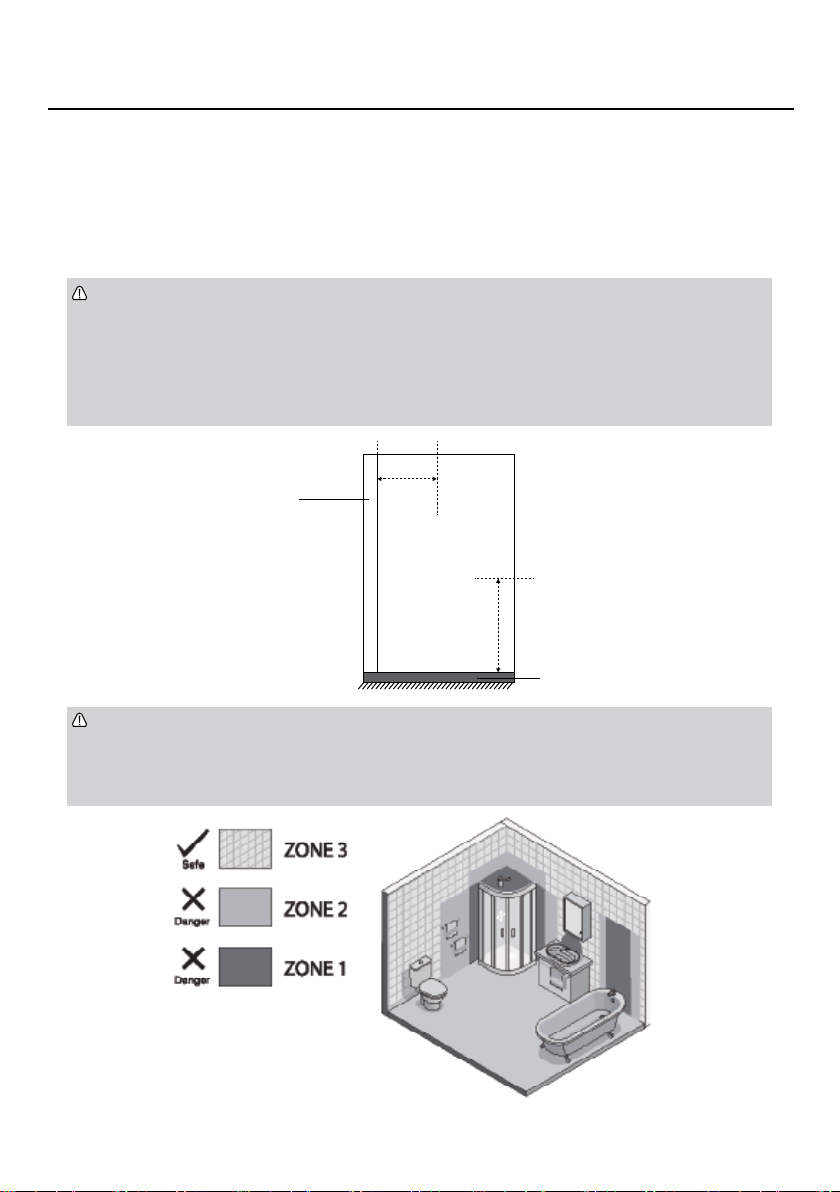
10. DO NOT use this product in the immediate surroundings of a bath, a shower or a swimming pool.
11. Do not use this product if it has been dropped.
12. This product must not be located immediately below a socket-outlet.
13. DO NOT use if there are visible signs of damage to this product.
14. If the supply cord is damaged, it must be replaced by a special cord or assembly available from
the manufacturer or its service agent.
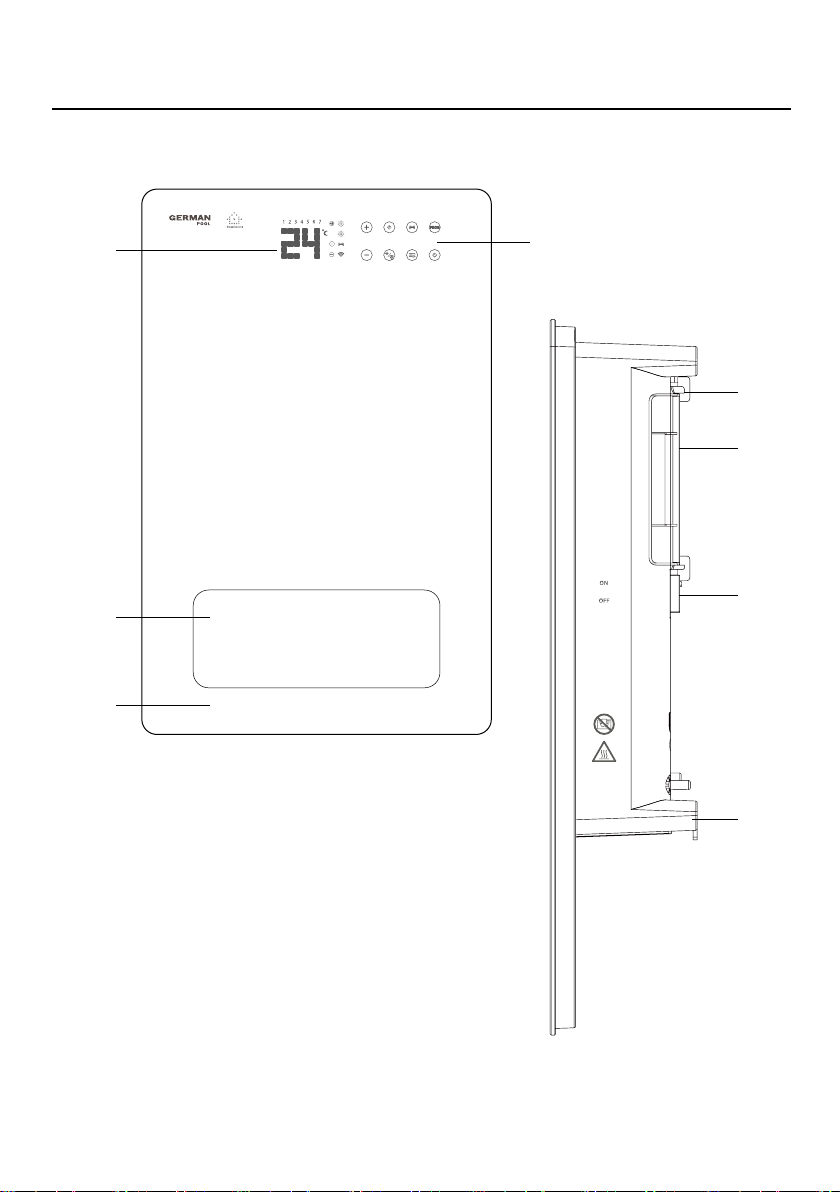
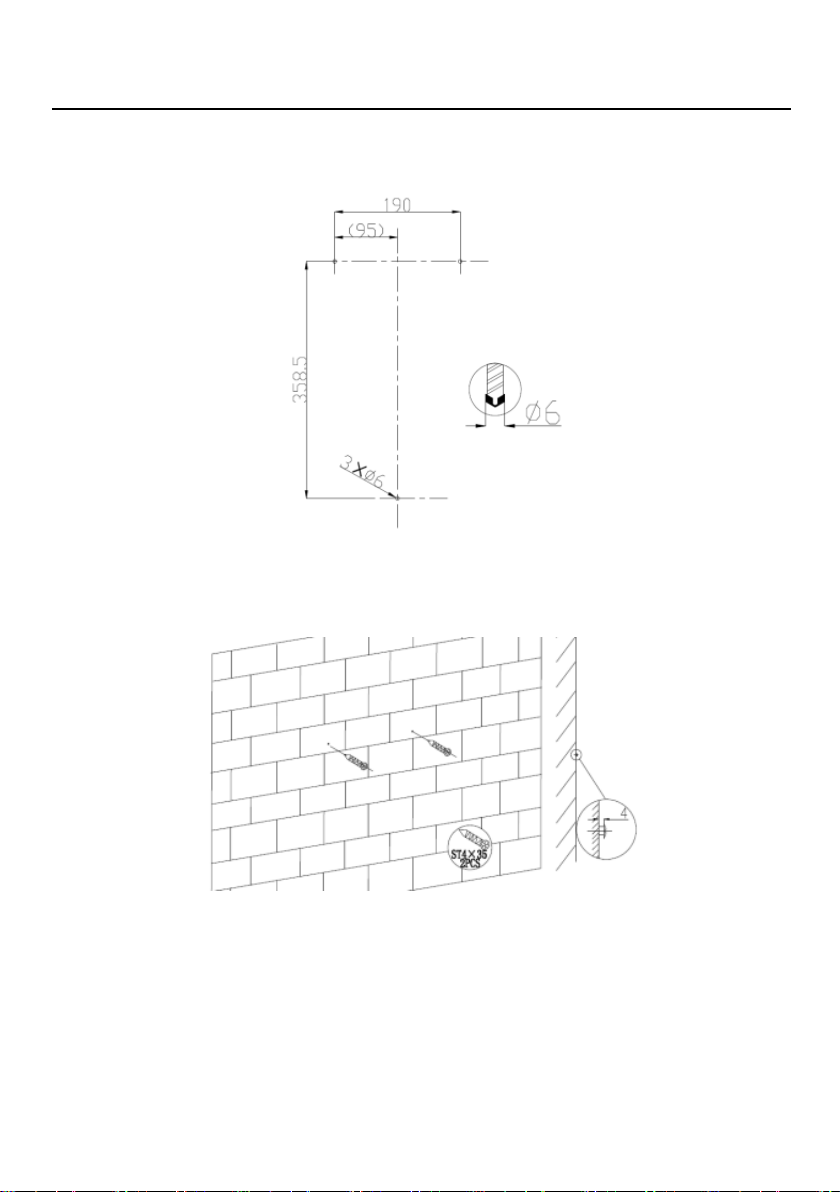
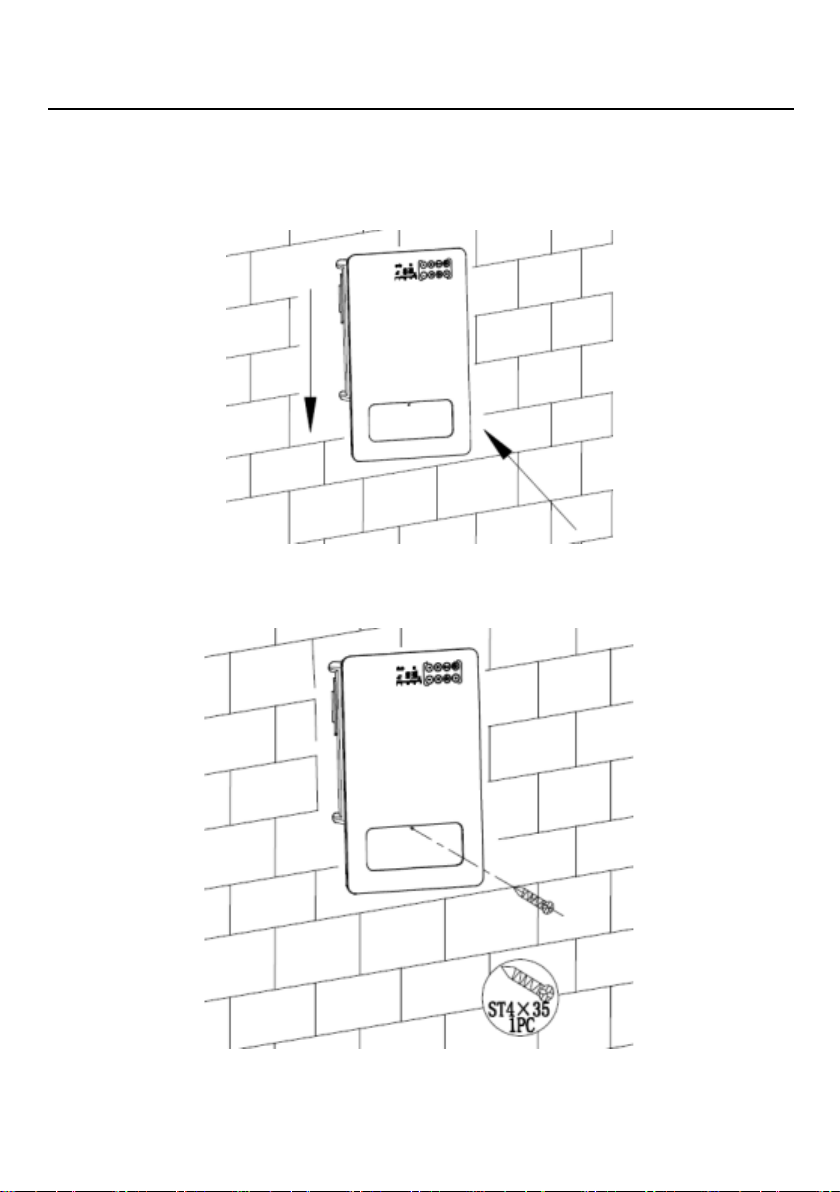
15. Use this product on a at and stable surface. (Note: After installation, the bottom of the product
should be 1-1.8 meter off the ground, and distance to the sidewall should be more than 0.3
meter. If this product is used in the bathroom, it should be at least 1 meter away from the water
source).
16. WARNING! DO NOT use this product in small rooms when they are occupied by persons not
capable of leaving the room on their own, unless constant supervision is provided.
17. WARNING! In order to avoid a hazard for very young children, this product should be installed
so that the lowest heated rail is at least 1 meter above the oor.
18. This product must be placed in a location where switches and other controls cannot be touched
by a person in the bath or shower.
19. This product for household and indoor use only.
20. Switch and control panel cannot be touched by wet hand.
21. For additional protection, the installation of a residual current device (RCD) having a rated
residual operating current not exceeding 30 mA is advisable in the electrical circuit supplying the
bathroom. Ask your installer for advice.
22. This product is intended only for drying textiles washed in water.
23. The plug of this product shall be protected, for example, away from the water source, or the plug
shall be protected with a waterproof box.
24. DO NOT ingest battery, Chemical Burn Hazard.
25. WARNING! This product contains a coin / button cell battery. If the coin / button cell battery is
swallowed, it can cause severe internal burns in just 2 hours and can lead to death.
26. Keep new and used batteries away from children.
27. If the battery compartment does not close securely, stop using the remote control and keep it
away from children.
28. If you think batteries might have been swallowed or placed inside any part of the body, seek
immediate medical attention.
29. The batteries contain materials which are hazardous to the environment; they must be removed
from this product before it is scrapped and that they are disposed of safely.
30. WARNING! To reduce the risk of re, keep textiles, curtains, or any other ammable material a
minimum distance of 1 m from the air outlet.

P.6
Product Structure
①②
⑤
⑥
⑦
⑧
③
④
1. LED Display
2. Control Panel
3. Air Outlet
4. Towel Rack
5. Wall Mount Holes
6. Air Inlet & Mesh Filter
7. Power Switch
8. Air Outlet

P.7
Installation Instructions
Installation Requirements
Wall-Mounted Installation
To meet IP24 protection rating, this product must be mounted on the wall. If it is used in the bathroom,
it should be at least 1 meter away from the water source.
WARNING!
When installing this product, must leave ample space on all sides to ensure adequate ventilation and
heat dissipation.
1. Leave at least 500mm above the product.
2. Leave at least 300mm on either side of the product.
3. Leave 1,000-1,800mm from the ground.
WARNING!
• This product can only be installed beyond ZONE 1 and 2.
• This product must be installed so that switches and other controls cannot be touched by a person
in the bath or shower.
Wall

P.8
Installation Instructions
Installation Steps
1. Drill threeØ6 holes in a load-bearing wall according to the dimensions below.
2. Insert plastic wall plugs into the three holes, and screw two ST4*35 large at head self-tapping
screws into the top two holes (Note: must leave 4mm space between the screw head and the
wall).

P.9
3. Align the screw holes on the back of this product with the screws on the wall, then gently pull the
product downwards until the screws t snugly over the holes and the product hangs securely on
the wall.
4. Align the bottom hole of the product back casing with the bottom plastic plug, and screw in one
ST4*35 large at head self-tapping screw until the product is securely mounted onto the wall.
Installation Instructions

P.10
Operation Instructions
LED Display Control Keys (Same For Remote Control)
Day Of The Week Display Increase Key
Temperature / Time
Display
Decrease Key
Temperature Indicator
Light
Clock / Timer Key
Clock / Timer Indicator
Light
Anion / WiFi Key
Quiet Mode Indicator
Light
Motion Sensor Key
High / Low Mode
Indicator Light
Mode Key
Motion Sensor Indicator
Light
Program Key
Anion Indicator Light On/Off Key
WiFi Indicator Light

P.11
A. Basic Operation
Note:
• Whether you are operating this product via the control panel on the main unit or via the remote
control, the procedure is the same.
• When operating with the remote control, make sure to point it directly towards this product’s LED
panel to maximize the signal reception.
A1. Set Current Day and Time (when using this product for the rst time)
1. Connect to the power source. Switch on the Power Switch located on the back of the product.
Buzzer beeps twice, all function keys light up constant and Temperature/Time Display shows the
current room temperature, and product enters standby state. In standby state, tap On/Off Key to
turn on the product.
Note:
If the product receives no command in 10 seconds, Display Panel will go dark except for Temperature/
Time Display and On/Off Key. Tap any key and all function keys will light up again.
2. When product is turned on, tap and hold Clock/Timer Key for 3 seconds to enter “Day and Time
Setting”.
3. Tap + or – Key to select current day of the week (1-7 refers to Monday - Sunday), tap Clock/Timer
Key to conrm.
4. Tap + or – Key to select current hour (00-23 refers to 12am-11pm), tap Clock/Timer Key to
conrm.
5. Tap+ or – Key to select current minute (00-59), tap Clock/Timer Key to conrm. Current day and
time are now set.
6. After the clock is set, Temperature/Time Display will show current ambient temperature.
Note:
To check the current time: When the product is turned on, tap Clock/Timer Key once, Temperature/
Time Display will show current hour for 2 seconds, then show current minute for 2 seconds, then show
back the current temperature.
A2. Turn On/Turn Off
1. Turn On: In standby state, tap any key to wake up Control Panel, then tap On/Off Key to turn on
the product, and the product will run according to its previously set parameters.
2. Turn Off: When product is operating, tap On/Off Key to turn off the product. Product will stop
heating immediately, and the heat-dissipating fan will continue to run for 30 seconds, after which
the product will return to standby state.
Operation Instructions

P.12
Note:
If product is running but control keys have turned dark, tap any key to wake up the Control Panel rst,
then tap On/Off Key to turn off the product.
A3. High Mode / Low Mode / Quiet Mode
1. Connect to the power source. Product enters standby state, buzzer beeps twice, LED Display
shows current ambient temperature and current day and time.
2. Press On/Off Key to turn on the product. If using for the rst time, the product is set to target
temperature of 24°C and High Mode by defaults, icon lights up, Temperature/Time Display shows
current ambient temperature.
3. Tap Mode Key to cycle among Low Mode / Quiet Mode / High Mode.
4. To adjust target temperature, tap + Key to increase temperature or – Key to decrease
temperature by 1°C increments. User can tap and hold key to speed up adjustment.
5. To turn off the product, tap On/Off Key and product will return to standby state.
A4. Setting The Temperature
1. When the product is operating, tap +or – Key to enter Temperature Setting, Temperature Display
shows current set temperature. Tap + or – Key again to increase or decrease target temperature
to between 5°C-40°C.
2. After setting the target temperature, product will automatically conrm setting, and 5 seconds
later Temperature Display will show current room temperature.
Note:
• If product is in Anti-Freeze Mode, target temperature is not adjustable. User must exit Anti-Freeze
Mode rst.
• When product has reached target temperature, it will automatically stop heating; when room
temperature drops 1°C below the target temperature, the product will resume heating.
A5. Off-Timer Function
When product is running in P1 program, user can set the time for the product to turn off (off-timer).
1. Tap Clock/Timer Key to enter Off-Timer Setting. Temperature/Time Display blinks “0” by default,
Clock/Timer Indicator light blinks.
2. Tap + and – Keys to adjust off-timer from 0-24 hr; after setting is complete, product will
automatically conrm setting after 5 seconds, Temperature/Time Display Indicator Light light up
constant, and product will start to countdown.
3. To cancel the timer, tap Clock/Timer Key twice again.
Operation Instructions

P.13
Note:
• During countdown, Temperature/Time Display will show current temperature and countdown time
alternately.
• Off-Timer is only available in P1 program. P2-P5 programs do not support personal setting of off-
timers.
B. Advanced Operation
Preset Weekly Program Mode
This product is equipped with preset weekly programs P1-P5. Product will run in Comfort Mode (product
operates at user’s selected temperature and High/Low/Quiet Mode) or Anti-freeze Mode at specic
times according to the program selected.
P1: All Day Program
P2: Family Program
P3: Ofce Program
P4: Commercial Program
P5: Anti-Freeze Program
1. When product is operating, tap M key repeatedly to cycle among P1-P5. After program is selected,
product will automatically conrm setting after 3 seconds, and Temperature/Time Display will
show the current temperature.
2. To cancel preset weekly program, tap On/Off Key to turn off the product.
Operation Instructions

P.14
Operation Instructions
Mode Day Of The Week Operation Description
P1 1-7 00:00-24:00 Comfort Mode Suitable for daily use
P2
1-5
00:00-06:30 Anti-freeze Mode
06:30-08:30 Comfort Mode
08:30-17:00 Anti-freeze Mode
17:00-22:30 Comfort Mode
22:30-24:00 Anti-freeze Mode
Suitable for families who work
during weekdays and are home
during weekends
6-7
00:00-07:30 Anti-freeze Mode
07:30-10:00 Comfort Mode
10:00-12:00 Anti-freeze Mode
12:00-14:00 Comfort Mode
14:00-17:00 Anti-freeze Mode
17:00-22:30 Comfort Mode
22:30-24:00 Anti-freeze Mode
P3 1-5
00:00-06:00 Anti-freeze Mode
06:00-17:00 Comfort Mode
17:00-24:00 Anti-freeze Mode
Suitable for ofces that are
open during normal ofce hours
on weekdays and closed on
weekends
6-7 00:00-24:00 Anti-freeze Mode
P4 1-7
00:00-06:00 Anti-freeze Mode
06:00-22:00 Comfort Mode
22:00-24:00 Anti-freeze Mode
Suitable for commercial spaces
that are open all week
P5 1-7
00:00-24:00 Anti-freeze Mode Suitable for when the room will
not be occupied for a prolonged
period of time (eg. family on trip)
Power-Off Memory Function
1. When power is cut off, the product will stop operating. After power is reconnected, product
enters standby state. Tap On/Off Key to restart the product, product will operate according to its
previously set parameters.
2. If product was set to Quiet Mode prior to power cut-off, after power is reconnected, product will
rst run in High Mode for 15 seconds, then resume Quiet Mode.
Note:
When power is out off, settings and time data will only be stored for 72 hours. If power is not turned
back on within 72 hours, user will need to reset current day and time again.
Motion Sensor Function
When product is operating, tap Motion Sensor Key to turn on this function. When this function is turned
on, every time the product detects motion, Motion Sensor Indicator Light will light up, and product
will automatically start heating; if no motion is detected in 15 minutes, the product will stop heating,
Temperature/Time Display will show current temperature, and all other indicator lights and function
keys will go dark.
To turn off this function, tap Motion Sensor Key again, and Motion Sensor Indicator Light will turn off.

P.15
Anion Function
When product is operating, tap Anion/Child Lock Key to turn on anion purication function, Anion
Indicator Light will light up constant.
To turn off this function, tap Anion/Child Lock Key again, and Anion Indicator Light will turn off.
Child Lock Function
When product is operating, tap and hold Anion/Child Lock Key for 3 seconds to activate child lock,
Temperature/Time Display will show [ ] for 5 seconds then return to original display status, and all keys
will be rendered inoperable.
To deactivate child lock, tap and hold Anion/Child Lock Key for 3 seconds again.
Reset To Factory Default Setting
When product is operating, tap + and – Keys simultaneously twice, and product will return to factory
default setting of High Mode and 24°C.
Operation Instructions

P.16
WARNING!
Before cleaning and maintenance, turn off the product and unplug the power plug rst.
DO NOT immerse this product in water and DO NOT splash water on it.
Cleaning The Surface
Clean the surface of the product with a wrung out soft cloth. DO NOT immerse, rinse or wet product
directly with water. DO NOT use gasoline, thinner, or corrosive cleaners or solvent.
Cleaning The Filter
If too much foreign matter adheres to the mesh lter, it will affect the air ontlet performance, outlet, so
it should be cleaned at least every other month.
1. Remove the mesh lter from the back casing of the product, and use vacuum cleaner to vacuum
off any accumulated dust.
2. If mesh lter is too dirty, rinse it in water and diluted neutral detergent, then allow it to completely
air dry before installing it back.
Maintenance
1. If the product won’t be used for a long time, pull out the power plug, pack the heater to prevent
dust from entering it.
2. Before packing, make sure that the outer surface and the lter are dry.
3. After packaging, it should be stored in a dry and ventilated place away from direct sunlight.
Changing Battery For Remote Control
1. To open the battery cover at the bottom of the remote control, press the buckle on the battery
cover inward and pull it out.
2. Identify the polarity of the battery, and insert the battery into the battery slot.
3. Reinsert the battery cover into the bottom of the remote control.
WARNING!
This product contains a coin / button cell battery. If the coin / button cell battery is swallowed, it can
cause severe internal burns in just 2 hours and can lead to death. Keep new and used batteries away
from children.
Cleaning & Maintenance
Bottom of Remote Control
Press the Buckle
Pull Out
Battery Cover

P.17
Troubleshooting
Technical Specication
Model HTW-M20-SC
Voltage / Frequency 220-240 V ~ 50 Hz
Power 2000 W
Product Dimensions (H) 535 (W) 340 (D) 110 mm
Net Weight 4.18 kg
Protection Rating IP24*
*IP24 protection rating only applies to wall-mounted installation.
• Specication is subject to change without prior notice.
• If there is any inconsistency or ambiguity between the English version and the Chinese version,
the Chinese version shall prevail.
• Refer to www.germanpool.com for the most update version of the user manual.
Error Code Problem Solution
E1 Sensor short circuit Contact German Pool Customer
Service & Repair Centre
E2 Sensor open circuit Contact German Pool Customer
Service & Repair Centre
E3 Temperature too high (> 50°C) Use this product in a suitable
ambient tenperature
environment
E4 Temperature too low (< -40°C) Use this product in a suitable
ambient tenperature
environment

P.18
目錄
警告及注意事項
產品結構
安裝說明
使用說明
清潔與保養
故障檢修
技術規格
保用條款
19
21
22
25
29
30
30
31

P.19
警告及注意事項
注意:
• IP24防水防塵級別只適用於掛牆安裝。
• 本產品不可作風扇用途。
警告!
使用本產品前,請仔細閱讀所有說明。
• 本產品只限家居室內日常使用,如產品作任何商業、工業、出租或其他用途,保用證即告失
效。
• 請勿讓兒童或身體有殘障、精神不健全及對本產品缺乏經驗或知識的人士單獨使用本產品;
如需使用,必須要在負責任的成年人監管下方可使用。
• 應照顧好兒童,確保他們不會玩耍本產品。
• 無成年人監管下,勿讓兒童清潔及維護本產品。
• 使用前,請先檢查所有電壓是否與本產品標籤上的電壓相符。
• 如果電源線損壞,為免發生意外,電源線必須由廠方、廠方指定的維修中心或同等合格的技
術人員進行更換。
• 清潔或檢查本產品前,必須先關機及拔掉插頭。
• 請聯繫德國寶授權的技術人員進行維修或保養本產品。
1. 使用本產品前,請仔細閱讀所有說明。
2. 使用前,請先檢查所用電壓是否與本產品標籤上的電壓相符。
3. 當本產品由8歲或以上兒童、感官或精神有缺陷、及缺乏必要經驗和知識的人使用時,必須有
對其安全負責的人進行監管,並確保使用者的安全及其明白當中潛在危險。當兒童對本產品
進行清潔和維護時,必須有對其安全負責的人進行監管。
4. 3歲以下的幼兒應遠離本產品,除非有對其安全負責的人進行持續監管。
5. 當本產品被放置或安裝在正常工作位置時、在有對其安全負責的人的指導或協助、並確保使
用者的安全及其明白當中潛在危險的前提下,3至8歲的兒童只可開啟/關閉本產品。3至8歲的
兒童不可調節、清潔、保養本產品,亦不可把本產品插頭連接電源。
6. 警告!本產品的某些部分可能變得非常熱並導致燒傷,兒童和弱勢群體在場時請特別注
意。
7. 本產品不適用於身體、感官或精神有缺陷,及缺乏必要經驗和知識的人群(包括小孩),除
非在能對其安全負責的人的監管下使用。
8. 兒童應進行監管,以確保他們不玩耍本產品。
9. 警告!為避免過熱,禁止覆蓋本產品。
10. 在浴缸、花灑、噴頭或泳池的四周不得使用本產品。
11. 如果本產品有跌落過,請勿使用。
12. 本產品不得直接置於電源插座下面。
13. 如果本產品有明顯的損壞跡象,請勿使用。
14. 如果電源軟線損壞,為了避免危險,必須由製造商、其維修部或類似部門的專業人員更換。
15. 在水平和穩定的表面上使用本產品。(注意:安裝後,本產品底部必須距離地面1-1.8米,
距離牆壁大於0.3米,如果在浴室使用,必須垂直安裝,並確 保安裝位置離水源的距離大於
1米)。

P.20
警告及注意事項
16. 警告!當小房間內有無法自行離開房間的人員時,請勿在小房間內使用本設備,除非提供
持續的監督。
17. 警告!為了避免對年幼兒童造成危險,該設備的安裝應確保最低加熱面至少高出地板1
米。
18. 本產品的擺放應確保開關和其他控制裝置不會被沐浴或淋浴的人觸及。
19. 本產品僅供家用和室內使用。
20. 不能用濕手觸摸開關和控制面板。
21. 對於附加保護,建議在浴室供電電路中安裝額定工作電流不超過30mA的過流保護裝置
(RCD)。請向安裝人員諮詢。
22. 本產品僅用於烘乾水洗過的紡織品。
23. 應保護電器插頭,例如遠離水源,或用防水盒保護插頭。
24. 不要攝入電池,可能導致化學灼傷危險。
25. 警告!本產品包含紐扣電池。如果紐扣電池被吞下,可能在2小時內造成嚴重的內部燒
傷,並可能導致死亡。
26. 新電池和舊電池應遠離兒童。
27. 如果電池蓋不能安全關閉,請停止使用遙控器,並將其遠離兒童。
28. 如果您認為電池可能被吞食或放置在身體任何部位,請立即就醫。
29. 電池含有對環境有害的材料;在報廢前,必須將其從設備中取出,並進行安全處理。
30. 警告!為避免引起火警,出風口1米範圍內,嚴禁擺放任何布料、窗簾或其他易燃物料。
Table of contents
Popular Indoor Furnishing manuals by other brands

Dorel Home Products
Dorel Home Products 4071439 manual

Coaster
Coaster 882036 Assembly instructions

OVE
OVE PEDRO 42 installation manual

highmore
highmore HM-GC004-001 user manual

New Classic Furniture
New Classic Furniture TAOS U4229 Assembly instructions

Walker Edison
Walker Edison RAMU1O Assembly instructions