German pool WP700ASJ17Q-2B User manual

WP700ASJ17Q-2B
WP700ASJ17Q-M-09(2)
嵌入/座檯式
Built-In/Free-Standing

P.2
TABLE OF CONTENTS
NOTICE BEFORE USE P.3
INSTALLATION INSTRUCTIONS P.4
MICROWAVE COOKING PRINCIPLES P.5
UTENSILS GUIDE P.5
PRODUCT STRUCTURE P.6
CONTROL PANEL P.7
OPERATING INSTRUCTIONS P.8
CARE & MAINTENANCE P.11
TECHNICAL SPECIFICATIONS P.22
WARRANTY TERMS & CONDITIONS P.23

P.3
NOTICE BEFORE USE
IMPORTANT
For safety purpose, you should read the instructions carefully before using the appliance for the rst time.
Save the instructions for future reference.
The appliance is designed for domestic use and may only be installed and operated in accordance with
these instructions for use.
1. Do not allow children to operate the oven without supervision. The oven must not be unattended at any
time during operation.
2. Use this appliance only for its intended use as described in this manual. Do not use corrosive
chemicals or vapors in this appliance. This type of oven is specically designed to heat, cook or dry
food. It is not designed for industrial or laboratory use.
3. Do not operate the oven when it is empty.
4. Do not operate this appliance: if its cord or plug is damaged, if it is not working properly or if it has been
damaged or dropped. If the supply cord is damaged, it must be replaced by German Pool-authorized
or licensed technicians in order to avoid hazards.
5. To reduce the risk of re in the oven cavity:
– When heating food in plastic or paper container, keep an eye on the oven frequently due to the possibility of ignition.
– Remove wire twist-ties from paper or plastic bags before placing bag in oven.
– If smoke is observed, switch off or unplug the appliance and keep the door closed in order to stie any ames.
– Do not use the cavity for storage purposes. Do not leave paper products, cooking utensils or food in
the cavity when the oven is not in use.
6. Liquid or other food must not be heated in sealed containers since they are liable to explode.
7. Microwave heating of beverage can result in delayed eruptive boiling, therefore care has to be taken
when you handle the container.
8. Do not fry food in the oven. Hot oil can damage oven parts and utensils and even result in skin burns.
9. Eggs in their shell and whole hard-boiled eggs should not be heated in microwave ovens since they may
explode even after microwave heating has ended.
10. Pierce foods with heavy skins such as potatoes, whole squashes, apples and chestnuts before cooking.
11. The contents of feeding bottles and baby jars should be stirred or shaken and the temperature
should be checked before serving in order to avoid burns.
12. Cooking utensils may become hot because of heat transferred from the heated food. Potholders may
be needed to handle the utensil.
13. Utensils should be checked to ensure that they are suitable for use in microwave oven.
14. It is hazardous for anyone other than a trained technician to carry out any service or repair operation
which involves the removal of any cover which gives protection against exposure to microwave energy.

P.4
15. To avoid possible exposure to excessive microwave energy:
– Do not attempt to operate this oven with the door open since open-door operation can result in harmful
exposure to microwave energy. It is important not to defeat or tamper with the safety interlocks.
– Do not place any object between the oven front face and the door or allow soil or cleaner residue to
accumulate on sealing surfaces.
– Do not operate the oven if it is damaged. It is particularly important that the oven door close properly
and that there is no damage to the:
• Door ( bent )
• Hinges and latches (broken or loosened)
• Door seals and sealing surfaces
– The oven should not be adjusted or repaired by anyone except properly qualied techincians.
INSTALLATION INSTRUCTIONS
1. Make sure that all the packing materials are removed from the interior of the oven.
2. WARNING: Check the oven for any damage, such as misaligned or bent door, damaged door seals and
sealing surface, broken or loose door hinges and latches, and dents inside the cavity or on the door. If
there is any damage, do not operate the oven. Contact qualied technicians for repair.
3. This microwave oven must be placed on a at, stable surface to hold its weight and the heaviest food
likely to be cooked in the oven.
4. Do not place the oven where heat, moisture, or high humidity are generated, or near combustible materials.
5. For correct operation, the oven must have sufcient airow. Allow 20 cm of space above the oven,
10 cm at the back and 5 cm at both sides. Do not cover or block any openings on the appliance.
Do not remove feet.
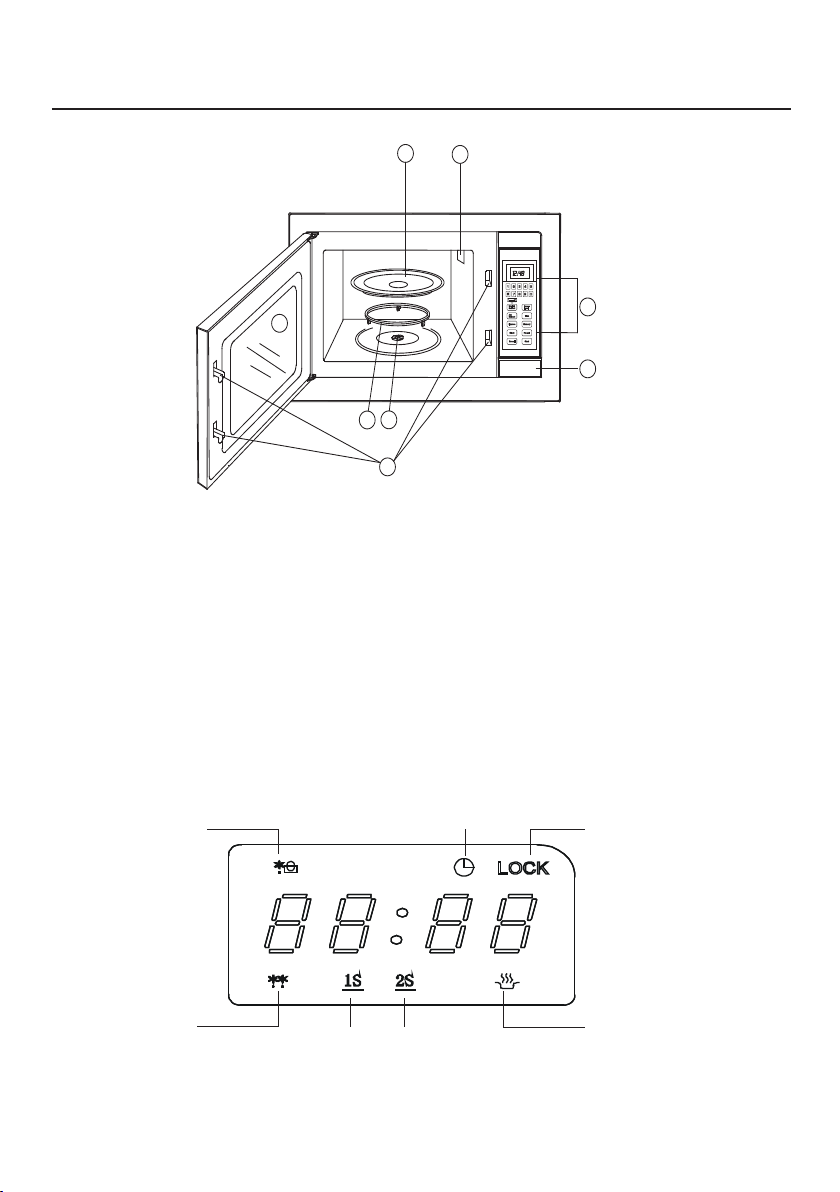
6. Do not operate the oven without glass tray, roller support, and shaft in their proper positions.
7. Make sure that the power supply cord is undamaged and does not run under the oven or over any hot
or sharp surface.
8. The socket must be readily accessible so that it can be easily unplugged in an emergency.
9. Do not use the oven outdoors.
Grounding Instructions
1. This appliance must be grounded.
2. This oven is equipped with a cord having a grounding wire with a grounding plug.
3. It must be plugged into a wall receptacle that is properly installed and grounded.
4. It is recommended to provide a separate circuit serving only the oven. Using a high voltage is
dangerous and may result in a re or other accidents causing oven damage.
WARNING: Improper use of the grounding plug can result in a risk of electric shock. If you have any
questions about the grounding or electrical instructions, consult a qualied technician.
NOTICE BEFORE USE

P.5
MICROWAVE COOKING PRINCIPLES
1. Arrange food carefully. Place the thickest areas towards edge of dish.
2. Watch cooking time. Cook for the shortest amount of time indicated and add more as needed. Food
severely overcooked can smoke or ignite.
3. Cover food while cooking. Covers prevent spattering and facilitate food to be cooked evenly.
4. Turn food over once during microwave cooking to speed up cooking of such foods as chicken and
hamburgers. Large items like roasts must be turned over at least once.
5. Rearrange food such as meatballs halfway through cooking both from top to bottom and from the
center of the dish to the edge.
UTENSILS GUIDE
1. The ideal material for a microwave utensil is transparent to microwave, as it allows energy to pass
through the container and heat the food.
2. Microwave cannot penetrate metal, so metal utensils or dishes with metallic trim should not be used.
3. Do not use recycled paper products during microwave cooking, as they may contain small metal
fragments which may cause sparks and/or re.
4. Round /oval dishes rather than square/oblong ones are recommended, as food in corners tends to overcook.
The list below is a general guide to help you select the correct utensils.
COOKWARE MICROWAVE
Heat–Resistant Glass Yes
Non Heat–Resistant Glass No
Heat–Resistant Ceramics Yes
Microwave–Safe Plastic Dish Yes
Kitchen Paper Yes
Metal Tray No
Metal Rack No
Aluminum Foil & Foil Containers No

P.6
PRODUCT STRUCTURE
87
6
5
43
2
1
1. Door Safety Lock
2. Oven Window
3. Roller Ring
4. Shaft
5. Door Release Button
6. Control Panel
7. Oven Air Vent
8. Glass Tray
Weight Defrost
(refer to P.9)
Jet Defrost
(refer to P.9) Memory (Stage 1)
(refer to P.9 “Program Cooking”)
Memory (Stage 2)
Cooking
Safety Lock
(refer to P.10)
Pre-set
(refer to P.9)
Body
Display

P.7
CONTROL PANEL
Number Keys (0-9)
Press to set time or weight.
Power Level
Use to set power level, and to check power level
during timed cooking.
Time
Use to set cooking time.
Memory
When programming the oven to cook by time, use
the memory key when setting both the 1st and the
2nd cooking stages (“1S” and “2S” will light up).
The respective lights will come on to indicate which
stage the oven is operating in.
Pre-set
Use to set the oven to start-up at a later time.
Weight Defrost
Use to defrost frozen meat, poultry and seafood
by weight. The defrosting time and power level are
automatically set, once the food category and the
weight are programmed.
Jet Defrost
Press to set defrosting time; the oven automatically
divides the defrosting time into periods of
alternating defrost and stand times by cycling on
and off.
Express
Use this feature to program the oven for 4 popular
microwave timings at high power.
Clock
Use to set the time of day or recall the time of day.
Start
Press to start the cooking or defrosting programs.
The cooking indicator light and the oven light will
turn on and the cooling fan will operate.
Cancel
Press to cancel the selected power level, cook or
defrost times previously programmed. The time of
the clock will not be cancelled.
NOTE:
- Each time a button is pressed, a beep will sound
to acknowledge the press.
- When the oven nishes cooking, but the door
is not opened and no button is pressed, display
will show “End” and a sound will be heard every
2 minutes.

P.8
A.SETTING COOKING TIME AND POWER LEVEL
I. One-stage Cooking
1. Press TIME key.
2. Use the number keys to set a cooking time. You can set a cooking time from one second to 99 minutes
and 99 seconds. If you are setting a time greater than one minute, you must enter numbers for both minutes
and seconds. For example, to set 20 minutes, enter 2,0,0,0.
3. If you want to set a power level other than 100% power, press POWER, and then use the number keys
to enter the power level.
4.Press START to start cooking.
II. Two-stage Cooking
Some recipes require different stages of cooking at different temperatures.
1. SET STAGE 1:
Follow steps 1 and 2 in “One-stage Cooking”.
*Do not press START key.
2. SET STAGE 2:
Press MEMORY key, then enter proper cooking time and (lower) power level (most 2-stage recipes use
lower power for the second stage).
3. Press START key.
NOTE:
The respective lights will come on to indicate which stage the oven is operating in. After total time has
elapsed, 3 beeps sound. After a cooking or defrosting program has completed, the oven will automatically
continue to sound three beeps every two minutes until the door is opened or the CANCEL key is pressed.
OPERATION INSTRUCTIONS
THESE SINGLE DIGITS REPRESENT POWER LEVELS
Number Key % of Power
1, 0 100%
9 90%
8 80%
7 70%
6 60%
5 50%
4 40%
3 30%
2 20%
1 10%

P.9
OPERATION INSTRUCTIONS
B. PROGRAM COOKING
The oven can be programmed to do several consecutive functions.
Suppose you want to set the following cooking program:
- JET DEFROST
- 1st stage: Cook for 5 minutes at 100%
- 2nd stage: Cook for 10 minutes at 50%.
Steps:
1. Press CANCEL key.
2. Input JET DEFROST program.
3. Press MEMORY key (“1S” will light up on the display).
4. Input time (5 minutes) and power level (100%) cooking program.
5. Press MEMORY key (“2S” will light up on the display).
6. Input time (10 minutes) and power level (50%) cooking program.
7. Press START key.
NOTE:
JET DEFROST and WEIGHT DEFROST can only be selected before entering the cooking stage in a
program. It cannot be selected between or after stage1 or stage 2.
C. PRE-SET
Suppose you want to set the oven to start-up at 2 o’clock.
1. Press PRE-SET key.
2. Press numeral keys 2.0.0.
3. Set the cooking programs.
4. Press START key.
NOTE:
Be sure the time of day clock is set at the correct time before programming PRE-SET.
D. SETTING “WEIGHT DEFROST”
Suppose you want to defrost 600g shrimp.
1. Press WEIGHT DEFROST key 3 times. “d3” will appear in the display.
2. Press number keys 6.0.0.
3. Press START key.
NOTE:
The maximum allowable weight for each category is shown below.
For foods exceeding these maximum weights, use the JET DEFROST program. If you program weight in
excess of the maximum recommended, the oven will not operate properly.
E. SETTING “JET DEFROST”
1. Press JET DEFROST key.
2. Enter desired defrosting time by pressing correct number keys. Digital timer sets minutes and seconds
from left to right, so that a single digit (5 for 5 seconds) or up to 4 digits (2405 for 24 minutes 5
seconds) can be set.
3. Press START key.
FOOD CATEGORY MAXIMUM WEIGHT DISPLAY
Meat 2300g d1
Poultry 4000g d2
Seafood 900g d3

P.10
OPERATION INSTRUCTIONS
F. EXPRESS
Use this feature to program the oven for 4 popular microwave timings.
With each press of the EXPRESS key you can program the oven for:
The oven will operate at high power (100% power output) for EXPRESS cooking program.
Suppose you want to set the oven to cook for 1 minute at 100% by using the feature:
1. Press the EXPRESS key 3 times, then “1:00” will appear in the display.
2. Press START key.
G.SETTING THE CLOCK
1. Press CLOCK key.
2. Press CANCEL key.
3. Use the number keys to enter the correct time. Press at least three numbers to set the clock
(one for hour and two for minutes).
4. Press CLOCK key again.
NOTE:
This is a 12-hour clock. When the oven is plugged in, “1:01” will appear in the display. To reset the time of day,
repeat the steps given above. You can check the clock time while cooking by pressing the CLOCK key.
H.SETTING “SAFETY LOCK”
Use to prevent unsupervised operation of the oven by children. The SAFETY LOCK indicator will show up on
display screen, and the oven cannot be operated while the SAFETY LOCK is set.
1. To set the SAFETY LOCK: Press 5 and 7 at the same time, a beep sounds and LOCK indicator lights.
2. To cancel the SAFETY LOCK: Press 5 and 7 at the same time, a beep sounds and LOCK indicator goes out.
I. SETTING THE TIME
1. Press TIME key.
2. Enter the amount of time you want to count down by pressing the number keys. Digit time is in minutes
and seconds and set left to right. Set one digit (a 5 for 5 seconds) or up to four digits (2405 for 24
minutes, 5 seconds).
3. Press POWER key.
4. Press number key 0.
5. Press START key.
NOTE:
Press TIME and then press CANCEL to cancel TIME during timing process.
Times of Pressing Cooking Time
1 15 sec
2 30 sec
31 min
42 min

P.11
IMPORTANT:
Do not use hard or abrasive substances, such as powerful cleansing agent, benzine and metal brush,
to clean any part of the oven.
1. Turn off the oven and remove the power plug from the socket before cleaning.
2. Keep the inside of the oven clean. When food splatters or spilled liquids adhere to oven walls, door,
window, door seals and the adjacent parts, wipe with a damp cloth. Mild detergent may be used if
the oven gets very dirty. Avoid the use of spray and other harsh cleaners as they may stain, streak or dull
the door surface.
3. The outside surfaces should be cleaned with a damp cloth. To prevent damage to the operating parts
inside the oven, water should not be allowed to seep into the ventilation openings.
4. Do not allow the control panel to become wet. Clean with a soft, damp cloth. When cleaning the control
panel, leave oven door open to prevent oven from accidentally turning on.
5. If steam accumulates inside or around the outside of the oven door, wipe with a soft cloth. This may
occur when the microwave oven is operated under high humidity condition. And it is normal.
6. It is occasionally necessary to remove the glass tray for cleaning. Wash the tray in warm sudsy water or in a dishwasher.
7. The roller ring and oven floor should be cleaned regularly to avoid excessive noise. Simply wipe the
bottom surface of the oven with mild detergent. The roller ring may be washed in mild sudsy water
or dishwasher. When removing the roller ring from cavity floor for cleaning, be sure to replace in
the proper position.
8. Remove odors from your oven by mixing a cup of water with the juice and skin of one lemon in a deep
microwaveable bowl, microwave for 5 minutes. Wipe thoroughly and dry with a soft cloth.
9. When it becomes necessary to replace the oven light, please consult a dealer to have it replaced.
10. The oven should be cleaned regularly and any food deposits removed. Failure to maintain the oven in a
clean condition could lead to deterioration of the surface, and this could adversely affect the life of the
appliance and possibly result in a hazardous situation.
11. When the oven malfunctions, contact German Pool Customer Service Centre to repair.
CARE & MAINTENANCE
The oven must be repaired by qualied technicians and the below instructions have to be followed when
repairing:
1. Beware of microwave energy. Do not expose yourself to the radiation given out by microwave generator or
parts of the microwave oven.
2. Use the specic models of oven lamp and power cord from German Pool, when they need to be replaced.
Beware of the parts listed below (they may have over 250V and be easily detachable)
Magnetron, high-voltage transformer, high-voltage capacitor, high-voltage diode and high-voltage fuse.
Situations that may lead to over-release of microwave energy
1. Magnetron is not installed on wave guide properly.
2. Oven door is not properly installed to the hinge, and door hinge is not properly installed.
3. Bracket for opening or closing is not properly installed.
4. Door, door seal or the case is damaged.
Repair Instructions

P.12
目錄
注意事項 P.13
安裝說明 P.15
微波爐使用常識 P.16
適用器皿 P.16
產品結構 P.17
操作面板 P.18
操作說明 P.19
清潔與保養 P.21
技術規格 P.22
保用條款 P.23

P.13
注意事項
1. 切勿讓兒童獨自操作使用本產品,亦不可在無人看管下使用本產品煮食。
2. 爐內無食物時,切勿使用微波爐。
3. 如電源線或插頭損壞或不能正常運作,切勿繼續操作微波爐。如電源線損壞,必須由製造
商、其維修部或其他專業人員更換,以免發生危險。
4. 為免爐腔生火:
-當食物在塑膠、紙或其他可燃材料製成的容器中加熱或烹調時,應時刻注意,防止起火。
-將紙或膠袋放入微波爐前,必須先除去電線扎口線。
-若烹調中發生冒煙或起火現象,請不要立刻打開爐門,否則遇空氣會加大火勢,應立即切
斷電源,並拔除插頭。
-切勿使用微波爐儲存任何物品。微波爐不操作時,切勿將紙製品及廚房器皿放於爐內。
5. 不要直接加熱裝在密封容器內的液體或其他食物,因為這樣有可能發生爆炸。
6. 以微波爐加熱飲料有可能引致熱力被鎖於液體之中,以至內部液體沸騰爆破。因此,處理內
有液體的容器時必須小心。
7. 切勿用微波爐煎炸食物。滾油會損壞微波爐零件及器皿,並可能引致皮膚燒傷。
8. 奶瓶及嬰兒食品罐應經過攪拌或搖動,餵食前應檢查瓶內食物的溫度,避免燙傷。
9. 從微波爐內提取食物和器皿時,應當使用鍋夾或戴上隔熱手套,以免高溫燙傷。
10.使用前,應檢查所用器皿是否適用於微波爐。
11.為防止轉盤受損壞,注意轉盤的最大負載重量不能超過5kg。
12.必須由合資格的維修人員執行檢修操作,包括拆下防止微波能量洩漏的防護蓋等。其他
人切勿執行檢修,因為這是非常危險的。
13.用微波爐燒開水時要盡量使用無蓋的寬口容器。如要加入咖啡粉、奶粉、麥片或其他沖劑,
必須先對開水進行攪拌或擱置幾分鐘至稍涼,以免水沸騰而被燙傷。
重要說明
-為安全起見,初次使用產品前請先細閱本說明書,並保存說明書,以便作參考之用。
-本產品只供家居使用。請必須依照本說明書內的指示安裝及操作。

P.14
14.必須注意放入微波爐內之食物,要點如下:
-切勿煮帶殼蛋,壓力會使蛋爆裂。另外蛋黃、蛋白也要用牙籤刺穿數次。
-已煮好的湯圓或荷包蛋等,馬上取出可能會造成其內部液體沸騰爆破而濺傷人體。注意應
打開爐門後,擱置一會兒,再取出食用。
-表面無孔的食物(如蛋、栗子、馬鈴薯、香腸等),請去皮或在外皮上開一裂縫或叉幾個小
孔,否則受熱膨脹,可能發生爆裂。
-烹調食譜所提供的是烹調的大約時間,影響烹調時間的因素包括:所喜歡的煮熟程度,食
物初時的溫度、形狀大小、份量,使用器皿的形狀、大小,以及食物的排列、遮蓋、翻
攪等。請適當修正烹調時間。
15.為了避免人體接觸微波能量:
-操作時切勿打開爐門,以免人體接觸微波能量。並注意切勿損毀爐門安全聯鎖開關。
-切勿於微波爐的前方與爐門之間放置任何物品,並切勿讓污物積聚於密封墊表面。
-切勿使用損壞了的微波爐,必須確保爐門能夠緊緊鎖上,而且並無以下的部件損毀情況:
˙爐門(扭曲)
˙鉸位及門閂(損壞或鬆脫)
˙門封及密封墊(破壞)
-微波爐如有損壞,必須由合資格技術人員維修。
注意事項

P.15
1. 將微波爐內的包裝物全部取出。
2. 查看微波爐有否損壞,例如爐門扭曲、門封與密封墊表面損毀、鉸位及門閂損壞或鬆開,及
爐腔凹陷。如有損壞,請立刻聯絡本公司維修部或合資格技術人員。
3. 將微波爐放置於有足夠承托力的水平面上。
4. 本微波爐應在通風乾爽、無腐蝕性氣體的環境中使用,遠離高溫及蒸氣。
5. 為確保正常運作,必須保持微波爐周圍空氣流通。切勿在爐頂放置任何物件,並保持與頂部
壁櫃距離至少20厘米。微波爐兩旁應與牆壁距離至少5厘米,爐背應與牆壁至少距離10厘米。
切勿拆除爐腳。
6. 使用時必須先妥為放入轉盤承托及玻璃轉盤,再將盛好食物的器皿放在玻璃轉盤上進行烹調。
7. 確保電源線沒有損毀,並且沒有被壓在爐底或被放置於熱或尖物表面。
8. 電源插頭必須放於容易接觸的位置,以便於緊急時拔掉。
9. 切勿於戶外使用本微波爐。
10. 警告:為了防止觸電,必須確保此微波爐接地良好。
安裝說明

P.16
現象 原因
微波爐燈光暗弱。 烹調時若不以微波高火而用較低的火力烹調,微波
爐的燈光會變得暗弱並有聲響產生,這是微波爐在
控制火力時所產生的正常現象。
蒸汽凝聚在爐門及有熱風從排氣口排出。 烹調時,食物會有蒸汽散發,而大部分會從排氣口
排出,但蒸汽也會在較涼的地方如爐門上凝聚,這
是正常現象。
電壓波動,會影響烹調時間及效果。 當電壓波動時,微波爐仍能運作,只是受電壓偏高
或偏低的影響,輸出功率會相應升高或降低,故烹
調時間及效果會有所變化,這是屬於正常現象。
注意:
根據不同烹調方式,選用合適的器皿十分重要。如果選擇不當,不僅會影響烹調效果,而且還會
造成損壞器皿或微波爐的不良後果。
器皿 微波烹調
耐熱玻璃 適用
陶、瓷器 適用
一般玻璃 不適用
耐熱塑膠 適用
一般塑膠 不適用
微波保鮮膜 適用
金屬網架 不適用
金屬器皿 不適用
微波爐使用常識
適用器皿
1.下列情況均屬正常
2. 如果微波爐不運作,應檢查:
- 電源插頭是否插好
- 爐門是否關好
- 安全鎖是否被鎖住
- 家電保護器是否跳閘或燒斷
3. 當爐內無食物,而微波爐被偶然啟動時,請立即打開爐門或按【CANCEL】鍵,停止操作。

P.17
87
6
5
43
2
1
1. 爐門安全聯鎖開關
確保爐門與爐腔緊密接觸
2. 視屏窗
有金屬遮罩層,可透過網孔,觀察食物烹調
情況
3. 轉盤支承
支承玻璃轉盤並按其軌道轉動
4. 轉軸
帶動玻璃轉盤轉動
5. 爐門開關
按此開關,爐門打開
6. 控制面板
詳見控制面板說明
7. 波導口
磁控管發射的微波進入爐腔的通道(裝有雲母
片,切勿拆卸)
8. 玻璃轉盤
裝好食物的容器放在轉盤上,加熱時轉盤轉
動,使食物烹調均勻,以達到理想均勻烹調的
效果
產品結構
顯示屏說明
結構說明
按重解凍
(參閱P.20“按重解凍”)
快速解凍
(參閱P.20“快速解凍”) 第一階段
(參閱P.19“多段烹調”)
微波烹調
(參閱P.19“微波烹調”)
安全鎖
(參閱P.20“安全鎖功能”)
預設
(參閱P.19“預設功能”)
第二階段

P.18
按鍵功能
數字鍵 (0-9)
用來輸入烹調時間或於解凍時輸入食物重量。
火力 【Power Level】
用來輸入所需微波火力。
時間 【Time】
用來輸入微波烹調時間。
記憶 【Memory】
如選用多段烹調功能,可按【Memory】鍵選定
在第一階段“1S”或第二階段“2S”烹調。
預設 【Pre-set】
用以預定微波爐在預設時間自動啟動。
按重解凍 【Weight Defrost】
微波爐會自行以合適時間及火力解凍。
快速解凍 【Jet Defrost】
微波爐會自動從中高火至中低火再降至低火
操作。
快速烹調 【Express】
此功能可快速加熱食物。
時鐘 【Clock】
用來調校時鐘,或在烹調過程中按【Clock】鍵
可檢視當前時鐘時間。
啟動 【Start】
按【Start】鍵可以啟動已輸入的烹調程式。
取消 【Cancel】
在設置程式時,按【Cancel】鍵可以取消之前已
輸入的操作。
注意:
- 每次按鍵,微波爐會發出提示聲。
- 當完成烹調程式後,如果不打開爐門或沒
有按任何鍵,顯示屏顯示“End”,系統將
每隔兩分鐘發出一次提示音。
操作面板

P.19
操作說明
火力 輸出功率
按1,0鍵 100%輸出功率
按9 鍵 90%輸出功率
按8 鍵 80%輸出功率
按7 鍵 70%輸出功率
按6 鍵 60%輸出功率
按5 鍵 50%輸出功率
按4 鍵 40%輸出功率
按3 鍵 30%輸出功率
按2 鍵 20%輸出功率
按1 鍵 10%輸出功率
A.微波烹調
設定時間
- 烹調時間最長可選擇到99分99秒。
設定火力
- 按鍵輸入所需微波火力。
- 在微波烹調過程中,按【Power Level】鍵
可檢視當前火力。
- 如不另外輸入火力,微波爐將自動以最高
火力烹調。
- 以下是火力及相應的輸出功率:
例:輸入2分鐘,30%火力的烹調程式。
步驟:
1. 按【Time】鍵。
2. 按數字鍵 2,0,0。
3. 按【Power】鍵。
4. 按數字鍵 3 。
5. 按【Start】鍵。
注:如用100%火力烹調時,不需輸入步驟4。
按【Start】鍵可以啟動已輸入的烹調程式。當
程式開始時,烹調顯示燈和爐燈便會亮起,冷
卻風扇和轉盤也會開始轉動。
- 如要中途停止烹調程式 只需打開爐門,
微波爐將立刻停止操作。
- 如不需繼續操作,請按【Cancel】鍵。
- 如需繼續操作,請關緊爐門,並按
【Start】鍵,烹調程式便會再次啟動。
B.多段烹調
- 本微波爐可設置兩段或三段烹調程式,進
行連續運作的特點。
- 顯示屏會顯示出微波爐正進行的烹調階段。
例:輸入快速解凍→微波烹調→微波烹調的多
段烹調程式。
步驟:
1. 按【Jet Defrost】鍵。
2. 按數字鍵輸入所需解凍時間。
3. 按【Memory】鍵,此時顯示燈“1S”亮。
4. 按【時間】鍵。
5. 按數字鍵輸入所需烹調時間。
6. 按【Power】鍵。
7. 按數字鍵輸入所需微波火力。
8. 按【Memory】鍵,此時顯示燈“2S”亮。
9. 按【Time】鍵。
10. 按數字鍵輸入所需烹調時間。
11. 按【Power力】鍵。
12 按數字鍵輸入所需微波火力。
13. 按【Start】鍵。
注:於多段烹調程式中不能設置快速烹調。
C.預設功能
- 在輸入預設約程式前,必須將時鐘校正。
- 當微波爐正處於預設狀態,預設顯示燈會
閃動。
- 在快速烹調時不能設定預設功能。
例:用預置功能預定12:30開始1分鐘60%火力
的微波烹調程式。
步驟:
1. 按【Pre-set】鍵。
2. 按數字鍵1,2,3,0。
3. 按【Time】鍵。
4. 按數字鍵1,0,0。
5. 按【Power】鍵。
6. 按數字鍵 6。
7. 按【Start】鍵。

P.20
D.按重解凍
- 只需按食物種類來按【Weight Defrost】鍵
不同次數並輸入食物重量,微波爐會自行
以 合適時間及火力解凍。
- 各類食物的最高解凍重量及顯示如下
例:輸入解凍600克蝦的程式。
步驟:
1. 按【Weight Defrost】鍵至顯示d3。
2. 按數字鍵 6,0,0。
3. 按【Start】鍵。
注:解凍過程中,請暫停程式翻轉食物,以達
到解凍均勻的效果。
E.快速解凍
只需按【Jet Defrost】並輸入解凍食物所需
的時間,微波爐會自動從中高火至中低火再降
至低火操作。
例:輸入解凍食物5分30秒的程式。
步驟:
1 按【Jet Defrost】鍵。
2. 按數字鍵 5,3,0。
3. 按【Start】鍵。
注:快速解凍功能可用在按重解凍範圍以外的
食物或超出按重解凍最高重量限制的食物上。
F.快速烹調
按下【Express】鍵,可選擇四種100%高火力的
烹調時間如下:
例:輸入2分鐘的快速烹調程式。
步驟:
1. 按【Express】鍵到顯示2:00。
2. 按【Start】鍵。
G.調校時鐘
例:設置12時35分。
步驟:
1. 按【Clock】鍵。
2. 按【Cancel】鍵。
3. 按數字鍵 1,2,3,5。
4. 再按【Clock】鍵一次確認。
注:當微波爐發生故障或切斷電源時,必須重
新調校時間。
H.安全鎖功能
- 用來防止兒童在沒有成人指導的情況下使
用微波爐。
- 當安全鎖功能啟動後,微波爐不能操作。
A. 設置安全鎖
在待機狀態下,同時按數字鍵5 和 7 ,
此時安全鎖顯示燈“LOCK”會亮起。程
式完成後,微波爐便不能操作。
B. 解除安全鎖
同時按數字鍵5 和 7,此時安全鎖顯示燈
“LOCK”會熄滅。程式完成後,微波爐
可以繼續操作。
I.計時功能
- 用來方便你進行爐外烹飪操作時計時,當
計時程式開始,爐內的照明燈、冷卻風扇
及轉盤也開始操作,而微波能量卻完全停
止發放。
- 在待機狀態下,按【Time】鍵一次,再按
數字鍵輸入計時時間,按【Power】鍵一
次,再按數字鍵0,最後按【Start】鍵計
時即開始。
操作說明
按鍵次數 食物種類 最高重量 顯示
1 肉類 2300克 d1
2 家禽類 4000克 d2
3 海鮮類 900克 d3
- 如食物超出最高解凍重量,微波爐將不會
啟動,這時可選用快速解凍功能。
按鍵次數 烹調時間
1 15秒
2 30秒
3 1分鐘
4 2分鐘
Table of contents
Other German pool Microwave Oven manuals

German pool
German pool MVG-3014 User manual

German pool
German pool MAG-280 User manual

German pool
German pool MVG-1712 User manual

German pool
German pool SGM-T4228 User manual

German pool
German pool MVH-125M User manual

German pool
German pool SGM-2519 User manual

German pool
German pool SGM-3620 User manual