manuals.online logo
Brands
  1. Home
  2. •
  3. Brands
  4. •
  5. Gesswein
  6. •
  7. Engine
  8. •
  9. Gesswein POWER HAND 3 User manual

Gesswein POWER HAND 3 User manual

Instruction Manual
for
35,000RPM Motor Assembly
Model: PH3 35X
#510-3351
2
Introduction
The Gesswein Power Hand 3 M-35X Rotary Motor is engineered and
manufactured to a high degree of precision and will give you many years
of trouble-free service. Backed by a limited warranty that covers wear parts
for 90 days and overall balance of parts for six months.
This DC electrically driven rotary motor is designed to be used with the
Power Hand 3 Controller (#510-3300). For use with Gesswein Power Hand 2X
controllers, the PH3 adaptor (#510-3304) is necessary to connect the
5 prong motor plug to the 3 prong controller receptacle. Controllers convert
the Alternating Current (AC) power supply to a variable Direct Current (DC)
by means of an I.C. “transistorized” automatically controlled circuit.
The Gesswein Power Hand 3 rotary motor series consists of six motors
and eight head assemblies with maximum operating speeds ranging from
8,000 to 55,000rpm. The maximum RPM speed is indicated on each motor
case housing.
To connect Power Hand 3 handpieces to Power
Hand 2X controllers, use the PH3 Adaptor 5 to 3
prong reducer plug. #510-3304.
3
Accessories
Included Accessories
A. Two Carbon Brushes (reorder #510-0169)
Optional Accessories
A. Handpiece Extension Cord (#510-3380): adds 9 feet, or almost 3 meters,
to the rotary handpiece cord
B. Handpiece Cradle Rest (#510-1130): provides a safe holding place
for the rotary handpiece when not in use
C. PH3 Variable-Speed Foot Rheostat (#510-3306)
D. 3mm Collet (#501-0106)
E. Reducing Collets: 1⁄8" to 3⁄32" (#816-1501), 1⁄8" to 1⁄16" (#816-1502),
3⁄32" to 1⁄16" (#816-1503), 3mm to 3⁄32" (#816-1504), 3mm to 1⁄16" (#816-1505)
Parts Nomenclature
1. Test Rod
2. Collet
3. Head Cover
4. Collet Release Ring
5. Motor Connecting Ring
6. Motor Housing
7. Motor Cover
8. Motor Cord with 5-prong plug
9. On/Off Switch
Fig. 1
134
2
67
8
5
9
4
PH3 On/Off motor switch
All Power Hand 3 rotary motors feature a convenient on/off motor switch
(Fig. 2) for easy access to start/stop the motors. The Power Hand 3
On/Off motor switch will only function when connected to the Power
Hand 3 controller. When connected to a Power Hand 2X controller
(via the PH3 adaptor plug), the On/Off motor switch will have no affect.
Simply press the On/Off motor switch to start or stop the rotary handpiece.
Be careful not to push the On/Off motor switch when changing collet chuck
or any tools.
5
Operating Procedure with Power Hand 3 Controller
With your rotary handpiece fitted with a selected tool, connect the Gesswein
Power Hand 3 Controller to an electrical supply and the handpiece to the
A motor or B motor output socket.
Put the Controller Main Switch to the “ON” position, which lights up the LED
lights of controller. Then select the A motor or B motor button depending
on which socket the handpiece is plugged in to. Check to make sure the
desired rotational direction is selected on the Fwd./Rev. button. Then press
the START/STOP button to supply power to your handpiece. RPM speed is
adjusted by the round dial in the center. It is always best to start at minimum
RPM and then increase to the desired RPM speed.
A Load Indicator light is located on the front panel of the PH3 Controller with
8 steps of LED lights from green to yellow to red. The display lights up as
force is being applied to the handpiece. For best results and long life, stay
within the green.
On/Off switch
Fig. 2
6
Precautions
A. Before operating your handpiece, be sure that the Collet Release Ring is
in the “S” or secure position. Failure to do so (referred to as “locked rotor
condition”) will cause the motor to stall and could possibly cause motor
damage.
B. Do not attempt to change tools or rotate the Collet Release Ring while the
handpiece is running. This action will stop the motor abruptly, cause parts
damage, and could also possibly cause motor damage.
C. During use, avoid stalling the motor by pushing too hard on the work tool
or by exceeding the torque capacity of the handpiece motor.
D. The Gesswein Power Hand 3 Rotary Handpiece is designed not to
overheat with normal use. It can be used continuously and will provide
efficient, longlife performance if you apply just enough machining and
polishing pressure to maintain full motor speed.
E. The 3⁄32" (2.35mm), 1⁄8" (3.2mm) and 3.0mm collets are manufactured to
accept 3⁄32", 1⁄8" and 3.0mm ± 0.0008" shank tools respectively. Use only
tools that correspond to the collet size being used.
F. Do not use your handpiece in water or oil, and never allow any oil, water
or other fluids, dirt, or wood dust to enter the inner casing. Failure to
keep foreign matter out of the inner casing will cause damage to the ball
bearing assemblies.
G. Do not subject the power cord on the handpiece to sharp bending or
rough treatment. Such treatment could break the cord wires or damage
the male connecting pins and female cord connectors.
H. Be careful not to point the handpiece at any part of the body while it is
running, particularly during startups.
I. Be careful when using Wire Burnishing Tools. DO NOT USE THESE TOOLS
AT SPEEDS FASTER THAN 14,000 -15,000RPM. Each tool is made of
individual piano wire. Operating a Wire Burnishing Tool at higher than
recommended speed could cause the wire to come free from the hub.
7
Replacement of carbon brushes
Gesswein Power Hand 3 motors use a spring tension-type carbon brush
assembly. The approximate life of these brushes is 800-1,000 hours. Use the
set of two replacement carbon Brushes supplied with your handpiece when
it becomes necessary to replace worn brushes. (Brushes should be changed
when handpiece is not running at maximum speed, or if it sounds as though
it’s running out of gas.) Please note that in the event you must change the
brushes, it is important that both be replaced at the same time. Replacement
of only one carbon brush will cause motor damage.
Instructions for replacing Carbon Brushes
1. Disconnect the handpiece from the controller.
2. Remove the screw on the back of the motor cover.
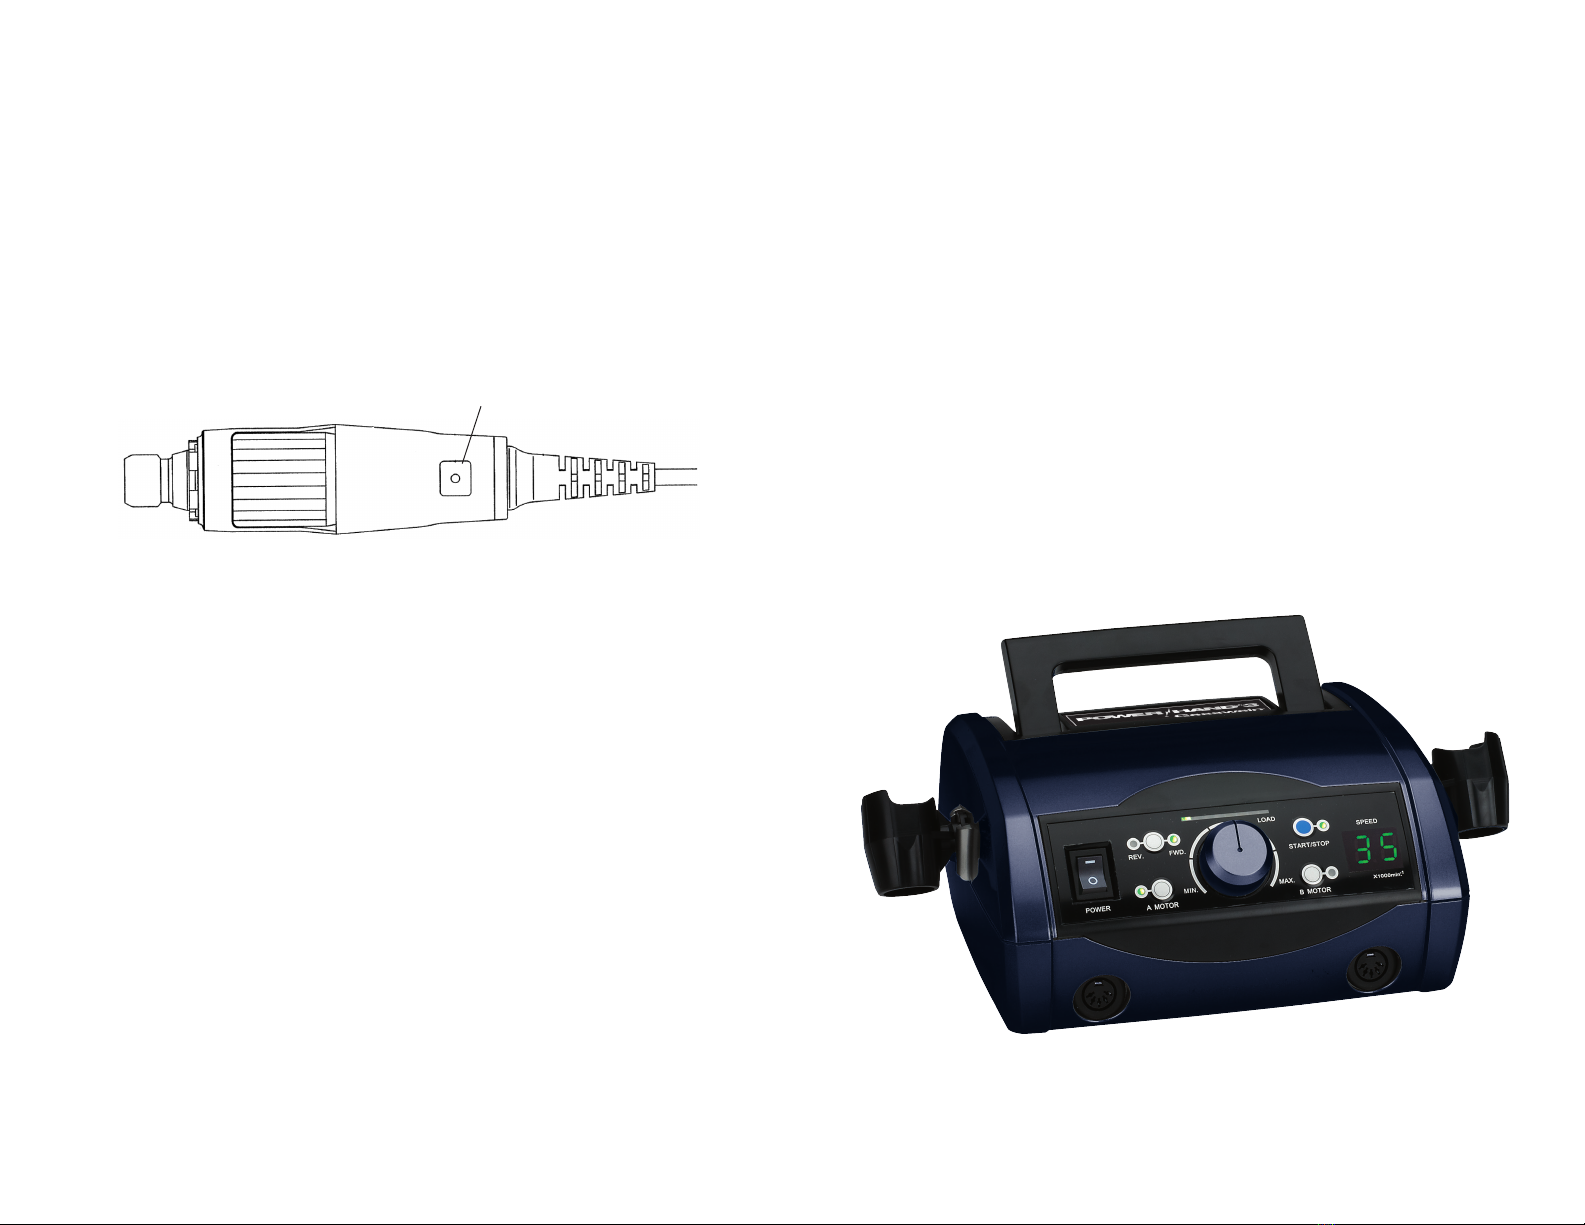
3. Detach the motor cord from the motor by grasping the motor cord and
pulling backwards. Do not hold the motor cap when pulling backwards
to avoid damaging the On/Off switch (Fig. 3).
Fig. 3
8
4. Remove the 2 carbon brush screws and take out the carbon brushes. Be
careful not to lose screws.
5. Install the new Carbon Brushes and secure with screws (Fig. 4).
6. Gently push down the On/Off motor switch to free the motor cord from
the motor cap. Be careful not to damage the On/Off motor switch. Then
plug the motor cord back into the motor (Fig. 5)
7. Dust Removal - From time to time, it will be necessary to clean excessive
dust that accumulates in the motor cover. To remove this dust, remove
the motor cap (see instructions for replacing carbon brushes to remove
motor cap). If compressed air is available, use it inside the cover and the
motor armature air cooling vent. If air is not available, remove excessive
dust with a dry brush. If necessary, use a cloth moistened with detergent
to clean the cover, and blow into the air cooling vents to clean around the
armature. DO NOT USE any volatile liquid as a cleaner (i.e. paint thinner
or alcohol).
Periodically cleaning the inner threads on handpiece collets will ensure
their easy collet removal when changing sizes. Twist a clean rolled-up
piece of tissue paper in and out of the threaded area.
Fig. 4
Fig. 5
8. Align the On/Off motor switch with the square hole of the motor cap, and
gently insert motor cap (Fig. 6 & 7). Then insert the motor cap screw.
9. While the power is off, plug handpiece into controller. Please speed up
gradually from minimum RPM and make sure nothing is abnormal with
behavior.
10. Lubrication - Lubrication of your Gesswein Power Hand 3 Rotary
Handpiece IS NOT NECESSARY, and you should NOT let oil or other
fluids enter the Head Assembly (see Precautions).
9
Fig. 6
Fig. 7
PH3 35X Motor Parts List
When ordering spare parts, always specify part#
(or item# if applicable) and description.
10 11
Part# Item# Description
UM13A-318 896-0341 Motor Case
YSF21-103 896-0002 Countersunk Head Screw
S-10 896-0012 O-Type Rubber Ring
KS-107 896-0092 Metal Spacer
KS-601 896-0093 Teflon Spacer
KS-108 896-0094 Metal Spacer
1030ZZ 510-3073 Ball Bearing
KS-034 896-0095 Metal Spacer
KA10-115-BB 510-2320 Armature Completed
KA10-115 510-2321 Armature
KF-204A 896-0096 Dust Proof Collar
KF-201A 896-0097 Dust Proof Collar
830ZZ 510-3076 Ball Bearing
S-8 896-0098 O-Type Rubber Ring
HE5E-205 896-0099 Metal Rear Lid
ON08-201 896-0100 O-Type Rubber Ring
UM10-202 896-0336 Brush Side Lid
PKE60-101A 510-0169 Carbon Brush (set of 2)
YSP21-114 896-0337 Pan Head Screw
KE-548C 896-0102 (-) Terminal Plate
KE-548D 896-0103 (+) Terminal Plate
KE75-201 896-0342 Hand Switch Assembly
KE50-154 510-3382 Motor Cord with Plug
UM13A-760 896-0343 Motor Cap
YSF21-124 896-0325 Pan Head Screw
KP-615A 510-0180 Chuck Wrench
KA10-115-BB
#891-3541/C0813
Power Hand 3 component selection:
•PH3 controller
•Six motors (three high torque,
two standard, and one high speed)
•A selection of 8 heads
•Two reciprocating profilers
•One side-to-side profiler
•Belt Sander
Power Hand 3 controllers and handpieces combine to create the most versatile
finishing system in the industry, offering rotary, profiling and belt sanding action.
201 Hancock Ave. Bridgeport, CT 06605, USA
orders 800.243.4466 |203.366.5400 |fax 203.366.3953
email [email protected] |www.gesswein.com

This manual suits for next models

2

Popular Engine manuals by other brands

TKM BT82 Service guide

TKM

TKM BT82 Service guide

Briggs & Stratton 190000 Series Operator's manual

Briggs & Stratton

Briggs & Stratton 190000 Series Operator's manual

Briggs & Stratton Vanguard 350000 Operator's manual

Briggs & Stratton

Briggs & Stratton Vanguard 350000 Operator's manual

Regal-Beloit Genteq Evergreen VS installation guide

Regal-Beloit

Regal-Beloit Genteq Evergreen VS installation guide

Royal Enfield EURO IV Service manual

Royal Enfield

Royal Enfield EURO IV Service manual

O.S. engine MaX-37SZ-HRING Owner's instruction manual

O.S. engine

O.S. engine MaX-37SZ-HRING Owner's instruction manual

Eaton Char-Lynn Parts and repair manual

Eaton

Eaton Char-Lynn Parts and repair manual

Graco Viscount I Plus Instructions-parts list

Graco

Graco Viscount I Plus Instructions-parts list

Caple INCH Technical manual

Caple

Caple INCH Technical manual

Hatz Diesel H50 Series Assembly instructions

Hatz Diesel

Hatz Diesel H50 Series Assembly instructions

Lenze g500-S Mounting and switch-on instructions

Lenze

Lenze g500-S Mounting and switch-on instructions

Moons' TSM24P user manual

Moons'

Moons' TSM24P user manual

MerCruiser Sterndrive 4.3 MPI user manual

MerCruiser

MerCruiser Sterndrive 4.3 MPI user manual

SEW-Eurodrive MOVIMOT MM07 Operating intstructions

SEW-Eurodrive

SEW-Eurodrive MOVIMOT MM07 Operating intstructions

Lombardini CHD series Workshop manual

Lombardini

Lombardini CHD series Workshop manual

Briggs & Stratton Vanguard 540000 Series Operator's manual

Briggs & Stratton

Briggs & Stratton Vanguard 540000 Series Operator's manual

Simu T3.5 HZ.02 instructions

Simu

Simu T3.5 HZ.02 instructions

Lycoming YO-233-B2A Maintenance manual

Lycoming

Lycoming YO-233-B2A Maintenance manual

manuals.online logo
manuals.online logoBrands
  • About & Mission
  • Contact us
  • Privacy Policy
  • Terms and Conditions

Copyright 2025 Manuals.Online. All Rights Reserved.